

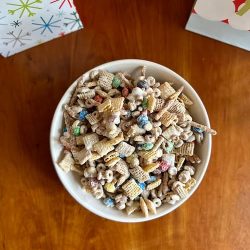
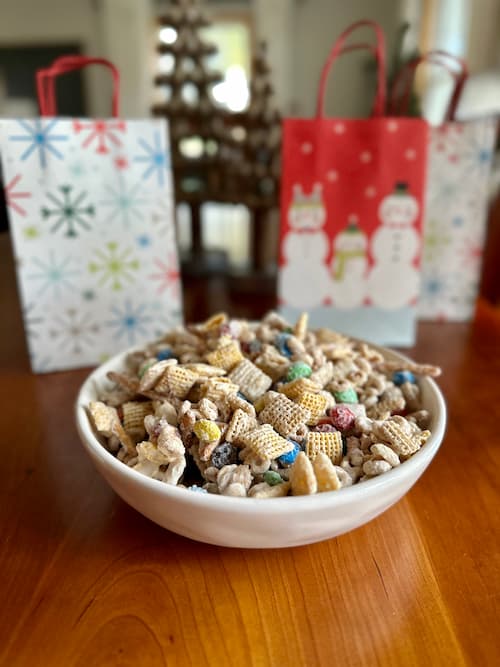
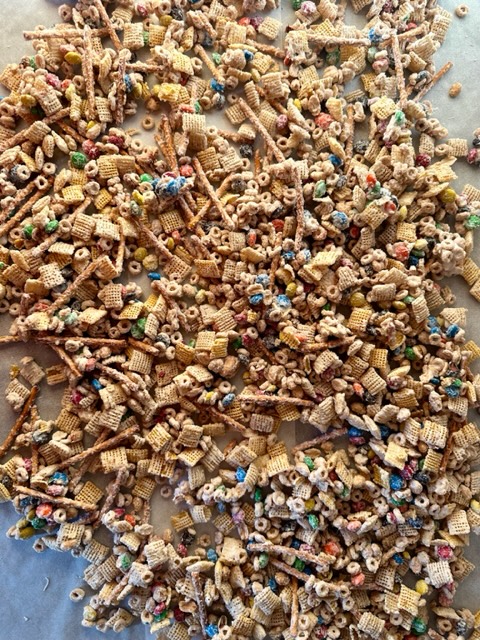
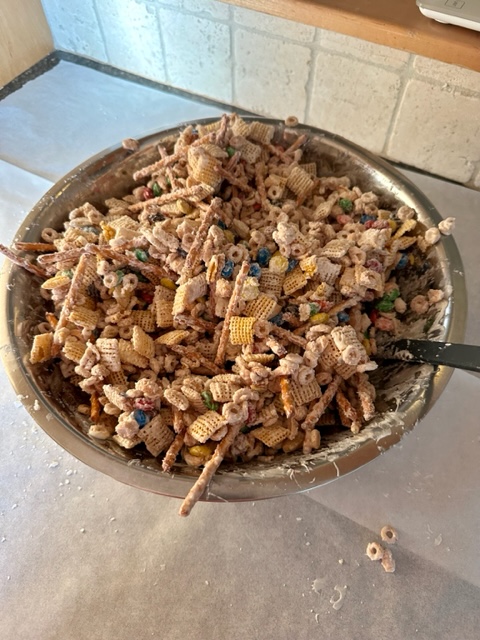
This White Christmas Mix is so easy to make, tastes yummy, and is so addictive! (Plus, get FREE printable gift tags to go with this gift when you download our FREE Homemade Christmas Gifts Guide!)
Recipe by Sarah from the MoneySavingMom team. During the months of November and December, we’ll be highlighting some of our favorite homemade gifts! Download our FREE Homemade Gifts Guide to get recipes to 15+ easy-to-make gifts, plus printable gift tags to go with each gift!
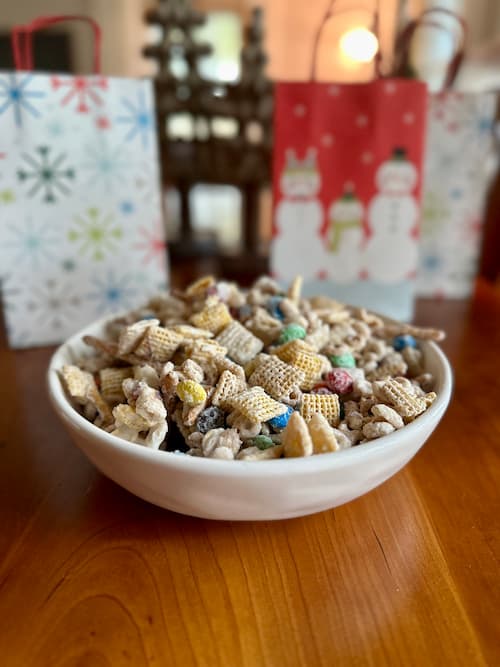
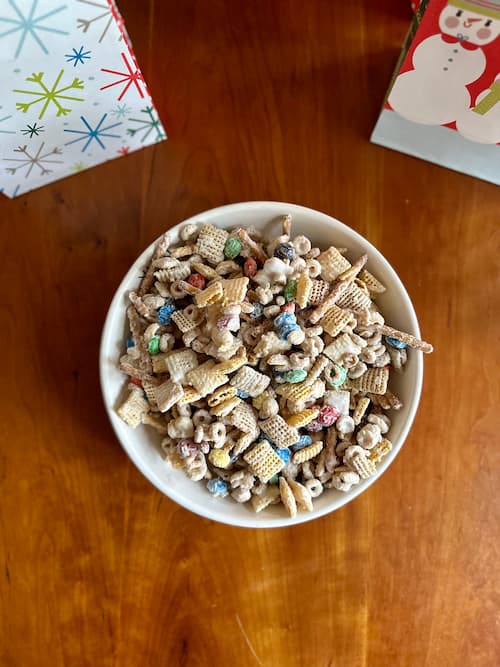
You won’t be able to stop eating this Christmas Chex Mix Recipe
White Christmas Mix is a holiday treat that we come back to year after year.
It’s so easy to make and the entire family loves it (maybe a little too much). And I love that it is adapted from my elementary school cookbook.
It pairs everyday cereals and snacks with melted white chocolate — and you can make it even more festive by using Christmas M&Ms!
Gifting this Christmas Snack Mix
White Christmas Mix is wonderful for homemade Christmas gifts and you can totally make it last minute! Put it into airtight bags tied with festive ribbon, and add one of our Free Printable Gift Tags. Or whip up a quick batch and bring it to a holiday party.
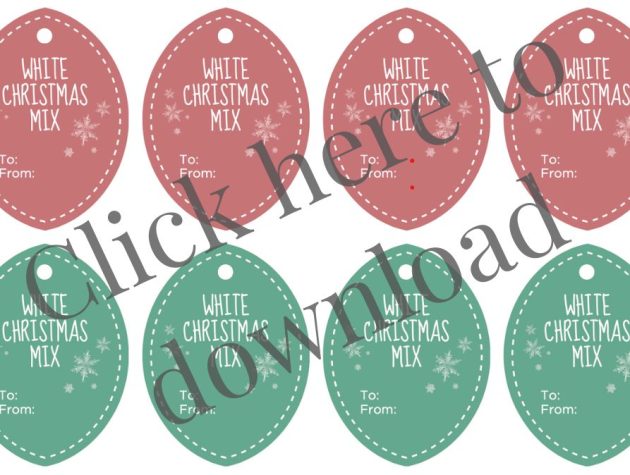
Download your free printable gift tags!
Want to add on Christmas gift tags to gift this to someone this holiday season? Go HERE to download printable gift tags designed for this yummy mix!
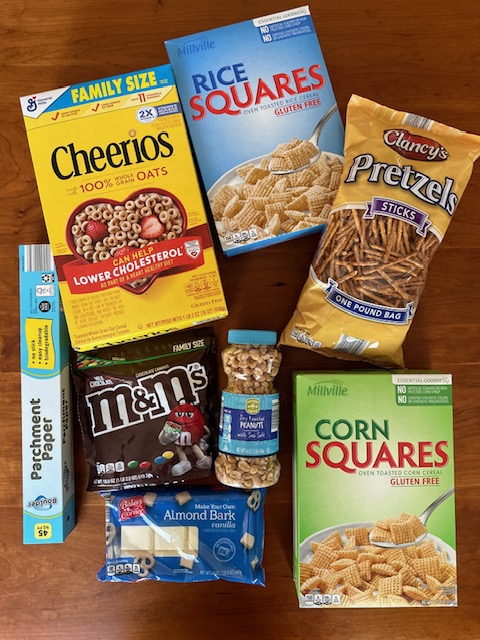
Christmas Chex Mix ingredients
- 3 c Corn Chex
- 3 c Rice Chex
- 3 c Cheerios
- 2 c pretzels
- 2 c peanuts
- 16 oz M&Ms
- 20 ounces almond bark
How to make this Chex Mix Christmas Recipe
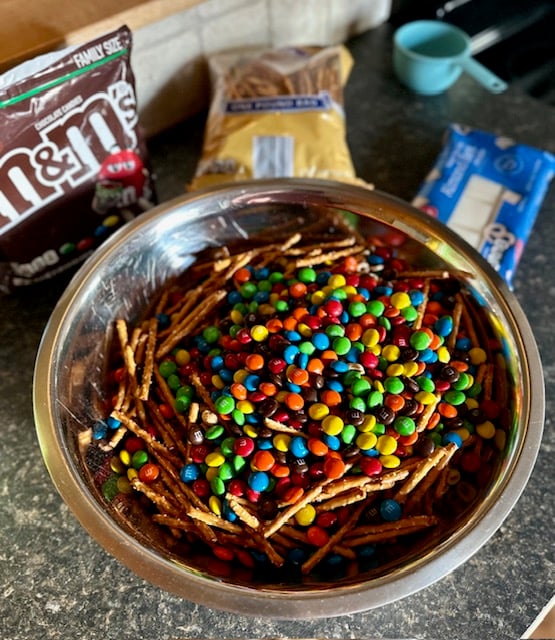
1. In a very large mixing bowl, combine Chex, Cheerios, pretzels, peanuts, and M&Ms.
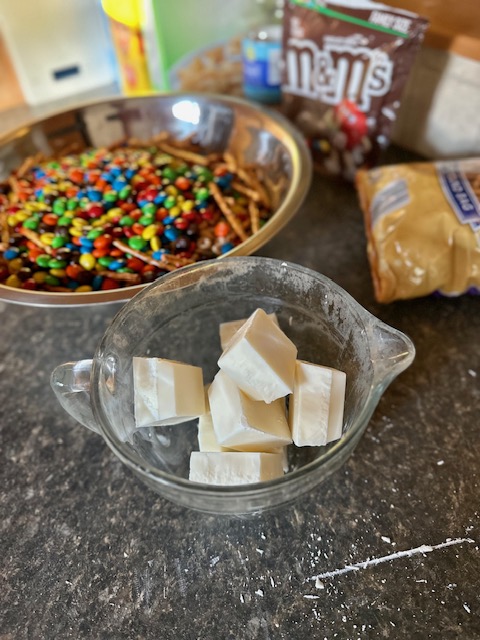
2. In a smaller, microwave-safe bowl, melt 20 ounces of almond bark according to the package instructions.
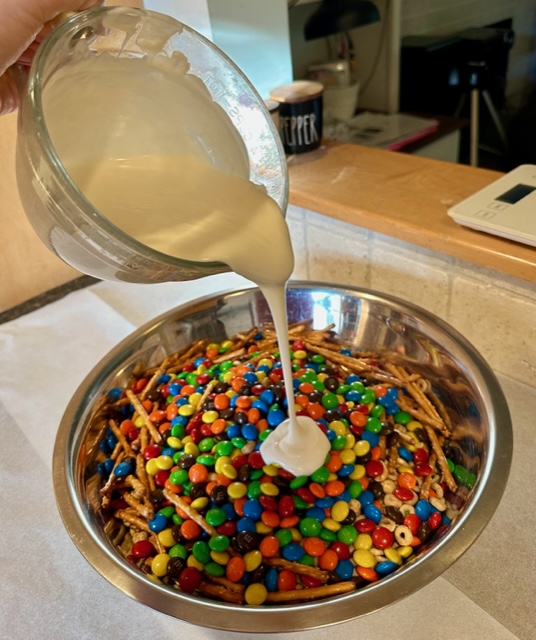
3. Pour melted almond bark over the dry ingredients.
4. Mix together until well-coated.
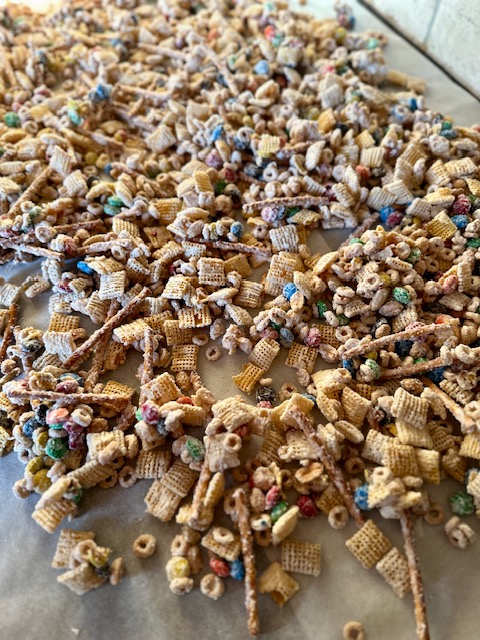
5. Spread the chocolate mixture onto parchment paper to cool and harden.

6. Once the chocolate is hard, break the mixture apart and serve (or store it in an airtight container for later).
How to store Christmas Trail Mix
Once the mixture is completely cooled, you can store it in an air-tight food storage container, zip top bag, or glass jars at room temperature for up to 6 weeks.
You can also freeze it for much longer (even up to 6 months).
Trail Mix Recipe Christmas FAQs
Chex mix needs enough room to spread out in order to harden and “dry out” properly. Don’t try to squeeze it all on a small baking sheet — use multiple baking sheets if necessary, so the chocolate can cool and harden quickly.
For traditional Chex Mix (not coated in chocolate) you can freshen it up by baking it in the oven at 200º for 30-40 minutes (watching it to make sure it doesn’t burn). However, this would not work for chocolate coated Chex Mix.

Christmas Trail Mix
Ingredients
- 3 c Corn Chex
- 3 c Rice Chex
- 3 c Cheerios
- 2 c pretzels
- 2 c peanuts
- 16 oz M&Ms
- 20 ounces almond bark
Instructions
- In a very large mixing bowl, combine Chex, Cheerios, pretzels, peanuts, and M&Ms.
- In a smaller, microwave-safe bowl, melt 20 ounces of almond bark according to the package instructions.
- Pour melted almond bark over the dry ingredients.
- Mix together until well-coated.
- Spread the chocolate mixture onto parchment paper to cool and harden.
- Once the chocolate is hard, break the mixture apart and serve (or store it in an airtight container for later).
Love this recipe?
Make sure to share and save it on your favorite platform below!

Get your FREE Homemade Christmas Gifts Guide!
If you’re looking for ways to simplify gift giving this year, we have just the solution for you! Download our brand new FREE Homemade Christmas Gifts Guide! When you sign up, you’ll get:
- 15+ DIY recipes for unforgettable gift ideas (we’ve included something for everyone on your list!)
- Step-by-step instructions for ridiculously easy homemade gifts that anyone can make!
- Customizable, ready-to-print gift tags to go with each homemade gift!
This FREE guide was designed to help you have a more peaceful, intentional holiday season. Our hope is that it reduces stress, helps you save more money and spend less on your gift budget, and simplifies things so you can focus on what matters most this season!
Click here to get your FREE Homemade Christmas Gifts Guide!

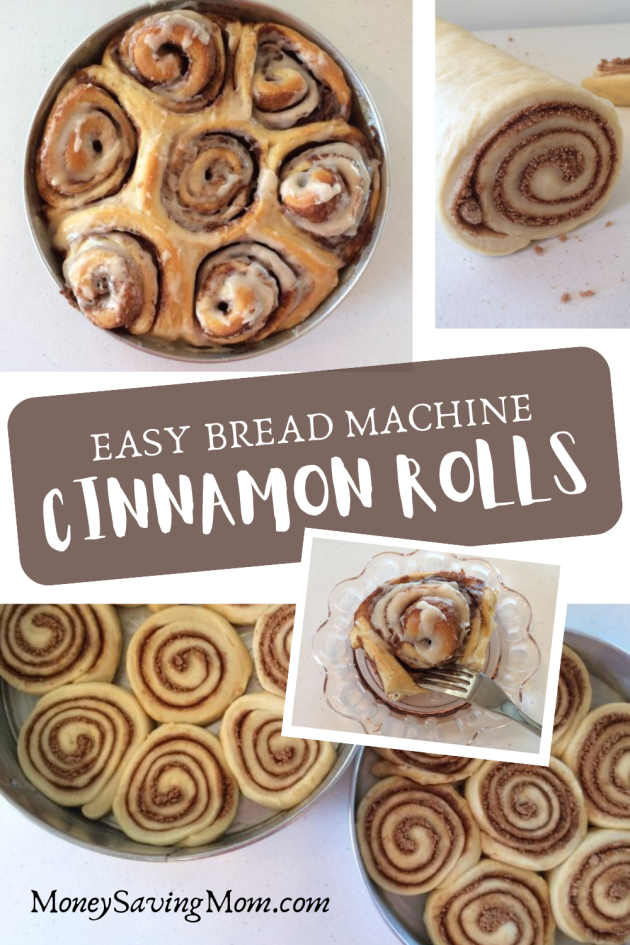
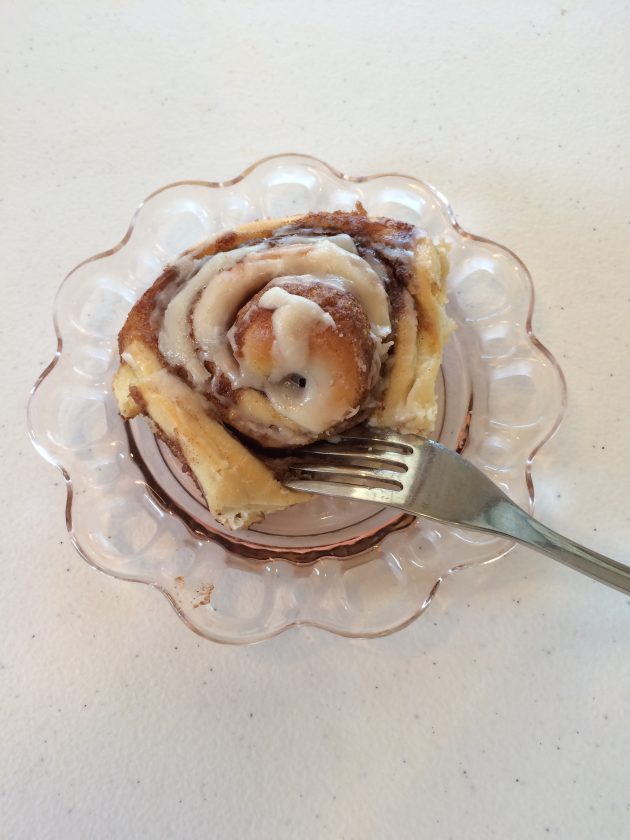
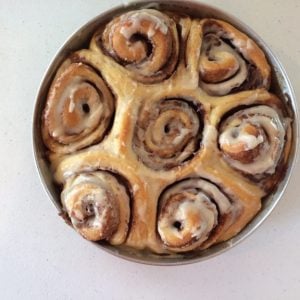
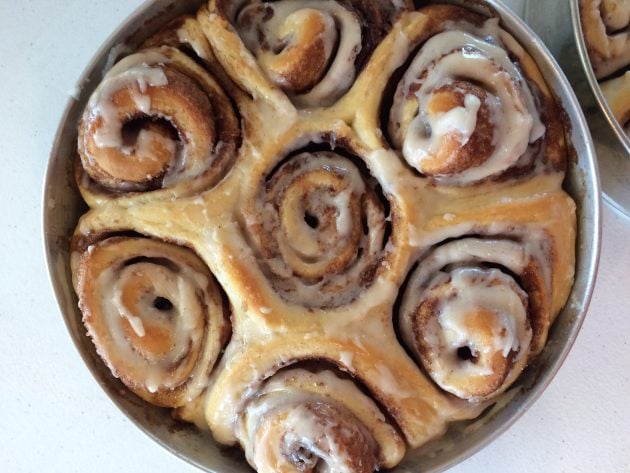
Cinnamon Roll Recipe in the Bread Machine + Free Printable Gift Tags
Cinnamon Roll Recipe in the Bread Machine + Free Printable Gift Tags
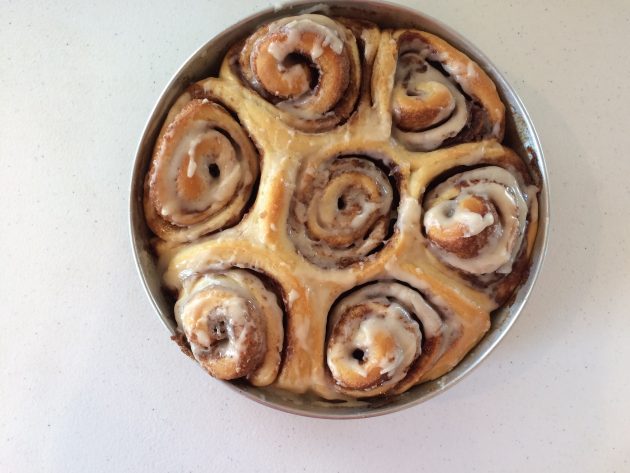
Have you ever wondered how to make cinnamon rolls at home? This is (in my opinion) the best cinnamon roll recipe of all time! They’re SO delicious and the bread machine makes them super simple to make!
Looking for more yummy recipes? Check out Bread Machine Buttery Rolls, Homemade Bread Sticks in the Bread Machine, my Favorite Muffin Recipes, Easy Homemade Bread Recipes, and My Favorite Pancake Recipes.
During the months of November and December, we’ll be highlighting some of our favorite homemade gifts! Download our FREE Homemade Gifts Guide to get recipes to 15+ easy-to-make gifts, plus printable gift tags to go with each gift!
The Best Bread Machine Cinnamon Roll Recipe
We’ve been making these bread machine cinnamon rolls for over a decade, and they never get old. It took me many failed attempts to find this perfect cinnamon rolls recipe, but they’ve been a hit in our house ever since.
And my favorite part of these homemade cinnamon rolls is that they usually only take a total of about 20 minutes of hands-on effort to pull off since you make them in the bread machine.
That’s my kind of recipe! 😃
We’ve made these easy cinnamon rolls over and over again throughout the years, and my husband and kids still get excited every time we whip up a batch on a lazy Saturday morning! And over the years, the kids have learned how to make these and love helping out with them.
Oh, and these cinnamon rolls freeze beautifully! So if you manage to have any leftovers after day one, these are a great freezer-friendly breakfast idea!
Give Cinnamon Rolls as a Holiday Gift!
These Cinnamon Rolls are perfect for the holidays, too! We love making them for Christmas breakfast, taking them to family get-together for brunch, or even giving them as homemade gifts!
Get FREE printable gift tags to go with it!
Want to add on Christmas gift tags to gift this to someone this holiday season? Go HERE to download printable gift tags designed for these Cinnamon Rolls!
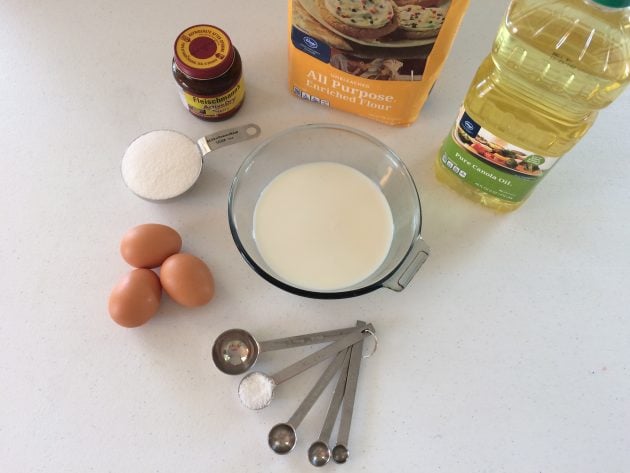
Bread Machine Cinnamon Roll Recipe Ingredients
For the dough:
- 1 cup warm milk
- 3 tablespoons oil
- 1 egg, lightly beaten
- 2 egg whites
- 1/2 cup sugar
- 4 cups flour
- 1 teaspoon salt
- 1 tablespoon active dry yeast
For the filling:
- 4 tablespoons melted butter
- 1 1/3 cups brown sugar
- 2 tablespoons cinnamon
For the icing:
- 1 teaspoon milk
- 1 1/2 cups confectioners sugar
- 4 tablespoons butter, softened
- 1 teaspoon vanilla
How to Make Cinnamon Roll Dough Bread Machine
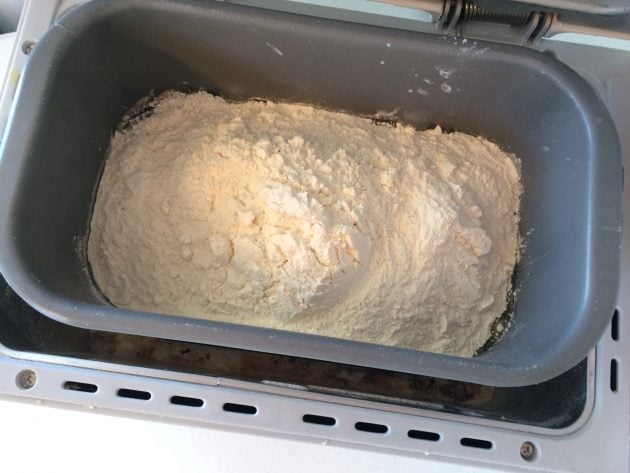
1. Layer dough ingredients in the bread machine in the order listed and run on the dough cycle.
2. While the dough mixes, combine ingredients for the filling and set aside.
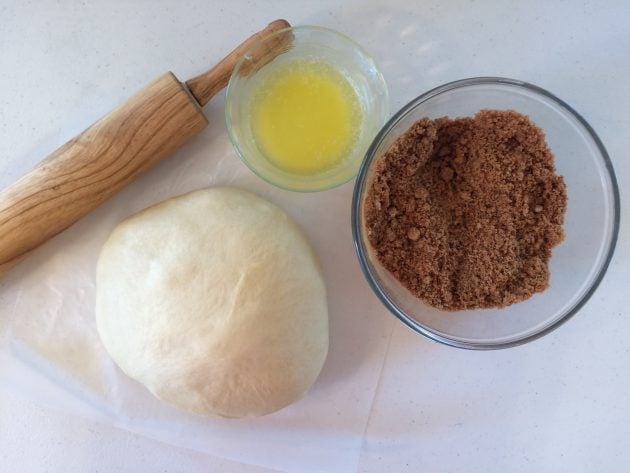
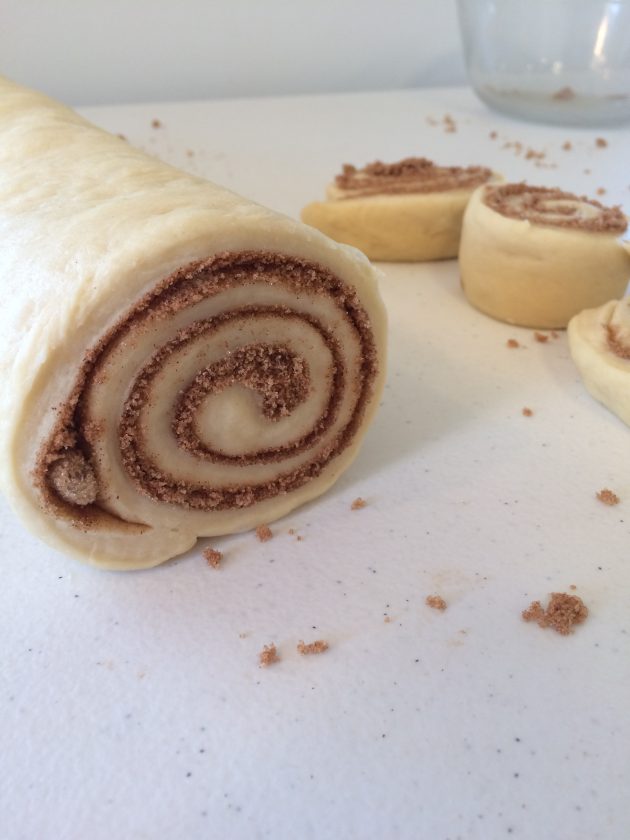
3. After the dough cycle is finished, roll the dough into a large rectangle and spread the filling ingredients over the dough.

4. Roll the dough, starting with the longest end, and cut it into 12-16 rolls.
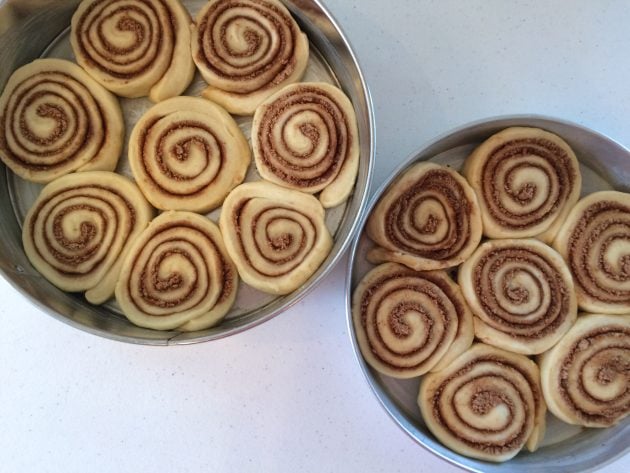
5. Place rolls in two greased round 9″ cake pans and cover them with plastic wrap while the oven preheats. OR, put them in the refrigerator overnight and bake in the morning.
6. Preheat oven to 325ºF.
7. Bake rolls in preheated oven for 20 minutes, or until just starting to get golden brown on top.
8. While the rolls bake, mix icing ingredients together until smooth (this works best with a hand mixer).
9. Spread prepared icing on rolls as soon as they come out of the oven.
10. Eat and enjoy!
What to Serve with Bread Machine Cinnamon Rolls
Cinnamon rolls are a great breakfast staple, and perfect for a mid-morning brunch. They can also be the start of your “brinner” (breakfast for dinner!) So basically, you can enjoy them any time of the day.
Serve them with quiche or other egg casseroles, or just whip up a big batch of scrambled eggs to keep things simple.
Cinnamon rolls are also delicious with a yogurt parfait or even a simple fruit cup.
Storing Bread Maker Cinnamon Rolls
If you have any cinnamon rolls left over (and that’s a big “if”), we recommend putting them in a food storage container and storing them at room temperature for up to 2 days, or freeze them for longer.
Cinnamon Roll Dough Bread Machine FAQs
If you have bread flour in the house, go ahead and us it as it will most likely produce lighter and fluffier rolls. However, don’t make a special trip to the store just for bread flour. All-purpose flour works just fine and is less expensive too!
There are a few possible causes for flat or dense rolls. Your yeast might not be active anymore or you could have used too hot of liquid (more than 110ºF) which could potentially kill the yeast. Another possibility is that your room is too cold so they didn’t have a chance to rise enough, or you could have oven-kneaded the dough, which can cause it to become very tough and dense.
You definitely want to wait on the icing until AFTER the rolls are finished baking — otherwise it will melt through to the bottom and create a sticky mess! That said, we like spreading a bit of frosting on the rolls right when they come out of the oven, and serving the rolls with additional frosting for those who like them extra sweet!
Bread Machine Cinnamon Rolls
Equipment
Ingredients
For the Dough:
- 1 cup warm milk 105ºF
- 3 Tbsp. oil
- 1 egg
- 2 egg whites
- ½ cup sugar
- 4 cups flour
- 1 tsp salt
- 1 Tbsp active dry yeast
For the Filling
- 4 Tbsp melted butter
- 1⅓ cup brown sugar
- 2 Tbsp cinnamon
For the Icing:
- 1 tsp milk
- 1½ cups confectioners sugar
- 4 Tbsp softened butter
- 1 tsp vanilla extract
Instructions
- While the dough mixes, combine ingredients for the filling and set aside.
- After the dough cycle is finished, roll the dough into a large rectangle and spread the filling ingredients over the dough.
- Roll the dough, starting with the longest end, and cut it into 12-16 rolls.
- Place rolls in two greased round 9″ cake pans and cover them with plastic wrap while the oven preheats. OR, put them in the refrigerator overnight and bake in the morning.
- Preheat oven to 325ºF.
- Bake rolls in preheated oven for 20 minutes, or until just starting to get golden brown on top.
- While the rolls bake, mix icing ingredients together until smooth (this works best with a hand mixer).
- Spread prepared icing on rolls as soon as they come out of the oven.
- Eat and enjoy!
Nutrition
Love this recipe?
Make sure to share and save it on your favorite platform below!
By the way, if you’re in the market for a good bread machine, I have the Zojirushi Bread Machine and absolutely love it. Read my review of it here.
Many thanks to reader, Sarah, who emailed this recipe to me. It’s a keeper!
Looking for more Bread Machine Recipes?
- My Favorite Homemade Bread Recipe
- My Sister’s Bread Recipe
- Homemade Breadsticks in the Bread Machine
- Homemade Pita Pockets
- Easy Italian Breadsticks
- Bread Machine Buttery Rolls
Get your FREE Homemade Christmas Gifts Guide!
If you’re looking for ways to simplify gift giving this year, we have just the solution for you! Download our brand new FREE Homemade Christmas Gifts Guide! When you sign up, you’ll get:
- 15+ DIY recipes for unforgettable gift ideas (we’ve included something for everyone on your list!)
- Step-by-step instructions for ridiculously easy homemade gifts that anyone can make!
- Customizable, ready-to-print gift tags to go with each homemade gift!
This FREE guide was designed to help you have a more peaceful, intentional holiday season. Our hope is that it reduces stress, helps you save more money and spend less on your gift budget, and simplifies things so you can focus on what matters most this season!
Click here to get your FREE Homemade Christmas Gifts Guide!

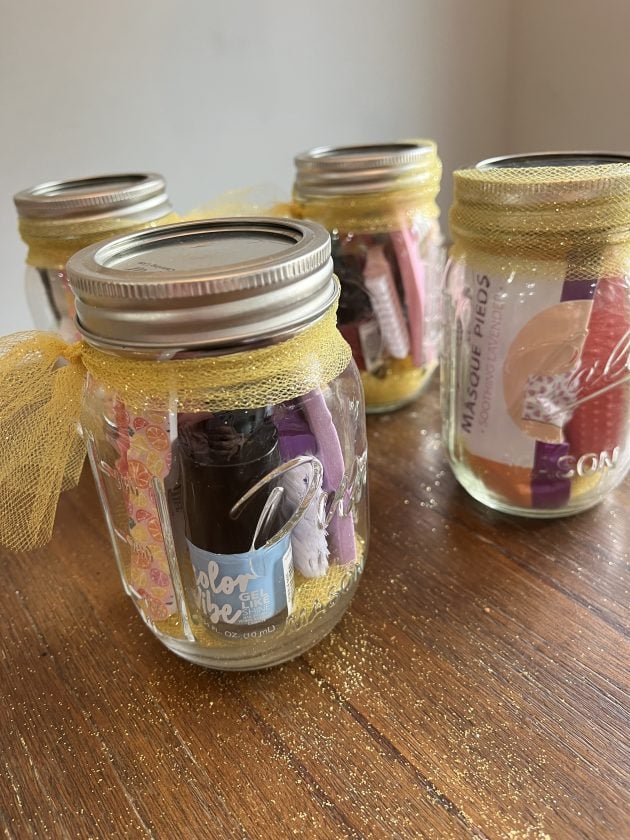
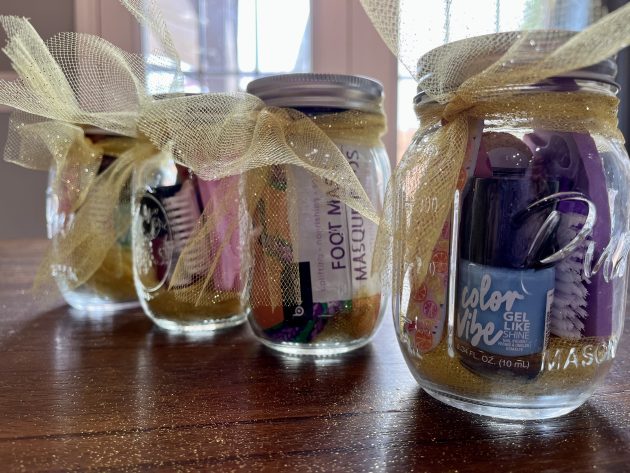
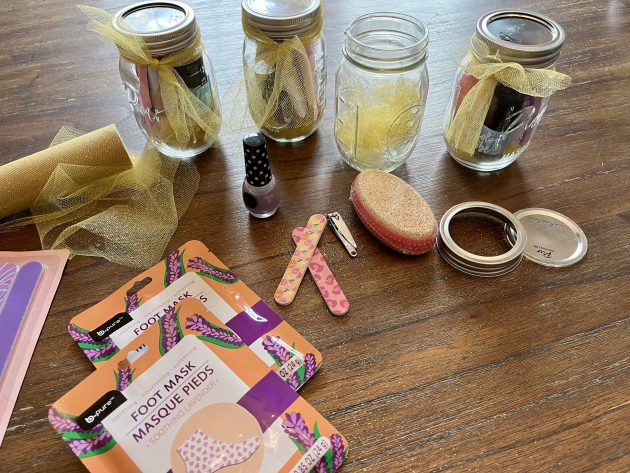
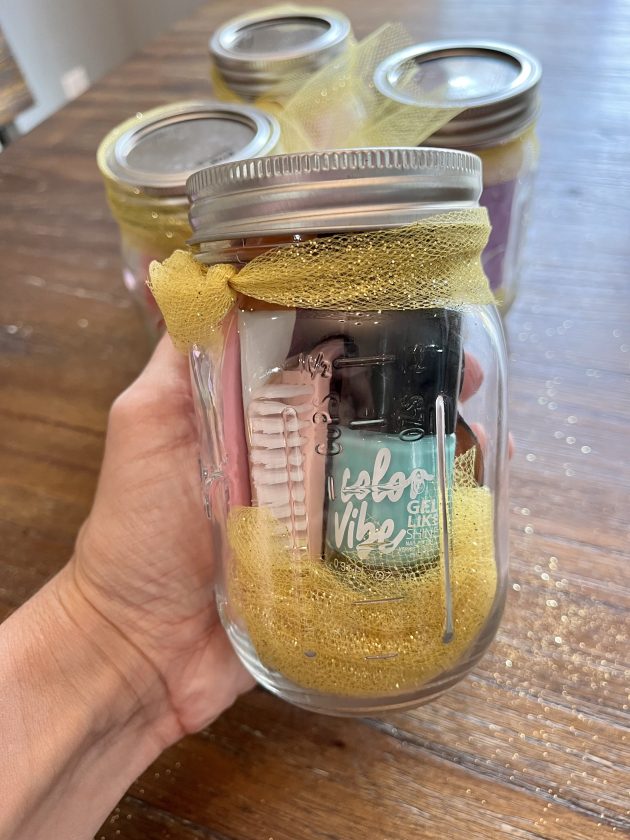
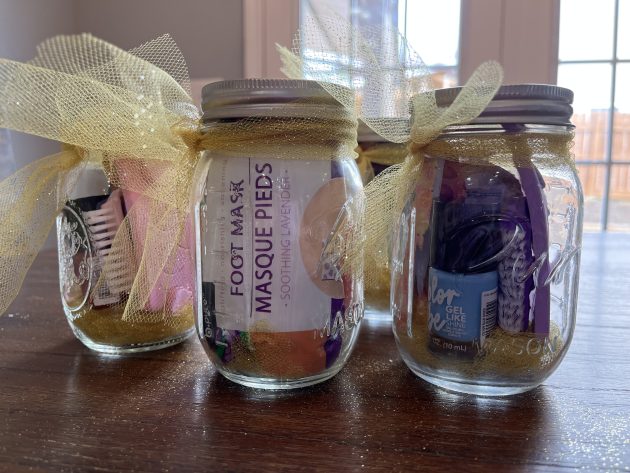
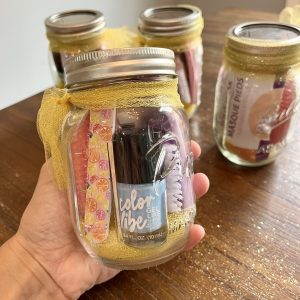
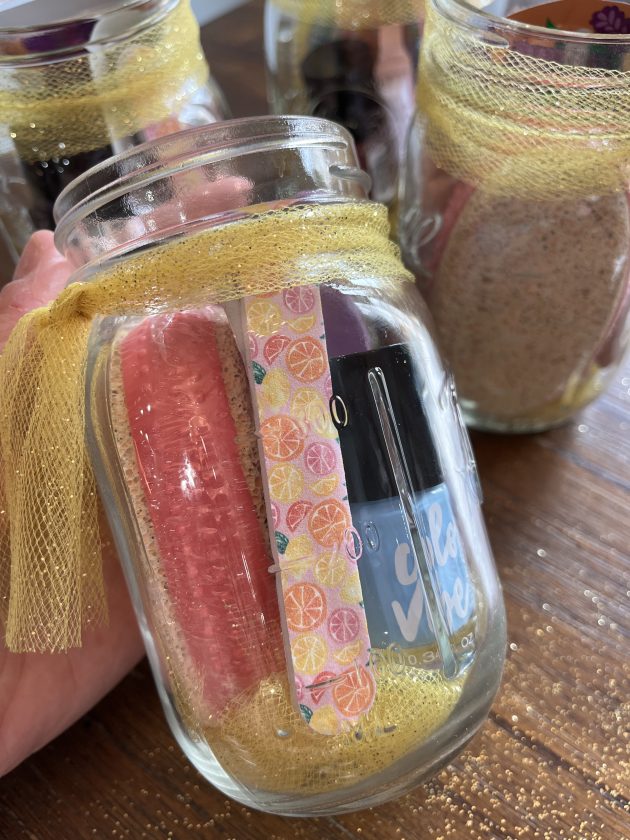
DIY Pedicures In A Jar + Free Printable Gift Tags!
These DIY Pedicures in a Jar make beautiful homemade gifts and they’re super easy to make and really budget-friendly! And be sure to grab your FREE printable gift tags that go with it!
DIY tutorial by Gretchen from the MoneySavingMom team. During the months of November and December, we’ll be highlighting some of our favorite homemade gifts! Download our FREE Homemade Gifts Guide to get recipes to 15+ easy-to-make gifts, plus printable gift tags to go with each gift!
These DIY Pedicures in a Jar are great frugal gift ideas!
If you’re looking for the perfect gift for the females in your life, try a pedicure in a jar! I put these together in just a few minutes for very little cost, and they are so cute!
This gift is SO versatile and there are literally so many things you can put inside each jar. It’s a great pampering gift and a fun way to show love.
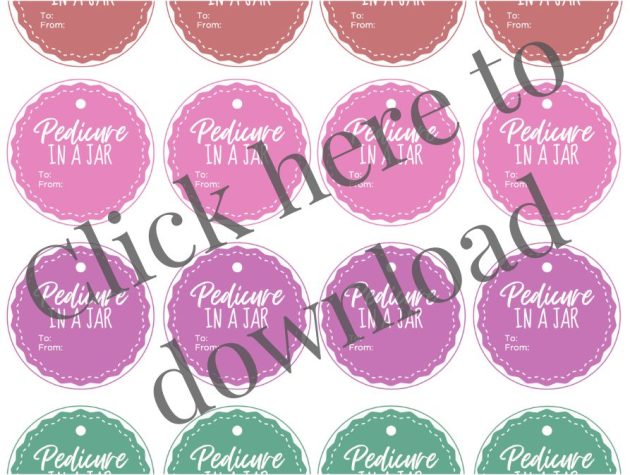
Get FREE printable gift tags to go with it!
Want to add on Christmas gift tags to gift this to someone this holiday season? Go HERE to download printable gift tags designed for these Pedicures in a Jar!
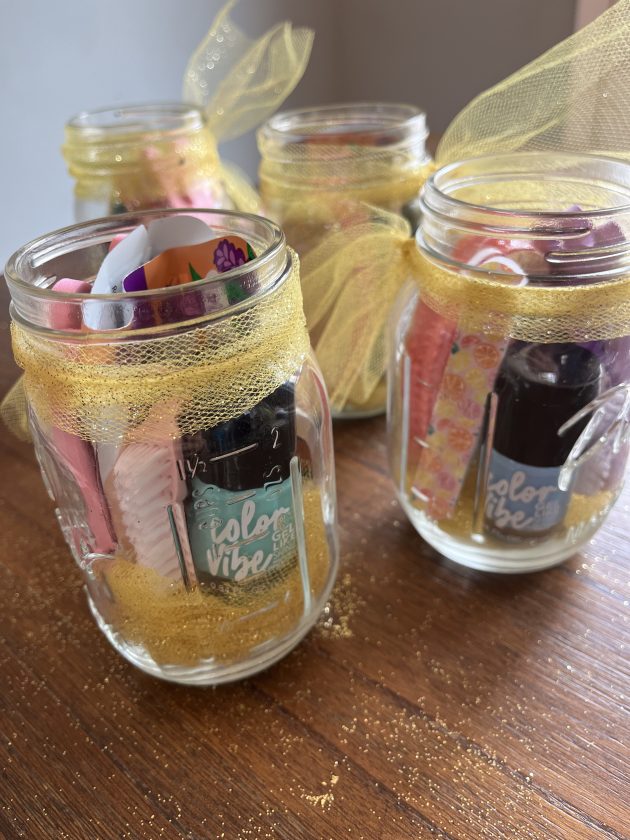
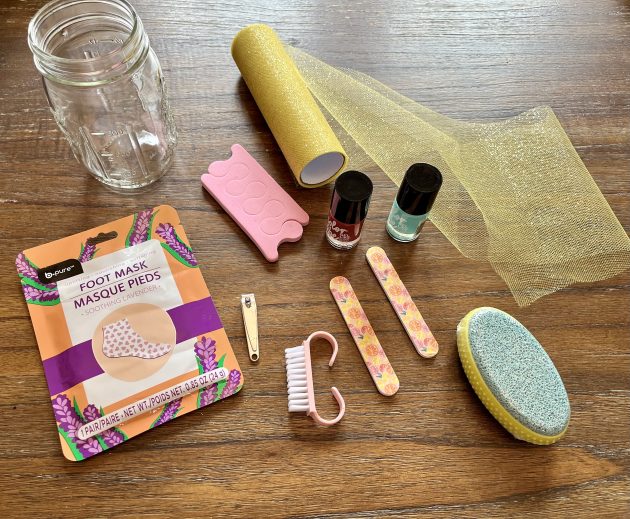
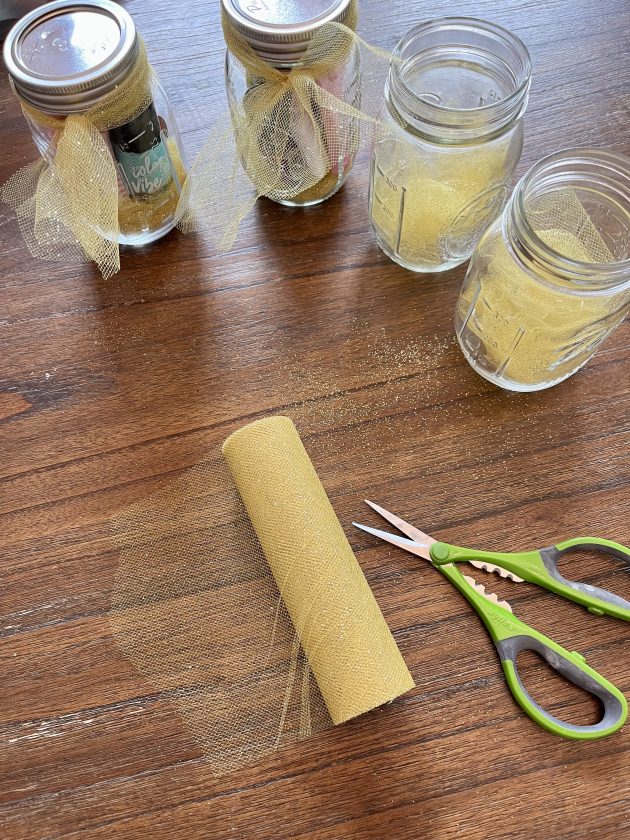
Materials for DIY Pedicures in A Jar
I usually stop by Dollar Tree where I find most of my items. This time, I even found a pedicure bundle that included several things for just $1 so it was very inexpensive.
- Pint jars, lids, and rings
- Tulle or something fluffy for the bottom of the jar
- Ribbon, twine, or more tulle to wrap around the ring
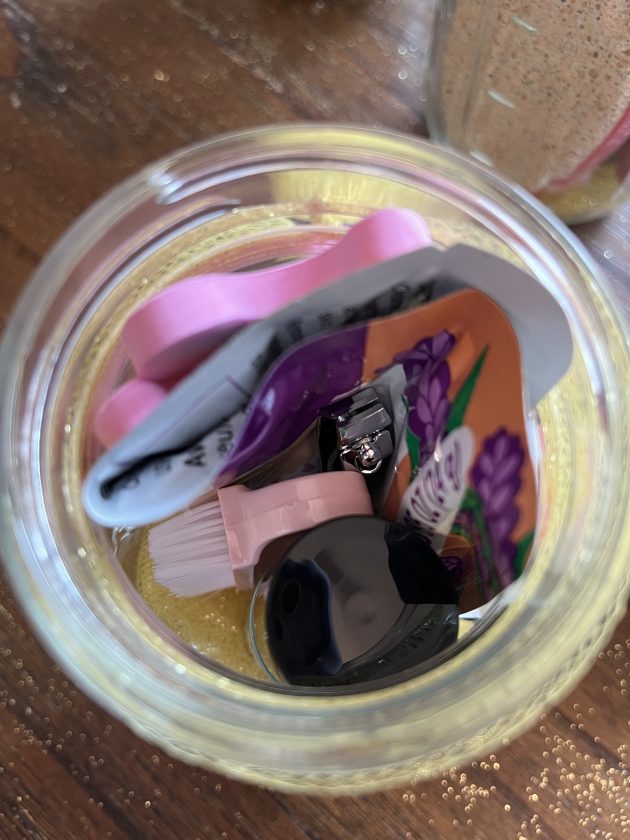
- Pedicure Supplies (fingernail polish, foot mask, nail clippers, toe separators, nail file, small lotion, etc)
How to Make Pedicures in a Jar
1. Gather all your supplies and lay them out.
2. Cut roughly 16-inch pieces of tulle and stuff into the bottom of the jars.
3. Fill the mason jars with supplies.
4. Tie with ribbon/tulle and put lids on top. You can also label them if you’d like.
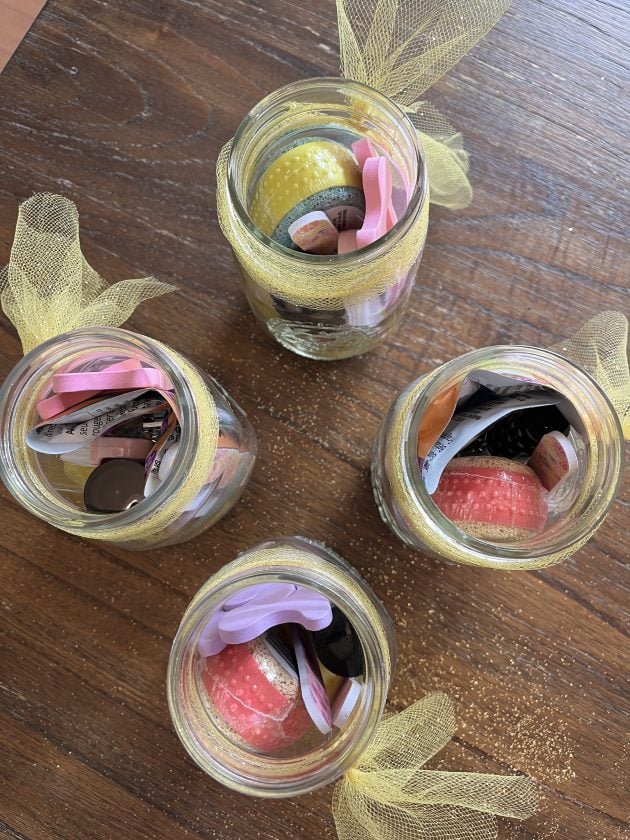
Make as many of these jars as you need and give them to all your friends and family!
They are such a fun and easy gift idea!
DIY Pedicures in a Jar
Materials
- Pint jars
- Canning lids wide mouth or regular — depending on your jars
- Canning rings
- Tulle or something fluffy for the bottom of the jar
- Ribbon twine, or more tulle to wrap around the ring
Pedicure Supplies
- Nail polish
- Foot mask
- Nail clippers
- Toe separators
- Nail file
- Small lotion
Instructions
- Gather all your supplies and lay them out.
- Cut roughly 16-inch pieces of tulle and stuff into the bottom of the jars.
- Fill the mason jars with supplies.
- Tie with ribbon/tulle and put lids on top. You can also label them if you’d like.
Love this craft?
Make sure to share and save it on your favorite platform below!
Get your FREE Homemade Christmas Gifts Guide!
If you’re looking for ways to simplify gift giving this year, we have just the solution for you! Download our brand new FREE Homemade Christmas Gifts Guide! When you sign up, you’ll get:
- 15+ DIY recipes for unforgettable gift ideas (we’ve included something for everyone on your list!)
- Step-by-step instructions for ridiculously easy homemade gifts that anyone can make!
- Customizable, ready-to-print gift tags to go with each homemade gift!
This FREE guide was designed to help you have a more peaceful, intentional holiday season. Our hope is that it reduces stress, helps you save more money and spend less on your gift budget, and simplifies things so you can focus on what matters most this season!
Click here to get your FREE Homemade Christmas Gifts Guide!

Raising Spiritually Strong & Emotionally Healthy Children
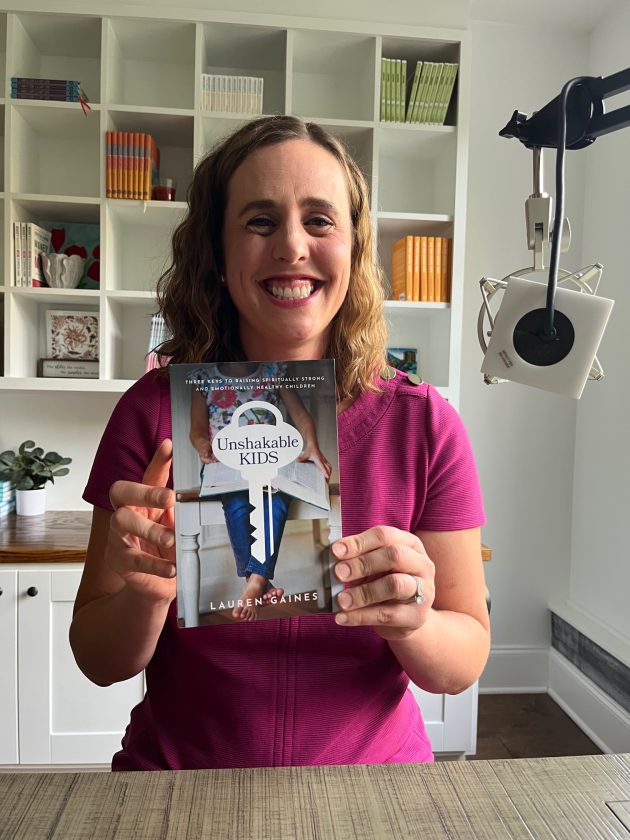
I am joined this week by Lauren Gaines, author of Unshakable Kids: Three Keys to Raising Spiritually Strong and Emotionally Healthy Children. As someone who often discusses emotional language and nurturing emotional health in your kids, I have received many, many questions from moms about teaching these concepts to young kids, so Lauren is joining me today to help me tackle this topic!
Lauren is a mother of three with a background in school psychology, and she provides practical insights and resources for parents seeking to instill spiritual strength and emotional resilience in their children. Join us as we delve into the three keys of focusing on the mind, heart, and identity, emphasizing metacognition, emotional intelligence, and building courage and confidence in Christ.
Lauren also shares incredibly valuable brain builders and discusses the crucial role of rest in creating a more balanced and peaceful family life. If you’re a parent navigating the challenges of raising spiritually strong and emotionally healthy kids, I hope this episode encourages you and gives you a lot of food for thought.
Powered by RedCircle
In This Episode
[0:35] – Lauren Gaines, author of Unshakable Kids, is today’s guest!
[2:01] – Lauren, a mother of three with a school psychology background, integrates psychology and biblical teachings.
[5:35] – What does the phrase “spiritual strength” mean to Lauren?
[8:47] – Hear Lauren define what “emotionally healthy” means to her.
[10:14] – In her book, Lauren emphasizes the profound impact of the mind and explores emotional health, identity, and practical strategies for parenting.
[12:59] – Lauren highlights metacognition, encouraging conversations with kids about the power of words and providing ways to shift negative thought patterns.
[15:33] – Lauren delves into methods that teach kids to understand and change thought patterns for emotional well-being.
[17:47] – How to boost kids’ emotional awareness and promote positive expressions and understanding.
[20:19] – It’s important for kids to recognize physical sensations as signals of emotions.
[22:49] – How does Lauren navigate homeschooling stress?
[24:37] – Lauren guides kids through adversity with a three-step process, emphasizing reflection and aligning beliefs with positivity.
[26:46] – How to find quiet moments in your day, even if you have a very full life.
[29:01] – Lauren explains that she embraces rest and aligns with biblical teachings for improved well-being.
[31:35] – Lauren talks about how they’ve recently restructured their lifestyle and the difference it has made.
[33:31] – How slowing down, reflecting, and prioritizing peace over rushing can make such a difference in your home.
Links & Resources
- Unshakable Kids: Three Keys to Raising Spiritually Strong and Emotionally Healthy Children by Lauren Gaines
- FREE Homemade Gift Guide
- 10 Days to Be a Happier Mom
- Crystal Paine
- Sign up for the Hot Deals Email List
- MoneySavingMom.com
- My Instagram account (I’d love for you to follow me there! I usually hop on at least a few times per day and share behind-the-scenes photos and videos, my grocery store hauls, funny stories, or just anything I’m pondering or would like your advice or feedback on!)
- Have feedback on the show or suggestions for future episodes or topics? Send me an email: crystal @ moneysavingmom.com
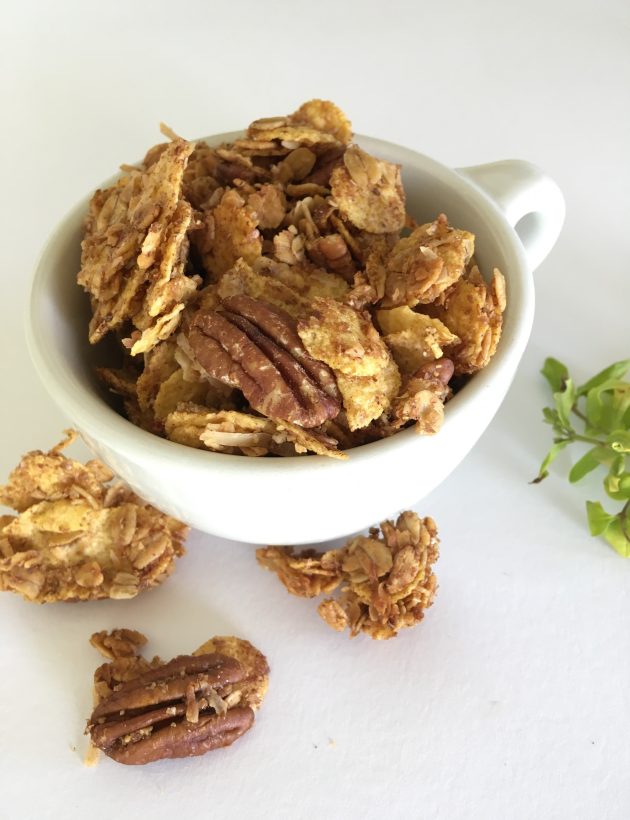
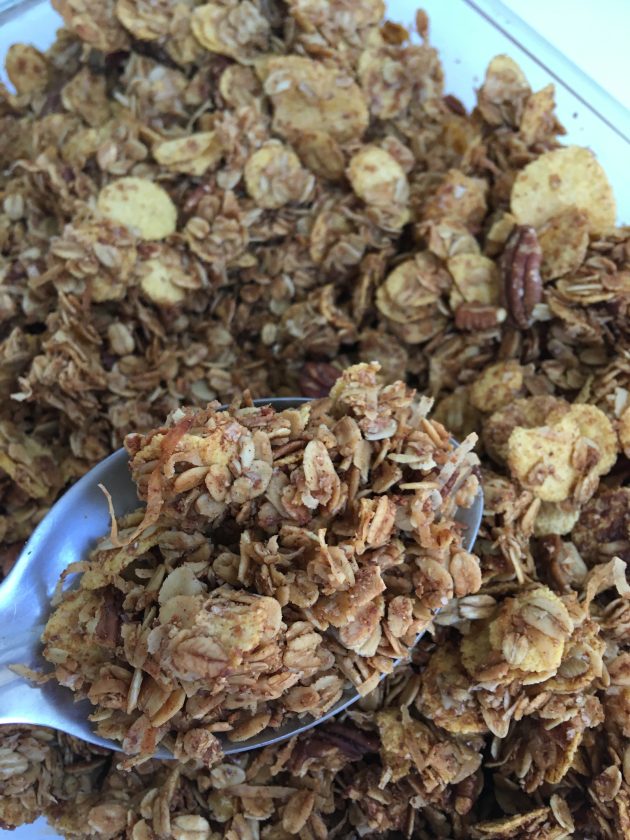
Homemade Granola with Honey + Free Printable Gift Tags!
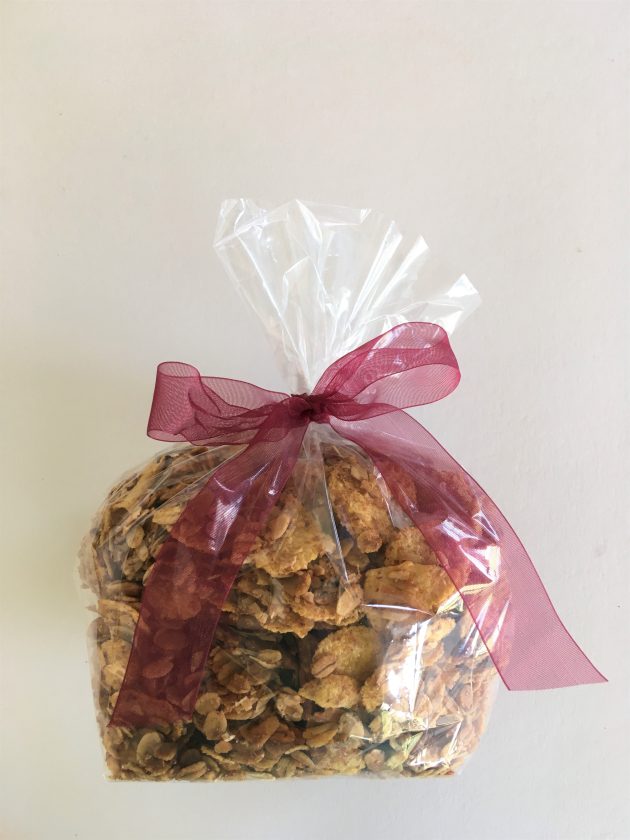
Your search for the perfect granola ends here — I just know you’ll love it! It’s so easy, it makes a big batch, and it freezes well too! You can even give it as a unique holiday gift! (Don’t forget your FREE printable gift tags to go with it!

Recipe from my sister, Brigette. During the months of November and December, we’ll be highlighting some of our favorite homemade gifts! Download our FREE Homemade Gifts Guide to get recipes to 15+ easy-to-make gifts, plus printable gift tags to go with each gift!
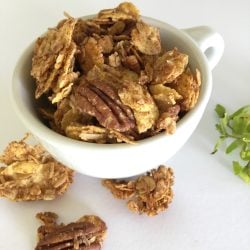
This Homemade Granola has been my go-to for years!
I enjoy many different granola recipes, but this is my go-to recipe.
I received this recipe as a wedding gift from one of my very best friends (a handwritten cookbook is a great gift, by the way!) and I’ve only slightly tweaked it over the years.
It’s the perfect mix of crunchy and chunky and sweet and savory and everything you could possibly want in a bowl of granola.
In fact, I know people who “don’t like granola” yet get hooked on this recipe.
Eat a bowl as a breakfast treat, grab a handful of it for an afternoon pick-me-up, or sprinkle it on ice cream or yogurt for a late-night treat… yum!
This Homemade Granola with Honey makes a great frugal gift!
This delicious granola is also a great homemade gift for teachers, neighbors, and friends. In fact, certain family members and friends have come to expect (even demand!?) this granola from me every December.
Even though it works great as a gift, you’ll definitely want to make sure you save some for yourself. 😉
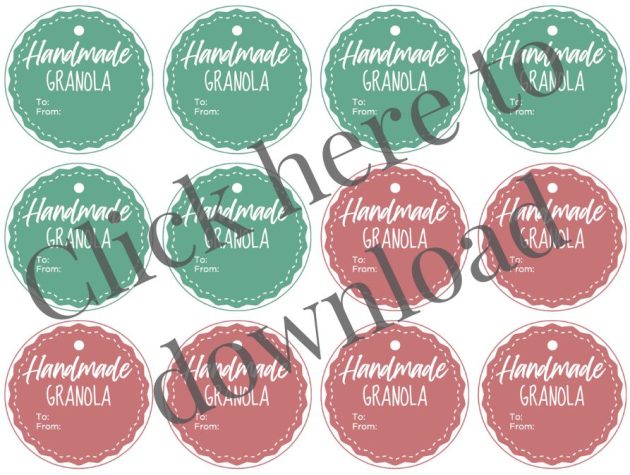
Get your free printable gift tags!
Want to add on Christmas gift tags to gift this to someone this holiday season? Go HERE to download printable gift tags designed for this homemade granola!
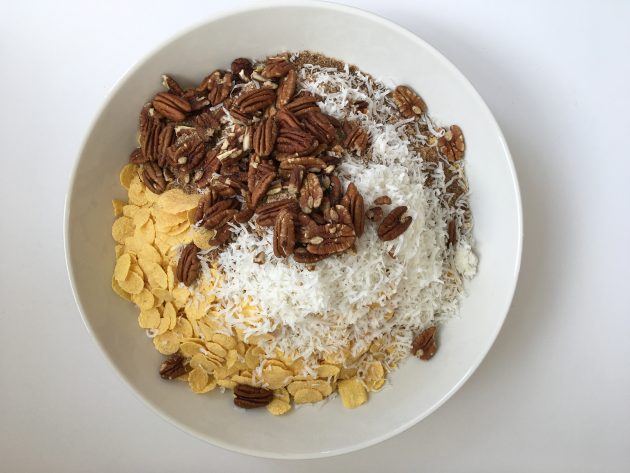
Homemade Granola Recipe Ingredients
DRY INGREDIENTS:
- 6 cups rolled oats
- 5 cups cornflakes cereal
- 1 cup wheat germ (or wheat bran, oat bran, etc. – something with a more “flour-like” consistency)
- 1 cup pecans
- ½ cup shredded unsweetened coconut
- 1 Tablespoon ground cinnamon
- ½ teaspoon salt
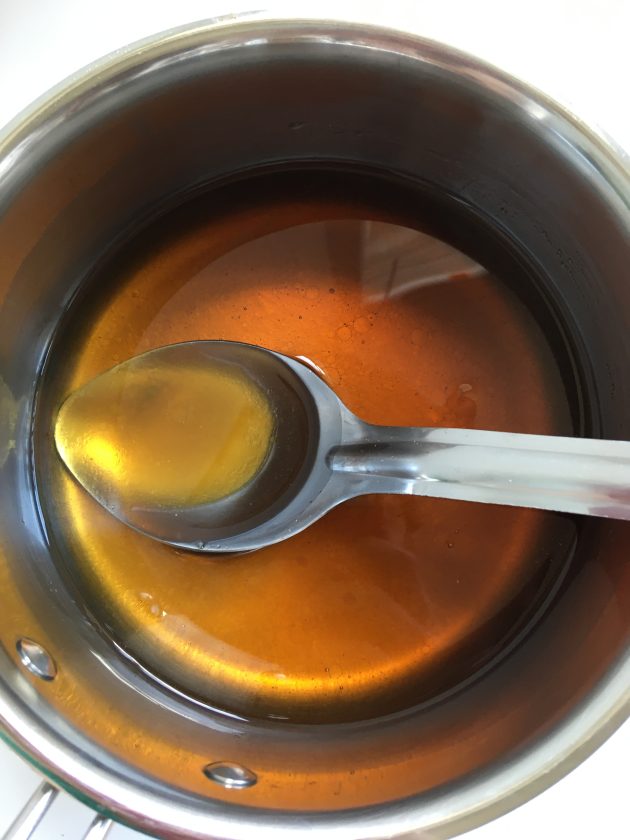
WET INGREDIENTS :
- ¾ cup oil (vegetable or coconut)
- 1 cup honey (use less if you don’t like your granola very sweet)
- ¼ cup maple syrup
- 1 Tablespoon vanilla extract

How to Make Homemade Granola
1. Preheat oven to 250ºF.
2. Grease a 10″ x 15″ baking dish and set aside.
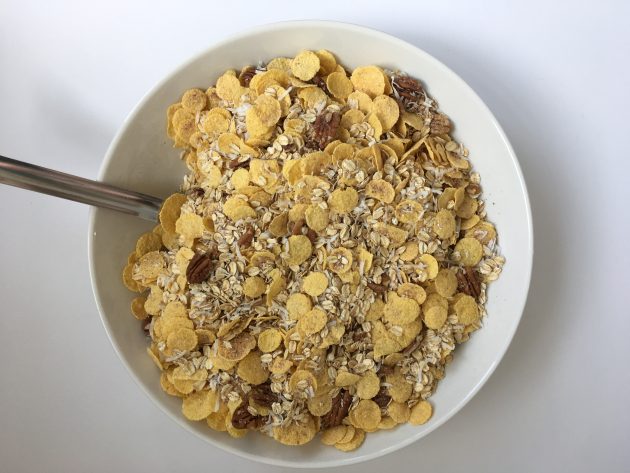
3. In a large bowl, mix dry ingredients together.
4. Add wet ingredients to a medium saucepan and simmer over low heat until warm, stirring occasionally.
5. Pour wet ingredients over dry ingredients and mix well.
6. Spread mixture evenly in baking dish and bake in preheated oven for 2 hours, stirring every 20-30 minutes.
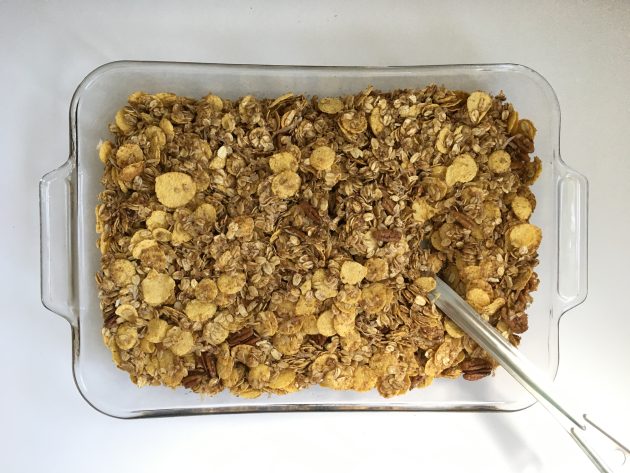
7. After 2 hours, press the granola down firmly into the pan, turn your oven off, and put the pan back into the oven (with the oven door closed) until completely cool (this will take several hours but helps create a more crunchy granola, which I love).
If you happen to like chewier granola, let it cool on the counter instead of in the oven.
8. Store cooled granola in an airtight container at room temperature, or freeze for later.
How to store Homemade Granola with Honey
After the granola cools completely, store it in an air-tight food storage container, a zip-top bag, or glass jars with tight-fitting lids.
How long does Homemade Granola Last?
It should stay fresh for a few weeks at room temperature and will last for months in the freezer.
Freezing Oatmeal Granola
It freezes wonderfully. Simply store it in a ziptop bag or airtight food storage container and it will stay fresh for months.
Easy Homemade Granola Serving Suggestions
This homemade granola is great severed over your favorite yogurt with a little fresh fruit, as a crunchy ice cream topping, or just in a bowl with milk.
You can also sprinkle it over banana bread or cinnamon bread batter BEFORE you bake it. It will give the bread a nice crunchy sweet topping.
Oatmeal Granola FAQs
Honestly, there’s a lot of sugar in granola, but it’s honey and maple syrup (natural sugar). Granola also has a fair amount of protein and fiber. It’s not something I’d eat for every meal, but it’s a highly nutritious treat.
Store-bought granola is extremely expensive, so even though some of the bulk ingredients in our homemade version can be a little spendy, I’m positive it’s still much cheaper than buying it from the store.
In order to get crispy granola, you must cook it slowly at a low temperature so it has plenty of time to dry out without burning. We also recommend turning off your oven after 2 hours and letting the granola sit in the oven until completely cooled. It takes a little extra time, but it really helps to produce crunch granola!
We suggest old-fashioned oats as they hold up better than quick oats and make “chunkier” granola.
We prefer the taste of real maple syrup, but you can substitute any syrup you have in your pantry.
You could try Rice Krispies, Bran Flakes, or even Frosted Flakes for a sweeter granola!
Yes. Feel free to make a double or triple batch — just make sure you use multiple pans or a very large pan so the granola can spread out (otherwise it will take forever to cook).
Easy Homemade Granola
Ingredients
Dry Ingredients:
- 6 cups rolled oats
- 5 cups cornflakes
- 1 cup wheat germ
- 1 cup pecans
- ½ cup unsweetened shredded coconut
- 1 Tbsp ground cinnamon
- ½ tsp salt
Wet Ingredients:
- ¾ cup coconut oil
- 1 cup honey
- ¼ cup maple syrup
- 1 Tbsp vanilla extract
Instructions
- Preheat oven to 250ºF.
- Grease a 10″ x 15″ baking dish and set aside.
- In a large bowl, mix dry ingredients together.
- Add wet ingredients to a medium saucepan and simmer over low heat until warm, stirring occasionally.
- Pour wet ingredients over dry ingredients and mix well.
- Spread mixture evenly in baking dish and bake in preheated oven for 2 hours, stirring every 20-30 minutes.
- After 2 hours, press the granola down firmly into the pan, turn your oven off, and put the pan back into the oven (with the oven door closed) until completely cool (this will take several hours but helps create a more crunchy granola, which I love).
- Store cooled granola in an airtight container at room temperature, or freeze for later.
Notes
Nutrition
Love this recipe?
Make sure to share and save it on your favorite platform below!
Get your FREE Homemade Christmas Gifts Guide!
If you’re looking for ways to simplify gift giving this year, we have just the solution for you! Download our brand new FREE Homemade Christmas Gifts Guide! When you sign up, you’ll get:
- 15+ DIY recipes for unforgettable gift ideas (we’ve included something for everyone on your list!)
- Step-by-step instructions for ridiculously easy homemade gifts that anyone can make!
- Customizable, ready-to-print gift tags to go with each homemade gift!
This FREE guide was designed to help you have a more peaceful, intentional holiday season. Our hope is that it reduces stress, helps you save more money and spend less on your gift budget, and simplifies things so you can focus on what matters most this season!
Click here to get your FREE Homemade Christmas Gifts Guide!
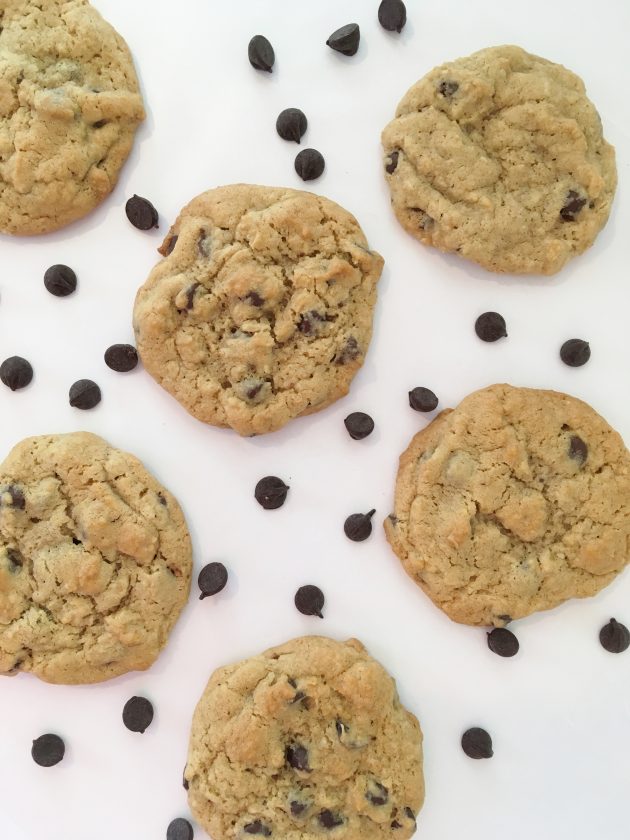
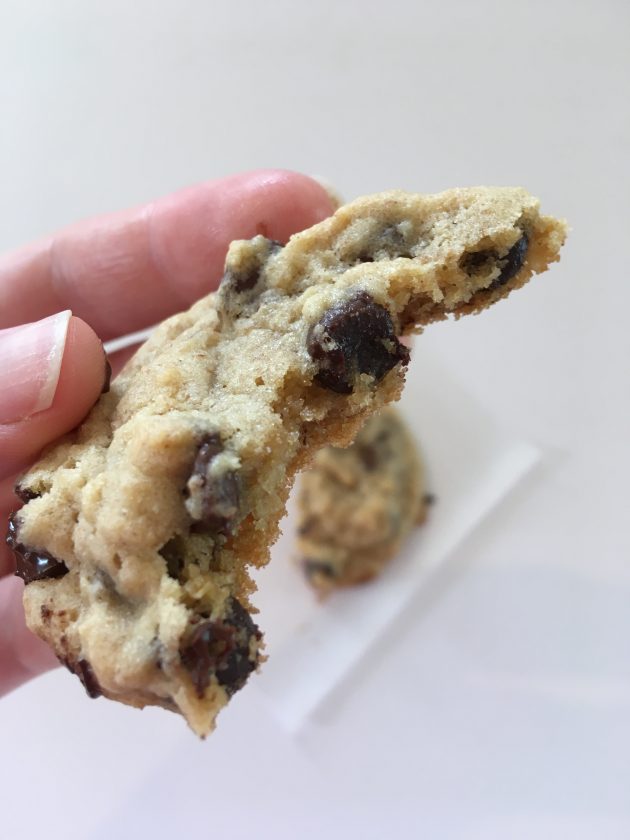
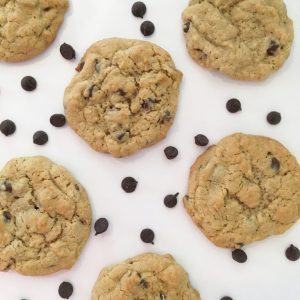
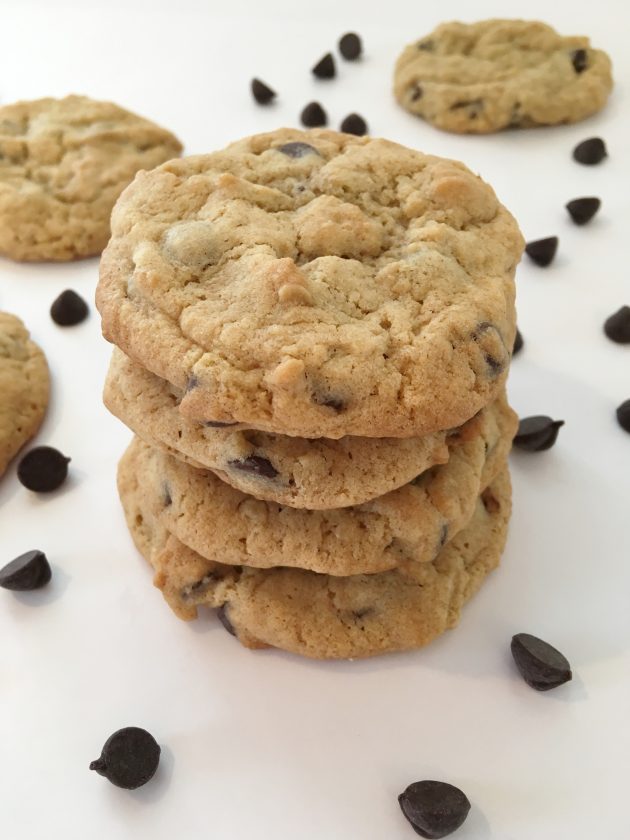
Gooey Chocolate Chip Cookies with Whole Wheat Flour (A Family Favorite!) + Free Printable Gift Tags
Gooey Chocolate Chip Cookies with Whole Wheat Flour (A Family Favorite!) + Free Printable Gift Tags
Is there anything better than soft, gooey chocolate chip cookies, fresh out of the oven? If you’re a sucker for delicious chocolate chip cookies, you absolutely must give this recipe a try! (Plus, get FREE printable gift tags to give these as a holiday gift when you download our FREE Homemade Christmas Gifts Guide!)

Recipe from my sister, Brigette. During the months of November and December, we’ll be highlighting some of our favorite homemade gifts! Download our FREE Homemade Gifts Guide to get recipes to 15+ easy-to-make gifts, plus printable gift tags to go with each gift!
Soft Gooey Chocolate Chip Cookies have been a staple over the years!
I’ve made a lot of chocolate chip cookies over the years.
I remember being 9 or 10 and feeling so excited the first time I made them all by myself. I quickly discovered that if you know how to bake a good cookie, you will always have friends!
When we lived overseas for two years, I was able to build many relationships with the local children as a result of chocolate chip cookies. After introducing them to this American staple, they were quickly hooked, so they obviously had to keep coming back to my house since it was the only way to get more!
This Chocolate Chip Oat Cookies recipe is our all-time fave!
This recipe is one of my all-time favorite cookie recipes. I’ve adapted it slightly from a recipe from one of my long-time friends (Thanks, Elsie!). It’s traveled the world with me and has consistently turned out in many different ovens.
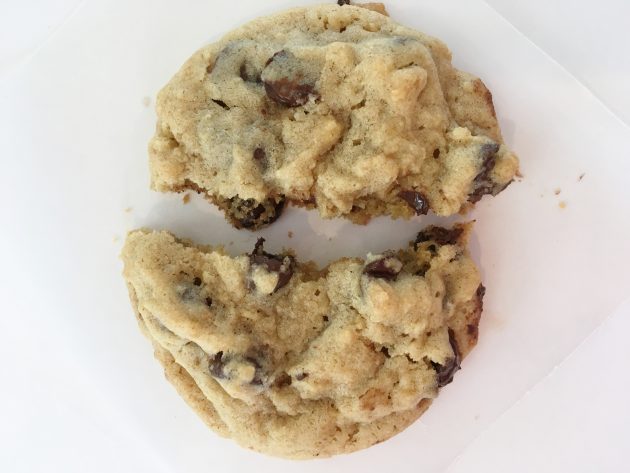
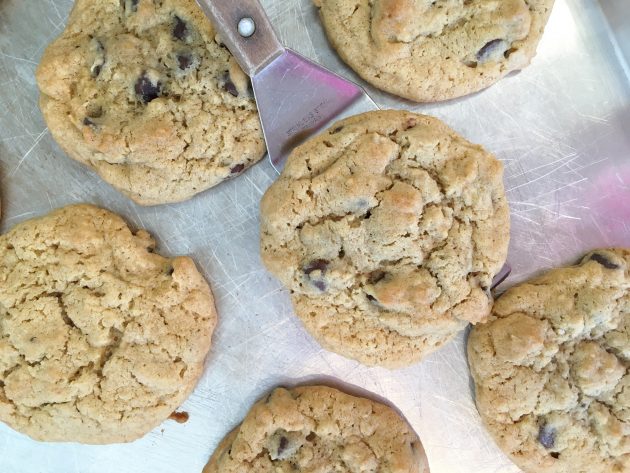
These buttery gems are crispy on the edges and soft and gooey in the center. Not too puffy, and not too flat. Perfect.
It’s a pretty basic recipe with a couple of interesting additions. I don’t recommend making any substitutions or leaving anything out!
Chocolate Chip Cookies are a great Christmas gift idea!
Because this chocolate chip cookie recipe is SUCH a hit with everyone, it makes a great homemade and delicious holiday gift! Or use them in a Christmas Cookie Exchange!
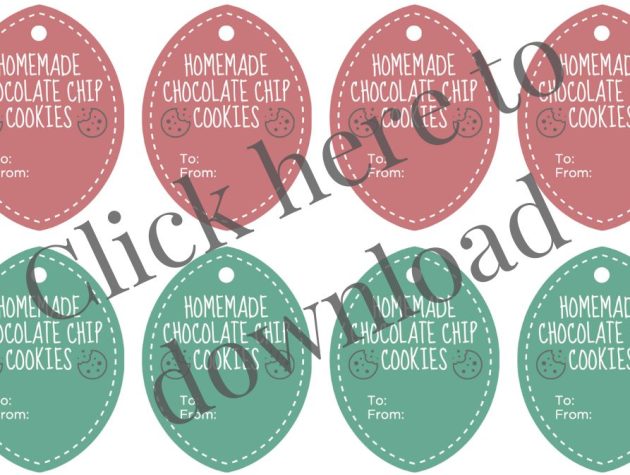
Get your free printable gift tags!
Want to add on Christmas gift tags to gift this to someone this holiday season? Go HERE to download printable gift tags designed for these cookies!
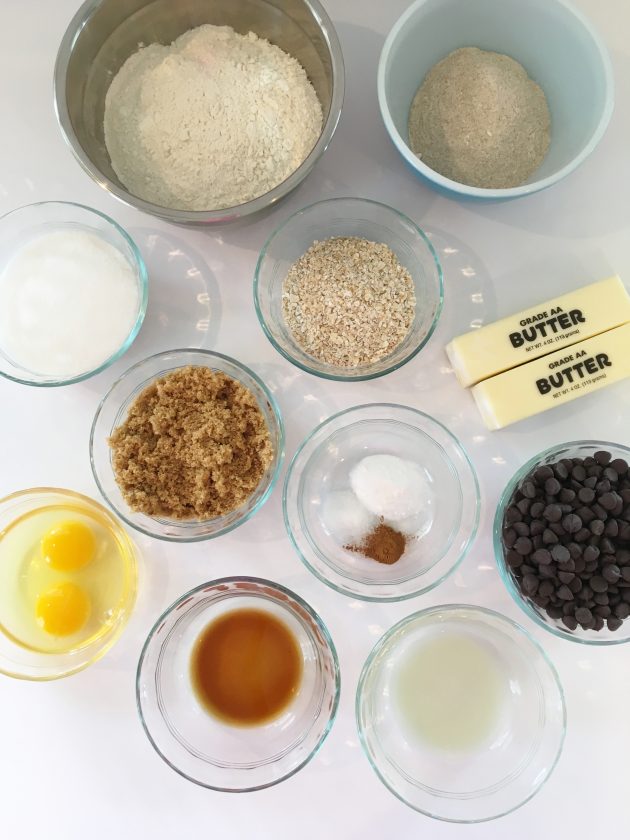
What are the Ingredients for Chocolate Chip Cookies?
- 1 cup butter, softened
- ¾ cup sugar
- ¾ cup brown sugar, packed
- 2 teaspoons vanilla
- 2 teaspoons lemon juice
- 2 eggs
- 2 cups all-purpose flour
- ½ cup whole wheat flour
- ½ cup quick-cooking oats*
- 1 ½ teaspoons baking soda
- ½ teaspoon salt
- ¼ teaspoon cinnamon
- 1 ½-2 cups chocolate chips
*You can use regular rolled oats if you prefer – just process them for several seconds in a blender first.
Can you substitute all-purpose flour for the whole wheat flour in this recipe? Is it a 1:1 swap?
Yes! If you’d rather use only all-purpose flour, just substitute an extra 1/2 cup of all-purpose flour for the 1/2 cup of whole wheat flour.
How to make Soft Chocolate Chip Cookies with Whole Wheat Flour
1. Preheat the oven to 350ºF.
2. In a large bowl, cream the butter and sugar until fluffy.
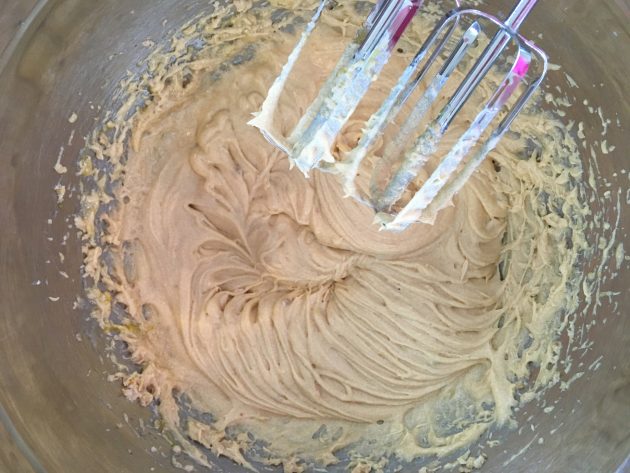
3. Add vanilla, lemon juice, and eggs. Beat well.
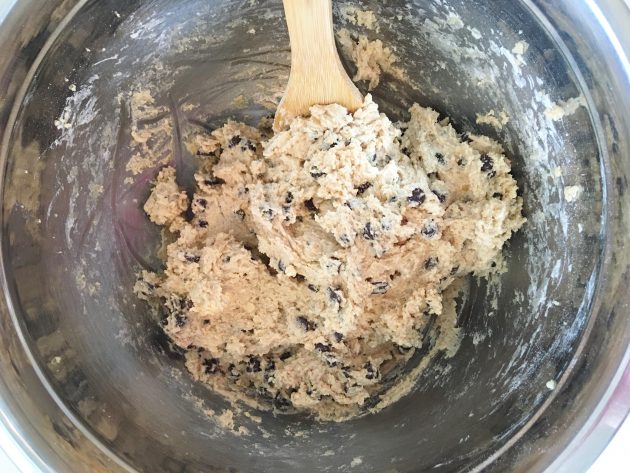
4. In a separate bowl, mix the flours, oats, baking soda, salt, and cinnamon.
5. Gradually add the dry mixture to the wet mixture.
6. Stir in the chocolate chips.
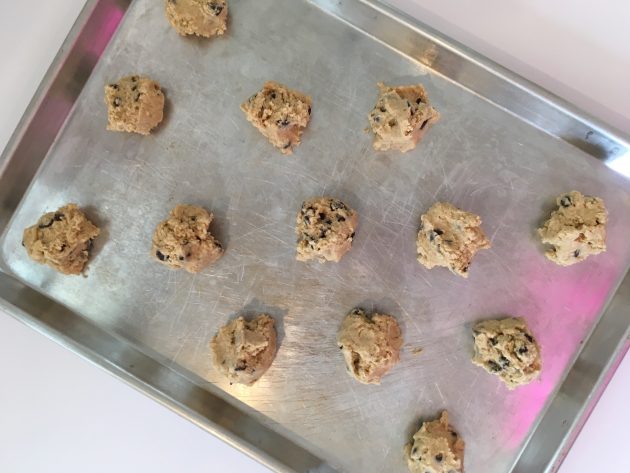
7. Drop by rounded tablespoons on an ungreased cookie sheet.
8. Bake in preheated oven for 10-12 minutes.
9. Cool on wire racks.
How long to bake Chocolate Chip Cookies?
We recommend starting with the lowest time (10 minutes) and checking for doneness. If they need another minute or two, you can always add more time.
However, we feel chocolate chip cookies are always best slightly under-done than overdone!
Tips for making the best Soft Gooey Chocolate Chip Cookies
There are a few things that will help your cookies to be very soft and gooey…
- Make sure your butter is very soft (but not melted)
- Use the full amount of brown sugar (don’t skimp!)
- Don’t over-mix the batter or over-bake the cookies
- Make sure the oven is fully pre-heated before putting the cookies in.
How to Store Oat Chocolate Chip Cookies
Keep your cookies in a tightly sealed container or bag at room temperature or in the freezer. Do not store them in the refrigerator as that will dry them out faster.
How Long do Chocolate Chip Oat Cookies last?
Cookies should stay fresh for roughly 3 days at room temperature. If you want to make them in advance, or make a triple batch for later, freeze the extras.
How to Freeze Chocolate Chip Cookies
After the cookies cool completely, place them in an air-tight food storage container with wax paper between each layer of cookies. Freeze for up to 6 months.
FAQs for Quick Oat Chocolate Chip Cookies
Use lots of chocolate chips and don’t over-bake them.
Use softened butter,
Flat cookies could be caused by using too much butter (or melted butter), using too little flour, or if your baking soda/powder is expired. Your cookies could also be flat if your oven temperature isn’t hot enough.
Quick oats help to “bind” the dough together, absorbing moisture and building structure.
All-purpose flour will produce the lightest and fluffiest cookies, but adding a little whole wheat flour creates a nice texture and denseness with a small amount of extra nutrients.
Gooey Chocolate Chip Cookies
Ingredients
- 1 cup butter softened
- ¾ cup sugar
- ¾ cup brown sugar packed
- 2 teaspoons vanilla
- 2 teaspoons lemon juice
- 2 eggs
- 2 cups all-purpose flour
- ½ cup whole wheat flour
- ½ cup quick-cooking oats or regular oats processed in a blender
- 1 ½ teaspoons baking soda
- ½ teaspoon salt
- ¼ teaspoon cinnamon
- 1 ½-2 cups chocolate chips
Instructions
- Preheat the oven to 350ºF.
- In a large bowl, cream the butter and sugar until fluffy.
- Add vanilla, lemon juice, and eggs. Beat well.
- In a separate bowl, mix the flours, oats, baking soda, salt, and cinnamon.
- Gradually add the dry mixture to the wet mixture.
- Stir in the chocolate chips.
- Drop by rounded tablespoons on an ungreased cookie sheet.
- Bake in preheated oven for 10-12 minutes.
- Cool on wire racks.
Nutrition
Love this recipe?
Make sure to share and save it on your favorite platform below!
These cookies are so delicious.
If you’re on the lookout for a better chocolate chip cookie recipe, you must give this one a try!
What are your favorite cookies? I’d love to hear!
Get your FREE Homemade Christmas Gifts Guide!
If you’re looking for ways to simplify gift giving this year, we have just the solution for you! Download our brand new FREE Homemade Christmas Gifts Guide! When you sign up, you’ll get:
- 15+ DIY recipes for unforgettable gift ideas (we’ve included something for everyone on your list!)
- Step-by-step instructions for ridiculously easy homemade gifts that anyone can make!
- Customizable, ready-to-print gift tags to go with each homemade gift!
This FREE guide was designed to help you have a more peaceful, intentional holiday season. Our hope is that it reduces stress, helps you save more money and spend less on your gift budget, and simplifies things so you can focus on what matters most this season!
Click here to get your FREE Homemade Christmas Gifts Guide!
Brigette’s $133 Grocery Shopping Post and Weekly Menu Plan for 6
Brigette’s $133 Grocery Shopping Post and Weekly Menu Plan for 6
My older sister, Brigette, shares her shopping trips and menu plans every week! You can go HERE to see all of her weekly menu plans and you can go HERE to read all about her family!
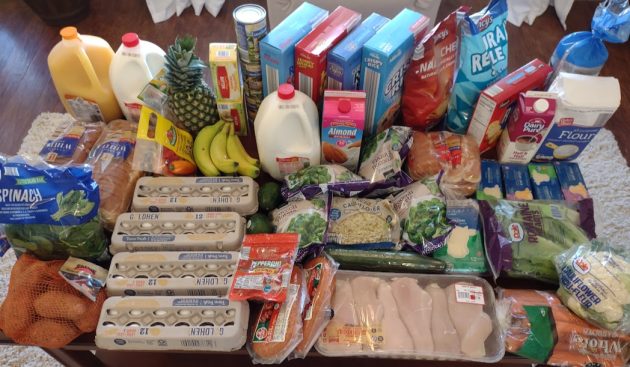
Aldi
1 3-lb bag Sweet Potatoes – $2.29
1 Pineapple – $1.69
1 large carton Organic Spring Mix – $4.89
1 head Cauliflower – $2.59
1 bunch Bananas $0.28/lb) – $0.54
1 bag frozen Riced Cauliflower – $1.99
4 pkgs frozen Broccoli Florets – $4.36
1 3-lb bag Carrots – $1.39
3 cans Green Beans – $1.89
1 bag Mini Sweet Peppers – $3.19
1 Seedless Cucumber – $0.95
1 bag Romaine Hearts – $2.69
2 Avocados – $0.98
1 bag Spinach – $1.49
1/2 gallon Unsweetened Almond Milk – $2.19
1 32-oz carton Half and Half – $2.29
2 gallons Whole Milk – $5.02
1 gallon Orange Juice – $5.99
1 pkg boneless Chicken Breasts ($2.29/lb) – $11.06
2 pkgs Kielbasa – $5.78
1 pkg Pepperoni – $2.49
1 32-oz carton Greek Yogurt – $3.25
2 1-lb boxes Butter Quarters – $3.98
4 8-oz blocks Cheese – $7.96
1 8-oz pkg Sliced Cheese – $1.75
4 dozen Eggs – $7.54
1 box Honey Wheat Puffs – $1.95
1 box Rice Squares – $2.39
1 box Crispy Rice – $1.69
2 boxes Crunchy Raisin Bran Granola – $5.28
1 5-lb bag Flour – $1.95
1 bag Rice Cakes – $2.09
1 box Golden Rounds Crackers – $2.15
2 loaves Sandwich Bread – $1.00
1 pkg Hot Dog Buns, reduced – $0.50
1 bag Nacho Tortilla Chips – $2.39
1 bag Tortilla Chips – $1.95
Total: $112.18
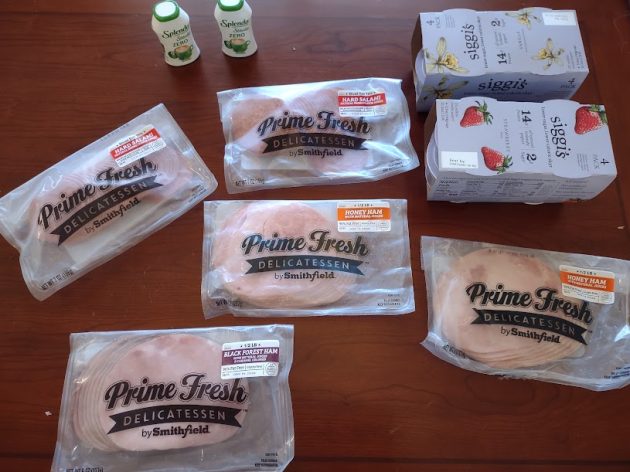
Publix
2 Splenda Liquid Sweeteners (B1G1) – $4.69, used (2) $3/1 printables – $1.31 Money Maker after Coupons
5 pkgs Smithfield Deli Meat (B1G1) – $14.98, used $5/$25 Smithfield Publix digital coupon – $9.98 after coupon (this coupon comes off because it is $25 before B1G1)
2 4-ct pkgs Siggi’s Yogurts – $5.79, used $1/2 printable – $4.79 after coupon
~ Used $2/$10 Publix Digital Perk
Total: $11.46

Sawyer’s Produce
24 8-oz cartons Strawberries – $10
Total: $10
Grocery Total for the Week: $133.64
Weekly Menu Plan
Breakfasts
Cereal, Yogurt, Fruit, Toast, Scrambled/Boiled/Fried Eggs, Oatmeal
Lunches
Deli Meat Sandwiches, Carrots, Strawberries x 2
Cheese and Crackers, Cucumbers/Peppers, Strawberries x 2
Leftovers x 3
Dinners
Grilled Hobo Packets, Tossed Salad
Meatloaf, Roasted Cauliflower, Baked Sweet Potatoes
Chicken Gravy over Rice, Biscuits, Green Beans
Spaghetti, Breadsticks, Green Beans
Chicken Pot Pie, Broccoli, Tossed Salad
Build-Your-Own-Taco-Salad (Seasoned Ground Venison, Shredded Lettuce, Shredded Cheese, Salsa, Avocados, Chips, Chopped Onions, Rice)
Venison Roast in the Crockpot, Baked Potatoes, Mixed Veggies
Psst! Want to cut your grocery budget? Go here and sign up (it’s free!) I’ll send you my 10 Easy Ways to Cut Your Grocery Bill By $50.
Did you do any grocery shopping this week? I’d love to hear what great deals you scored!

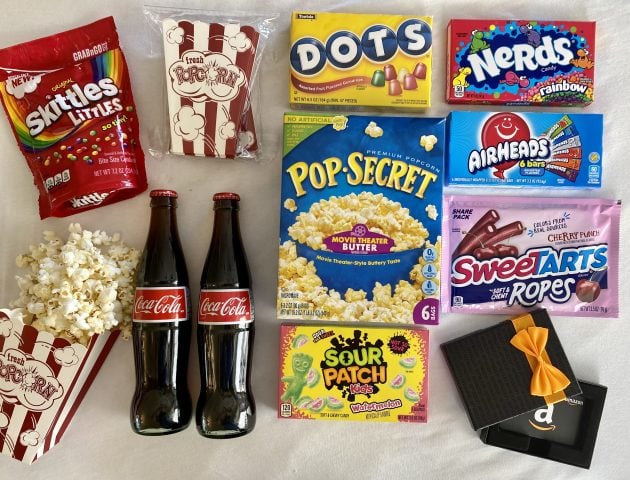
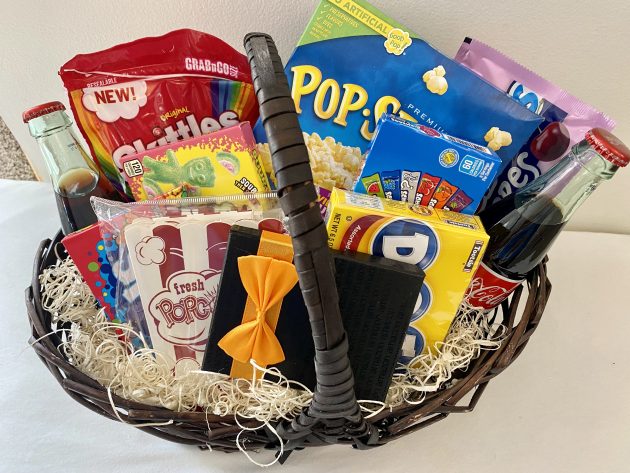
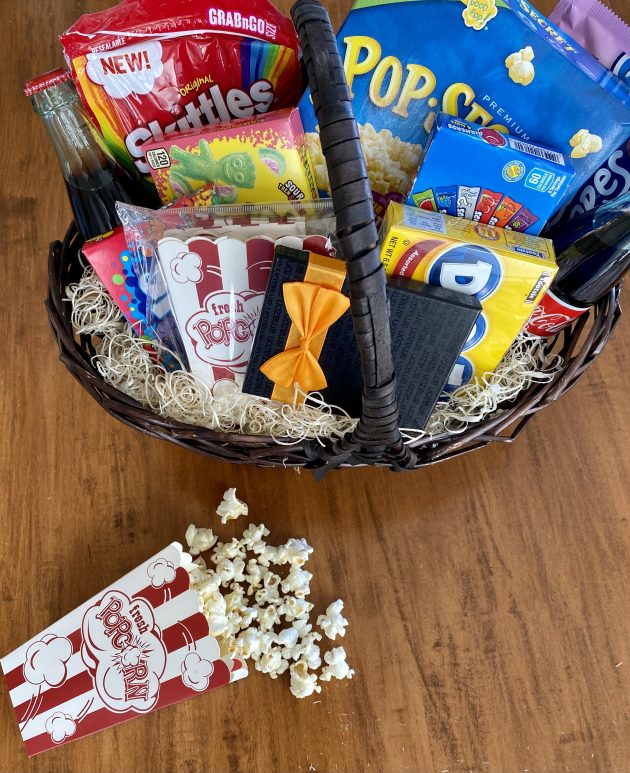
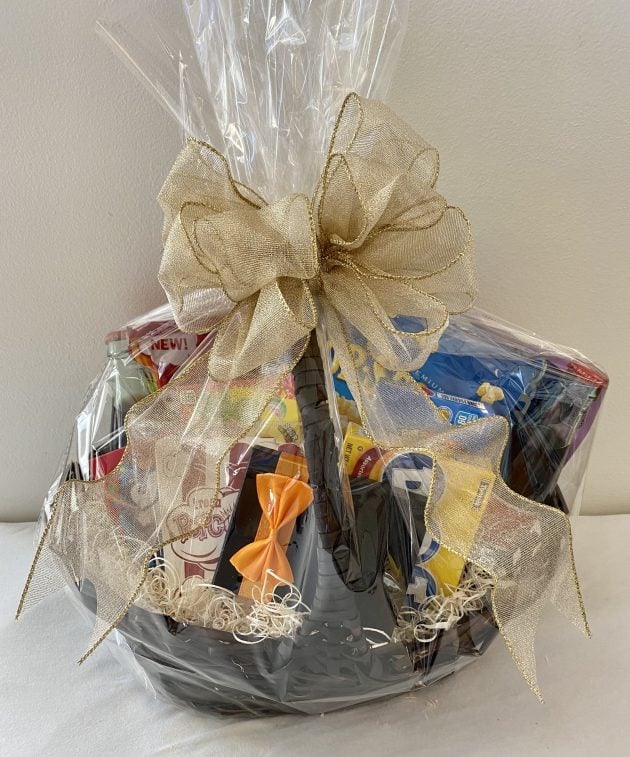
Homemade Movie Night Gift Basket Ideas + Free Printable Gift Tags!
Homemade Movie Night Gift Basket Ideas + Free Printable Gift Tags!
A family movie night basket might just be the perfect clutter-free, frugal, and fun gift for a bunch of people on your list this year! And be sure to grab some FREE printable gift tags to go with it to match!

During the months of November and December, we’ll be highlighting some of our favorite homemade gifts! Download our FREE Homemade Gifts Guide to get recipes to 15+ easy-to-make gifts, plus printable gift tags to go with each gift!
A few years ago, my sister-in-law gave our family a unique and fun gift that’s one of those you remember for a long time.
What was it?
It was the perfect gift because we could all use and enjoy it. It was also consumable (so it didn’t add toy clutter) and it was something we could do together as a family.
Family Movie Night Gift Basket Ideas — An Easy Last Minute Gift!
A Movie Night Gift Basket it’s a great gift for families, couples, or even individuals on your list who are hard to buy for, or who seem like they already “have everything”.
This is a very versatile gift idea as you can tailor it to the ages, preferences, and dietary restrictions of the recipient. And of course, you can tailor it to your budget — making it as big as you want, or scaling back if finances are a bit tight.
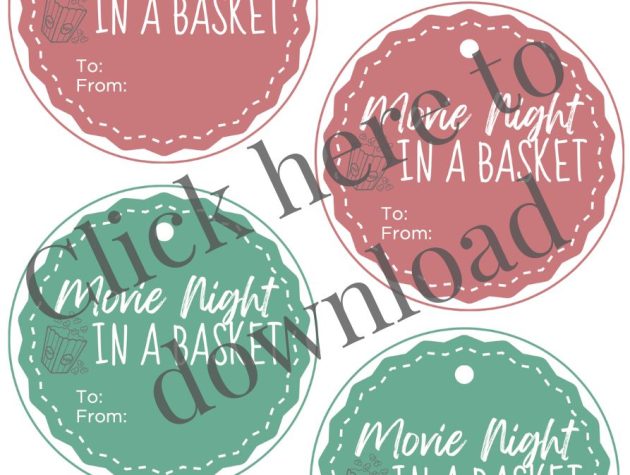
Movie Night Basket Printable Gift Tag
Want to add on Christmas gift tags to gift this to someone this holiday season? Go HERE to download printable gift tags designed for this gift basket!
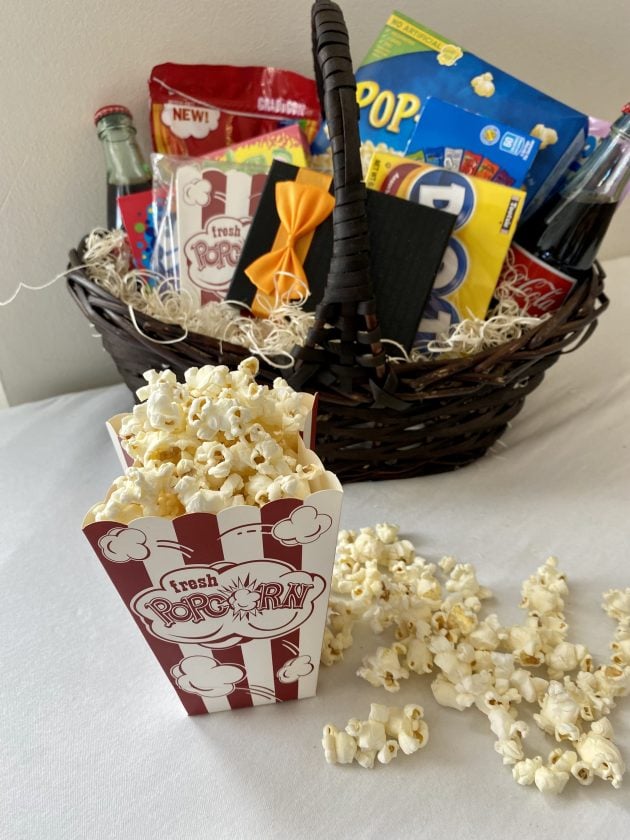
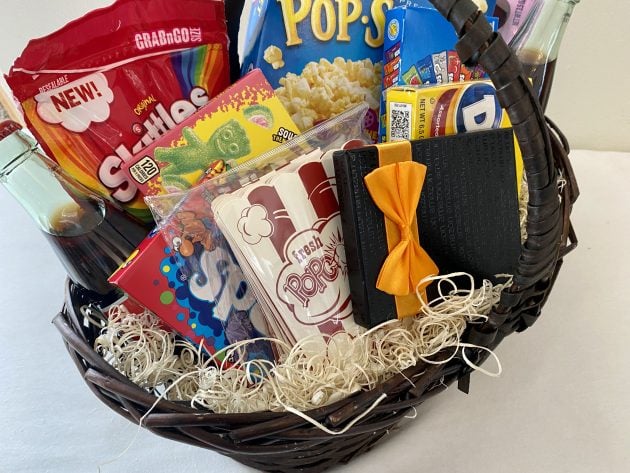
What to put in a Family Movie Night Gift Basket
- Movies: Purchase a DVD you think they would enjoy, give an Amazon gift card to stream a favorite movie, or include Redbox movie codes. You might also include a list of movie recommendations!
- Drinks: Provide one drink for each person — soda pop, sports drinks, hot cocoa, Izze’s, or sparkling waters are some ideas.
- Popcorn: Microwave popcorn packets, a bag of caramel corn, or other fun homemade popcorn mixes.
- Popcorn Boxes: To make it feel even more like a movie theater, we like using popcorn boxes!
- Snacks: Movie theater candy boxes, trail mix, chips, pretzels, gum, mints, etc.
- Gift Cards (optional): As an extra bonus, you might include gift cards for a local pizza delivery place or to buy ice cream for sundaes or root beer floats.
- Fun Extras (optional): If you’re creative you could include fake movie theater ticket stubs and a fun gift tag. You could also get as fancy as you want — including items like cozy socks, plush throw blankets, a scented candle, etc.
How to Make a Movie Night Gift Basket
1. Choose your container.
If you plan to make several gift baskets, start scouring local thrift stores for medium and large baskets with fun handles that could hold your gift items and also be useful for the recipient after the goodies are gone.
You could also use a simple cardboard box and cover it with fun gift wrap or brown craft paper. Diaper boxes work really well for a large gift basket as they have built-in handles, and the biggest Oxiclean boxes also have handles and could work well for a medium-sized movie “basket”.
2. Gather your supplies.
It’s nice to have a variety of snacks — sweet, salty, savory, sour, etc. and drinks for each person in the family. Use your best judgment, but try to include items you know the family enjoys (especially the kids) as this adds an extra-personal touch to the gift. And if you know the family is trying to stay away from too much sugar or has food sensitivities, there are still plenty of fun “treat” options if you do a little hunting!
3. Arrange items nicely in the box or basket.
Use crumpled newspaper, tissue paper, or any other “filling” medium to elevate some items and create an eye-catching presentation — putting bigger/taller items in the back and smaller/shorter items in the front.
4. Showcase the movie.
You can’t have a “Family Movie Night Gift Basket” without a movie! If you’re including an actual DVD, put it right up front so it’s the first thing they notice. Otherwise, put your Amazon/Redbox gift card front and center.
A $5 gift card is often plenty to rent one or two movies on Amazon… so this doesn’t need to cost a lot!
5. Add any extras.
This is totally optional, but you can definitely take your basket to the next level with additional dinner gift cards, comfy socks for the whole family, or even a really nice throw blanket to snuggle up in.
You could also stay low-budget and include handmade ticket stubs, a list of your family’s favorite movies, and a handmade gift tag — just little extra-personal touches.
6. Wrap it up!
To make sure nothing falls out (and to add a lot of charm to this gift) we love the idea of wrapping it in clear cellophane with a giant bow on top.
Of course, there are many other ways to wrap up this gift as well. You could even put the entire gift basket inside another large box and wrap the box to keep the gift a surprise.

Movie Night Basket
Materials
- Movies DVD, Amazon gift card, Redbox codes, etc.
- Drinks soda pop, sports drinks, hot cocoa, Izze’s, or sparkling waters
- Popcorn
- Popcorn Boxes
- Snacks movie theater candy boxes, trail mix, chips, pretzels, gum, mints, etc.
- Gift Cards optional — local pizza delivery
- Fun Extras optional — movie theater ticket stubs, cozy socks, plush throw blankets, a scented candle, etc.
Instructions
- Choose your container.
- Gather your supplies.
- Arrange items nicely in the box or basket.
- Showcase the movie.
- Add any extras.
- Wrap it up!
Love this craft?
Make sure to share and save it on your favorite platform below!
What else would you add to a Movie Night Gift Basket?
Looking for more ideas for frugal family fun? Check out these Kid Date Ideas, Creative Ideas for Family Fun at Home, The Ultimate Checklist for Family Movie Night, and Inexpensive Ways to Have Fun at Home!
Get your FREE Homemade Christmas Gifts Guide!
If you’re looking for ways to simplify gift giving this year, we have just the solution for you! Download our brand new FREE Homemade Christmas Gifts Guide! When you sign up, you’ll get:
- 15+ DIY recipes for unforgettable gift ideas (we’ve included something for everyone on your list!)
- Step-by-step instructions for ridiculously easy homemade gifts that anyone can make!
- Customizable, ready-to-print gift tags to go with each homemade gift!
This FREE guide was designed to help you have a more peaceful, intentional holiday season. Our hope is that it reduces stress, helps you save more money and spend less on your gift budget, and simplifies things so you can focus on what matters most this season!
Click here to get your FREE Homemade Christmas Gifts Guide!
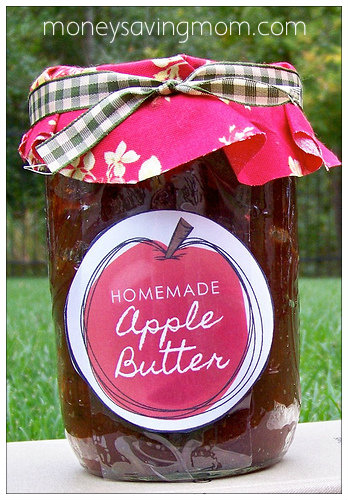
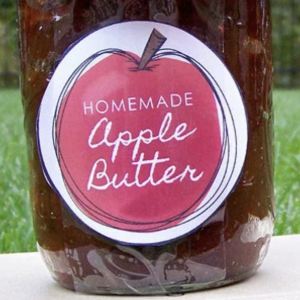
Apple Butter Recipe + Free Printable Gift Tags!
This homemade apple butter is so easy to make in your slow cooker! Make a huge batch, divide them into jars, and gift them this holiday with our free printable gift tags from the Homemade Christmas Gift Guide!
During the months of November and December, we’ll be highlighting some of our favorite homemade gifts! Download our FREE Homemade Gifts Guide to get recipes to 15+ easy-to-make gifts, plus printable gift tags to go with each gift!
Crockpot Apple Butter (Better than store-bought!)
Years ago, I decided to try making homemade apple butter as an experimental do-it-yourself project.
I’m not typically that much of an apple butter fan, but I’m glad I didn’t let that deter me because, let me tell you, this homemade apple butter is fantastic — much, much better than any storebought stuff I’ve ever tried!
And if you use clearance bags of apples on markdown, this can be a very inexpensive recipe!

What is Apple Butter?
Apple butter is a spreadable preserve made by slowly cooking apples and spices over low heat in order to concentrate the flavors. The cooked apples are pureed or blended to create apple butter’s signature smooth texture.
There’s not actually any butter in apple butter!

You’ll love this Crockpot Apple Butter Recipe
It’s such a delicious and versatile treat any time of year, but especially in the fall/winter when apples are ripe.
Plus, it’s SO easy to make in a slow cooker!
And other than the peeling and chopping process, which did take me a little while (though it was relaxing–especially since I listened to an audiobook at the same time!), the whole process was so simple.
Once the apples were peeled and sliced, the crockpot did the rest of the work!
This Apple Butter is a GREAT gift idea!
This apple butter is a yummy, unique gift idea to give during the holidays. And it’s SO easy to whip up a huge batch and divide into several jars for multiple gifts!
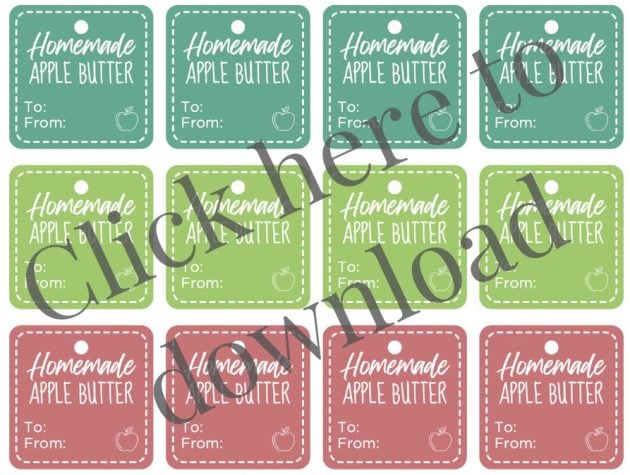
Download your free printable labels and gift tags!
Want to add on Christmas gift tags to gift this to someone this holiday season? Go HERE to download printable gift tags designed for this Apple Butter!
You can also click here to download and print labels to stick on the jars. (Note: We recommend using this sticker paper!)

Crock Pot Apple Butter Ingredients
- 6 pounds of apples
- 2 Tablespoons vanilla extract
- 1 1/2 cups raw or brown sugar
- 1 teaspoon ground cloves
- 3-4 teaspoons cinnamon
What are the best apples for Apple Butter?
I used Jonathans, but any variety should work.
It’s often nice to have a variety of apples so you get a mixture of flavors. Also, if you get them from the orchard, ask for “seconds” as they are usually about half the price and it doesn’t matter if they have a few bruises as you’ll be cooking them down.

How to make Slow Cooker Apple Butter
1. Peel, core, and slice apples in fourths.
2. Put them in a large crockpot with vanilla and cook on low for 6-8 hours. Stir every few hours.
3. Once apples are very, very tender, mash with a potato masher and stir in sugar and spices.
4. Cook on low for another 5-6 hours, stirring occasionally.
5. Cool and pour into jars or airtight containers and refrigerate.
Tips for Making Slow Cooker Apple Butter
Make sure you have a large enough slow cooker so the mixture doesn’t boil out (it’s a really sticky mess!) and give it enough time to properly thicken up.
How to Thicken Apple Butter
Apple butter tends to be naturally thick… but if you’d like it to be thicker, simply let it cook without the lid for another 1-2 hours on low (stirring occasionally) or until it reaches your desired thickness.

What to Do With Apple Butter
There are SO many possibilities for how to use apple butter:
- Apple Butter tastes amazing on toast, bagels, and English muffins.
- Or stir it into your oatmeal.
- It’s also a great topping for pancakes and waffles (instead of syrup.)
- It tastes delicious slathered on chicken and pork.
And you can use Apple Butter in place of applesauce in many baking recipes (like these Apple Butter Muffins!)

Storing Crock Pot Apple Butter
You can store apple butter in sealed containers in the refrigerator for up to a month.
You can also freeze jars of apple butter for a year.
Or, you can process the jars in a hot water bath with proper canning lids and rings and store at room temperature almost indefinitely.
How long does Apple Butter last?
Depending on which storage method you choose above, you could store it almost indefinitely! But easily at least for a month or year!
Crockpot Apple Butter Recipe
Ingredients
- 6 pounds apples
- 2 Tablespoons vanilla extract
- 1 1/2 cups raw or brown sugar
- 1 teaspoon ground cloves
- 3-4 teaspoons cinnamon
Instructions
- Peel, core, and slice apples in fourths.
- Put them in a large crockpot with vanilla and cook on low for 6-8 hours. Stir every few hours.
- Once apples are very, very tender, mash with a potato masher and stir in sugar and spices.
- Cook on low for another 5-6 hours, stirring occasionally.
- Cool and pour into jars or airtight containers and refrigerate.
Notes
Love this recipe?
Make sure to share and save it on your favorite platform below!
Get your FREE Homemade Christmas Gifts Guide!
If you’re looking for ways to simplify gift giving this year, we have just the solution for you! Download our brand new FREE Homemade Christmas Gifts Guide! When you sign up, you’ll get:
- 15+ DIY recipes for unforgettable gift ideas (we’ve included something for everyone on your list!)
- Step-by-step instructions for ridiculously easy homemade gifts that anyone can make!
- Customizable, ready-to-print gift tags to go with each homemade gift!
This FREE guide was designed to help you have a more peaceful, intentional holiday season. Our hope is that it reduces stress, helps you save more money and spend less on your gift budget, and simplifies things so you can focus on what matters most this season!
Click here to get your FREE Homemade Christmas Gifts Guide!
Gretchen’s $13.49 Walgreens Pickup Order (Plus, Received $5.35 in Walgreens Cash!)
Gretchen’s $13.49 Walgreens Pickup Order (Plus, Received $5.35 in Walgreens Cash!)
Looking to save money without actually shopping in-store? With several kids in tow, I can’t usually shop the drugstore deals in-store, but have come to love doing pickup orders. I always place my order online using my Walgreens app and within 10 minutes it is ready for pickup at my closest store. The best part? I don’t even have to get out of my car as they bring it out to me!
Here’s what I bought:
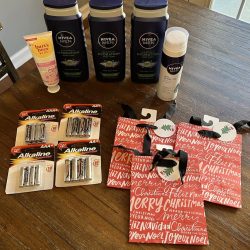
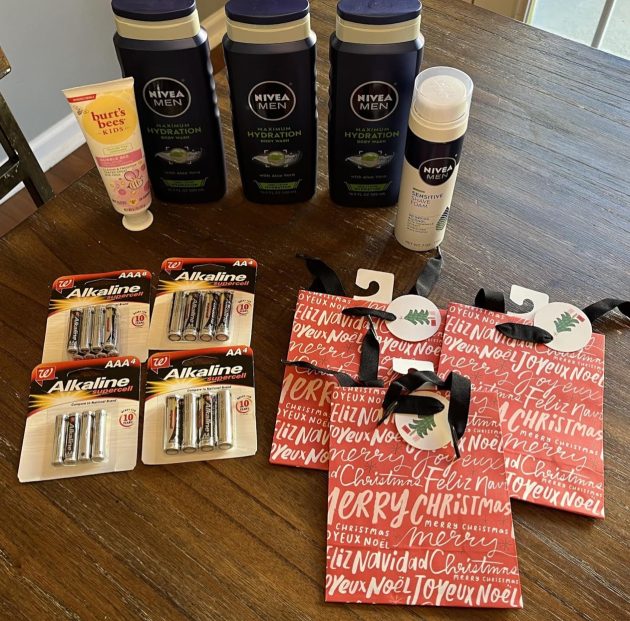
3 Nivea Men’s Bodywash – $5 each
Buy 3, Get $5 in Walgreens cash
Used promo code NIVEA ($5 off $15)1 Burt’s Bees Kid’s Toothpaste – $3.50
Used $2/1 digital coupon5 packs Walgreens Batteries – $1 each (I ordered 5 but they substituted one 8-pack for two of them because they were out.)
3 Hallmark Christmas Gift Bags – 3/$5.98
Used $4/2 digital coupon
And used $2/1 digital coupon1 Nivea Men’s Shaving Foam – $3.49
Used $2.50/1 digital couponUsed $4 in Walgreens Cash
Total before coupons, cash, and code: $32.97
Total after coupons, cash, and code: $13.49, Plus received $5.35 in Walgreens Cash
OVER-SPENDING EVERY SINGLE MONTH?Grab these FREE Budgeting Sheets!
Click here to download!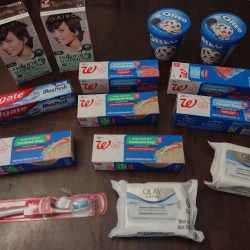
Brigette’s $15.06 Walgreens Shopping Trip ($6 Money Maker after Rebates!)
Brigette’s $15.06 Walgreens Shopping Trip ($6 Money Maker after Rebates!)
Love drug store shopping each week? Don’t miss these GREAT deals Brigette grabbed this week at Walgreens!
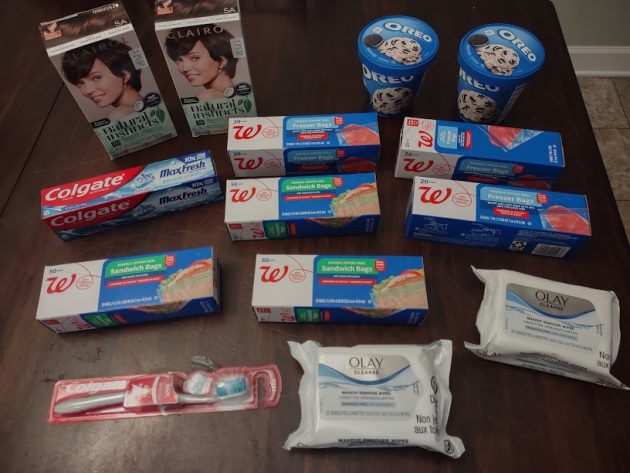
Walgreens
All of my coupons are from the Walgreens app. I highly recommend downloading it if you haven’t already. You can clip both Manufacturer’s and Store coupons and stack them together on the same item.
What I Bought:
2 Clairol Hair Color, marked down – $9.58
Receive $4 Walgreens Cash when you buy 2
Used $6/2 Clairol Walgreens digital manufacturer’s coupon
= $3.58 for 2 total out of pocket ($0.42 money maker for 2 after $4 Walgreens Cash!)
2 pkgs Olay Make Up Wipes Remover (B1G1 40%) – $10.48
Used $5/2 Olay Walgreens digital manufacturer’s coupon
= $5.48 for 2 total out of pocket
1 Colgate Toothbrush and 1 Colgate Toothpaste – $9
Receive $3 Register Rewards when you buy 2
Used $2.50/1 Colgate Toothpaste Walgreens digital manufacturer’s coupon
Used $2.50/1 Colgate Toothbrush Walgreens digital manufacturer’s coupon
= $4 for 2 total out of pocket ($1 for 2 after Register Rewards!)
6 boxes Nice! Bags (B1G2) – $5.58
= $5.58 for 6 out of pocket
2 Oreo Ice Cream – $6
Receive (2) $2/1 Ibotta Oreo rebates
= $6 for 2 out of pocket ($2 for 2 after rebates!)
Totals:
Total: $24.64 plus tax
Used $10/$40 Any Purchase Walgreens digital booster coupon
Paid with $12 Register Rewards from previous weeks
Total Paid Out Of Pocket: $15.06, plus I received $3 Register Rewards, $14.34 Walgreens Cash, and $4 Ibotta Rebates!
Psst! Want to cut your grocery budget? Go here and sign up (it’s free!) I’ll send you my 10 Easy Ways to Cut Your Grocery Bill By $50.

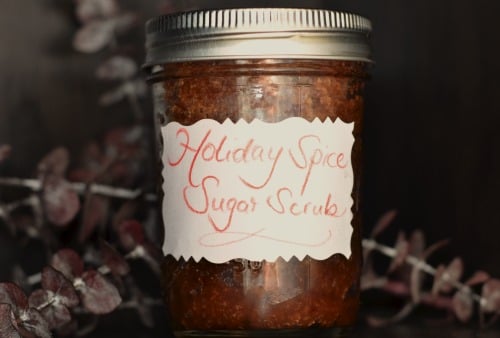
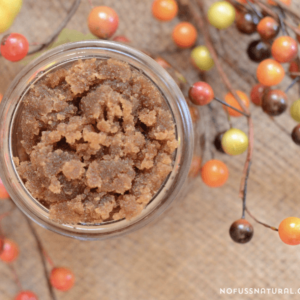
Holiday Spice Sugar Scrub + Free Printable Gift Tags
This Holiday Spice Sugar Scrub is such a lovely homemade gift idea! (Plus, get FREE printable gift tags to go with this gift when you download our FREE Homemade Christmas Gifts Guide!)
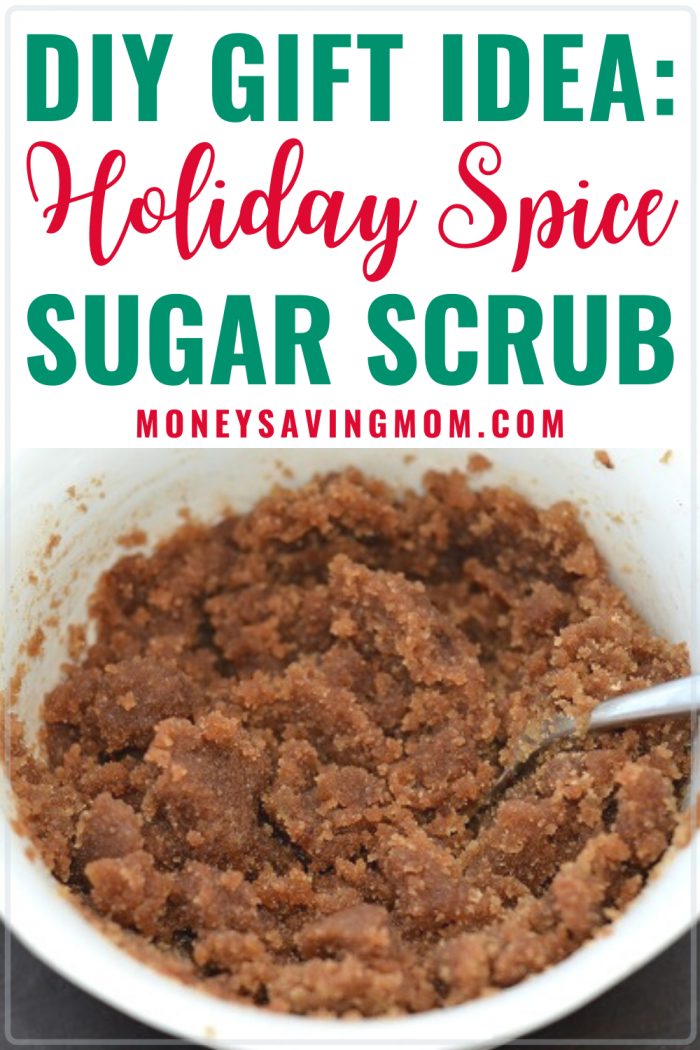
Guest post from Stacy of No Fuss Natural. During the months of November and December, we’ll be highlighting some of our favorite homemade gifts! Download our FREE Homemade Gifts Guide to get recipes to 15+ easy-to-make gifts, plus printable gift tags to go with each gift!
Homemade Sugar Scrub makes a Quick & Easy Gift!
Sugar scrubs are one of my favorite homemade gifts to give because even though they are so simple to make, they still convey thoughtfulness and care.
Plus, sugar scrub recipes are easy to double, triple, or quadruple so you can make gifts for a lot of people in just a few minutes!
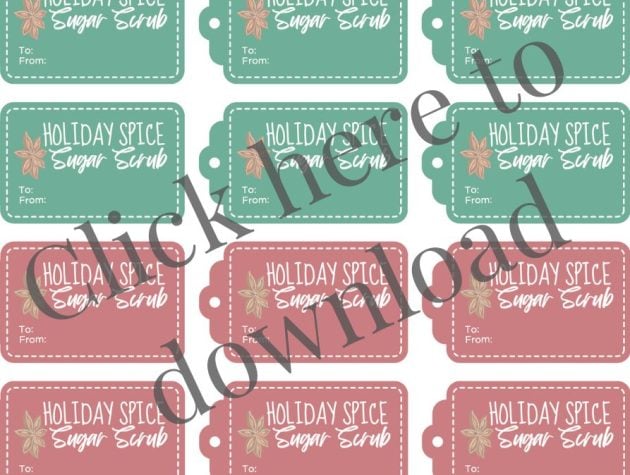
Homemade Body Sugar Scrub Gift Tag Printable
Want to add on Christmas gift tags to gift this to someone this holiday season? Go HERE to download printable gift tags designed for this Holiday Spice Sugar Scrub!
Homemade Sugar Body Scrub Recipe
Making sugar scrub is quick and easy — measure the ingredients, stir to combine, and you are good to go! It will probably take longer to label the jar than it will to make the scrub.
The following recipe creates a sugar scrub that smells just like the holidays. It is a treat for tired hands and feet and would be a wonderful gift on any occasion.
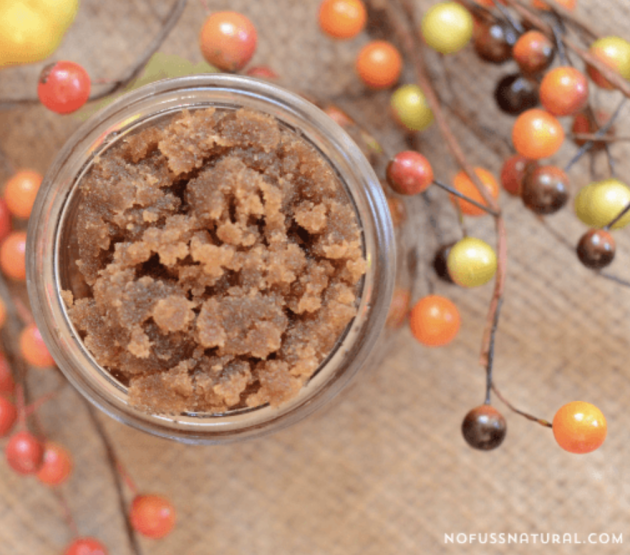
Holiday Homemade Sugar Scrub Recipe Ingredients
- 1 cup brown sugar
- 1 tsp ground cinnamon
- ½ tsp ground allspice
- ¼ tsp ground nutmeg
- 1/3 cup oil (olive, sweet almond, or walnut oil)
- 1/8 tsp ground cardamom (optional)
How to Make Homemade Body Scrub Sugar – Holiday Spice Edition!
- In a large bowl, mix sugar and spices.
- Add oil and stir to combine.
- Scoop into jars or containers.
- Download your FREE gift tags to attach.
- Your gift is complete and ready to give!
Homemade Body Sugar Scrub Recipe Tips
Take the time to mix your ingredients thoroughly.
Feel free to alter the spices to whatever you have in the house, or whatever your favorite holiday scents are!
Also, use your best judgement to create the right consistency — if it feel dry, add a bit more oil; if it feels oily, add a bit more sugar.
And make sure your storage containers have tight-fitting lids so the contents stay fresh as long as possible.
Homemade Sugar Scrub Storage:
How long does homemade sugar scrub last?
Homemade sugar scrub should last up to 2-3 months if stored in a clean, airtight container and kept in a cool, dry place.
Does homemade body scrub need to be refrigerated?
No, it does not need to be refrigerated. As long as you store it in an air-tight jar or container and put the lid on tight after each use, it will stay fresh!
Sugar Scrub Homemade Recipe FAQs
We prefer olive oil, sweet almond oil, or walnut oil. However, you could also use grapeseed oil or coconut oil.
If you want your scrub to be thicker, go with coconut oil as it solidifies at room temperature. However, if you prefer more of a thiner consistency (or you don’t like the smell of coconut) then olive oil would be the better choice.
If you use coconut oil and your home is colder than 75º, your scrub will be much harder as coconut oil doesn’t liquify until 76º.
The simple solution would be to stir it up before each use. You can also use an emulsifying wax to keep the oil from separating.
You don’t need to (we don’t) but if you want it to last longer, or if you plan to store it in a wet place (like the shower) where mold and bacteria can grow, you can add preservatives.
Don’t use sugar scrubs if you have very sensitive skin as it may irritate it. Also, we don’t recommend using a scrub on sunburned skin or an open wound. This body scrub should not be used on pets or young babies.
Sugar Scrub (Homemade)
Materials
- 1 cup brown sugar
- 1 tsp ground cinnamon
- ½ tsp ground all spice
- ¼ tsp ground nutmeg
- 1/3 cup oil (olive, sweet almond, or walnut oil)
- 1/8 tsp ground cardamom (optional)
Instructions
- In a large bowl, mix sugar and spices.
- Add oil and stir to combine.
- Scoop into jars or containers.
- Label and gift!
Love this craft?
Make sure to share and save it on your favorite platform below!

FREE DOWNLOAD:
Christmas Budget Boost Cheatsheet!
20 Simple Ways to Easily Add $100+ To Your Gift Budget Before Christmas! 🥳
Stacy is a homeschooling mom to three kids and wife to a preacher. She has a slight obsession with all things homemade, and especially enjoys making her own skin care products. Stacy believes home is where hearts are shaped for eternity. She encourages mothers along the journey and shares lots of natural living tips at No Fuss Natural. You can also find more scrub recipes in her eBooks.

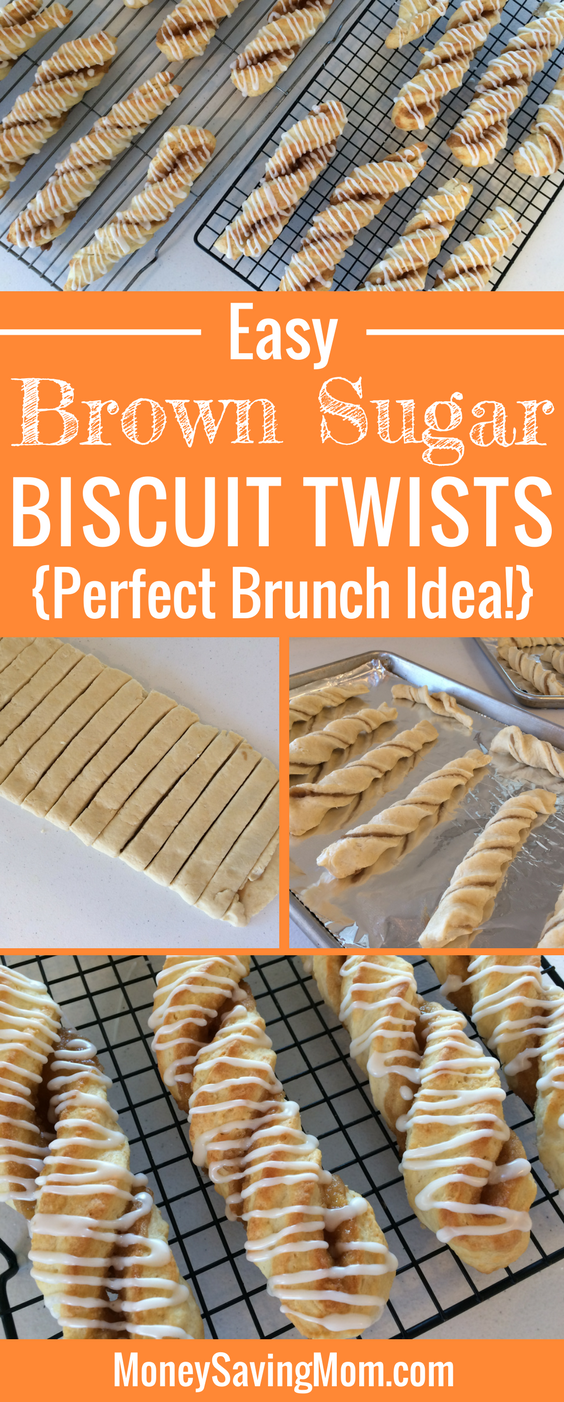
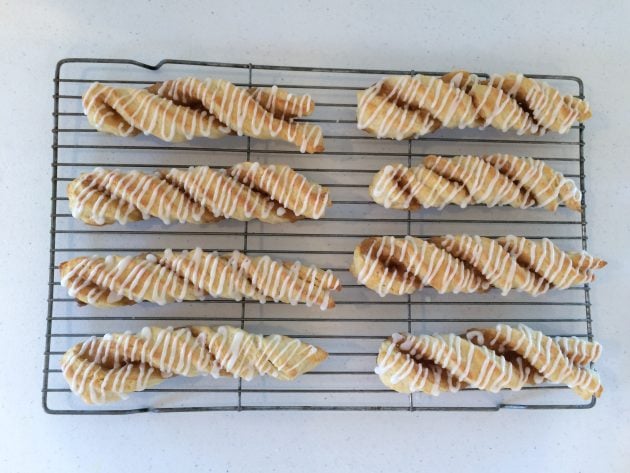
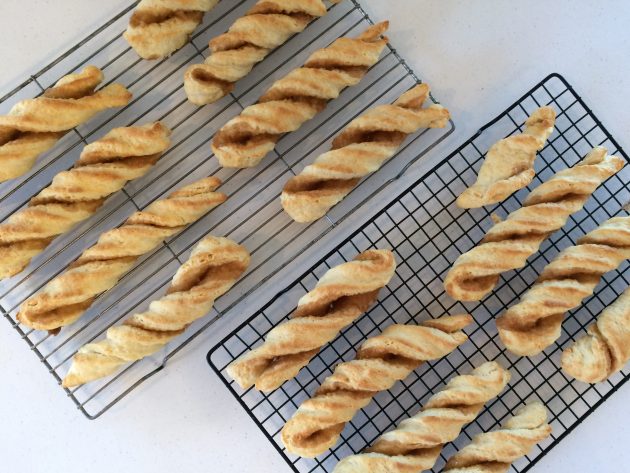
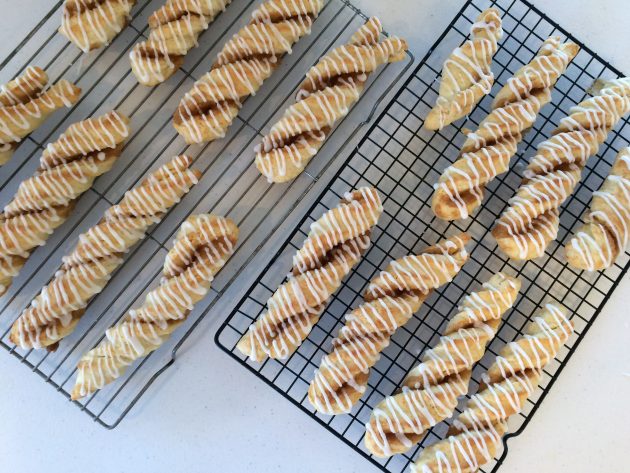
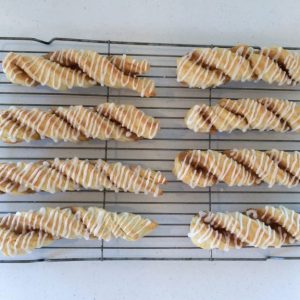
Brown Sugar Biscuit Twists Recipe + Free Printable Gift Tags!
These Brown Sugar Biscuit Twists are one of our family’s all-time favorite recipes! And homemade breads are a great gift idea during the holidays! (Plus, get FREE printable gift tags to go with this gift when you download our FREE Homemade Christmas Gifts Guide!)
During the months of November and December, we’ll be highlighting some of our favorite homemade gifts! Download our FREE Homemade Gifts Guide to get recipes to 15+ easy-to-make gifts, plus printable gift tags to go with each gift!
Brown Sugar Biscuit Recipe (One of our family favorites!)
This recipe is one of our family’s very favorite recipes. I originally adapted it from an old, falling-apart Better Homes and Gardens bread cookbook my mom had when we were growing up.
I’ve made these countless times and they are so easy to do and so yummy!
This is a great holiday gift idea!
Homemade bread is a great holiday gift idea and these sugar twists are so unique and different from probably any other homemade goody people will get this time of year.
Download your free printable gift tags!
Want to add on Christmas gift tags to gift this to someone this holiday season? Go HERE to download printable gift tags designed for these Biscuit Twists!
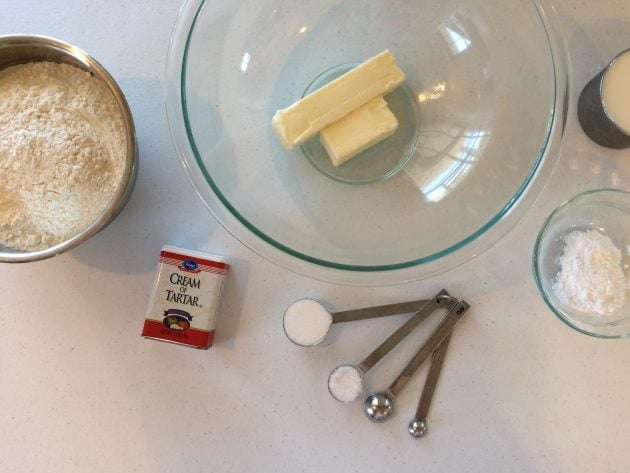
Twister Biscuit Ingredients
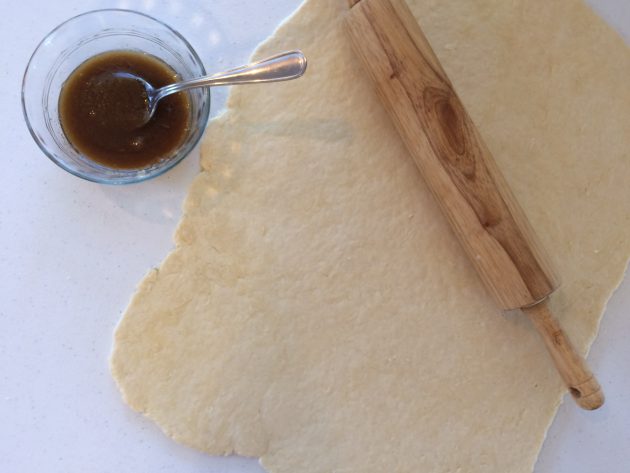
Biscuit dough:
- 3 cups flour
- 4 teaspoons baking powder
- 1 Tablespoon sugar
- 1 teaspoon salt
- 3/4 teaspoon cream of tartar
- 3/4 cup butter
- 1 cup milk
Filling:
- 4 Tablespoons melted butter
- 6 Tablespoons brown sugar
Glaze:
- 1 cup powdered sugar
- 1/2 tsp vanilla extract
- a few teaspoons of milk (enough to make a runny glaze)
How to make Sugar Twists
1. Preheat oven to 450ºF.
2. In a large bowl, stir together dry ingredients for the biscuit dough.
3. Cut in cold butter with a pastry blender until the mixture resembles coarse crumbs.
4. Make a well in the center of the flour mixture and add milk. Stir just until moistened.
5. Turn dough onto a lightly floured surface and knead for 5 minutes.
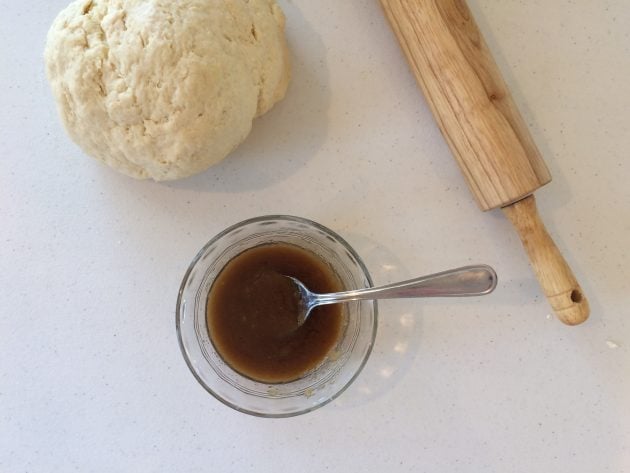
6. Roll dough out into a rectangle (approximately 1/4-inch thick).
7. Stir together 4 Tablespoons melted butter and 6 Tablespoons brown sugar and evenly spread filling over rectangle.
8. Fold rectangle in half and cut into about 1-inch strips.
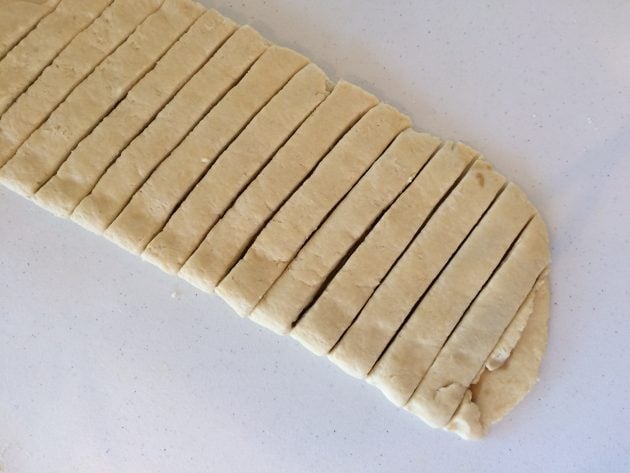
9. Twist strips and place on a greased or lined baking sheet.
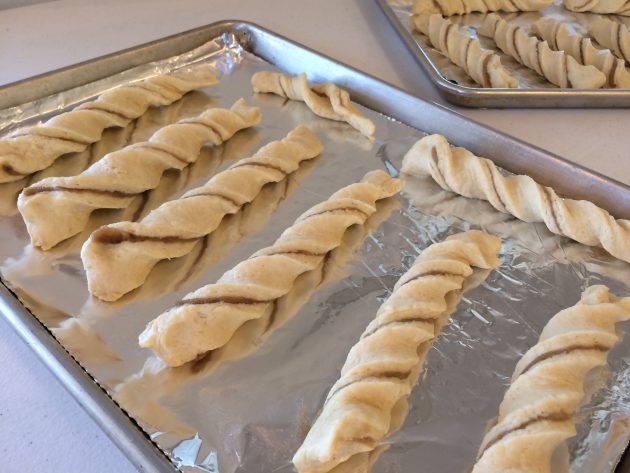
10. Bake in preheated oven for 10-12 minutes.
11. While baking, mix together 1 cup powdered sugar, 1/2 teaspoon vanilla, and a few teaspoons milk (enough to make the mixture of drizzling consistency).
12. Drizzle glaze over biscuit twists as soon as they come out of the oven.

Tools Used for Making Sugar Twists
There are very few tools needed for this delicious recipe — just a bowl, a knife, and your hands. However, there are a few others that will make the process a bit easier.
- Large mixing bowl
- Pastry blender
- Measuring cups and spoons
- Large rolling pin
- Sharpe knife
- Large rimmed baking sheet
- Cooling racks

Fun Ways to Serve this Sugar Biscuit Recipe
We like to serve these fresh out of the oven on Christmas morning (or really any morning!)
They are also great paired with an Egg, Ham, and Cheese casserole and fruit for a simple Christmas brunch.
These could make a fancy-looking dessert or a really fun after-school snack. They might also be a special birthday treat.
Storing Sugar Twists
If, for some reason, you don’t eat them all immediately, you can store them in a tightly sealed food storage container (after they are fully cooled) at room temperature for a few days.
Or, you can freeze them for 3 months.
NOTE: you can freeze them before or after baking.
Twisted Biscuit FAQs
The most likely answer is baking them at too low of a temperature. A higher heat will generate more caramelization from the butter on top of the biscuits, leaving you with a beautifully golden crust — so make sure your oven is at least 450ºF.
Since brown sugar has molasses in it, it naturally adds more moisture to baked goods — making them nice and chewy.
Brown Sugar Twister Biscuit
Ingredients
Biscuit dough:
- 3 cups flour
- 4 tsp baking powder
- 1 tbsp sugar
- 1 tsp salt
- 3/4 tsp cream of tartar
- 3/4 cup butter
- 1 cup milk
Filling:
- 4 tbsp melted butter
- 6 tbsp brown sugar
Glaze:
- 1 cup powdered sugar
- 1/2 tsp vanilla extract
- a few teaspoons of milk enough to make a runny glaze
Instructions
- Preheat oven to 450ºF.
- In a large bowl, stir together dry ingredients for the biscuit dough.
- Cut in cold butter with a pastry blender until the mixture resembles coarse crumbs.
- Make a well in the center of the flour mixture and add milk. Stir just until moistened.
- Turn dough onto a lightly floured surface and knead for 5 minutes.
- Roll dough out into a rectangle (approximately 1/4-inch thick).
- Stir together 4 Tablespoons melted butter and 6 Tablespoons brown sugar and evenly spread filling over rectangle.
- Fold rectangle in half and cut into about 1-inch strips.
- Twist strips and place on a greased or lined baking sheet.
- Bake in preheated oven for 10-12 minutes.
- While baking, mix together 1 cup powdered sugar, 1/2 teaspoon vanilla, and a few teaspoons milk (enough to make the mixture of drizzling consistency).
- Drizzle glaze over biscuit twists as soon as they come out of the oven.
Nutrition
Love this recipe?
Make sure to share and save it on your favorite platform below!
Get your FREE Homemade Christmas Gifts Guide!
If you’re looking for ways to simplify gift giving this year, we have just the solution for you! Download our brand new FREE Homemade Christmas Gifts Guide! When you sign up, you’ll get:
- 15+ DIY recipes for unforgettable gift ideas (we’ve included something for everyone on your list!)
- Step-by-step instructions for ridiculously easy homemade gifts that anyone can make!
- Customizable, ready-to-print gift tags to go with each homemade gift!
This FREE guide was designed to help you have a more peaceful, intentional holiday season. Our hope is that it reduces stress, helps you save more money and spend less on your gift budget, and simplifies things so you can focus on what matters most this season!
Click here to get your FREE Homemade Christmas Gifts Guide!
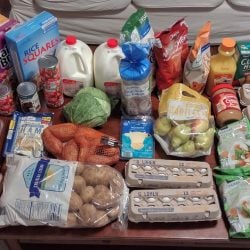
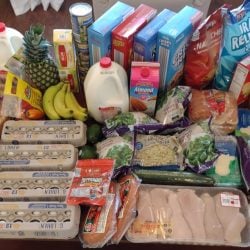
Brigette’s $150.60 Grocery Shopping Trip and Weekly Meal Plan for 6
Brigette’s $150.60 Grocery Shopping Trip and Weekly Meal Plan for 6
My older sister, Brigette, shares her shopping trips and menu plans every week! You can go HERE to see all of her weekly menu plans and you can go HERE to read all about her family!
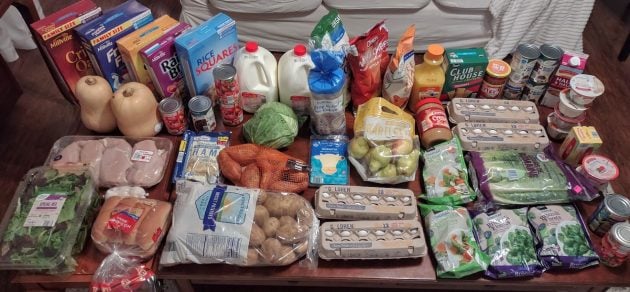
This is more than I usually spend, but I bought extra of a few staples. We were also running low on things after not doing regular shopping the week of Thanksgiving.
Aldi
1/2 gallon Orange Juice – $3.29
1 32-oz carton Half and Half – $2.55
2 gallons Milk – $5.06
2 bags frozen steamable California Medley Vegetables – $2.18
2 bags frozen Broccoli Florets – $2.18
1 large carton Organic Spring Mix – $4.89
1 3-lb bag Sweet Potatoes – $1.99
1 3-head pkg Garlic – $1.49
1 10-lb bag Russet Potatoes – $3.49
1 bag Romaine Hearts – $2.69
2 cans Green Beans – $1.26
4 cans Organic Black Beans – $3.96
4 cans Tomatoes – $3.52
1 jar Salsa – $2.19
1 Cabbage – $1.56
1 3-lb bag Pears – $2.99
2 Butternut Squash $0.69/lb) – $5.04
1 box Cinnamon Crunch Squares – $2.79
1 family-size box Honey Nuts Crisp Oats – $2.95
1 box Rice Squares – $2.55
1 family-size box Frosty Flakes – $3.29
1 box Honey Crunch’n Oat – $2.45
1 box Raisin Bran – $2.19
1 pkg boneless Chicken Breasts ($2.29/lb) – $11.68
1 40-oz jar Peanut Butter – $3.95
1 bag Flour Tortillas – $1.95
1 bag Rice Cakes – $2.49
1 bag Nacho Chips – $2.39
1 bag Sweet Potato Chips – $2.39
1 bag Organic Blue Corn Chips – $2.19
1 box Clubhouse Crackers – $2.55
6 Greek Yogurts – $3.54
1 8-oz pkg Deli Sliced Cheese – $1.69
1 16-oz pkg Deli Meat – $3.99
4 dozen Eggs – $5.26
1 bag Pretzels – $1.78
1 pkg Hotdog Buns – $1.09
1-lb box Butter Quarters – $2.95
Total: $116.46
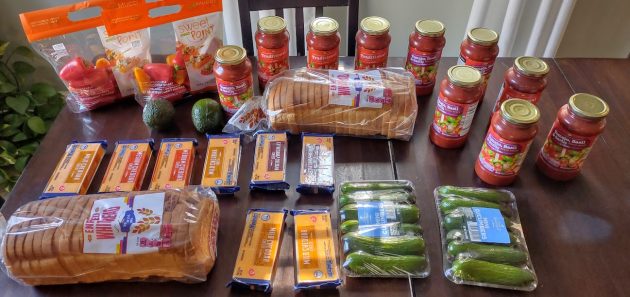
Lidl
2 loaves Sandwich Bread – $1
2 bags Mini Sweet Peppers – $3.98
2 Avocados – $1.18
2 pkgs Mini Cucumbers – $2.98
10 hars Pasta Sauce – $10
9 8-oz blocks Cheese (missing one in this picture because it was already half gone :)) – $15
Total: $34.14
Grocery Total for the Week: $150.60
Weekly Menu Plan
Breakfasts
Cereal, Oatmeal, Fruit, Smoothies, Eggs, Yogurt, Veggie Omelets, Toast
Lunches
Deli Meat/Cheese Sandwiches, Peppers/Cucumbers, Chips, Applesauce
PB and Honey on Rice Cakes, Peppers/Cucumbers, Chips, Apples
Leftovers x 4
Dinners
Hamburger Vegetable Soup (using Venison Sausage), Crackers, Shredded Cheese
Build-Your-Own-Burrito/Taco Salad (Seasoned Ground Venison, Shredded Romaine, Shredded Cheese, Chopped Onions, Chips, Tortillas, Salsa, Avocados, Rice)
Venison Meatloaf, Baked Sweet Potatoes, Mixed Vegetables
Chili, Crackers, Shredded Cheese, Honey Cornbread
Chicken Gravy over Rice, Biscuits, Tossed Salad, Green Beans
Venison Taco Meat over Baked Potatoes, Broccoli, Shredded Cheese
Baked Chicken, Mashed Potatoes, Tossed Salad, Broccoli
Psst! Want to cut your grocery budget? Go here and sign up (it’s free!) I’ll send you my 10 Easy Ways to Cut Your Grocery Bill By $50.
Did you do any grocery shopping this week? I’d love to hear what great deals you scored!
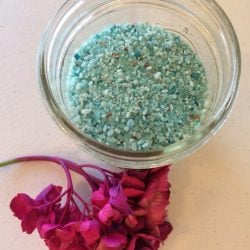
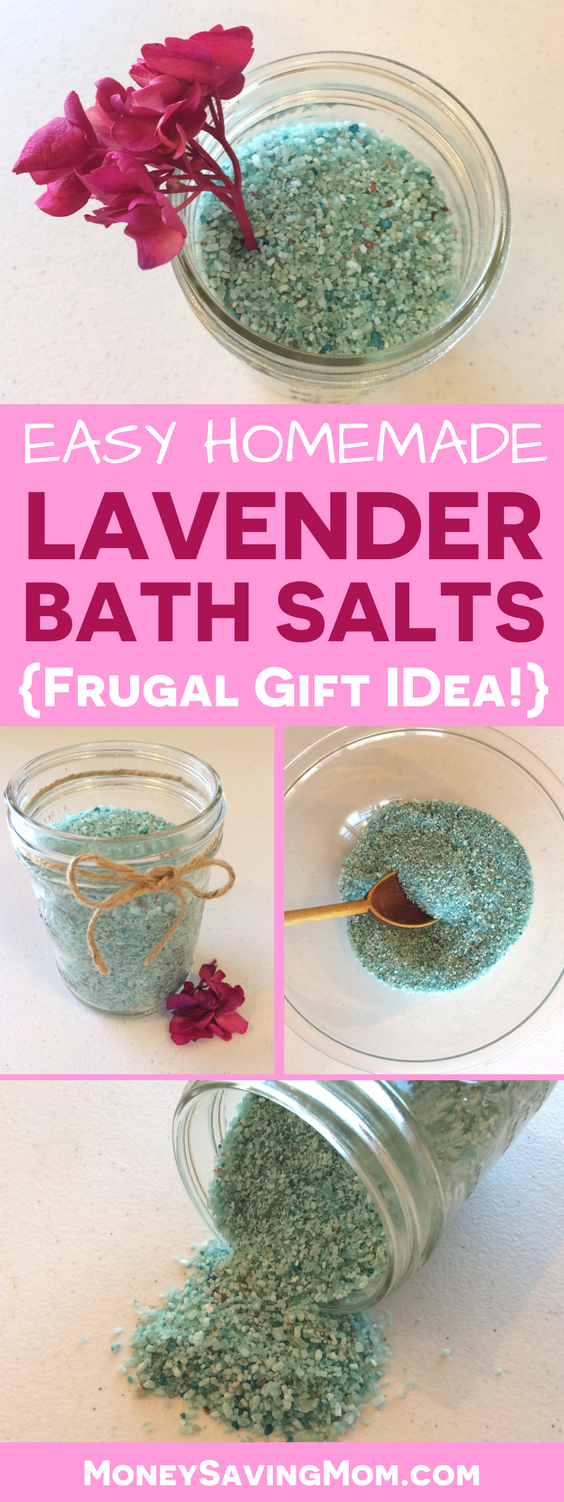
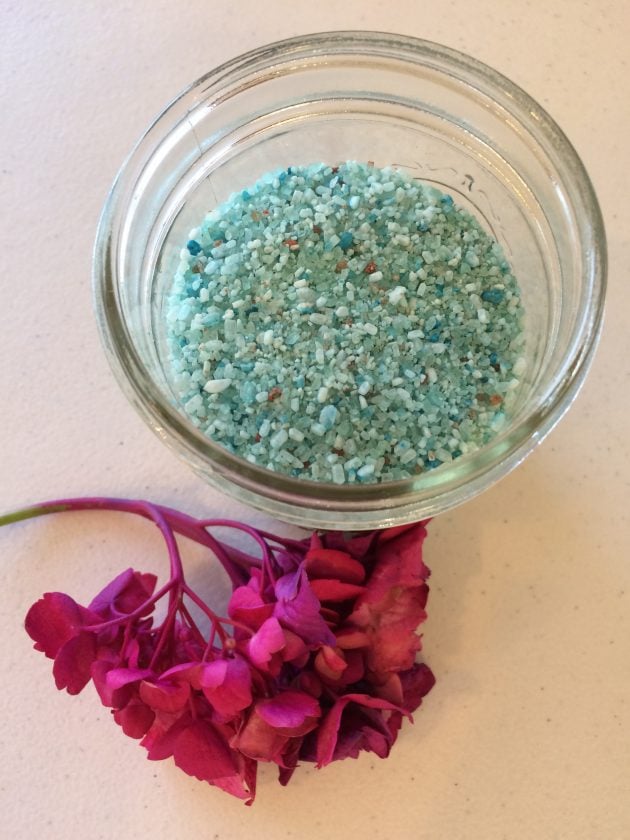
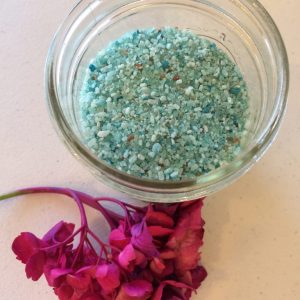
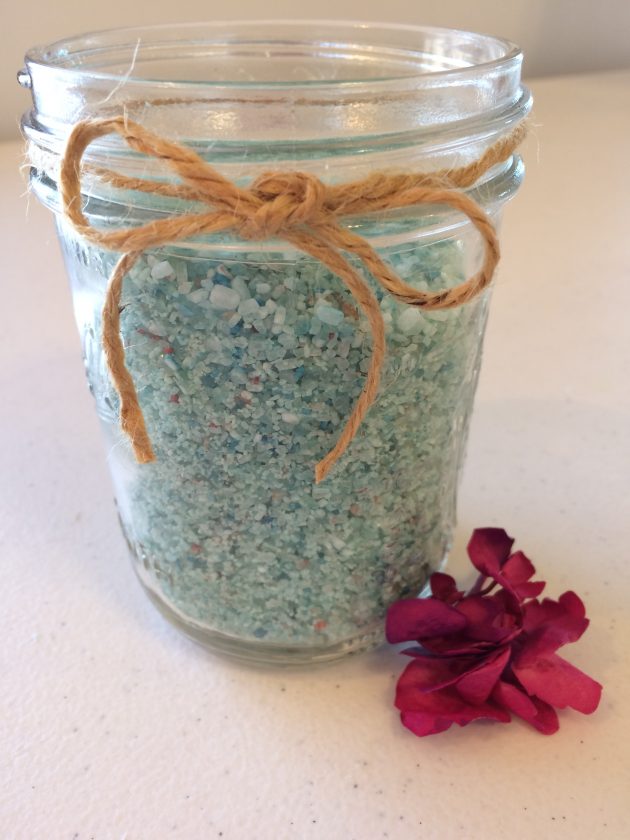
Homemade Lavender Bath Salts + Free Printable Gift Tags!
These Homemade Lavender Bath Salts are a beautiful homemade gift idea! (Plus, get FREE printable gift tags to go with this gift when you download our FREE Homemade Christmas Gifts Guide!)
During the months of November and December, we’ll be highlighting some of our favorite homemade gifts! Download our FREE Homemade Gifts Guide to get recipes to 15+ easy-to-make gifts, plus printable gift tags to go with each gift!
Homemade Bath Salts Recipe: Great Gift Idea!
I made this recipe years ago after having it on a list of do-it-yourself ideas to try. I remember being so pleasantly surprised by how easy it was and wondered why I’d waited so long to try it!
This recipe is SO simple and fun to make, and you could try using different essential oils and food coloring colors to change things up.
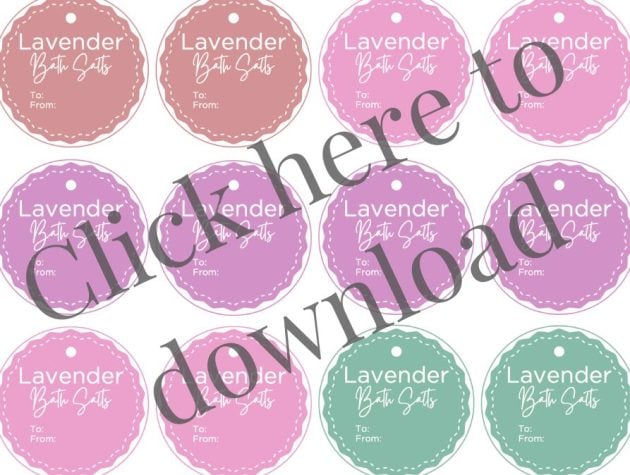
Download your free printable gift tags!
These bath salts make a wonderful frugal gift idea for so many people on your list, too!
Want to add on Christmas gift tags to gift this to someone this holiday season? Go HERE to download printable gift tags designed for these bath salts!
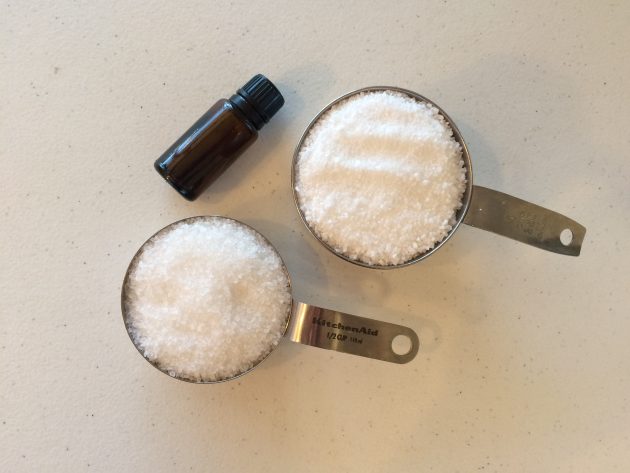
Ingredients for Lavender Bath Salts
- 1 cup Epsom salt
- 1/2 cup sea salt
- 10 to 15 drops of lavender essential oil
- 4-8 drops food coloring, optional
How to Make Homemade Lavender Bath Salts
1. In a mixing bowl, stir together all ingredients until well blended.

2. Transfer to an airtight container and let rest for a few days to allow time for the oil to infuse the salts.
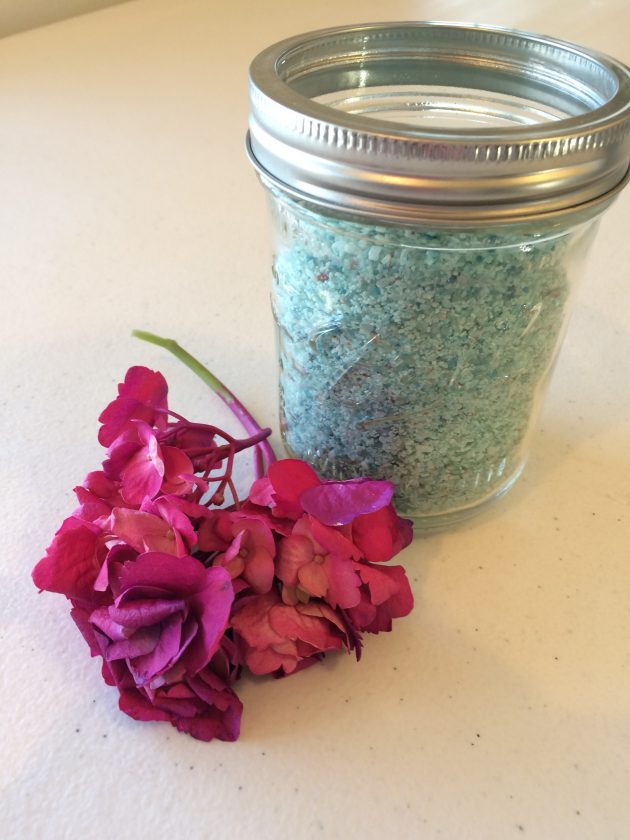
3. Use in your own bath or give as a gift.
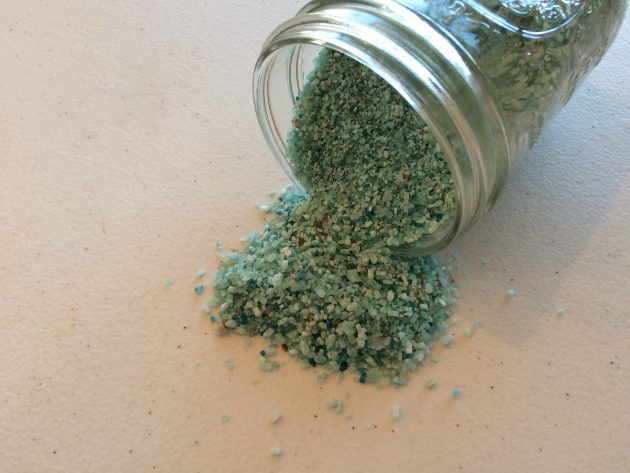
To Use: Add 4 to 6 Tablespoons of Lavender Bath Salt to warm running bath water. Enjoy a refreshing and relaxing bath soak!
Lavender Bath Salts
Materials
- 1 cup Epsom salt
- 1/2 cup sea salt
- 10 to 15 drops of lavender essential oil
- 4-8 drops food coloring optional
Instructions
- In a mixing bowl, stir together all ingredients until well blended.
- Transfer to an airtight container and let rest for a few days to allow time for the oil to infuse the salts.
- To Use: Add 4 to 6 Tablespoons of Lavender Bath Salt to warm running bath water. Enjoy a refreshing and relaxing bath soak!
Love this craft?
Make sure to share and save it on your favorite platform below!
Get your FREE Homemade Christmas Gifts Guide!
If you’re looking for ways to simplify gift giving this year, we have just the solution for you! Download our brand new FREE Homemade Christmas Gifts Guide! When you sign up, you’ll get:
- 15+ DIY recipes for unforgettable gift ideas (we’ve included something for everyone on your list!)
- Step-by-step instructions for ridiculously easy homemade gifts that anyone can make!
- Customizable, ready-to-print gift tags to go with each homemade gift!
This FREE guide was designed to help you have a more peaceful, intentional holiday season. Our hope is that it reduces stress, helps you save more money and spend less on your gift budget, and simplifies things so you can focus on what matters most this season!