
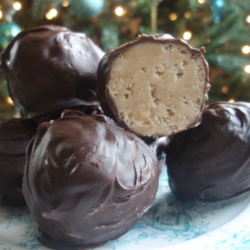
This is a longtime favorite family recipe! These Peanut Butter Bon Bons are such a classic, so easy to make, and are a GREAT gift idea! (Plus, get FREE printable gift tags to go with this gift when you download our FREE Homemade Christmas Gifts Guide!)

Recipe by Brigette from the MoneySavingMom team. During the months of November and December, we’ll be highlighting some of our favorite homemade gifts! Download our FREE Homemade Gifts Guide to get recipes to 15+ easy-to-make gifts, plus printable gift tags to go with each gift!
Chocolate Peanut Butter Truffles — A Perfect Holiday Treat!
This recipe brings back special childhood memories for me. Every December, my family would make and freeze dozens and dozens and dozens of cookies – and we always included these bon bons!
We would spend the week before Christmas making up platters of goodies to give away to all of our neighbors, relatives, friends, co-workers, and anyone else my mom could come up with. We even included the mailman and UPS man! Of all of the delectable treats we would make, these were always one of my very favorites.
I mean, how could you not like peanut butter and chocolate?

Download your free printable gift tags!
Want to add on Christmas gift tags to gift this to someone this holiday season? Go HERE to download printable gift tags designed for these Peanut Butter Bon Bons!
Why you’ll love this Peanut Butter Truffle Recipe
These bon-bons only take a handful of ingredients, make a large batch, and store in the freezer very well. They look fancy and indulgent and taste amazing. Just one word of warning, though: these are extremely addictive!
Ingredients for Peanut Butter Truffles
- 2 cups peanut butter
- ½ cup butter
- 1 teaspoon vanilla
- 3 cups crispy rice cereal
- 4 cups powdered sugar
- 12oz semi-sweet chocolate chips*
- 1 tablespoon vegetable oil
* This amount of chocolate is just enough to cover each ball. If you coat them very thickly, you will need more chocolate than this.
Peanut Butter Bon Bon Recipe Substitutions
If you’re trying to stay away from peanut butter, you can substitute any other nut or sun butter. You can also try chunky peanut butter for a little extra crunch.
Try almond extract for a slightly different flavor.
Feel free to mix up the chocolate too — try dark chocolate, white chocolate, or even milk chocolate with a white chocolate drizzle!

How to make Peanut Butter Truffles
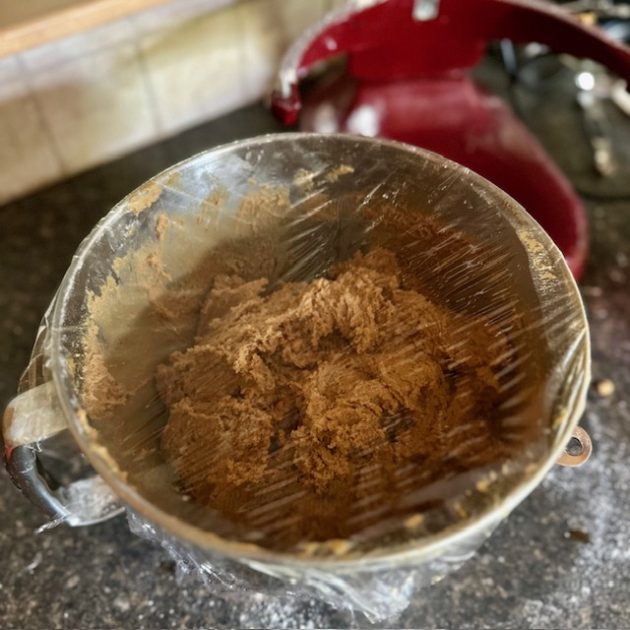
1. Melt peanut butter and butter in a microwave-safe bowl.
2. Stir in vanilla.
3. Add rice cereal and powdered sugar and mix well (it might seem a little dry at first but will start holding together the more you mix. I usually finish up the mixing using my hands).
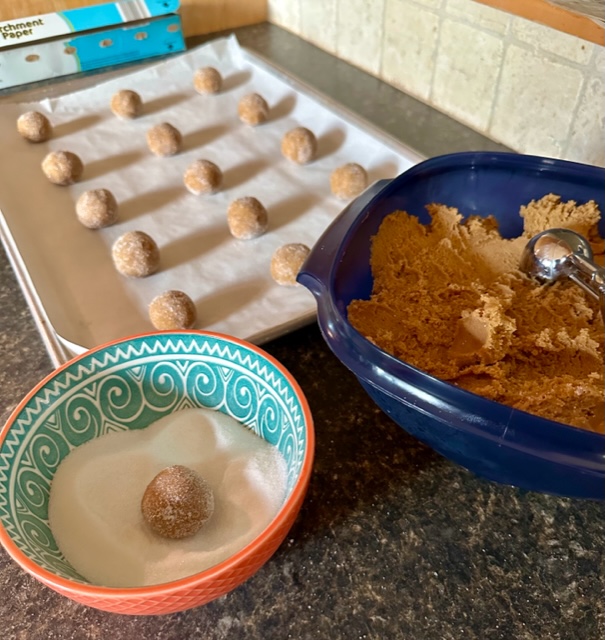
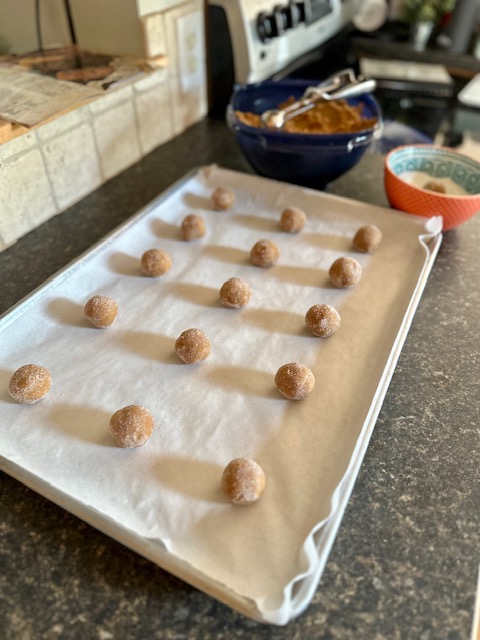
4. Form into 1-inch balls, firmly packed.
5. Place on a cookie sheet and freeze until firm (at least 30 minutes).
6. In a saucepan (or the top of a double broiler), melt the chocolate chips and oil together over very low heat, stirring often.**
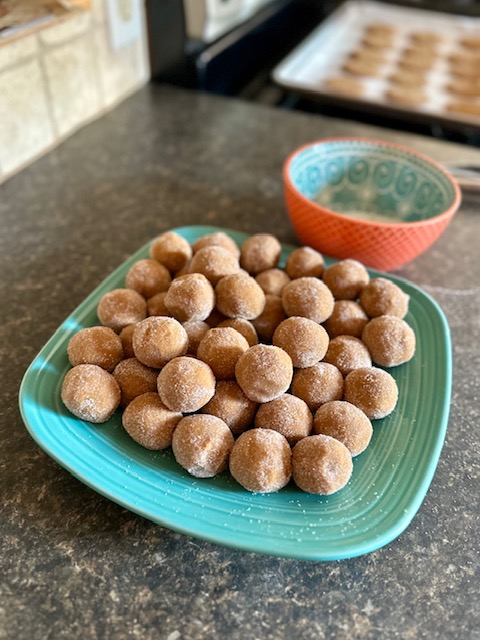
7. Using a toothpick, dip each peanut butter ball in the chocolate and place them on wax-paper lined cookie sheets (I go back later and smooth out the toothpick hole on the top of each bon-bon). Chill until firm.
These can be eaten cold or at room temperature (or even frozen… but I’m weird like that!)
**You want the chocolate to stay in a nice, warm “liquidy” state during all the dipping. I don’t have a double broiler, so I usually take the saucepan on and off of the very low heat several times during the process. You can also add a little more oil if you need to.
Peanut Butter Bon Bons Recipe Variations
If you want to mix things up a bit, you can roll freshly coated chocolate balls in sprinkles, chopped nuts, graham cracker crumbs, or even just colored sugar. The melty chocolate will “glue” these additions to the bon bons and look extra festive!
Peanut Butter Truffle Recipe Serving Suggestions
These are great for holiday parties, after-school snacks, potlucks, birthday parties, or really for anything!
Just don’t let them get too warm or they will start melting and become very messy.
Storing leftover Peanut Butter Bon Bons
These will stay fresh for a LONG time, especially if you keep them in the freezer.
How long do Chocolate Peanut Butter Truffles last?
Just store them in a tightly-sealed food storage container or zip-top bag, and they should last for months (if you don’t eat them first!)

Peanut Butter Bon Bon Recipe (Peanut Butter Truffles)
Ingredients
- 2 cups peanut butter
- ½ cup butter
- 1 teaspoon vanilla
- 3 cups crispy rice cereal
- 4 cups powdered sugar
- 12 oz semi-sweet chocolate chips*
- 1 tablespoon vegetable oil
Instructions
- Melt peanut butter and butter in a microwave-safe bowl.
- Stir in vanilla.
- Add rice cereal and powdered sugar and mix well (it might seem a little dry at first but will start holding together the more you mix. I usually finish up the mixing using my hands).
- Form into 1-inch balls, firmly packed.
- Place on a cookie sheet and freeze until firm (at least 30 minutes).
- In a saucepan (or the top of a double broiler), melt the chocolate chips and oil together over very low heat, stirring often.**
- Using a toothpick, dip each peanut butter ball in the chocolate and place them on wax-paper lined cookie sheets (I go back later and smooth out the toothpick hole on the top of each bon-bon). Chill until firm.
Love this recipe?
Make sure to share and save it on your favorite platform below!
That’s it!
If you’re looking for a simple, delicious treat to make for a holiday party… give my Peanut Butter Bon-Bons a try!
Get your FREE Homemade Christmas Gifts Guide!
If you’re looking for ways to simplify gift giving this year, we have just the solution for you! Download our brand new FREE Homemade Christmas Gifts Guide! When you sign up, you’ll get:
- 15+ DIY recipes for unforgettable gift ideas (we’ve included something for everyone on your list!)
- Step-by-step instructions for ridiculously easy homemade gifts that anyone can make!
- Customizable, ready-to-print gift tags to go with each homemade gift!
This FREE guide was designed to help you have a more peaceful, intentional holiday season. Our hope is that it reduces stress, helps you save more money and spend less on your gift budget, and simplifies things so you can focus on what matters most this season!
Click here to get your FREE Homemade Christmas Gifts Guide!

Jane.com Has Unexpectedly Shut Down — Here’s What To Do
This post is not meant to be alarmist, but rather to serve our readers well through complete honesty and transparency. We take our readers’ trust very seriously and sometimes unexpected events like this happen. We want you to always know you can trust us to post legitimate deals on trustworthy sites and we would never ever intentionally partner with a site that we didn’t fully trust. We have been posting Jane deals on our site for close to a decade, so this comes as a complete shock to us.
What is going on with Jane.com?
We got word today that Jane.com — a site that we have promoted and partnered with closely for years — has unexpectedly shut down without notice or warning.
They went dark on Friday without telling anybody — their affiliates, customers, employees, or marketplace sellers — what happened. As affiliates, we received a couple emails telling us that the Jane site was “down for maintenance” which seemed strange leading up to Black Friday week, but we didn’t think much of it.
Today (Monday), we got word from a reader and a seller on Jane that they had unexpectedly shut down.
When we reached out to Jane directly for transparency on what is going on, they would not give us any information at all and avoided our questions.
If you have any firsthand information or are a seller, please let us know as we’re trying to get to the bottom of things and confirm what’s going on.
How this affects you as our reader (and what to do)
If you have purchased any Jane deals through our site recently and haven’t received your orders yet, you will most likely NOT be receiving them.
From what little we know and have been able to research online, they have left thousands of orders unfulfilled with no intention of shipping them out. The sellers on Jane who provide their beautiful handmade items to be featured on the marketplace were left in the dark and are owed thousands and thousands of unpaid earnings for their sales.
Therefore, we recommend that you open a dispute with your bank/credit card company and report fraudulent charges so that you can get your money back.
They have been reported to the police and an investigation has been open. This is a developing story and very little is known, but you can read this article for more information.
We are so sorry to have to post this announcement, but we hope that you will continue to trust us to bring you the best legitimate deals every day! Thank you for being here!
More From Money Saving Mom

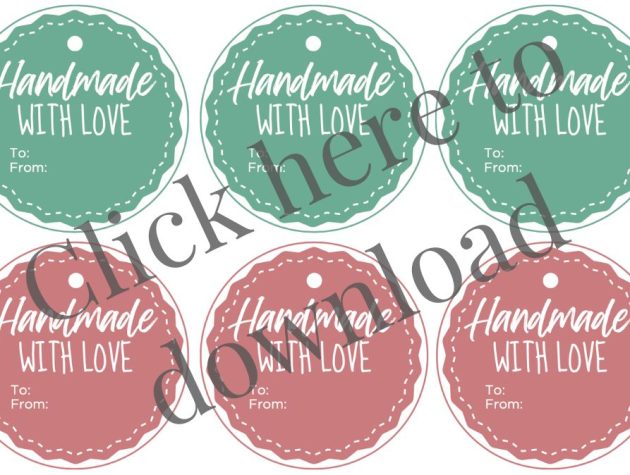
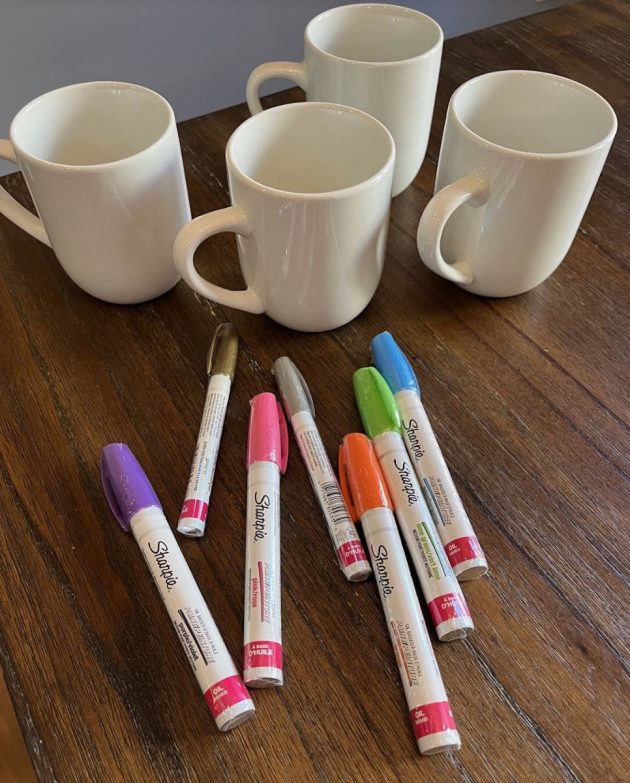
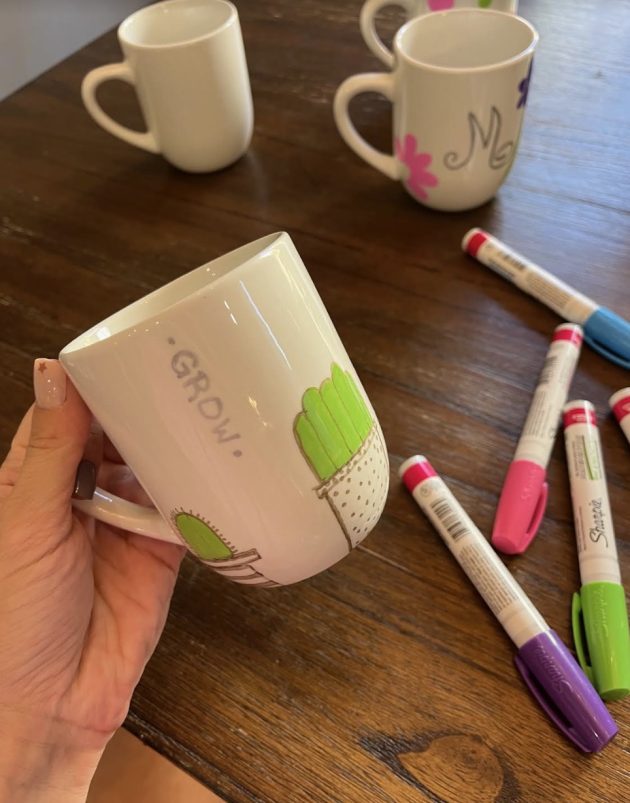
Easy DIY Sharpie Mugs Gift Idea + Free Printable Gift Tags!
If you’re looking for a super easy, personalized gift idea, these DIY Sharpie Mugs are so simple! (Plus, get FREE printable gift tags to go with this gift when you download our FREE Homemade Christmas Gifts Guide!)

DIY tutorial by Gretchen from the MoneySavingMom team. During the months of November and December, we’ll be highlighting some of our favorite homemade gifts! Download our FREE Homemade Gifts Guide to get recipes to 15+ easy-to-make gifts, plus printable gift tags to go with each gift!
DIY Sharpie Mugs make GREAT gifts!
These DIY Sharpie Mugs are SO easy and can be done in one afternoon. Not to mention, it’s a really inexpensive gift idea as well! (And we created some FREE printable gift tags to go with them!)
I’ve done these for Christmas gifts to family members twice now, and it was a big hit. In fact, I gifted some of these to my mom almost 3 years ago and she is still using them to this day!

These mugs are also a great gift idea that kids can make and give to grandparents, teachers, etc. Let them color away, draw pictures, or write their name, and it makes such a fun, unique gift.
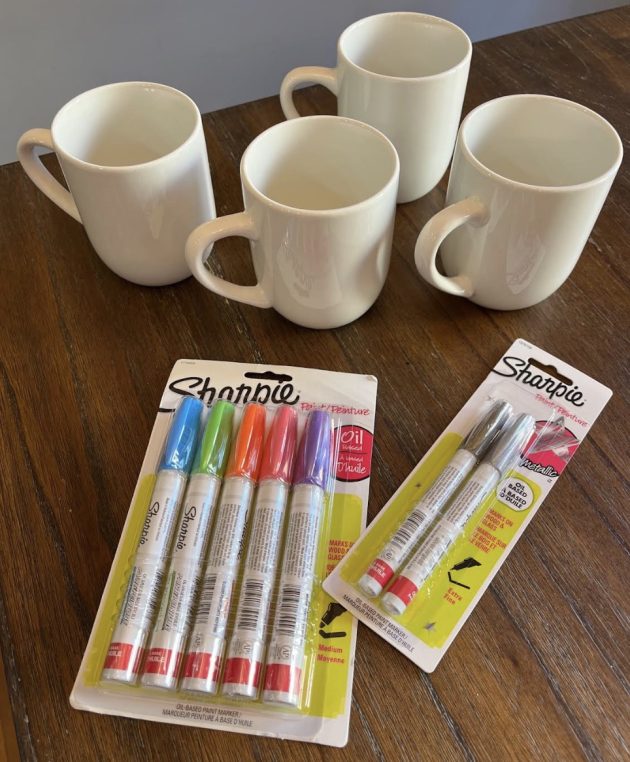
If you are the creative, artistic type, you could go all out and draw beautiful art on the mugs.
Download your free printable gift tags!
Want to add on Christmas gift tags to gift this to someone this holiday season?
Go HERE to download printable gift tags designed for these delicious cookies!
Materials for DIY Sharpie Mugs
- Plain coffee mugs (I purchased mine from Walmart for just $1.12 each.)
- Sharpie Paint Oil-Based Markers (These are the ones I purchased.)
- Pencil
How to Make Sharpie Mugs
1. Wash and thoroughly dry your mugs.
2. Decide on a design and use a pencil to draw the design on the mug. (You can skip this step if you feel brave.)
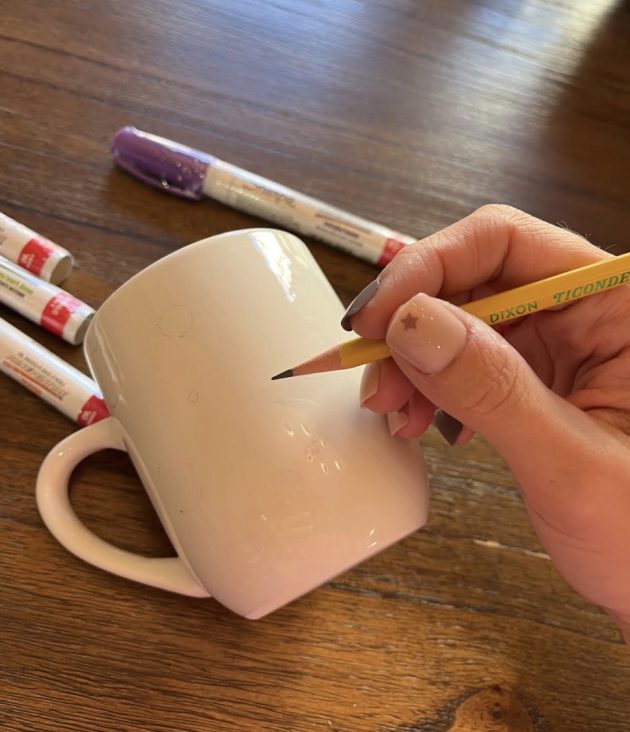
3. Using the oil-based markers, carefully draw (or trace) your design onto the coffee mugs. This is the time to be really creative!
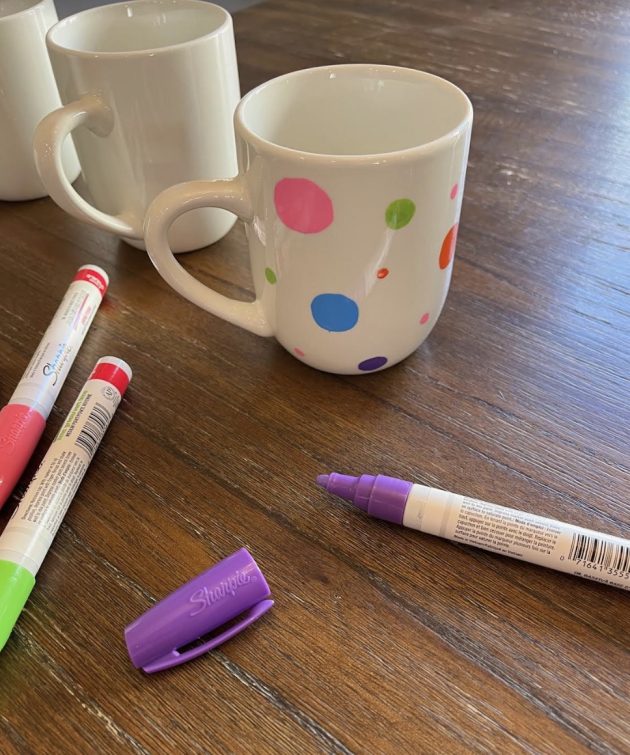
4. Place your mugs on a baking sheet and bake at 350ºF for 20 minutes to set the paint. This step is extremely important.

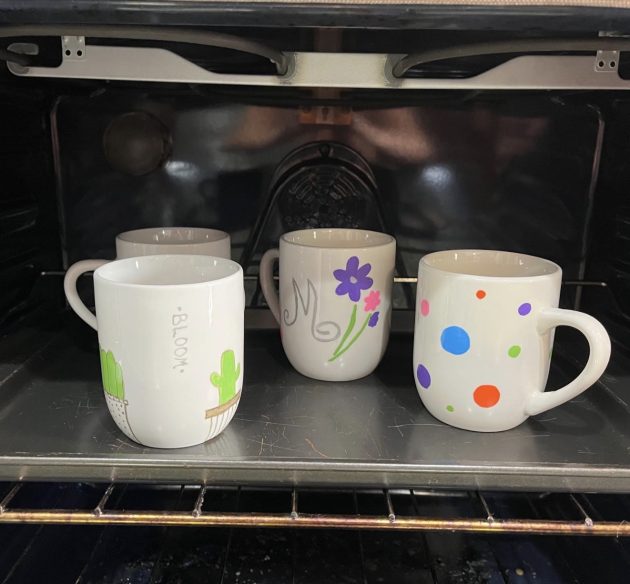
5. Remove mugs from the oven and let them cool completely.
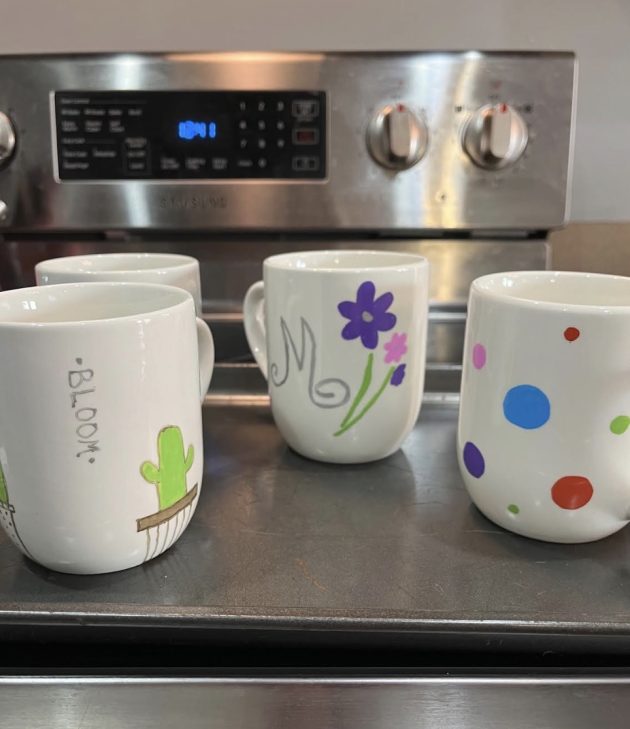
That’s it! Your coffee mugs are finished and ready to gift! (Don’t forget your free printable gift tags!)
Please note that these mugs are NOT dishwasher safe and must be hand-washed.

DIY Sharpie Mugs
Materials
- plain white or cream coffee mugs
- Sharpie Paint Oil-Based Markers
- pencil
Instructions
- Wash and thoroughly dry your mugs.
- Decide on a design and use a pencil to draw the design on the mug.
- Using the oil-based markers, carefully draw (or trace) your design onto the coffee mugs.
- Place your mugs on a baking sheet and bake at 350ºF for 20 minutes to set the paint. This step is extremely important.
- Remove mugs from the oven and let them cool completely.
Notes
Love this craft?
Make sure to share and save it on your favorite platform below!

Get your FREE Homemade Christmas Gifts Guide!
If you’re looking for ways to simplify gift giving this year, we have just the solution for you! Download our brand new FREE Homemade Christmas Gifts Guide! When you sign up, you’ll get:
- 15+ DIY recipes for unforgettable gift ideas (we’ve included something for everyone on your list!)
- Step-by-step instructions for ridiculously easy homemade gifts that anyone can make!
- Customizable, ready-to-print gift tags to go with each homemade gift!
This FREE guide was designed to help you have a more peaceful, intentional holiday season. Our hope is that it reduces stress, helps you save more money and spend less on your gift budget, and simplifies things so you can focus on what matters most this season!
Click here to get your FREE Homemade Christmas Gifts Guide!

My favorite Canada Weather Gear Coats are as low as $24.99 + shipping! (Reg. $180)
My favorite Canada Weather Gear Coats are as low as $24.99 + shipping! (Reg. $180)
Whoa!! Do not miss this hot deal on these Canada Weather Gear Coats!

Yay! This reader favorite deal is back and just in time for cooler weather!
Zulily has the super popular Canada Women’s Weather Gear Puffer Coats starting at only $24.99 right now! You’ll also find a variety of quilted jackets, puffer vests, and more!
Plus, our readers save an extra 10% off an order of $50+ when you use the promo code ZUAFF05868 at checkout.
There are lots of varieties and styles included in this sale for both men and women.
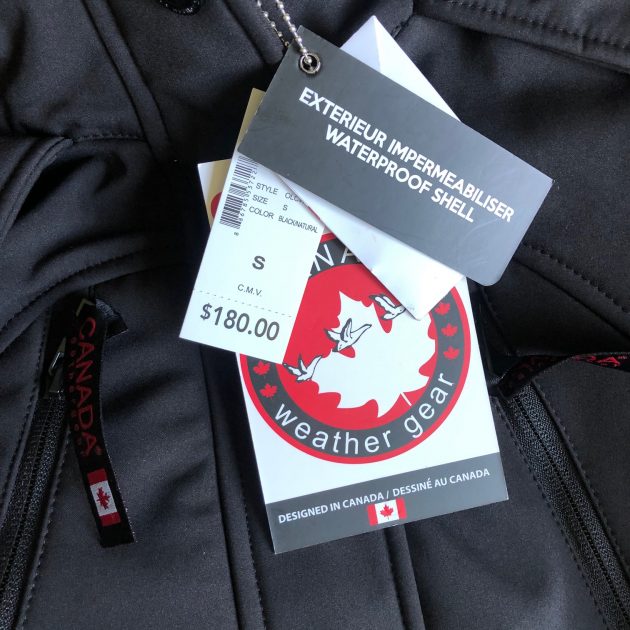
These are regularly $180-$230, and this is such a HOT deal on this brand. Great opportunity to grab a nice jacket for this winter.
I have a Canada Weather Gear Coat and it’s such high quality! It’s really lightweight, yet so cozy warm! I wore it all winter long last year and it’s become my go-to, favorite coat!
Shipping starts at $6.99. But if you place one order today, the rest of your orders will ship for FREE through 11:59 p.m. PT tonight!
Shop the Canada Weather Gear Coat sale here.
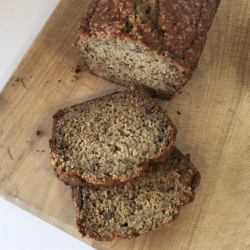
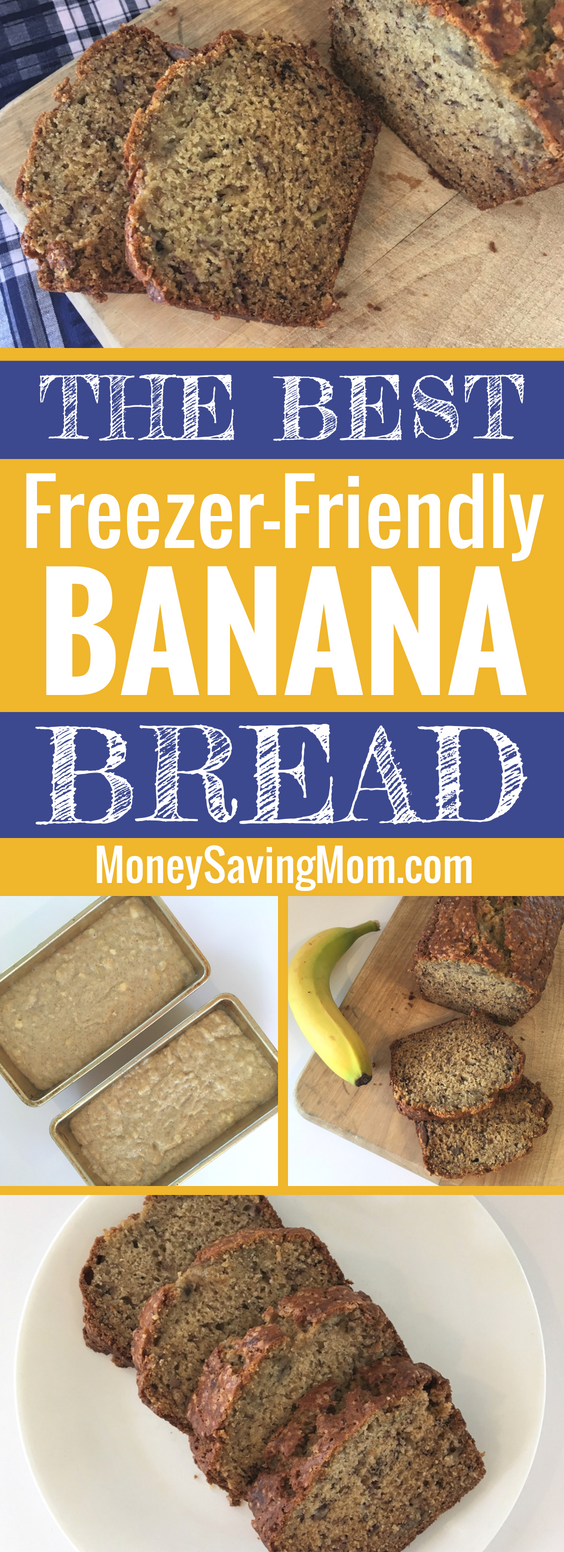
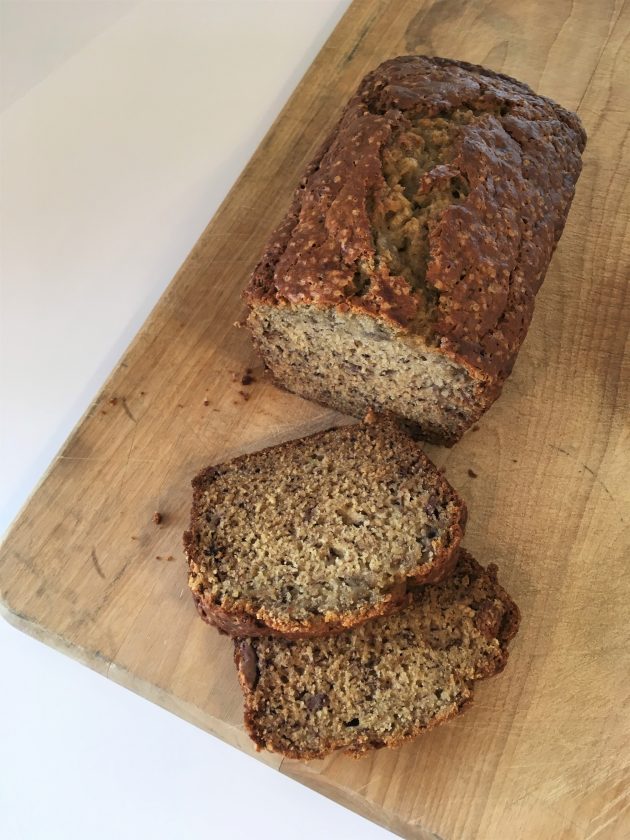
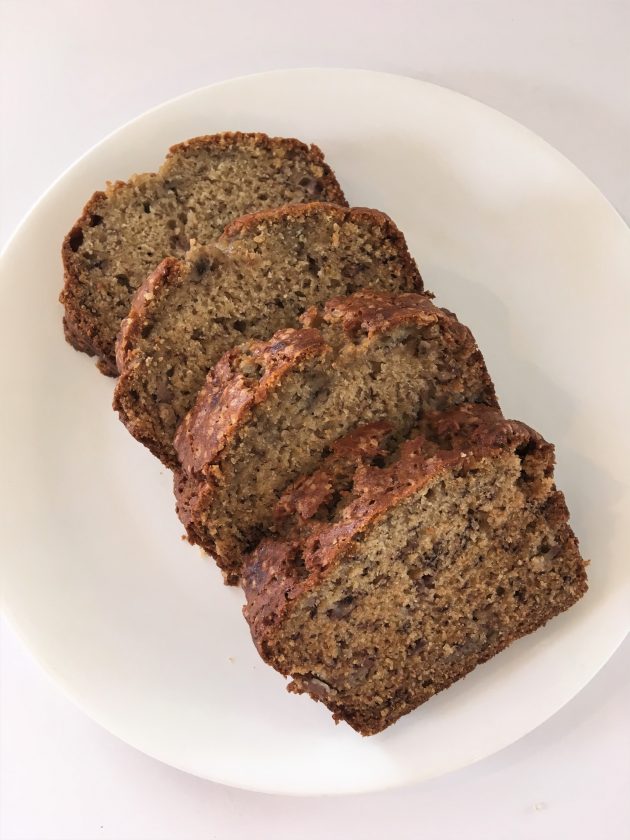
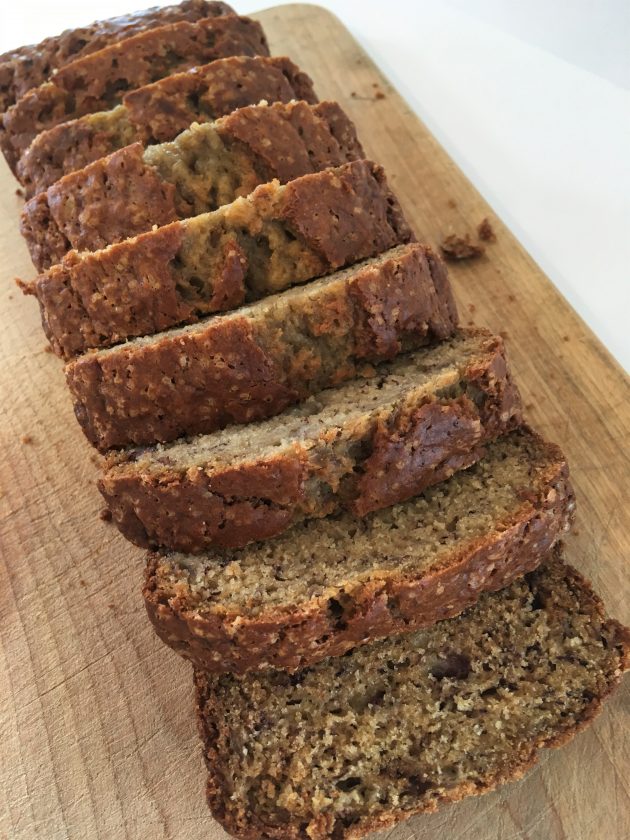
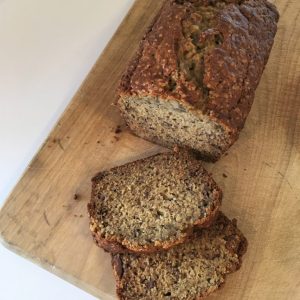
Frozen Banana Bread Recipe
Our family has made this banana bread recipe for years and we LOVE it! It also makes an easy homemade gift idea for the holidays! (Plus, get FREE printable gift tags to go with this gift when you download our FREE Homemade Christmas Gifts Guide!)
During the months of November and December, we’ll be highlighting some of our favorite homemade gifts! Download our FREE Homemade Gifts Guide to get recipes to 15+ easy-to-make gifts, plus printable gift tags to go with each gift!
We love this Easy Moist Banana Bread Recipe
This is our tried and true banana bread recipe — everyone in our family LOVES it, which is why I’ve been making it for years and years. It’s so easy to make and uses ingredients you probably already have on hand.
I wouldn’t say it is the most healthful banana bread recipe ever invented, but it sure is delicious! Plus, it freezes exceptionally well, which is always a plus in my book!
This recipe works well as a breakfast, snack, dessert, or side dish, and it’s an excellent way to use up over-ripe bananas.
Silas often helped me whip up this easy recipe while I made dinner. Look how tiny (and cute) he is!

Homemade Banana Bread is a Great Holiday Gift Idea!
We love making homemade breads and giving them as budget-friendly gifts during the holidays. Whip up a couple loaves of these and attach a beautiful gift tag and you’ve got a really lovely handmade gift without spending much at all!
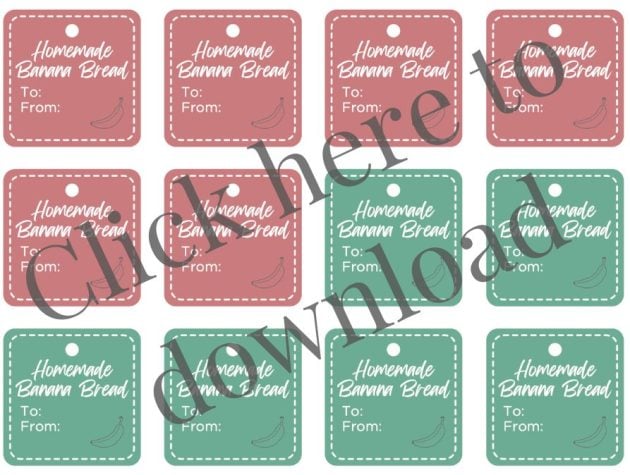
Download your free printable gift tags!
Want to add on Christmas gift tags to gift this to someone this holiday season? Go HERE to download printable gift tags designed for this banana bread!
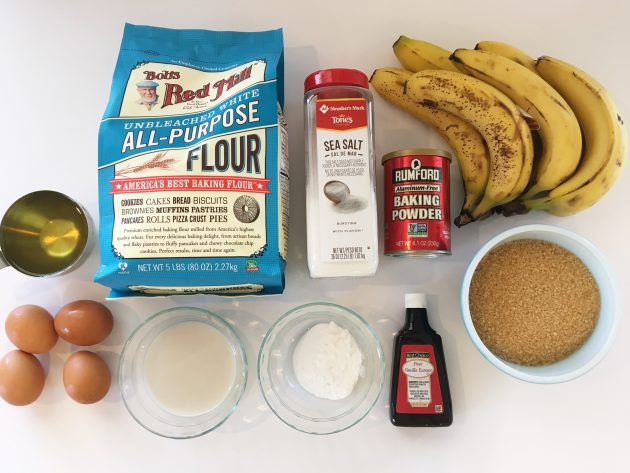
Banana Bread Recipe Simple ingredients
- 4 cups flour (all-purpose, whole-wheat, or a mixture of both)
- 2 teaspoons baking soda
- 1 teaspoon baking powder
- 1 teaspoon salt
- 1 cup oil (I used melted coconut oil)
- 2 cups sugar (I used turbinado)
- 4 eggs, beaten
- 6-8 bananas, mashed
- 1 teaspoon vanilla
- 1/3 cup milk
Use ripe bananas for this Simple Banana Bread
We always freeze bananas whole (without peels) in a freezer bag once they are so ripe that no one wants to eat them. And then we save them to use in banana bread! (Here are 55 other recipes for ripe bananas.)
Banana Bread Recipe Easy mix-ins
- 1 cup mini or regular chocolate chips
- 1 cup chopped walnuts
- 1 cup chopped pecans
- 1 cup butterscotch chips
- 1 full banana, chopped into pieces (not smashed with the other bananas)
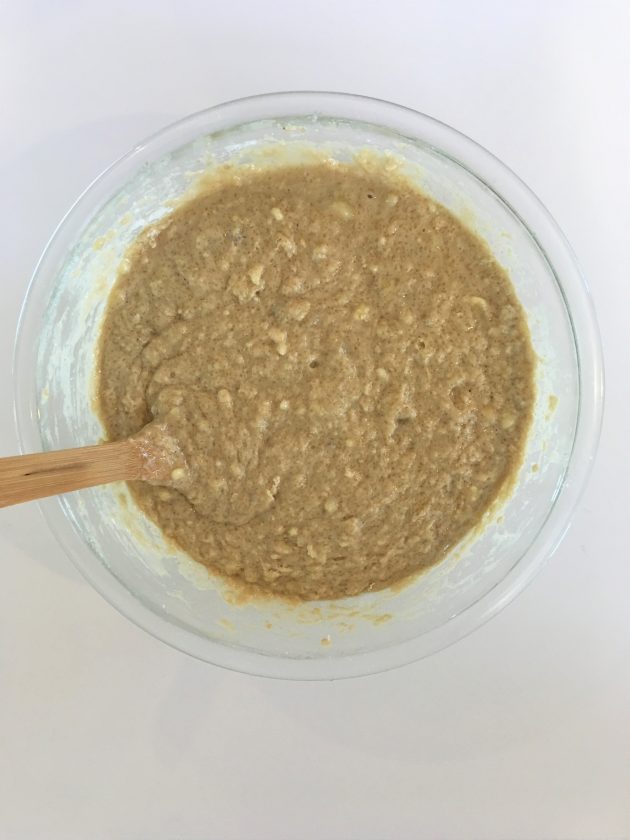
How to make Banana Bread with Oil
1. Preheat oven to 350ºF.
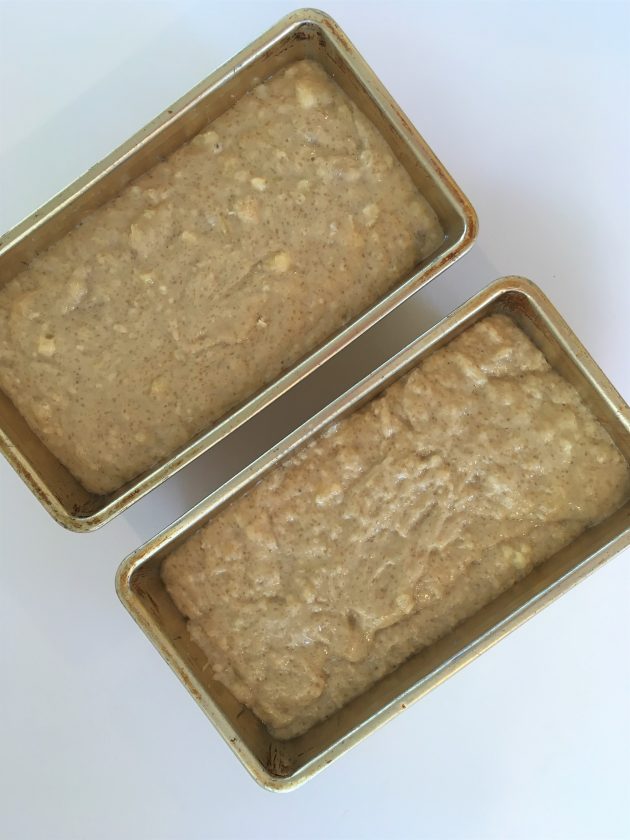
2. Grease two 9″ loaf pans and set aside.
3. In a medium bowl, stir together dry ingredients.
4. In a large bowl, mix all wet ingredients.
5. Add dry ingredients to wet ingredients and blend until just combined.
6. Pour mixture into greased loaf pans and bake in preheated oven 1 hour and 15 minutes, or until a toothpick inserted into the bread comes out clean.
7. Cool in pan for 10 minutes and then transfer to a wire rack.
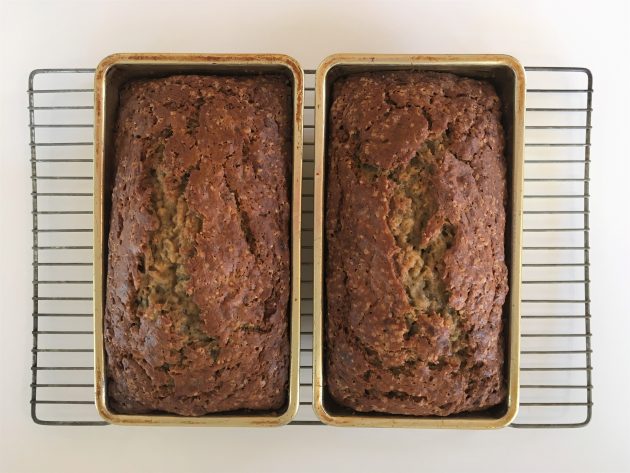
8. Eat while still warm, or cool completely and freeze for later.
How to store this Easy Moist Banana Bread Recipe
To freeze: Let the bread cool and slice the loaf. Cover it in plastic wrap and foil (or put in a zip-top freezer bag). Slice the loaf and cover it in plastic wrap, then in foil (or put in a zip-top bag).
To serve: Thaw on the countertop for a few hours or defrost an individual piece in the microwave for 20-45 seconds. We love to serve ours warm with butter. We also love to pull out slices as needed to use on-the-go as a snack!
Banana Bread Recipe with Oil FAQs
There are several factors that could produce dry banana bread — using under-ripe bananas, using too much flour, baking for too long, an oven that bakes extra “hot”, or even the lack of humidity in your climate. Make sure you aren’t adding too much flour and/or over-baking to start with!
We recommend letting the bread cool for at least 10 minutes in the pan before trying to remove it or slice it. This will allow the bread to finish baking and the steam created will help the bread pull away from sides of the pan easier. Plus, if you try to cut it too soon, it will just turn to mush.
Yes! Using too many bananas could produce very heavy, dense, and soggy bread that is difficult to bake all the way through.
The baking process tends to mute strong flavors — so banana bread will taste less “bananay” than eating a plain banana. That said, if you use unripe bananas, the flavor of your banana bread will be very weak. It’s best to use extremely over-ripe bananas to get the most flavor.
Freezer Friendly Banana Bread Made With Oil
Ingredients
- 4 cup flour all purpose or whole wheat
- 2 tsp baking soda
- 1 tsp baking powder
- 1 tsp salt
- 1 cup melted coconut oil or melted butter
- 2 cups sugar granular or turbinado
- 4 eggs
- 6-8 over ripe bananas mashed
- 1 tsp vanilla extract
- ⅓ cup milk
Instructions
- Preheat oven to 350ºF.
- Grease two 9″ loaf pans and set aside.
- In a medium bowl, stir together dry ingredients.
- In a large bowl, mix all wet ingredients.
- Add dry ingredients to wet ingredients and blend until just combined.
- Pour mixture into greased loaf pans and bake in preheated oven 1 hour and 15 minutes, or until toothpick inserted into the bread comes out clean.
- Cool in pan for 10 minutes and then transfer to a wire rack.
- Eat while still warm, or cool completely and freeze for later.
Notes
Nutrition
Love this recipe?
Make sure to share and save it on your favorite platform below!
Get your FREE Homemade Christmas Gifts Guide!
If you’re looking for ways to simplify gift giving this year, we have just the solution for you! Download our brand new FREE Homemade Christmas Gifts Guide! When you sign up, you’ll get:
- 15+ DIY recipes for unforgettable gift ideas (we’ve included something for everyone on your list!)
- Step-by-step instructions for ridiculously easy homemade gifts that anyone can make!
- Customizable, ready-to-print gift tags to go with each homemade gift!
This FREE guide was designed to help you have a more peaceful, intentional holiday season. Our hope is that it reduces stress, helps you save more money and spend less on your gift budget, and simplifies things so you can focus on what matters most this season!
Click here to get your FREE Homemade Christmas Gifts Guide!

SayMore Surveys: Sign up to earn gift cards!
Want to earn some extra cash for your spending budget each month? Try SayMore!

If you’re looking for creative ways to stretch your budget each month, check out SayMore Surveys — a brand new opportunity from the well-established market research firm Sago (which means they’re credible, reliable, and trustworthy!)
Just go here to sign up, start taking surveys, and earning points towards your first gift card! You’ll earn $0.50-$3 per survey (and sometimes more) on average, and you get to cash out for your first rewards at $5. Choose from gift cards like Amazon, Starbucks, Apple, Target, Walmart, and more!
Go here to get started with SayMore!
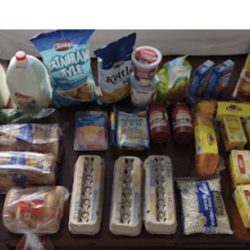
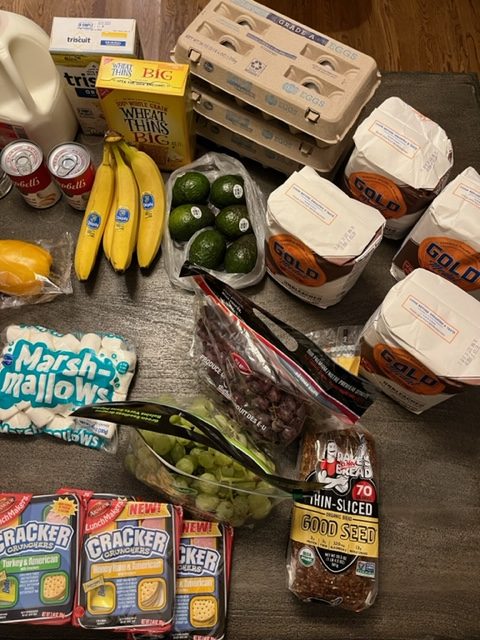
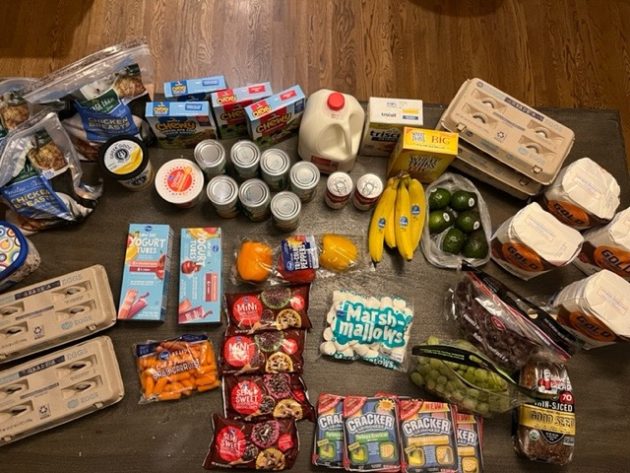
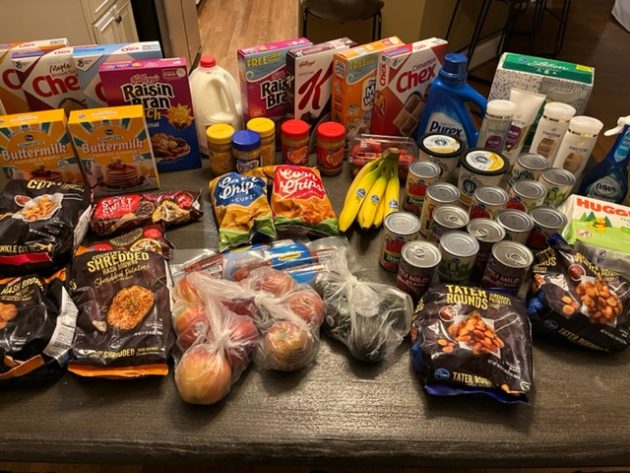
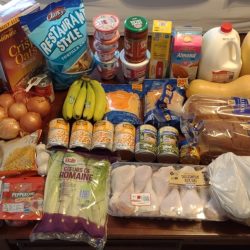
Brigette’s $116 Grocery Shopping Trip and Weekly Menu Plan for 6
Brigette’s $116 Grocery Shopping Trip and Weekly Menu Plan for 6
My older sister, Brigette, shares her shopping trips and menu plans every week! You can go HERE to see all of her weekly menu plans and you can go HERE to read all about her family!
Aldi
2 gallons Milk – $5.04
1/2 gallon Unsweetened Almond Milk – $2.19
1/2 gallon Orange Juice – $2.69
1 pkg Uncured Beef Franks – $2.85
1 16-oz pkg Deli Meat – $4.19
2 jars Spaghetti Sauce – $2.70
1 pkg Romaine Hearts – $2.55
2 3-ct packages Multi-Colored Peppers – $3.70
1 tub Organic Spring Mix – $4.89
1 bunch Bananas ($0.29/lb) – $0.45
4 dozen Eggs – $5.32
1 16-oz pkg Organic GF Quinoa Pasta – $2.15
6 boxes Butter Quarters – $11.54
1 8-oz pkg Deli Sliced Cheese – $1.68
1 32-oz carton Greek Yogurt – $3.25
1 24-oz carton Cottage Cheese – $2.29
1 bag Tortilla Chips – $1.85
1 bag Kettle Chips – $1.85
2 cans Pumpkin – $2.38
2 boxes Macaroni and Cheese – $1.10
2 loaves Sandwich Bread – $1.00
1 pkg Hotdog Buns – $0.98
1 2-lb bag Great Northern Beans – $2.49
Total: $69.13
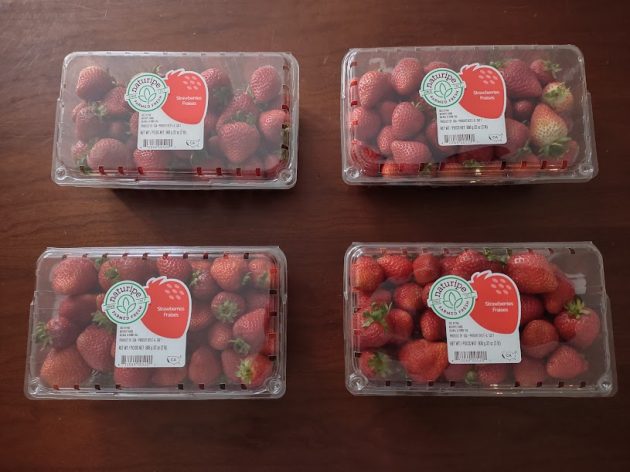
Sawyer’s Produce
4 2-lbs cartons Strawberries – $12
Total: $12
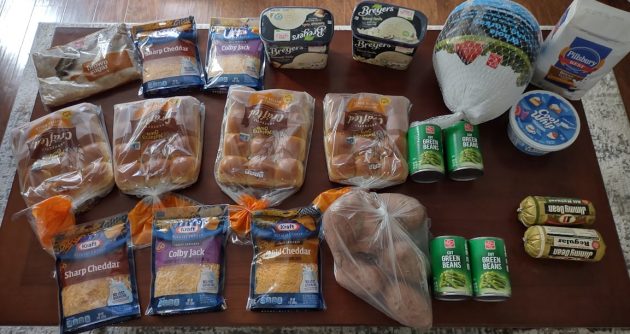
Harris Teeter
1 5-lb bag Pillsbury Bread Flour – $4.00
5 bags Shredded Kraft Cheese (B2G3 – $11.73, plus receive (5) $0.50/1 Ibotta Rebates – $9.23 for 5 after Rebates
1 Kraft Cool Whip – $1.49, plus receive $0.50/1 Ibotta Rebate – $0.99 after Rebate
2 cartons Breyers Ice Cream (B1G1) – $6.99, used $2/2 Harris Teeter e-vic coupon, plus received 1865 points from Fetch Rewards ($1.86) – $3.13 for 2 after Coupon and Rebate
2lbs Jimmy Dean Sausage (B1G1) – $6
1-lb bag Brown Sugar – $2.50
4 cans Green Beans (B1G1) – $1.25
1 bag Sweet Potatoes (4.33lbs @ $0.25/lb) – $1.33
1 15.57lb Premium Turkey ($0.29/lb when you spend $40) – $4.52
4 pkgs Nature’s Own Rolls – (B1G1) – $8.98, plus received (4) $0.50/1 Ibotta Rebates – $6.98 for 4 after Rebates
~ this purchase added the last 3 offers I needed to qualify me for a $5 Ibotta Cash Casserole bonus
Total after Coupons and Rebates – $34.93
Grocery Total for the Week: $116.06
Weekly Menu Plan
Breakfasts
Cereal, Oatmeal, Smoothies, Yogurt, Fruit, Toast, Scrambled/Boiled/Fried Eggs, Veggie Omelets
Lunches
Macaroni and Cheese, Strawberries, Peppers
Deli Meat/Cheese Sandwiches, Apples, Peppers, Chips x 2
Leftovers x 4
Dinners
Hotdogs, Green Beans, Baked Potato Fries
Ham and Bean Soup (using a ham someone gave us), Cornbread
Spaghetti (using venison sausage), Tossed Salad, Applesauce
French Toast, Sausage, Strawberries
Homemade Pepperoni Pizza, Cheesy Breadsticks, Tossed Salad
Grilled Chicken, Green Beans, Biscuits, Strawberries
Chicken Gravy over Rice, Green Beans, Sliced Apples
Psst! Want to cut your grocery budget? Go here and sign up (it’s free!) I’ll send you my 10 Easy Ways to Cut Your Grocery Bill By $50.
Did you do any grocery shopping this week? I’d love to hear what great deals you scored!

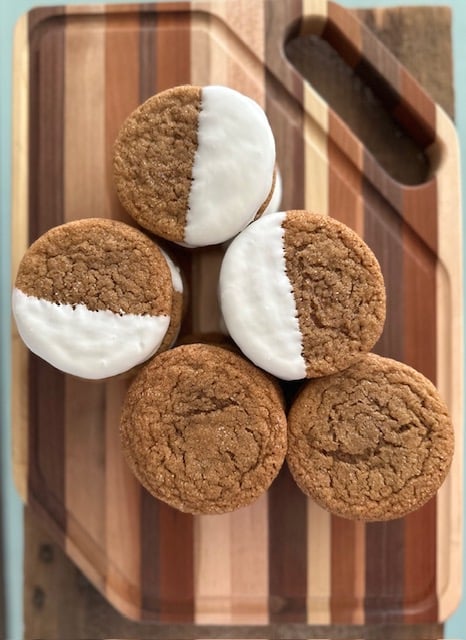
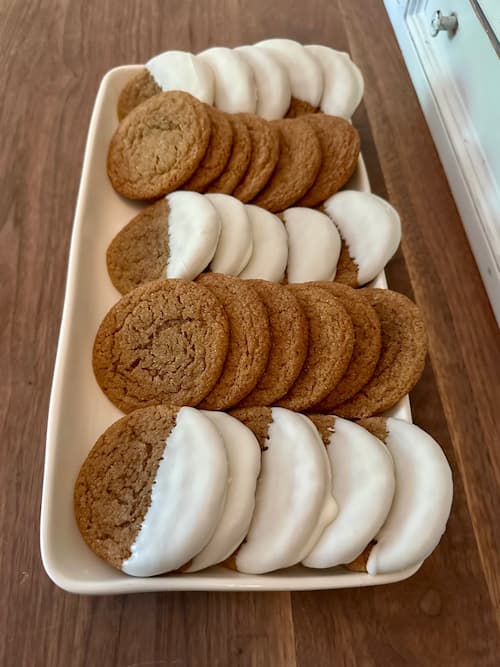
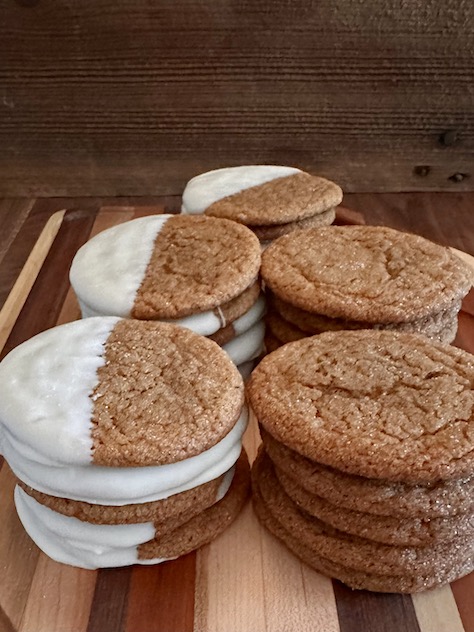
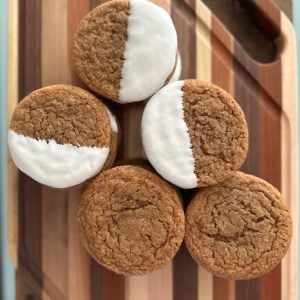
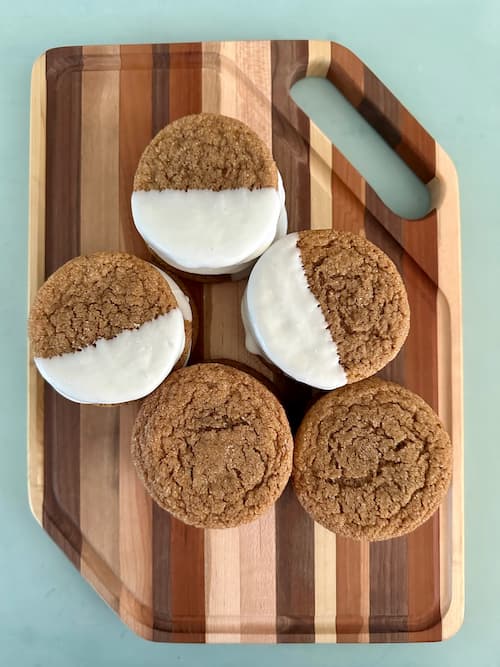
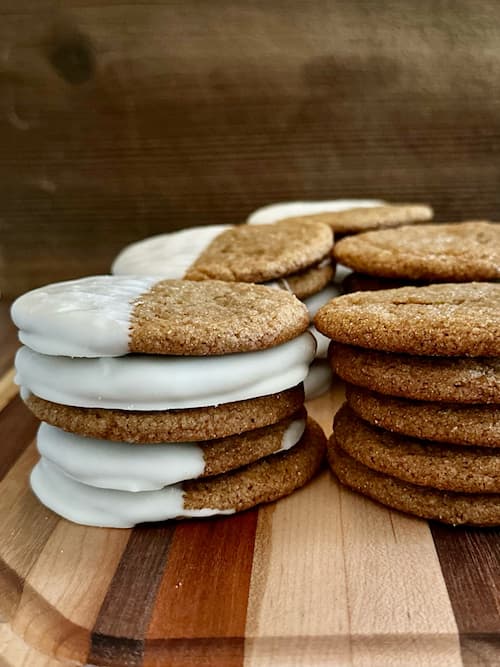
Dipped Chewy Ginger Molasses Cookies + Free Printable Gift Tags
Dipped Chewy Ginger Molasses Cookies + Free Printable Gift Tags
These Dipped Ginger Cookies make delicious, homemade Christmas treats! It takes the depth of ginger cookie flavor and pairs it with white chocolate. Delicious and beautiful! (Plus, get FREE printable gift tags to go with this gift when you download our FREE Homemade Christmas Gifts Guide!)
Recipe by Sarah from the MoneySavingMom team. During the months of November and December, we’ll be highlighting some of our favorite homemade gifts! Download our FREE Homemade Gifts Guide to get recipes to 15+ easy-to-make gifts, plus printable gift tags to go with each gift!
BEST Ginger Cookies
Dipped Ginger Cookies have been a Christmas-time family tradition for years. My kids anticipate the day that we make these each year.
These cookies taste delicious and look beautiful — and our home smells amazing while the cookies bake!
Plus, they are amazing to give as gifts! (And we created some FREE printable gift tags to go with them!)
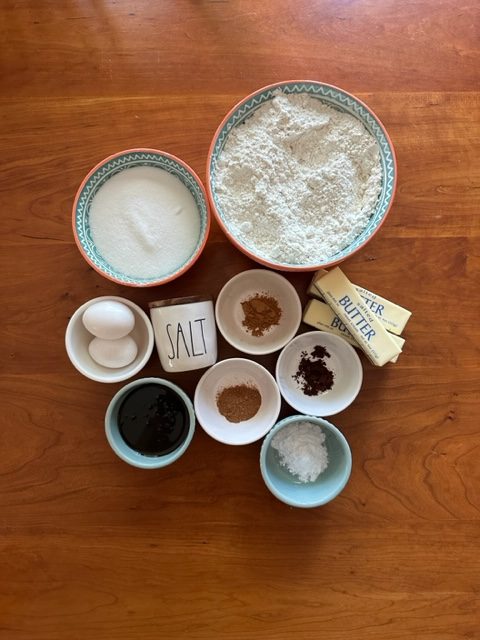
Dipped Chewy Ginger Cookies Ingredients
- 2 cups granulated sugar
- 3 sticks of butter
- 1/2 cup molasses
- 2 eggs
- 4.5 cups all-purpose flour
- 3 tsp. baking soda
- 1/2 tsp. salt
- 2 tsp. cinnamon
- 1 tsp. cloves
- 1 tsp. ginger
- 1/2 tsp. nutmeg
- 1/2 cup extra sugar for rolling dough balls in
- Parchment paper (not pictured)
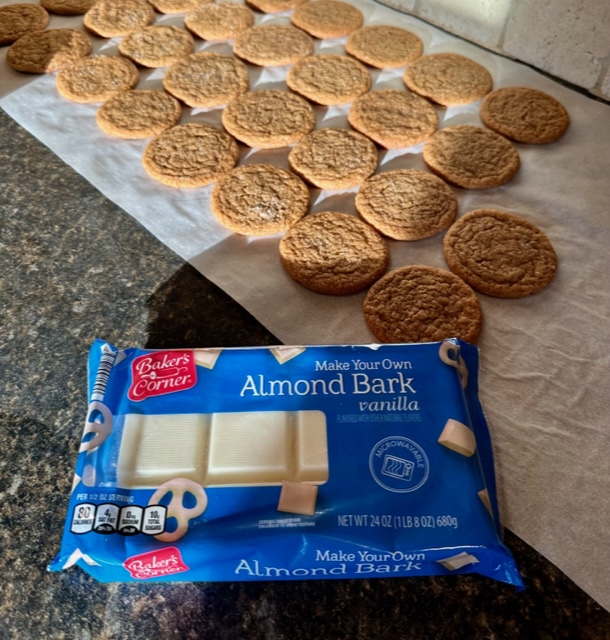
- 24 ounces Almond Bark

How to Make Molasses Ginger Cookies
Psst! If you’re planning to give these as a gift this year, be sure to grab your FREE printable gift tags to go with them!
1. In a large mixing bowl, beat sugar and butter together.
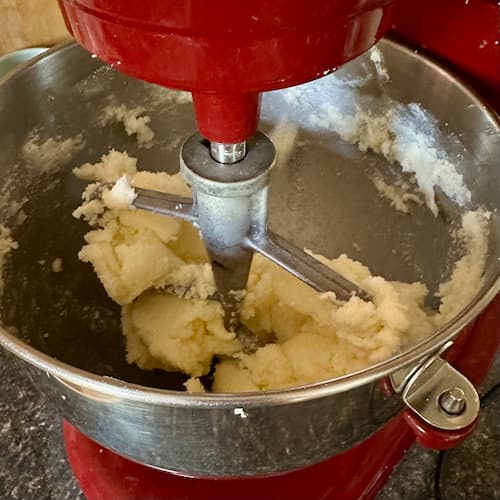
2. Add molasses and eggs and beat until light and fluffy. Scrap off the sides of the bowl.
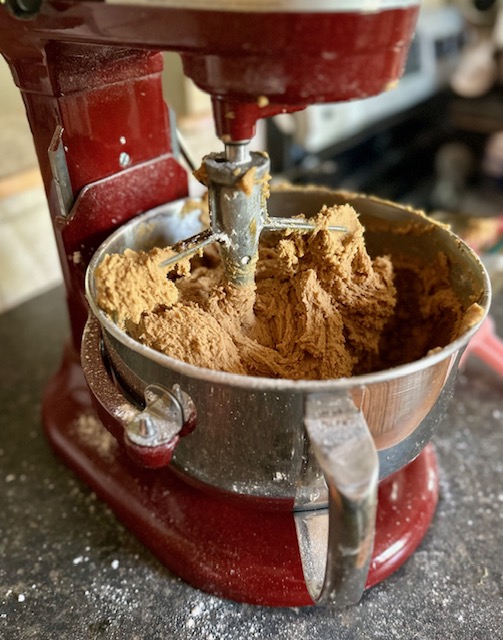
3. In a separate bowl, combine flour, baking soda, salt, cinnamon, cloves, ginger, and nutmeg.
4. Add the flour mixture to the mixing bowl (cup by cup) and mix until well combined.
5. Cover with plastic wrap or put dough in an airtight container and refrigerate for at least an hour.
6. After the dough is chilled, preheat the oven to 350ºF.
7. Use a cookie scoop to remove the dough from bowl and form the dough into a ball with your hands.
8. Roll each ball in a small bowl of sugar and place on parchment-lined cookie sheets.
9. Bake in the preheated oven for 8 to 12 minutes. The cookies will puff and flatten during baking.
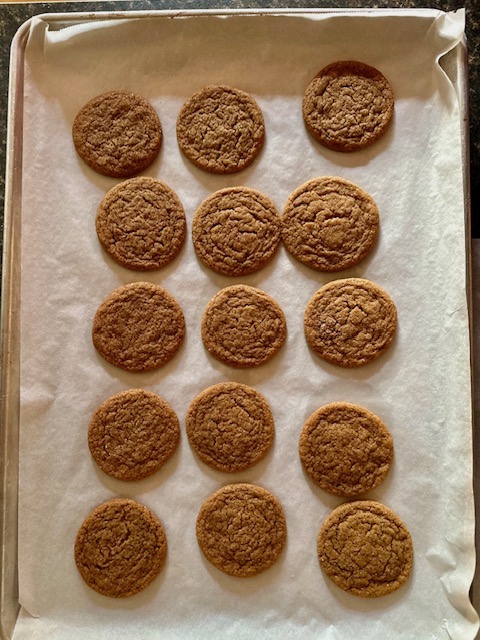
10. Let the cookies cool on parchment paper.
11. Melt half the almond bark according to the package instructions. You may end up using more almond bark, but it works best to dip in batches so that the melted bark doesn’t get too thick as it cools.
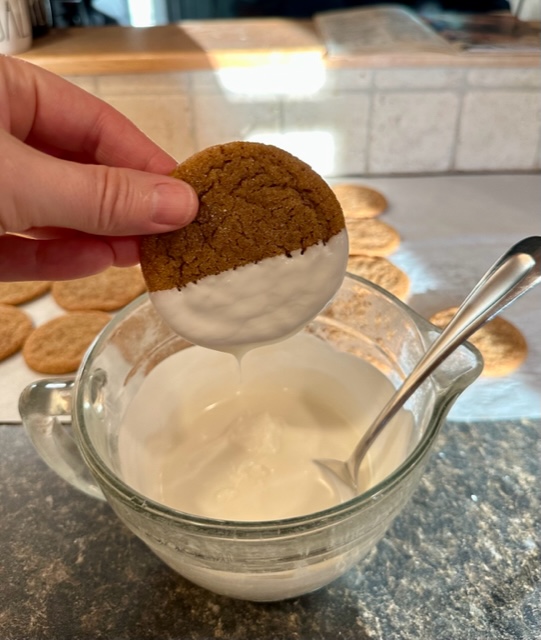
12. Dip the cookies into the melted almond bark and place back on parchment paper.
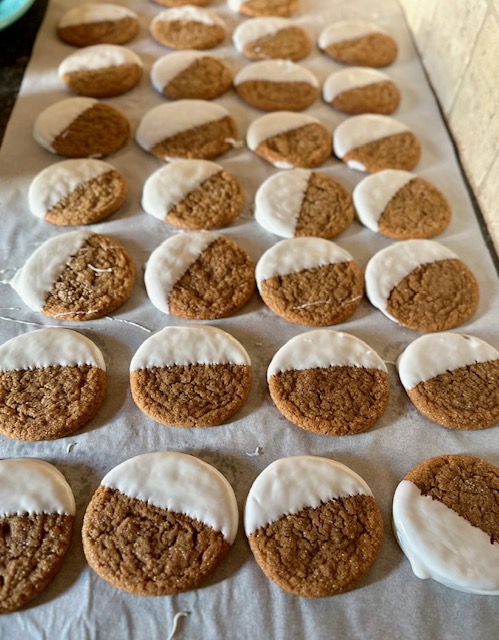
13. Cool until hardened and place in an airtight container. You can make these weeks ahead and freeze.
NOTE: I typically leave some cookies undipped to give people options.
Chewy Ginger Molasses Cookies for Holiday Gifts!
I’ve shared these delicious cookies in cookie exchanges, brought them to grandparent’s day at my kids’ school, brought them to family & friends gatherings, and included them in homemade Christmas gifts.
They are always a hit!
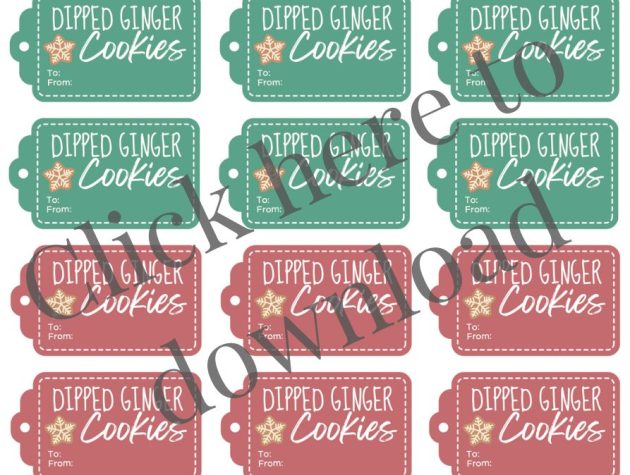
Printable Ginger Cookies Gift Tags!
Want to add on Christmas gift tags to gift this to someone this holiday season?
Go HERE to download printable gift tags designed for these delicious cookies!
Chewy Molasses Ginger Cookies Recipe FAQs
Ginger cookies usually have a crispier texture and a spicier, more pronounced ginger flavor. Molasses cookies are often softer with a deeper, rich molasses flavor.
The most common reason your cookies are “puffy” instead of flat is that you used too much flour. If your cookies are not as flat as you’d like, you could try gently pressing them down with a flat-bottomed measuring cup immediately after they come out of the oven.
Use unsulfured molasses whenever possible as sulfured molasses can leave a chemical aftertaste. Light molasses is also usually preferred over a darker molasses as it has a lighter flavor.
This would not be a recommended substitute (unless a recipes specifically calls for blackstrap molasses). Blackstrap molasses has about 25% less sugar and is often bitter tasting.
Best Ginger Cookies – Dipped Molasses Ginger Cookies
Ingredients
- 2 cups granulated sugar
- 1 1/2 cups butter 3 sticks, softened
- 1/2 cup molasses
- 2 eggs
- 4.5 cups all-purpose flour
- 3 tsp. baking soda
- 1/2 tsp. salt
- 2 tsp. cinnamon
- 1 tsp. cloves
- 1 tsp. ginger
- 1/2 tsp. nutmeg
- 1/2 cup granulated sugar additional for rolling cookie dough balls in
- 24 ounces almond bark
Instructions
- In a large mixing bowl, beat sugar and butter together.
- Add molasses and eggs and beat until light and fluffy. Scrap off the sides of the bowl.
- In a separate bowl, combine flour, baking soda, salt, cinnamon, cloves, ginger, and nutmeg.
- Add the flour mixture to the mixing bowl (cup by cup) and mix until well combined.
- Cover with plastic wrap or put dough in an airtight container and refrigerate for at least an hour.
- After the dough is chilled, preheat the oven to 350ºF.
- Use a cookie scoop to remove the dough from bowl and form the dough into a ball with your hands.
- Roll each ball in a small bowl of sugar and place on parchment-lined cookie sheets.
- Bake in the preheated oven for 8 to 12 minutes. The cookies will puff and flatten during baking.
- Let the cookies cool on parchment paper.
- Melt half the almond bark according to the package instructions. (You may end up using more almond bark, but it works best to dip in batches so that the melted bark doesn’t get to thick as it cools.)
- Dip the cookies into the melted almond bark and place back on parchment paper.
- Cool until hardened and place in an airtight container. You can make these weeks ahead and freeze.
Notes
Nutrition
Love this recipe?
Make sure to share and save it on your favorite platform below!
Adapted from Pillsbury Mmm More Cookies (a really old grocery store magazine rack cookbook).
Get your FREE Homemade Christmas Gifts Guide!
If you’re looking for ways to simplify gift giving this year, we have just the solution for you! Download our brand new FREE Homemade Christmas Gifts Guide! When you sign up, you’ll get:
- 15+ DIY recipes for unforgettable gift ideas (we’ve included something for everyone on your list!)
- Step-by-step instructions for ridiculously easy homemade gifts that anyone can make!
- Customizable, ready-to-print gift tags to go with each homemade gift!
This FREE guide was designed to help you have a more peaceful, intentional holiday season. Our hope is that it reduces stress, helps you save more money and spend less on your gift budget, and simplifies things so you can focus on what matters most this season!
Click here to get your FREE Homemade Christmas Gifts Guide!

Huge Sale on Strategy and Party Games {Early Black Friday Deal!}
Huge Sale on Strategy and Party Games {Early Black Friday Deal!}
Amazon has started their Early Black Friday deals and they are having a huge sale on Strategy and Party Games! Here are are some deals we spotted…
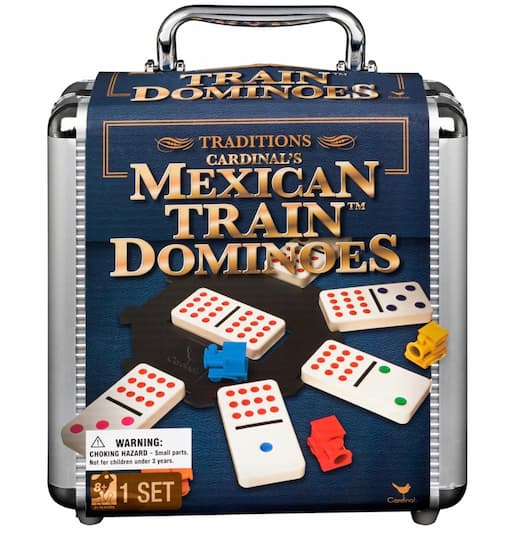
Get this Mexican Train Dominoes Set Tile Board Game for just $8.99!
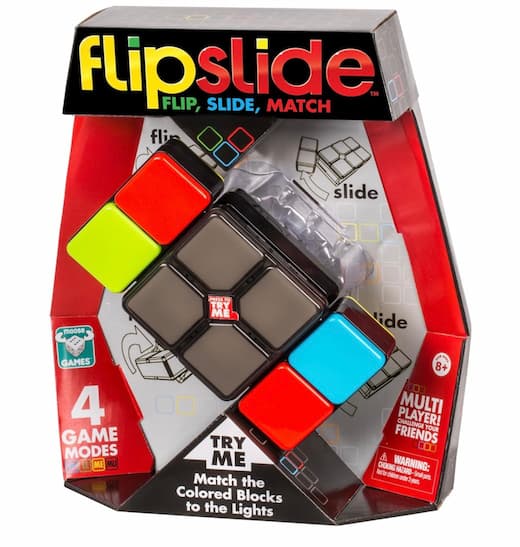
Get this Flipslide Game – Electronic Handheld Game for just $10.49!
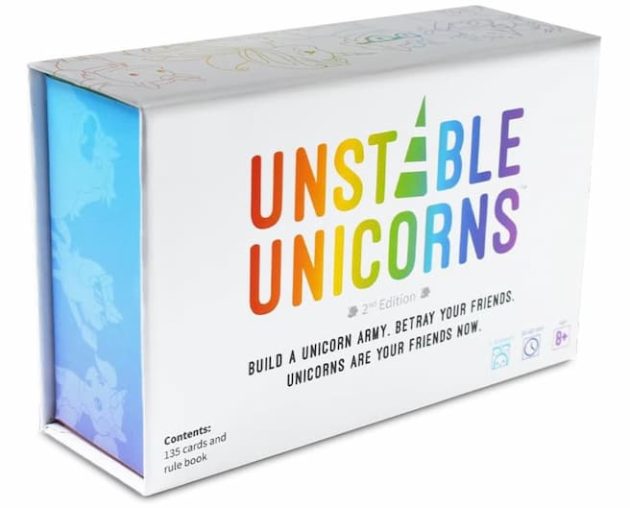
Get this Unstable Unicorns Card Game for just $8.49!
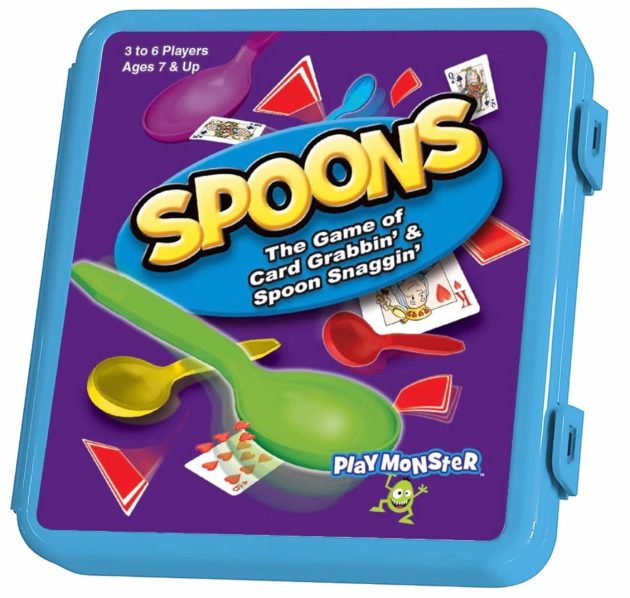
Get this Spoons — Classic Game for just $7.19!
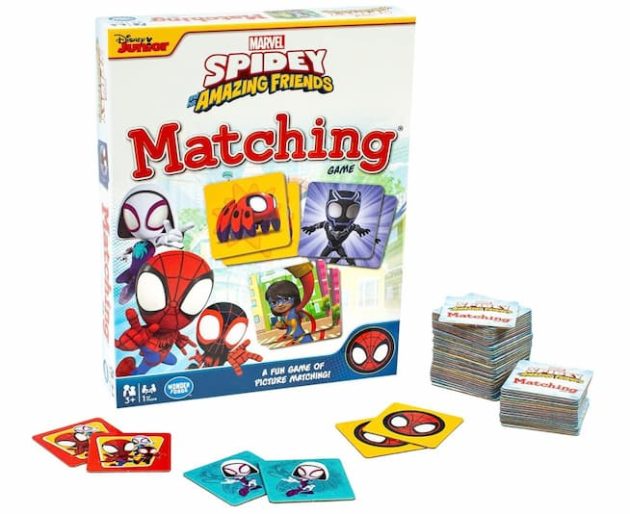
Get this Marvel Matching Game by Wonder Forge for just $9.99!
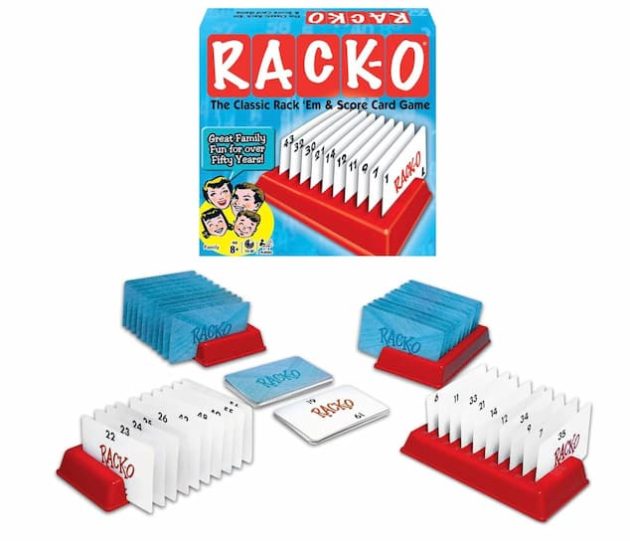
Get this Winning Moves RACK-O for just $8.79!
Sign up for a free trial of Amazon Prime to get free two-day shipping (and possibly one-day or same-day shipping!) with no minimum. If you’re not sure Prime is worth it, read this post for some helpful info to help you decide! And don’t forget you can sign up for Swagbucks to earn free gift cards to use on Amazon deals!
Shop the entire sale here.
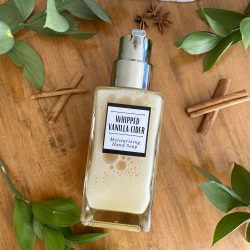
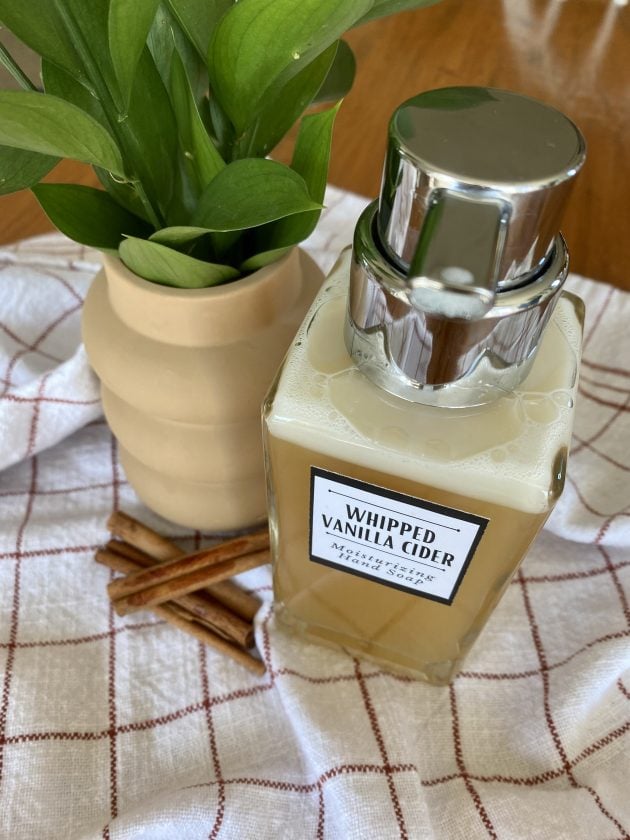
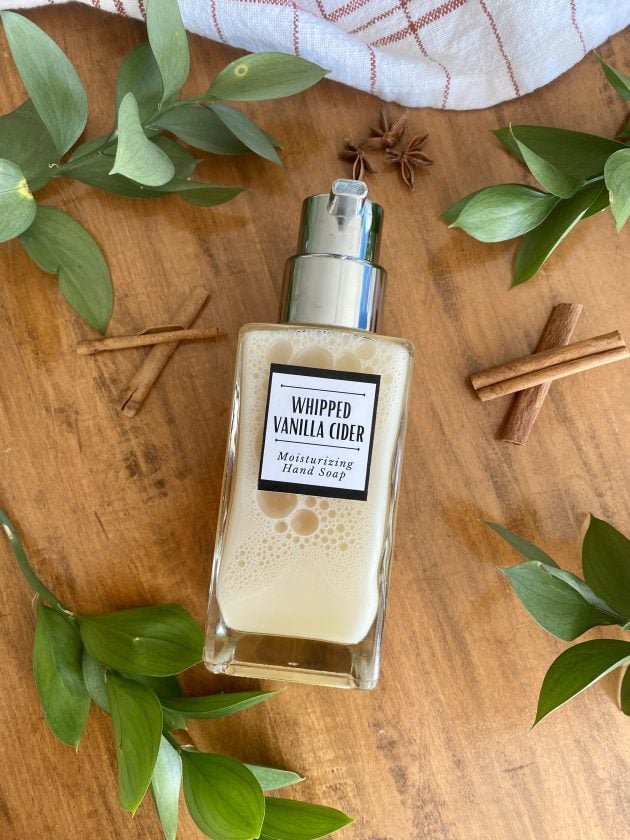
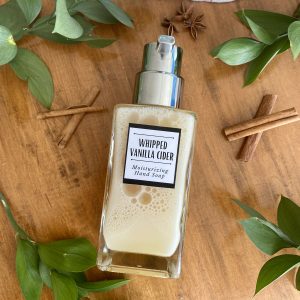
Homemade Foaming Hand Soap with Free Printables
This DIY Foaming Hand Soap smells so good and makes such a beautiful homemade gift idea! (Plus, get FREE printable gift tags to go with this gift when you download our FREE Homemade Christmas Gifts Guide!)
DIY tutorial by Olivia from the MoneySavingMom team. During the months of November and December, we’ll be highlighting some of our favorite homemade gifts! Download our FREE Homemade Gifts Guide to get recipes to 15+ easy-to-make gifts, plus printable gift tags to go with each gift!
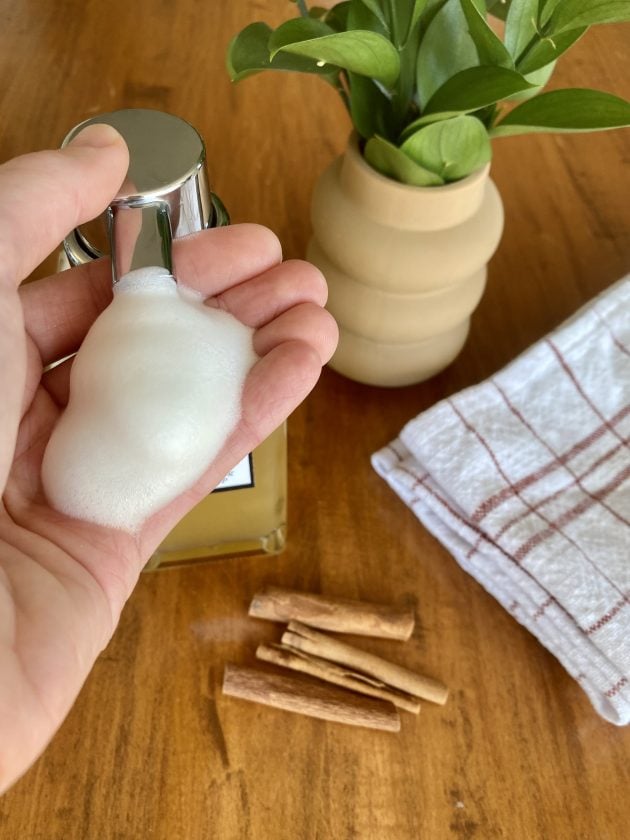
This is the best Homemade Foaming Soap recipe!
I recently created this recipe for a girls’ fall party I hosted and it was a huge hit!
Not only does it smell amazing, but it also looks really festive too! It forms a white foam layer on the top that reminds me of whipped cream on top of a hot beverage — perfect for the colder months!
This foaming hand soap is extremely moisturizing, thanks to the MCT oil and glycerin. It’s perfect for the upcoming dry winter months.
As an added bonus, you can even use this lovely foaming soap for shaving cream and body wash! Just add a bit less water so the foam is extra thick and creamy.
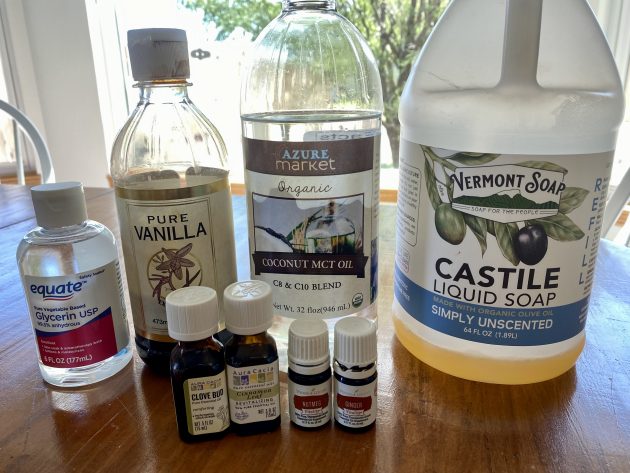
Vanilla Cider Foaming Hand Soap ingredients
- 14 oz Foaming Hand Soap Dispenser Bottle
- 2 Tablespoons MCT Oil
- Essential Oils (I used 22 drops cinnamon, 6 drops clove bud, 5 drops ginger, and 1 drop nutmeg)
- 2 Tablespoons Vegetable Glycerin
- 6 Tablespoons Liquid Castile Soap
- 1 Tablespoon Vanilla Extract
- Filtered Water
How to make Foaming Hand Soap
1. Add MCT oil and essential oils to the foaming hand soap dispenser bottle. Give it a good swirl to mix the oils together.
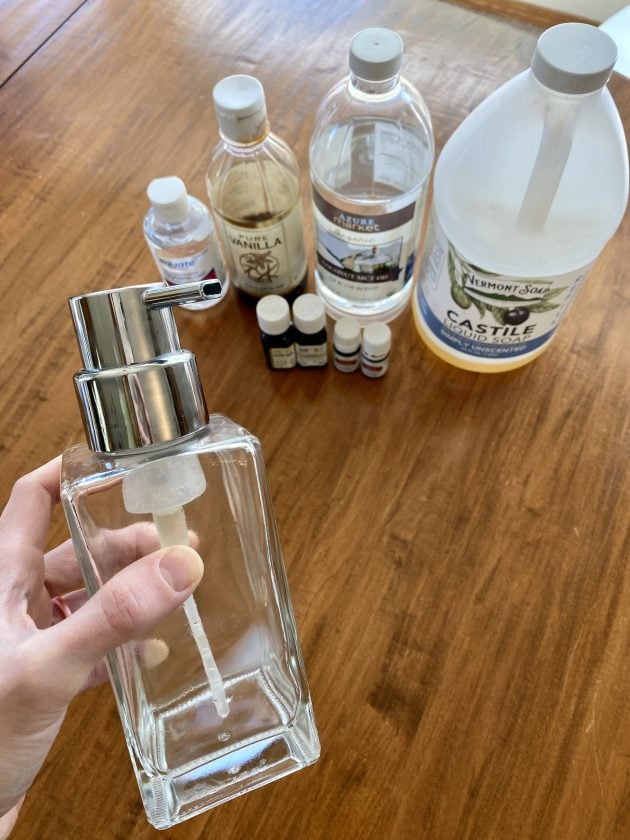
2. Add in all remaining ingredients except the water. Give it another swirl to mix everything together.
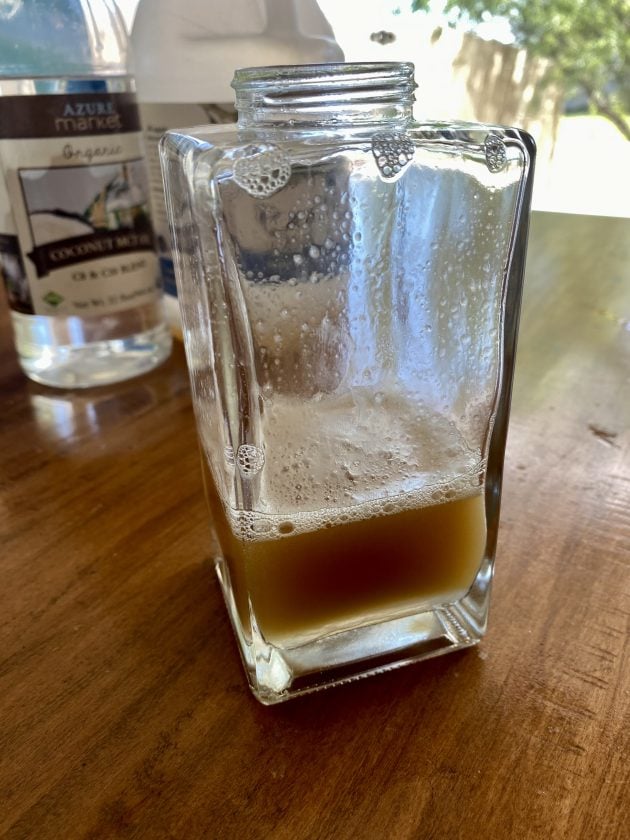
3. Fill the remainder of the jar with filtered water. Screw on the lid and shake it a few times.
This DIY Foaming Hand Soap makes a great gift!
This recipe makes enough for one 14-ounce bottle of foaming hand soap OR 4 mini foaming hand soap containers.
These tiny bottles make excellent gifts for teachers, coaches, friends, neighbors, or even as a party favor!
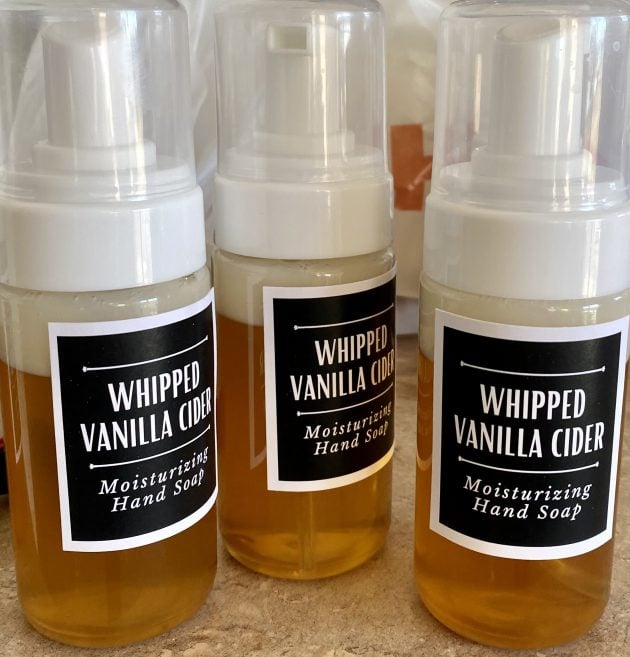
How to divide this recipe into 4 mini bottles:
Follow the first 2 steps above (mixing all ingredients, except the water).
Then divide the mixture (as evenly as possible) into 4 mini pump bottles.
Finally, add water to fill each one individually and swirl to combine.

Download your free printable labels!
Want to add on Christmas gift tags to gift this to someone this holiday season? Go HERE to download printable gift tags designed for this foaming hand soap!
You can also click here to download and print labels to stick on individual bottles. (Note: We recommend using this sticker paper!)

Foaming Hand Soap Recipe FAQs
Yes, basically! Foaming hand soap is a diluted version of liquid hand soap that goes through a special foaming pump that adds air into the mix to create an already-sudsy hand soap “lather” when it’s dispensed onto your hands.
Yes, but only put a few Tablespoons of regular soap in the dispenser, and then fill the rest (slowly) with water. Swirl after securing the pump.
It’s usually recommended that you use foaming hand soap within 30 days. If it’s been longer than that, you might need to swirl it a bit as the soap/water may separate.
Whipped Vanilla Cider Foaming Hand Soap Recipe
Materials
- 2 tbsp MCT Oil
- Essential Oils I used 22 drops cinnamon, 6 drops clove bud, 5 drops ginger, and 1 drop nutmeg
- 2 tbsp Vegetable Glycerin
- 6 tbsp Liquid Castile Soap
- 1 tbsp Vanilla Extract
- Filtered Water enough to fill the container
Instructions
- Add MCT oil and essential oils to the foaming hand soap dispenser bottle. Give it a good swirl to mix the oils together.
- Add in all remaining ingredients except the water. Give it another swirl to mix everything together.
- Fill the remainder of the jar with filtered water. Screw on the lid and shake it a few times.
Notes
Love this craft?
Make sure to share and save it on your favorite platform below!
Get your FREE Homemade Christmas Gifts Guide!
If you’re looking for ways to simplify gift giving this year, we have just the solution for you! Download our brand new FREE Homemade Christmas Gifts Guide! When you sign up, you’ll get:
- 15+ DIY recipes for unforgettable gift ideas (we’ve included something for everyone on your list!)
- Step-by-step instructions for ridiculously easy homemade gifts that anyone can make!
- Customizable, ready-to-print gift tags to go with each homemade gift!
This FREE guide was designed to help you have a more peaceful, intentional holiday season. Our hope is that it reduces stress, helps you save more money and spend less on your gift budget, and simplifies things so you can focus on what matters most this season!
Click here to get your FREE Homemade Christmas Gifts Guide!
OVER-SPENDING EVERY SINGLE MONTH?Grab these FREE Budgeting Sheets!
Click here to download!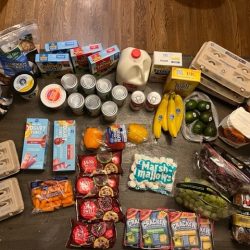
Crystal’s Kroger Pick-up Trips from the last 2 weeks
I did two Kroger pick-up trips over the past two weeks! Here were the deals I got:
Eggs were on a great price with the digital coupon, so I stocked up!
And so were granola bars, chocolate chips, and canned veggies!
I stuck the extra flour in the freezer for holiday baking!
My total for all of this was: $121.01
After three months of no sales tax on groceries in Tennessee, I’m sad that sales tax is back again. So that will definitely add to my grocery costs each month, but I’m grateful we had three months without it!
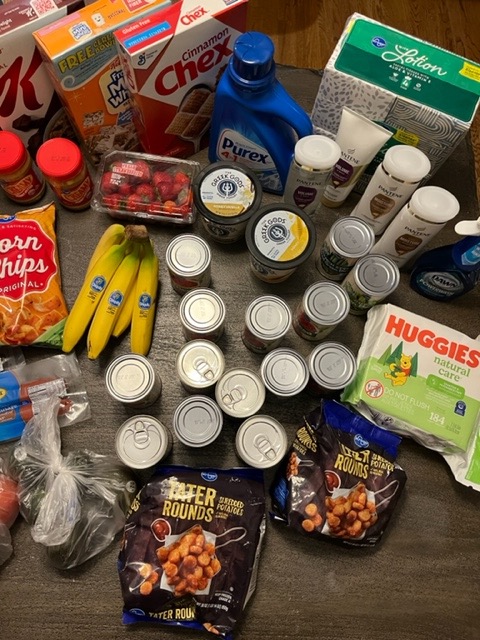
I stocked up on cereal, shampoo, canned goods, wipes, and tissues this past week.
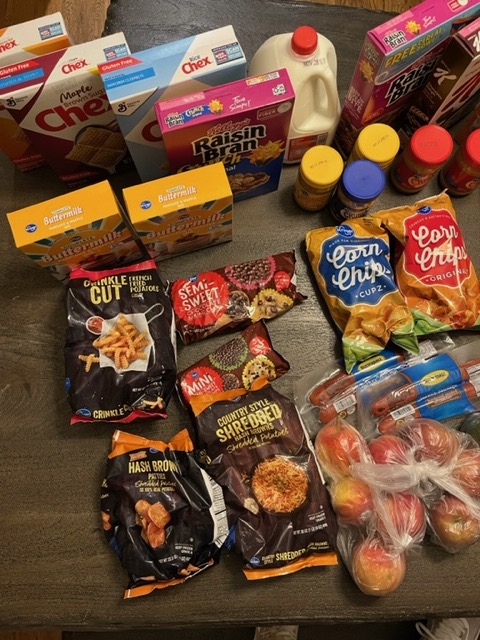
Plus, I also stocked up on peanut butter and froze potatoes!
My total for all of these groceries was $122.40.
Psst! I almost didn’t post this post as I know the sales are over (I’d planned to post these earlier when the sales were still live with lots more details so you could also grab these deals, but if you’ve been following on Instagram, you know we’ve had a lot of sickness and David had surgery and then complications from the surgery, so I had very little time to blog the past few weeks! Thank you for your patience as things have been pretty rough here for the last few weeks!)
I wanted to go ahead and post so that you could see what I bought… for those who love to see what I buy each week, even if the sales are already over. Hopefully I’ll be back to posting more details and posting earlier this coming week since we are finally all well and David is recovered from surgery! Be sure to follow along on Instagam where I’m sharing in real-time what I’m making each night for dinner!
1000 Hours Outside (with Ginny Yurich)
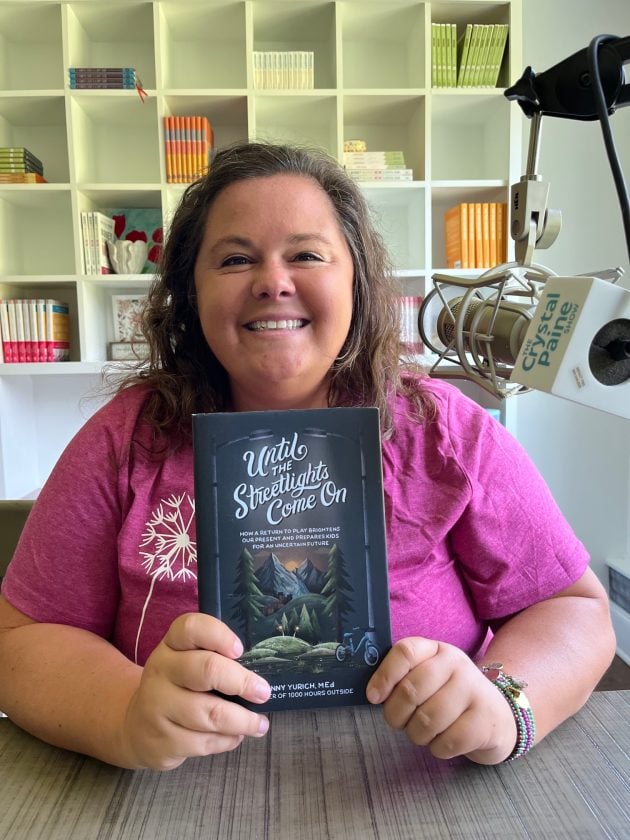
I try not to have favorite podcast episodes, but I just really, really loved this episode and can’t wait for you to hear it. I hope it inspires and warms your heart as much as it did mine!
This week, I got to sit down with Ginny Yurich, the founder of 1000 Hours Outside, to delve into her impactful work and discuss her latest book, Until the Streetlights Come On: How a Return to Play Brightens Our Present and Prepares Kids for an Uncertain Future!
Ginny has deeply inspired me through her work and I share more about how the concept of 1000 Hours Outside has changed my life this past year. I share a little about this during this conversation and then Ginny shares how this idea first came about for her. You will fall in love with Ginny (if you don’t already follow her online!) as she shares her heartfelt story and passion for families spending more time outdoors.
From practical tips for busy moms to anecdotes about navigating outdoor adventures with teenagers, we explore the multifaceted benefits of outdoor play and the positive impact it has on our mental and emotional well-being. I think you will be so inspired and blessed by listening to this episode!
Powered by RedCircle
In This Episode
[0:35] – I am thrilled to welcome Ginny Yurich to the podcast!
[3:18] – Ginny shares her transformative experience that first launched the idea of 1000 Hours Outside.
[6:24] – Hear how Ginny discovers the joys of unstructured outdoor time, realizing its profound impact on child development and emotional enrichment.
[11:12] – Ginny offers advice on spending more time outdoors, such as finding a friend, choosing a safe space, packing essentials, and starting with easy outings.
[14:04] – Spending a few hours per day outdoors doesn’t have to be as complicated to make happen as it might seem at first.
[15:35] – Ginny touches upon how incorporating outdoor rhythms transforms parenting.
[18:51] – Outdoor adventures foster lasting memories, boost cognition, and defy screen-centric teen stereotypes.
[21:23] – Ginny shares how encouraging teens in diverse activities fosters lifelong development.
[25:26] – Setting a 1000-hour outdoor goal ensures accountability, balancing learning with flexible and efficient educational opportunities.
[27:19] – Ginny points out that morning outdoor time boosts mood and energy and sets a healthy day-night cycle.
[29:27] – I, in closing, point out that the thousand hours outside concept invites a balance, not a strict choice; embracing nature is a gift for both parents and kids.
Links & Resources
- Crystal Paine
- 1000 Hours Outside
- Until the Streetlights Come On: How a Return to Play Brightens Our Present and Prepares Kids for an Uncertain Future by Ginny Yurich MEd
- 10 Days to Be a Happier Mom
- Sign up for the Hot Deals Email List
- MoneySavingMom.com
- My Instagram account (I’d love for you to follow me there! I usually hop on at least a few times per day and share behind-the-scenes photos and videos, my grocery store hauls, funny stories, or just anything I’m pondering or would like your advice or feedback on!)
- Have feedback on the show or suggestions for future episodes or topics? Send me an email: crystal @ moneysavingmom.com
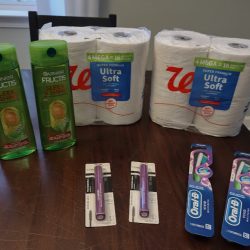
Brigette’s $2.13 Walgreens Shopping Trip ($12 Money Maker after Rebates) and $0.24 CVS Shopping Trip!
Brigette’s $2.13 Walgreens Shopping Trip ($12 Money Maker after Rebates) and $0.24 CVS Shopping Trip!
Love drug store shopping each week? Don’t miss these GREAT deals Brigette grabbed this week at CVS and Walgreens!
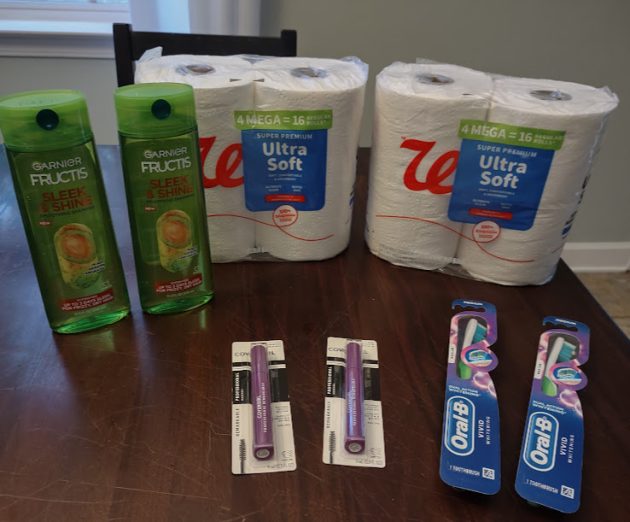
Walgreens
All of my coupons are from the Walgreens app. I highly recommend downloading it if you haven’t already. You can clip both Manufacturer’s and Store coupons and stack them together on the same item.
What I Bought:
2 Walgreens 4-Ct Mega Roll Toilet Paper – $3.98
= $3.98 total out of pocket
2 Covergirl Mascara (B1G1 50%) – $10.18
Used $2/1 Walgreens digital manufacturer’s coupon
Received $2/1 Shopmium Rebate
Received (2) $3/1 Covergirl Eye Ibotta Rebates
= $8.18 for 2 total out of pocket ($0.18 for 2 after Rebates!)
2 Garnier Fructis – $8
Receive $3 Register Reward when you buy 2
Used $3/2 Garnier Fructis Walgreens digital manufacturer’s coupon
= $5 for 2 total out of pocket ($2 for 2 after Register Rewards!)
2 Oral-B Toothbrushes – $6
Receive $3 Register Reward when you buy 2
Used $3/2 Crest Walgreens digital manufacturer’s coupon
= $3 for 2 total out of pocket (FREE after Register Rewards!)
Totals:
Total: $20.16 plus tax
Used $20 Walgreens Cash
Total Paid Out Of Pocket: $2.13, plus I received $6 Register Rewards and $8 Rebates
CVS Shopping Trip
All of my coupons are from the CVS app. I highly recommend it if you don’t have it already! Just log in to your account and clip the coupons you want, and they automatically come off in the store. There are CVS store coupons and manufacturer coupons to clip on the app – and you can stack them on the same product.
What I Bought:
6 General Mills Cereals – $11.94
Used $1/2 General Mills CVS digital manufacturer’s coupon
Used $1/2 General Mills CVS digital manufacturer’s coupon
Received $1/2 General Mills Ibotta Rebate
= $9.94 for 6 total out of pocket ($8.94 for 6 after $1 Rebate!)
Totals:
Total: $9.94 plus tax
Paid with $9.70 ECB’s from previous weeks
Total Paid Out Of Pocket: $0.24 plus I received $1 Rebate
Psst! Want to cut your grocery budget? Go here and sign up (it’s free!) I’ll send you my 10 Easy Ways to Cut Your Grocery Bill By $50.

One simple tweak that has made a big impact

Jesse and I did something we’ve never done before for this episode: we recorded it twice! Not because of technical issues, either. Listen in for why (and you can laugh!)
In this week’s podcast, we share a candid glimpse into some struggles we’ve experienced in recent months that prompted a conversation that led to a change in our daily lives. We talk about some of the hurdles that come with working from home and how these have impacted us recently.
We also talk about how to be honest when you feel stuck, how to assess and acknowledge your challenges, and how to move forward from stuck to solutions.
Throughout the conversation, listen in as we emphasize the importance of recognizing that you’re never truly stuck, and we encourage listeners to be open to new perspectives and approaches. Join us as we share our journey of embracing change, finding solutions, and discovering the transformative power of a fresh perspective!
Powered by RedCircle
In This Episode
[1:37] – RSV, stomach bugs, and surgery… it’s not been dull around here!
[10:37] – I just finished listening to a really fascinating novel!
[15:19] – What has been saving my life?
[16:10] – Car seat covers have been so helpful!
[20:24] – We are talking about a little tweak that has made a big difference in our lives!
[22:51] – Learn about the four As to tweak your life!
[24:57] – I felt resistance to Jesse’s idea at first.
[29:46] – I detail how this tweak brought unexpected benefits.
[34:56] – Jesse adds not to dismiss possibilities based on perceived impracticality.
[35:52] – I emphasize the importance of not believing that you’re stuck; there’s always a solution.
Links & Resources
- Car Seat Covers
- The Crystal Paine Show – 230. Why I’m Saying No
- A Night Divided by Jennifer A. Nielsen
- Crystal Paine
- 10 Days to Be a Happier Mom
- Sign up for the Hot Deals Email List
- MoneySavingMom.com
- My Instagram account (I’d love for you to follow me there! I usually hop on at least a few times per day and share behind-the-scenes photos and videos, my grocery store hauls, funny stories, or just anything I’m pondering or would like your advice or feedback on!)
- Have feedback on the show or suggestions for future episodes or topics? Send me an email: crystal @ moneysavingmom.com
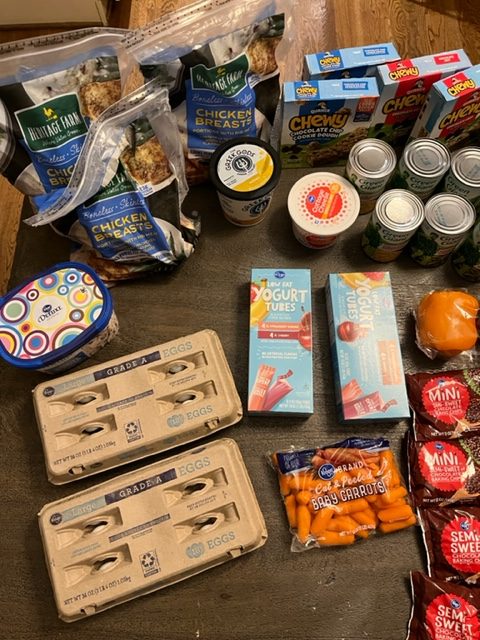
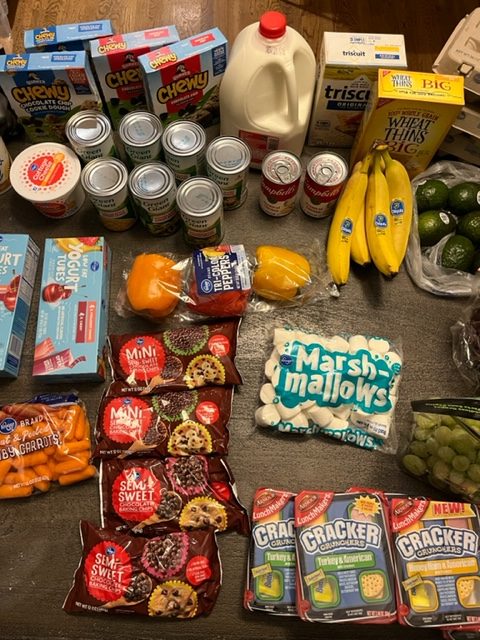
Brigette’s $123 Grocery Shopping Trip and Weekly Menu Plan for 6
Brigette’s $123 Grocery Shopping Trip and Weekly Menu Plan for 6
My older sister, Brigette, shares her shopping trips and menu plans every week! You can go HERE to see all of her weekly menu plans and you can go HERE to read all about her family!
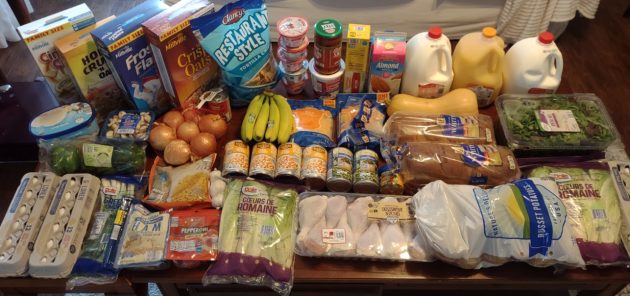
Aldi
2 gallons Whole Milk – $5.06
1 gallon Orange Juice – $5.19
1 64-oz carton Unsweetened Almond Milk – $2.19
4 cans White Northern Beans – $3.00
1 jar Salsa – $2.09
1 carton Ice Cream – $2.49
1 family-size box Honey Nut Crisp Oats – $2.65
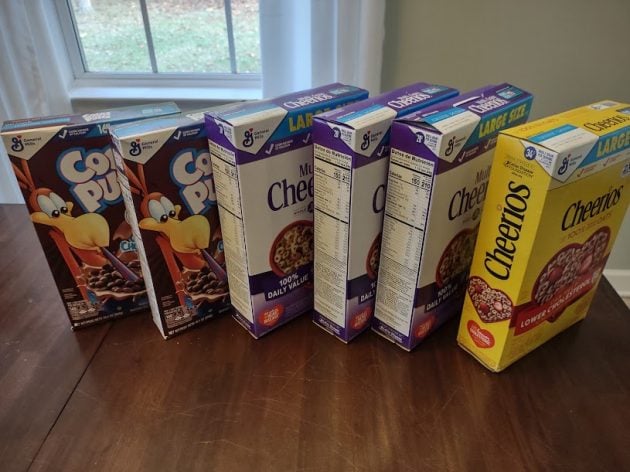
1 family-size box Frosty Flakes – $2.65
1 box Honey Crunch’n Oats – $2.39
1 family-size box Cinnamon Crunch Squares – $2.79
1 16-0z pkg Deli Meat – $4.19
1 pkg Chicken Drumsticks ($1.29/lb) – $6.46
1 pkg Pepperoni – $2.49
2 bags Romaine Hearts – $5.10
1 pkg Mushrooms – $0.99
1 3-lb bag Yellow Onions – $1.69
1 3-ct bag Green Peppers – $1.69
1 large tub Organic Spring Mix – $3.99
2 cans Green Beans – $0.98
1 bag frozen Corn – $0.66
1 bag Green Onions – $0.99
1 bunch Bananas – ($0.68/lb) – $0.68
1 Butternut Squash ($0.69/lb) – $2.62
1 10-lb bag Russet Potatoes – $3.49
1 3-head ct pkg Garlic – $1.15
1 jar Bouillon Cubes – $1.65
3 dozen Eggs – $3.57
5 single-serve cartons Greek Yogurt – $2.95
2 16-oz bags Shredded Cheddar Cheese – $5.96
1 24-oz carton Cottage Cheese – $2.29
2 boxes Butter Quarters – $3.98 (this was an unadvertised price, and I didn’t realize it until just now! I need to go back for more!)
2 loaves Sandwich Bread – $1.00
1 can Condensed Tomato Soup – $0.65
1 bag Tortilla Chips – $1.85
Total: $91.57
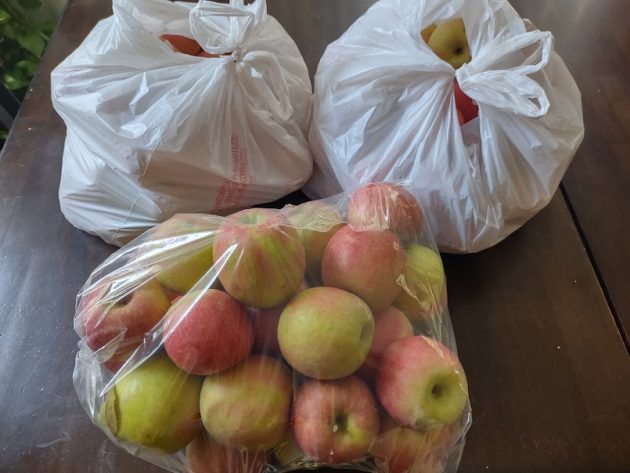
Approximately 30lbs Pink Lady Apples from our favorite roadside stand (the ones in the white grocery sacks are “seconds”) – $16.00
Sawyer’s Produce
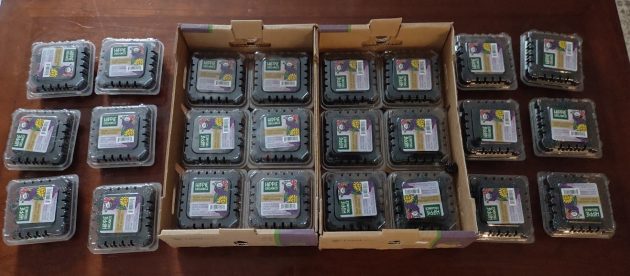
24 cartons Organic Blackberries – $16.00
Grocery Total for the Week – $123.57
Weekly Menu Plan
Breakfasts
Cereal, Toast, Eggs, Smoothies, Oatmeal, Blackberry Muffins, Pancakes, Fruit
Lunches
Deli Meat/Cheese Sandwiches, Blackberries, Peppers x 2
Baked Potatoes with Cheese, Carrots, Blackberries
Leftovers x 4
Dinners
Shepherd’s Pie, Ice Cream Pie (Birthday Dinner)
French Toast, Venison Sausage, Fried Eggs
Venison Meatloaf, Baked Potatoes, Green Beans
Chicken Taco Soup with Shredded Cheese and Chips
Spaghetti with Pepperoni, Tossed Salad
Grilled Chicken Drumsticks, Tossed Salad, Broccoli
Date Night Out (kids eat Macaroni and Cheese)
Psst! Want to cut your grocery budget? Go here and sign up (it’s free!) I’ll send you my 10 Easy Ways to Cut Your Grocery Bill By $50.
Did you do any grocery shopping this week? I’d love to hear what great deals you scored!