


This delicious orange cream smoothie is such a refreshing way to start the day (or a nice afternoon treat). It’s also a great way to use up a bunch of oranges if you find them on clearance (yes, you can freeze oranges!)

I promised I’d let you know how my freezing oranges experiment went. Well, I’m happy to report that it was a success!
I used them to make this Orange Cream Smoothie recipe last week and it was a hit.
The children all drank it down and loved it… and my sister and brother, who were over at our house, also said it was delicious.

Ingredients for Orange Cream Smoothies
- 2 cups frozen oranges (you can read how I froze mine here)
- 1 cup milk
- 1 cup plain yogurt
- 5 teaspoons raw sugar
NOTE: you may use vanilla yogurt in place of the plain yogurt — if you do this, you can likely omit the extra sugar as well!

How to Make Orange Cream Smoothies
1. Put all ingredients in a high-powered blender and blend on high until smooth (we use a Vita-mix).
2. Pour into 2 mugs and enjoy!
NOTE: I can’t say for sure how well the frozen oranges would grind up in a regular blender. If you try this recipe in a regular blender, let us know how it turns out!

Orange Cream Smoothie
Equipment
Ingredients
- 2 cups frozen oranges
- 1 cup milk
- 1 cup plain yogurt
- 5 teaspoons raw sugar
Instructions
- Put all ingredients in a high-powered blender and blend on high until smooth (we use a Vita-mix).
- Pour into 2 mugs and enjoy!
Notes
Nutrition
Love this recipe?
Make sure to share and save it on your favorite platform below!
More Smoothie Recipes You’ll Enjoy!
- Chocolate Peanut Butter Banana Smoothie
- Patriotic Smoothie
- Pick-Me-Up Smoothie
- Blueberry Ginger Smoothie
- Strawberry Oatmeal Smoothie
- Banana Coconut Green Smoothie
- Tropical Hawaiian Smoothie
- Sweet Potato Smoothie
FREE 50+ Easy and Cheap Breakfast Ideas!!
Mornings just got so much easier with this FREE list of 50+ Easy & Cheap Breakfast Ideas for Busy Weekday Mornings!

More Than Double Your Budget with Daily Deal Sites
Guest post by Stephanie at Daily Deals by Brad and Stephanie.
I was skeptical of daily deal sites at first, but I decided to check them out since we’re always looking for ways to save money. In the first three months of using Groupon, I saved $150, with little effort. Now, I’m totally sold out on daily deal sites!
Maximize Your Budget
- Only purchase deals for something you will use and with money you have in your budget already. For example, we allocate a certain amount each month for dining out. If we only use daily deal vouchers, then we have effectively doubled our dining out budget for that month.
- If you want to purchase a daily deal voucher for a store or restaurant you’ve never been to, check online reviews (like Urbanspoon and Yelp) first. You don’t want to spend your hard-earned and painstakingly budgeted money on a place that’s sub-par.
- Consider buying vouchers as gifts. I purchased half of my Christmas gifts from daily deal vouchers. That’s a savings of at least 50%! Plus, sometimes the daily deals give me gift ideas I wouldn’t have come up with on my own.
- Subscribe to the daily deal sites for other cities that you visit often for work, or a city you are planning a vacation for. Not only will you double your budget, but you will get ideas for new places to visit in an unfamiliar locale.
- Subscribe to multiple daily deal sites. Often, I have seen the same store or website offering a daily deal voucher on different sites. Usually, one has a better deal. See a list of recommended Daily Deal Sites here.
More Ways To Save
- Refer your friends. Almost all daily deal sites have a referral program where, for each referral you give, you earn credit at that daily deal site. Some sites offer $10, $12 and even $25 in referral cash.
- Shop through cashback sites, like Rakuten (formerly Ebates) and ShopAtHome when using online vouchers. Shopping at these sites mean you earn additional cash back on your online purchases. Before using your daily deal voucher, always check these sites first to see if you can earn money on your purchases.
- Look for coupon codes to stack with your voucher. Some vouchers can be used in conjunction with coupon codes. If that’s the case, check coupon code sites like RetailMeNot for online vouchers or scour your mailers and Sunday papers for coupons to use with local vouchers.
Be Cautious
- Check prices before you buy. Always check out the website to see what the prices are before you buy. A $20 voucher to a perfume store which you got for $2 is probably not going to be a good deal if the perfume store only sells perfumes which are $100 and up.
- Find out if shipping is included. If it’s not, check if the daily deal voucher can be used towards shipping. If shipping is not included, you’ll need to factor that into your budget before determining whether purchasing the voucher is a good deal.
- Can you buy multiple daily deal vouchers? Sometimes buying more than one will further your savings (as long as you’re still staying within your budget guidelines). However, many vouchers only allow you to use one per purchase.
- Read the fineprint! Most of the daily deal sites have a very clearly marked section for “Fine Print”. Be sure to read it. And remember, never buy something because you feel pressured by the timer. If they do the deal once, they’ll likely do it again at some point.
Do you have any more tips for daily deal sites? Share in the comments below.
Stephanie and her pastor hubby Brad regularly compile the best daily deals from sites like Groupon.com and share daily deal tips at Daily Deals by Brad and Stephanie. They love using daily deal sites to buy gifts, stretch their budget and try new places!

Making Extracurricular Activities Extra Affordable

Guest Post by Sarah at Read Cook Save
Your eight-year old is excited about playing soccer this spring, your six-year old says she wants to take violin lessons and your four-year old has her heart set on ballet. In addition to paying for the classes, you’ll need shin guards and a uniform, ballet shoes and a violin. How are you going to afford it all?
The trick, as always, is planning ahead. Way ahead, if possible. Here are a few tips for making extracurricular lessons both fun and affordable:
The Lessons
- Know your options. Dance academies and martial arts dojos often require lengthy (and costly) commitments. If your child is new to the activity or if you prefer a more low-key environment, check out community education programs, your parks and recreation department and local YWCA/YMCA. Some churches also sponsor youth programs. Start asking around your community — you may be surprised at what’s available.
- Ask about trial lessons. Your child may be able to take a trial class for a pro-rated fee (or possibly free). This gives you and your child a chance to make sure the class is a good fit all the way around before committing to an entire class.
- Understand registration fees. Some programs require a registration fee in addition to class fees. Find out if there is one, if it is for the family or the individual and how often (annually, seasonally, etc.) it is required. Ask if there are circumstances in which it can be waived and see if you qualify.
- Sign up early. Many programs offer a discount of 10-30% if you register several weeks in advance. Of course, this is more time for something unexpected to come up on your end, so be sure you understand the cancellation/refund policy.
The Equipment
- Ask when you sign up. Make sure you understand exactly what kind of supplies, equipment or clothing are required and what, if anything, is covered by the cost of the class. Ask where you can buy or rent what you need at a reasonable price. Ask if there are stores in your area that give students in this program a discount.
- Put the word out. Let your friends know what you’re looking for; if someone has it in her attic or garage she may be willing to lend it or give it to you.
- Consignment shops. Call the children’s consignment shops in your area and ask if they carry the kind of equipment/clothing you’re looking for.
- Yard sales and thrift stores (of course!). With some lead time, these can be good places to browse for outgrown leotards and sports equipment. You’re less likely to find a second-hand flute or a pair of size two tap shoes — but you never know!
- Craigslist and Freecycle. Better if you’re looking for specific brands, sizes or styles.
- Retail stores. By planning ahead, you can still find bargains. Ask when their sales are, if they give discounts to students in your program, and find and use coupons.
Sarah Barbour blogs about her adventures in new-found thriftiness at Read Cook Save.
photo by Summers
Q&A Tuesday: Less-expensive avenues for creating a will?

My husband and I want to have a will but it seems attorneys are charging a lot of money for this service. Can you suggest any other avenues to create a will? I know there are online tools like legal zoom but it seems so confusing. -Kristen
If you have been following the recent news over federal tax policy at all, you will know that one of the most hotly-debated proposals was the reviving of the estate tax (which was non-existent in 2010). This debate underscores the importance of having proper estate planning to ensure that one’s assets be distributed according to their wishes at death.
One of the most critical aspects of estate planning is having a properly executed will. Whether you have a sizable estate built after years of hard work or are just getting started and want to make sure your young children are cared for, you need a will.
Now bear in mind that a will will not save you in the event the constantly-changing death tax comes back, but it will ensure that you, and not the State, dictate what happens to those you love and care about.
As you would expect, I recommend that you visit with an attorney in your state about your individual needs and desires. There is no one-size-fits-all approach and each state has their own requirements for creating a will.
For instance, some states allow you to write out a will by hand and have it notarized, others do not. Some require you need to have a two witnesses and a self-attestation clause, again others do not. This is why it is imperative that you seek professional advice from someone knowledgeable for your state’s laws on Wills and Estates.
One of the main reasons my wife and I seek to encourage people to get out of debt and get their financial lives in order is so that they can get in the position to personally grow, succeed, give and provide a solid foundation for generations to come. A will or proper estate plan is a cornerstone of that foundation.
Jesse Paine is a licensed attorney who owns his own law firm. He’s married to Crystal and is the numbers nerd of the MoneySavingMom.com team! If you have a question you’d like him to answer in a future column, you can submit it here.
The content of this column intended for informational use only and is not to be construed as providing legal, investing, accounting, or other professional advice. Your situation is factually specific and you should accordingly seek qualified professional counsel concerning your specific legal, investing or accounting needs.
Save Money By Buying a Vehicle at a GSA Auction

Guest post by Amy from Raising Arrows
With the birth of our son in 2009, we noticed our little minivan was quickly becoming too crowded for comfort. Our five-foot tall 11-year-old was squished between two car seats and cargo space was virtually nonexistent.
As we searched for a larger vehicle, it became apparent 12- and 15-passenger vans cost a pretty penny — which we didn’t have. With our determination to stay out of debt, we put the idea of up-sizing our vehicle on the back burner and continued to squeeze children into our minivan.
Then, in August of 2009, a friend of ours who owns a small used car lot, informed us of a GSA auction in Omaha, Nebraska with several 15-passenger vans available.
GSA stands for General Services Administration, which is a specific entity of the US Government that handles the acquisitions for other agencies within the federal government. When you purchase GSA vehicles, you are purchasing vehicles that were owned by the federal government and used in specific government agencies. These auctions, where used government vehicles are sold off, are always open to the public. Because government vehicles are regularly maintained, they tend to be in first-rate condition, which relieves a lot of the stress of buying a used vehicle.
GSA auctions are hosted by various car auction companies, such as Manheim. Not every state has GSA auctions, but the savings you encounter buying vehicles this way is well worth the trip out of state.
You can find an auction near you here. Once on the site, you will be able to see all the vehicles up for auction.
Two ways to bid on GSA vehicles
The first is to go in person to the auction. Many auction sites require the bidder to put money down in order to obtain a bidder number. This is refundable if you don’t buy anything. You will be able to look over the vehicle, turn over the engine and put it in gear, but not test drive it.
The second way to buy is online; however this requires you to have a dealer’s license or know someone who does. We went this route through our friends who own a used car lot as well as the online auction bidding business named CarCo.
When bidding online, the auto auction company provides pictures and specifications on the vehicle, as well as any problems or repairs that have been made. The dealer then bids remotely during the live auction. CarCo charges a fee to bid on your behalf, but once again, the deals you can find at these auctions make the fee well worth it.
If you win the auction, there will be a buyer’s fee and a time limit as to when you must pick up the vehicle with cash in hand. The auto auction company will provide you a with a certificate to obtain a title.

The GSA 15-passenger van we purchased was a maroon 2002 Chevy with 46,000 miles on it. It was in tip-top condition, and only cost us $8900 total, fees included. Purchasing through a GSA auction proved to be the answer to our prayers!
Amy is the homeschooling mother of six living children and a precious daughter named Emily being held in the Lord’s arms. She strives to offer a candid and honest look at homeschooling and daily life in a larger-than-average family. You can read more of her struggles and successes in bringing blunt-edged babes to finely sharpened arrows on her blog Raising Arrows.
Do you have an idea for a guest post? I am always looking for high-quality,original (i.e. not published anywhere else online) content with tips and ideas Money Saving Mom® readers can use. If you would like to submit a guest post, please follow the Guest Posting Guidelines.
31 Weeks to a Better Grocery Budget Video Series: How to Plan a Weekly Menu, Part 1
31 Weeks to a Better Grocery Budget Video Series: How to Plan a Weekly Menu, Part 1
Related Posts: Menu-Planning on a Budget
How I Have a Low Grocery Budget Without Relying on Coupons

Guest post by Johnlyn
Many people assume I use coupons to keep our grocery budget low. They tell me that they can’t have a low grocery budget because they just don’t have the time or energy to clip coupons.
At the beginning of 2010, my grocery budget was $260.00 per month for our family of four. My husband is a marathon runner with a high metabolism and my kids were 13 and 11 at the time and they both continue to eat more than I do.
Small Town Living
When you live in a small town, you do not receive the same coupon inserts in the newspaper as you do when you receive a large city newspaper.
Here are the coupons I received in last weekend’s newspaper insert: Zicam, Lysteda, Pillsbury Sweet Rolls, Betty Crocker Warm Delights, Red Baron Pizza, Chuck E Cheese, Weight Watchers Yogurt, Foot Pain Wraps and Wrist Supports and Direct T.V. I won’t use any of those!
Five Tips to Keep Your Food Budget Low Without Coupons
- Change your attitude. Be thankful that you can afford to buy ground beef even though you really want the shrimp!
- Take cash to the store. This changed my mindset completely. Even though I always paid off my credit card bill every month, I became much more aware of how much money that I was spending when I changed to a cash envelope system.
- Determine the lowest amount of money you need to spend in order to feed your family. For a few weeks, make low cost meals and buy only what you need at the grocery store for those meals. Don’t buy items just because they are on sale and avoid buying junk food.
- Find substitutes. For example, I’ve bought cabbage instead of bok choy because it was much cheaper and worked for the meal I was making
- Menu plan using your pantry. Make a simple menu plan after looking in your pantry, fridge and freezer.
Voting With My Dollars
I’ve decided to increase our food budget to $400.00 per month. The $140.00 increase is for several reasons:
- After watching the movie Food, Inc. I decided to support our local farmers and ranchers when possible. I’ve found that the quality and peace of mind more than offset the increase to our budget.
- There is a store here in our town where the prices are wrong quite frequently. After several customer service issues, I’ve decided to support the small grocery store with excellent customer service.
- When my budget was $260.00 per month we focused on breads and pastas to “fill us up”. Three members of our family had horrible hypoglycemic issues while eating this way. We now we focus on veggies, meat, healthy fats and fruit.
Johnlyn has been a full time homemaker for the past nine years. She is the owner of Hummingbird Homemaking: Working the Home to Save Time and Money.
Super Savings Saturday
I went out shopping last Saturday evening to four different stores — all by myself!– and got some great deals. It was so weird to be kid-less, as I usually always take at least one child with me.
I was amazed at how cathartic and refreshing it was to go grocery shopping by myself to multiple stores — something I’ve not done in months, as far as I can remember. I came back feeling like I’d just spent two hours at the spa! 🙂
Here was my “loot” from the health food store, Aldi, Target and Dillon’s:

Altogether, I spent right around $45 for all the groceries shown.
I think my favorite deal of all was the Enjoy Life Chocolate Chips for $0.99 per bag. I have to admit that it took quite a bit of self-control to not buy all 20 bags they had on the clearance shelf. But I convinced myself that I really did not need 20 bags of chocolate chips — especially since we usually only use an average of one bag of chocolate chips per month.
I also was excited to get free Finish Powerball Tabs and Rimmel Eye Shadow at Target by combining Target coupons and manufacturer’s coupons. Now that we don’t live near a CVS anymore, I’m rarely able to score free makeup or dishwashing detergent, so I was especially thrilled about these two deals.
And avocados were only $0.25 each at Aldi — a price we rarely, rarely see around here. So that was another exciting bargain. I’m considering trying putting a few in our smoothies in the mornings just to keep things interesting. Anyone have a great smoothie recipe which uses avocados?
This week, we also bought four loaves of bread at the dollar store (I’ve recently discovered that our Dollar Tree sells soon-to-be-expiring Nature’s Own bread for only $1 per loaf so I’ve been buying a few loaves every few weeks and sticking them in the freezer to use as needed.) and milk, more cheese and some fruit and veggies at Dillon’s.
So all totaled, we spent around $65 on groceries the past seven days.
Would you like to know what the best deals and coupon match-ups are for your local stores? Be sure to check out the Store Deals section of our site where we post the best deals and coupon match-ups each week for over 100 different stores across the country. You can sign up to receive the top deals in your email inbox each week as soon as they are posted!

 Did you snag any great deals or bargains this week or save money in other ways? If so, be sure to post about them on your blog and leave your link below. Please remember that this weekly round-up is to share deals you personally got and/or money you were able to save this week. In order to keep this weekly round-up focused on helping and inspiring others in their efforts to save money, links which have little-to-no content other than promoting affiliate links, etc. will be deleted. Also, to make it easy for everyone to navigate quickly through the links, your link must link directly to your Super Savings Saturday post.
2011 Do-It-Yourself Experiment #2: Homemade Dishwashing Detergent
2011 Do-It-Yourself Experiment #2: Homemade Dishwashing Detergent

Homemade Dishwashing Detergent gets mixed reviews, but I decided to try it anyway.
I’ve been using the Tropical Traditions Powdered Dish Detergent for the past four weeks because they sent it to me. It’s very similar to the homemade version and so far, I’ve been liking it quite a bit. I’ve noticed that some of our plastic dishware is sometimes cloudy, but it’s not been a huge issue.

Homemade Dishwashing Detergent Recipe
- 1 cup baking soda or washing soda
- 1 cup borax
- 1/2 cup salt
- 1/2 cup citric acid
Mix together. Use 1 Tablespoon per load. Add some vinegar to the rinse aid compartment of your dishwasher to help prevent clouding.

I bought all the ingredients but the borax from Amazon with Swagbucks. The borax cost me $4.55.
If I was paying out of pocket for all the ingredients, I am not convinced that this recipe would really be less expensive than buying dishwashing detergent with coupons — especially since I can occasionally get it for free at Target and elsewhere. (If you typically pay full price for dishwashing detergent, though, making your own is less expensive per this cost breakdown.)
However, it was fun to try my hand at making something I’ve never made before.
And in case you missed it, here’s the list of the 12 Do-It-Yourself Projects I Plan to Try in 2011:
January: Make From-Scratch Chai Tea
February: Make Homemade Dishwashing Detergent
March: Make Homemade Hamburger Buns
April: Make Homemade Laundry Soap (I did attempt this one time before, but it was with a pre-made mix someone gave me. So I’m going to try again — this time completely from scratch!)
May: Make Appliqued Flower Tee
June: Make Homemade Hummus
July: Make Freezer Jam
August: Make Homemade Soap
September: Sew a Rag Quilt
October: Make Homemade Apple Butter
November: Make Artisan Bread in Five Minutes a Day
December: Make Homemade Marshmallows
Have you attempted any new do-it-yourself projects recently? I’d love to hear how they went!

Valentine’s S’more Bites

Looking for a last-minute sweet treat to make for Valentine’s Day? These Valentine’s S’More Bites look scrumptious and simple to pull off.
OVER-SPENDING EVERY SINGLE MONTH?Grab these FREE Budgeting Sheets!
Click here to download!
We Paid Cash! :: A Second Car

A testimony from Liz at e squared.
When my husband and I got married in 2005, he had never been in any kind of debt. He was working his way through college and paying his school bills without the use of student loans.
While he had some savings and some mutual funds, I had a small car loan, $11,000 in student loans and no savings. I sometimes joked that he brought all the assets into our marriage, while all I brought were liabilities!
We only had one car, and although I would have loved to buy a second one, we made the decision to make do with one car until we could afford to pay cash for a second car. This meant paying off the loans I currently had — which were driving my previously debt-free husband crazy! — before we could even start saving for another car. Back then, it seemed like quite an impossible goal.
How We Did It
- The first 18 months of our marriage were spent just making ends meet. My husband’s paychecks covered his school bills, and we lived on my income as a medical secretary. We lived in an old trailer, which kept our rent very low. We clipped coupons and stuck to our grocery budget. I was often motivated by my husband’s offer of a treat at Sonic if I stayed at least $5 under budget that week – that was a great incentive not to add things we didn’t really need to my shopping cart!
- After my husband graduated in May 2007 and began his career, the temptation was great to upgrade our lifestyle a bit with the added income and move into a nicer apartment. However, we stayed in our trailer and all our extra money went toward my student loans. By doing this, we were able to pay them off in less than one year!
- In August 2008, we began looking into purchasing a home. We made it our goal to keep our mortgage and other “necessity” expenses within my husband’s income, so that much of my income could be saved.
- During this entire time, we have tried to live frugally to save as much as possible. At times, this was really difficult. We often felt left out having to turn down invitations from our friends who ate out frequently. We made do with only having one car, and while I’m thankful we were able to do this, it didn’t come without frustrations.
The Result
 In July 2010, we finally had enough saved to buy a used car, and after searching for a few months we were able to purchase a 2006 Ford Fusion for $8000.
We are both incredibly thankful for God’s grace and provision. I’ve learned much about patience, contentment and stewardship in the past five years. Although reluctant to this whole idea at first, I’m glad for the wisdom my husband had financially and so thankful to not have a car payment!
Married for five years, Eric and Liz live in Madison, WI. Eric works in retail management while Liz works from home as a medical transcriptionist and does her best to keep their blog, e squared, updated.
Have you saved up and paid cash for something — large or small? Submit your story for possible publication here.
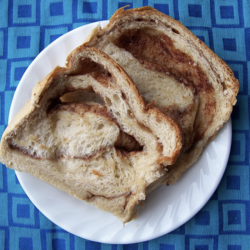
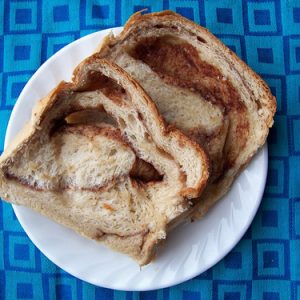
Cinnamon Swirl Bread in Bread Machine
You can enjoy delicious, homemade cinnamon swirl bread with almost no hands-on effort, thanks to this impossibly easy bread machine recipe!

This Bread Machine Cinnamon Swirl Bread is easy and scrumptious!
This variation on my favorite bread recipe is absolutely scrumptious. In fact, our whole family can eat almost an entire loaf in one meal!
My favorite thing about this recipe? It can easily be done in 15 minutes or less of actual prep time. And the end result looks like you slaved for at least an hour in the kitchen!

Homemade Cinnamon Swirl Bread Ingredients
For the Dough:
- 1 cup warm water (110-115 degrees F.)
- 1/2 cup oil, melted butter, or melted coconut oil
- 4 Tablespoons brown sugar or raw sugar
- 1 teaspoon salt
- 2 cup whole-wheat flour
- 1 cups all-purpose flour
- 2 teaspoons dry yeast (It’s much less expensive if you get this in bulk from Sam’s Club or Costco.)
For the Filling:
- 2 teaspoons cinnamon (You can also do a cinnamon/sugar mixture.)
- 1 to 1 1/2 Tablespoons honey
- Raisins, optional
How to make Cinnamon Swirl Bread in Bread Machine
1. Put ingredients in a bread machine and turn on the dough cycle.

2. Take out dough and roll into a rectangle.

3. Sprinkle with cinnamon.

4. Add raisins (if you’d like).

5. Drizzle with honey.

5. Roll up, tuck ends under, place in a greased bread pan.
6. Cover with a towel or plastic wrap and let rise for 20-40 minutes (or until double in size).
7. Bake at 350ºF for 30 minutes, or until golden brown.
8. Let cool, then slice and eat!
How to serve Cinnamon Swirl Bread
This bread is so delicious, warm from the oven with some butter (and maybe a little more honey!)
It’s also really yummy toasted, or used for your favorite french toast casserole.
How to store Homemade Cinnamon Swirl Bread
Once the bread is completely cool, place it in a zip-top bag or food storage container and store at room temperature for up to 4 days.
If you plan to store it longer than a few days, you’ll want to slice it and store it in the freezer. You can remove one or more slices and toast them whenever you have a craving for a little something sweet.

Cinnamon Swirl Bread Machine Recipe FAQs
It might be because you kneaded the dough a little too long. It might also be because it wasn’t rolled tight enough so it separated in the pan. Make sure you roll up the dough nice and tight and properly seal the outside edge so it doesn’t come apart while baking.
If your bread is too dense for your preference, try using bread flour in place of all-purpose or whole grain flour.
Gummy bread is almost always a result of bread that didn’t rise long enough. Make sure you watch your bread machine during the rise cycle to make sure the dough is getting enough time to rise.
Cinnamon Swirl Bread Machine Recipe
Ingredients
For the Dough:
- 1 cup warm water 110-115 degrees F.
- 1/2 cup melted butter or melted coconut oil
- 4 Tablespoons brown sugar or raw sugar
- 1 teaspoon salt
- 2 cup whole-wheat flour
- 1 cups all-purpose flour
- 2 teaspoons dry yeast It’s much less expensive if you get this in bulk from Sam’s Club or Costco.
For the Filling:
- 2 teaspoons cinnamon You can also do a cinnamon/sugar mixture.
- 1 to 1 1/2 Tablespoons honey
- Raisins optional
Instructions
- Put ingredients in a bread machine and turn on the dough cycle.
- Take out dough and roll into a rectangle.
- Sprinkle with cinnamon.
- Add raisins if you like
- Drizzle with honey
- Roll up, tuck ends under, place in a greased bread pan.
- Cover with a towel or plastic wrap and let rise for 20-40 minutes (or until double in size).
- Bake at 350ºF for 30 minutes, or until golden brown.
- Let cool, then slice and eat!
Nutrition
Love this recipe?
Make sure to share and save it on your favorite platform below!
If you want a Cinnamon Sugar Swirl bread, you can try Laura’s recipe. I didn’t seem to have great success in using butter as it seemed to be too heavy and caused the loaf to separate and have holes in the center. But hopefully you’ll have better success than me! 🙂
FREE 50+ Easy and Cheap Breakfast Ideas!!
Mornings just got so much easier with this FREE list of 50+ Easy & Cheap Breakfast Ideas for Busy Weekday Mornings!
Impromptu Freezer Cooking Day: The Final Tally

Well, as usual, the freezer cooking ended up taking longer and making more of a mess than I’d hoped. And I skipped making the brownies in favor of cleaning up the kitchen. But I’m happy to have some meals and goodies in the freezer again.
Here’s what I ended up making:
::Bag of chicken breasts baked and chopped
::Green Rice Casserole
::Freeze oranges (for smoothies)
I never managed to get a picture of the Green Rice Casserole. However, I froze it uncooked, so I promise I’ll post the recipe and pictures sometime in the next few weeks.
And the jury is still out on how the frozen oranges worked since I didn’t get a chance to make smoothies for breakfast this morning. I’ll let you know what the verdict is as soon as I have a chance to make smoothies.
Thanks for joining in my Impromptu Freezer Cooking Day yesterday. You all are such great cheerleaders and encouragers!
Impromptu Freezer Cooking Day: Brown Bag Burritos, Oranges and Cinnamon Swirl Bread
Impromptu Freezer Cooking Day: Brown Bag Burritos, Oranges and Cinnamon Swirl Bread

Once I finished making the Chocolate Chip Pancakes, I made the Brown Bag Burritos. Since I already had chicken cooked, I went ahead and substituted chicken for the ground beef. Because you know how I just can’t bear to stick with a recipe exactly! 🙂

I realized that I didn’t have enough tortillas for all the filling, so I just filled the tortillas I had and put the rest of the filling in bags to freeze. While not quite as nice as having the burritos completely made, it’s really simple to just thaw the filling and make up a quick pan of burritos. Plus, it takes up less space in the freezer.

And then the freezing oranges experiment commenced.

I just cut, peeled, pulled them into pieces and stuck them in a freezer bag. I’m anxious to try them in some smoothies and see how they turn out. I have visions of variations on Orange Cream Smoothies.

Then it was time to roll out the bread dough for Cinnamon Swirl Bread. I’m happy to report that it actually turned out this week and we ate almost the entire loaf for dinner.
I spent the rest of the evening making granola, finishing our homeschool lessons for the day, playing with the children in the snow, cleaning up messes and more messes (!), getting dinner on the table, helping Jesse shovel the mountain of snow on the driveway (talk about a workout!) and then we all settled in and read four chapters of On The Banks of Plum Creek before bedtime.
All in all, it was a good day — even if my kitchen isn’t very clean right now and I’m pretty tired!
Coming up tomorrow: Granola photos and Cinnamon Swirl Bread recipe
Impromptu Freezer Cooking Day: Chocolate Chip Pancakes, Chicken and Bread Dough
Impromptu Freezer Cooking Day: Chocolate Chip Pancakes, Chicken and Bread Dough

First up, I mixed up the Chocolate Chip Pancake batter.

I used some milk from the freezer in the batter. I also grab up marked down milk when I find it on a great deal and then freeze it to use in pancake batter.

While cooking the pancakes, I laid the chicken out on a cookie sheet and popped it in the oven to bake. I used to boil chicken breasts, but a reader left me a tip last year about baking them in the oven instead and I’ve found this to be much easier and the chicken ends up a lot more tender and juicy.

I then dumped all the bread dough ingredients in the bread machine and set it on the dough cycle. I just seriously love how simple it is to make dough using my bread machine!

I let the children have Chocolate Chip Pancakes for lunch. I guess they are getting their share of chocolate chips today! 🙂
The only problem is that they love Chocolate Chip Pancakes so much, that after they’d had their fill for lunch, we only had four pancakes left. I guess I need to make a bigger batch next time if I want to have any left for the freezer.
Next up: Brown Bag Burritos and my experiment with freezing oranges