Have any other great last-minute gift ideas? Share them in the comments!
Have you blogged about a Handmade Christmas idea? Submit the link through this form here and we’ll consider sharing it as part of this series during the next 4 weeks!
Published: by Crystal Paine on | This post may contain affiliate links. Read my disclosure policy here.
Hopefully by now, your Christmas presents are purchased. Some of you ultra-organized folks likely had them purchased and wrapped months ago. But some of the rest of us are just now getting around to thinking about wrapping gifts. 🙂
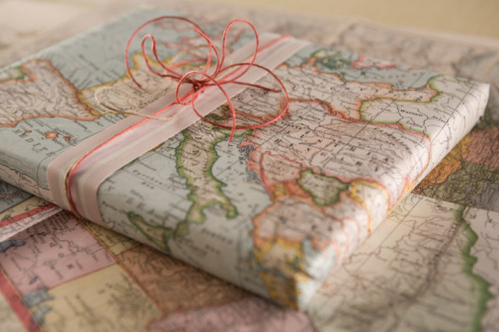
If you’re one of those people, don’t despair! Here are six simple and frugal ideas to dress up your packages without spending a lot of money:
1. If you haven’t done so already, get the rest of your gifts wrapped in the next 24 hours.
2. Once you’ve wrapped your gifts, be sure to label them clearly with the recipient’s name.
3. If you’re attending multiple Christmas gatherings, divide your wrapped gifts up into boxes or tubs by event (label these boxes/tubs with the event name) and then stick them by the door so that you can just grab the appropriate tub or box on your way out the door and you’re good to go! (Since we have young children who like to unwrap gifts, we’re keeping our wrapped gifts at the top of our coat closet. That way, it’s almost impossible to forget them since we have to put our coats on before we head out the door!)
Published: by Crystal Paine on | This post may contain affiliate links. Read my disclosure policy here.
Guest post by Kimberly from Couponing University
Growing up, I can remember Thanksgiving to be just as exciting as Christmas at my Grandma’s home. Every year, she would make all ten of the grandchildren a Christmas ornament. These became the first gift of the season, coming at Thanksgiving so we could enjoy them for the month to come.
Her ornaments were most often intricately crocheted with amazing skill and great attention to detail. My grandmother’s thoughtfulness ran deep as she crafted us ornaments each year. She knew that her gifts would serve to fill our first tree of our own one day as we began our journey into adulthood when money might run tight and leave us with an otherwise bare tree.
As my Grandmother’s ornaments graced my very first tree just three years after she passed, I couldn’t help but pull up the memories of all those years in anticipation for Thanksgiving and a new ornament. Today, all my Grandmother’s ornaments have a special tabletop tree for themselves.
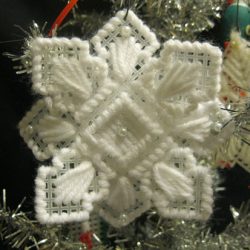
Sometimes, my Grandmother would make us something out of the ordinary, such as this snowflake ornament which was given to me in 1989. (Grandma would always label the back with the year.) We loved this ornament so much that my mother deconstructed the snowflake so that we could reproduce what seemed like a hundred of them for gifts to teachers, neighbors and friends.
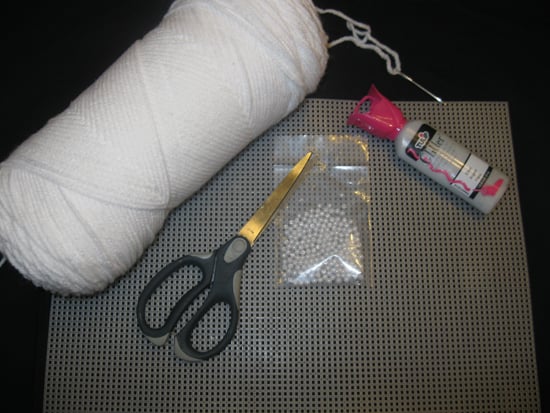
Supplies:
Plastic mesh canvas (one sheet will make six completed ornaments)
White yarn
Pearl beads
Glitter fabric paint
Yarn needle
Scissors
Instructions:
::Cut two snowflakes following the pattern. To begin, cut 19 by 19 squares, then cut the ‘petals’. Once you have cut one petal, you can use your scissors as a guide to begin the next cut, just line them up with the inner line and start over.
::Cut a hole in the middle of the one of the snowflakes. The easiest way to do this is to fold the piece in half, count in two squares, and cut up two squares on each side. Then fold the other direction, again cutting up two on each side. This will be the top piece.
::Starting in the middle of the full snowflake piece, secure the yarn by creating the first stitch and making a knot. Continue to stitch the center.
::Bring the yarn up to the closest petal and stitch the veins.
::Bring the yarn to the side and overstitch the sides, making two stitches in each outer corner, until you come to the next petal.
::Continue in this manner until the bottom is complete, making a double knot at the end.
::Begin stitching the top snowflake in the veins of the petal, creating a double knot to secure. Continue to stitch the first petal.
::Overstitch outer edges, petals, as the bottom snowflake.
::Overstitch the inner edge and secure with a double knot.
::Using the glitter fabric paint, place a dot in the middle of the bottom snowflake to attach a bead. You may find it easier to use the needle to help hold the bead in place. Place beads in the same manner onto the stitched points on the petals of the top snowflake.
::Allow to dry overnight.
::Place the snowflake with the center hole on top of the second snowflake and turn 45 degrees.
::Gently pop the petals of the top snowflake into the centers of the bottom snowflake.
::Tie a loop with yarn into the top of one petal or attach an ornament hook for hanging.
::Write the year on the back with glitter fabric paint.
::Hang to dry.
Kimberly is a stay-at-home mother of two teenage daughters and a one year old boy. In her spare time, she blogs at Couponing University where she shares all she has learned about shopping smarter as well as other tricks for the Domestic Engineer of today.
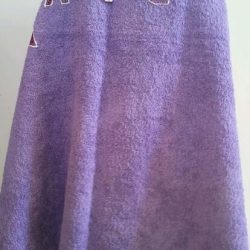
This towel is the absolute cutest personalized gift, and kids just love receiving something with their name on something that they use so regularly. While the pictures in this tutorial are of a towel that is made for a young child, I have made this gift for children of various ages (including one for a “tween” boy using camouflage material and a dark-colored towel) and they have all been well-received!
You could also do the name of a favorite sports team or school. With only four materials that are all inexpensive, this gift is not only incredibly frugal, but also very quick to make.
Supplies needed:
Towel — $2
1/4 yard fabric that coordinates with towel — $2
Heat ‘n’ Bond Ultrahold — $2.50 (found at Walmart — will make several towels)
Tulip Slick Fabric Paint — $3
Instructions:
1. Pre-wash the fabric and the towel.
2. Cut the fabric and the Heat ‘n’ Bond to a smaller size that will fit all of your letters but will be more manageable to work with.
3. Follow the directions on the Heat ‘n’ Bond package to adhere the Heat ‘n’ Bond to the fabric using an iron.
4. Take the paper off the back of the heat Heat ‘n’ Bond.
5. Cut the letters needed for the child’s name from the fabric you just adhered the Heat ‘n’ Bond to. I use my Cricut to cut the letters, but you can also simply type the name in Microsoft Word in a simple font, then before you print it, in the Print Dialog Box, choose “Mirror”. After it prints, cut the letters from the paper and use these as your letters for the towel.
6. Trace them onto the Heat ‘n Bond that is adhered to the fabric. By tracing them backwards onto the back of the fabric, they will then be the correct way when you look at the front of the fabric. Or maybe you’re just artistic enough to freehand the letters!
5. Follow the directions on the Heat ‘n’ Bond package to iron the letters onto the towel.
6. After they cool, use the Fabric paint to outline the letters and/or shapes. This keeps the edges from fraying and helps keeps the edges attached to the towel.
7. Allow the paint to dry for approximately 72 hours before wrapping the present.
8. Enjoy seeing the special kiddo in your life be thrilled to receive a gift that was made just for them!
Leah is married to her best friend and is a mom to three children who will always be reminded of their names at the end of bathtime. She enjoys blogging about anything that will help you save your dime and your time at YourDimeYourTime.com.
WANT TO SAVE $100 FAST?!Join the FREE 14-Day Savings Challenge!
Macaroni & cheese with baked chopped chicken, green beans
PB&J, carrot sticks, apple slices
Egg salad sandwiches, peas, pears
Refried Beans with cheese, carrot sticks, pear slices
Tossed salad with hard-boiled eggs, feta cheese, and dried cranberries
Leftovers x 2
Snacks
Fruit/veggies
Cheese/crackers
Granola Bars
Dinners
Baked chicken, twice-baked potatoes, mixed greens salad, fruit salad Cheesy Chicken and Rice Bake, fruit salad, steamed veggies
Jesse’s Office Christmas Dinner Homemade Pizza in Less Than 30 Minutes, carrot sticks, pear slices Black Bean and Beef Taco Bake, steamed veggies, fruit
PB&J, carrots, pears (Jesse’s going to be gone this night, so I’m keeping it simple!)
Hamburgers, tater tots, steamed veggies, fruit
What’s on your menu this week? Share details and/or your link to your menu plan in the comments.
Megan (Megsicthus@)
Shannon (skellee@)
Cindi (osunanook@)
Nichole (Brannic@)
Need (needanap2@)
Laura (lasmith6@)
Anna (annabelle002@)
Rebecca (beccamcg@)
Lindsey (joshandlindsey@)
Mary (OOMERRYMARYOO@)
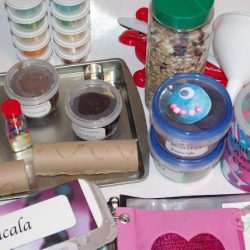
Of the 3,027 entrants, the winners of the Jenuinely Pure are:
Each of you should have received an email with further instructions on claiming your prize.
_____________
Are you giving something away on your blog this week or have you found a great giveaway elsewhere on the web? If so, post your link below and let all the readers here know so they can get in on the action! Your giveaway must be family-friendly and no-strings-attached. In addition, to make it easy to navigate, your link must go directly to your giveaway post. Links going to the homepage of your blog or any other part of your blog besides the direct link to your giveaway post will be deleted.
Published: by Crystal Paine on | This post may contain affiliate links. Read my disclosure policy here.
Do you agree or disagree with the three things I share in this video? Are there other items you’d suggest waiting until after Christmas to buy? I’d love to hear.
Published: by Crystal Paine on | This post may contain affiliate links. Read my disclosure policy here.
We finished up almost 100% of our Christmas to-do list on Saturday so we can just enjoy the next two weeks. It’s been a busy December and I’m looking forward to a quieter week this week–hopefully!
I’m going to be blogging less next week so I can take time to step back and do some planning and goal-setting for 2012 with my husband. I’ll also be making a quick two-day trip to Chicago next week to record The Money Saving Mom®’s Budget as an audiobook. So, to keep it simple, I’m only making 10 goals for the next two weeks.
Here were last week’s goals {I can’t believe I almost finished all of them!}:
How did you do on last week’s goals? What are your goals for this week? I’d love to have you share your progress on last week’s goals and your goals for this coming week in the comments. Of, if you’ve blogged about it, leave your direct link below. Let’s cheer each other on to live purposeful and productive lives!
Have you blogged about a Handmade Christmas idea? Submit the link through this form here and we’ll consider sharing it as part of this series during the next 4 weeks!
OVER-SPENDING EVERY SINGLE MONTH?Grab these FREE Budgeting Sheets!
Have you blogged about a Handmade Christmas idea? Submit the link through this form here and we’ll consider sharing it as part of this series during the next 4 weeks!
Published: by Crystal Paine on | This post may contain affiliate links. Read my disclosure policy here.
Disciplines of a Godly Woman — This book has been an excellent read for me, especially coming off the 21 Days to a More Disciplined Life series. It’s packed with practical encouragement, thought-provoking chapters, and motivation to live a disciplined life. Highly recommended to Christian women.
Read Aloud
These Happy Golden Years— Our whole family has been enjoying our evenings of cozying up together and reading this book. Even Jesse and I are really enjoying this series and we’re sad that it’s almost over with (anyone have any really great book series to recommend that might be in a similar vein to the Little House books?)
An iPad was something I dreamed about having–not only was it cool looking and I’d be able to use it as a reader and the Internet, but I’d be able to take it with me to work on my blog, An Oregon Cottage. However, our budget did not have a extra money in it for this extra “want.”
Luckily, my husband was on board and wanted to find a way to help me purchase an iPad (woot!). So last spring we added an “iPad” column to our budget and started putting any extra money we could come up with into it. We weren’t in a hurry and we didn’t think that we’d be able to order the iPad for probably six months or so, given our budget.
You can imagine how shocked we were when just three months after we created the budget category we were able to order the iPad! How? Here are some of the ways we raised the cash needed:
Sold some items on Craigslist (a weight bench; old stereo)
Used Amazon gift cards I bought with Swagbucks (When we learned that Amazon wouldn’t be selling the iPad 2, we bought food items and then transferred the cash from our food budget towards the iPad)
Scoured the house for anything to sell on eBay–we found mirrors, candlesticks, computer items, yarn, vintage plates, and jewelry
Used my six-month Google Adsense check since I would be using the iPad for some blogging
Honestly, neither of us could believe how fast we were able to accumulate the cash when we put our minds to it. And you know what? We found it fun and exciting to work towards a goal and watch the total go up. There were lots of high-fives and dancing when we’d see we were getting closer to our goal. We’d plan and talk and dream together.
And when we were able to order it and it came in the mail, we just looked at it for awhile–it’s such a great feeling to reach a goal and know it was ours, free and clear. Was it worth it? Oh yes, I love my iPad! I use it everyday and I’m finding more and more things I can do with it. And my husband? I occasionally let him use it, too.
Jami is a wife, mother, and preschool teacher who blogs at An Oregon Cottage. She loves everything about a cottage, but especially what she calls “the cottage mentality” that puts people above things, celebrates imperfections, embraces simplicity, and finds joy in everyday life.
Published: by Crystal Paine on | This post may contain affiliate links. Read my disclosure policy here.
Christmas would not be Christmas to me without wonderful Christmas music playing in the background. When I was growing up, we always had a special stack of Christmas records and cassettes (yes, remember those?) that we pulled out to play only at Christmas time. Pulling out the Christmas records and cassettes always signaled that Christmas time was really here.
We decorated the Christmas tree, baked cookies for the neighbors, made homemade gifts for the grandparents, drank hot cocoa, wrapped Christmas presents, and celebrated our family gatherings with Christmas music playing in the background. It set the tone for so many special memories.
Today, we’ve traded the records and cassettes for MP3s, but Christmas still wouldn’t be the same without the music. I like to buy a new album or two each year to add to our family’s collection. And then we rotate playing our Christmas music all December long.


 Are you giving something away on your blog this week or have you found a great giveaway elsewhere on the web? If so, post your link below and let all the readers here know so they can get in on the action! Your giveaway must be family-friendly and no-strings-attached. In addition, to make it easy to navigate, your link must go directly to your giveaway post. Links going to the homepage of your blog or any other part of your blog besides the direct link to your giveaway post will be deleted.


 Guest post by Jami from


