

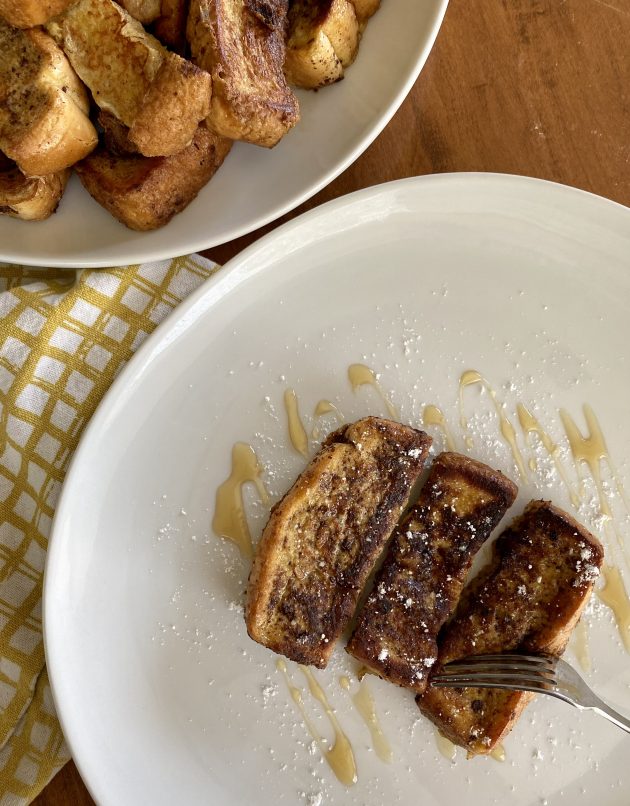
These easy french toast sticks are the perfect breakfast for busy weekdays or lazy weekends. They are so delicious, and a great way to use up slightly stale bread!

The girls were gone with Jesse at swimming and ice skating practices all afternoon/evening yesterday, so Silas and I had a fun Mother-Son Day.
We went to our friend’s pool and hung out for most of the afternoon. Then came home to make Cinnamon Rolls (one of Silas’ favorite foods. Okay, and mine, too!!)
However, we were out of flour and our wheat grinder decided to bite the dust (I’m hoping I can resurrect it, but that didn’t happen last night), so we improvised and made homemade French Toast Sticks instead.
You’ll love these Easy French Toast Sticks!
We loved this recipe because it’s SO simple to make. Also, the French Toast Sticks were delicious and it was a fun and kid-friendly twist on regular French Toast!
We ate them without syrup, which made the recipe quite frugal, and we thought they were plenty yummy without syrup. However, I think it’d be fun to sprinkle them with a little powdered sugar and dip them in syrup too. 🙂
Ingredients for French Toast Sticks
- 8 slices thick-cut Texas toast (or whatever bread you have on hand)
- 4 large eggs
- 1 cup half and half (or heavy cream, or milk)
- 2 1/2 teaspoons cinnamon
- 1 Tablespoon brown sugar (or granulated sugar)
- 1 Tablespoon vanilla extract
- 3 Tablespoons butter, for cooking
- Maple syrup (optional — for serving)
- Powdered sugar (optional — for serving)
How to Make French Toast Sticks
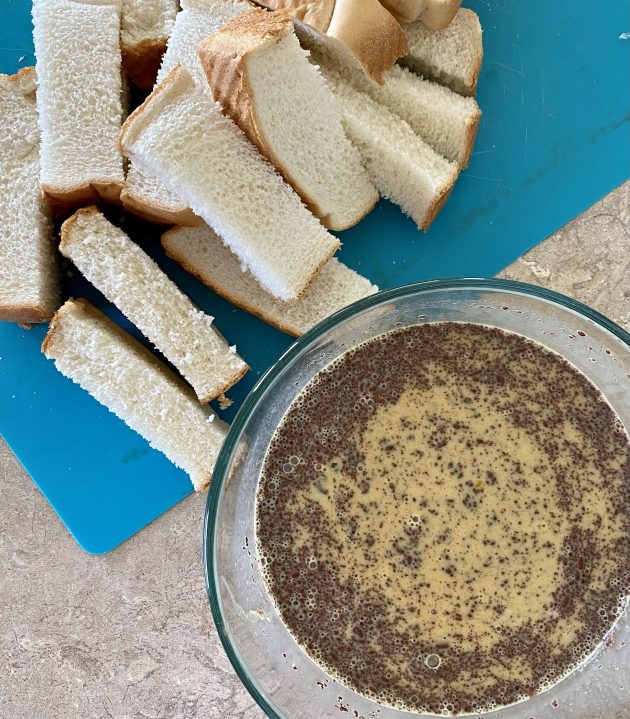
1. Cut slices of bread into four sticks per slice and set aside.
2. In a large bowl, whisk the eggs, half and half, cinnamon, sugar, and vanilla.
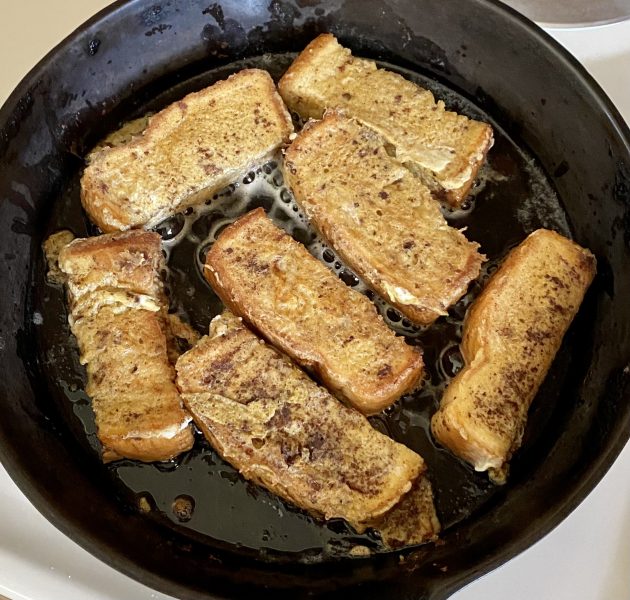
3. Heat a large frying pan or griddle over medium heat and add 3 T. butter.
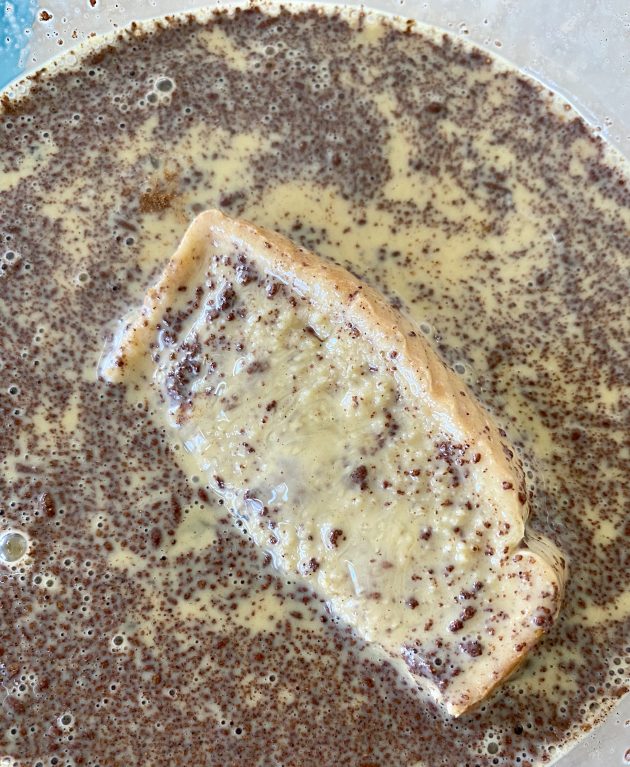
4. Quickly dip each stick of bread into the egg custard mixture and drop several onto the preheated frying pan / griddle (don’t over-crowd the pan).

5. Flip sticks until all sides are evenly browned, then transfer to a serving platter.
6. Continue dipping and cooking sticks until all your bread and egg mixture is used up.
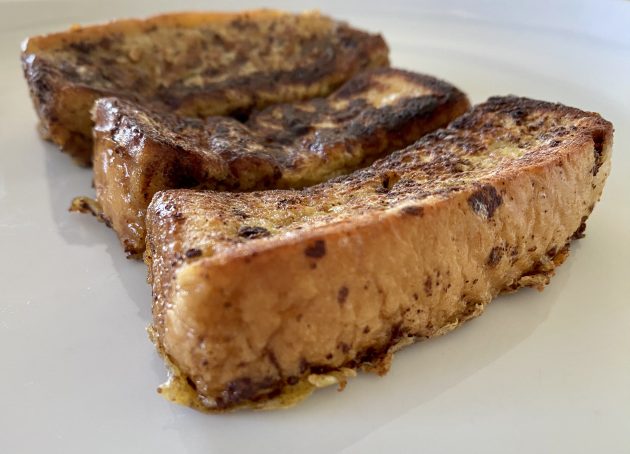
7. Serve immediately with maple syrup, powdered sugar, or another dipping sauce.
French Toast Sticks FAQs
You’ll want to use good “sturdy” bread for best results. Texas toast slices are much thicker than regular slices of bread, so it usually works better. If you want to use homemade bread, cut the slices at least 1″ thick and let it sit for a day (stale bread works better too!)
Yes, because of the dairy and egg, you’ll want to refrigerate any leftovers in a food storage container. You can easily microwave them the next day for a yummy treat!
If you’re making a double or triple batch to feed a crowd, we recommend putting a large rimmed baking sheet in the oven at 250º. Then, as you finish cooking the french toast sticks in your pan or griddle, transfer them to the baking sheet while you cook the next batch. Everything will stay warm and they shouldn’t get soggy.

Easy Homemade French Toast Sticks
Ingredients
- 8 slices texas toast or whatever bread you have on hand
- 4 eggs
- 1 cup half and half or heavy cream, or milk
- 2½ tsp cinnamon
- 1 tbsp brown sugar or granulated sugar
- 3 tbsp butter
- maple syrup
- powdered sugar
Instructions
- Cut slices of bread into four sticks per slice and set aside.
- In a large bowl, whisk the eggs, half and half, cinnamon, sugar, and vanilla.
- Heat a large frying pan or griddle over medium heat and add 3 T. butter.
- Quickly dip each “stick” of bread into the egg custard mixture and drop several onto the preheated frying pan / griddle (don’t over-crowd the pan).
- Flip sticks until all sides are evenly browned, then transfer to a serving platter.
- Continue dipping and cooking sticks until all your bread / egg mixture is used up.
- erve immediately with maple syrup, powdered sugar, or another dipping sauce.
Nutrition
Love this recipe?
Make sure to share and save it on your favorite platform below!
FREE 50+ Easy and Cheap Breakfast Ideas!!
Mornings just got so much easier with this FREE list of 50+ Easy & Cheap Breakfast Ideas for Busy Weekday Mornings!
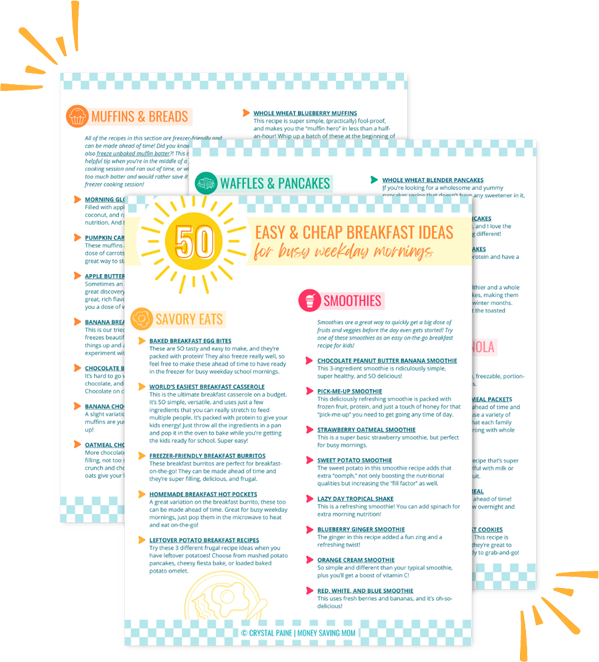
How We Save Over $150 On Our Monthly Grocery Bill
Guest post from Gerri of Maple Planners
Saving money wasn’t really anything I ever thought about until we became a one-income family. Both my husband and I are computer engineers and we made a good income, so I never gave second thought to budgeting.
It wasn’t until our little one came along and I was home for maternity leave that I first thought about trying to save money. After a break of nearly a year, I decided to stay home with my child and began looking at money-saving tips to keep our finances under control.
After writing down our expenses for a couple of months (I never kept track before), I was shocked to find that we were spending around $400 every month on groceries! Well, that was enough to make me start thinking about taking action in our spending department.
I am glad to report that our expenses have been under control since then, and we have been able to save around $150 on groceries every month! Here are some of the tips and tricks I utilized to lower our grocery bill:
1. Compare Prices
Comparing the prices of different items across different stores has probably saved us the most amount of money. I use Crystal’s Price Book to write down the price of the most-shopped-for items in our household. It also helps me figure out if the sale advertised in that week’s flyer is actually saving us money or not.
This is how my price book works. Let’s say you buy 4 boxes of cereals every month, usually for $3.94. You end up paying $15.76 monthly. Every few weeks, the price drops to $3.44 a box and you pay $13.76 per month. When you buy cereal every time the price is reduced you end up saving $2 per month.
Similarly I compare bread, sugar, cooking oil, frozen vegetables, etc. at a variety of stores for different dates. It may not be a huge savings per item, but believe me, when you add up the amount for major items, the saving can be significant by the end of the year. We were able to save right around $70 per month just by comparing prices.
2. Stock up on Sales
I watched as my sister bought in bulk from Costco, but the thought never occurred to me!
However, after our family grew, I started stocking up on non perishable items like sugar, bread, cereal, ice cream etc. I saw significant savings of $25 with this change.
I sometimes use coupons on top of buying in bulk and end up saving even more.
3. Plan Weekly Meals
Before we started meal planning, we would buy whatever we saw in the aisles of the supermarket. For example, I would buy an extra bag of potatoes, not realizing there is already one lying in the corner in our pantry.
When I started our planning our weekly meals, I had to write down the menu for each day of the week. That led me to track down everything in our pantry, fridge, and freezer, and then make a grocery list.
This system helped me save more than $40 per month that would most likely have been thrown away or wasted (rotten vegetables and fruit).
4. Avoid Prepackaged Food
You might be tempted to buy that cute packing of pre-cut apples and melons, or the snack size mini Oreos, but you end up spending too much money as opposed to buying whole fruits or family sized packages.
We ended up saving more than $40 when we stopped buying prepackaged food.
We are glad that we were able to come up with a system that helped us save money without compromising our lifestyle and the quality of food we consume.
Do you have any other tips to save money on groceries?
Gerri is the owner of Maple Planners, where she creates all kinds of different printables for home management, planning, and entertaining. When she’s not busy creating printables, she loves hanging out with her family and friends.
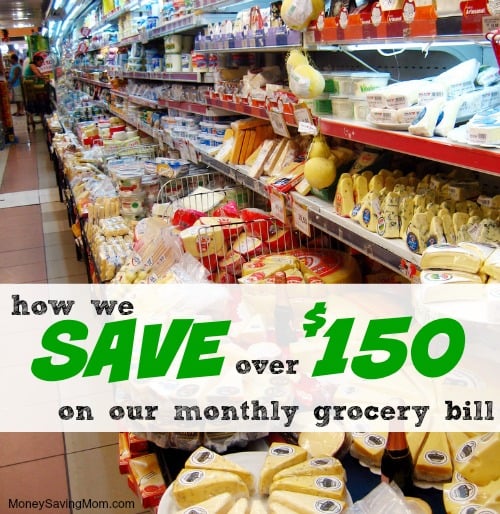
Gretchen’s $48 Grocery Shopping Trip and Weekly Menu Plan
Dillons
1 Turkey Hill Ice Cream – $2.50, used $0.10 Mobisave rebate AND $0.25 Ibotta rebate – $2.15 after rebates
1 Danimal Smoothie – $1.49
2 Kellogg’s Cocoa Krispies – $1.49 each, used $1/2 printable AND $1/2 SavingStar.com rebate – $0.49 each after coupon and rebate
1 Nabisco Good Thins – $2.77, used Free e-coupon (no longer available) – Free after coupon
2 Kellogg’s Frosted Flakes – $1.49 each, used $1/2 printable – $0.99 each after coupon
1 Malt O Meal Cereal – $1.99, used $1/1 e-coupon – $0.99 after coupon
2 Cascadian Farms Cereal – $1.99, used 2 $1/1 printable AND $1 SavingStar.com rebate – $0.49 each after coupons and rebate
1 Betty Crocker Brownie Mix – $1
1 Romaine Lettuce – $0.99
2.23 lbs Bananas – $1.32, used $0.10 Mobisave rebate – $1.22 after rebate
2 lbs Simple Truth Ground Beef – Marked down to $3.99 each
1 pkg Stew Beef – Marked down to $3.48
1 Kroger Shredded Cheese (16 oz) – $3.79, used $0.65/1 e-coupon – $3.14 after coupon
1 Kroger Cottage Cheese – $2
Total after coupons and rebates: $28.38
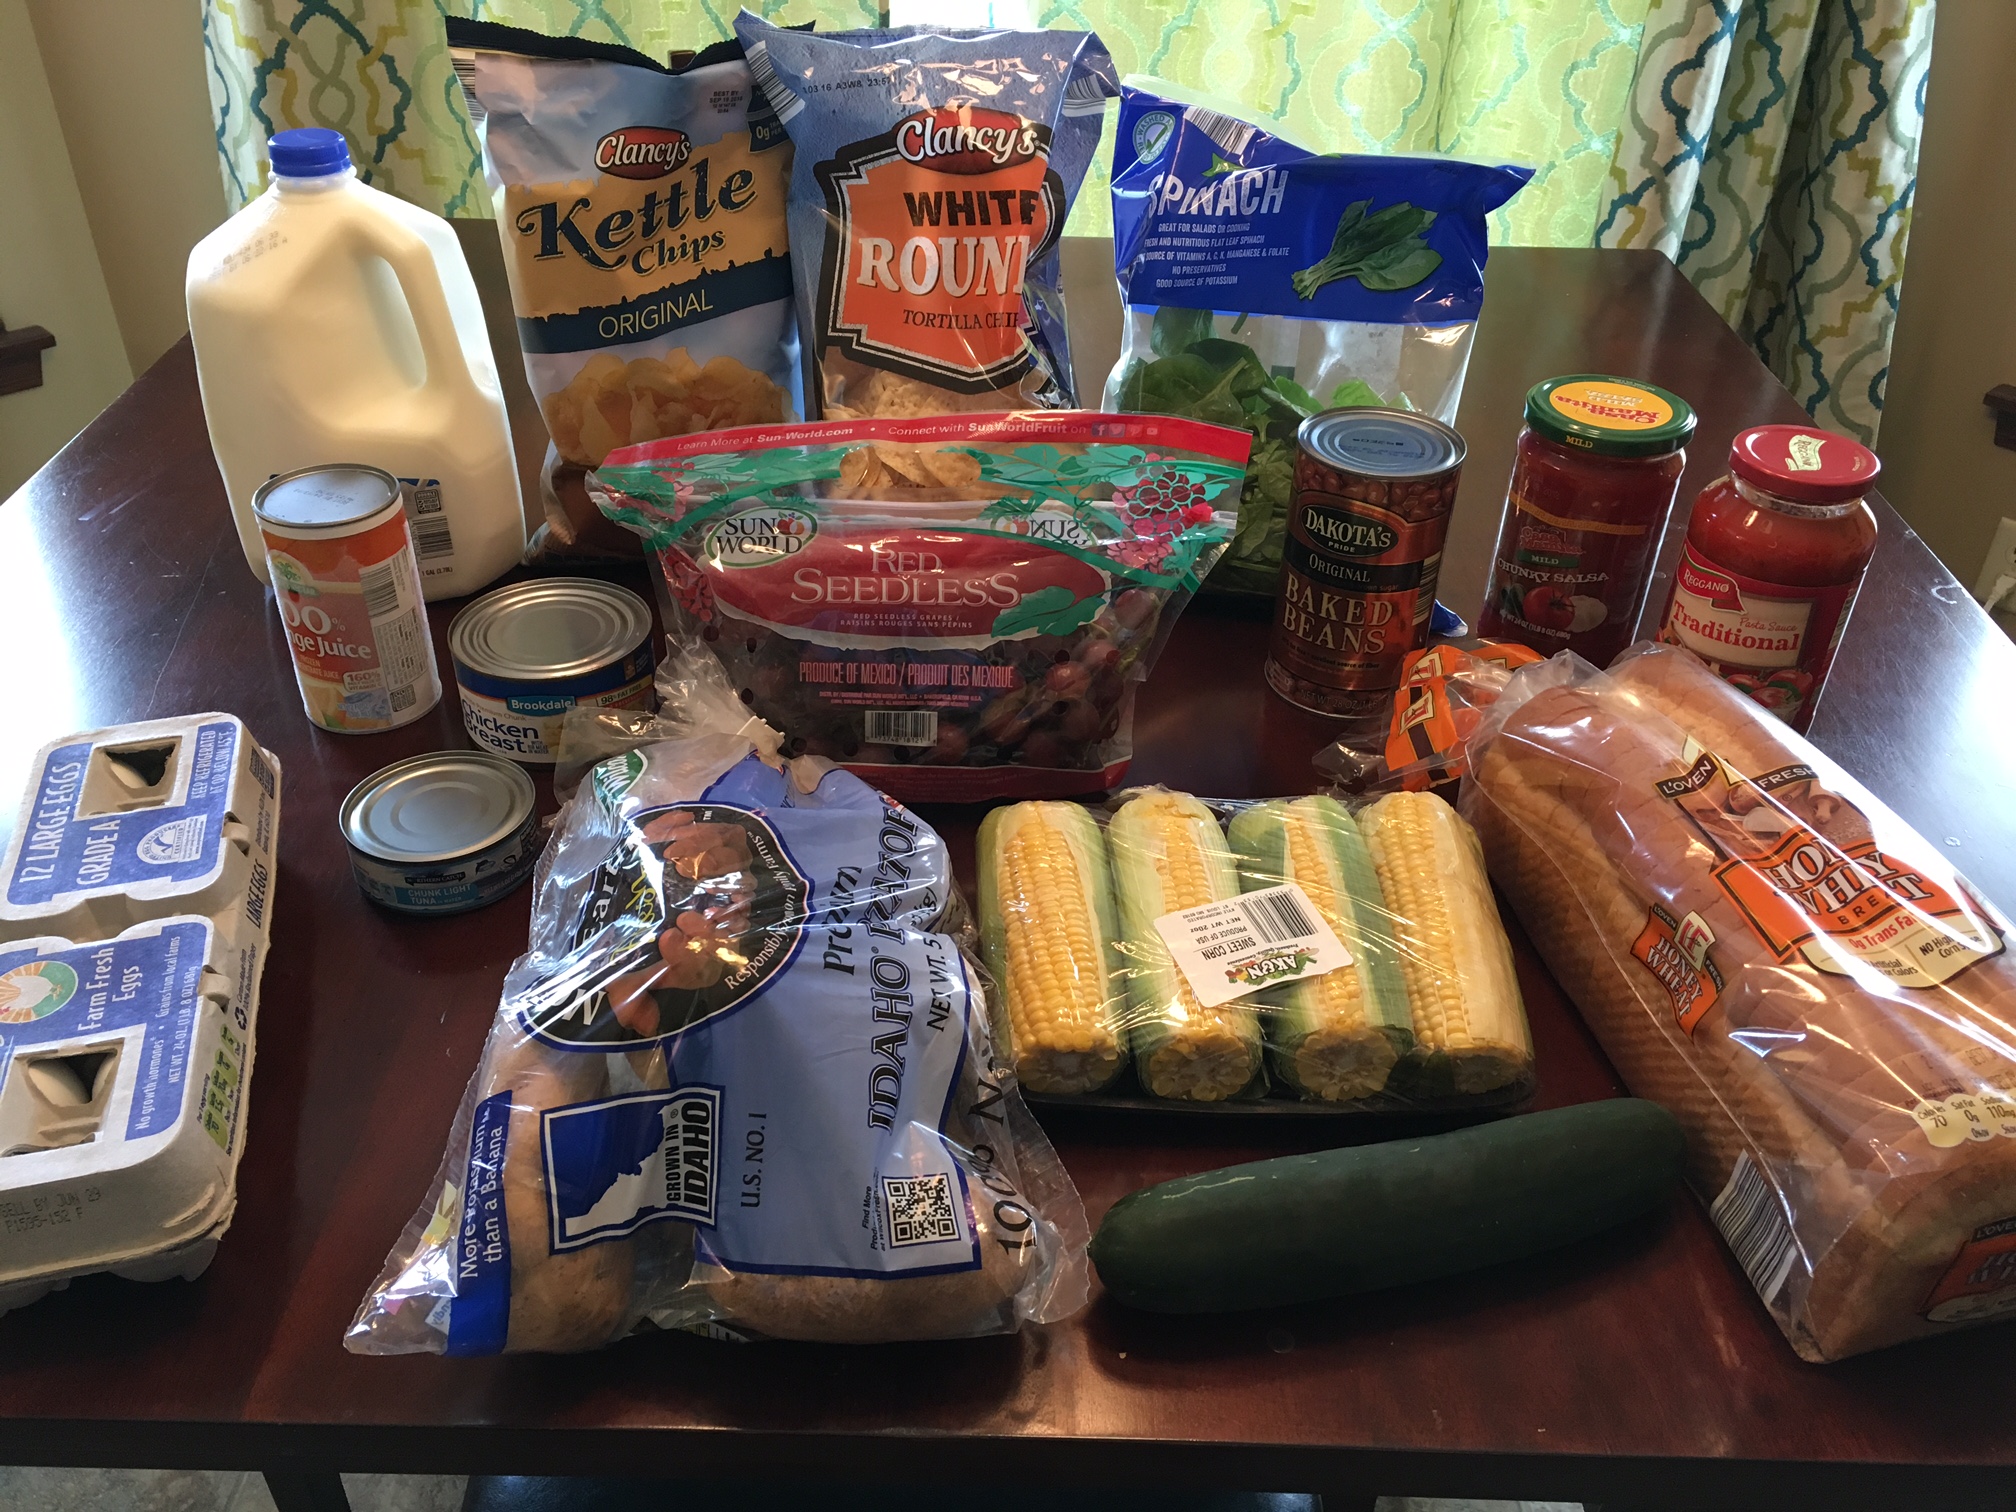
Aldi
1 can Chicken Breasts – $1.69
1 gallon Milk – $1.89, used $0.10 Mobisave rebate – $1.79 after rebate
1 dozen Eggs – $0.69, used $0.10 Mobisave rebate – $0.59 after rebate
1 bag Tortilla Chips – $1.19
1 bag Spinach – $1.79
1 Kettle Chips – $1.79
1 loaf Bread – $1.39, used $0.10 Mobisave rebate – $1.29 after rebate
1 can Baked Beans – $1.39
1 Mild Salsa – $1.89
1 Frozen Orange Juice – $1.19
1 jar Spaghetti Sauce – $0.99
1 Cucumber – $0.29
1 bag Grapes – $1.78
1 can Tuna – $0.65
5 lbs Potatoes – $1.99, used $0.25 Checkout 51 rebate – $1.74 after rebate
Total after rebates: $20.05
Total for both stores: $48.43
Menu Plan for This Week
Breakfasts
Cereal x 3
Eggs, Spinach, Toast x 3
Oatmeal, Orange Juice
Lunches
Tossed Salad Bar
Peanut Butter & Jelly Sandwiches, Grapes, Cucumber Slices
Chicken Salad Sandwiches, Veggies
Lunch with friends (We are bringing brownies.)
Macaroni & Cheese, Fruit
Baked Potatoes, Cottage Cheese
Leftovers
Dinners
Hamburgers, Baked Beans, Chips, Corn on the Cob
Beef & Noodles, Tossed Salad, Banana Bread
Chicken & Rice, Steamed Broccoli (from freezer)
Bean Burritos, Chips & Salsa, Fruit Salad
French Toast, Eggs, Orange Juice
Leftovers
Out to eat

That hard thing in your life? You never know how it might actually end up bringing hope and light to others…
I got this little oil lamp in Nazareth and it has been on our mantle ever since I got back home from Israel.
Yesterday, the kids asked if we could please light it. So we did… And I wondered why I had waited until now to do so.
That little tiny light brought so much joy to our hearts. The kids were fascinated with how the oil lamp worked and I was so inspired by remembering the olive press in Nazareth Village.
In Bible times, the oil used in lamps was the third press. The first press was given to God. The second press was used for your household (baking, etc.). And the third press was what was used for the oil in the lamps.
There was so much spiritual significance in this for me. Life is full of things that press in, squeeze, and bruise us. We can feel stressed, frustrated, and broken by these things.
Without the pressing, we would never have oil for lamps. Those things that press in on us, they are part of our story, part of our refining. And the things that crush and overwhelm us can be what God uses to bring light and hope to others.
So today, when you face the hard things that come up, remember that this might be the very thing that is going to be used in a powerful way in someone else’s life.

5 Things I’m Loving This Week: Doughnuts, Dollar Shave Club, Water Slides, + more!
5 Things I’m Loving This Week: Doughnuts, Dollar Shave Club, Water Slides, + more!
1. Doughnuts
I may have completely forgotten my birthday this past year, but you’d better believe I didn’t forget National Doughnut Day! I may have had, um, 3 to celebrate. Okay, so it was over the course of two days. Does that make it any better? 😉
2. Water Slides
We went to a waterpark and had a blast on the water slides this weekend. Oh my goodness! I felt like a little kid again. You can watch the video I posted here for proof. (Yes, that’s me going down the waterslide and squealing.)

3. This Post on Instagram
A reader shared this post on Instagram from The Alaskan Wife sporting one of our Choose Joy shirts and I just absolutely loved it. Go read it and I bet you’ll be encouraged, too!
4. Freezer Cooking
I can’t believe I fell off the freezer cooking bandwagon for so long. It’s the BEST. THING. EVAH. {Read all about the recipes I made and the kitchen adventures I had last week here.}
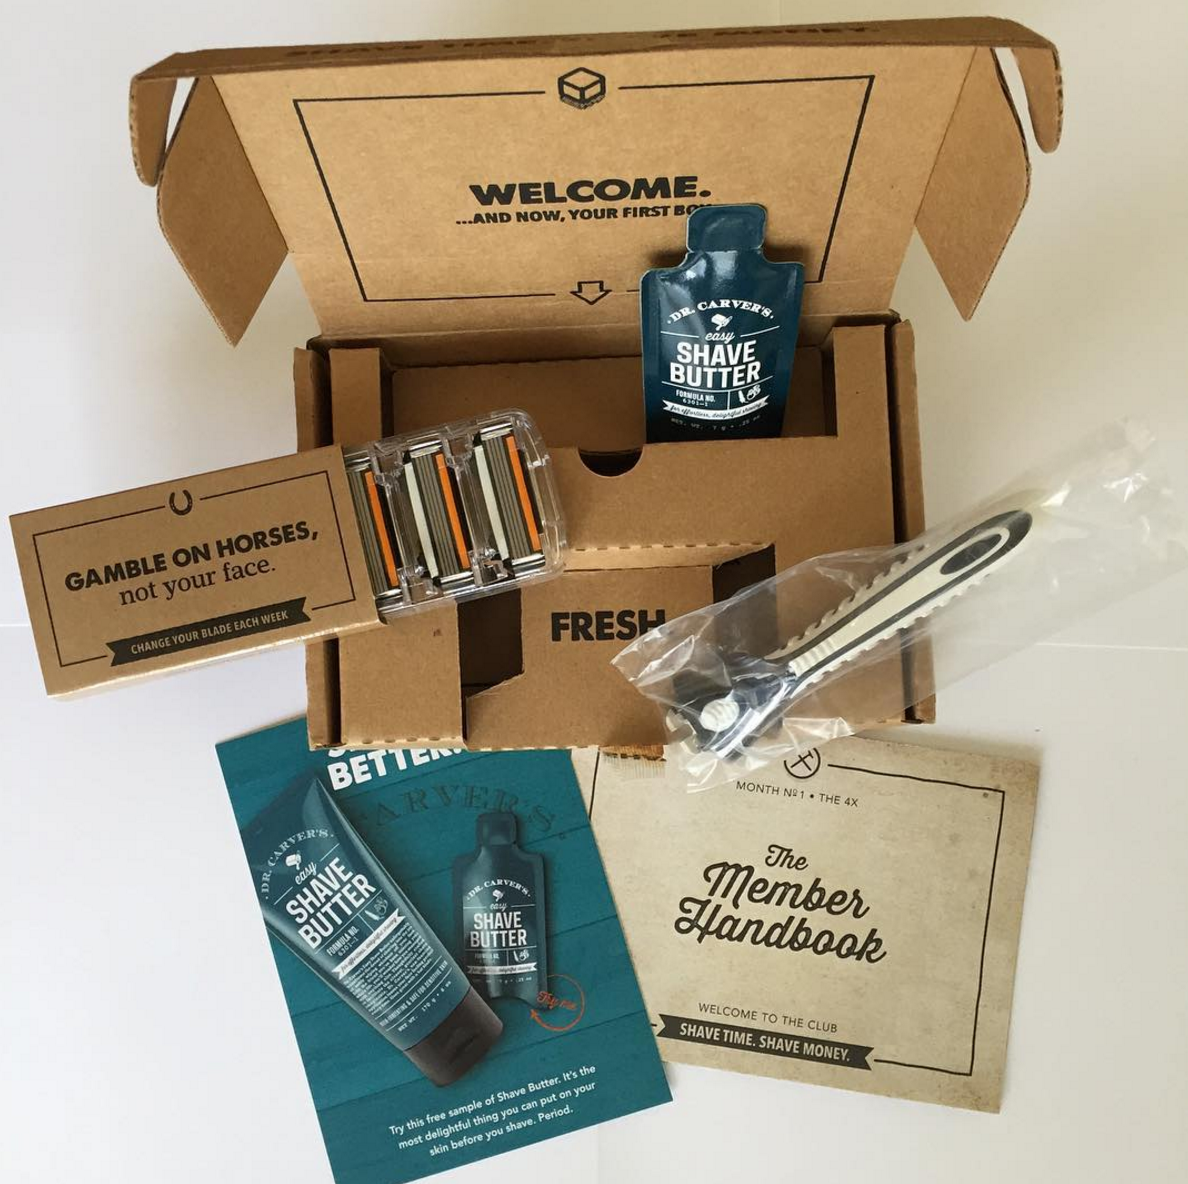
5. Dollar Shave Club
After a bunch of you highly, highly recommended Dollar Shave Club, I caved and signed up. Mostly because I couldn’t believe how many people raved about it and also because it was only $6/month and I figured that if I don’t like it, I can cancel after a month or two and not be out much out of pocket.
For those who are curious, here’s what came in my first box: 1 razor handle, 4 razor blades, and a shave butter sample. For $6 shipped, I was pretty impressed — especially because the quality of the razor seems pretty good.
I’m going to test it out for the next two months and then plan to write a Completely Honest Review post on my blog of my experience with Dollar Shave Club. Stay tuned!
I did an unboxing video and talked more about it here, if you’re interested.
What are YOU loving right now?

We’re all afraid of something
Have you ever looked at someone who was bold and brave and thought, “I wish I had that same kind of courage?”
Well, I can almost guarantee that that same person who seems so courageous has struggled with fear of some kind.
Because we all have fear… Fear of the unknown. Fear of failure. Fear of missing out. Fear of rejection.
Fear comes in a thousand different forms and varieties and no one is immune.
It’s what we choose to do with our fear that will change the trajectory of our life.
We can freak out and run from it, we can be paralyzed by it, or we can face the fear head on and walk through it.
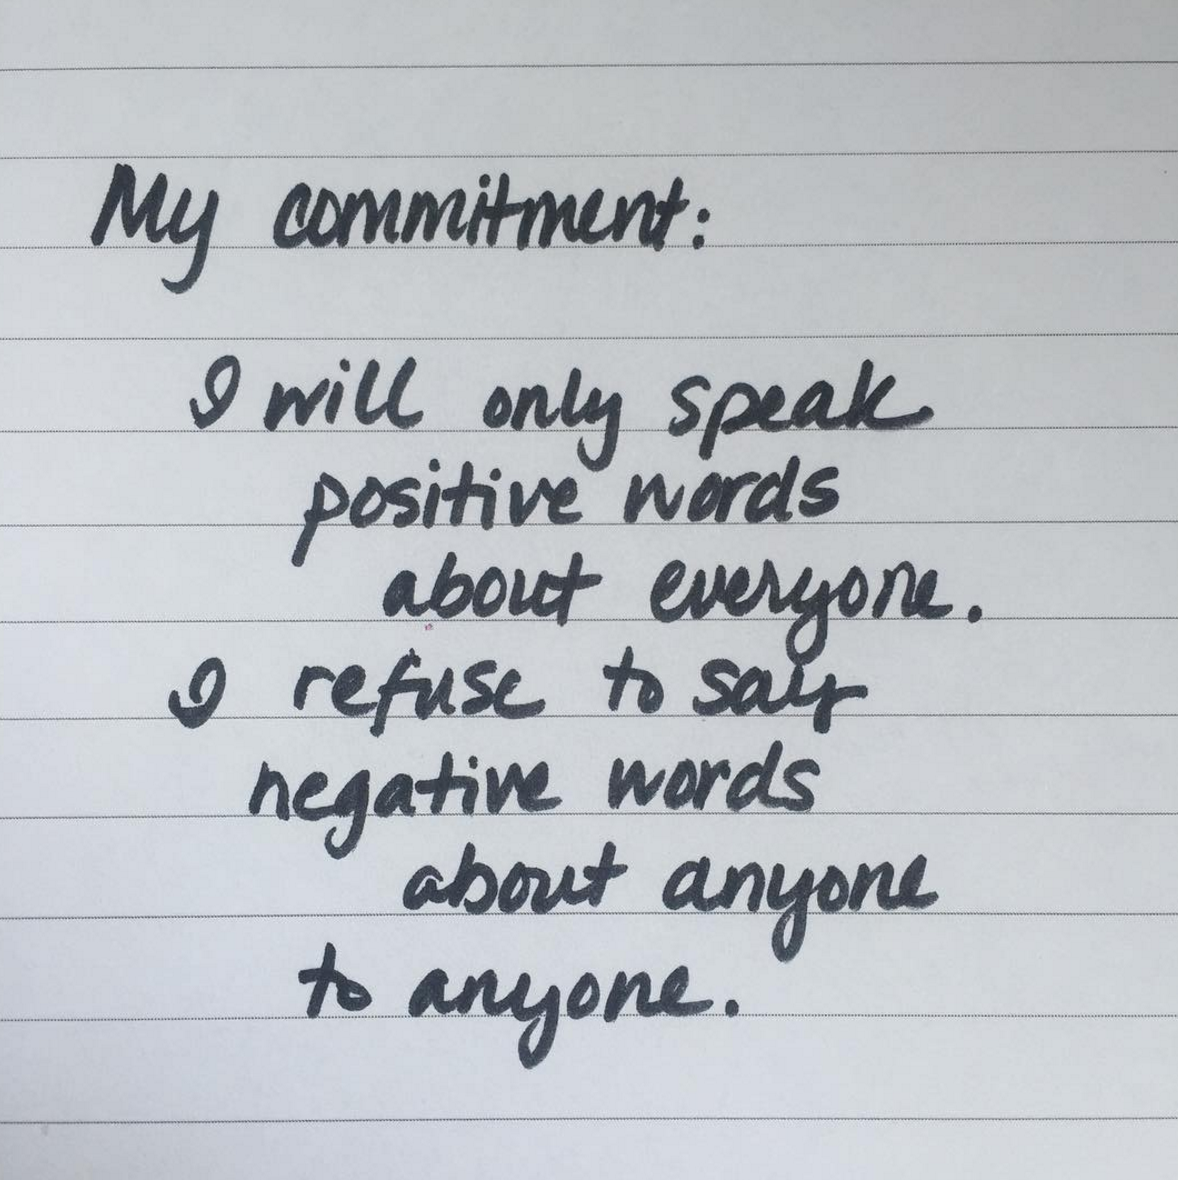
A commitment that has changed my life
8 days ago, I made this simple commitment. It’s changed my life.
It’s opened my eyes to the fact that I say a lot more negative words than I realized I did. So I’ve talked a lot less — which isn’t a bad thing. 😉
It’s also shown me that I spend a lot of time thinking negative thoughts or stressing over what appears to be a negative situation or purporting a negative perspective on a situation. This does nothing but waste time and cause discouragement. I’ve had a lot more brain space freed up because I’m refusing to dwell on negative thoughts.
I’ve been a whole lot happier because my focus is on the beautiful, wonderful, positive things in life. And I’m finding that I love life a whole lot more when I focus on those!

7 Ways To Shrink Your Grocery Bill
Guest post from Chrissy of Littles and Laundry
I am a frugal mama. Don’t get me wrong, shopping is one of my favorite things to do – I be shoppin’. But most of the time… I be window shoppin’. 😉
Since becoming a stay-at-home mom, I have spent a lot of time researching how to cut down on our grocery bill while still eating (mostly) healthy, whole food.
Are you looking for some ideas to shrink your grocery bill? In my experience, here are the things that have helped us most:
1. Limit meat.
Especially when you buy the organic, free-range stuff. We eat meat but it’s definitely something we cut down on to cut costs.
Consider using it as a condiment instead of centerpiece to your meals. Foods like beans and lentils, quinoa and the like are great sources of protein at a fraction of meat’s price.
2. Make friends with potatoes.
Baking potatoes, sweet potatoes, whichever kind you like. Potatoes and delicious and oh SO cheap!
We like to use them in a variety of ways: Baked (maybe with vegan chili on top), chopped and as a side dish, or homemade potato soup. French fries, anyone?
3. Have a Fiesta!
I find when I’m cutting down on costs we eat a lot of Mexican-style dishes. It’s just very affordable to make meals like enchiladas, tacos, etc. When in doubt, make it a Taco Tuesday!
4. Shop at Aldi or Walmart.
Aldi and Walmart meet our week to week needs best and at a great price. I usually check Aldi for everything on my list first, and whatever they don’t have I get at Walmart.
5. Meal plan, meal plan, meal plan.
I used to make a meal plan and then I wouldn’t even follow it. Not the best use of my time right? However, now I refer back to my meal plan often to remember what I’m supposed to be making for dinner that night.
It really helps me to not use ingredients I purchased for one meal accidentally on another. It also gives me the option to prepare dinner in the morning since my plan has already been thought out for me. No more 4:30pm “uh-oh-what’s-for-dinner” freak outs!
6. Grocery shop once a week.
This one can be tough (and I don’t always stick to it) but it really does help keep costs down.
If you run out of something, consider substituting a couple of ingredients for clever alternatives. There are great cheat sheets on Pinterest in subbing one ingredient for another.
One of my favorites? If you don’t have 1 cup buttermilk, sub 1 cup almond milk or the like with 1 TBSP of apple cider vinegar! Now you can go make buttermilk pancakes. You’re welcome. 😉
7. Eat oatmeal for breakfast.
Oatmeal is cheap and healthy, it fills you up and did I mention that it’s cheap?! I like to add almond milk, cinnamon, blueberries, and ground flax to mine. Delish!
So there are some ideas to shrink your grocery bill. I hope they help!
Happy grocery shopping!
Chrissy is a Jesus loving wife, boy mom and coffee lover. She blogs over at Littles and Laundry. Her heart is to encourage women to bloom in motherhood and homemaking.

Brigette’s $58 Grocery Shopping Trip and Weekly Menu Plan for 6
Brigette’s $58 Grocery Shopping Trip and Weekly Menu Plan for 6
Aldi
1 box Crispy Oats – $1.19
2 boxes Crisp Rice – $2.78
1 jar Organic Coconut Oil – $4.99
1 bag Radishes – $0.99
2 containers Blueberries – $2.58
5lbs Fresh Ground Beef – $9.45
4 dozen large Eggs – $2.76 (I’m loving egg prices at Aldi the past few weeks!)
3-lb bag Pink Lady Apples – $3.49
48-oz Vegetable Oil – $1.79
1 loaf Wheat Bread – $0.50
3 16-oz containers Egg Whites – $5.97
1 container Strawberries – $1.49
3 bags Baby Carrots – $2.07
2 2-lb bags Red Grapes – $3.56
1 head Organic Cauliflower – $2.49
2 cans Green Beans – $0.98
1 3-pk Green Peppers – $0.99
1 gallon Milk – $2.99
Total: $51.06
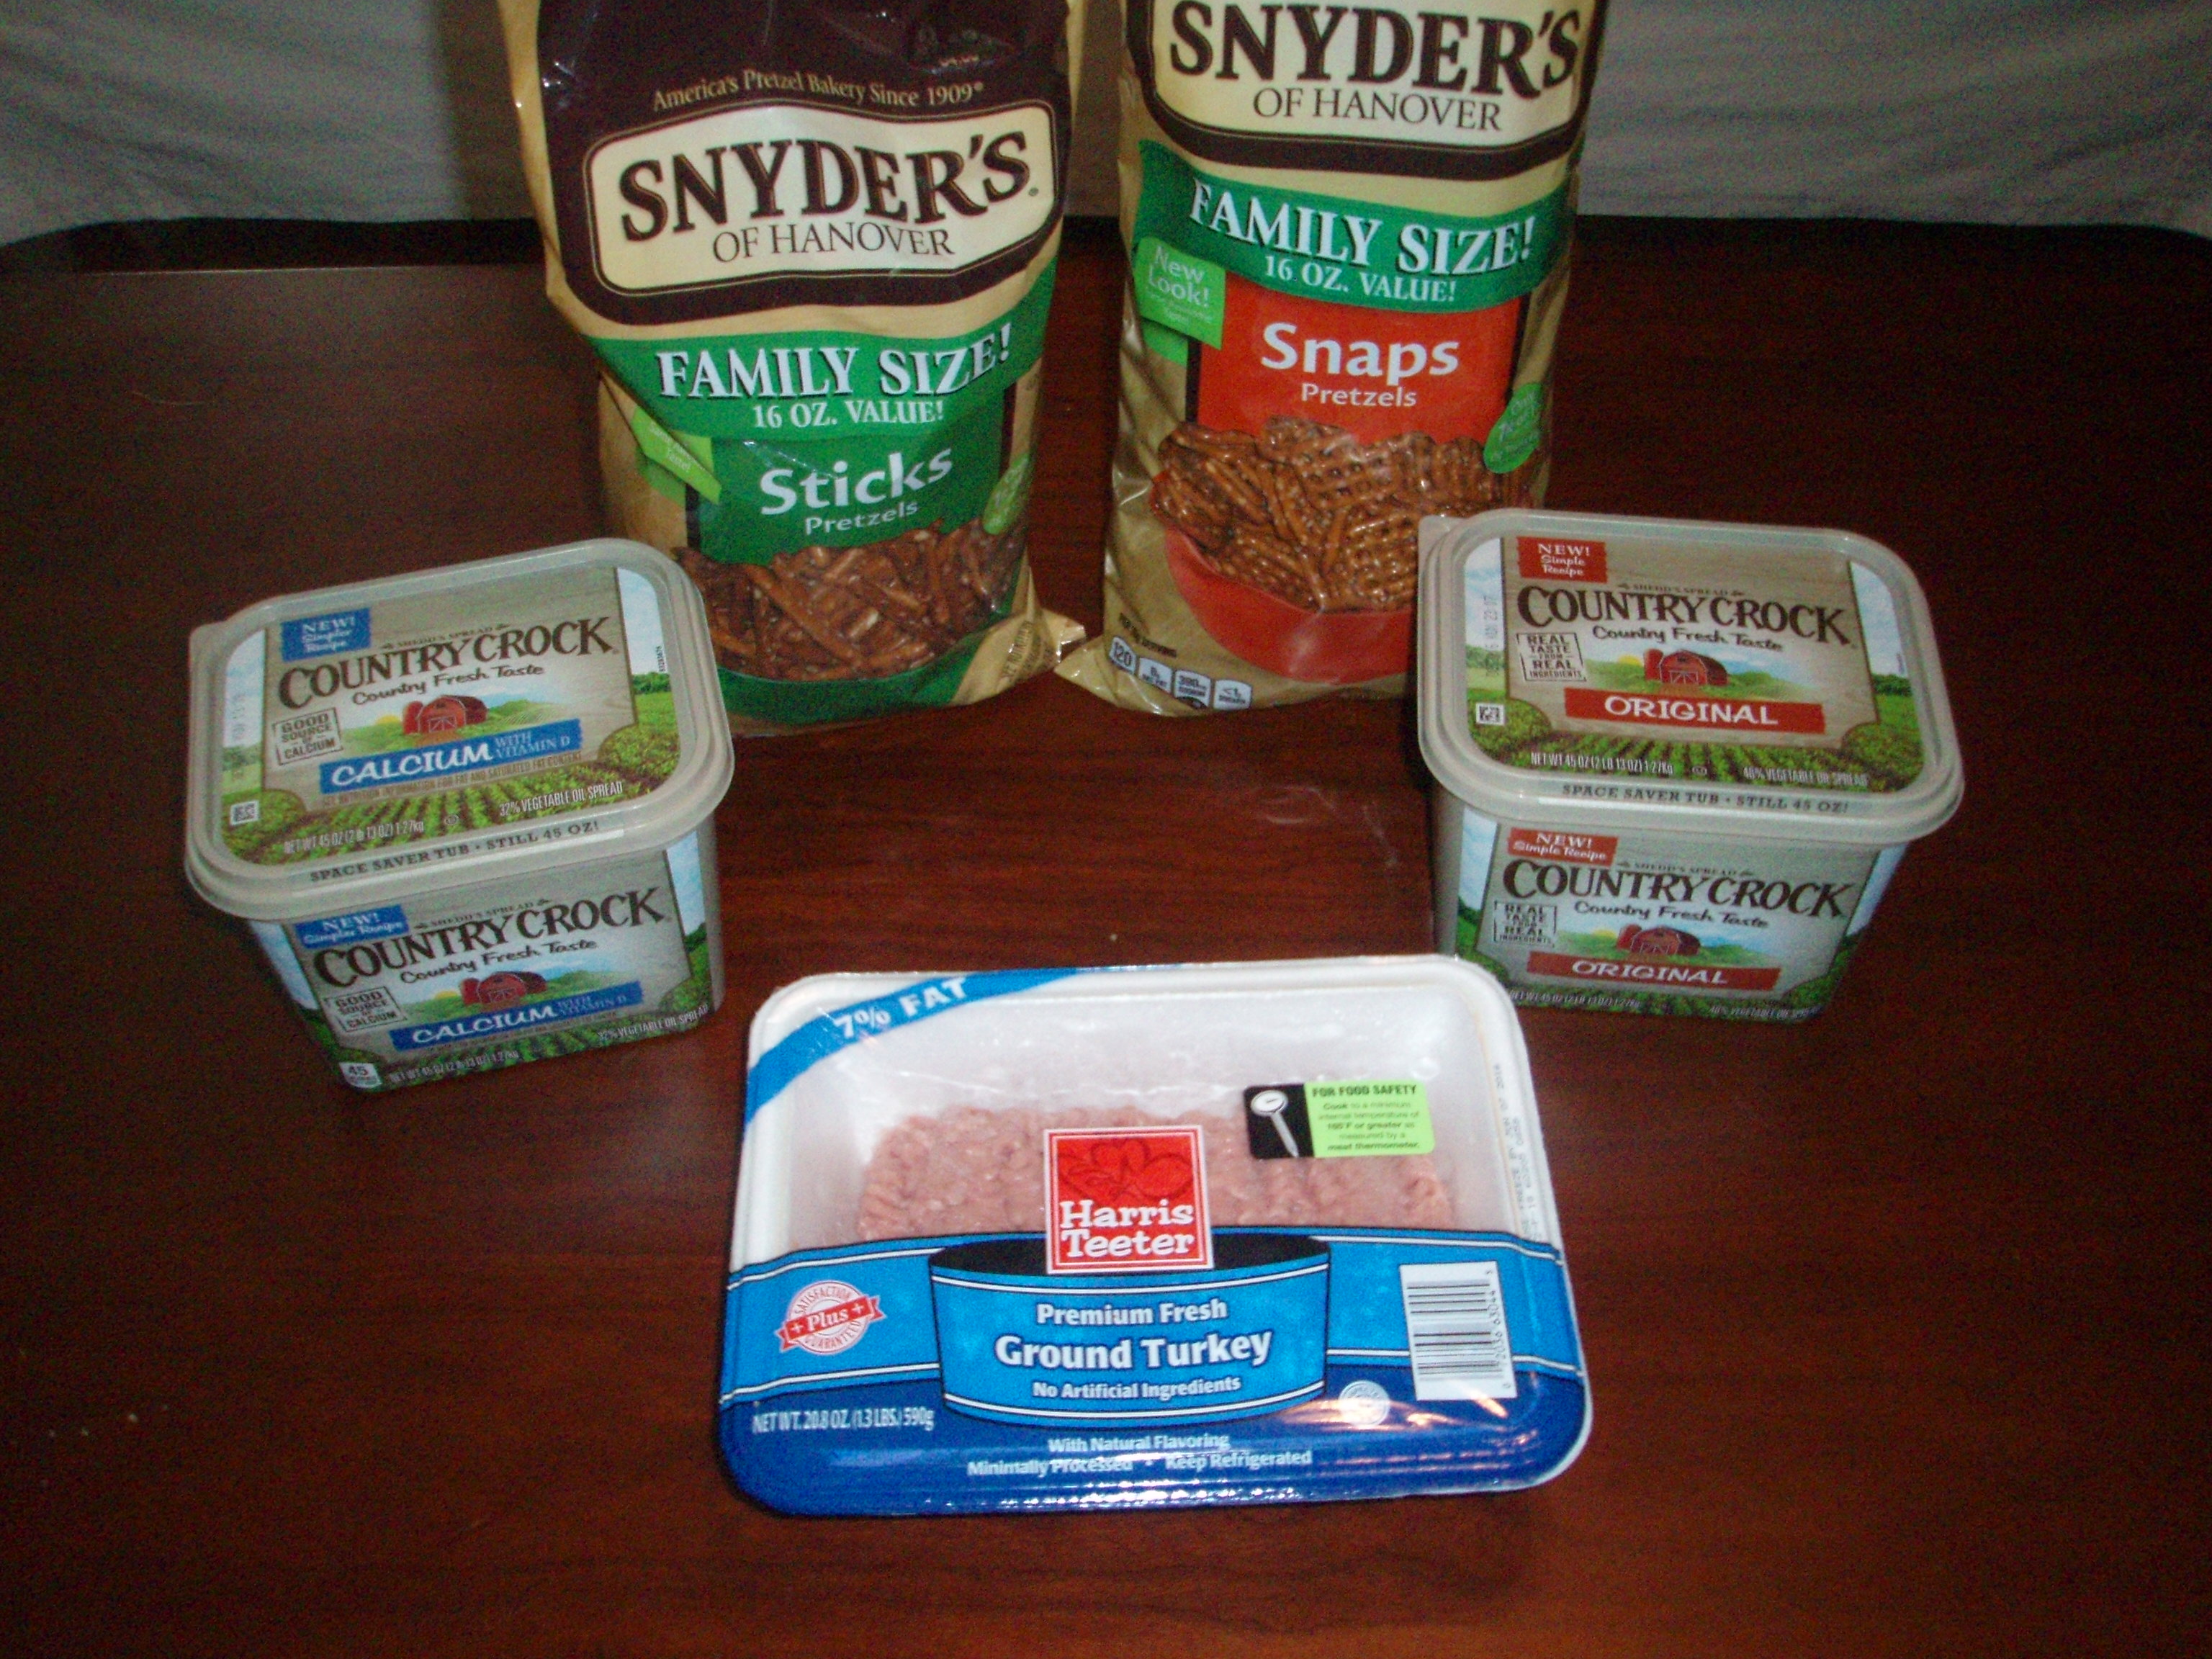
Harris Teeter
2 45-oz cartons Country Crock – $3.94, used 2 $0.55/1 printable (doubled) – $1.74/2 after coupons
1 20-oz container 93/7 Fresh Ground Turkey – $2.99
2 family-size bags Synder’s of Hanover Pretzels – $5.00, used 2 $0.55/printable (doubled) – $2.80/2 after coupons
Total: $7.53
Grocery Total for the Week: $58.59
Weekly Menu Plan
(My menu plan from last week didn’t exactly happen…I spent a couple of days/evenings at the hospital with a dear friend and Eirik and the children stayed at home and ate who-knows-what for dinner (for SURE it wasn’t anything on “the” menu! ;)) We are out-of-town for a few days this week, but I hope to do better as far as following my planned meals when we are home.
Breakfasts
Scrambled Eggs and Toast, Berries x 2
Overnight Oatmeal x 2
Cereal x 2
French Toast, Over Easy Eggs
Lunches
Grilled Cheese Sandwiches, Carrots, Apples x 2
Pretzels dipped in Almond Butter, Sliced Cheese, Peppers, Grapes x 2
Leftovers x 3
Dinners
Barbequed Meatballs, Mashed Cauliflower, Steamed Carrots, Make Ahead Butterhorns
Shepherd’s Pie, Tossed Salad, Butterhorns
Homemade Pizza, Soft Garlic Breadsticks, Fresh Veggies with Dip
Grilled Chicken, Fruit Salad, Steamed Broccoli, leftover Soft Garlic Breadsticks
Crustless Spinach Quiche, Grapes, French Breakfast Puffs
Leftovers x 2
Snacks
Popcorn, Fruit, Treeses (recipe from the THM cookbook), S’Mores Bars (recipe from Eirik’s Mom)
Gretchen’s $34.89 Grocery Shopping Trip and Menu Plan
After a crazy busy few weeks and taking time off from menu planning and couponing, it was nice to get back into the swing of things this week.
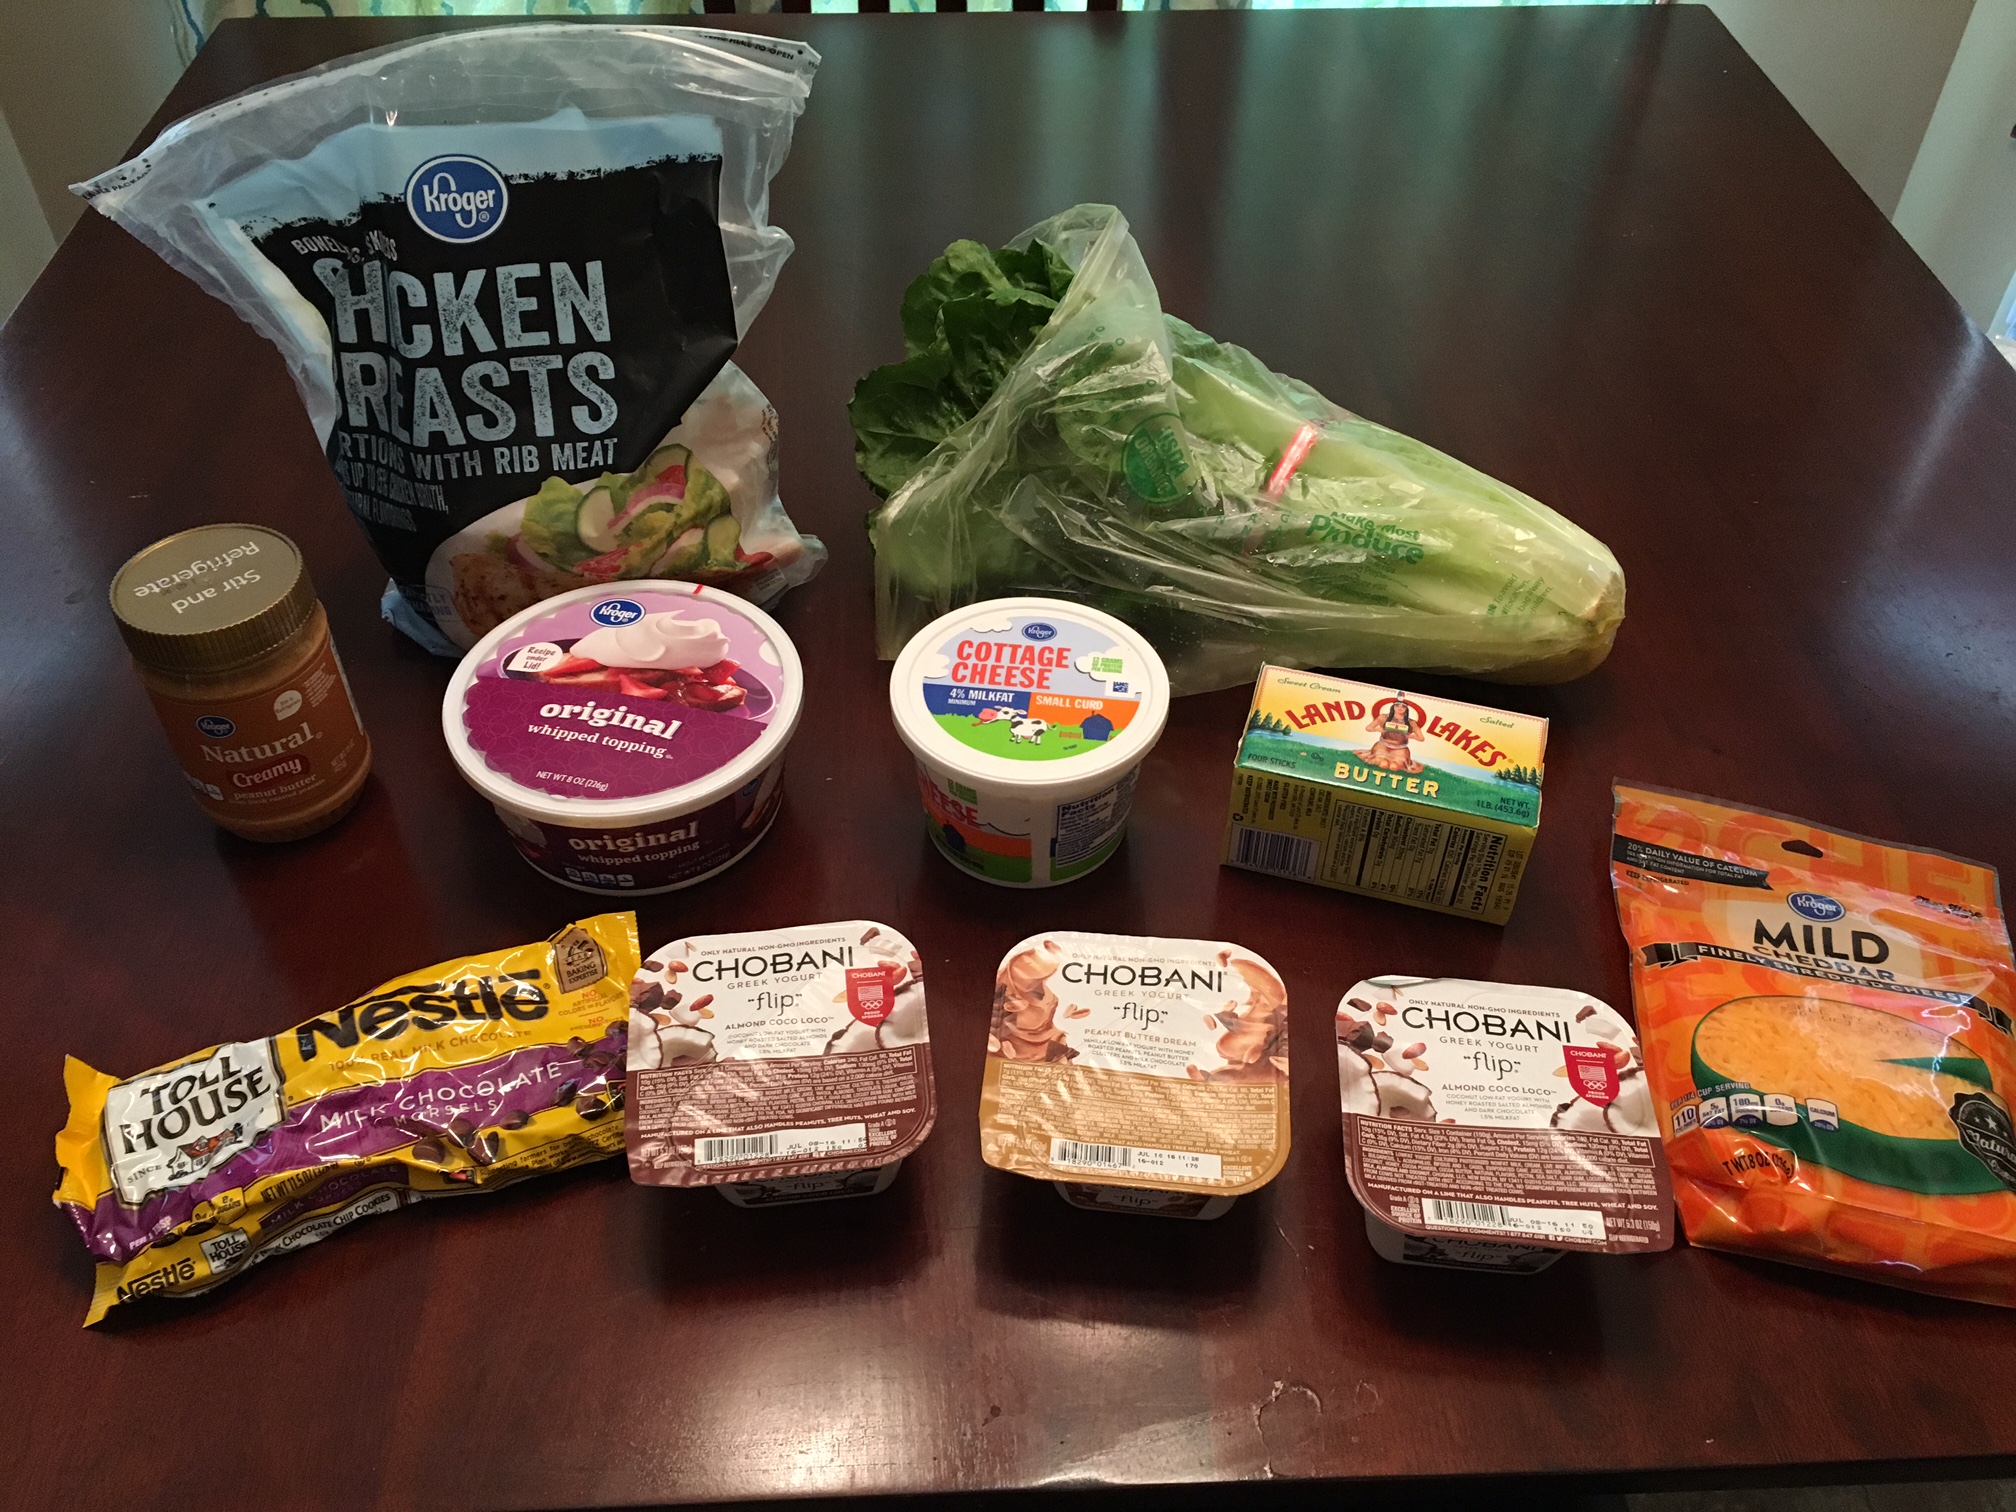
Dillons
1 bag Kroger Boneless Skinless Chicken Breasts – $6.99, used $1.45/1 e-coupon – $5.54 after coupon
1 Nestle Milk Chocolate Chips – $3.59, used Free e-coupon – Free after coupon
1 bag Kroger Shredded Cheese – $1.77
3 Chobani Greek Yogurt – $1.25 each, used $1/3 printable – $0.92 each after coupon
1 Land O Lakes Butter – $2.50
1 Kroger Cottage Cheese – $1
1 Kroger Peanut Butter – $1.79, used Free e-coupon – Free after coupon
1 Romaine Lettuce – $0.99
1 Kroger Whipped Topping – $0.88
Total after coupons: $15.44
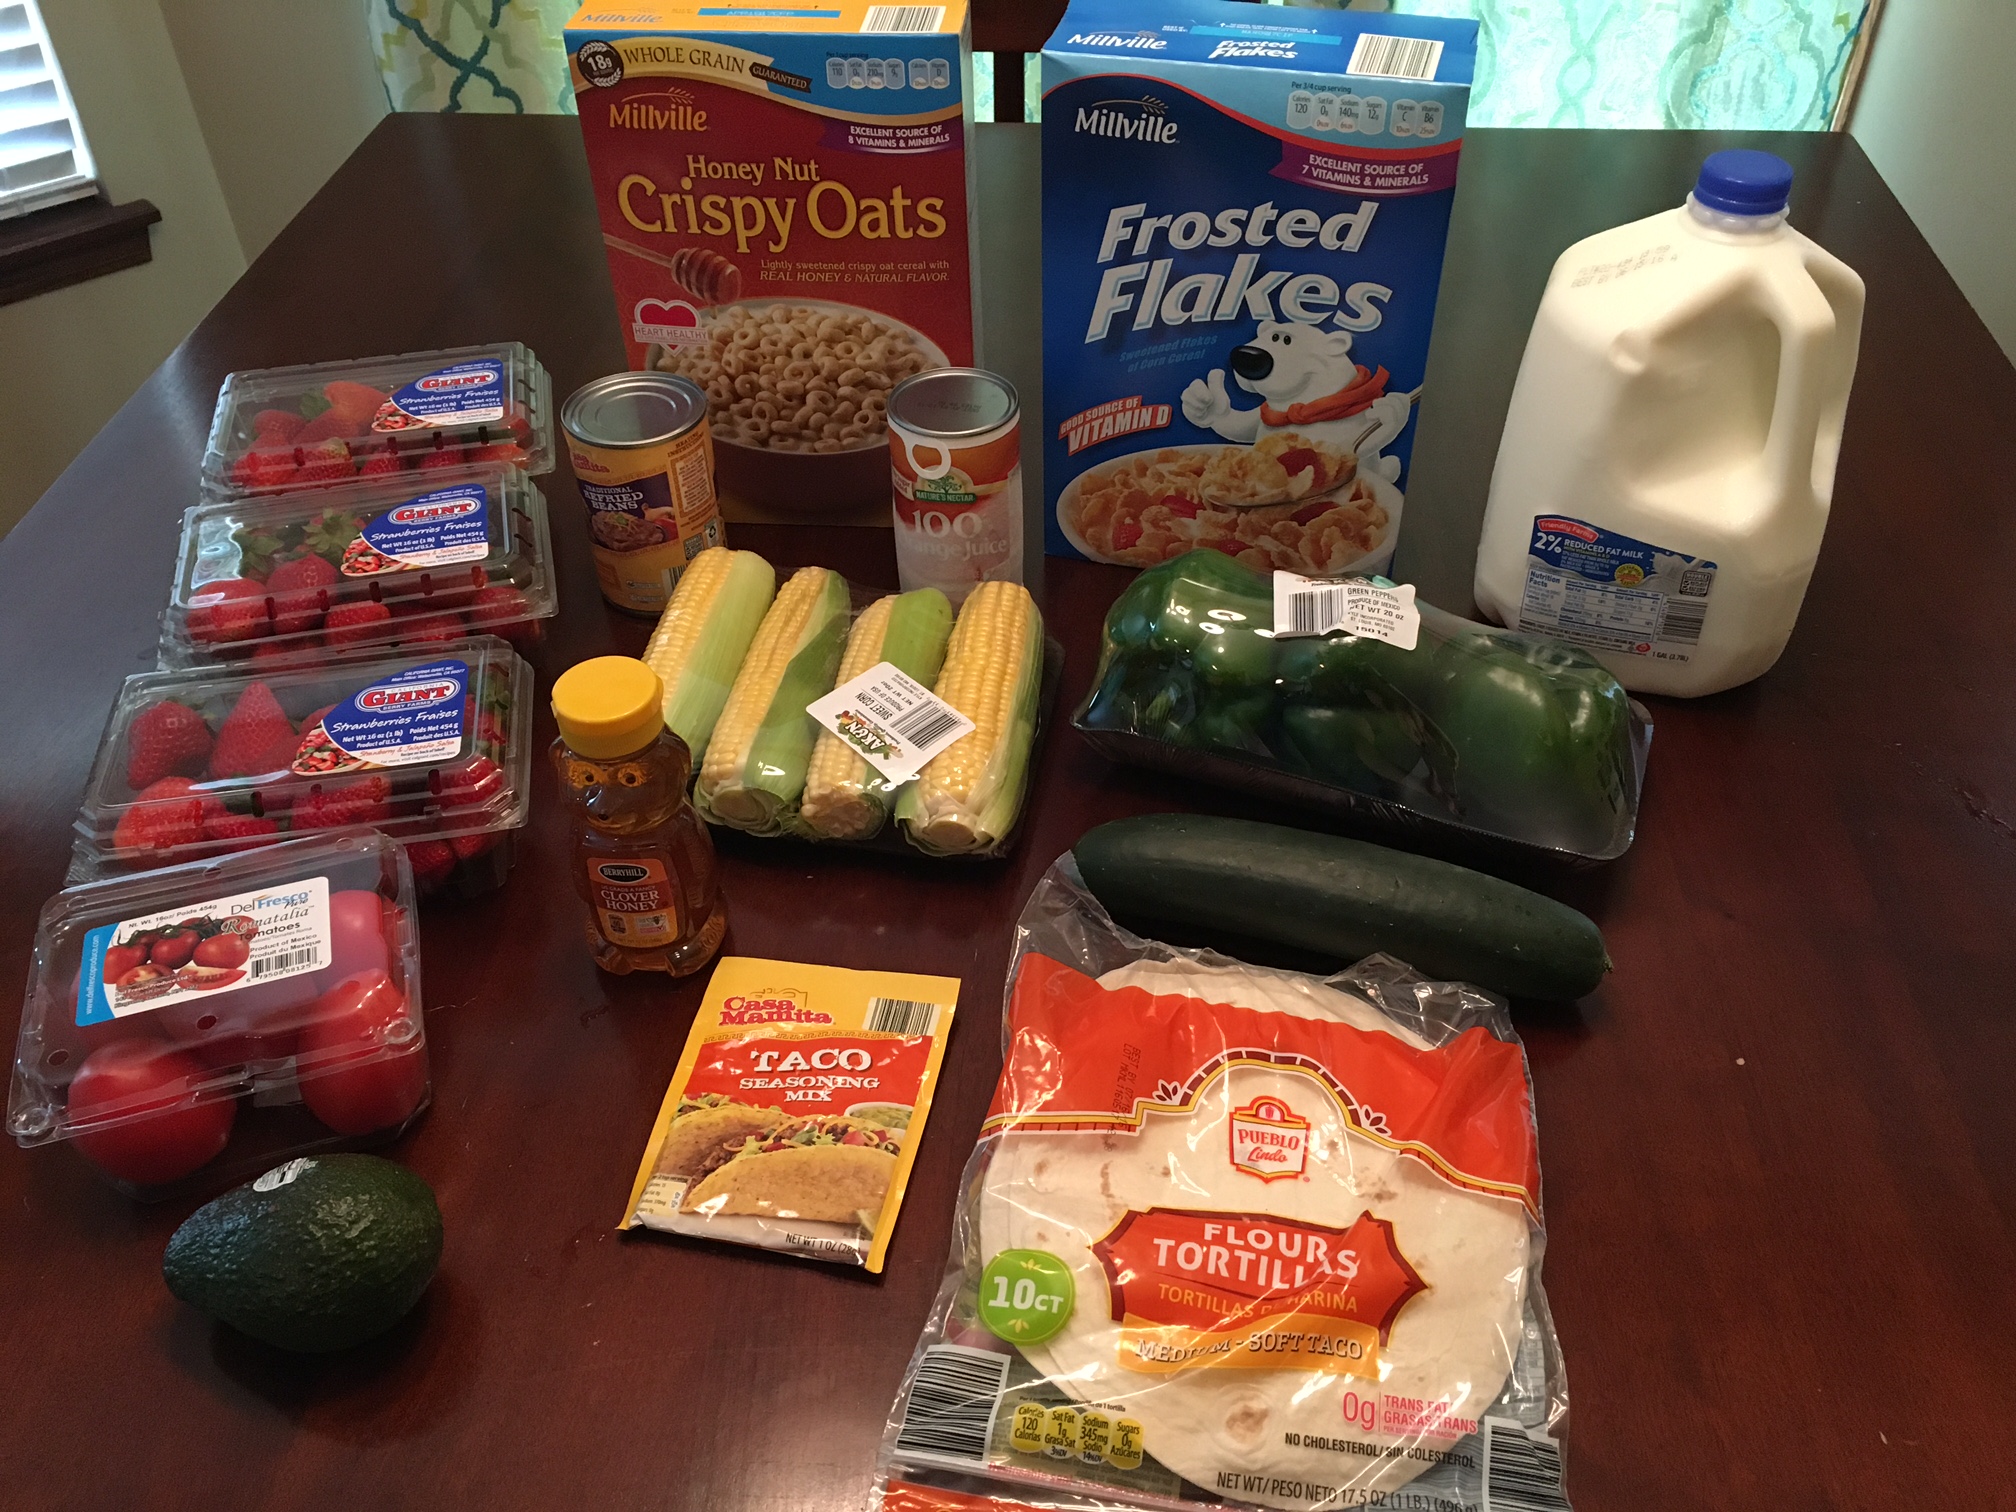
Aldi
1 Honey Nut Oats Cereal – $1.19
1 Frozen Orange Juice – $1.19
3 pkg Strawberries – $1.29 each
1 pkg Green Peppers – $1.29
1 Cucumber – $0.49
1 gallon Milk – $1.79
1 Frosted Flakes Cereal – $1.29
1 Avocado – $0.69
1 pkg Sweet Corn – $0.99
1 pkg Flour Tortillas – $1.19
1 Taco Mix – $0.35
1 can Refried Beans – $0.79
1 Honey Bear – $2.99
1 pkg Roma Tomatoes – $1.49
Received $0.25 back from Find & Save app
Total: $19.45
Total for both stores: $34.89
Menu Plan for This Week
We have some staple items (bread, eggs, fruit, etc) we bought over the last few weeks that I will be trying to use up this week.
Breakfasts
Cereal x 4
Toast, Eggs x 2
Pumpkin Muffins, Strawberries
Lunches
Tossed Salad Bar x 2
Baked Potatoes, Cottage Cheese x 2
Peanut Butter & Jelly Sandwiches, Sliced Veggies
Grilled Cheese Sandwiches, Fruit
Leftovers
Dinners
Hawaiian Haystacks
Bean Burritos, Steamed Peas (from freezer)
Broccoli Cheddar Quiche, Strawberries
Hamburgers (using frozen buns I got on sale a while back and ground beef that was given to us), Grilled Green Peppers, Corn on the Cob
Chicken Stir-Fry (I’ll just throw in whatever leftover veggies we have with the chicken and sauté them.), Biscuits
Taco Bar
Out to eat
OVER-SPENDING EVERY SINGLE MONTH?Grab these FREE Budgeting Sheets!
Click here to download!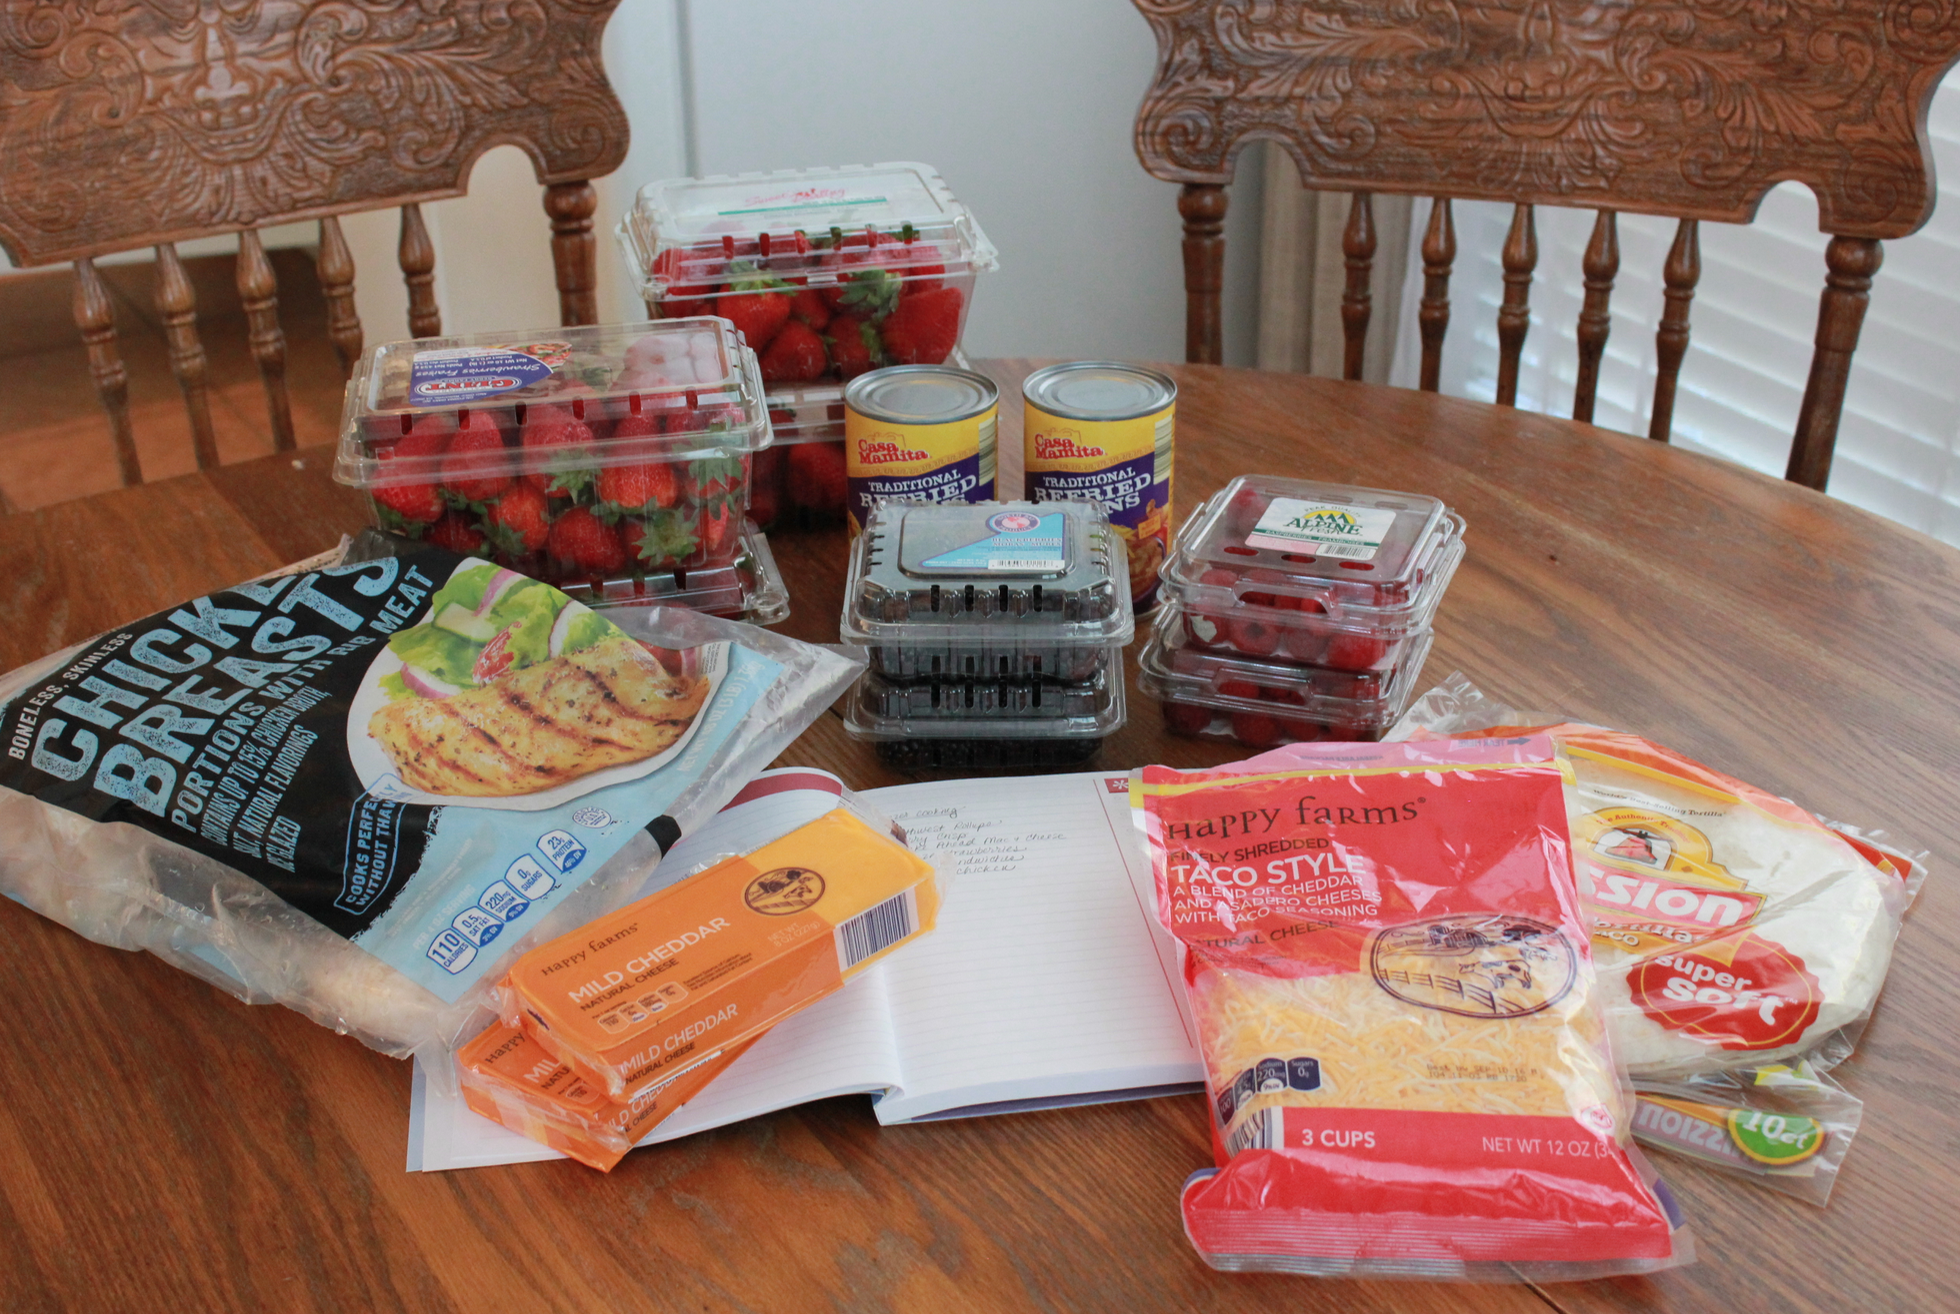
This Week’s Freezer Cooking (yes, I’m *finally* back to it again!)
This Week’s Freezer Cooking (yes, I’m *finally* back to it again!)
So, as you may have noticed, after years of being a big advocate of Freezer Cooking, I had sort of fallen off the bandwagon.
Well, “sort of fallen off the bandwagon” isn’t even close to accurate.
I fell off hard and didn’t even attempt to get back up on the bandwagon. I kind of just laid on the side of the road and tried to pretend I wasn’t once such a hardcore freezer cooking proponent. 🙂
I could state a dozen different reasons why I stopped freezer cooking, but the truth of the matter is that I let other things take a higher priority. And since Jesse’s been doing so much of the cooking, we’ve been surviving just fine without me regularly stocking the freezer.
However, now that summer is here, school is finished, and I feel like I have more breathing room in our schedule, the freezer cooking itch resurfaced again.
For a little while, I tried to ignore the itch.
But then I thought of all the yummy things I used to stock the freezer with. And, well, my appetite got the better of me and I came to my senses and realized that I should stop ignoring the itch and actually get up and do something about it.

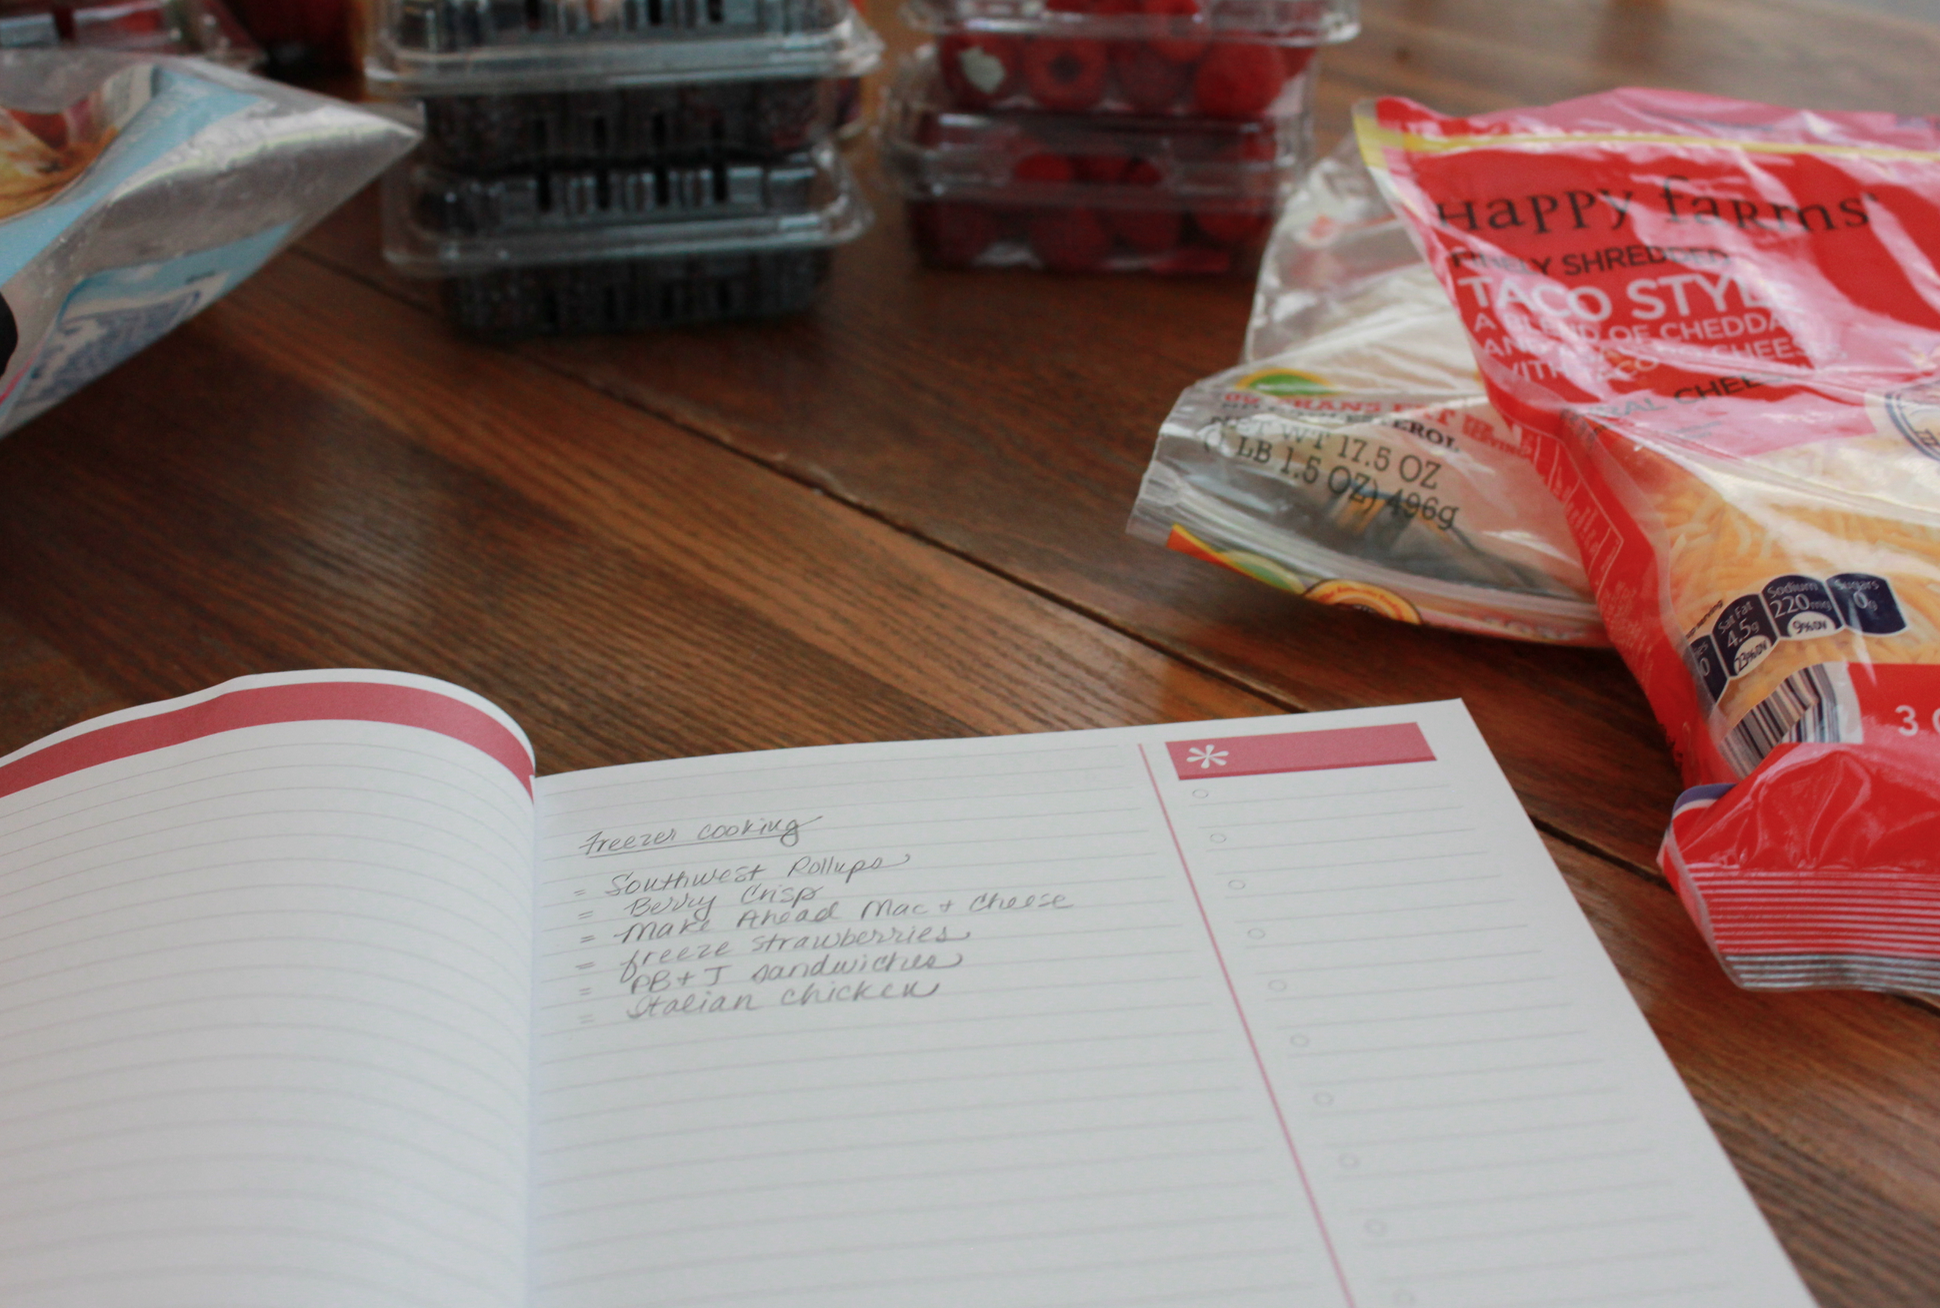
So I looked through the refrigerator, cupboards, and freezer and made a real freezer cooking list.
And I felt all domestic and homemaker-y just by writing the list.
{Of course, I’m one of those weird people who just absolutely adores list-writing and lists. They make me so happy!}
Here’s what I put on this list:
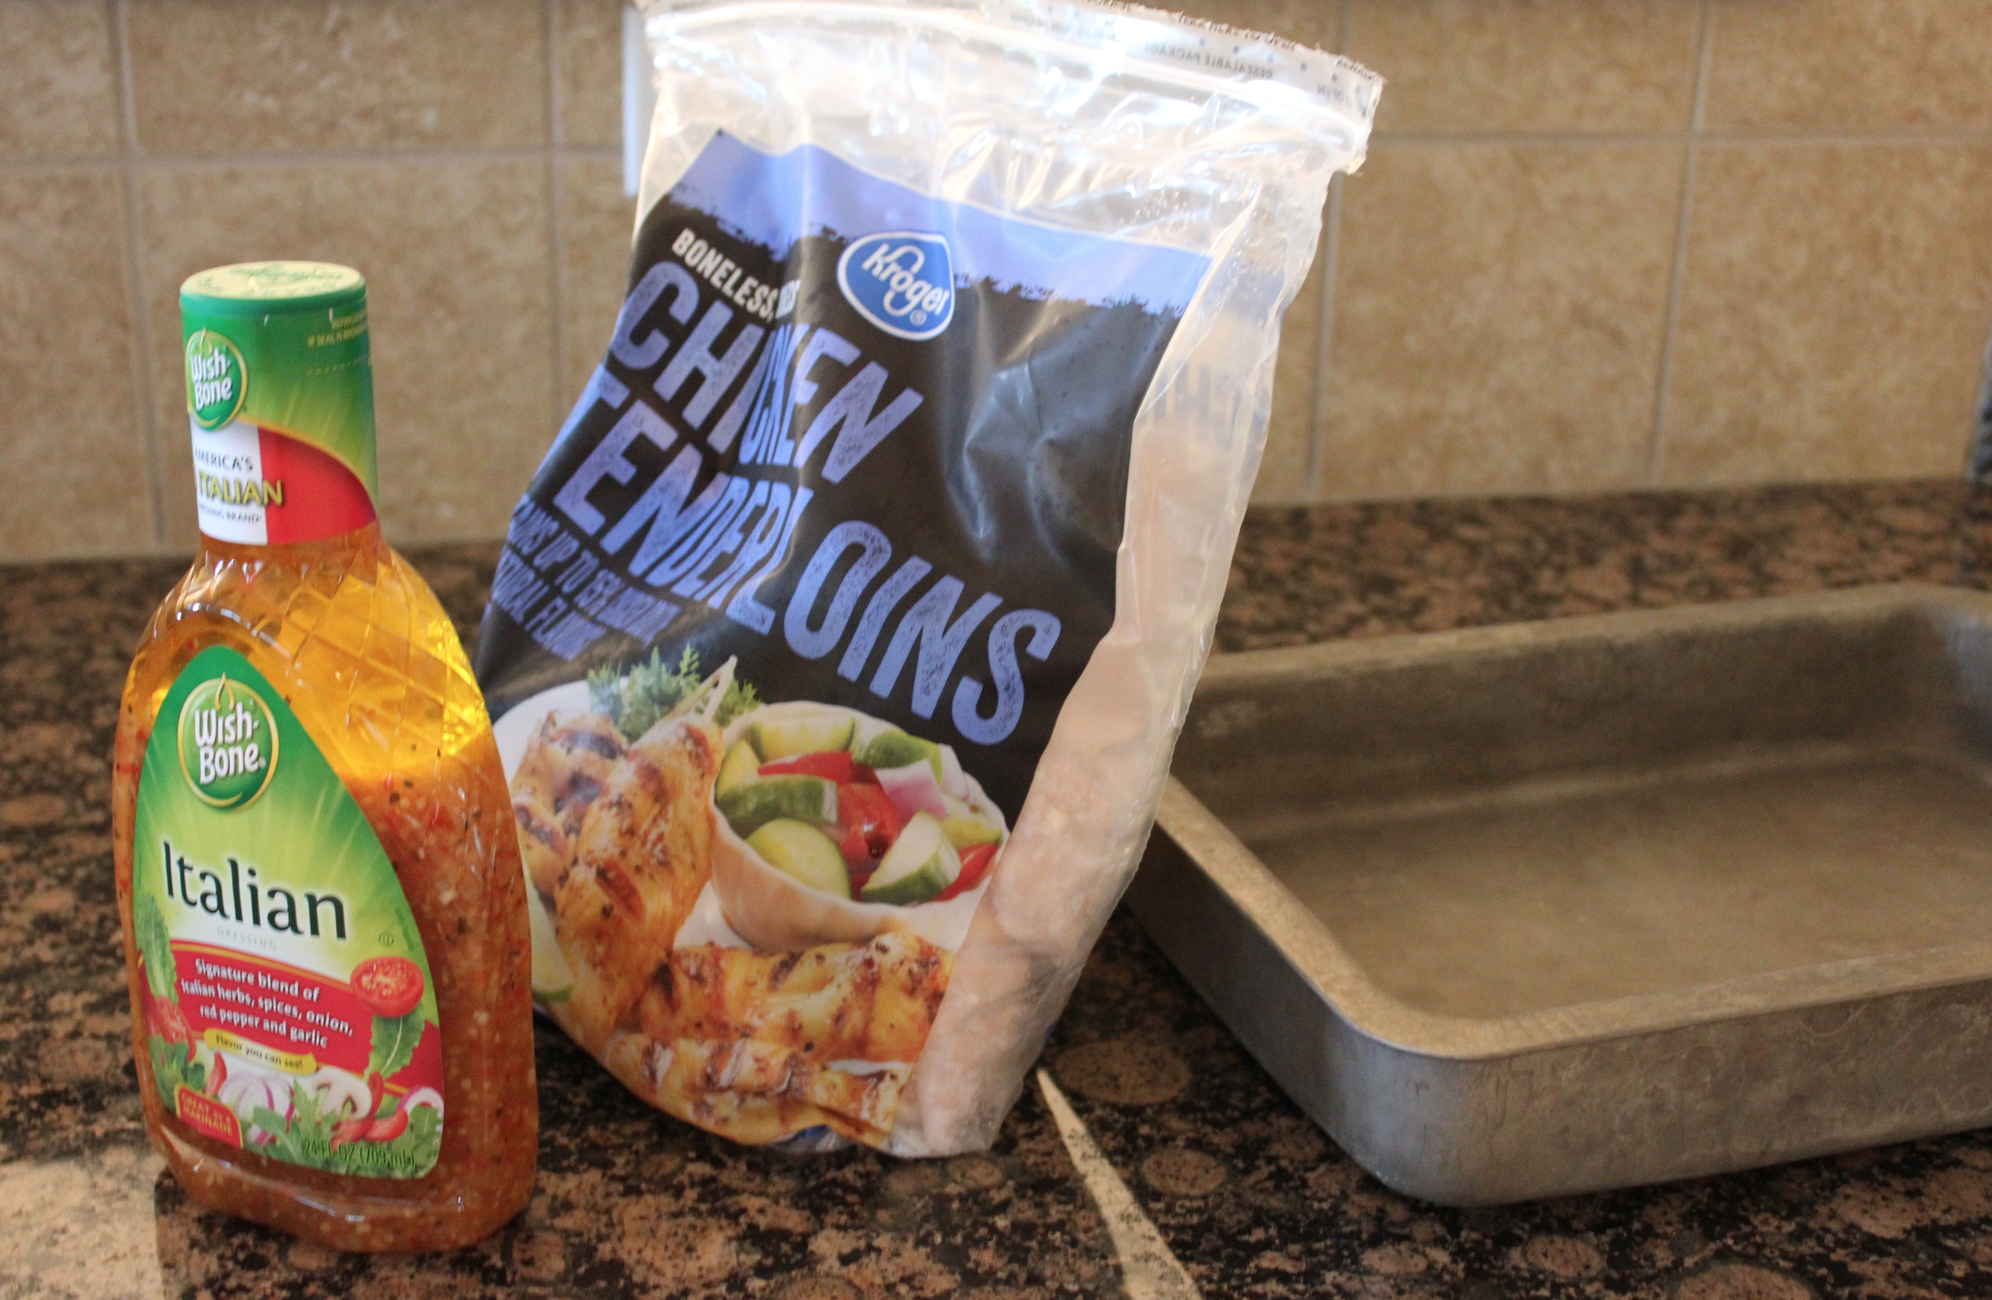
- Southwest Rollups
- Berry Crisp
- Make Ahead Mac & Cheese
- Freeze Strawberries for Smoothies
- Freezer-Friendly PB&J Sandwiches
- Italian Chicken
- Barbecued Chicken (not listed; I made it for dinner that night)
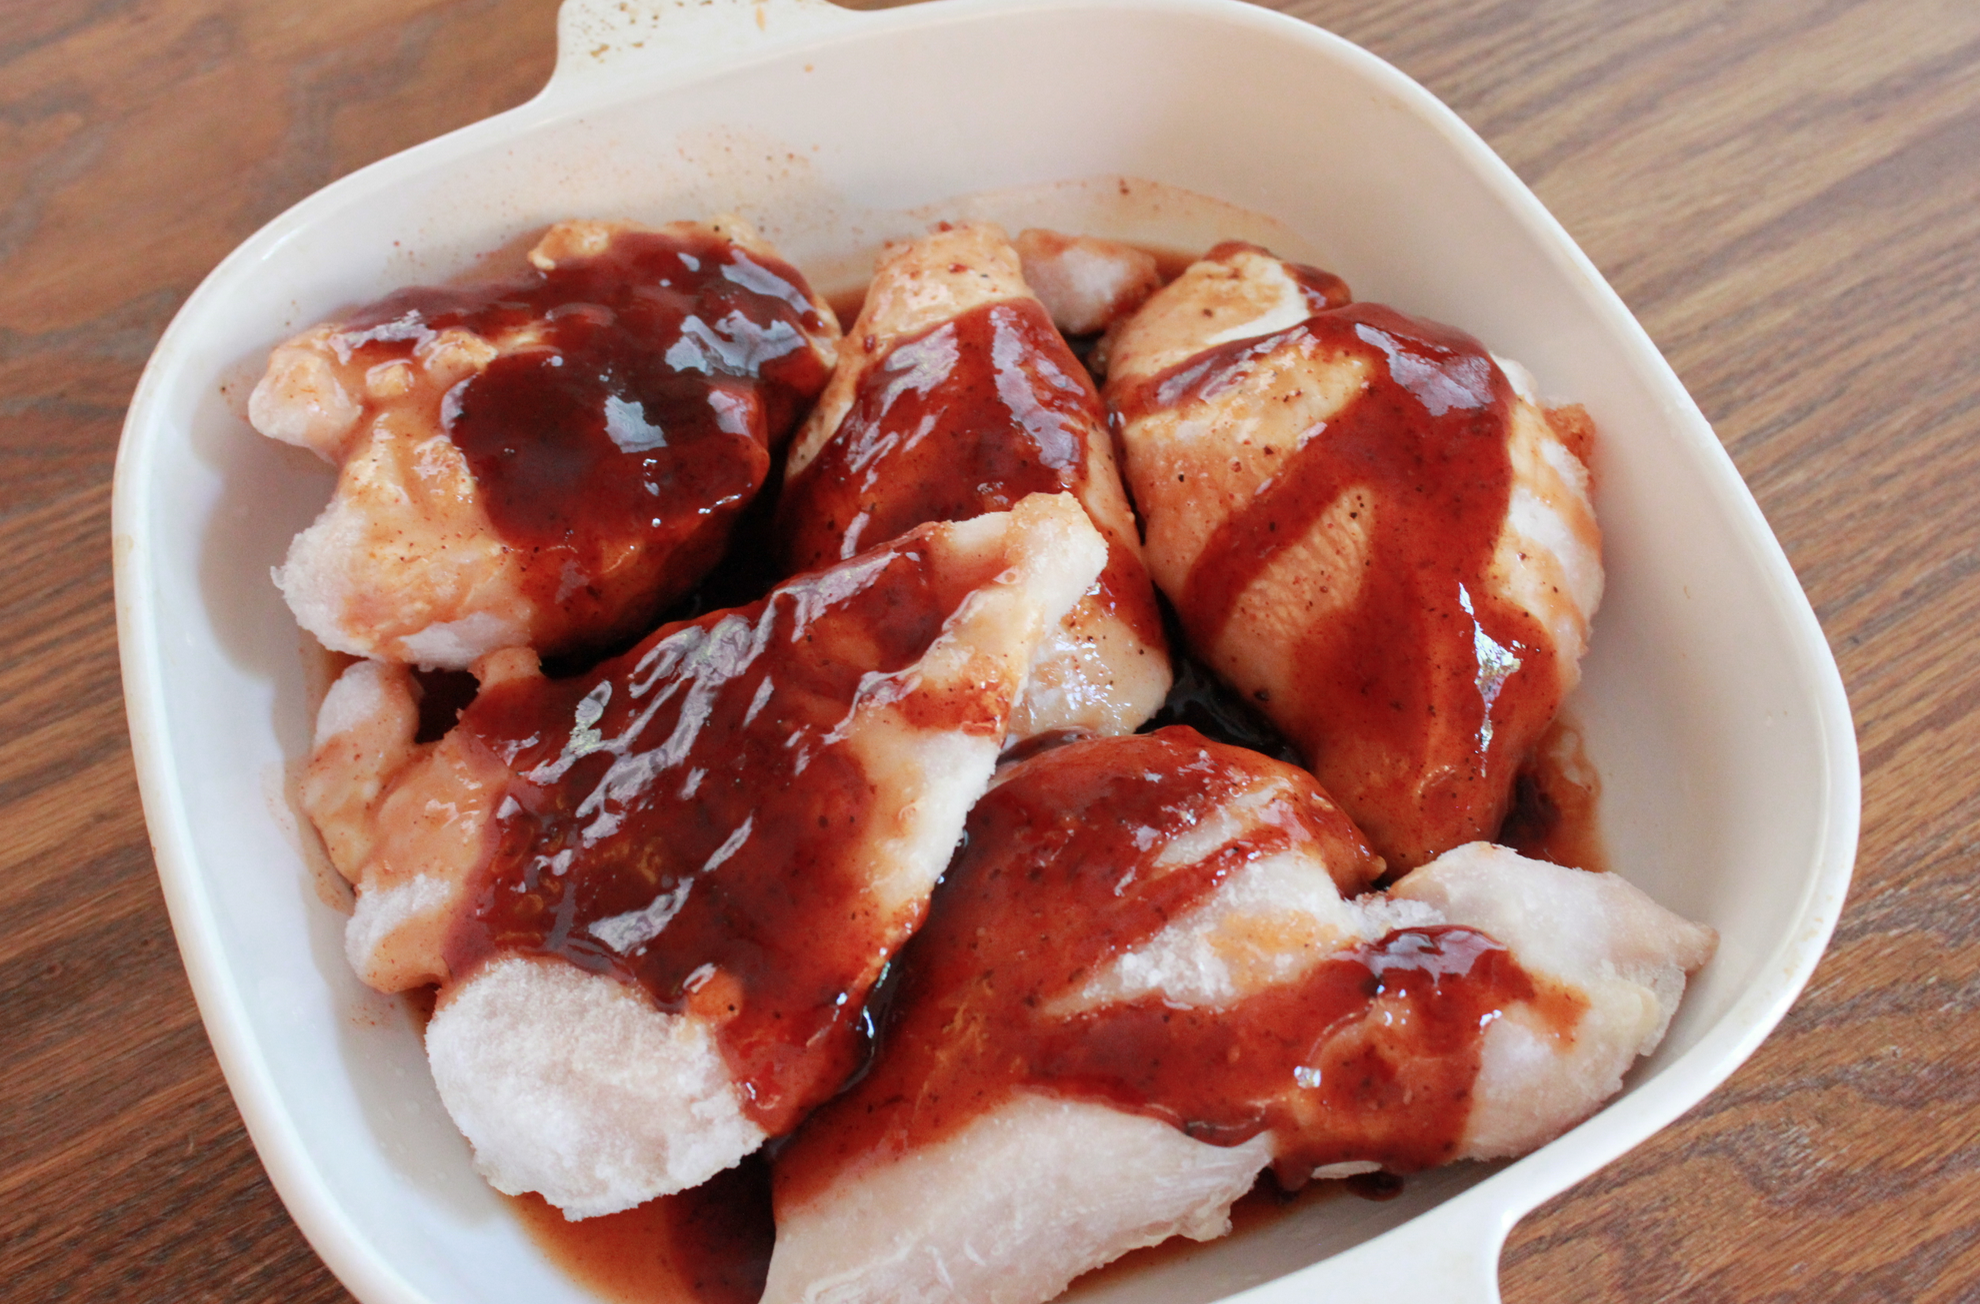
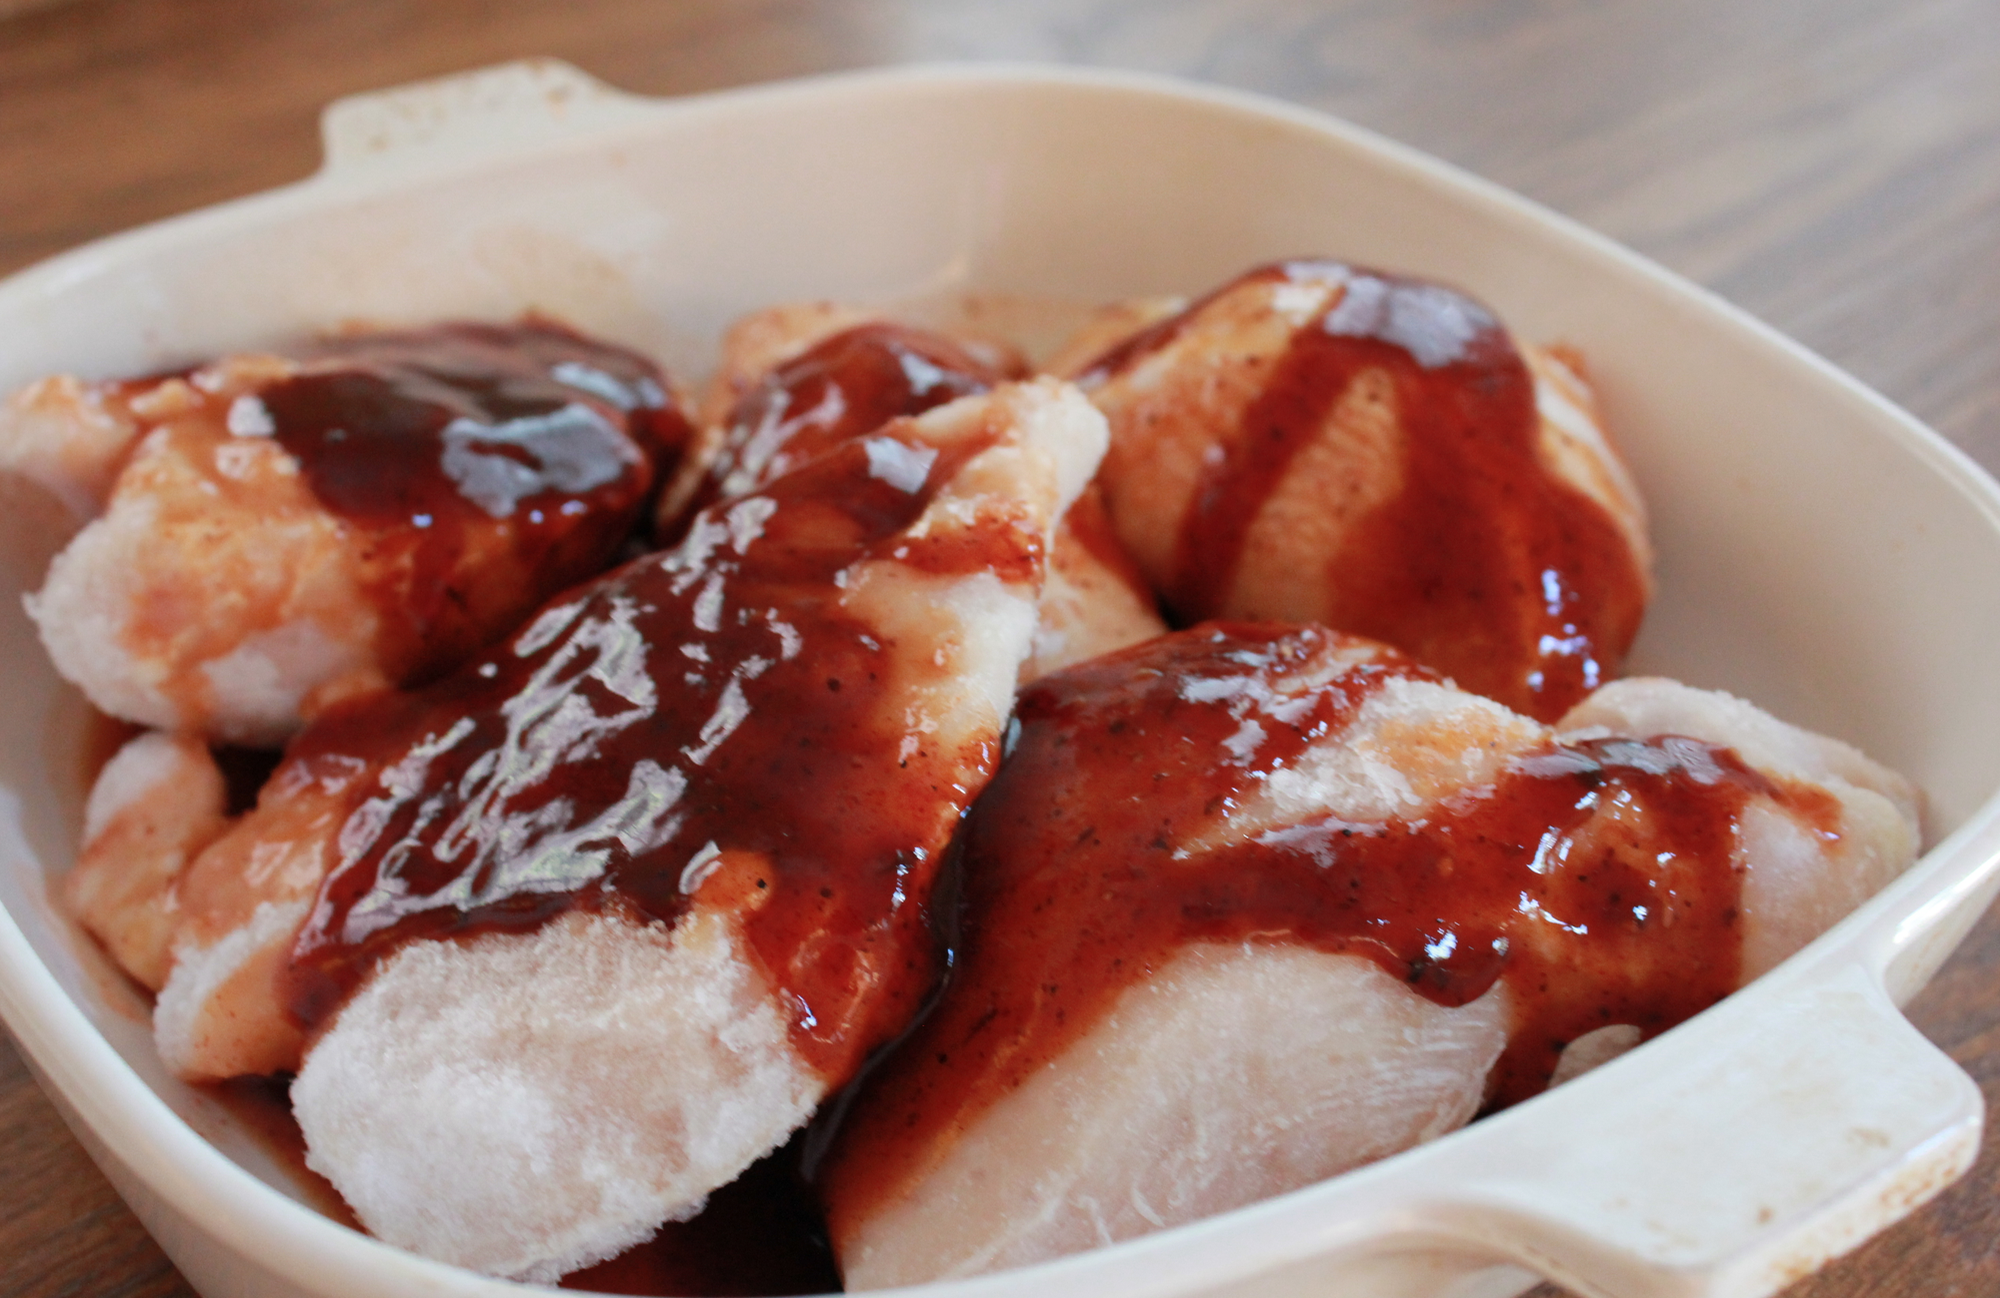
I made the Barbecued Chicken first because I wanted to get it in the oven for dinner. This is literally the easiest recipe on the planet. A bottle of barbecue sauce dumped over chicken breasts.
(I used frozen chicken breasts and stuck it all straight in the oven. Which meant it had to cook longer and probably goes against all the cooking rules. But whatever. I’m a cooking rebel like that. ;))
You can also cook this in the crockpot or on the grill. It’s yummy however you cook it!
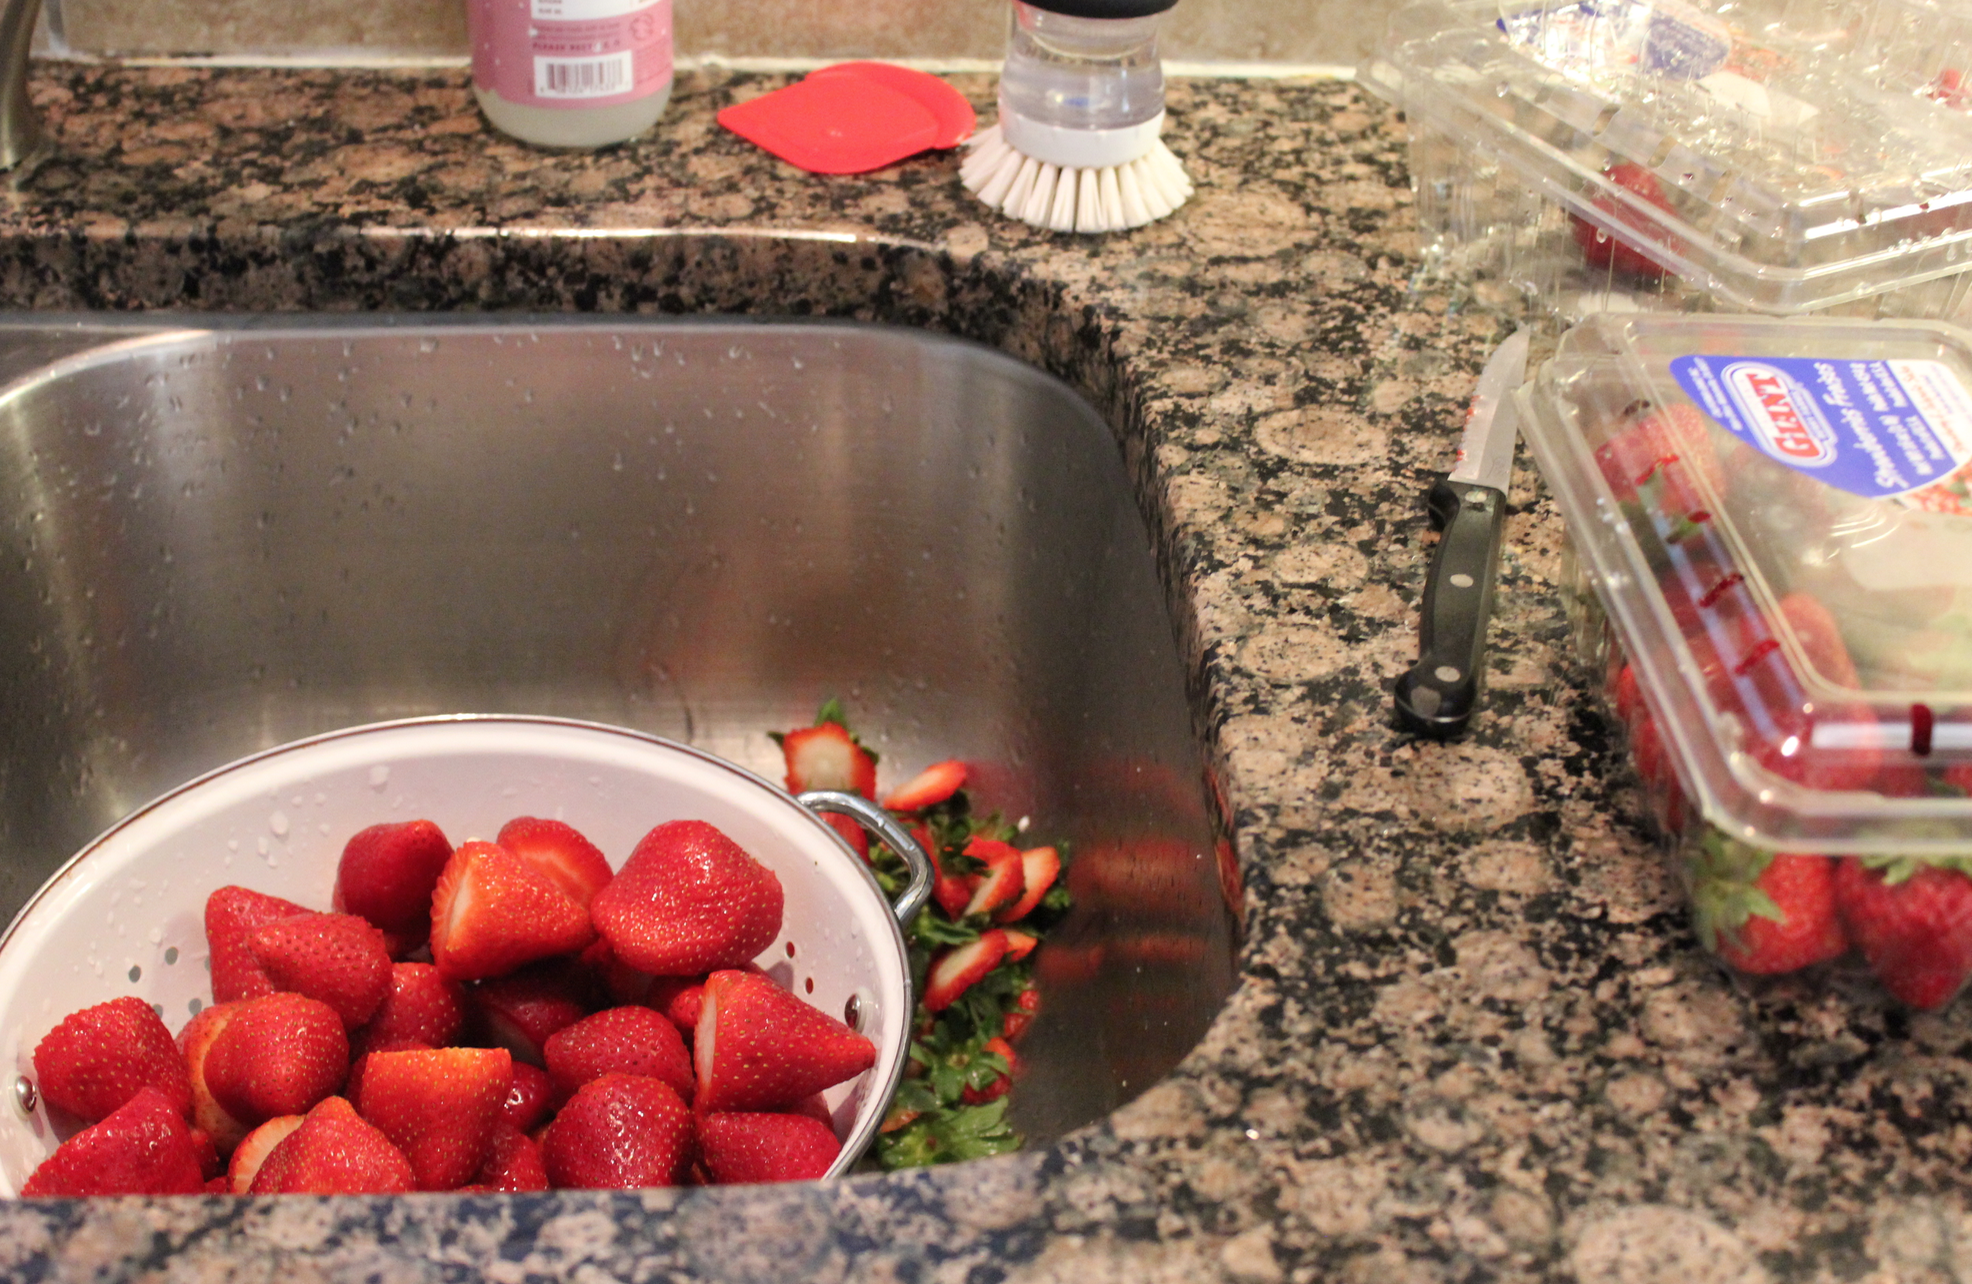
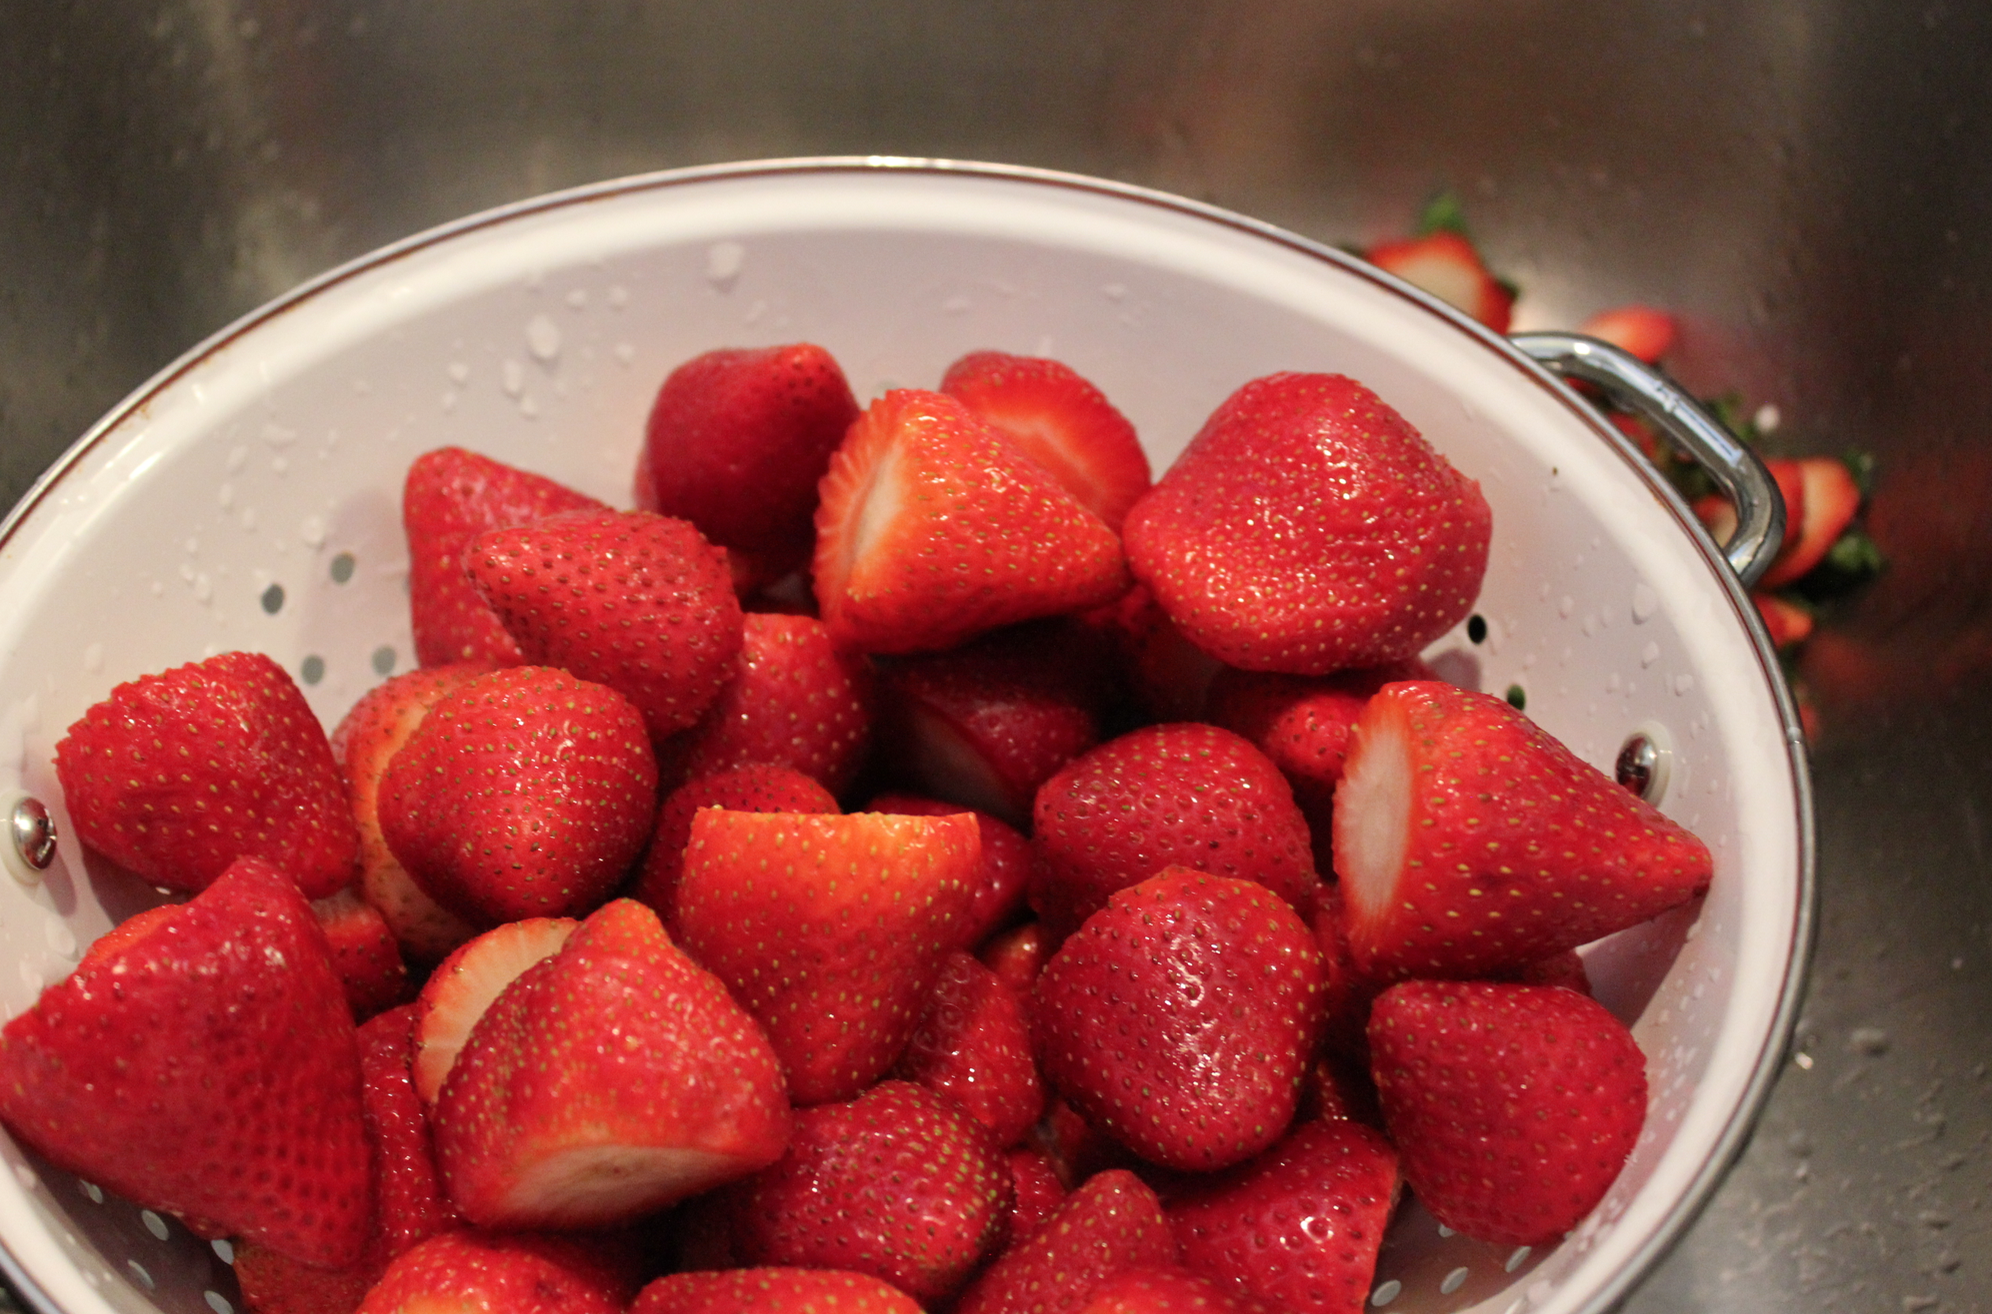

Berries have been on sale at Aldi and elsewhere recently, so we’ve been in berry heaven around here. We had some extras and I wanted to freeze them for smoothies. Why? Because my kids down smoothies in summer like their life depends upon it! 🙂

Okay, I sort of lied. Because I told you Barbecued Chicken was the easiest recipe on the planet. Except, I think Italian Chicken might tie for first place when it comes to the Easiest Recipes on the Planet Contest.
{If there really was such a contest, you know that I could enter pretty much all my recipes in it. Because, well, I’m the cook who likes one-bowl recipes with fewer than seven ingredients and two steps, thank you very much!}
This recipe is such a winner and every time I serve it to people they rave about it. And then I’m kind of embarrassed when they ask me for the recipe. 😉
People always wonder how I can make so many different recipes in such a short amount of time. Well, it’s because my “recipes” are so crazy easy that we probably shouldn’t even call them recipes. But they are food that my people eat and love and that I make with ingredients (even if there are only two or three of said ingredients!), so that qualifies them as “recipes”, right?
{If you just said “wrong”, please don’t tell me. I don’t want to be wrong! I never like to be wrong, ever, but especially not if it means I have to start using multiple bowls and steps and ingredients I can’t pronounce. No, ma’am!}
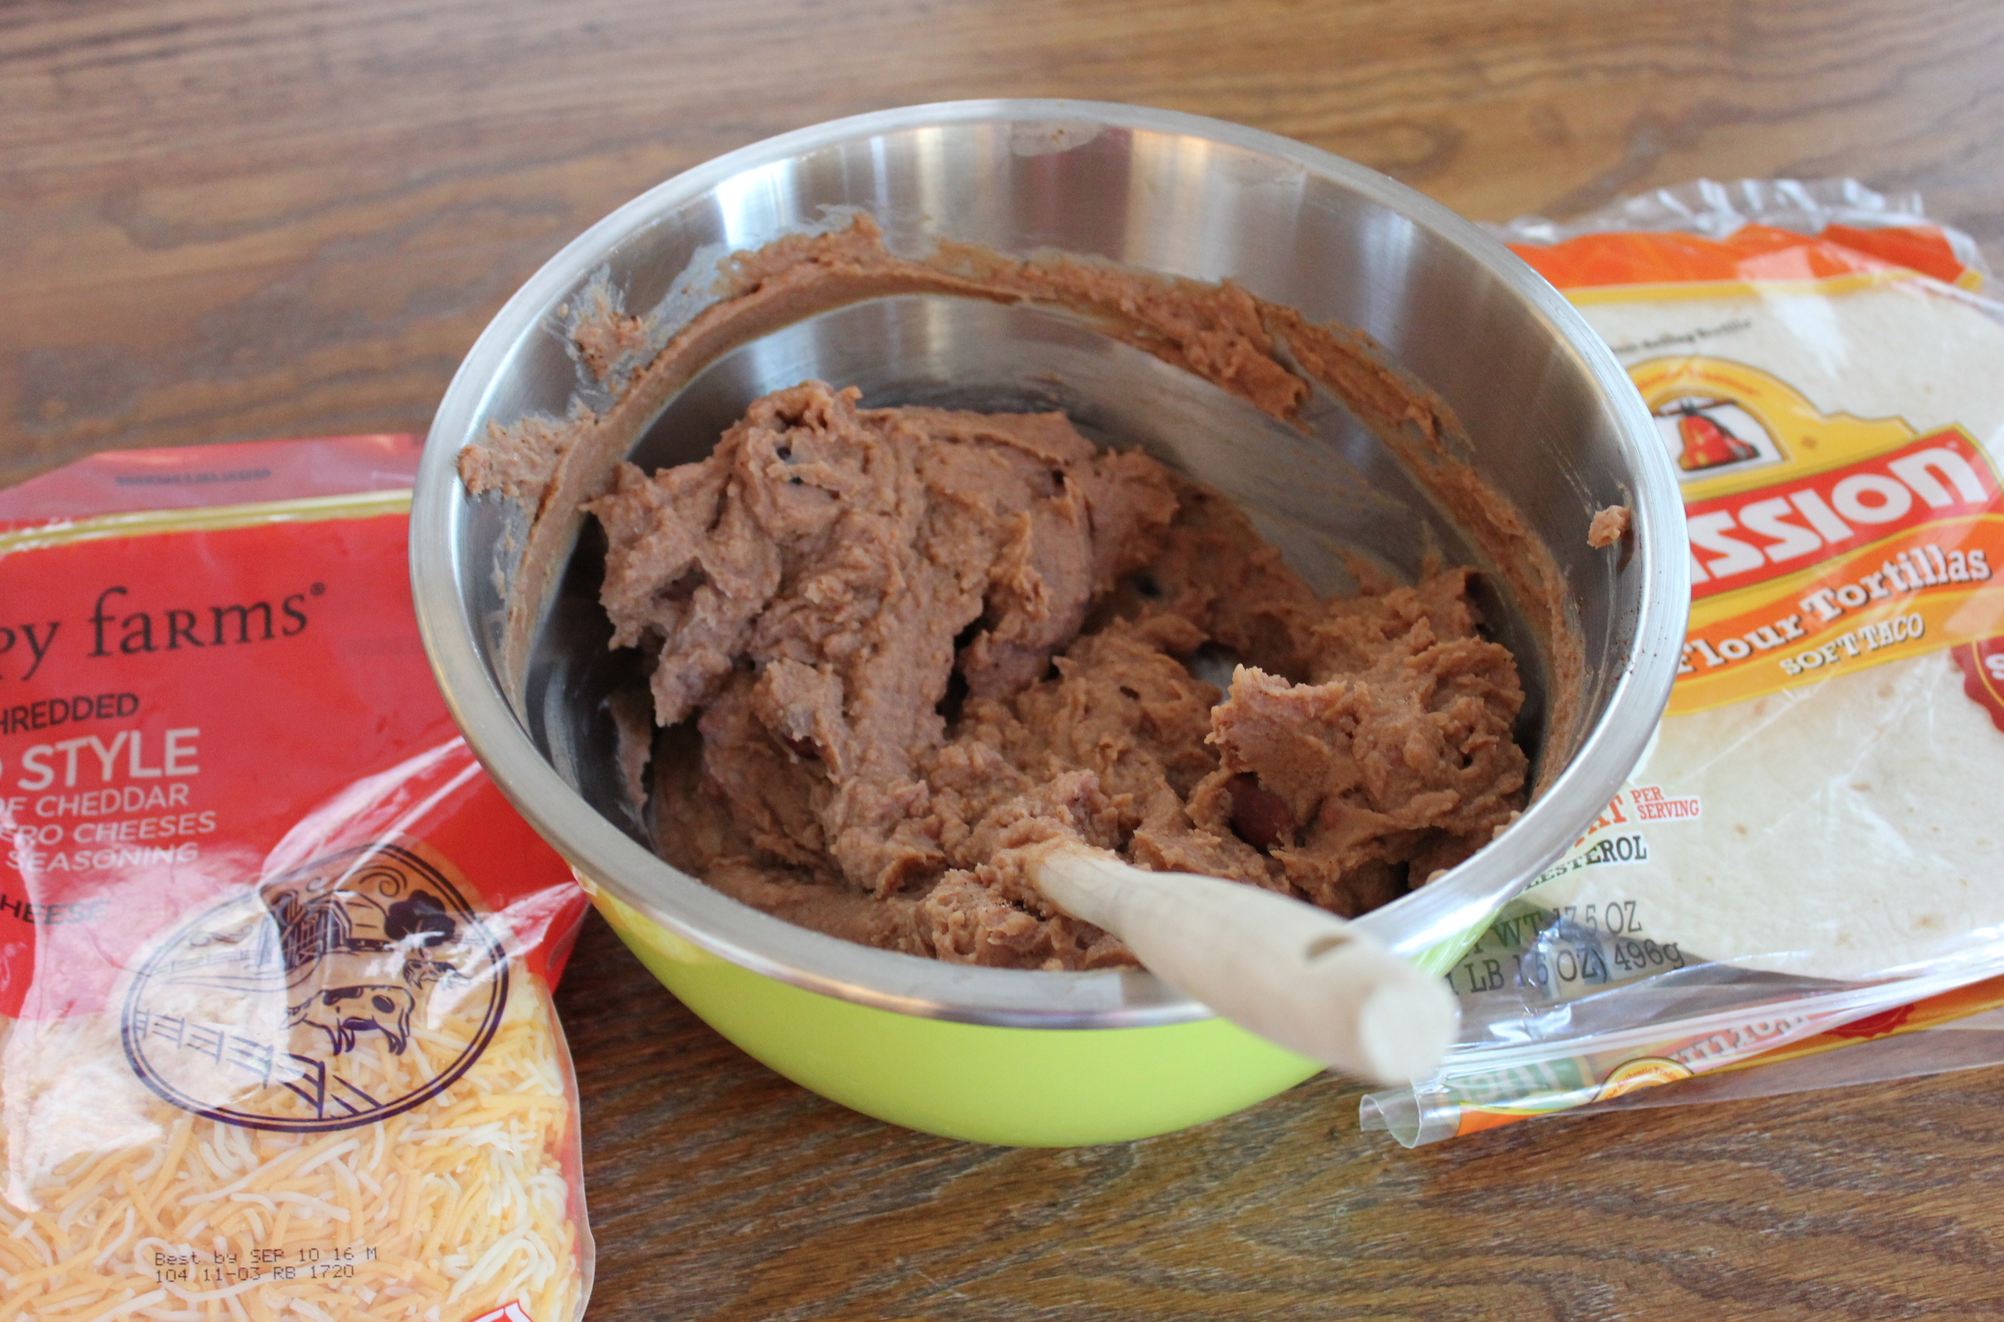
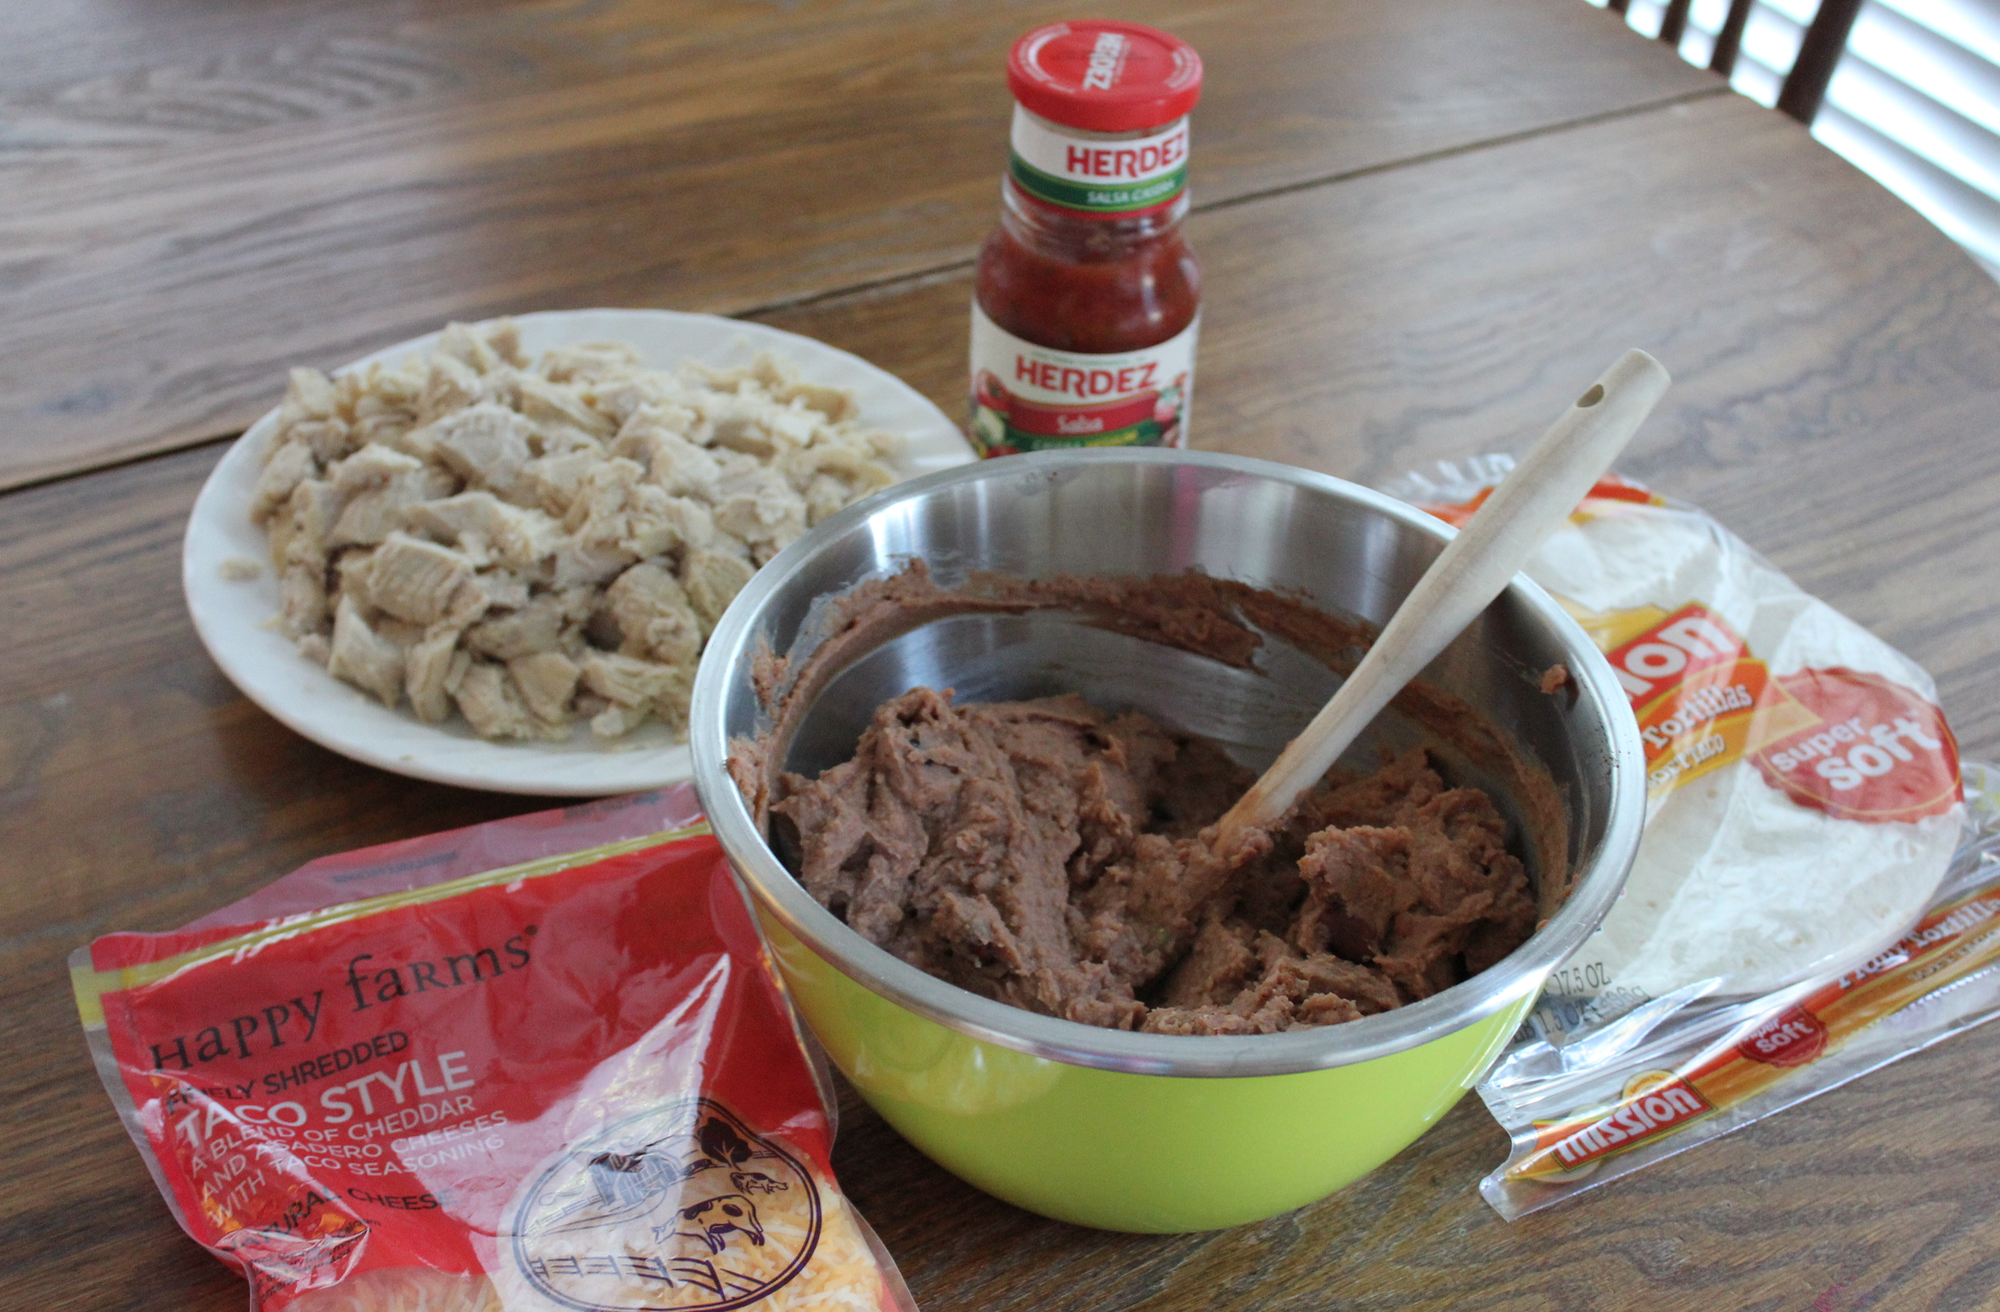
This Southwest Rollups recipe has been a family favorite since the beginning of our marriage. It’s easy (of course!), frugal, and filling.
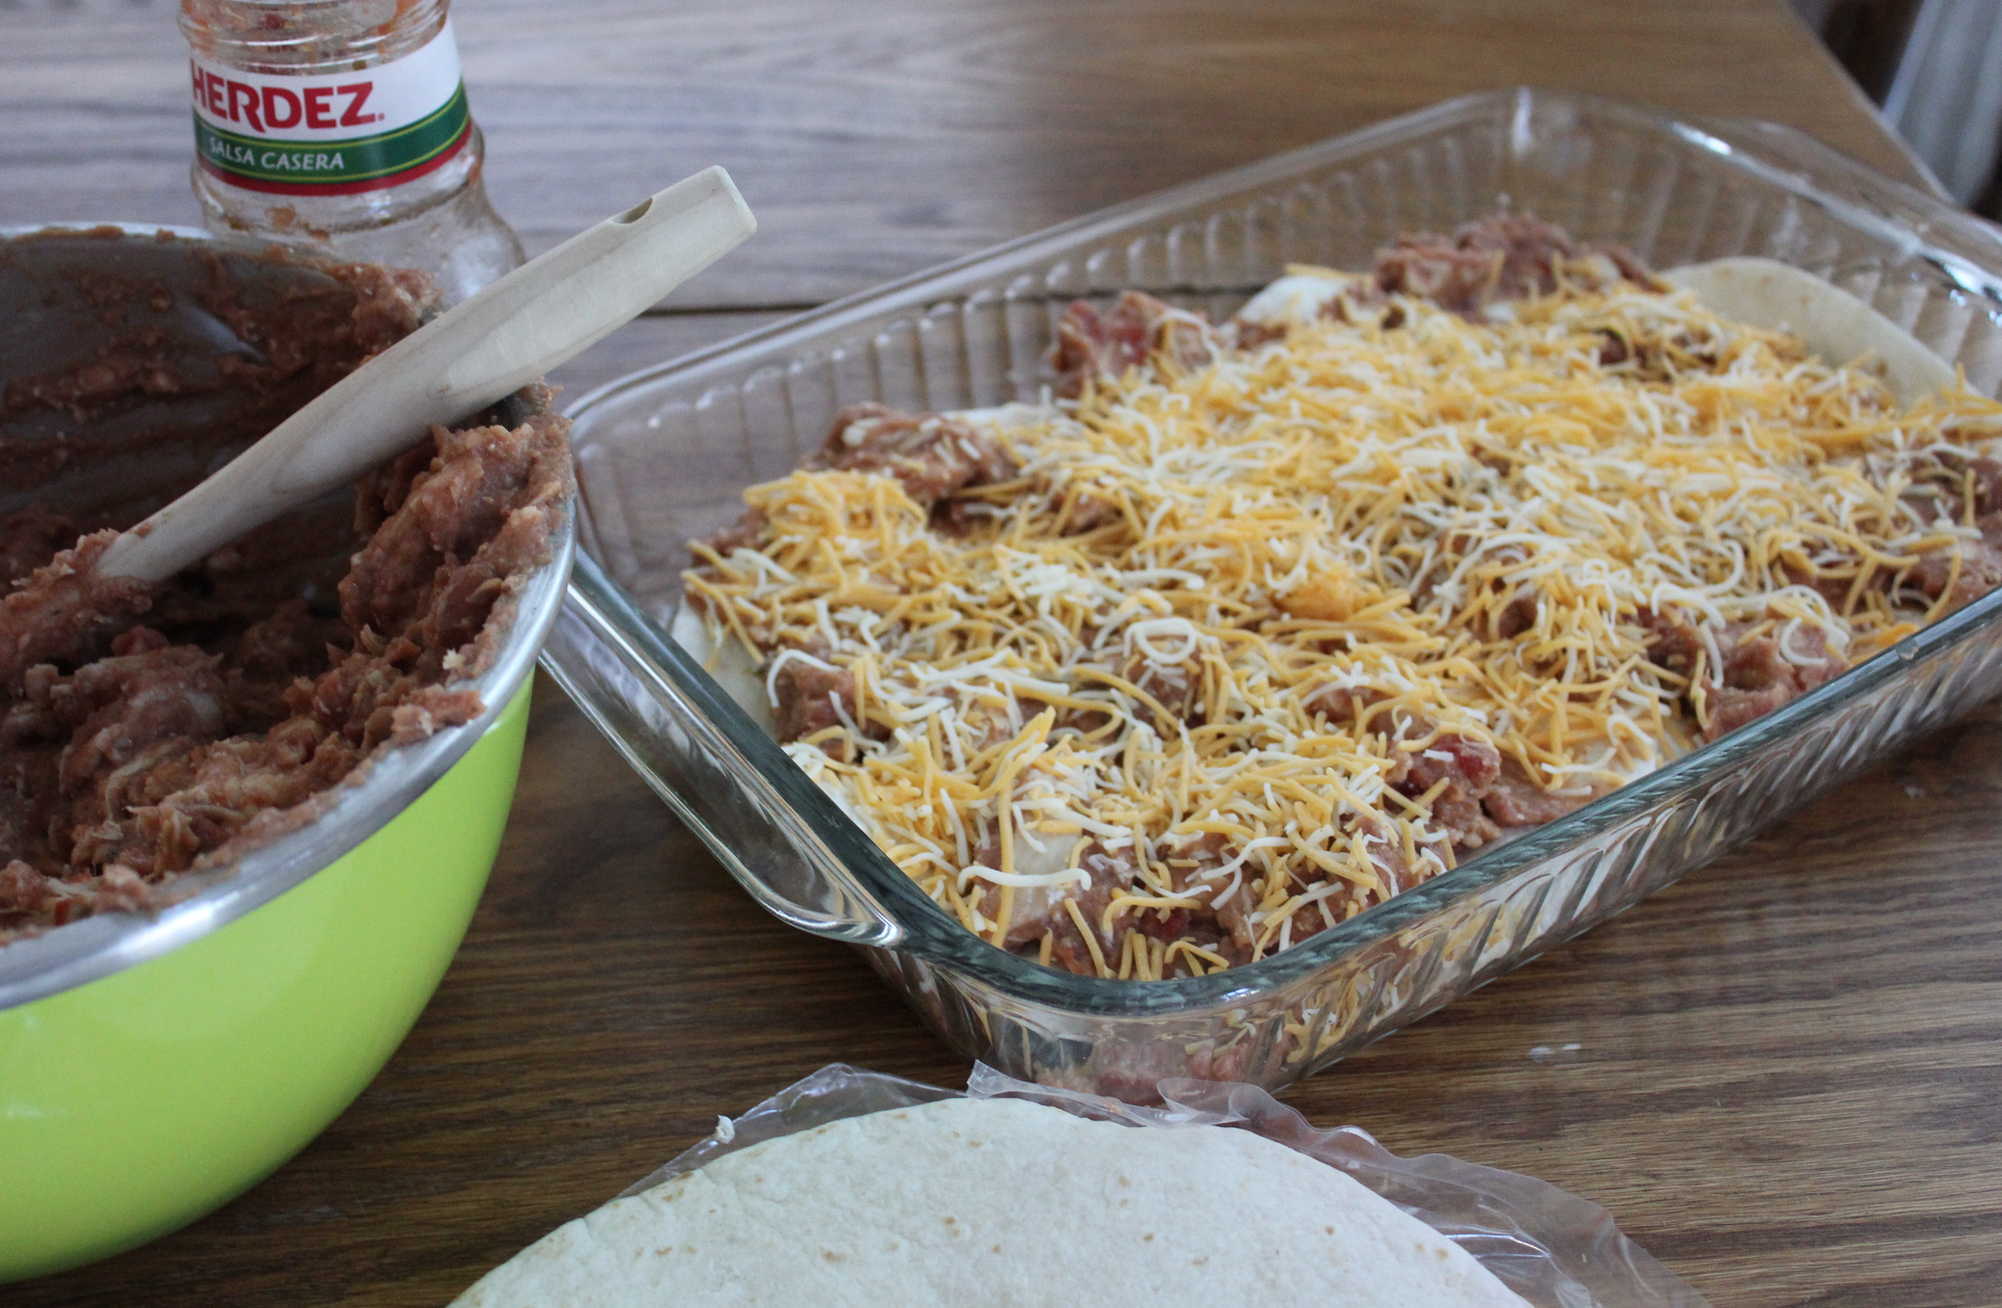
I got lazy and decided to change things up a little this time around. Instead of rolling up the filling inside the tortillas, I tried making it like a sort of Southwest Rollup Lasagna. It was super easy, but we haven’t tasted it yet to see if we like it this way or not.
(That’s the only downside to posting about my freezer cooking the week I cook… We haven’t actually tried everything yet! Because the point of freezer cooking is so I have things in the freezer for later! ;))
I think it will work well, but it does kind of negate the whole “being able to pop a rollup in the microwave at any time of the day or night” thing that the usual way of making the recipe allows you to. However, I don’t think my family will complain.
Plus, it will guarantee that no one sneaks rollups without me knowing about it and then me going to serve my family rollups and finding that they are all G-O-N-E! Don’t ask me how many times that has happened!
I loved this Mac & Cheese recipe so much that I had to write a whole post swooning over it already. You can go read it here.
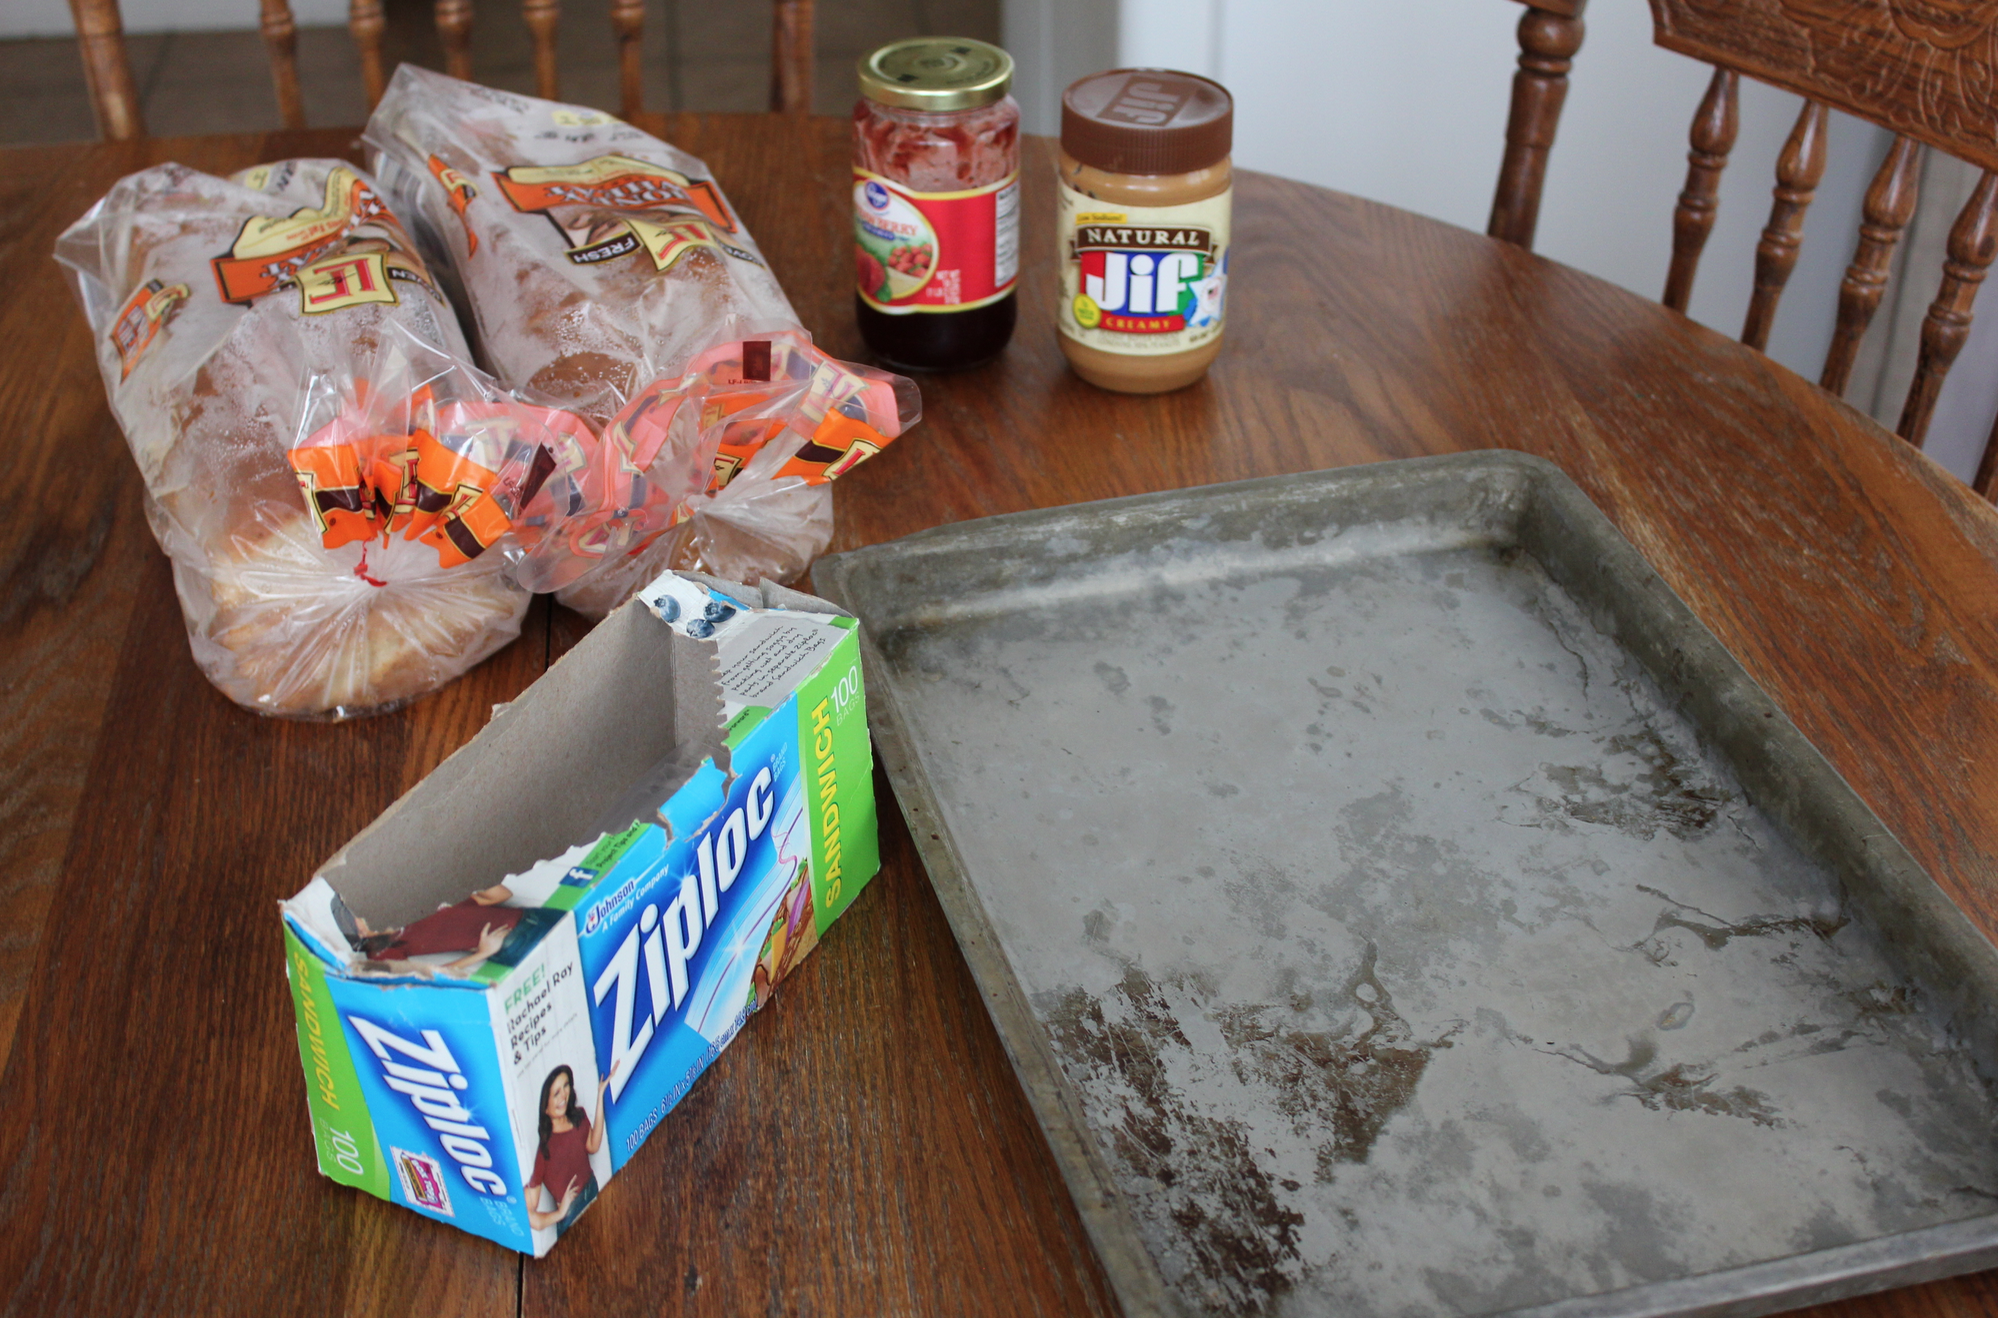

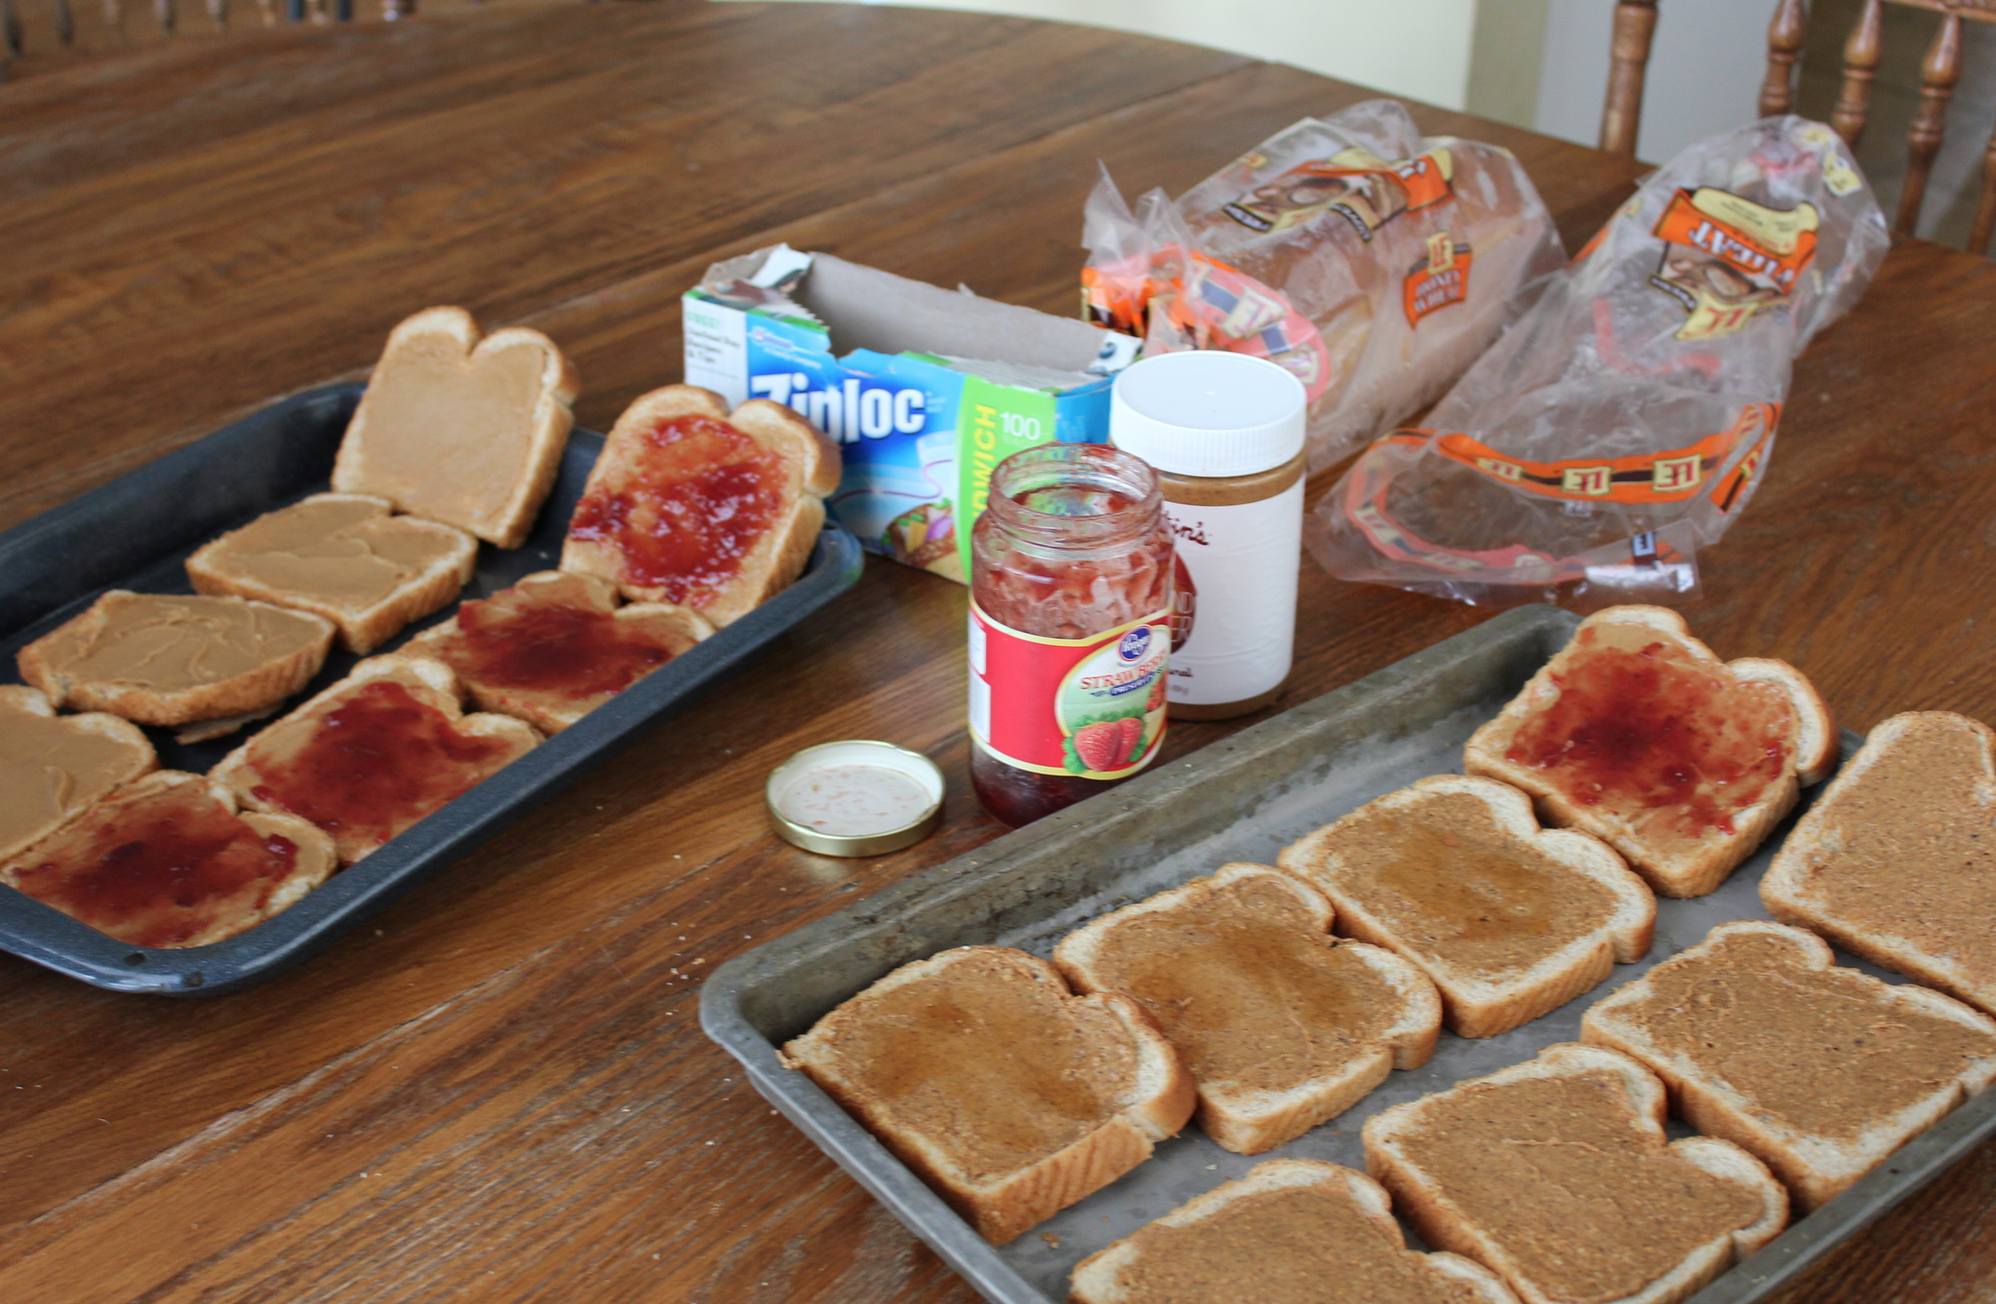
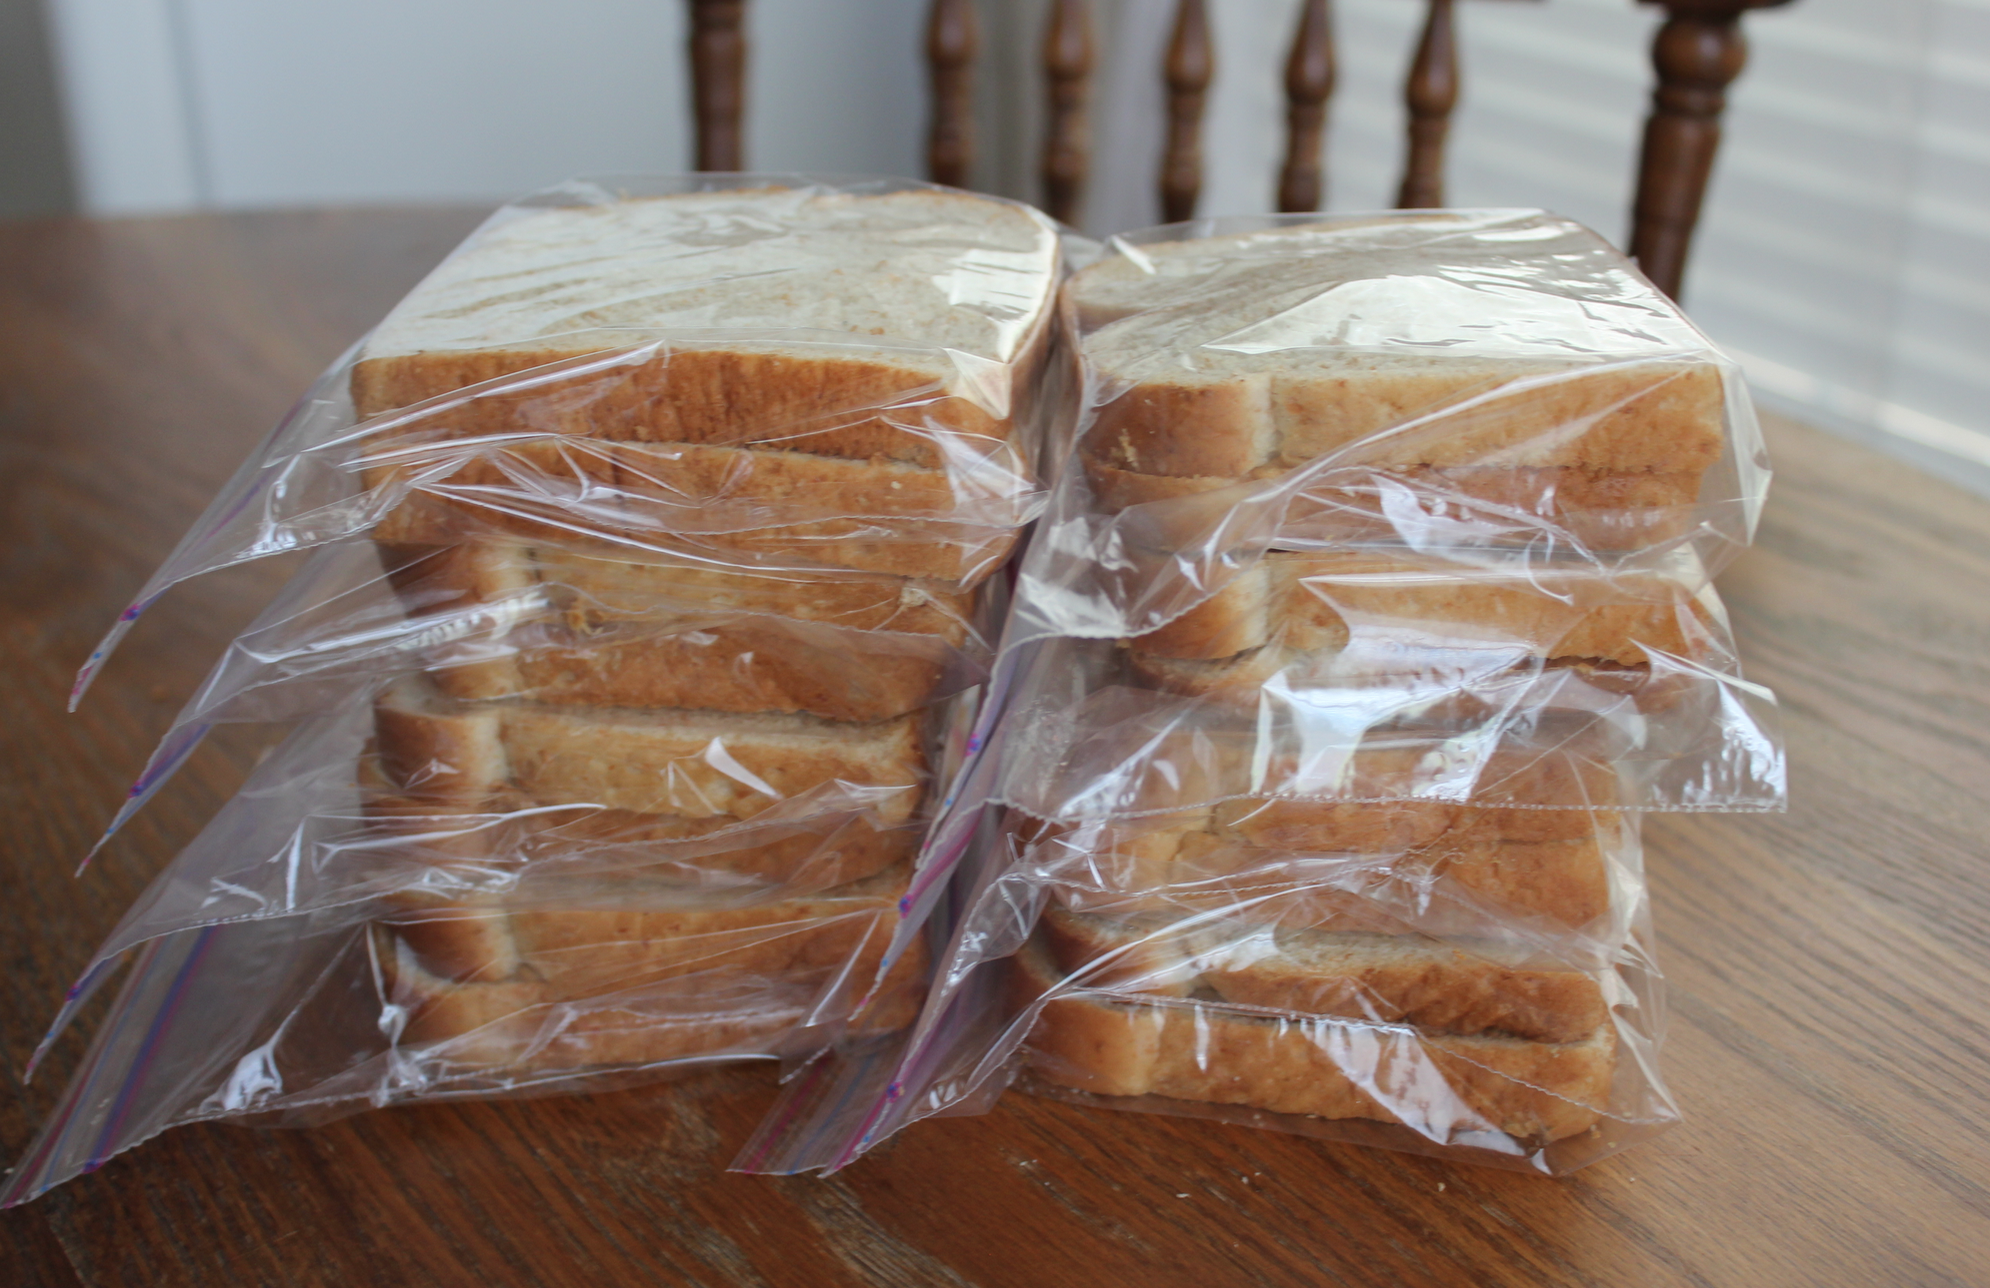
And I made Freezer-Friendly PB&J Sandwiches — a perfect thing to have in the freezer on busy summer days! I even did a quick video about it because so many people have asked me about this “recipe” recently. Watch the video here.
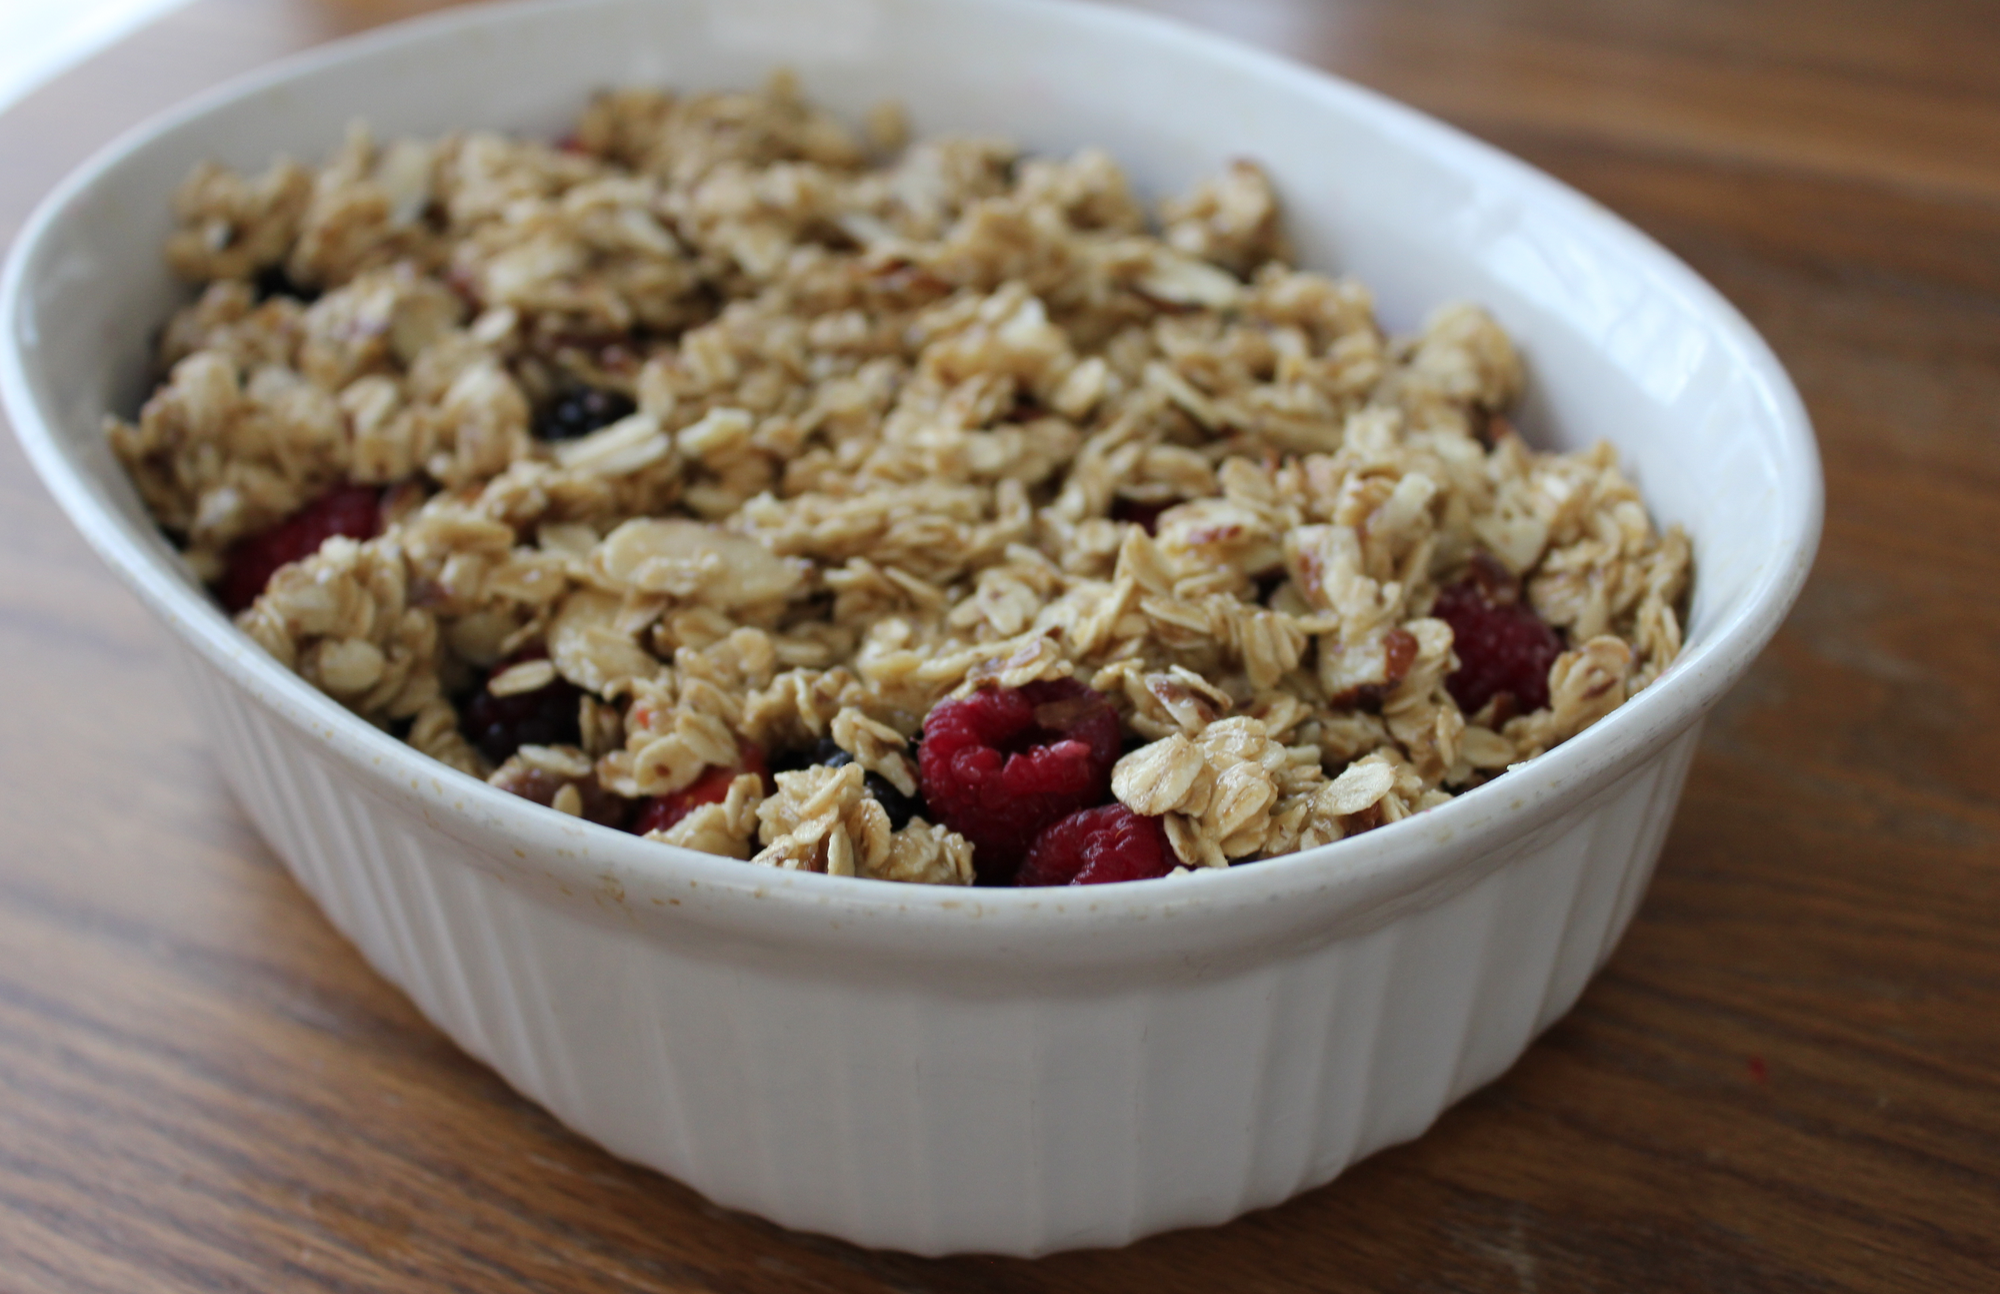
And I saved the best for last! This Berry Crisp is amazing. Amazing, I tell you. (I used blackberries, raspberries, and strawberries. I also added some almonds to the crust and used flour instead of almond meal.)
Truth be told, I had no plans to put this beauty in the freezer. It was going straight into my stomach as soon as it was done.
I had it for dessert last night and then again for breakfast this morning. I told myself it was basically like eating a bowl of oatmeal with fruit. Ahem. 🙂
{I’m so good at justifying eating dessert for breakfast. I mean, don’t you know that chocolate cake is basically like eating a cupcake which is basically like a muffin? And muffins are healthy and 100% breakfast food. Therefore, you can totally eat chocolate cake for breakfast! ;)}
So there you have the full scoop on my freezer cooking from this week! It felt so good to be making ahead food in the kitchen and it feels SO good to have food at-the-ready in the freezer.
Now tell me, why on earth did I ever think it was okay to fall off the Freezer Cooking bandwagon?? I have no idea… but I can tell you this: I’ve hopped back up on the train and plan to be sharing lots more freezer cooking posts with you in the coming weeks and months! 🙂
Do you have any great freezer cooking recipes to share that you think I should try? Share the link in the comments!
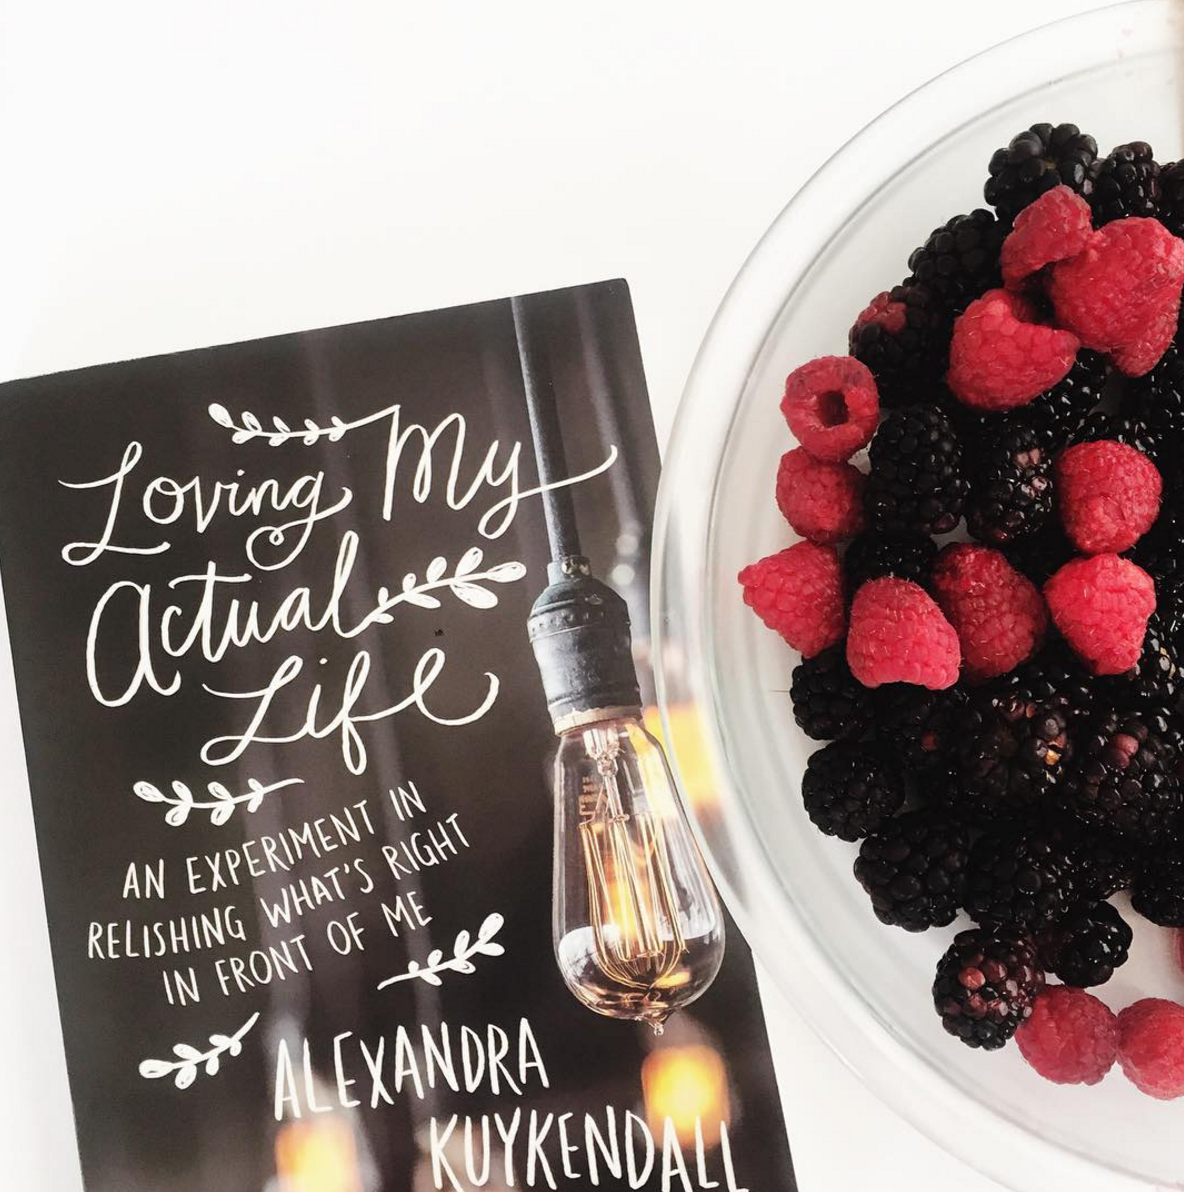
Loving My Actual Life
I’ve wasted much of my life pining away for a different time, a different season, a different set of circumstances.
No more.
This year, I’ve committed to love my actual life. The one I’m really living. Right here. Right now. Today.
It’s sometimes messy. It’s sometimes disorganized. And I rarely get everything done that I hope to in a day, but that doesn’t mean I can’t embrace it, savor it, and fall in love with it.
It’s a gift. All of it. And the more I choose to see it as such, the more I notice the gifts and the beauty all around me.
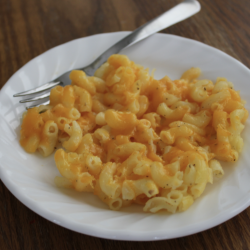
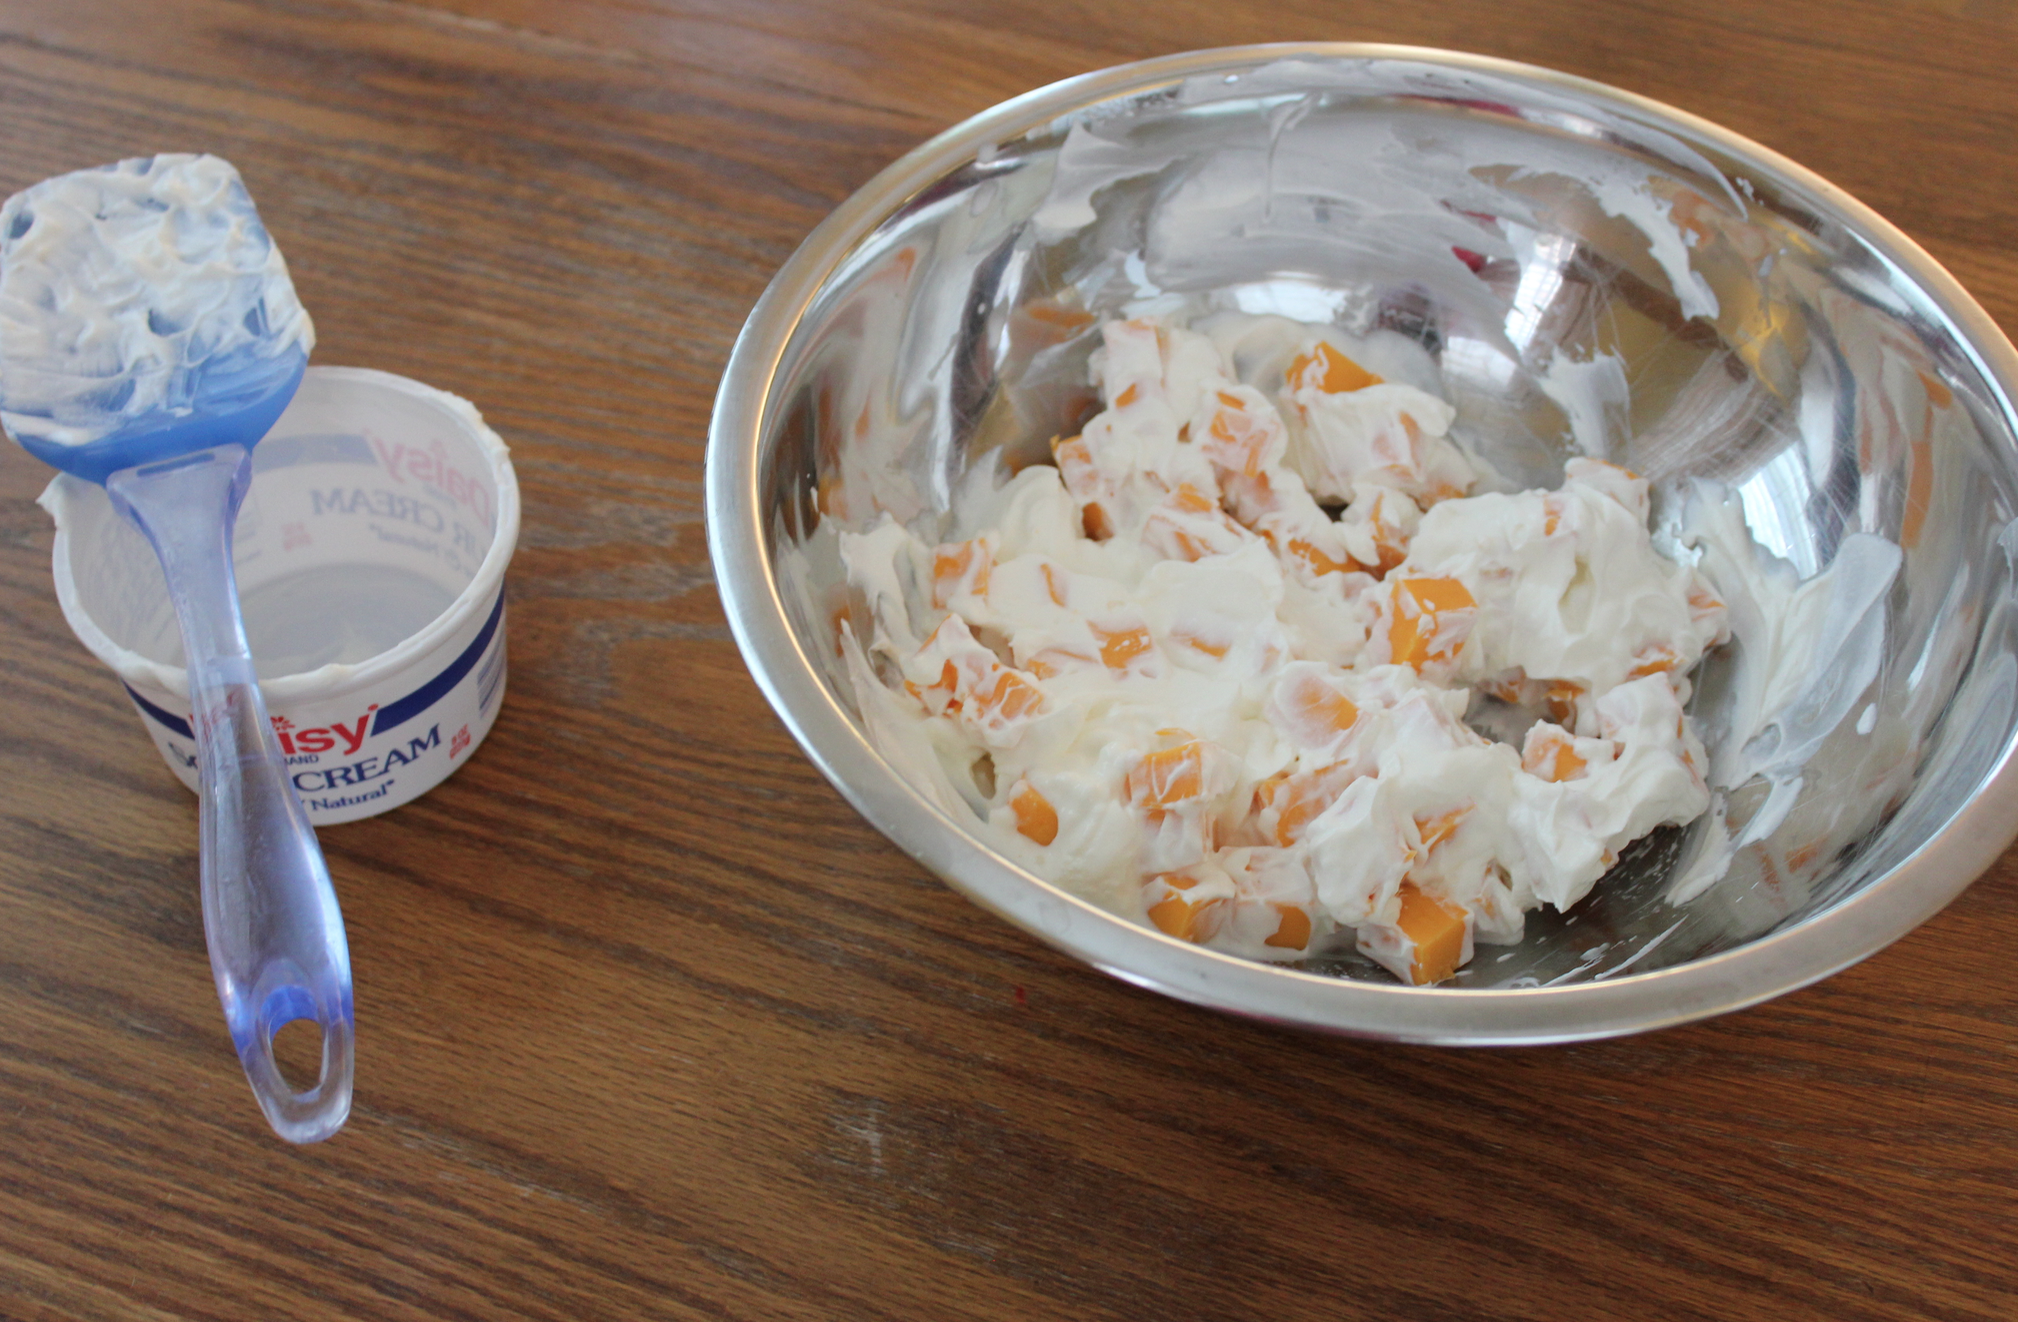
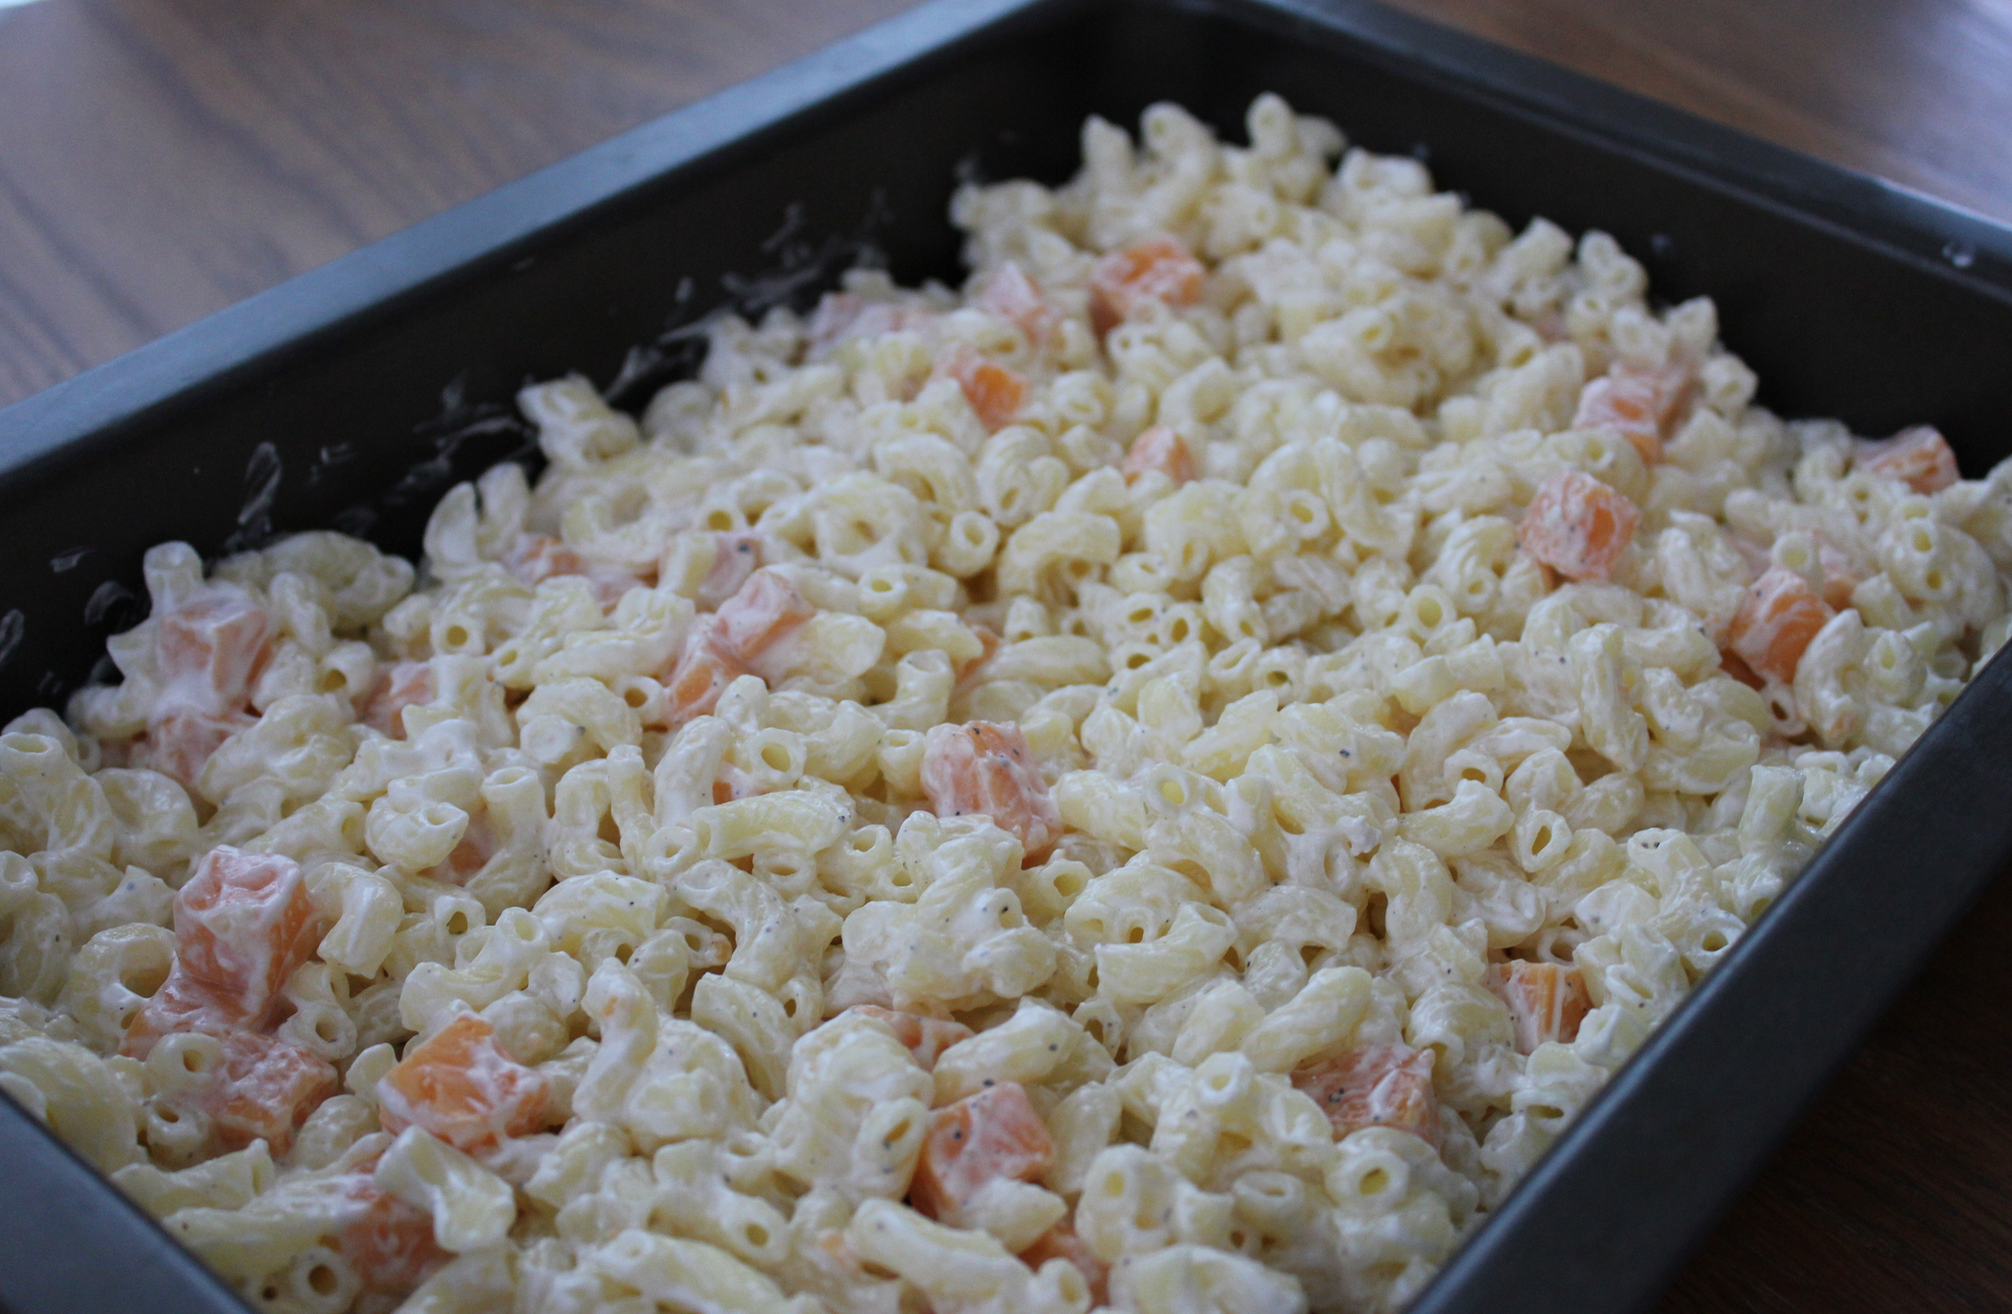
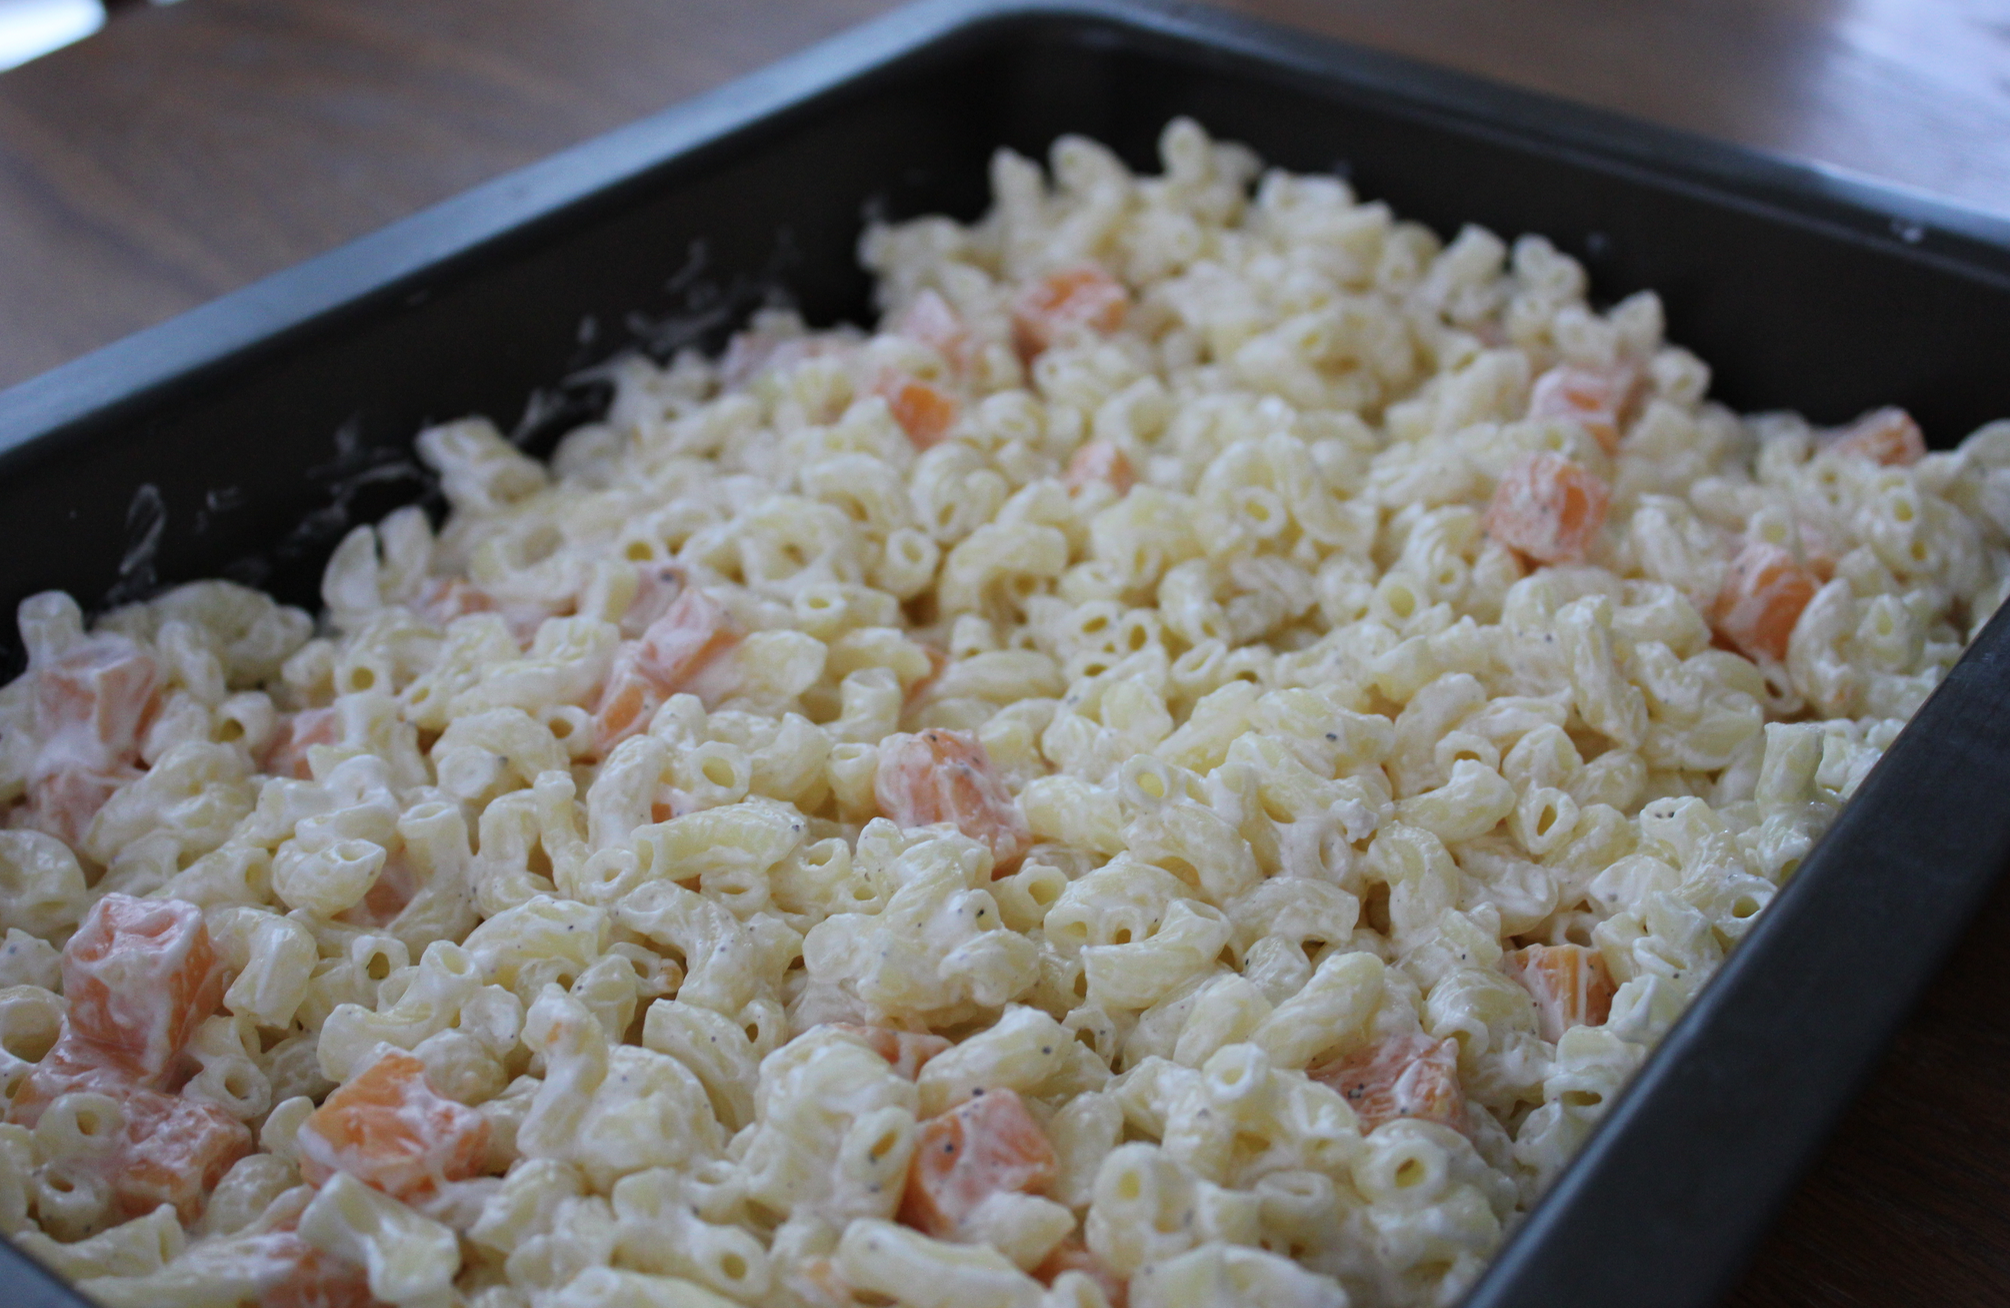
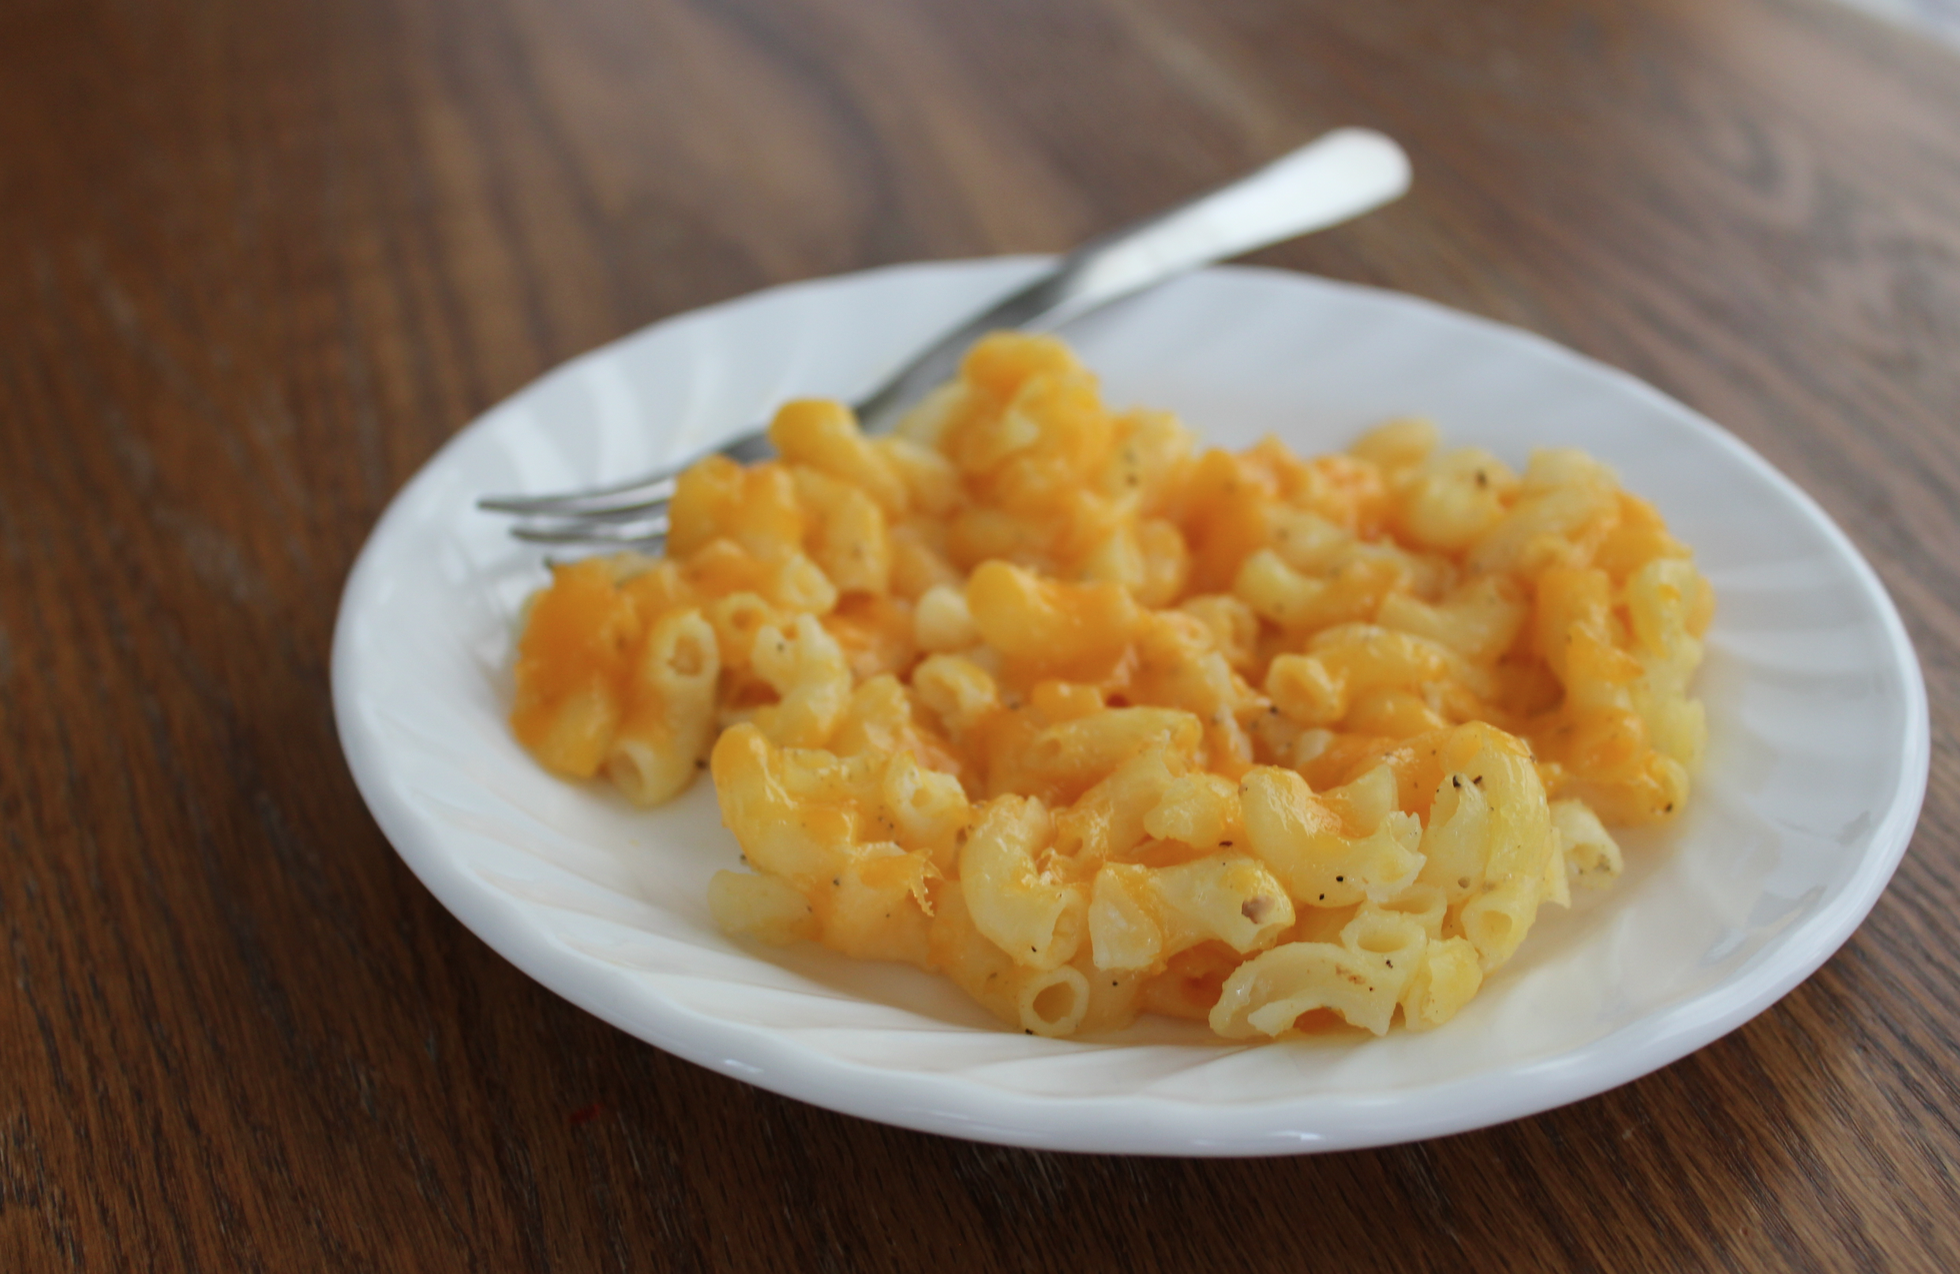
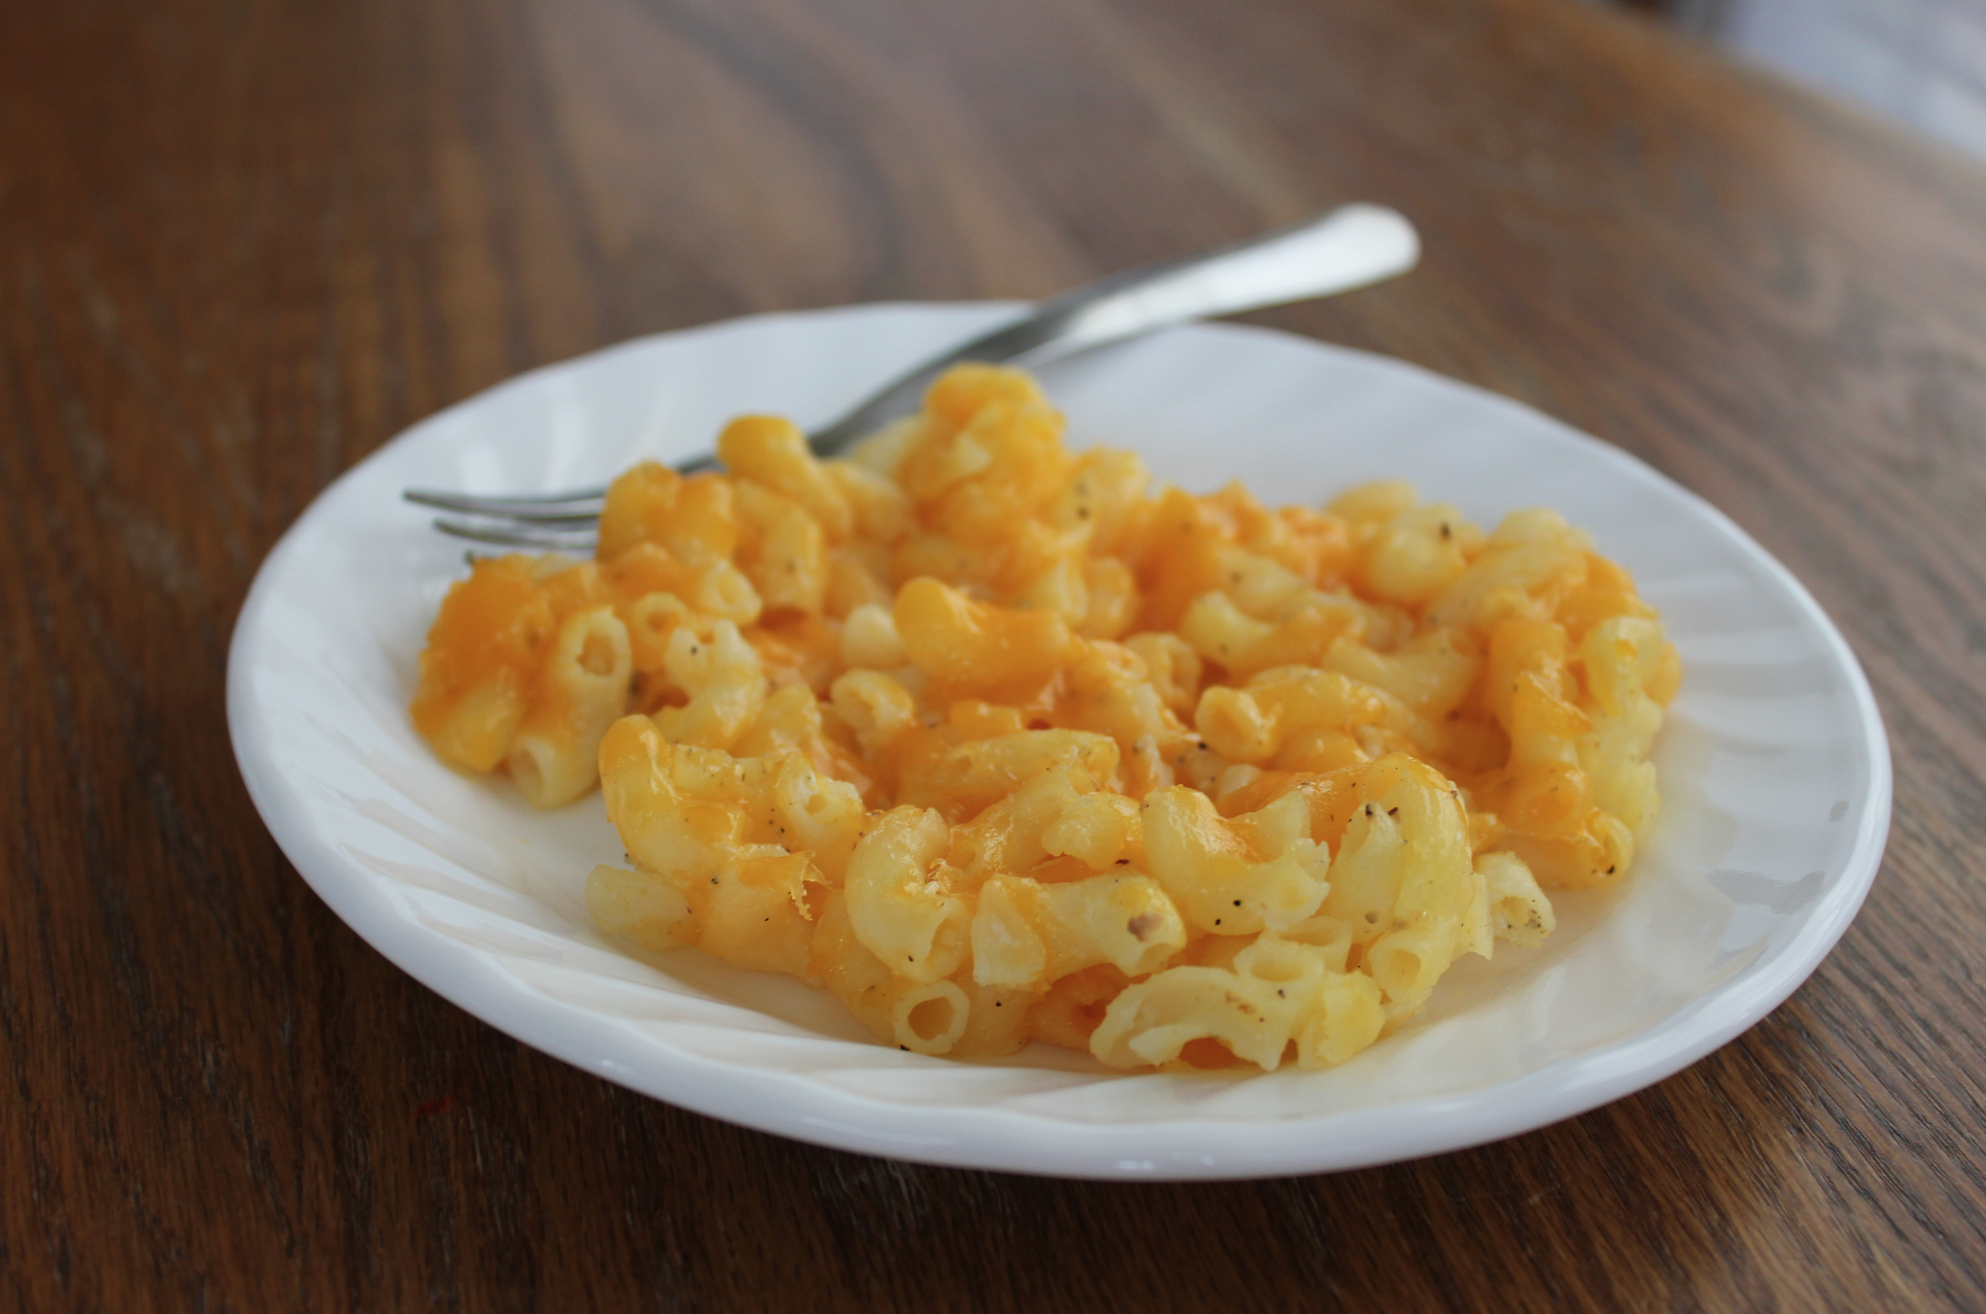
The Very Best Mac & Cheese Recipe I’ve Ever Tried

Remember when I posted this yesterday and said I needed to try the mac & cheese recipe stat?
Well, I did. Because I’m impatient like that when I find a really good-looking recipe.
And you guys… I have cracked the Homemade Mac & Cheese code.
I may have wanted to hide the pan so I can keep it all to myself. 😉 But, since I couldn’t keep the goodness all to myself (and because I probably would need to work out for about 19 hours to work off all the calories in a whole pan!), I shared it with my family.
They raved and raved about it. Before I knew it, the pan was gone and we were all wishing there was more!
It only took me about 57 different Homemade Mac & Cheese recipes to finally find THE recipe, but it was worth it. Plus, all that trial and error made finding the perfect recipe that much more exciting.
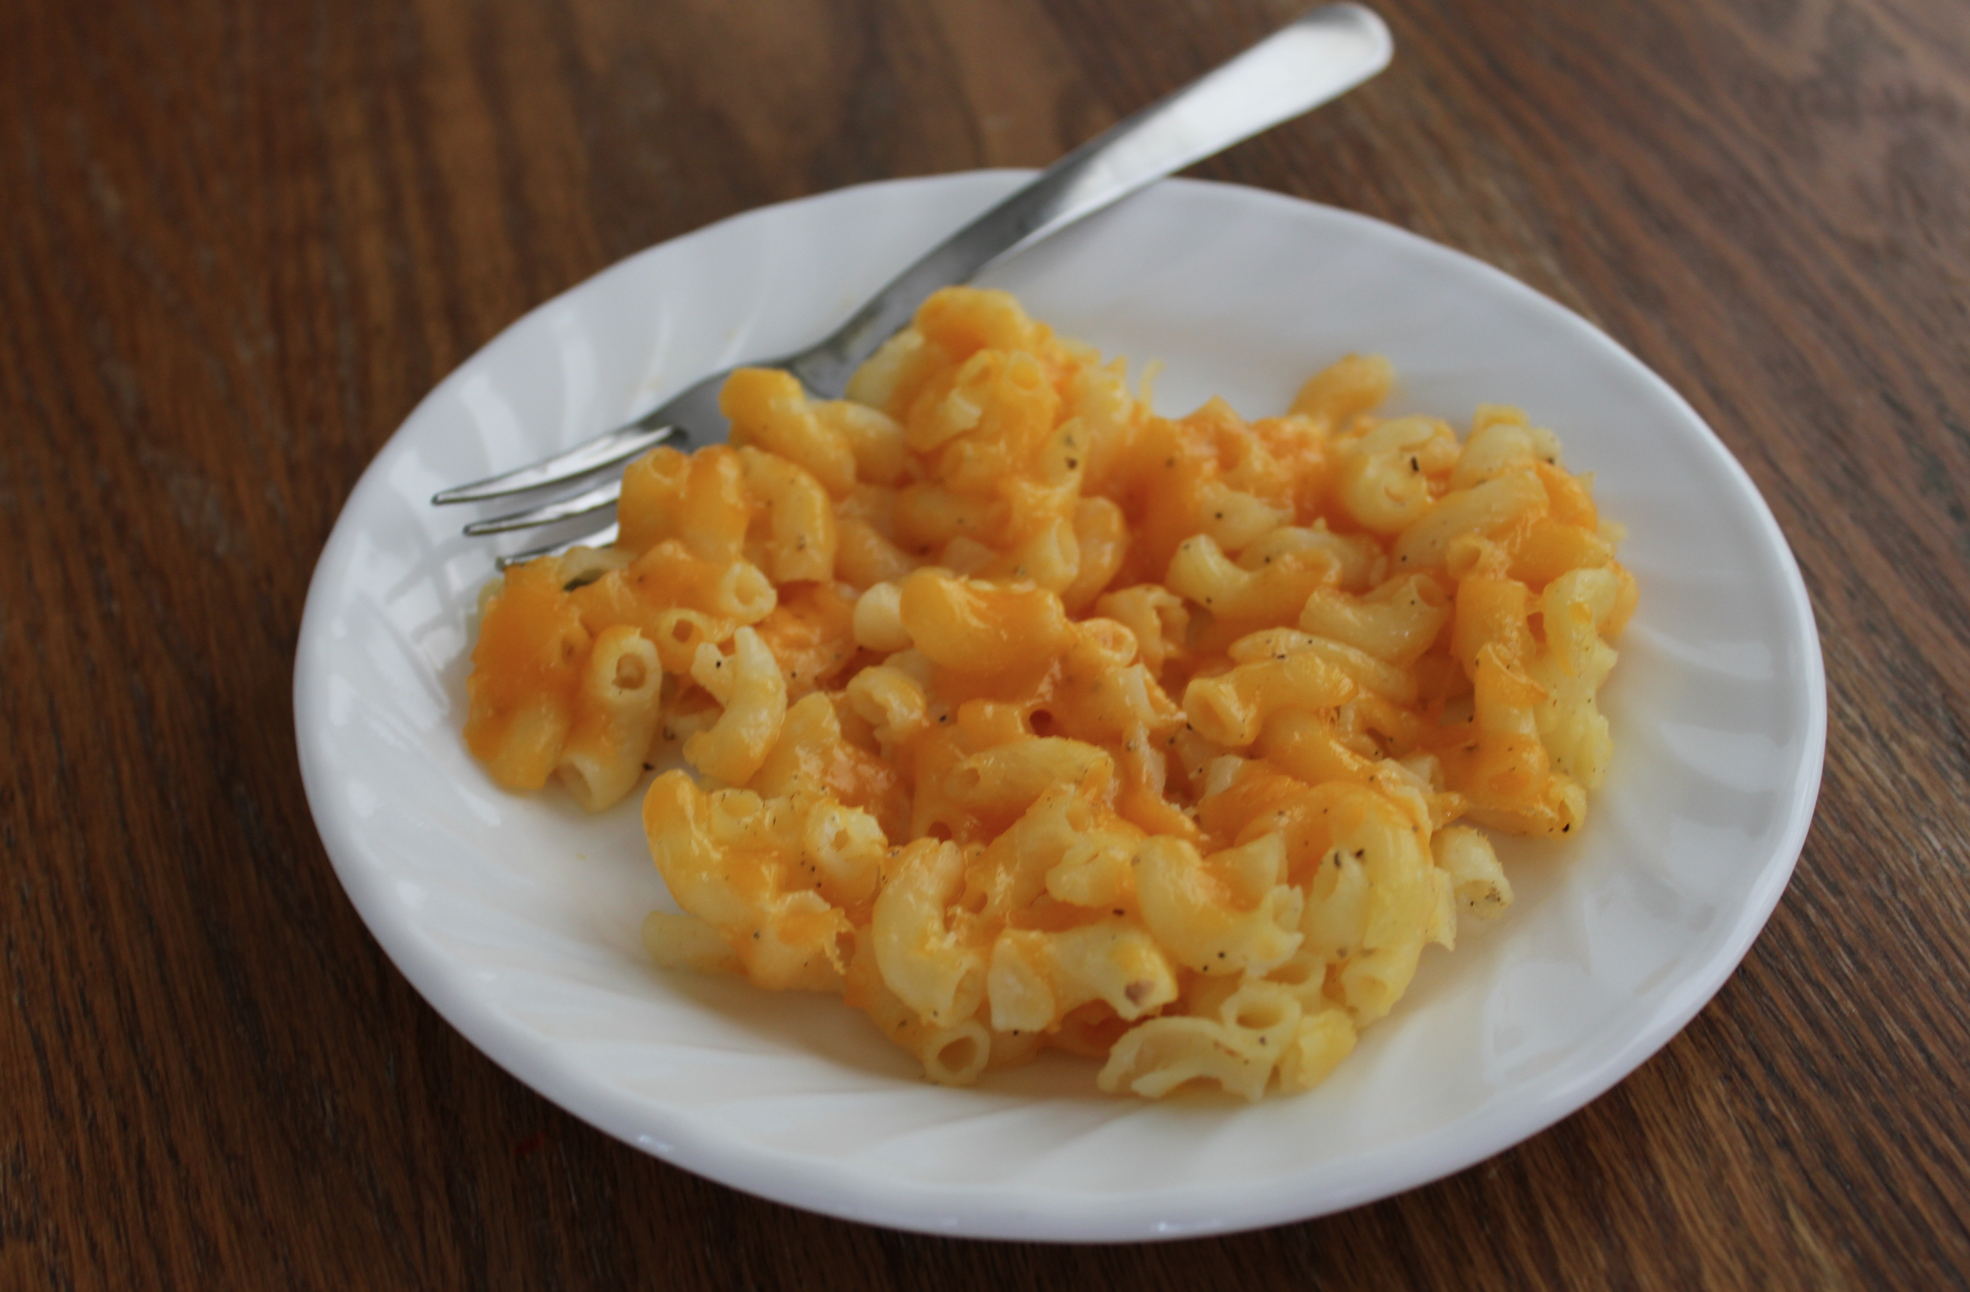
There are so many different things that I love about this recipe:
- It only takes 5 ingredients. For real. And one of them is salt & pepper — which I’m not sure even really counts!
- It’s pretty frugal. Okay, so if you find boxed mac & cheese on some crazy low sale, making this from scratch is probably going to be more expensive. But overall, the ingredients are very inexpensive and ones you can pick up for less than $5 total at Walmart or Aldi — or less, if you get them on sale with a coupon!
- It’s filling. Our kids are currently at that always hungry all the time stage. (It’s no wonder considering they are all in competitive sports and have multiple practices a week. Plus, they spend the bulk of the rest of their hours running and biking and playing baseball and kickball with the neighbors.) This kind of recipe actually sticks to them for longer than 3 minutes! 🙂
- It’s so simple to make. You know I’m as simple as they come when we’re talking about recipes. I don’t like lots of steps or multiple bowls or hoops to jump through. This recipe is my kind of recipe — it literally only takes about 5 minutes of prep work. Boil the noodles. Cut up the cheese. Mix everything together and dump it in a pan. I’m SO down with that.
- It’s adaptable. We used gluten-free noodles and I added extra cheese on top (is there such a thing as too much cheese? Nope, I didn’t think so!). I think you could also add cubed ham or chopped steamed broccoli or other spices… or probably a bunch of sophisticated ingredients that a non-foodie like me wouldn’t even know how to pronounce, let alone think to add!
- It’s supposedly freezer-friendly. I’m not sure I have the self-control to ever let it make it to the freezer, though.
Here’s the recipe link. You’re welcome.
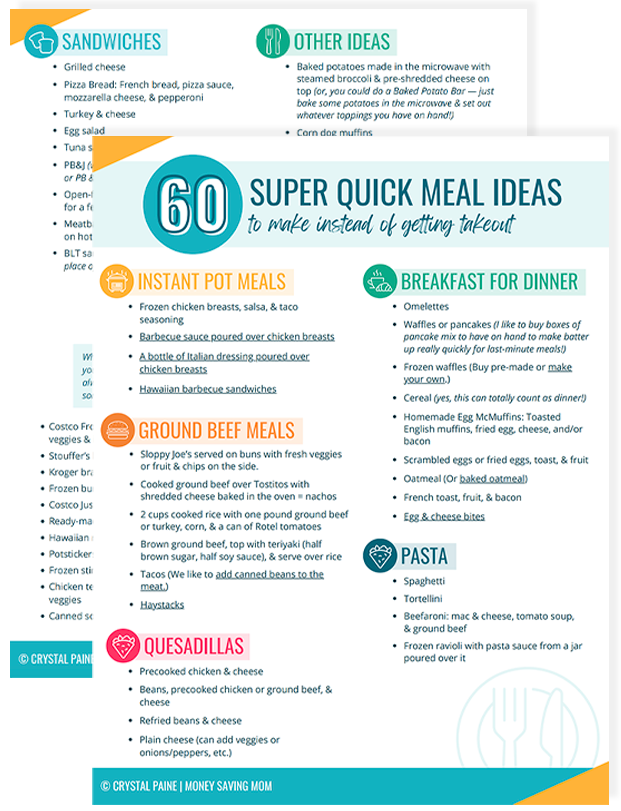
FREE DOWNLOAD: 60 Meals To Help You Avoid Takeout!
Meal time just got so much easier!

The only person you can change…
Who is the only person you can change?
Yourself.
You can inspire other people, you can motivate other people, you can nurture and mentor other people. But ultimately, you can only change YOU.
Every day, you wake up and have the opportunity to choose your attitude. You can choose to be a victim or a victor. You can choose to be a complainer or a conqueror.
You choose your attitude. And your attitude sets the whole tone for your day — and your life.
Choose wisely.

5 Things I’m Loving This Week
1. Periscope
I kind of felt like breaking up with Periscope after Katch shut down and there was no easy way to save broadcasts (they would disappear after 24 hours!). But Periscope wooed me back again by making it possible to save broadcasts forever on the app itself.
So if you’ve not checked out Periscope yet, it’s better than ever and I’m back in love with it again. I am giving myself grace to not be tied down to scoping at the same time every day right now, but I’m mostly finding that I’m hopping on every afternoon sometime between 2 and 3:30 p.m. Central time.
I’d love for you to join me there or watch some of the broadcasts from this past week. It’s such a fun way to connect on a much more personal level. I’m also experimenting with Facebook Live, as well. Here’s a recent broadcast I did on my favorite things to bring on every trip.

2. Downton Abbey
We finally finished watching the final season of Downton Abbey and I was so happy that it ended well… but I will miss the show! It’s one of the few shows that I’ve ever watched every single season of and loved pretty much every single one.
There are a few somewhat edge-y things in it here and there, but overall, it was very well done and such a great series. It took us at least 4-5 episodes to get into, though, so if you’re one of the few people on the planet who hasn’t watched it, do keep that in mind.

3. She Reads Truth
I know I’ve mentioned She Reads Truth multiple times before, but I just have to mention it again! We’re finishing up Proverbs right now and gearing up to start Acts as the summer study. I glean so much from these studies and love starting my day with them.

4. Pushing Myself in Weight-Lifting
I had 5 really, really intense workouts this week and it felt so good. (Okay, who am I kidding? I was also crazy sore. But it hurt so good! :))
As I told you earlier this week, it feels amazing to be regularly working out again. (Missed my post on how I’m making time for working out? Read it here.)

5. A Cartoon That Made Me Laugh
Jesse found the above cartoon earlier this week on Facebook and we got a good laugh over it… so I just had to share it here in case you needed a smile, too! 😉
What are YOU loving this week? Tell us in the comments.