


Guest post by Jessica from Preserving Life’s Moments
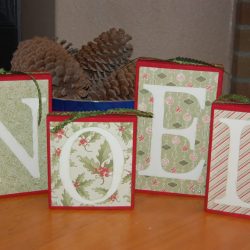
After making these easy Boo Blocks, I just knew I needed to make some for Christmas, too. I chose the word Noel and I haven’t decided yet if they’ll stay here or be gifted out to a special someone in my life.
Supplies You’ll Need To Make “Noel” Blocks:
- a 2×6 piece of wood cut into 6, 7, 8 and 9 inch blocks (My husband cut my pieces out of leftover wood he had saved from a previous project.)
- sandpaper paint and paint brush
- scrapbook paper
- letters (I cut mine using my Cricut. You can also purchase letters at a store, or print them out from the internet.)
- ribbon
- embellishments (optional)
- adhesive of your choice (craft glue, double-sided tape, etc.)
Step 1: Cut your wood, sand it and paint with a color that coordinates with the paper you have chosen.
Step 2: Cut your paper to size. I left a 1/4 of an inch around each block.
Step 3: Adhere your paper to your blocks. I used double-sided tape. That stuff works for just about anything and is super easy to use.
Step 4: Adhere your letters to the blocks.
Step 5: Tie your ribbon around the edges.
Step 6: Finally, add some embellishments if you would like. I have added a couple flowers and sparkles on mine.

I had almost all of these items lying around my house so this was a very inexpensive and easy project to create. It is perfect as a decoration in your home or a great gift to give to that special teacher, friend, or family member in your life.
Jessica is a work-at-home mom to Shane (4.5) and Adalyn (11 months). She loves photography, crafting, reading, baking, and cooking. You can read about all of Jessica and her families adventures at Preserving Life’s Moments.
Do you have a great idea for a handmade Christmas gift? We’d love to have you submit your tutorial for possible publication for our Handmade Christmas series.


