
Guest post by Kimberly from Couponing University
Growing up, I can remember Thanksgiving to be just as exciting as Christmas at my Grandma’s home. Every year, she would make all ten of the grandchildren a Christmas ornament. These became the first gift of the season, coming at Thanksgiving so we could enjoy them for the month to come.
Her ornaments were most often intricately crocheted with amazing skill and great attention to detail. My grandmother’s thoughtfulness ran deep as she crafted us ornaments each year. She knew that her gifts would serve to fill our first tree of our own one day as we began our journey into adulthood when money might run tight and leave us with an otherwise bare tree.
As my Grandmother’s ornaments graced my very first tree just three years after she passed, I couldn’t help but pull up the memories of all those years in anticipation for Thanksgiving and a new ornament. Today, all my Grandmother’s ornaments have a special tabletop tree for themselves.
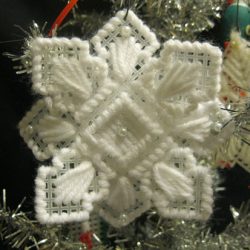
Sometimes, my Grandmother would make us something out of the ordinary, such as this snowflake ornament which was given to me in 1989. (Grandma would always label the back with the year.) We loved this ornament so much that my mother deconstructed the snowflake so that we could reproduce what seemed like a hundred of them for gifts to teachers, neighbors and friends.
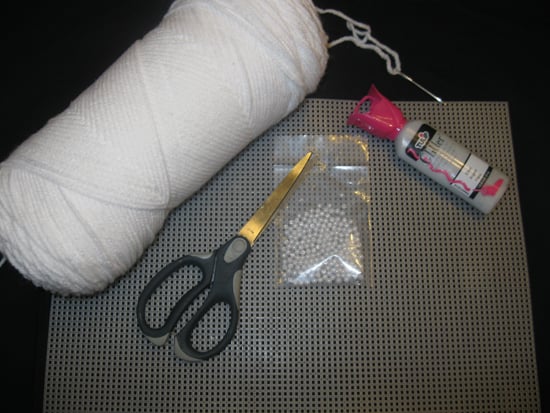
Supplies:
- Plastic mesh canvas (one sheet will make six completed ornaments)
- White yarn
- Pearl beads
- Glitter fabric paint
- Yarn needle
- Scissors
Instructions:

::Cut two snowflakes following the pattern. To begin, cut 19 by 19 squares, then cut the ‘petals’. Once you have cut one petal, you can use your scissors as a guide to begin the next cut, just line them up with the inner line and start over.

::Cut a hole in the middle of the one of the snowflakes. The easiest way to do this is to fold the piece in half, count in two squares, and cut up two squares on each side. Then fold the other direction, again cutting up two on each side. This will be the top piece.

::Starting in the middle of the full snowflake piece, secure the yarn by creating the first stitch and making a knot. Continue to stitch the center.

::Bring the yarn up to the closest petal and stitch the veins.
::Bring the yarn to the side and overstitch the sides, making two stitches in each outer corner, until you come to the next petal.
::Continue in this manner until the bottom is complete, making a double knot at the end.
::Begin stitching the top snowflake in the veins of the petal, creating a double knot to secure. Continue to stitch the first petal.

::Overstitch outer edges, petals, as the bottom snowflake.
::Overstitch the inner edge and secure with a double knot.

::Using the glitter fabric paint, place a dot in the middle of the bottom snowflake to attach a bead. You may find it easier to use the needle to help hold the bead in place. Place beads in the same manner onto the stitched points on the petals of the top snowflake.

::Allow to dry overnight.
::Place the snowflake with the center hole on top of the second snowflake and turn 45 degrees.
::Gently pop the petals of the top snowflake into the centers of the bottom snowflake.

::Tie a loop with yarn into the top of one petal or attach an ornament hook for hanging.
::Write the year on the back with glitter fabric paint.
::Hang to dry.

Kimberly is a stay-at-home mother of two teenage daughters and a one year old boy. In her spare time, she blogs at Couponing University where she shares all she has learned about shopping smarter as well as other tricks for the Domestic Engineer of today.


 Are you giving something away on your blog this week or have you found a great giveaway elsewhere on the web? If so, post your link below and let all the readers here know so they can get in on the action! Your giveaway must be family-friendly and no-strings-attached. In addition, to make it easy to navigate, your link must go directly to your giveaway post. Links going to the homepage of your blog or any other part of your blog besides the direct link to your giveaway post will be deleted.


 Guest post by Jami from