


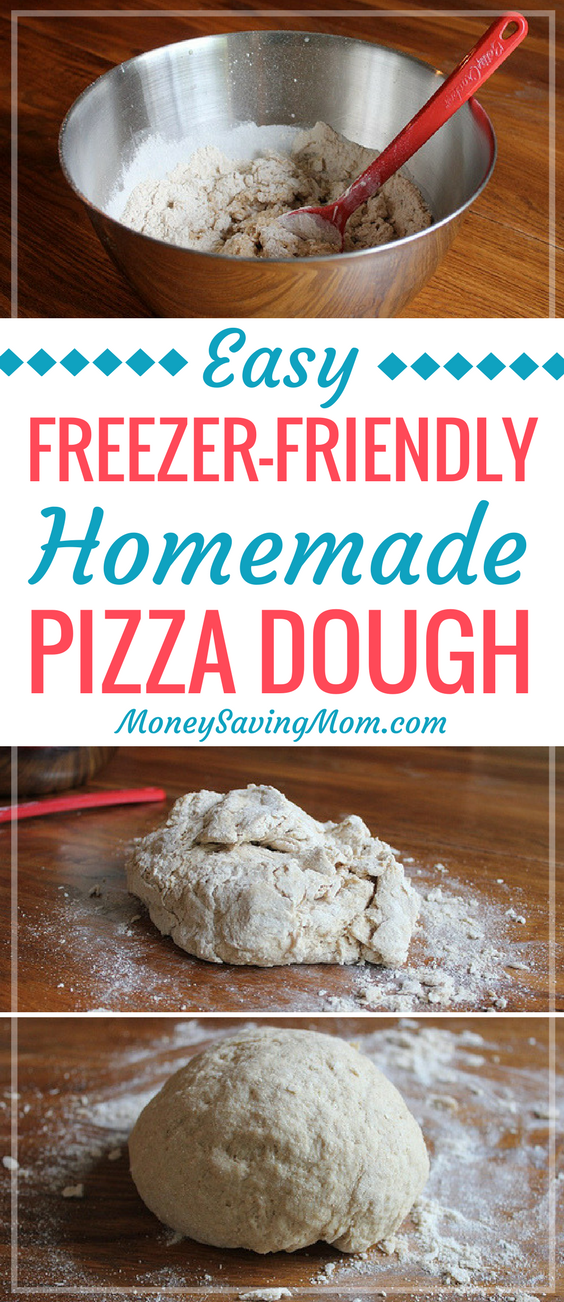
Homemade pizza is such a family-friendly meal… and extra delicious with a homemade crust. This recipe is super easy (and freezer-friendly!)
You Will Love this Homemade Pizza Dough Recipe
This pizza crust recipe has been my go-to recipe for years. It’s so easy to make — and it’s really hard to ruin. In fact, I’ve made it dozens upon dozens of times and I don’t think I’ve ever messed it up.
That’s saying a lot coming from someone like me, who can even ruin simple recipes like Reese’s Peanut Butter Bars.
Can you freeze pizza dough?
Last year, I experimented with freezing the pizza dough — to make it even quicker to pull off Homemade Pizza for dinner.
While I still think fresh is best, the frozen dough is almost as good — and it’s much less expensive than ordering pizza for dinner! 🙂
Ingredients for Homemade Pizza Dough
- 2 cups warm water (105º to 115º F)
- 2 Tablespoons active dry yeast
- 2 teaspoons sugar
- 2 teaspoons salt
- 4 Tablespoons oil (vegetable, Canola, or olive oil)
- 5 cups flour (can use all whole-wheat, half white/half whole-wheat, or all white)
How to Make The Best Pizza Dough
1. Pour warm water into a large bowl and sprinkle the yeast over it. Stir to dissolve.
2. Add the remaining ingredients and mix.

3. Dump onto a floured surface and knead dough for 3-5 minutes, or until smooth and no longer sticky.

4. Cut the lump of dough in half and roll out onto 2 greased pizza pans OR, put each half of dough into an airtight freezer bag and freeze for 4-6 weeks.

5. To Bake with Fresh dough: Add pizza toppings of your choice. Bake at 500ºF for around 10 minutes (until the crust looks crispy and lightly browned).
6. To Bake from Frozen dough: Place frozen dough in a greased bowl, cover with a damp towel, and thaw at room temperature for at least 3-4 hours. Roll out and shape onto a greased pizza pan. Add pizza toppings of your choice. Bake at 500ºF for around 10 minutes (until the crust looks crispy and lightly browned).
How to freeze Homemade Pizza Dough
The best way to freeze this homemade pizza dough is to divide the dough ball into 2 portions and place each into a gallon-size zip top freezer bag. Squeeze the air out, label, and freeze for 4-6 weeks.
I’ve found it often works best to let the dough cool in the refrigerator (in the zip top bags) before freezing it. The dough will continue to rise in the fridge, so you may need to squeeze the air out of the bag a couple of times.

How to thaw this Frozen Pizza Dough Recipe
You’ll want to plan ahead about 5 hours when using frozen pizza dough — as that’s about how long it takes to defrost, top, and bake.
1. Place frozen dough in a greased bowl and thaw at room temperature for at least 3-4 hours.
2. Roll out defrosted dough and shape onto a greased pizza pan.
3. Add pizza toppings of your choice.
4. Bake at 500ºF for around 10 minutes (until the crust looks crispy and lightly browned).

Does Frozen Pizza Dough need to rise after thawing?
Nope! Simply defrosted the dough enough so you can roll it out, then top and bake!
Fun recipes to try with the Best Homemade Pizza Dough
- Olympic Rings Pizza
- Homemade Hawaiian Pizza
- Grilled Pizza
- Pepperoni Rolls
- Stromboli (add the filling to half the dough, fold the other half over the filling)

Homemade Frozen Pizza
Ingredients
- 2 cups warm water 105º to 115º F
- 2 tbsp active dry yeast
- 2 tsp sugar
- 2 tsp salt
- 4 tbsp oil vegetable, Canola, or olive oil
- 5 cups flour
Instructions
- Pour warm water into a large bowl and sprinkle the yeast over it. Stir to dissolve.
- Add the remaining ingredients and mix.
- Dump onto a floured surface and knead dough for 3-5 minutes, or until smooth and no longer sticky.
- Cut the lump of dough in half and roll out onto 2 greased pizza pans OR, put each half of dough into an airtight freezer bag and freeze for 4-6 weeks.
- To Bake from Fresh: Add pizza toppings of your choice. Bake at 500ºF for around 10 minutes (until the crust looks crispy and lightly browned).
To Bake from Frozen:
- Place frozen dough in a greased bowl and cover with a damp towel.
- Thaw at room temperature for at least 3-4 hours.
- Roll out and shape onto a greased pizza pan.
- Add pizza toppings of your choice and bake at 500ºF for around 10 minutes (until the crust looks crispy and lightly browned).
Love this recipe?
Make sure to share and save it on your favorite platform below!
FREE One Week Menu Plan!
Done-For-You Dinner Recipes With Simple Ingredients and a Grocery Shopping List!

Reader testimonial: We made 112 lunches in 7 hours!

Need some freezer cooking inspiration? Head on over to Finding Hope to read about how Kayse and Bethany made 112 lunches in 7 hours!
How to Overcome Burnout and Get Back on a Routine (Part 4)

If you missed Parts 1-3, be sure to read them here.
6. Make Time For Things That Energize You
If you are feeling burned out, step back and evaluate your life. How much of the time are you spending doing things that drain you and how often are you doing things that energize you?
If your answer to this question is that you’re doing little that energizes you, you may have just found the solution to overcoming burnout.
Make a List of Things You Love to Do
Instead of thinking of all the things you have to do or the things you should do, clear your mind for 10 or 15 minutes and just make a list of things you love to do. What excites you, makes you feel alive, refreshes you, and recharges your batteries?
Maybe it’s gardening, having lunch with a friend, going to garage sales, painting, scrapbooking, swimming, writing, or browsing books at a bookstore. Whatever comes to your mind as something you love to do, write it down.
Be Intentional About Scheduling In Time for Things You Love
Take your list and schedule in at least one or two things every week that you love to do. Not only does this give you something to look forward to every week, but it prevents you from becoming too worn down. If every few days — or at least once a week — you’re doing something that recharges you, you’re going to be less apt to ever feel completely burnt out because you’re regularly replenishing your energy stores.
When I did this exercise, it was so helpful for me. I realized that, while I love spending time with other people, I’m most refreshed with quiet. Going and doing and being with people exhausts me after awhile.
So, in order to recharge my batteries, I need time away — going to a coffeeshop and writing for a few hours, curling up with a good book for an hour, or going grocery shopping by myself.
Because I know this about myself, I intentionally carve out at least an hour or two of quiet each week, if at all possible. The stillness — without people and projects and pressing to-do’s — re-energizes me and makes me much more productive and passionate about life.
What If You Can’t Think of Anything You Love To Do?
When I was deep in the midst of postpartum depression, someone encouraged me to try and do something fun every single day. The problem was, I couldn’t come up with a single thing I wanted to do. Nothing sounded fun, interesting, exciting, or even appealing to me. And that was a warning sign that I needed to get help — and to get it quickly.
If you’re feeling this way, please don’t take it lightly. Like me, you may be suffering from something more than just physical exhaustion or fatigue.
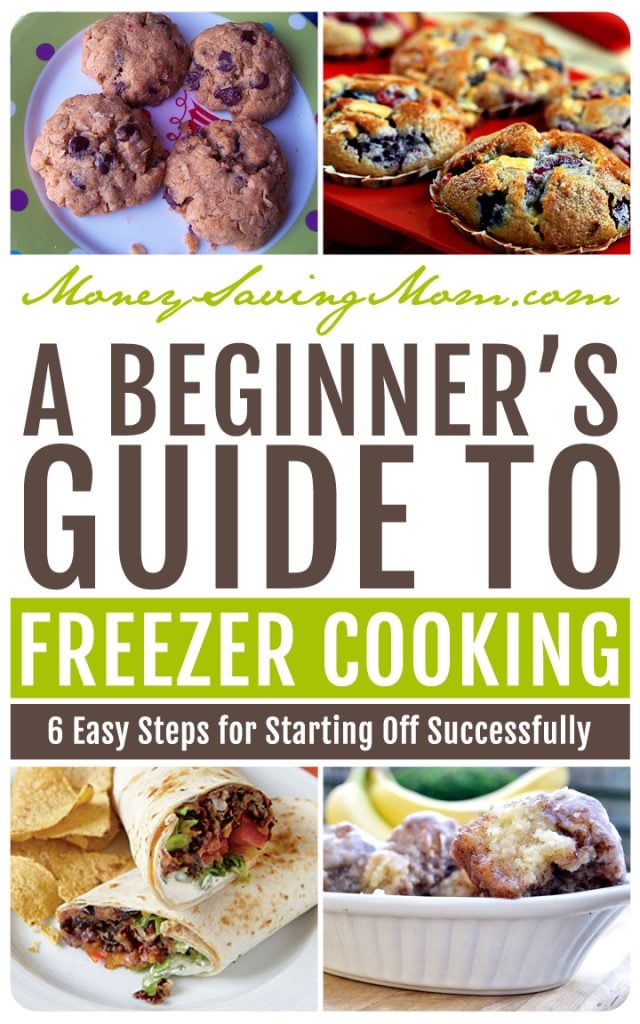
A Beginner’s Guide to Freezer Cooking

Think you might be interested in trying your hand at freezer cooking? Here are some suggestions for starting off successfully:
1) Start Small
If you’ve never done any freezer cooking before, I’d recommend starting with no more than two recipes at first. You’re probably capable of much more, but start small and gradually work up from there.
2) Pick Recipes You Already Know You Love
If you want to love the recipes you stick in the freezer, make sure you pick recipes you already know your family loves. There will be time for experimenting later, but wait until you feel really confident with freezer cooking before you branch out and try a bunch of new recipes.
Not sure your favorite recipe will freeze well? Check my list of what freezes well in my free Freezer Cooking ebook.
3) Set Aside at Least an Hour for Cooking
Set aside sometime during the week or on the weekend when you have a free hour and plan to do your cooking then. Make sure that you have a solid hour or more set aside for the cooking so that you’re not in a rush. Rushing around trying to get things done before you have to go somewhere only sets you up for failure.
4) Have a Plan for Your Children
If you have young children, make sure you have a plan for what they’ll be doing while you’re cooking, too. The last thing you need is to have your first freezer cooking experience be an exercise in frustration due to constant interruptions from needy little people.
Afternoon naptime might be the best time to do your freezer cooking. Or, you could do it on the weekends when daddy or grandma can watch the children. If neither one of those are an option, consider putting together some Busy Bags or Day of the Week tubs to be brought out only during freezer cooking times.

Freezer-Friendly Whole Wheat Chocolate Chip Cookies
5) Wrap Things Well
Want to ruin your yummy food? Don’t let it cool, don’t wrap it well, and don’t package it up in an airtight manner. All three of these things almost guarantee that your foods will develop freezer burn.
6) Make Sure to Use What You Cook in a Timely Manner
It’s wonderful to have food at-the-ready in the freezer, but it does you no good if you don’t actually use it. Make sure to eat it within 2-3 months, if not before.
I always consult my freezer when planning our weekly menu and incorporating some of the meals — especially those that need to be used up soon — into our weekly menu.
Need some tried and true freezer recipes for your first freezer cooking experiment? Here are a few of our most-loved freezer cooking recipes:
::Pumpkin Chocolate Chip Muffins
::Banana Bread
::Whole Wheat Chocolate Chip Cookie Dough
::Brown Bag Burritos
::Ham & Cheese Pockets
::World’s Easiest Marinated Chicken
::And don’t forget to check out all of my posts so far in the 4 Weeks to Fill Your Freezer series.
What advice and tips do you have for someone who is brand-new to freezer cooking?
Reader Tip: Another Way to Save on Medical Bills

Rhonda emailed in the following tip:
I read your post about Saving on Medical Necessities and I have one more tip to add to that list… I recently had an outpatient procedure and my husband had a scope on his stomach. Our insurance only pays 80% after our $1000 per person deductable. So, since my bill alone was nearly $1000, I immediately called the hospital to set up a payment plan.
The person I talked to informed me I could get a 35% discount if I paid cash all at once; and since we just received our tax refund, I immediately paid the bill in full! I contacted the other providers, and out of the 7 bills we had, 5 gave us a discount ranging from 10% to 35%. We saved $516.32!
5 Ways a Cash Budgeting System Will Change Your Life

I’m honored to have an article up on AllYou.com today titled 5 Ways a Cash Budgeting System Will Change Your Life.
Whether you’re struggling to stay afloat financially, or just trying to save money and make smarter spending choices, you should consider a cash budgeting system.
In our family, we use cash-only for most expenses, including groceries, gifts, clothing, miscellaneous items and eating out. This means we allot a set amount to each category monthly, then place that exact amount of cash in individual envelopes labeled for each expense at the beginning of every month.
Here are five reasons I’d encourage you to consider setting up your own cash budgeting system:
1. A Cash Budget Gives You Freedom
For many, just the word “budget” has negative connotations. However, a budget doesn’t have to be restrictive. In fact, for my husband and me, it has had the opposite effect — the boundaries of a budget have given us a freedom we didn’t have before. For example, we don’t have to worry that if we buy groceries, we won’t be able to pay our electric bill.
Head on over to AllYou.com to read the full article.
PSST! Want to chat with other frugal folks about ways to spend less this summer? I’ll be hosting a live chat on the All You Facebook Page next Wednesday at 2 p.m. EST and we’ll be talking about how to save money on summer activities and family road trips!
Ask the Readers: Frugal summer activities for older kids?

In response to last week’s question about frugal summer activities for toddlers, today’s question is from Heather:
I seem to see lots of free and discounted activities for younger kids (parks, zoos, kids eat free nights, etc) but I would love to know about any creative and frugal ideas for OLDER kids — ages 8-13.
We try to take advantage of BOGO food coupons and discounted movies, but we’re past the swinging-in-the-park days. I can only afford 1 week of camp for each kid so any suggestions would be awesome!
Do you have a question you’d like to ask Money Saving Mom® readers? Read the submission guidelines and submit it here.

Save Money By Skipping the Grocery Stores

Guest post from Laura.
One of the easiest ways to save money on groceries is to avoid the grocery store! Historically, grocery stores didn’t exist until the 1940s. Families raised much of their own food, bought it locally, or even traded with friends and neighbors.
Although I appreciate the convenience the grocery store offers, I’ve discovered the financial and health benefits of stocking my pantry from either my yard or local farmers.
Knowing where our food comes from can help reduce sickness, as food that is heavily processed or travels long distances is often void of essential nutrients. In addition, buying locally what you can’t grow or raise at home stimulates local economies. For example, The Virginia Department of Agriculture states that if every household spent $10 per week on local food, 1.65 billion dollars would be generated annually into the local economy!
I often hear many excuses as to why people can’t raise some of their own food, but there are solutions to almost all of those excuses!
Not Enough Space:
Container gardening, square foot gardening, and community gardening are all possibilities for those with limited space.
Not Enough Sun:
Is your lot wooded, or partially wooded? Consider planting edibles in your front yard, replacing ornamentals with fruit-bearing trees or bushes, or looking into shade-tolerant edibles. EdibleLandscaping.com is a great resource, or you can find many edible plants at your local nursery.
I have one friend who plants her garden along her driveway because it’s the only place that gets sun. Again, Square Foot Gardening gives some great suggestions for working with small spaces.
Not Enough Time:
Start small! Were you turned off by the mealy tomato at the grocery store? Try growing tomatoes this year. Next year, add in something else. Gardens are great projects for kids, too; they will learn much and take some of the responsibility off your hands.
Not Enough Money:
Prices of local meats and eggs are often more than their conventionally-raised counterparts at the store, though still often less than organics. Personally, we live on a teacher’s salary, so this hits close to home for us. Consider getting egg-laying hens (female chickens). This was a common backyard animal up until the 1940s. Chickens are easy to care for and relatively quiet.
In addition, buy in bulk. We got an extra freezer on Craigslist that can easily hold a quarter of a cow and several whole chickens.
Not in the Country:
Got an HOA, or a city that restrains how you can use your yard? Could you help change that? Our local city has a petition circulating right now to allow hens and honey bees within city limits!
Not a Good Cook:
Eating in season and simple recipes can make this task less daunting. Simply in Season is a wonderful cookbook to help you get started!
Laura is a wife and homeschooling mom to two children. She enjoys writing, reading, art, photography, gardening, and farming.
How to Overcome Burnout and Get Back on a Routine (Part 3)

If you missed Part 1 and Part 2 be sure to read them here before you read Part 3 below.
5) Recognize That You Can’t Do It All
No woman, no matter how put together she might seem, is superwoman. Every woman has her flaws, shortcomings, and struggles.
Stop comparing yourself to others.
The sooner you stop comparing yourself to others, the sooner you’ll start to find more peace and contentment in life.
You can spend all of your life trying to measure up to someone else. You can fritter away hours of time wishing you had her hair or her figure or her energy or her gifts. But you are not her, you are you.
You have unique gifts, talents, and abilities. You can improve upon what God has given you, you can wisely steward what He has given you, but you cannot change who He has created you to be.
So instead of living life wishing you were someone else, embrace your own uniqueness. Don’t feel guilty if you can’t get up when she gets up, or decorate your home like she decorates hers, or fit into the size of jeans she does, or juggle all the activities and responsibilities she does.
Your life and goals are going to look different from others — and that is completely okay. In fact, if everyone were a carbon copy of each other, wouldn’t life be dull and colorless?
Do the best you can with the energy, gifts, talents, and resources you have in the season of life you are in. And then be free from guilt!
Pick a few priorities and let the other stuff go.
People ask me all the time, “How do you do it all?” And the simple truth is: I only have a few priorities — and I seek to do a good job at those priorities. Then, I let a bunch of other stuff go.
And by a bunch, I mean a bunch of other stuff.
I don’t cook gourmet meals, I don’t host elaborate parties, and I’m the farthest thing from a fashionista.
I don’t sew. I don’t really garden. I don’t head up any organizations or run any committees.
My children are only involved in one extracurricular sport/activity right now (they are all taking ice-skating lessons) and we stay home all day at least two or three days most weeks.
I have a fantastic team of people who help with all the behind-the-scenes stuff for MoneySavingMom.com, I have a full-time assistant, and I have a mother’s helper who comes in one day each week.
So while I might do a good job of reading aloud to my children most weeks, I might accomplish a number of my weekly goals, I might read quite a few books, and I might update this blog frequently, the only reason I have time to do those things is because I’ve chosen to say “no” to a lot of other things that I’ve deemed aren’t priorities in my life right now.
Give yourself grace.
You are never going to be where you want to be. There will always be something undone or left to do. And as soon as you complete one project, there’s another project (or five) that needs to be completed.
Don’t beat yourself up that you’re not as far as you’d like to be. Instead, give yourself grace, and focus on the progress you have made and are making.
Rather than becoming discouraged that you have 12 things left on your to-do list to do and it’s 10:30 p.m., be encouraged that you accomplished three of the things you set out to do today.
When you have a day when it seems like nothing gets done and you just go around and around in circles, remind yourself that tomorrow is a new day.
And remember: Life is meant to be enjoyed and savored not run through at breakneck speed. Take time to stop and smell the roses, even if it means fewer things get crossed off the to-do list!
…to be continued tomorrow
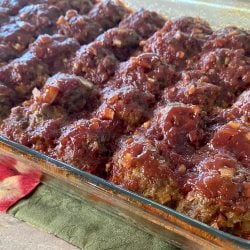
Barbecue Meatballs Recipe (Freezer-Friendly!)
My great-grandmother passed along a love of barbecue meatballs to our family — and it’s a recipe we’ve made over and over again. We love to serve these with twice-baked potatoes, homemade rolls, and a tossed salad.

Freezing Homemade Meatballs is so easy!
Even if you’re not a fan of most freezer meals, I bet this one would work for your family since you freeze it uncooked.
No one will likely know that you pulled this out of the freezer to serve for dinner. 🙂
It’s SO easy and delicious!

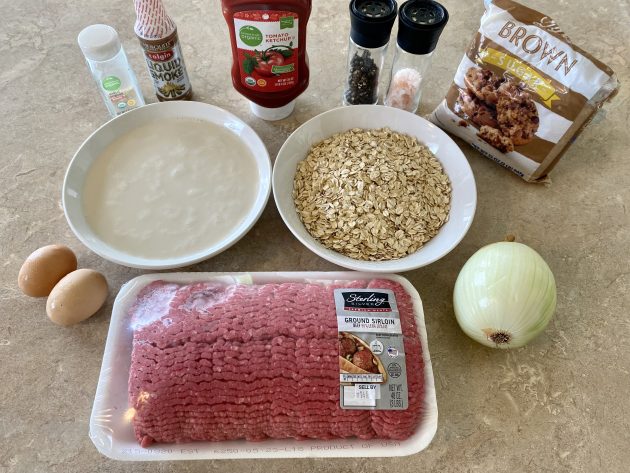
BBQ Meatballs Recipe Ingredients
For the Meatballs:
- 2 eggs, lightly beaten
- 2 cups milk
- 2 cups oats (quick-cooking or old-fashioned — can also substitute bread crumbs)
- 1 onion, chopped
- 2 teaspoons salt
- 2 teaspoons chili powder
- 1/2 teaspoon garlic powder
- 1/2 teaspoon pepper
- 3 pounds raw ground beef (since you’ll be freezing this recipe uncooked, you’ll want to make sure the meat is fresh, not frozen)
For the Sauce:
- 2 cups ketchup
- 1 1/2 cups packed brown sugar
- 1/2 cup chopped onion (optional)
- 1 teaspoon Liquid Smoke (optional)
- 1/2 teaspoon garlic powder
How to make BBQ Meatballs
1. In a large bowl, combine all meatball ingredients and mix well.
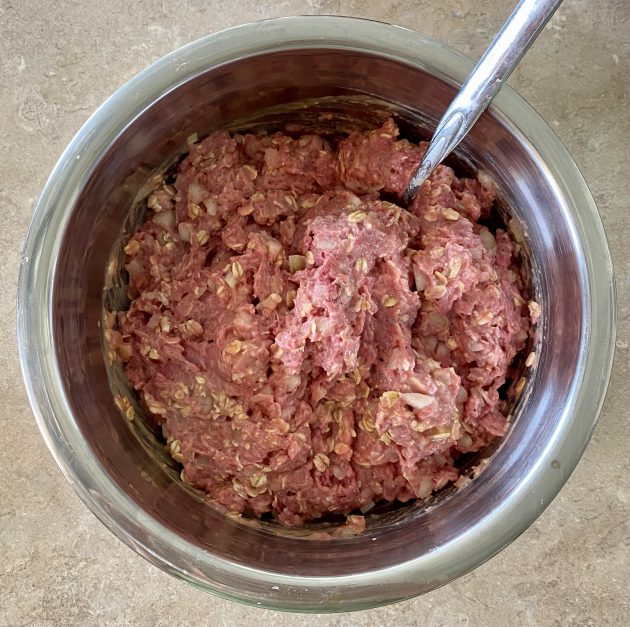
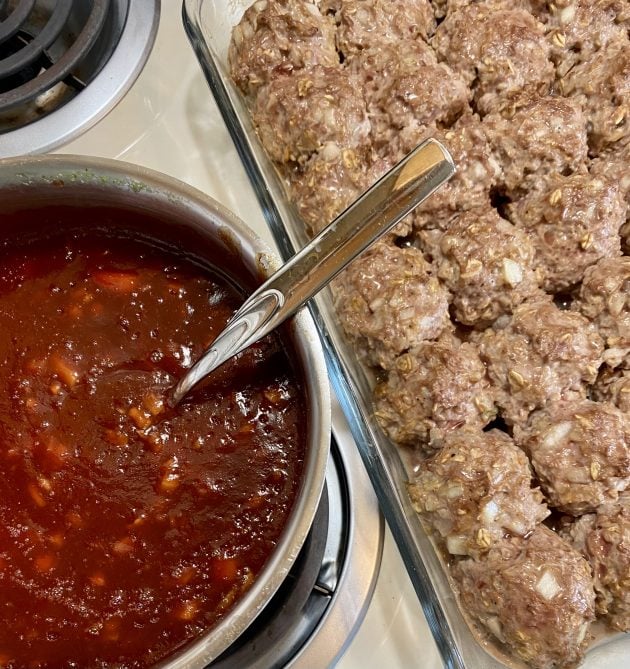
2. Shape into one-inch balls and place in a greased baking dish to bake immediately or on a cookie sheet to freeze for later.

Directions for Freezing Homemade Meatballs
1. Shape into one-inch balls and place on a cookie sheet.
2. Freeze uncooked meatballs on a cookie sheet for one hour.
3. Remove from cookie sheet and transfer to airtight ziptop freezer bags.
4. Label and freeze for up to 3 months.
How to Defrost Freezer Meatballs
1. Remove meatballs from the freezer and defrost overnight (or for 8 hours) in the refrigerator.
2. When you’re ready to bake the meatballs, place them in a greased baking dish.

How to cook BBQ Meatballs
1. Preheat oven to 350ºF.
2. Place defrosted meatballs in a greased baking dish.
3. Bake for 18-20 minutes.
4. Drain the grease.
5. While meatballs are baking, combine sauce ingredients in a saucepan on the stove.

6. Bring ingredients to a boil, reduce heat, and simmer for 2 minutes, stirring frequently.
7. Pour BBQ sauce over meatballs and bake for 10-20 minutes longer, or until done.

Storing BBQ Meatballs
Refrigerate any leftover cooked meatballs in a food storage container (with any extra sauce).
Uncooked meatballs can be frozen in zip-top freezer bags for up to 3 months.
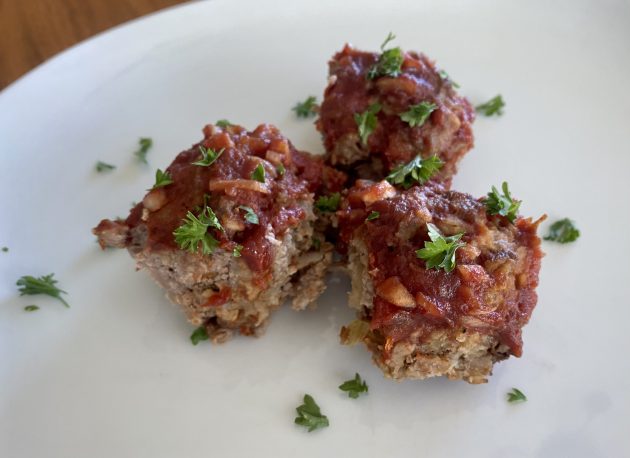
What to serve with this Barbecue Meatballs Recipe
Meatballs pair well with almost any type of potato, vegetable, salad, fruit, and/or bread — so pick your favorite and enjoy a delicious meal!
- Baked potato / twice baked potatoes
- Mashed potatoes
- Cheesy hashbrowns potatoes
- Roasted vegetables
- Any type of salad
- Homemade Rolls
- Fresh fruit or fruit salad
- Applesauce

BBQ Freezer Meatballs
Ingredients
For the Meatballs:
- 2 eggs lightly beaten
- 2 cups milk
- 2 cups oats or bread crumbs
- 1 onion diced
- 2 tsp salt
- 2 tsp pepper
- 3 lbs ground beef
For the Sauce:
- 2 cups ketchup
- 1½ cups brown sugar
- ½ cup diced onion optional
- 1 tsp Liquid Smoke optional
- ½ tsp garlic powder
Instructions
To Assemble Meatballs
- In a large bowl, combine all meatball ingredients and mix well.
- Shape into one-inch balls and place in a greased baking dish to bake immediately or on a cookie sheet to freeze for later.
To Bake Meatballs
- Preheat oven to 350ºF.
- Bake meatballs for 18-20 minutes.
- Drain the grease.
- While meatballs are baking, combine sauce ingredients in a saucepan on the stove.
- Bring ingredients to a boil, reduce heat, and simmer for 2 minutes, stirring frequently.
- Pour BBQ sauce over meatballs and bake for 10-20 minutes longer, or until done.
To Freeze Meatballs
- Shape into one-inch balls and place on a cookie sheet.
- Freeze uncooked meatballs on a cookie sheet for one hour.
- Remove from cookie sheet and transfer to airtight ziptop freezer bags.
- Label and freeze for up to 3 months.
Nutrition
Love this recipe?
Make sure to share and save it on your favorite platform below!
Did you do any freezer cooking today? If so, I’d love to see the results of your efforts! Link up your blog posts below or tell us about your success in the comments.
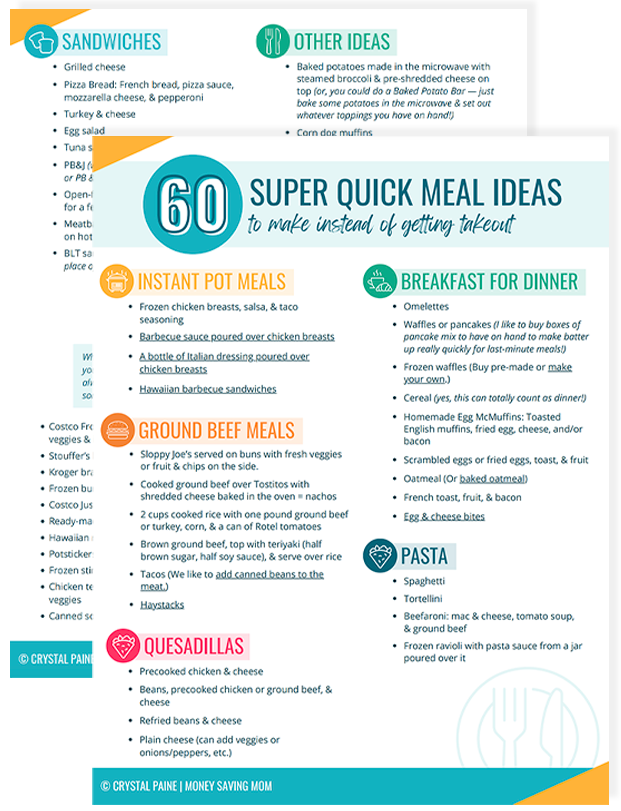
FREE DOWNLOAD: 60 Meals To Help You Avoid Takeout!
Meal time just got so much easier!
OVER-SPENDING EVERY SINGLE MONTH?Grab these FREE Budgeting Sheets!
Click here to download!
Is freezer cooking really worth the effort?

How do you find the strength/discipline to follow through with freezer cooking on a consistent basis? I’ve not disciplined myself to do so as of yet. I do so enjoy reading about your freezer cooking experiences, however. Is it really that well worth the effort? (time saved, easy clean-up after each meal, etc.?) –a reader
Yes, freezer cooking has been so worth it for our family. I wrote a post in 2010 with three specific reasons why I love freezer cooking. And those reasons still hold very true two years later.
1. I spend a lot less time cooking and cleaning up the kitchen.
I no longer have big time blocks in our schedule to do full day or half day cooking sessions, but I’ve found that doing mini half-hour or one-hour freezer cooking sessions works really well for this season of our life. And while I might not be making 20 or 30 meals at a time, by consistently cooking ahead once or twice a week, we always have some meals in the freezer for those busy days when I don’t have time or energy for cooking.
Instead of having to dirty up a bowl to make meatloaf three times in six weeks, I just triple the recipe and make meatloaf once and stick the extra two dinners’ worth of meatloaf in the freezer. If I’m already going to dirty up a bowl, I might as well double or triple the recipe saving me the effort and mess later on in the month. After all, it really doesn’t take but a few more minutes to make two extra batches of meatloaf — and the clean up time is pretty much the same!
2. I don’t have to dread 5 p.m. anymore.
I don’t know about you, but there are some days at our home when life whizzes by so quickly and all of a sudden, it’s 5 p.m. and dinner isn’t even a figment of my imagination. Before I started regularly cooking ahead and freezing meals, I’d be tempted to call my husband and ask him to bring something home for dinner.
Freezer cooking has solved the 5 p.m. “What’s-For-Dinner” panic. If I forget to pull something out earlier in the day, I’ll just pick a meal from my freezer stash that defrosts quickly — such as meatballs. I pair this with some frozen veggies, rice, and maybe a fruit salad. No one even has to know I forgot about dinner until 30 minutes before it was supposed to happen!
3. It’s not a huge undertaking to have dinner guests or take a meal to someone.
When I have meals already made in the freezer, it’s rather simple to bring food to a new mom or have friends over for dinner.
Lasagna casserole, spaghetti pie, and meatballs are great staple meals to have on hand to share with others. Just whip up some Bread Machine Buttery Rolls, make a salad or fruit and maybe some brownies and you’re set! I also like to sometimes make up chocolate chip cookie dough and freeze it so I can quickly make a dessert for friends coming over or to take somewhere.
Knowing the reward that comes as a result of the effort is what gives me the motivation and discipline to follow through with freezer cooking. Well, and it also helps that I have the public accountability of blogging about it and all. 🙂
More Helpful Freezer Cooking Articles
Start Where You Are and Learn As You Go
How to Plan a Freezer Cooking Day (and find more ideas here)
How to Cook for Your Freezer When You Don’t Like Casseroles
Can You Have a Freezer Cooking Day if You Don’t Have a Lot of Freezer Space?
How about the rest of you? Have you found freezer cooking to be worth it for you? Why or why not?
“It is more blessed to give than to receive…”

Katie and her sons with all of the birthday donations they collected from friends
I was so blessed and inspired by this email from Katie:
I’ve been a reader of yours for years, and you’ve helped me learn to be content with what I have and who I am. I’ve also learned from you the value of living with less “stuff”. With that, for my recent 29th (golden) birthday, I asked friends and family to donate birthday supplies (instead of buying me “more stuff”) to help with my mission to assemble and donate 29 bags for deserving/needy children in our area. The response was INCREDIBLE and my new goal is to assemble 100 bags this year, and maybe double that next year!
This has been an amazing lesson for my children to watch me give graciously and find joy in helping others.
Thank you for planting the seeds of generosity in my heart. -Katie
For more pictures and details on Katie’s story, check out this news story.
Do-It-Yourself: Homemade Butter

UnsophistiCook.com shows you how to make homemade butter.
Do you have a fun and frugal DIY idea to share? I’d love to hear about it! Read the submission guidelines and submit it here.
How to Overcome Burnout and Get Back on a Routine (Part 2)

If you missed Part 1, be sure to read it here before you read Part 2 below.
4) Take Care of Your Health
As women, we often are prone to take care of everything and everyone else before we take care of ourselves. The problem is, if we do this for months on end, soon we are going to end up so worn down and fatigued that we won’t be able to take care of anyone.
Make your health a priority — even if it means you must say “no” to other seemingly important commitments. In the long run, it will be every bit worth it.
Nourish your body with good foods.
In addition to making sure you’re getting enough sleep, make sure that you are nourishing your body with good foods. I’ve found that I feel so much more energetic if I eat at least one big salad everyday. If I don’t eat one for lunch, I eat one for dinner. Some days, if I’m feeling like I really need the extra nutrition and energy boost, I’ll eat one for lunch and dinner.
I don’t eat all these salads because I always feel like it, I eat them because I know that I won’t like how I feel if I don’t eat them. So I down the greens — and I always am thankful I did afterward. 🙂
If you can, chop up some veggies or wash and tear lettuce on the weekends. Then you don’t have to spend a lot of prep time throughout the week. And, you also have fewer excuses for getting in your greens when you make them more easily accessible. 🙂
Take your vitamins.
I know, I sound like your mother, but taking a good multi-vitamin can really make a difference in how you feel. I also recommend taking fish oil, too.
There are lots of other vitamins out there to consider taking, but do your research before you just start popping pills. Too much of a good thing can sometimes be just that — too much.
I used to be really, really bad about consistently taking vitamins. Then, I learned a trick: I had to make it part of my routine. Instead of just trying to remember to take my pills sometime during the day, I made pill-taking part of my evening routine.
Now, it’s become such a habit, that I pretty much can’t go to bed unless I’ve taken my pills. And I feel so much better as a result!
Drink lots of water.
Many, many of our physical ailments can be the result of just not drinking enough water. Headaches, constipation, weight gain, leg cramps, exhaustion, and much more can often be related to the fact that one is dehydrated. So before you spend a lot of money on products to help you with your physical problems, make sure you’re getting hydrated.
If you struggle to drink enough water throughout the day, you might find it helpful to track your water intake either online or on your phone — or just on a notebook in your kitchen. You could also fill up a pitcher of water or two bit water bottles before you go to bed at night and then commit to drink all of it by the time you go to bed the next night. You could even set a timer to go off periodically throughout the day to remind you to drink water.
Or, you can do what I do and try to always have a glass of water nearby wherever you are. I’ve found that the physical presence of that glass of water encourages me to constantly be taking sips of it throughout the day. And before I know it, I’ve downed 8 or 10 glasses of water!
Exercise regularly.
If you’re already fatigued, it might seem counterintuitive for me to be suggesting you start exercising. However, instead of exhausting you, exercise can often actually increase your energy.
If you aren’t regularly exercising, set really small goals at first: such as jogging or walking for 10 minutes three times a week. Track your progress on a site like SparkPeople to help you stay motivated. Or, find an exercise accountability partner to exercise with you or to check up on you throughout the week to make sure you’re sticking with your plan.
For those who feel like exercising is such a boring and dull thing, may I encourage you to try some new things? Join an exercise class, try biking, or check out some exercise DVDs from the library. Keep experimenting with different things until you land on something you enjoy.
And if you’re Type A like me, find a way to multi-task so that it feels more productive. I’ve found that I’m much more likely to hop on the treadmill if I have a good book I’m reading during my warm-up walk and a good podcast or audiobook to listen to while I’m running.
…to be continued tomorrow.
What suggestions or tips do you have for simple things a busy woman can do to take care of her health? I’m looking forward to hearing your ideas!
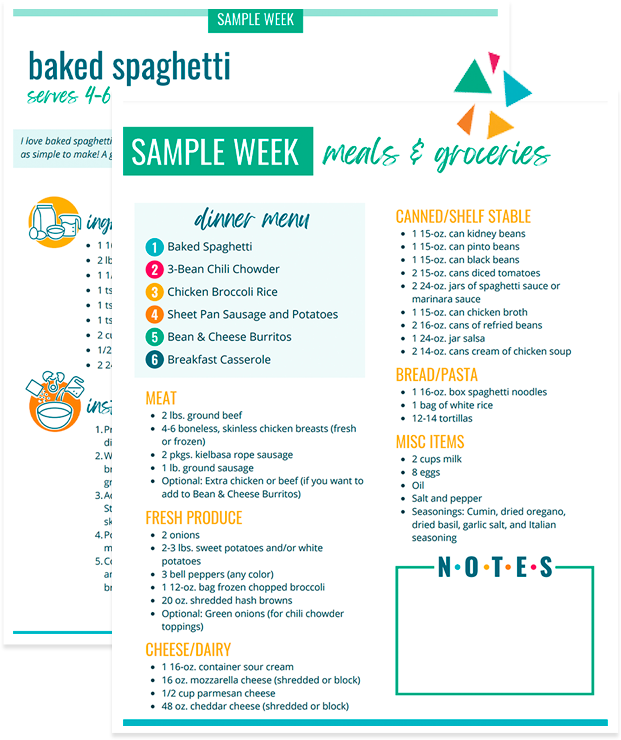
4 Weeks to Fill Your Freezer: Week #3 Freezer-Friendly Dinners + Shopping List
4 Weeks to Fill Your Freezer: Week #3 Freezer-Friendly Dinners + Shopping List

Are you ready for another week of filling your freezer? This week, we’re tackling dinners.
Here’s my plan for making Freezer-Friendly Dinners this week. Remember that you are more than welcome to substitute any or all of the recipes listed to make this what best fits with your budget and family’s preferences:
Freezer-Friendly Dinner Recipes
Tuesday — Double Recipe of Barbecued Meatballs
Wednesday — Double Recipe of Lasagna Casserole
Thursday — Double Recipe of Pizza Dough
Friday — Double Recipe of Chicken Broccoli Rice Casserole
Monday – Double Recipe of Italian Chicken
Grocery List
(I rounded up on the amounts needed, just to be safe. You probably have many of these items already on hand. You’ll want to double-check that you have the correct amounts, though.)
5 pounds ground beef
5 cups flour
6 eggs
2 cups milk (I’m using milk instead of evaporated milk in the Barbecued Meatballs)
2 cups quick oats or old-fashioned oats
4 onions
2 cups ketchup
1 jar spaghetti sauce
2 15-oz. cans diced tomatoes
16 ounces of dry pasta (we prefer rotini pasta, but any kind will work)
2 bottles of Italian Dressing (or your favorite homemade Italian Dressing)
12 chicken breasts (boneless/skinless or bone-in — can also substitute two whole chickens, if you prefer)
Chicken (enough for 4 cups chopped chicken)
3 bags of frozen broccoli (or 8 cups fresh chopped broccoli florets)
4 cups cottage cheese or ricotta cheese (we prefer cottage cheese and it’s typically much cheaper — especially if you can find it marked down!)
16 oz. mozzarella cheese
16 oz. cheddar cheese
2 cans cream of chicken soup (or make your own cream soup)
2 cans cream of mushroom soup (or make your own cream soup)
Liquid Smoke, optional
5 cups uncooked brown rice (or white rice)
Staple Ingredients
Salt/Pepper
Chili Powder
Garlic Powder
Parsley
Yeast
Oil
Sugar
Freezer Storage Items Needed
Foil
Plastic Wrap
10-12 large ziptop freezer bags
2-4 glass or aluminum pans (to freeze Lasagna Casserole in, and Barbecued Meatballs, if you prefer.)
Something to label packages with (marker to write on bags, labels, and/or tape)
Click on the “Print This” tab at the top of the list to generate a printer-friendly list. (If you’re reading via email or a feed reader, you may need to click through to the post to print the list.)