
Kojo Designs shows you how she spent one afternoon of chopping and prepping to result in 14 Crockpot Freezer Meals. Love this!

Saving Families Money Since 2007


Kojo Designs shows you how she spent one afternoon of chopping and prepping to result in 14 Crockpot Freezer Meals. Love this!
Testimony from KM of Lessons From Ivy:
When we announced that I was expecting our third child, my car was a 98’ Camry sedan and my husband drove an 02’ two-door Cavalier. Inevitably, the first question everyone started asking us was, “When are you going to get a minivan?”
Our response was, “Oh we don’t need one right away, we’ll buy one when we have the money.” Raised eyebrows always followed. Apparently no one could picture three carseats in my Camry!
Could we have gotten financed for a vehicle? Sure, many car salesmen are more than happy to find a finance company for just about anyone. But we weren’t going to let the excuse of an extra child cause us to finance a larger vehicle.
And I’m here to tell you that three kids doesn’t automatically mean you need a minivan. As we discovered, it is possible to fit three carseats (and properly install them) in the back of a 98’ Camry.
We used two Cosco carseats and an infant Graco carseat with a base. Getting the kids in and out of the car was a choreographed dance each time, but we managed until the right minivan came along and we could afford it.
We kept our eyes open and saved for a minivan for a year. It wasn’t until our son was three months old that we found that perfect minivan (a 2000 Sienna) at our perfect price tag.
It would have certainly been more convenient to have had a minivan right when our baby was born, but doing the crammed in a Camry shuffle was definitely worth it. I’ll take the financial stability of debt freedom over a spacious interior any day.
But I won’t lie; we all love the spacious interior!
KM Logan has a blog of Christian encouragement for women at Lessons From Ivy and has written several books that can be purchased through Amazon.

This shake is perfect for a quick breakfast or a mid-day pick-me-up on hot day. It’s so refreshing… and actually fairly healthy!

Guest post by Brigette Shevy
This thick, creamy, refreshing shake is the perfect recipe for the long, hot summer afternoons.
It’s a healthy version of “Pina-Colada meets Orange Julius,” combining some of my all-time favorite flavors.
I like this shake so much that it’s the only reason I always keep coconut extract on hand!

There are many ways to mix up this smoothie recipe based on your taste preferences (or what you already have in the house).
1. Blend all ingredients in a Vita-Mix or high-powered blender.
2. Pour into 2 glasses and garnish with additional shredded coconut or orange slices.


Make sure to share and save it on your favorite platform below!
Brigette is a full-time wife and mother who is blessed with three amazing bundles of energy. She enjoys music, experimenting in the kitchen, homeschooling her children, finding great deals, long-distance running, and anything chocolate.
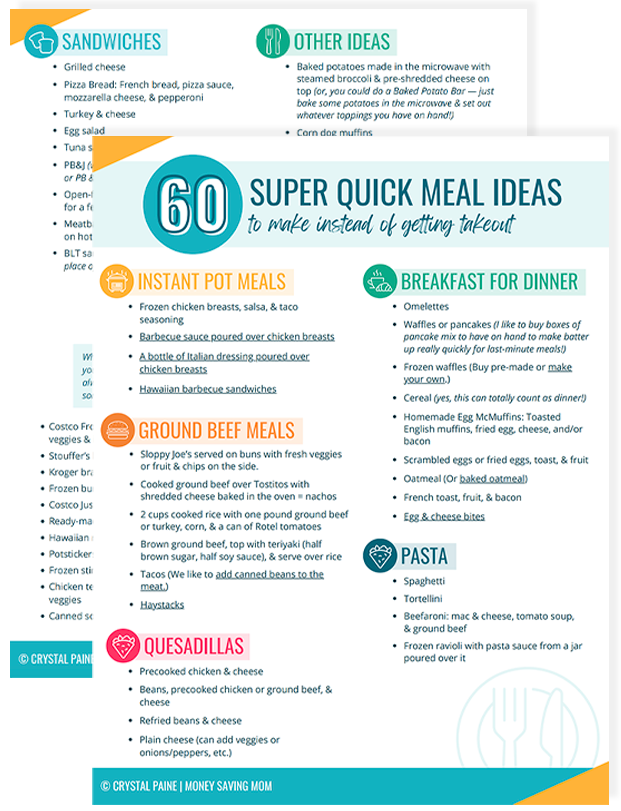
Meal time just got so much easier!

Benita emailed in the following tip:
I’ve recently found myself, like I do most summers, with an excess of zucchini thanks to my prolific garden! Even after giving a lot of it away, I still have more than I can keep up with. So, I’m always on the lookout for new ideas.
One of our family’s favorite desserts this time of year is to make “apple crisp” with zucchini. The last time I made it I started wondering if I could also use zucchini to make applesauce.
So, I peeled and seeded three medium-sized zucchini, sliced them up, and put them in the slow cooker with about a 1/2 cup of water (just enough to cover the bottom so the zucchini wouldn’t stick) I set the crock pot on high and let it do it’s thing. I stirred them occasionally and after several hours got out the potato masher to mush them up.
However, I quickly realized that zucchini could not be made into “apple”sauce! Not to be deterred, I pureed the mixture in the blender, poured the mixture into some canning jars, and put the jars in the refrigerator.
The next day, I was making muffins and was going to replace the oil with applesauce. But then I remembered the pureed zucchini and decided to give that a try instead of using applesauce (or oil). It worked great and we couldn’t taste any difference in the final muffins!
I froze the remaining zucchini puree in 1/2 cup portions and have since used that in several different recipes, all of them turning out perfectly. Our favorite so far is zucchini brownies — made with zucchini puree in place of the oil, of course!
Yay! One more way to make use of my abundant zucchini! -Benita

MyselfBetter.com shows you how to make upcycled bottle canisters.
Do you have a fun and frugal DIY idea to share? I’d love to hear about it! Read the submission guidelines and submit it here.

Earlier today, I asked on my Facebook Page what holds people back from setting goals. By and large, the overwhelming response was that a fear of failure is what is keeping most back from attempting to set goals.
Here’s the thing, you are going to fail in life. Failure is evidence that you’re trying.
If you’re jumping out and trying new things, taking some risks, and living life to your fullest potential, failing at some things is unavoidable. We aren’t always going to be able to do everything well nor will every idea we have turn into a golden idea.
But failing at something doesn’t make you a failure; it makes you human.
Failure doesn’t define you — unless you let it. You can choose to wallow in despair over the fact that you failed at something, or you can choose to pick yourself back up, dust yourself off, and move forward.

3 Things To Do When You Fail
1. Ask Yourself Why?
When you find that you are failing at something, or you’re at the bottom and have already miserably failed, one of the best things you can do is to step back and ask yourself “Why?” You can’t come up with a solution until you first isolate the problem.
Are you going about something the wrong way? Did you set unrealistic goals in the first place? Are there specific hindrances and roadblocks keeping you from success?
At the beginning of this year, I was all gung-ho about switching to a paperless planning system. I was so sure it was going to make my life and business run smoother.
But a few months into the year, I realized that I was feeling scatter-brained and disorganized as a result of trying so hard to make a paperless planning system work. As I began analyzing why it wasn’t working well for me, I realized that I remember things better when I write them down rather than type them in.
Since I was typing in my projects and responsibilities, I was having trouble remembering them. And while I could also check my phone or my computer, I just wanted to also be able to be able to recall them mentally, too.
2. Make Sure You’re Not Trying to Be Someone Else
As I talked about yesterday, it’s easy for us to feel like failures when we compare ourselves to someone we’re not. And honestly, I think much of our feelings of failure are not truly failure at all — they are actually just feelings of inadequacy that are a result of comparing ourselves to other people.
One of the big reasons I wanted a paperless planning system to work for me was because I saw how it was working so well for my husband. I also had read articles online describing its brilliancy.
But what works well for one person doesn’t always work for others — as I quickly found out. So instead of beating myself up for “failing” at a paperless planning system, I instead decided to accept the fact that it might be a fantastic idea for others, but it just wasn’t the best thing for me.
3. Consider What You Can Learn From Your Mistakes
Failure is not fun. It’s not glamorous. And it won’t usually win you any accolades.
Despite this, I have come to believe that failure is my friend. Through failure, I’ve discovered weaknesses and shortcomings in my life, I’ve pinpointed character that I need to work on, and I’ve uncovered many, many ways to do things that don’t work.
I wouldn’t have chosen all of the failures I’ve experienced in life, but in retrospect, I’m realizing that learning invaluable lessons the hard way has helped me develop as a person, shaped the way I approach things in life, and made me a better wife, mother, friend, and business owner.
Instead of running from failure, take time to really examine what you can learn from it so that you don’t make the same mistakes again. By doing so, you’ll probably agree with me that failure can become your greatest teacher to propel you onward and upward!

Cherilyn emailed in the following tip:
We recently realized we needed to perform a tune-up on our vehicle. We try to do this ourselves whenever possible to save money, so we purchased the needed items — but the prices were shocking!
- 8 Spark Plugs – $40
- Wires – $29
- 5 quarts of oil – $30
- Air filter – $21
- Oil Filter (someone had already given us the oil filter, thankfully).
I set out to find some deals and came across this one from Wal-Mart that would get us four quarts of oil for free after the mail in rebate… but the rest was all at full price.
When I came home, I was still disappointed that the entire procedure was going to be so costly. My husband wisely suggested I check online for some more rebates for the other items we purchased. Was I ever happy to find two more mail-in-rebates for the spark plugs and the air filter!
So in the end, what would have cost well over $140 ended up being $80 – a savings of over $50 for just a few minutes of checking.
 Today’s question is from Stephanie:
We’re in the market for a new home printer but we don’t need it to print photos — just basic documents and coupons. Are there any printers that you would recommend? Are there any particular brands that print coupons better than others?
Do you have a question you’d like to ask Money Saving Mom® readers? Read the submission guidelines and submit it here.


We’re on our annual vacation with extended family in Arkansas this week and, as usual, I got roped into water-skiing. As I wrote about last year, unlike most of the rest of my family, I’m not a great water-skiier. In fact, I have yet to successfully slalom, despite repeated tries to get up almost each and every year.
This year, I decided to play it safe and just water-ski with two skis. It doesn’t look anywhere near as sophisticated to water-ski with two skis, but at least it allows me to get up and stay up for awhile without having repeated crash landings and failed skiing attempts!
My goal for skiing this year was simple: get up on two skis, stay up, go over both wakes and back again, and drop the rope before falling. Yes, I know, it probably seems pathetic for those of you who are seasoned skiiers, but to me, accomplishing this was a fairly big feat.
As I was out there on two skis looking quite incompetent and uncoordinated trying to stay up on my skis and gingerly go over the wakes, I was reminded of how important it is for each of us to set goals that are realistic for us and our own personal abilities. My skiing goals and abilities paled in comparison to so many other’s skiing goals and abilities. And if I were to focus on how microscopic my goals were in light of someone else’s, I could easily become discouraged.
But I’m not someone else; I’m me. My talents and abilities are going to differ wildly from the person next to me. I can either accept and embrace this or spend my life feeling like I don’t measure up.
It’s the same with goals — whether they be financial goals, personal goals, or any other goals we set for ourselves. We need to set goals that are in line with our own individual abilities, situation, and strengths. If we set goals that are too far-fetched and unattainable, we’ll live all of our life feeling like a failure.
This doesn’t mean that we shouldn’t strive for excellence or that we shouldn’t be constantly seeking to challenge ourselves to step outside of our comfort zone or think creatively outside the box. However, it’s vitally important that we remember own strengths and weaknesses, current circumstances, and personal abilities.
If I were to set a goal to be hired on as a professional water-skier next year, I’d be setting myself up for defeat. In the same way, maybe you aren’t in a position to pay off $5,000 worth of debt this year.
But we can all set at least a few realistic goals that we can work toward — and hopefully achieve! What matters is not how much traction we’re making or how well we’re doing compared to someone else’s goals, but that we’re giving it 100%!

We’re in Arkansas this week for our annual vacation at the lake with extended family. It’s kind of our “last hurrah” before our Fall school schedule begins in two weeks.
In order to be realistic, I only set six easy goals for this week:
Last week’s goals:
Family/Mothering Goals
1. Start and finish reading Stuart Little aloud to the children.
2. Continue with swimming lessons for all three children.
3. Write a love note to Jesse.Personal Goals
4. Start and finish reading
The Simplicity of Homeschooling, The Guernsey Literary and Potato Peel Pie Society, and The Mom Walk.
5. Sleep for at least 7.5 to 8 hours every night. {Totally bombed this one, but most of it had to do with staying up watching the Olympics! That’s worth losing sleep for, in my opinion! :)}
6. Exercise at least five times.Homemaking Goals
7. Start working on planning out our Fall Schedule.
8. Try at least two new recipes.Business Goals
9. Finish editing my new ebook (more details coming soon!)
10. Projects finished for LitFuse Publicity campaign.
Here are my 10 goals for this week:
Family/Mothering Goals
1. Finish reading Stuart Little aloud to the children.
2. Enjoy our vacation with extended family at the lake in Arkansas.
Personal Goals
3. Start and finish reading The Guernsey Literary and Potato Peel Pie Society, The Life You’ve Always Wanted, and The Mom Walk.
4. Exercise at least five times.
Homemaking Goals
5. Type up our new Fall Schedule.
Business Goals
6. Write at least two articles for other blogs/sites.
How did you do on last week’s goals? What are your goals for this week? I’d love to have you share your progress on last week’s goals and your goals for this coming week in the comments. Of, if you’ve blogged about it, leave your direct link below. Let’s cheer each other on to live purposeful and productive lives!
You can download a free customizable weekly goal-planning sheet here.


Guest post from Chris of Simple Family Finance
Get ready. Today, you’re in for a good old fashioned food fight! Don’t pretend like you don’t love those. Three similar items are going to face-off to determine who the winner is. We all know that price comparisons are vital to a frugal food budget, so the winner will be determined by value.
This time, we’re going to take a closer look at Biscotti. Designed to dunk, biscotti is a coffee drinker’s best friend. Milk and tea drinkers, don’t fret. Biscotti is an excellent choice with either beverage. Grape soda drinkers, leave it alone. That’s gross.
Biscotti’s natural habitat is the large glass jar at your local coffee shop’s counter, but it has been known to frequent the cookie aisle at various supermarkets as well. Many species exist, such as lemon, vanilla, and chocolate dipped, but a subtle anise flavor remains my favorite.
Enough introductions. Bring on the battle.

Wow! It isn’t even close.
The first picture shows a coffee-shop style biscotti. It was individually wrapped near the check-out counter of our local coffee shop. The actual price of this particular biscotti was $1.59, but I labeled it as only $1.50 since prices will vary based on your area and $1.50 seems like a nice round number. You’ll notice it has a little bit of chocolate on it to lure you in.
Don’t fall for it.
First of all, in my wife’s humble opinion (a chocolate fanatic), the homemade biscotti tasted better despite the lack of chocolate. Second, it’s not like you can’t dip your own biscotti in a some chocolate to satisfy your craving.
The second picture represents the store-bought variety. In this case, the Walmart that I checked had a package of Nonni’s Biscotti for $2.98. The package had 8 individually wrapped biscotti inside. Therefore, you can afford 4 of them for $1.50. Congratulations.
The final photo shows you how many homemade biscotti can be made for $1.50. Notice the difference? With the recipe detailed below, $1.50 will buy you 32 truly delicious biscotti!
In fact, the picture doesn’t really do justice to the number of cookies. There are plenty more behind that tall stack in front. It’s not as easy as it seems to stack those buggers.
And the runaway winner is…Homemade Biscotti!
If you like to drink and dunk, please try the recipe below. It’s simple, delicious, and will save you a wheel barrel full of money.
Price Per Serving: $0.09 (2 Cookies)
Recipe Yield: 16 Cookies
Another delicious option: swap the vanilla with 1 – 2 teaspoons of Anise Seed for a slightly different flavor. The anise is subtle, so go with 2 teaspoons if you want a more distinct flavor.
This article is part of a series called Photo Food Fights at Simple Family Finance. You can find this recipe and over 150 other deliciously frugal recipes in Chris’s book, Eating Well For Only $2 A Day! You can find the book, as well as countless other articles, tips, and recipes at Simple Family Finance. Subscribe to the free email updates and receive a coupon code for 20% off the already low price of the book!

Testimony from Amanda of There We Grow
It’s been almost six years since my husband and I started down the road to becoming debt-free… and we’ve never looked back. It was his idea originally and I have to admit, I thought he was slightly crazy and not sure it was even possible. After all, you are always going to have a car payment, right?
My husband was trying to grow his landscape business and I was working as an orthodontic assistant. I had always hoped to stay home after we started our family but had no idea how we’d do it. Now seeing what’s happened with the job and housing market, I breathe a sigh of relief almost everyday that we stuck with our plan to live debt-free.
To get our momentum going, we sold some items we owned and started stashing as much cash as we could. As we gained a little confidence, we began throwing as much money as we could towards the debts we owed and one by one paid them off.
By 2008, we were completely debt-free (except our house) and had started building a bigger emergency fund. We were able to celebrate with a paid-with-cash trip of our dreams — to Hawaii!
What an amazing feeling that was! It’s kind of hard to describe, especially to someone who doesn’t remember ever being debt-free. It’s almost like trying to explain how refreshing a glass of cool water on a hot day is to someone who’s never tasted it.
Don’t get me wrong, there have been times we’ve looked at other people’s things and wanted to spend money to buy something similar — but we didn’t allow ourselves to, even when it was tempting. We’ve determined that being in debt — particularly when you’re in debt for items that depreciate and wear out quickly — pales in comparison to the freedom we have of not being strapped down.
Becoming debt-free also allowed me to make the transition from working full-time to being a stay-at-home mom. There have also been several opportunities we’ve been able to take advantage of because of our financial flexibility — not to mention helping people in ways we wouldn’t have otherwise been able to.
For those of you working toward the debt-free life, hang in there! The rewards are so worth it!
No career, training, or previous life experience completely prepared me for the gauntlet of all tasks: motherhood! Now my days revolve around my newfound passion in life as a stay- and work-at-home mama bear to our little boys and wife to my best friend of seven years. We love to travel, grow things in our garden, and explore the outdoors but our favorite thing is being able to do it all debt-free! If you’d like to learn more about me, I’d love to have you visit my blog at There We Grow.
")
photo source: BigStock
Jeni emailed in the following:
I was raised by a fabulously frugal homemaker mom who is also an incredible cook. Nothing went to waste in her kitchen.
Any bits of pie crust left – not enough to make another pie – were cut into pieces, dusted with cinnamon and sugar and baked on a cookie sheet. My siblings and I thought “pie crust cookies” were a marvelous treat.
Any frosting left after the cake was frosted was spread on graham cracker squares to make delicious sandwich cookies. We learned that a batter bowl was not really empty until it was scraped mercilessly with a rubber spatula – this could yield another one or two pancakes or fill one more cupcake paper.
We were taught to use things up. Of course, this idea goes beyond the kitchen.
For example, the facial moisturizer I use comes in a pump dispenser. When it is getting close to empty and product is not coming out through the pump anymore, it doesn’t get tossed in the trash yet. I take off the cap and tap the remnants into the palm of my hand. I can get a good two more weeks of use this way, and nothing goes to waste.
Being conscious of the way we use products in our home every day can help us waste less, and ultimately save us money. -Jeni

There aren’t many things that can compare to a fresh, hot piece of bread slathered with butter… and this recipe satisfies that craving for fresh bread without heating up your house!

Guest post from Brigette Shevy
This Grilled Three Cheese Bread is a sure winner, and goes well with many different grilled main dishes. The grill is the perfect way to get that crispy outside and soft, chewy, melty inside. Yum!
I like the fact that it can be made up a couple of hours ahead of time. The only last-minute thing I have to think about is sticking it on the grill 10 minutes before the main course is finished.
1. Preheat grill to medium heat.
2. In a small bowl, mix cream cheese and butter together until well blended.
3. Add remaining ingredients except bread and mix well.
4. Slice a large loaf of French or Italian bread in half the long-way.
5. Spread butter mixture on both sides of each piece of bread and put bread back into a loaf shape.
6. Wrap bread in a large piece of heavy-duty aluminum foil and secure tightly.
7. Grill 8-10 minutes over medium heat, turning once.


Make sure to share and save it on your favorite platform below!
Brigette is a full-time wife and mother who is blessed with three amazing bundles of energy (ages 5, 3, and 1). She enjoys music, experimenting in the kitchen, homeschooling her children, finding great deals, long-distance running, and anything chocolate.
Meal time just got so much easier!
