
Head on over to Gluten-Freely Frugal for a gluten-free version of my Pumpkin Chocolate Chip Muffin recipe.

Saving Families Money Since 2007


Head on over to Gluten-Freely Frugal for a gluten-free version of my Pumpkin Chocolate Chip Muffin recipe.
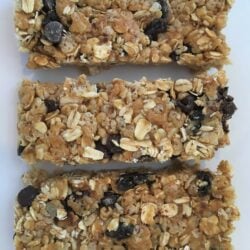
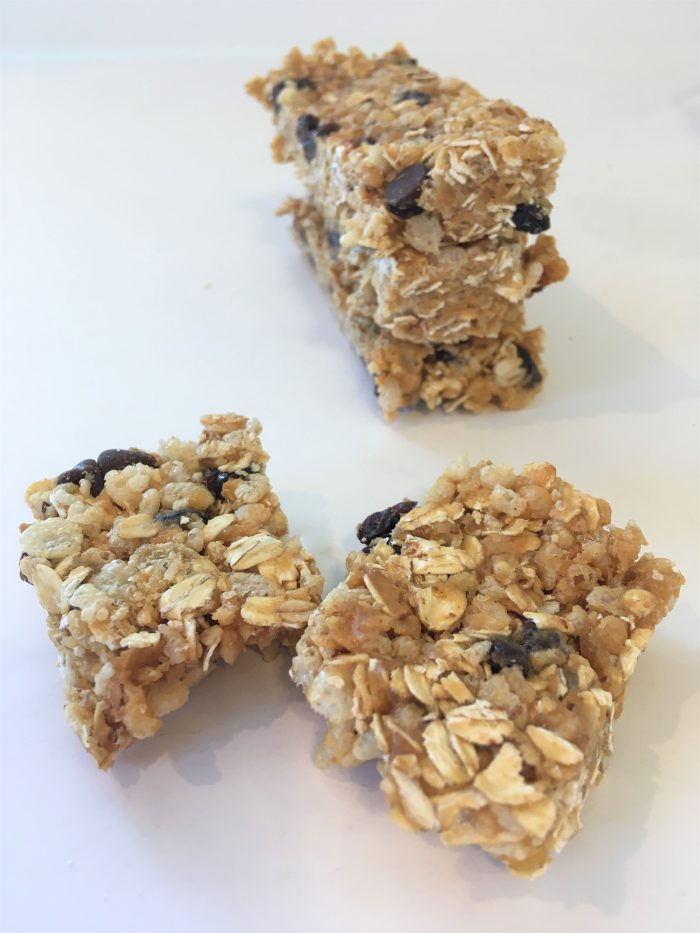
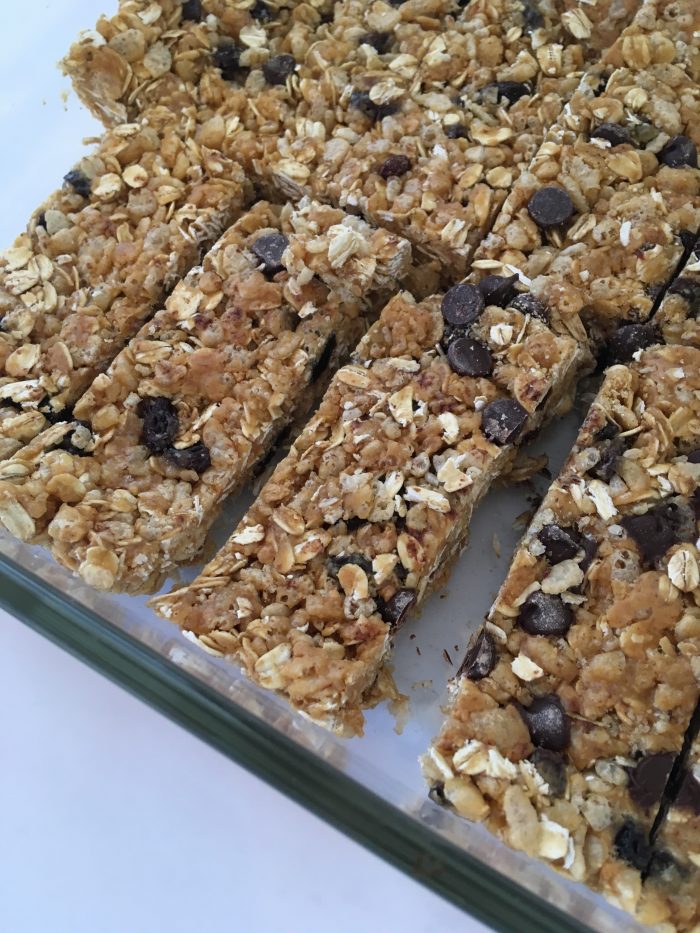
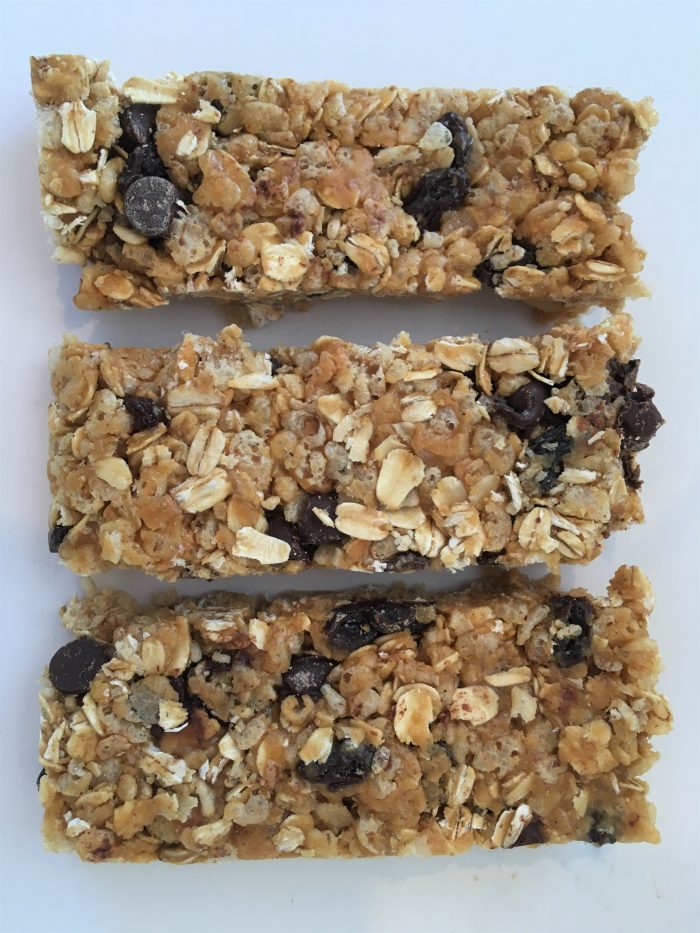
Do your kids blow through granola bars quickly? This homemade recipe might save you money! They’re simple to whip up, SO delicious, and freeze wonderfully!!

Guest post from Brigette Shevy
These are a perfect lunchbox treat!
They are so fast and simple to whip up, and they freeze perfectly. That’s assuming, of course, that they last long enough to make it to your freezer!
Our family of five can go through an entire pan of these in… um… such a short amount of time that I’m not quite ready to admit it in public.

There are many ways you can tweak this recipe to fit whatever you have in the house, or whatever your family prefers — here are a few ideas.
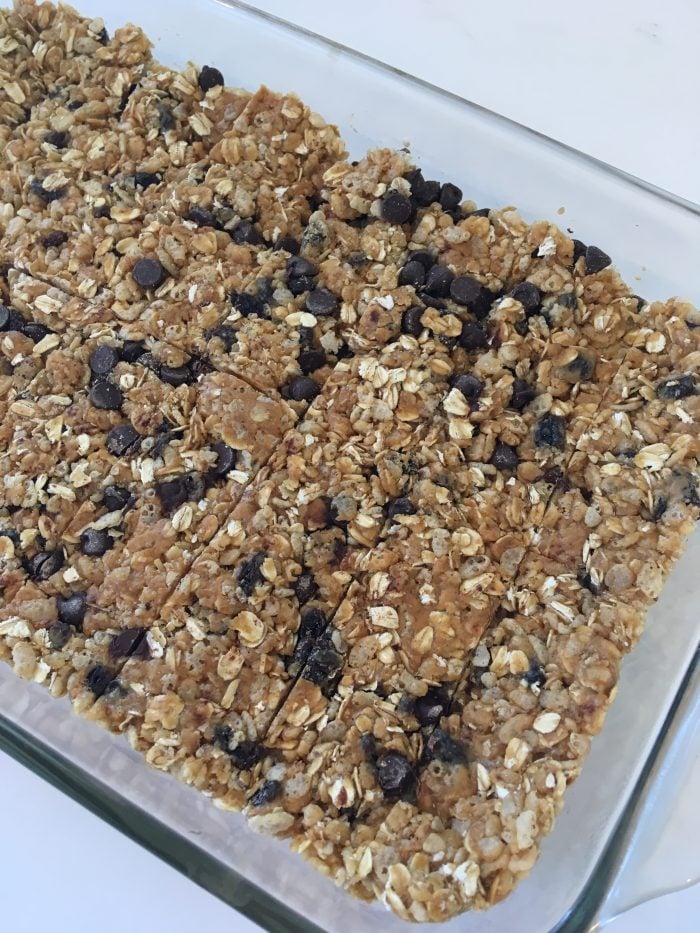
1. In a large bowl, combine cereal, oats, wheat germ, and any additional “dry” mix-ins.
2. In a saucepan, mix the honey, brown sugar, and salt, string over medium heat until the mixture comes to a complete boil for 30-60 seconds.
3. Remove pan from heat and stir in the peanut butter and vanilla until smooth.
4. Pour liquid mixture over the dry ingredients and mix well.
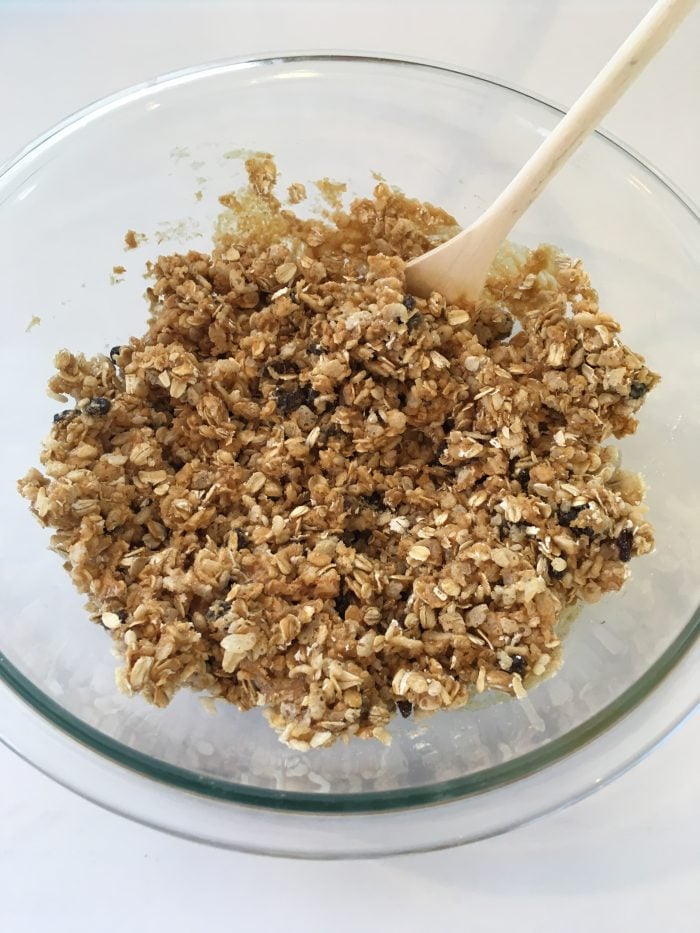
5. Let cool for 5-10 minutes, then mix in the chocolate chips.
6. Press into a greased 9×13 pan and let cool before cutting into bars.

7. Enjoy bars within a few days or freeze for later.
We usually eat these pretty quickly right out of the pan! However, when I do manage to save a few of these away for my husband’s lunches, I cut them into bars and wrap them individually.
I store them in a ziptop bag in the freezer, and pop them in lunches straight from the freezer (they thaw quickly).
Honey is the key here — it’s probably the best “binding agent” for granola bars. The trick is to boil it for just 30-60 seconds, which will help it firm up enough when cooled to hold the bars together. If you boil it longer, the cooled honey will become very brittle and your granola bars will be super crumbly and dry.
Yes! Gram for gram, these are significantly cheaper (and better for you!) than most packaged granola bars. And you could probably make these in less time than it would take you to drive to the store and buy a box of granola bars!
Make sure to share and save it on your favorite platform below!
Mornings just got so much easier with this FREE list of 50+ Easy & Cheap Breakfast Ideas for Busy Weekday Mornings!


Guest post from Jacqueline Smith
In a perfect world, eating lots of produce would be easy, economical, and fun for the whole family. But let’s face it: we all struggle with eating fresh fruits and vegetables for one reason or another.
The good news is, the more organized we are, the more we save on produce. Here are five tips to help you save money on produce:
1. Start your meal plan before you shop…but don’t limit yourself to it.
Meal planning is an essential part of making sure that you use up all of your produce, but you don’t want to handcuff yourself to buying just what’s on your meal plan as you shop.
The solution? Complete about 50% of your week’s meal plan before you head out the door. Once you have a chance to see what’s on sale and what looks freshest at your supermarket, buy those items, too, and finish up your meal plan when you get home.
2. Buy in-season produce. Skip the (expensive) rest.
We all know not to buy watermelon in February, but what about the fruits that are available year-round like apples (or vegetables made available year-round like sweet potatoes)? You may not notice because it inches up slowly, but the price of apples can go up as much as 50 cents per pound when they’re out of season.
The solution? Skip apples in the spring and summer. Buy berries and melons and other spring/summer fruits instead. Before you know it, fall will swing around again, and apples will come back down in price. This interactive map from Epicurious can help you know what’s in season in your region.
3. Involve the whole family.
Make sure you keep your grocery list and meal-planning sheets somewhere in the house where the whole family can see them. Encourage everyone to add to the lists whenever they have a request or meal idea. This ensures that you’ll buy produce your family will be excited to eat.
4. Have a worst-case scenario soup and smoothie plan.
Some weeks, we all just get so busy that much of the produce we buy doesn’t get eaten by the end of the week.
The solution? Simply keep some soup stock on hand and make a soup with all of the leftover veggies from the week. Likewise, throw overripe fruit in your blender and make smoothies either with ice or frozen bananas. No wasted produce = no wasted money!
5. Celebrate your team work.
In order to keep your family eating lots of produce over the long run, take time at the the dinner table to celebrate how you all worked together to eat the most perishable food before it spoiled. A little praise goes a long way!
How do you save money on produce?
Jacqueline Smith loves to help families save big on produce using simple tools that simply work. You can read more about her at JacquelineSmith.com.

I downloaded Every Writer Needs a Tribe when it was free last week. I’m so glad I did because I was very inspired by it. In fact, after reading it, I wanted to get on a plane, track down Jeff Goins, and see if I could get five minutes of his time to pick his brain more on some of the things I read!
While I’ve read many books on writing and marketing, Jeff’s way of presenting things in Every Writer Needs a Tribe made so much of the material seem new and fresh. He challenged me to step back and examine long and hard why I’m writing, what kind of writer I am, and who I should be writing to.
As blogger, it’s easy to become so focused on content production. Don’t get me wrong: Content production is a good thing. Without it, a blog would be kind of dead! But we need to take time to examine the kind of content we’re producing and what it’s accomplishing.
Being a good writer is about so much more than just producing content. You want to produce the kind of content that is going to get people’s attention and keep people’s attention. Ultimately, you want your words to make a difference in people’s lives — whether that be by challenging their viewpoints, inspiring them to take action, or just providing a story that people can enjoy reading.
The words we wield with a pen or keyboard can have a life-changing effect. For this to happen, though, we must invest the time to hone our craft and build our tribe. Without taking the effort to develop yourself as a writer, your words won’t have as much meaning. Without a tribe, you’ll spend years of your life speaking into a black abyss — with no one getting to benefit from your words of wisdom.
This short ebook will inspire you to invest in both improving your writing skills and building a loyal readership. It’s a quick read, and worth your time if you are a blogger or writer of any kind.
See more book recommendations I’ve posted this year here. You can also see all books I’ve read so far in 2012 here.
Have you read any good books recently?
![]()
Guest post from Anita
On Sunday night, I opened my chest freezer and found a new Eat from the Pantry Challenge unexpectedly waiting for me this week. In other words, all the food had thawed out, and everything had to be thrown away except one loaf of bread, one package of hot dogs, and the kids’ Freezies.
Instead of feeling sick to my stomach for all that wasted food (and money!), I decided right away to be grateful for this situation. The first and obvious thankful part was that an already-thawed freezer is super easy to clean!
But after a few more days of reflection, here’s what I have decided:
Some of the food I was a little upset to lose like the roasts, Ham and Cheese Pockets, and Brown Bag Burritos. But there were a few items in there that I really didn’t mind throwing away. I’m going to use this to more carefully inform my grocery shopping choices, especially when it comes to sales and “stocking up.”
I was grateful that I hadn’t yet divided up and frozen the 10lbs of chicken I had just purchased. But once I also took a few minutes to inventory the dry goods in the pantry, I came up with a list of 10 meals without having to purchase a single thing!
While I will still try to purchase a little extra over the coming weeks to rebuild our freezer supply — especially meat — I think I’m going to buy less at a time. This should help cut our grocery budget down even more.
This is a thought that’s been developing for me over the past few months, and something that is probably rooted in an economically-challenged childhood in a single-parent home. I feel more secure when I have a full freezer and pantry. But knowing that’s why I sometimes buy more than I need, allows me to stop and choose not to do it. There’s freedom in truth.
Once we determined that the freezer was just unplugged instead of broken, I was glad that we wouldn’t need to replace it. However, I also realized that if we had needed to do so, or really needed to purchase extra food for this week, we could have used part of our small emergency fund to do so.
A few years ago, a kaput appliance would have meant using a whole paycheck and playing catch-up with our regular bills for months.
The fact that I had food in the freezer, hadn’t paid full price for any of it, know how I’m going to replace it, can eat this week in the meantime, and have an Emergency Fund in case the situation had been worse, are all significant benchmarks to me of how much I have learned and developed new financial habits over the last four years.
While I know there’s still work to do, I’m grateful for this “test” and the encouragement of seeing just how far I have come already.
In a couple weeks, I’m going down to part-time work so I can spend more time teaching my children at home. While we’ll be saving some money on childcare, I still need to trim my household budget a little more to make our new arrangement work. Thanks to my freezer incident, I know exactly how I can do just that!
Anita works full-time {soon to be part-time} and homeschools her kindergartner in the evenings after the toddler goes to bed. She and her husband are rebuilding their credit and relearning financial habits after a bankruptcy, loss of a small business, and unemployment.
I’ve been getting some great freebies in my mailbox recently:


Free Woolite sample
Free Plum Kids product coupon
Free Oscar Mayer product coupon
Free Herbal Essence product coupon
Free Nescafe Memento sample
Free Honey Nut Cheerios sample
Free Nexcare Bandage samples
Free Eucerin lotion sample
Free Aussie product coupon
Free Fancy Feast cat food
What freebies have arrived in your mailbox this week?
By the way, if you want to start getting great freebies in your mailbox, just start signing up for the freebies I post every day that interest you. Within 4-6 weeks, your mailbox will start filling up with great freebies!

These 3-ingredient pumpkin chocolate chip muffins are delicious AND really easy to make. They freeze well and would be perfect for a quick lunch (at home or on the go).
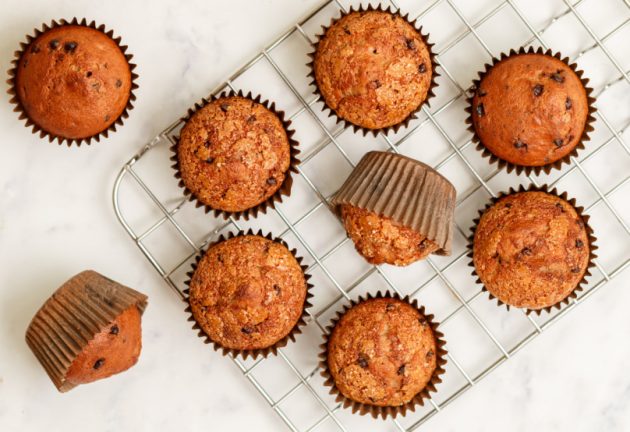
We’re big fans of Pumpkin Chocolate Chip Muffins here. So, of course, when I saw this recipe recently, I just had to try it — especially since I already had all of the ingredients on hand.
I thought it would be fun to change things up for our Lunchbox Freezer Cooking series and make these muffins, instead of our usual pumpkin chocolate chip muffin recipe.
These were very easy to make and were surprisingly yummy — especially for the ingredients.
They aren’t as good as our favorite recipe. However, they are much quicker to make. And, I’m guessing, they are much lower in fat and calories, too.

1. Preheat oven to 350ºF.
2. In a large bowl, mix canned pumpkin and chocolate cake thoroughly (can use an electric mixer, if you prefer).
3. Sprinkle chocolate chips over batter and stir in.

4. Fill greased or paper-lined muffin tins almost full.

5. Bake in preheated oven for 20 to 25 minutes, or until done.
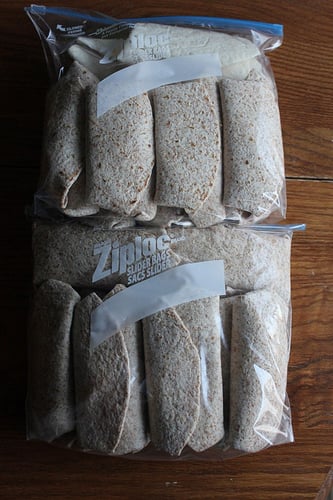
Cool completely and place into an airtight ziptop freezer bag.
Store for up to 4 weeks in the freezer.
Thaw for 30 minutes to 2 hours.
Or, warm for a minute in the microwave.

Make sure to share and save it on your favorite platform below!
If you haven’t tried our family’s favorite Pumpkin Chocolate Chip Muffin Recipe, you’ve got to give it a whirl. I can almost guarantee you’ll like. Unless you’re one of those strange people who don’t like chocolate or pumpkin! 🙂

Are you joining us for Lunchbox Freezer Cooking? If you’ve blogged about a lunchbox recipes you’ve made for your freezer, leave a link to your post and recipe below. I can’t wait to see your yummy recipes and ideas!
Mornings just got so much easier with this FREE list of 50+ Easy & Cheap Breakfast Ideas for Busy Weekday Mornings!
Sometimes, we take the little things for granted… like a cell phone.
Today, in the midst of getting all of the kids into swimming lessons in the rain, my cell phone fell out of the backpack. I didn’t realize it had fallen out, but after getting everyone situated with their goggles and swimming teachers, I sat down and instinctively went to pull out my phone.
It wasn’t in my purse. It wasn’t in the backpack.
I double-checked. I triple-checked.
No phone.
I went back out to the car to see if maybe I had accidentally left it out there, though I was positive I had stuck it in the backpack. I searched in all the cracks and crevices of the car.
Still no phone.
I knew Jesse was going to meet us at swimming lessons in about 15 minutes, so I went back in and retraced all of my steps, thought about every possible scenario of what could have happened to my phone, and went through every article and item in both my purse and backpack.
Jesse got there and I met him with the grim news that my phone was missing. He looked through my purse and backpack just to be absolutely sure, he retraced all of my steps, he looked in the car, and he went to check at the swim club’s lost and found.
Nothing.
Gratefully, Jesse’s more tech-y than I and he has GPS tracking set up on his phone for mine. He checked that and we could see that the phone was right there at the swim club. I wasn’t sure whether that should make me relieved or feel like a crazy woman that I couldn’t find my phone when it was supposedly right there in the building and there were basically no other options as to where it could have been.
We turned on the Find My iPhone alarms and started hunting all over the building and outside and in the car for the obnoxious noise that it makes. Again, this resulted in nothing.
I began praying that God would please help us to find the phone and I tried to remember Lisa’s words of encouragement in her book Unglued as to how to respond in situations and not panic or become stressed.
I reminded myself that it is just a phone, after all. I’ve lived without one before and, if it was truly lost or stolen, I could survive without it again.
But I still was rather unsettled about the whole thing — and wondering where I’d left my brain that a bright pink phone could just up and grow legs and walk off like that.
As a last resort, I suggested that Jesse call the phone. I’m not even sure why. I guess I thought maybe by some weird set of circumstances, the Find My iPhone alarm wasn’t working or something and that the phone ringer would work and we’d figure out the phone had been right under our noses all this time.
Well, Jesse called my phone — and someone picked up! They immediately asked, “Are you the owner of the phone?”
I couldn’t be more relieved!
I guess they had found the phone in the grass near the entrance to the swim club and had retrieved it so it wouldn’t get rained on. And then they hung onto it assuming that the rightful owner would eventually call.
They were no longer at the swim club, but we picked a nearby rendezvous point and, within minutes, had the phone back in our possession! Not only was I so thankful that my phone wasn’t hopelessly lost, but my heart was very warmed that, of all the people who could have came upon it, it was someone with the integrity to want to return it to me.
And the next time I go out, I think I’m going to make sure that my phone is securely mounted in some zippered pocket in my purse — as I’m still not sure how it managed to fall out of the backpack! 🙂

Guest post from Tiffany of Don’t Waste the Crumbs
I grew up thinking that every family had to have two cars. Even if the family lived in a big city, with ample public transportation, and both spouses worked from home – two cars were still necessary.
And even when we slashed our budget by 50%, we still kept two cars.
It wasn’t until my husband and I moved into our townhouse that we realized that having a second car wasn’t really a “need” for us. Between finding parking spaces, maintaining an older vehicle and switching two car seats back and forth, we often found it easier to just use the family sedan.
Not wanting to intrude on my responsibilities on managing the house and raising our kids (which often times require a vehicle), my husband had the idea of carpooling with a co-worker (who is also a good friend) for rides to and from work. When surf season had passed and regular exercise was becoming not-so-regular, my husband suggested riding his bike for the 8-mile commute.
After a few weeks with a new primary mode of transportation (his bicycle) and a back-up in place (his co-worker), it became apparent that we officially had no need for a second car. We listed the car for sale and sold it for asking price.
Since we’d just finished paying off all our debt over the last two years, we certainly did not want to back-track financially and take on debt if the need for a second car ever arose in the future. So we decided to start setting aside money into a car fund in case we decided to buy a second car in the future.
We took the money we’d earned from selling the second car and used it to set up our second car fund. The second major deposit into the car fund was the profit from a garage sale: $500!
Next came cash birthday gifts sent from various family members. Christmas came and we decided to put what we budgeted for gifts towards each other directly into the car fund instead. Our car fund was building – very slowly – but we were enjoying the thrill of watching the balance steadily go up.
One night my husband and I started “dreaming” about the next car. We weren’t in a rush to purchase, and certainly not in a need, but we enjoyed talking about someday walking into a dealership and paying for a car with cash. And then it hit us – we had gotten pretty good at saving and this goal was not unattainable. At that moment, we devised a plan to save aggressively so that we would be able to buy our “someday” new-to-us-car in one year.
Here are the basics of our plan:
As the one-year mark approached, our schedules started to shift and the need for a second vehicle had become inevitable. We checked the balance of our car fund and were surprised to see that we had indeed reached our goal!
My husband found a four-year old model of the car we wanted with just under 17,000 miles – it was practically a brand-new car. We went to the dealership, inspected the car and made a cash offer and they accepted.
Today’s we’re proud owners of a 2008 Honda CR-V EX. It was paid for by methods that aren’t new or earth-shattering, but they are proof that hard work and dedication do pay off… and that paying cash for a car really is as sweet as we dreamed it to be.
Tiffany is an in-house day care teacher, private chef, housekeeper, teacher, laundry service, chauffeur and dedicated CEO of her house. She aims to be a good steward of all He has given, so she tries to do more {and do it better} with less. She’s making baby-sized strides and would be honored if you joined her for the ride via her blog, Don’t Waste the Crumbs!

kojo-design.com shows you how to make a homemade sprinkled cake topper.
Do you have a fun and frugal DIY idea to share? I’d love to hear about it! Read the submission guidelines and submit it here.

I find a lot of great ideas on Pinterest… but pinning something doesn’t do anything unless I actually, you know, try the idea. So I thought it’d be fun to challenge myself to do at least one Pinterest experiment every week — and blog my results.
I can’t promise that I’ll always have a Pinterest Experiment post up each week, because you know how I sometimes get distracted or on blog tangents. But I’m at least going to try. By the way, you can follow my personal Pinterest account here, if you’re interested.
Silas and I whipped up some Sugar Hand Scrub tonight. I had gotten a bottle of Dawn Hand Renewal for $0.50 at Dillon’s recently and was excited to use it to make this recipe.

I only had raw sugar on hand so my end result wasn’t as pretty as it would have been with white sugar, but this stuff works and smells so good.

Someone mentioned putting a few drops of peppermint oil in the scrub and I think that would make this even more amazing!

If you wanted to make it for gifts, I’d recommend putting more sugar in it so that it’s not as watery. This should help it keep a good consistency and last longer.
Have you tried any ideas or recipes you’ve found on Pinterest recently? If so, I’d love to hear how they worked out for you. Feel free to leave your blog link in the comments if you blogged about your experiment!


Testimony from Megan
In April 2011, we were blessed with our second child — a little boy named Whit. He was precious and perfectly formed. But there was an unexpected complication… Whit was born with brain damage.
We soon found out his reality: he does not walk, talk, eat, roll over, reach, laugh, or purposefully do anything. He came home with an array of equipment, a curious big sister, and nervous parents!
It didn’t take us long to realize we had to figure out our “new normal.” We were thankful we had two precious children, my husband had a job, and I had a home to run, but the special needs world can be difficult to navigate and we found the two commodities we often lacked were time and money!
Through trial and error, we have learned a few tips for saving some of each:
1. Take One Day At A Time
The nature of our life is unpredictable. Whit gets sick often and quickly! No two days are ever alike.
My desire for some semblance of normalcy, however, is still there. After trying many different schedules, it finally dawned on me! We live day-to-day, so that’s how we should plan!
Every morning, my daughter and I sit together to make “our list.” She enjoys the freedom to add some of her favorite things, too! Things get accomplished, daily life is streamlined, and everyone seems more content.
2. Simplify
Things are boring around here — aside from the kids! Meals are simple. We have downsized to one car. Outings consist of the library or a walk outside. Whit’s tragic situation has given us some perspective: not only is simplicity okay, we love it!
3. Give Yourself Some Grace
I can’t remember the last time I scrubbed baseboards… I have no idea when it was! And I am completely okay with that!
I have learned to let go of some things in order to hold my family closer. Sure, we hit the basics (no one wants to live in a dirty house!), but have I vacuumed under the couch cushions lately? Not a chance! And sometimes, that’s okay!
4. When In Doubt, Bring Food
We go to appointments… All. The. Time. It is worth it to spend the money on groceries our family enjoys versus paying much more for a single meal in a drive-thru. We have saved so much just by having a picnic in the car!
5. Bring Those Siblings
Our daughter often accompanies us to appointments for Whit. We save money on a sitter, but I firmly believe this is opening her eyes to a world often unseen by other children. Yes, it saves money, but the lesson in compassion is worth more.
6. Why Spend If You Can Borrow?
Our town is relatively small, but there is a wealth of organizations that have loaned us equipment. It’s often second-hand, but always serves it’s purpose. Before you spend all that money, just ask someone! The worst they can do is say no.
Megan is a lover of Jesus, Bret, and her precious babies! She’s living her dream as a stay-at-home wife and mother. Since having Whit, her desire is to encourage families as they journey through the world of special needs.

Jingit is a simple way to earn a little money online for watching ads or for taking surveys.
Just sign up for a free account, complete a 30-second registration process, and you can then click on ads available to watch. You’re not going to get rich watching ads from Jingit, but it’s a nice way to earn a little extra side money!
Looking for more income-earning ideas and opportunities? Check out this page.
Thanks, Moms By Heart!
(Note: Some of the links in this post are my referral links. Read our disclosure policy here.)

Looking for an easy make-ahead lunch or dinner idea that’s frugal and will fill you up? How about a quick meal for busy weekdays? This freezer-friendly recipe for bean & cheese burritos checks all the boxes, and your family will love it too!

After the amazing success I had with Crockpot Refried Beans, I decided to try making Freezer-Friendly Bean & Cheese Burritos (adapted from Pennies & Pancakes). They were SO easy to make, and very inexpensive too!
These burritos aren’t anything spectacular and, if you’re a foodie, you just might be appalled that I’m posting such a crazily basic recipe.
But I’m all about keeping it simple — especially when it comes to quick lunches on the go!
1. In a large bowl, mix beans, salsa, and seasoning together.

2. Spread 2-3 Tablespoons of the mixture into center of a tortilla.

3. Sprinkle with cheese and roll up (folding the sides in to keep all the filling inside).

4. Place assembled burritos in a freezer bag OR cook burritos to eat immediately.

5. Serve with salsa and sour cream if desired.
Microwave Baking Instructions:
Oven Baking Instructions:


Make sure to share and save it on your favorite platform below!
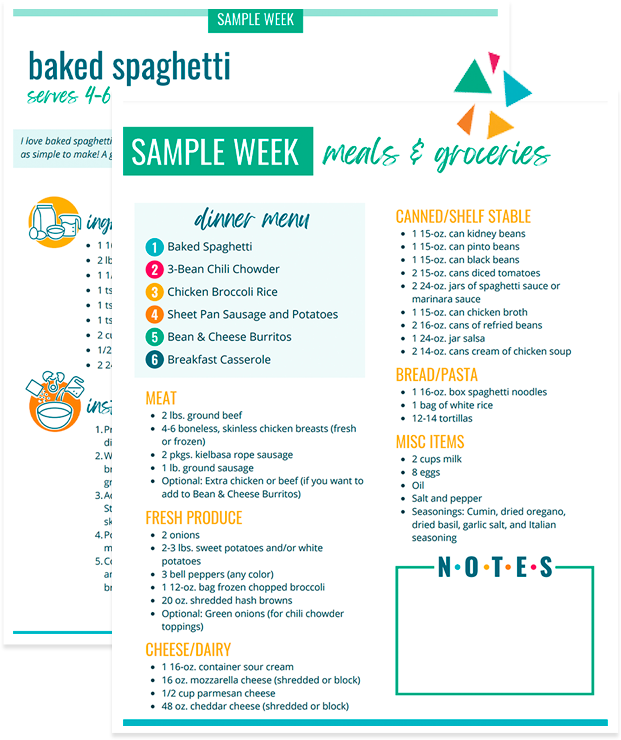
Done-For-You Dinner Recipes With Simple Ingredients and a Grocery Shopping List!

 Is your life feeling hopeless and overwhelming right now? My guest post on Hope for Women today might encourage you:
I flung myself into a heap on the floor in our little basement apartment.
“What am I supposed to do, God?” I cried aloud. “I’m so thankful for this baby, but I’m so sick with this pregnancy. And being so sick means I can’t work. How are we going to survive?”
I felt helpless and at the end of my rope. My morning-noon-and-night sickness had hung on for weeks, keeping me from working at the part-time jobs I had before I got pregnant.
While my husband was in law school, those part-time jobs were keeping us afloat. Combining both of our incomes, we were already barely making it. With the absence of my income, our finances suffered a huge blow – and so did my faith.
Read the full post over on Hope for Women.