
Here’s a creative idea for repurposing newspaper into gift sacks.

Or here’s another tutorial (in English!) for another gift bag that can be made out of newspaper.

Saving Families Money Since 2007

Here’s a creative idea for repurposing newspaper into gift sacks.
Or here’s another tutorial (in English!) for another gift bag that can be made out of newspaper.


Guest post by SB of One Cent at Time
If you’ve been married for a while, there’s a pretty good chance that either you or your spouse is the one “in charge” of the family finances. And if you’re like me, your spouse might not be nearly as involved as you would like — or they might even refuse to get involved.
This dilemma, which is be a huge issue for many marriages, can be addressed in an agreeable manner if you have the proper tools and attitude. Here are five tips that could help your spouse to get more involved in your family’s finances:
A two-way conversation is the only tool that will result favorably. It’s easier to gently persuade someone into changing their mind and it helps if you both focus on your goals which are mutual.
Try opening with the feel/felt/found method. For example, “When you bull up and refuse to discuss the finances with me, I FEEL like my concerns don’t matter. What I’ve found is that when I FEEL that way, I am not as careful about how I spend our money because I’m hurt and angry.”
If you spouse usually is not the bill-payer, let them give it a try for a month (and of course offer to help if necessary) This will give him or her a better understanding and appreciation for how important it is to be involved in the decision making process of your family’s finances.
We all have dreams of what we would do if money were not issue… but the reality is that without team work between couples, all of these wants and desires remain unrealized pipe dreams and may never come to fruition. Communicate your ideas and listen to your spouse’s ideas. Realize that you need to develop a plan TOGETHER to make your dreams come true.
If your spouse still can’t see the importance of his or her participation in the financial decision making, sit down together and look at your budget (or create a budget). When the numbers are right there in front of your eyes, it’s easier to be involved in the family finances.
Open communication is so important if you want to get your spouse more involved with the financial future of your family. Any purchases that are going to come out of the monthly budget should be discussed. Not argued over, but discussed like adults!
Treat each other like business partners.
Listen to the concerns of the other, but don’t let anything get blown out of proportion. If you can’t communicate with your spouse without losing your temper, you will never be able to realize your common goals and dreams. Only gentle persuasion and mature discussion will get your spouse to participate in the family financial decisions.
Do you do the finances in your family? Or do and your spouse tackle it together?
Do you have any other tips for encouraging your spouse to get involved more in your family’s finances?
SB is a personal finance blogger who writes about saving money, becoming rich and earning extra money over at One Cent at Time.

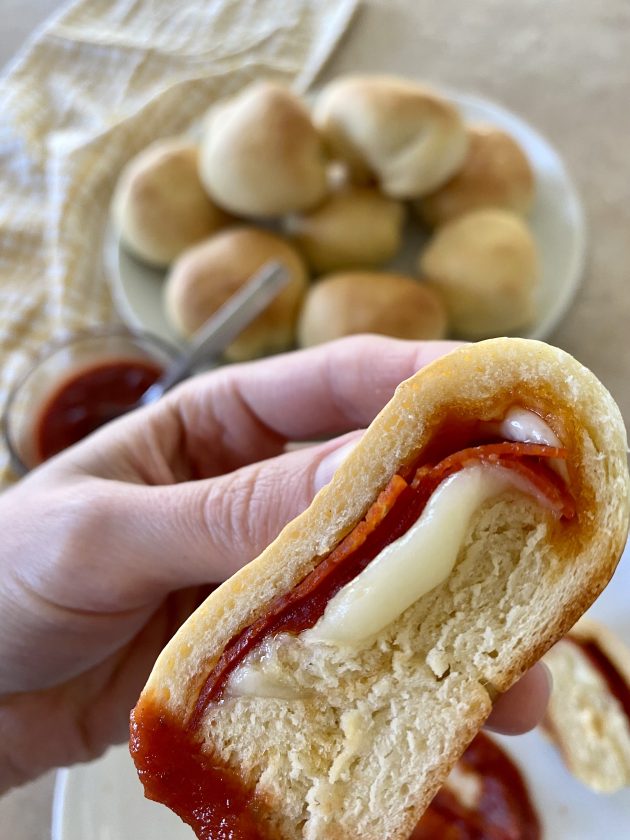
It doesn’t get much better than delicious homemade bread dough stuffed with savory pepperoni and gooey cheese! These pepperoni rolls are perfect for everything from an after school snack to a quick evening meal.

Guest post by Brigette Shevy:
I love that they can be made up ahead of time and frozen (by the way, this recipe easily doubles) – making them so easy to include in a sack lunch.
I stick these frozen in my husband’s lunch box, and they are completely thawed and ready to eat by lunchtime — which means they are the perfect solution for when I forget to pack his lunch… not that I’ve ever done that, of course!
If you’re feeling creative, you can always experiment with different combinations of cheese, or add some extra filling ingredients.
I hope your family will enjoy this recipe as much as mine does!

For the Dough:
For the Filling:
For the Topping:

1. Combine all dough ingredients in your bread machine in the order listed, or in the order recommended by your particular brand of bread machine.
2. Run the short dough cycle.
3. Divide dough into 12 pieces.
4. Flatten each into a circle about 4-5” in diameter.
5. Put several pepperoni slices and 2 chunks of cheese in the center of each dough piece.
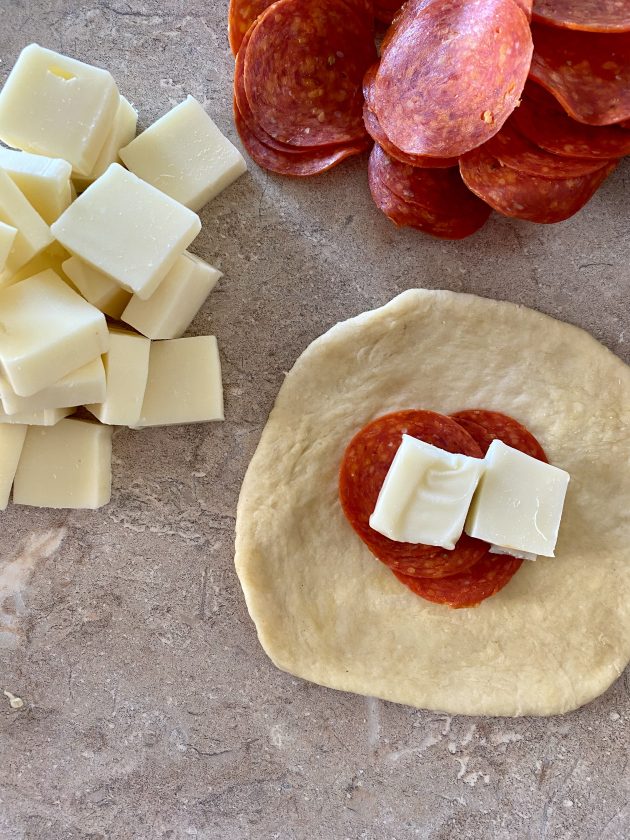
6. Bring up the sides of the dough around the filling and pinch the ends together.
7. Roll each into a ball, making sure the dough is evenly distributed around the filling with no “thin” spots.
8. Preheat oven to 350º.
9. Place dough balls on greased cookie sheets (place any visible seams down) and let rise for 15-20 minutes in a warm place while the oven preheats.

10. Bake in preheated oven for 12-15 minutes.

They are great fresh from the oven, at room temperature, and yep, even cold. 🙂
If I’m serving these for dinner, I’ll often include marinara sauce on the side. Dipping sauce is definitely not necessary though — for quick on-the-go meals, we love them just the way they are!
If you have any leftovers, let them cool and then refrigerate in a food storage container for up to a week.
You can also freeze them if you want to store them longer.
One of my favorite things about this recipe is that it’s SO easy to mix up based on what you have in the house, what ingredients are on sale, or what your family prefers.
Here are some ideas:
Use your imagination and try whatever sounds good to you — it will likely taste great too!

Make sure to share and save it on your favorite platform below!
Brigette is a full-time wife and mother who is blessed with three amazing bundles of energy. She enjoys music, experimenting in the kitchen, homeschooling her children, finding great deals, long-distance running, and anything chocolate.
Meal time just got so much easier!

Feeling like you just don’t measure up to all the other amazing bloggers and people who post things on Pinterest? Go read Queen Bee Coupon’s post on You Can’t Pin Love.

Snail Pace Transformations shows you how to turn a shopping bag into a cash envelope system.

Sweet Kisses and Dirty Dishes shows you how to make a fabric cash envelope system.
Since I’m neither crafty nor creative when it comes to things like this, we use the free envelopes the bank gives us to put our cash in. Yes, I know, we’re all original like that. 😉

KJ emailed in the following tip:
I have four children, including a newborn. I drive my older two children to school so all of us need to be ready to go in the morning.
In order to make the mornings go smoother, I wanted to have my two school-aged children pack their own lunches. I also wanted a variety in their lunches and not all cheese sticks 🙂
So I posted this on the fridge:
- (1) sandwich/granola bar/bread or muffin
- (1) fruit/veggie/yogurt/cheese
- (1) drink
- (1) cracker
- (1) dessert
- Have your lunch packed by 7:45
- Pray before you eat
- Have a great day!
On the weekends, I will bag the desserts and crackers. I then put the baggies in a large bag labeled desserts or crackers in the pantry. I make the PB&J sandwiches (put in freezer), and bag the fruit or veggies. I will also make the granola bars or homemade muffins. There is also a shelf in the fridge that is “their shelf”. That is where we keep the drinks, fruit, homemade applesauce, etc… for their lunches.
I timed it once and that whole process from start to finish took me 20 minutes! Much quicker than trying to put everything together in the mornings.
I like it because it is one less thing I have to do in the mornings. They like it because they can choose what they put in their lunch that day. It works well for us!

JustLaine.com shows you how to make a giant homemade chalkboard.
Do you have a fun and frugal DIY idea to share? I’d love to hear about it! Read the submission guidelines and submit it here.

Looking for ways to recycle your trash — and spend less on toy? Here are 20 ideas to turn your trash into toys.
My kids have created some of these ideas all on their own, but there are some fantastic new ideas for us there, too.

I re-created our well-loved Chicken Broccoli Rice Casserole into a more portable version tonight. Honestly, after making it, I’m not entirely sold on the idea of putting it in muffin tins.
It would work well for an at-home lunch with little people who have small appetites. But for anyone over the age of three or four, I think it might be more convenient to make the casserole, bake it, and then divvy it up into portion-sized airtight containers to freeze.


This is a recipe that freezes really well — baked or unbaked. And it thaws well, and re-heats well. So no matter how you decide to divvy it up and freeze it, it’s hard to go wrong.
By the way, if you’ve not tried this recipe yet, it’s a big favorite of ours. In fact, my kids request to eat it for breakfast when we have leftovers in the fridge! (Truth be told, I usually let them. But hey, it has grains, dairy, protein, and veggies. So I don’t think it can be that detrimental to eat for breakfast. And it’s probably loads better than most boxed cereals on the market — especially if you make your own homemade soup mixes!)
Are you joining us for Lunchbox Freezer Cooking? If you’ve blogged about a lunchbox recipes you’ve made for your freezer, leave a link to your post and recipe below. I can’t wait to see your yummy recipes and ideas!

I find a lot of great ideas on Pinterest… but pinning something doesn’t do anything unless I actually, you know, try the idea. So I thought it’d be fun to challenge myself to do at least one Pinterest experiment every week — and blog my results. You can follow my personal Pinterest account here, if you’re interested.

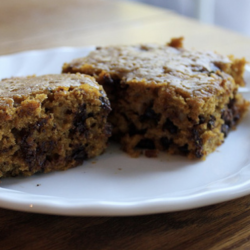
I saw this Pumpkin Chocolate Chip Brownie recipe on Pinterest last week and immediately knew it was a must try idea. I mean, it’s hard to go wrong with pumpkins and chocolate chips mixed together.

It was super easy to whip up. I went ahead and doubled the recipe so that, if it turned out, I could give half the batch to some friends of ours who recently had a baby.

I don’t think I layered it thin enough in the pan because my final results turned out quite a bit thicker than the original recipe. And I used mini chocolate chips (that’s all I had) and those sank a little more than the original recipe’s picture looked like it did.

That said, the final result was very delicious. Not quite like a brownie to me, though. It was more like a pumpkin spice cake with chocolate chips in it. But I can overlook that technicality. 🙂
Have you tried any ideas or recipes you’ve found on Pinterest recently? If so, I’d love to hear how they worked out for you. Feel free to leave your blog link in the comments if you blogged about your experiment!

Jennifer emailed in the following tip:
I had been wondering how much I actually saved using coupons — and if it was really worth all my time and energy, since sometimes I only saved a couple dollars at one particular store.
So recently, we started to actually track how much we saved in coupons at every store, and then we put that same amount into our savings account.
Now, each month (and each year) we can SEE exactly how much we saved with coupons… and see that my efforts really are worth it. This is a really simple concept and it makes saving a little more fun!

We’re working with Silas on learning to recognize his numbers right now. So this Clothespin Number Match-up Busy Bag from Confessions of a Homeschooler has been perfect for practicing!

All it requires is a pack of clothespins (check the dollar store for these), this printable, and a plastic bag.

Laminate or print the Clothes Pin Number Match-up on thick cardstock, write the numbers on clothespins, and stick it all in a plastic bag to have handy for when you want to keep your youngster busy while you’re working on something else.
Find more Busy Bag ideas here.


Guest post from Michelle of The Willing Cook
Do you sometimes gaze at your co-workers deli-prepared lunch, wishing you could just have one bite? Sure it may have been a bit pricey, but all caution is thrown out because it looks so good.
But, wait! You can’t have that deli sandwich because you have Celiac Disease or food allergies. I understand your pain. You just want a good gluten, dairy, and egg-free deli-style sandwich that quenches that desire.
But how? Chances are that you aren’t going to find it at the corner deli. Well, I’m here to offer you a brown bag lunch idea that is fairly easy and should meet your dietary restrictions and your desire for good food.
{free of gluten, dairy, egg, & more}
Tuna Salad Ingredients
Directions:
Mix together all the tuna salad ingredients in a bowl and place in the refrigerator.
Gluten-Free Flatbread Ingredients
Directions:

To assemble your sandwich, scoop out 1/2 cup of tuna salad onto the center of your flatbread. Top with slices of tomato and avocado; season with salt & pepper. If dairy is allowed, add a little feta cheese to your sandwich for an added punch.
When packing this to take to work or school, I recommend keeping the tuna salad and flatbread separate and assemble when you’re ready to eat it. A soggy sandwich could ruin your whole day!
Enjoy this simple and flavorful gluten and allergy-friendly sandwich! And be sure your co-workers see it too 🙂
Would you like more allergy-friendly brown bag lunch ideas? You can find more ideas at The Willing Cook by clicking on Lunch Ideas for School/Work.
Michelle is blessed to stay home with her three children (ages 10, 7, and 4), while her husband works to provide. When she’s not experimenting with allergy-friendly meals, she’s blogging about it at The Willing Cook. Through the Willing Cook, her hope is that you gain peace of mind in your kitchen (and your pocket book) and are able to serve those you love who suffer with food allergies.


I have been following your site for a few years now. I have a pretty difficult question for you. My husband is a youth pastor and makes $460 per week. We have three children with one on the way.
We want to save and budget better but don’t know how to on such a small amount. We do not have cable, or internet at home and the only thing we do that we do extra is eat out due to our crazy ministry schedule. Any help or suggestions would be AMAZING!!! -A very stressed wife
My heart goes out to you in the stress you’re experiencing! I wish I could hug you in person and tell you it’s going to be okay.
You might have some tough days ahead of you, but you are going to survive. So don’t lose hope, okay? That’s the first step to your success.
Here are some practical ideas and suggestions that I thought of for your particular situation:
It’s easy to feel discouraged when you only have a little bit of income coming in, but I know many, many families who are surviving on $460 per week or quite a bit less. So it is entirely possible.
But a budget is imperative. Even if you feel like you don’t have enough coming in, you need to maximize the mileage of every penny you’ve got and a budget is the best way to do that.
I highly recommend reading The Total Money Makeover by Dave Ramsey. Your library should have a copy. It will walk you step-by-step through the basics of setting up and sticking with a written budget.
Once you have your budget put together (and I’d heartily encourage you to sit down and get it done by this weekend, if at all possible), really go over it with a fine-toothed comb and consider what your basic necessities are. These will be things like food, shelter, transportation, and clothing.
What are the barebones payments/purchases that you must make to survive? Make these items your top priority in the budget before considering spending money on anything that is a non-necessity.
Often, when you strip your budget down to the barebones, you’ll realize that you actually have more wiggle room than you first thought you did. And that’s always an encouraging thing!
Taking the time to consider and determine your basic necessities will prepare you for this step: to cut out as many expenses as you can. It sounds like you’ve already cut many things — like cable and internet — but you could definitely cut out eating out, as painful as it may be.
Find creative ways to make meals at home more doable by using the crockpot, having freezer foods and snacks at-the-ready, and prepping ahead for the week on the weekends. It’s not a fun proposition to give up eating out, but remind yourself that it’s a short-term sacrifice you are making for the good of your family’s budget and for long-term success.
If you can carve out a few extra hours each week, put these toward doing things to increase your income. Sell anything you have that you don’t need on Craigslist, eBay, or in a garage sale. Look into the possibility of doing house-cleaning, teaching classes, or babysitting. If all else fails, there’s always the option of getting a newspaper route.
I encourage you to read The Other 8 Hours and 168 Hours: You Have More Time Than You Think if you’re feeling like you just don’t have any extra moments in your week to put toward income-earning possibilities.
As I said in the beginning, your attitude will make or break this situation. A can-do, committed, creative attitude will take you worlds further than a frustrated, complaining attitude will. And I promise you’ll enjoy the ride a lot more, too.
Choose to bloom where you’re planted — even if it feels like it’s among thorns!
What advice do the rest of you have for this reader? Please chime in with encouragement and practical tips in the comments!
photo from Big Stock

Okay, so this recipe probably won’t win the award for being the least time-intensive recipe to pull off… especially since it requires a few more steps than a typical PB&J sandwich.
However, it’s creative and different — and might be an fun option for a picky eater. And I think it was significantly easier than the homemade uncrustables were.
By the way, if you want to make things even easier for yourself, just make Freezer-Friendly Peanut Butter & Jelly Sandwiches.


Cut the crusts off the bread (you can use them to make homemade bread crumbs or homemade croutons). Roll out the bread with a rolling pin to flatten.
Spread peanut butter and jelly on bread. Roll up and cut into four parts.
To freeze: Put a lunchbox-portion of sushi in small plastic bags. Put all bags into a large ziptop airtight freezer bag and freeze up to six weeks.
To serve: Take as many serving-sized bags out as you need and let thaw for 30 minutes to a few hours before serving. They can also be warmed in the microwave for quick defrosting.
Recipe from Food.com.
Are you joining us for Lunchbox Freezer Cooking? If you’ve blogged about a lunchbox recipes you’ve made for your freezer, leave a link to your post and recipe below. I can’t wait to see your yummy recipes and ideas!