
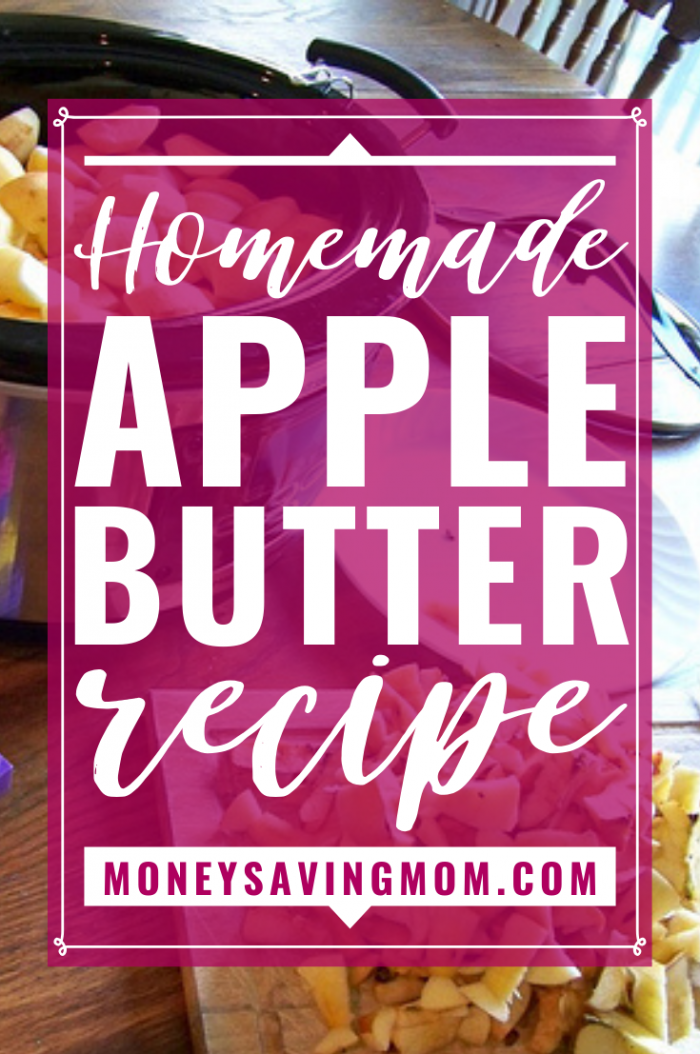
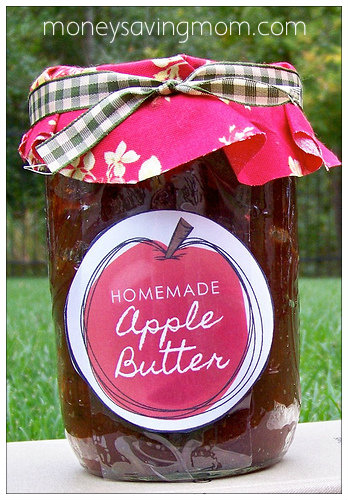
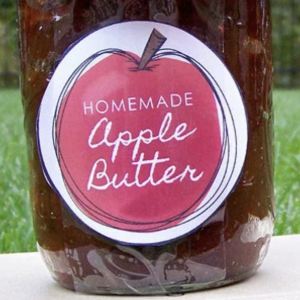
This homemade apple butter is so easy to make in your slow cooker! Make a huge batch, divide them into jars, and gift them this holiday with our free printable gift tags from the Homemade Christmas Gift Guide!
During the months of November and December, we’ll be highlighting some of our favorite homemade gifts! Download our FREE Homemade Gifts Guide to get recipes to 15+ easy-to-make gifts, plus printable gift tags to go with each gift!
Crockpot Apple Butter (Better than store-bought!)
Years ago, I decided to try making homemade apple butter as an experimental do-it-yourself project.
I’m not typically that much of an apple butter fan, but I’m glad I didn’t let that deter me because, let me tell you, this homemade apple butter is fantastic — much, much better than any storebought stuff I’ve ever tried!
And if you use clearance bags of apples on markdown, this can be a very inexpensive recipe!

What is Apple Butter?
Apple butter is a spreadable preserve made by slowly cooking apples and spices over low heat in order to concentrate the flavors. The cooked apples are pureed or blended to create apple butter’s signature smooth texture.
There’s not actually any butter in apple butter!

You’ll love this Crockpot Apple Butter Recipe
It’s such a delicious and versatile treat any time of year, but especially in the fall/winter when apples are ripe.
Plus, it’s SO easy to make in a slow cooker!
And other than the peeling and chopping process, which did take me a little while (though it was relaxing–especially since I listened to an audiobook at the same time!), the whole process was so simple.
Once the apples were peeled and sliced, the crockpot did the rest of the work!
This Apple Butter is a GREAT gift idea!
This apple butter is a yummy, unique gift idea to give during the holidays. And it’s SO easy to whip up a huge batch and divide into several jars for multiple gifts!
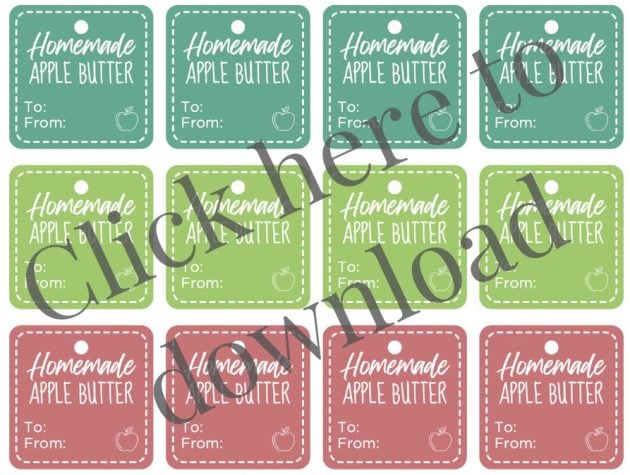
Download your free printable labels and gift tags!
Want to add on Christmas gift tags to gift this to someone this holiday season? Go HERE to download printable gift tags designed for this Apple Butter!
You can also click here to download and print labels to stick on the jars. (Note: We recommend using this sticker paper!)

Crock Pot Apple Butter Ingredients
- 6 pounds of apples
- 2 Tablespoons vanilla extract
- 1 1/2 cups raw or brown sugar
- 1 teaspoon ground cloves
- 3-4 teaspoons cinnamon
What are the best apples for Apple Butter?
I used Jonathans, but any variety should work.
It’s often nice to have a variety of apples so you get a mixture of flavors. Also, if you get them from the orchard, ask for “seconds” as they are usually about half the price and it doesn’t matter if they have a few bruises as you’ll be cooking them down.

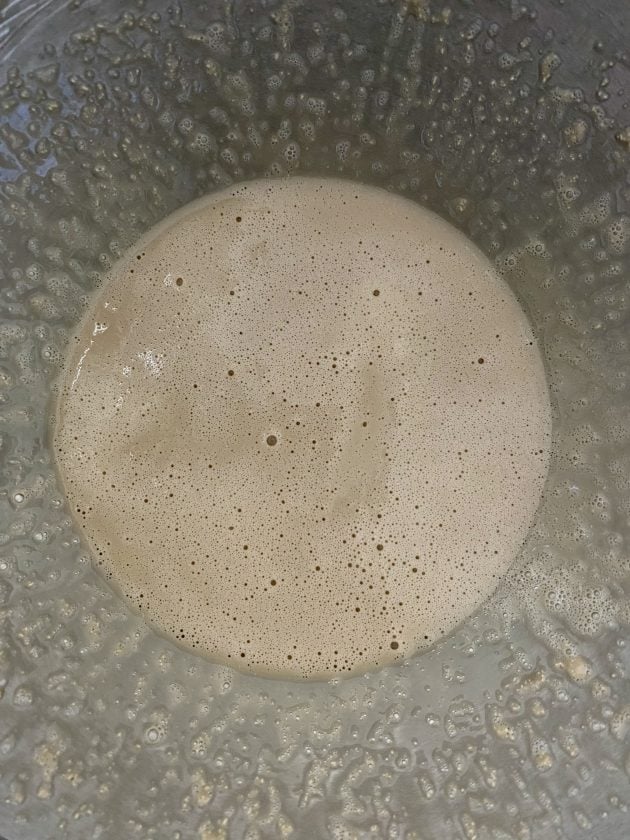
How to make Slow Cooker Apple Butter
1. Peel, core, and slice apples in fourths.
2. Put them in a large crockpot with vanilla and cook on low for 6-8 hours. Stir every few hours.
3. Once apples are very, very tender, mash with a potato masher and stir in sugar and spices.
4. Cook on low for another 5-6 hours, stirring occasionally.
5. Cool and pour into jars or airtight containers and refrigerate.
Tips for Making Slow Cooker Apple Butter
Make sure you have a large enough slow cooker so the mixture doesn’t boil out (it’s a really sticky mess!) and give it enough time to properly thicken up.
How to Thicken Apple Butter
Apple butter tends to be naturally thick… but if you’d like it to be thicker, simply let it cook without the lid for another 1-2 hours on low (stirring occasionally) or until it reaches your desired thickness.

What to Do With Apple Butter
There are SO many possibilities for how to use apple butter:
- Apple Butter tastes amazing on toast, bagels, and English muffins.
- Or stir it into your oatmeal.
- It’s also a great topping for pancakes and waffles (instead of syrup.)
- It tastes delicious slathered on chicken and pork.
And you can use Apple Butter in place of applesauce in many baking recipes (like these Apple Butter Muffins!)

Storing Crock Pot Apple Butter
You can store apple butter in sealed containers in the refrigerator for up to a month.
You can also freeze jars of apple butter for a year.
Or, you can process the jars in a hot water bath with proper canning lids and rings and store at room temperature almost indefinitely.
How long does Apple Butter last?
Depending on which storage method you choose above, you could store it almost indefinitely! But easily at least for a month or year!
Crockpot Apple Butter Recipe
Ingredients
- 6 pounds apples
- 2 Tablespoons vanilla extract
- 1 1/2 cups raw or brown sugar
- 1 teaspoon ground cloves
- 3-4 teaspoons cinnamon
Instructions
- Peel, core, and slice apples in fourths.
- Put them in a large crockpot with vanilla and cook on low for 6-8 hours. Stir every few hours.
- Once apples are very, very tender, mash with a potato masher and stir in sugar and spices.
- Cook on low for another 5-6 hours, stirring occasionally.
- Cool and pour into jars or airtight containers and refrigerate.
Notes
Love this recipe?
Make sure to share and save it on your favorite platform below!

Get your FREE Homemade Christmas Gifts Guide!
If you’re looking for ways to simplify gift giving this year, we have just the solution for you! Download our brand new FREE Homemade Christmas Gifts Guide! When you sign up, you’ll get:
- 15+ DIY recipes for unforgettable gift ideas (we’ve included something for everyone on your list!)
- Step-by-step instructions for ridiculously easy homemade gifts that anyone can make!
- Customizable, ready-to-print gift tags to go with each homemade gift!
This FREE guide was designed to help you have a more peaceful, intentional holiday season. Our hope is that it reduces stress, helps you save more money and spend less on your gift budget, and simplifies things so you can focus on what matters most this season!
Click here to get your FREE Homemade Christmas Gifts Guide!
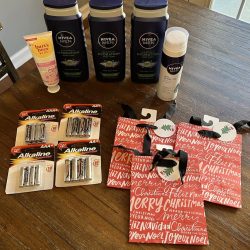
Gretchen’s $13.49 Walgreens Pickup Order (Plus, Received $5.35 in Walgreens Cash!)
Gretchen’s $13.49 Walgreens Pickup Order (Plus, Received $5.35 in Walgreens Cash!)
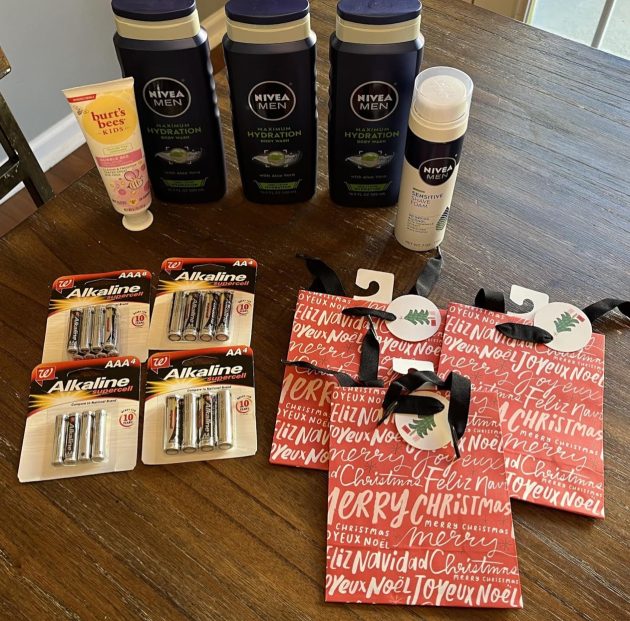
Looking to save money without actually shopping in-store? With several kids in tow, I can’t usually shop the drugstore deals in-store, but have come to love doing pickup orders. I always place my order online using my Walgreens app and within 10 minutes it is ready for pickup at my closest store. The best part? I don’t even have to get out of my car as they bring it out to me!
Here’s what I bought:
3 Nivea Men’s Bodywash – $5 each
Buy 3, Get $5 in Walgreens cash
Used promo code NIVEA ($5 off $15)1 Burt’s Bees Kid’s Toothpaste – $3.50
Used $2/1 digital coupon5 packs Walgreens Batteries – $1 each (I ordered 5 but they substituted one 8-pack for two of them because they were out.)
3 Hallmark Christmas Gift Bags – 3/$5.98
Used $4/2 digital coupon
And used $2/1 digital coupon1 Nivea Men’s Shaving Foam – $3.49
Used $2.50/1 digital couponUsed $4 in Walgreens Cash
Total before coupons, cash, and code: $32.97
Total after coupons, cash, and code: $13.49, Plus received $5.35 in Walgreens Cash
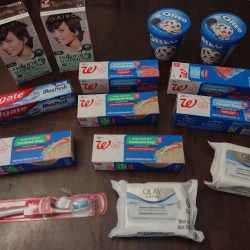
Brigette’s $15.06 Walgreens Shopping Trip ($6 Money Maker after Rebates!)
Brigette’s $15.06 Walgreens Shopping Trip ($6 Money Maker after Rebates!)
Love drug store shopping each week? Don’t miss these GREAT deals Brigette grabbed this week at Walgreens!
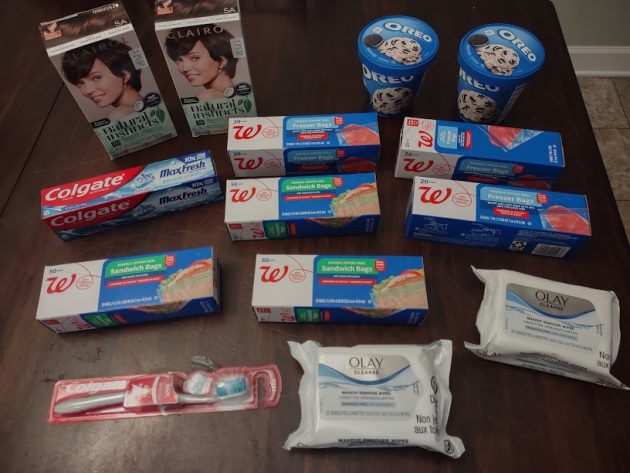
Walgreens
All of my coupons are from the Walgreens app. I highly recommend downloading it if you haven’t already. You can clip both Manufacturer’s and Store coupons and stack them together on the same item.
What I Bought:
2 Clairol Hair Color, marked down – $9.58
Receive $4 Walgreens Cash when you buy 2
Used $6/2 Clairol Walgreens digital manufacturer’s coupon
= $3.58 for 2 total out of pocket ($0.42 money maker for 2 after $4 Walgreens Cash!)
2 pkgs Olay Make Up Wipes Remover (B1G1 40%) – $10.48
Used $5/2 Olay Walgreens digital manufacturer’s coupon
= $5.48 for 2 total out of pocket
1 Colgate Toothbrush and 1 Colgate Toothpaste – $9
Receive $3 Register Rewards when you buy 2
Used $2.50/1 Colgate Toothpaste Walgreens digital manufacturer’s coupon
Used $2.50/1 Colgate Toothbrush Walgreens digital manufacturer’s coupon
= $4 for 2 total out of pocket ($1 for 2 after Register Rewards!)
6 boxes Nice! Bags (B1G2) – $5.58
= $5.58 for 6 out of pocket
2 Oreo Ice Cream – $6
Receive (2) $2/1 Ibotta Oreo rebates
= $6 for 2 out of pocket ($2 for 2 after rebates!)
Totals:
Total: $24.64 plus tax
Used $10/$40 Any Purchase Walgreens digital booster coupon
Paid with $12 Register Rewards from previous weeks
Total Paid Out Of Pocket: $15.06, plus I received $3 Register Rewards, $14.34 Walgreens Cash, and $4 Ibotta Rebates!
Psst! Want to cut your grocery budget? Go here and sign up (it’s free!) I’ll send you my 10 Easy Ways to Cut Your Grocery Bill By $50.

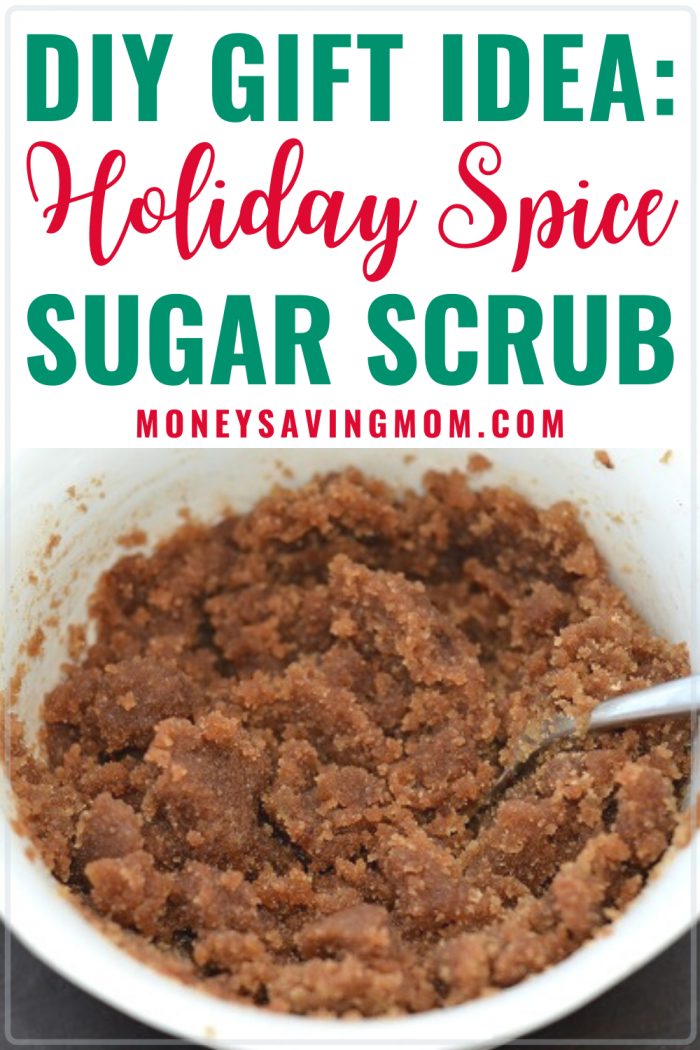
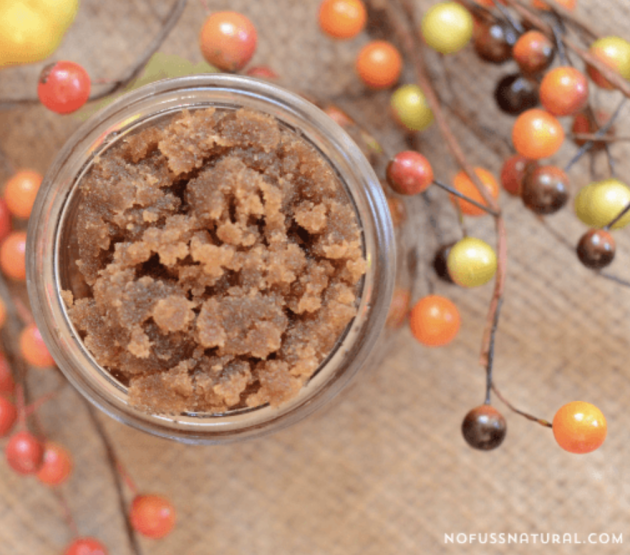
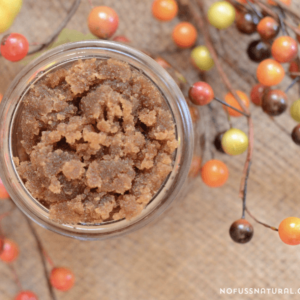
Holiday Spice Sugar Scrub + Free Printable Gift Tags
This Holiday Spice Sugar Scrub is such a lovely homemade gift idea! (Plus, get FREE printable gift tags to go with this gift when you download our FREE Homemade Christmas Gifts Guide!)
Guest post from Stacy of No Fuss Natural. During the months of November and December, we’ll be highlighting some of our favorite homemade gifts! Download our FREE Homemade Gifts Guide to get recipes to 15+ easy-to-make gifts, plus printable gift tags to go with each gift!
Homemade Sugar Scrub makes a Quick & Easy Gift!
Sugar scrubs are one of my favorite homemade gifts to give because even though they are so simple to make, they still convey thoughtfulness and care.
Plus, sugar scrub recipes are easy to double, triple, or quadruple so you can make gifts for a lot of people in just a few minutes!
Homemade Body Sugar Scrub Gift Tag Printable
Want to add on Christmas gift tags to gift this to someone this holiday season? Go HERE to download printable gift tags designed for this Holiday Spice Sugar Scrub!
Homemade Sugar Body Scrub Recipe
Making sugar scrub is quick and easy — measure the ingredients, stir to combine, and you are good to go! It will probably take longer to label the jar than it will to make the scrub.
The following recipe creates a sugar scrub that smells just like the holidays. It is a treat for tired hands and feet and would be a wonderful gift on any occasion.
Holiday Homemade Sugar Scrub Recipe Ingredients
- 1 cup brown sugar
- 1 tsp ground cinnamon
- ½ tsp ground allspice
- ¼ tsp ground nutmeg
- 1/3 cup oil (olive, sweet almond, or walnut oil)
- 1/8 tsp ground cardamom (optional)
How to Make Homemade Body Scrub Sugar – Holiday Spice Edition!
- In a large bowl, mix sugar and spices.
- Add oil and stir to combine.
- Scoop into jars or containers.
- Download your FREE gift tags to attach.
- Your gift is complete and ready to give!
Homemade Body Sugar Scrub Recipe Tips
Take the time to mix your ingredients thoroughly.
Feel free to alter the spices to whatever you have in the house, or whatever your favorite holiday scents are!
Also, use your best judgement to create the right consistency — if it feel dry, add a bit more oil; if it feels oily, add a bit more sugar.
And make sure your storage containers have tight-fitting lids so the contents stay fresh as long as possible.
Homemade Sugar Scrub Storage:
How long does homemade sugar scrub last?
Homemade sugar scrub should last up to 2-3 months if stored in a clean, airtight container and kept in a cool, dry place.
Does homemade body scrub need to be refrigerated?
No, it does not need to be refrigerated. As long as you store it in an air-tight jar or container and put the lid on tight after each use, it will stay fresh!
Sugar Scrub Homemade Recipe FAQs
We prefer olive oil, sweet almond oil, or walnut oil. However, you could also use grapeseed oil or coconut oil.
If you want your scrub to be thicker, go with coconut oil as it solidifies at room temperature. However, if you prefer more of a thiner consistency (or you don’t like the smell of coconut) then olive oil would be the better choice.
If you use coconut oil and your home is colder than 75º, your scrub will be much harder as coconut oil doesn’t liquify until 76º.
The simple solution would be to stir it up before each use. You can also use an emulsifying wax to keep the oil from separating.
You don’t need to (we don’t) but if you want it to last longer, or if you plan to store it in a wet place (like the shower) where mold and bacteria can grow, you can add preservatives.
Don’t use sugar scrubs if you have very sensitive skin as it may irritate it. Also, we don’t recommend using a scrub on sunburned skin or an open wound. This body scrub should not be used on pets or young babies.
Sugar Scrub (Homemade)
Materials
- 1 cup brown sugar
- 1 tsp ground cinnamon
- ½ tsp ground all spice
- ¼ tsp ground nutmeg
- 1/3 cup oil (olive, sweet almond, or walnut oil)
- 1/8 tsp ground cardamom (optional)
Instructions
- In a large bowl, mix sugar and spices.
- Add oil and stir to combine.
- Scoop into jars or containers.
- Label and gift!
Love this craft?
Make sure to share and save it on your favorite platform below!

FREE DOWNLOAD:
Christmas Budget Boost Cheatsheet!
20 Simple Ways to Easily Add $100+ To Your Gift Budget Before Christmas! 🥳
Stacy is a homeschooling mom to three kids and wife to a preacher. She has a slight obsession with all things homemade, and especially enjoys making her own skin care products. Stacy believes home is where hearts are shaped for eternity. She encourages mothers along the journey and shares lots of natural living tips at No Fuss Natural. You can also find more scrub recipes in her eBooks.

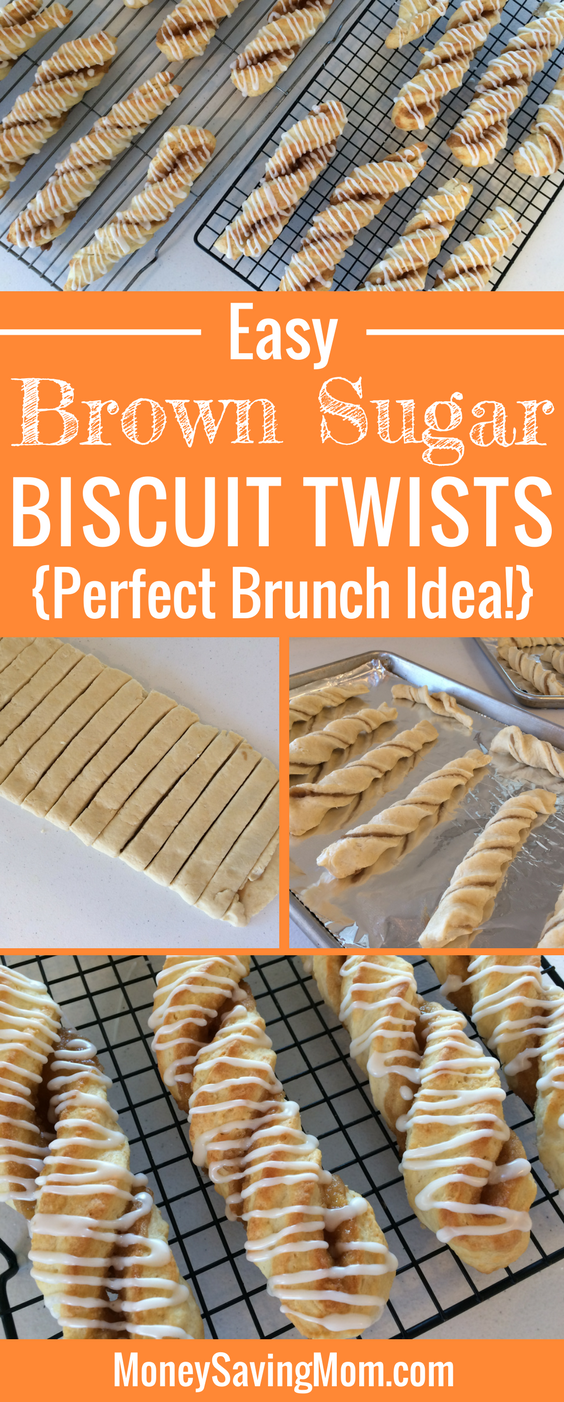
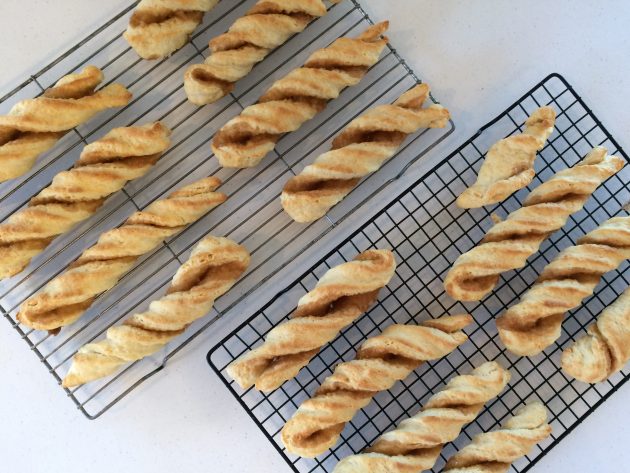
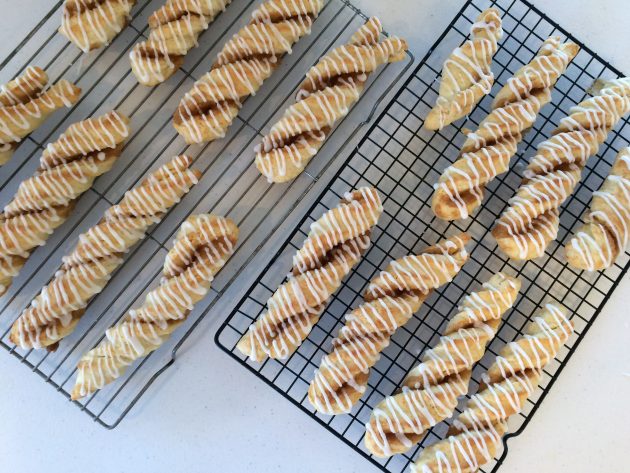
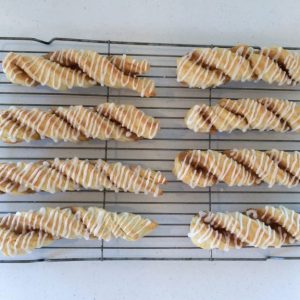
Brown Sugar Biscuit Twists Recipe + Free Printable Gift Tags!
These Brown Sugar Biscuit Twists are one of our family’s all-time favorite recipes! And homemade breads are a great gift idea during the holidays! (Plus, get FREE printable gift tags to go with this gift when you download our FREE Homemade Christmas Gifts Guide!)
During the months of November and December, we’ll be highlighting some of our favorite homemade gifts! Download our FREE Homemade Gifts Guide to get recipes to 15+ easy-to-make gifts, plus printable gift tags to go with each gift!
Brown Sugar Biscuit Recipe (One of our family favorites!)
This recipe is one of our family’s very favorite recipes. I originally adapted it from an old, falling-apart Better Homes and Gardens bread cookbook my mom had when we were growing up.
I’ve made these countless times and they are so easy to do and so yummy!
This is a great holiday gift idea!
Homemade bread is a great holiday gift idea and these sugar twists are so unique and different from probably any other homemade goody people will get this time of year.
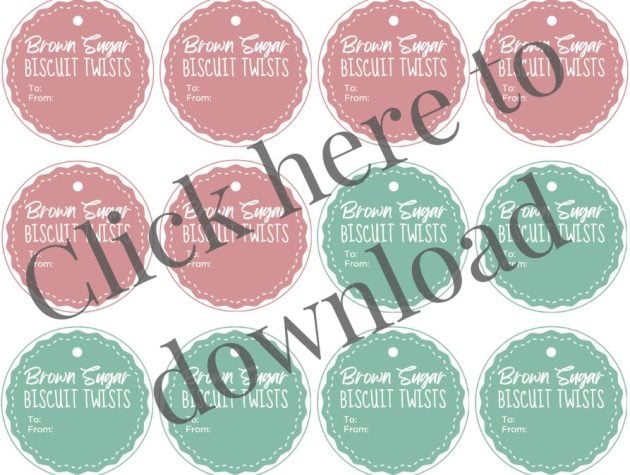
Download your free printable gift tags!
Want to add on Christmas gift tags to gift this to someone this holiday season? Go HERE to download printable gift tags designed for these Biscuit Twists!
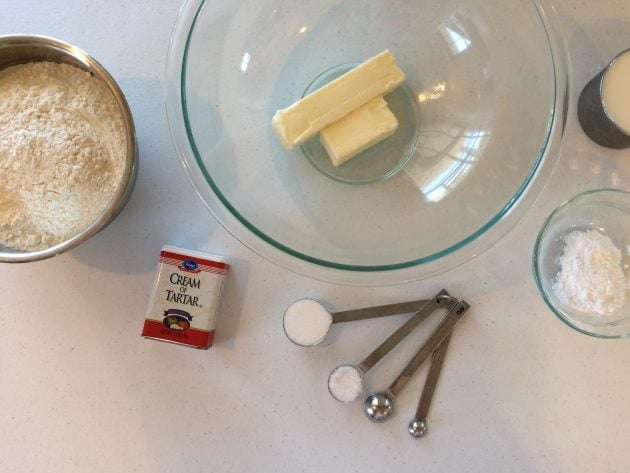
Twister Biscuit Ingredients
Biscuit dough:
- 3 cups flour
- 4 teaspoons baking powder
- 1 Tablespoon sugar
- 1 teaspoon salt
- 3/4 teaspoon cream of tartar
- 3/4 cup butter
- 1 cup milk
Filling:
- 4 Tablespoons melted butter
- 6 Tablespoons brown sugar
Glaze:
- 1 cup powdered sugar
- 1/2 tsp vanilla extract
- a few teaspoons of milk (enough to make a runny glaze)
How to make Sugar Twists
1. Preheat oven to 450ºF.
2. In a large bowl, stir together dry ingredients for the biscuit dough.
3. Cut in cold butter with a pastry blender until the mixture resembles coarse crumbs.
4. Make a well in the center of the flour mixture and add milk. Stir just until moistened.
5. Turn dough onto a lightly floured surface and knead for 5 minutes.
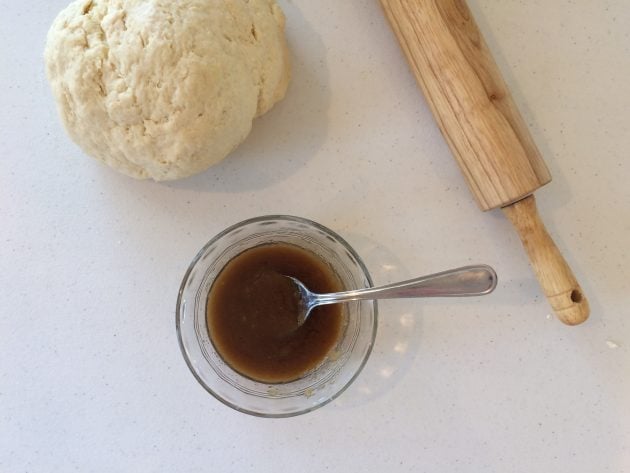
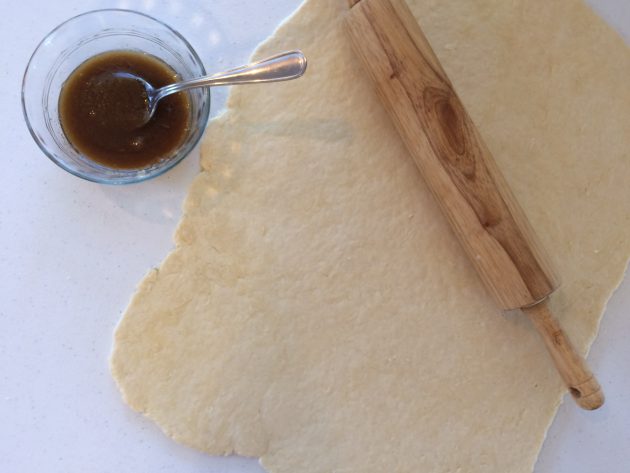
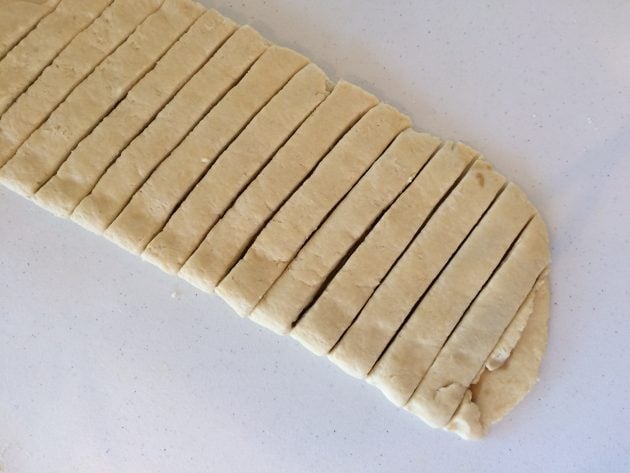
6. Roll dough out into a rectangle (approximately 1/4-inch thick).
7. Stir together 4 Tablespoons melted butter and 6 Tablespoons brown sugar and evenly spread filling over rectangle.
8. Fold rectangle in half and cut into about 1-inch strips.
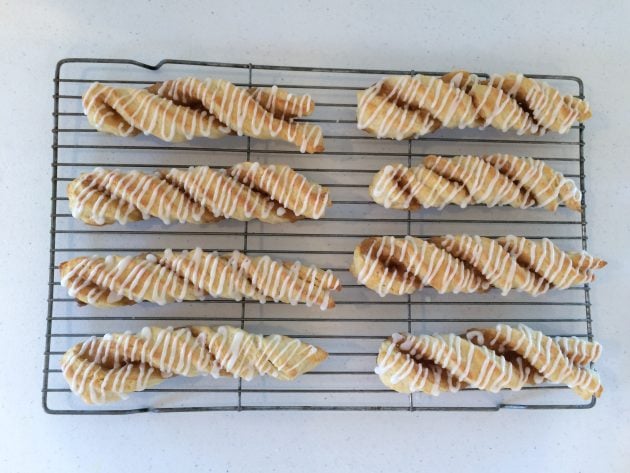
9. Twist strips and place on a greased or lined baking sheet.
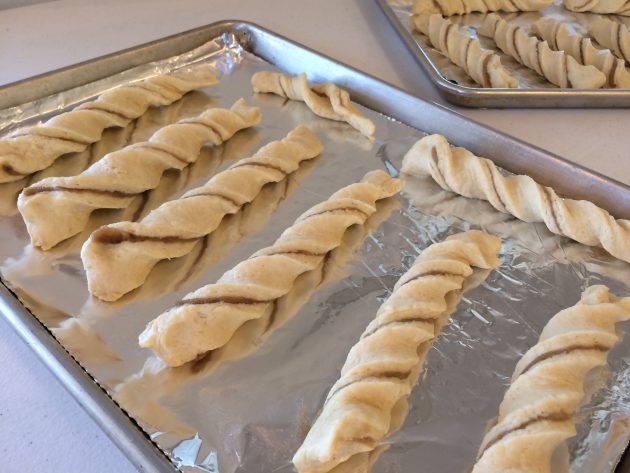
10. Bake in preheated oven for 10-12 minutes.
11. While baking, mix together 1 cup powdered sugar, 1/2 teaspoon vanilla, and a few teaspoons milk (enough to make the mixture of drizzling consistency).
12. Drizzle glaze over biscuit twists as soon as they come out of the oven.

Tools Used for Making Sugar Twists
There are very few tools needed for this delicious recipe — just a bowl, a knife, and your hands. However, there are a few others that will make the process a bit easier.
- Large mixing bowl
- Pastry blender
- Measuring cups and spoons
- Large rolling pin
- Sharpe knife
- Large rimmed baking sheet
- Cooling racks

Fun Ways to Serve this Sugar Biscuit Recipe
We like to serve these fresh out of the oven on Christmas morning (or really any morning!)
They are also great paired with an Egg, Ham, and Cheese casserole and fruit for a simple Christmas brunch.
These could make a fancy-looking dessert or a really fun after-school snack. They might also be a special birthday treat.
Storing Sugar Twists
If, for some reason, you don’t eat them all immediately, you can store them in a tightly sealed food storage container (after they are fully cooled) at room temperature for a few days.
Or, you can freeze them for 3 months.
NOTE: you can freeze them before or after baking.
Twisted Biscuit FAQs
The most likely answer is baking them at too low of a temperature. A higher heat will generate more caramelization from the butter on top of the biscuits, leaving you with a beautifully golden crust — so make sure your oven is at least 450ºF.
Since brown sugar has molasses in it, it naturally adds more moisture to baked goods — making them nice and chewy.
Brown Sugar Twister Biscuit
Ingredients
Biscuit dough:
- 3 cups flour
- 4 tsp baking powder
- 1 tbsp sugar
- 1 tsp salt
- 3/4 tsp cream of tartar
- 3/4 cup butter
- 1 cup milk
Filling:
- 4 tbsp melted butter
- 6 tbsp brown sugar
Glaze:
- 1 cup powdered sugar
- 1/2 tsp vanilla extract
- a few teaspoons of milk enough to make a runny glaze
Instructions
- Preheat oven to 450ºF.
- In a large bowl, stir together dry ingredients for the biscuit dough.
- Cut in cold butter with a pastry blender until the mixture resembles coarse crumbs.
- Make a well in the center of the flour mixture and add milk. Stir just until moistened.
- Turn dough onto a lightly floured surface and knead for 5 minutes.
- Roll dough out into a rectangle (approximately 1/4-inch thick).
- Stir together 4 Tablespoons melted butter and 6 Tablespoons brown sugar and evenly spread filling over rectangle.
- Fold rectangle in half and cut into about 1-inch strips.
- Twist strips and place on a greased or lined baking sheet.
- Bake in preheated oven for 10-12 minutes.
- While baking, mix together 1 cup powdered sugar, 1/2 teaspoon vanilla, and a few teaspoons milk (enough to make the mixture of drizzling consistency).
- Drizzle glaze over biscuit twists as soon as they come out of the oven.
Nutrition
Love this recipe?
Make sure to share and save it on your favorite platform below!
Get your FREE Homemade Christmas Gifts Guide!
If you’re looking for ways to simplify gift giving this year, we have just the solution for you! Download our brand new FREE Homemade Christmas Gifts Guide! When you sign up, you’ll get:
- 15+ DIY recipes for unforgettable gift ideas (we’ve included something for everyone on your list!)
- Step-by-step instructions for ridiculously easy homemade gifts that anyone can make!
- Customizable, ready-to-print gift tags to go with each homemade gift!
This FREE guide was designed to help you have a more peaceful, intentional holiday season. Our hope is that it reduces stress, helps you save more money and spend less on your gift budget, and simplifies things so you can focus on what matters most this season!
Click here to get your FREE Homemade Christmas Gifts Guide!
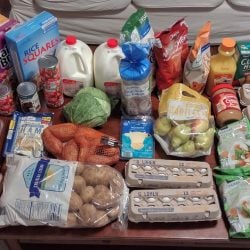
Brigette’s $150.60 Grocery Shopping Trip and Weekly Meal Plan for 6
Brigette’s $150.60 Grocery Shopping Trip and Weekly Meal Plan for 6
My older sister, Brigette, shares her shopping trips and menu plans every week! You can go HERE to see all of her weekly menu plans and you can go HERE to read all about her family!
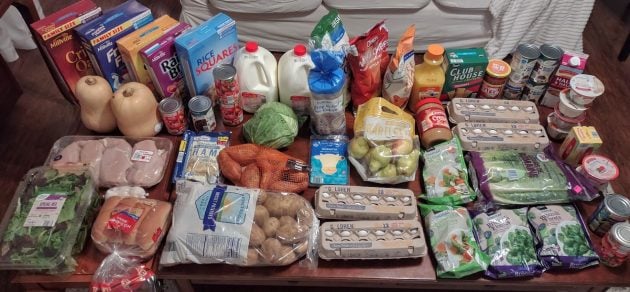
This is more than I usually spend, but I bought extra of a few staples. We were also running low on things after not doing regular shopping the week of Thanksgiving.
Aldi
1/2 gallon Orange Juice – $3.29
1 32-oz carton Half and Half – $2.55
2 gallons Milk – $5.06
2 bags frozen steamable California Medley Vegetables – $2.18
2 bags frozen Broccoli Florets – $2.18
1 large carton Organic Spring Mix – $4.89
1 3-lb bag Sweet Potatoes – $1.99
1 3-head pkg Garlic – $1.49
1 10-lb bag Russet Potatoes – $3.49
1 bag Romaine Hearts – $2.69
2 cans Green Beans – $1.26
4 cans Organic Black Beans – $3.96
4 cans Tomatoes – $3.52
1 jar Salsa – $2.19
1 Cabbage – $1.56
1 3-lb bag Pears – $2.99
2 Butternut Squash $0.69/lb) – $5.04
1 box Cinnamon Crunch Squares – $2.79
1 family-size box Honey Nuts Crisp Oats – $2.95
1 box Rice Squares – $2.55
1 family-size box Frosty Flakes – $3.29
1 box Honey Crunch’n Oat – $2.45
1 box Raisin Bran – $2.19
1 pkg boneless Chicken Breasts ($2.29/lb) – $11.68
1 40-oz jar Peanut Butter – $3.95
1 bag Flour Tortillas – $1.95
1 bag Rice Cakes – $2.49
1 bag Nacho Chips – $2.39
1 bag Sweet Potato Chips – $2.39
1 bag Organic Blue Corn Chips – $2.19
1 box Clubhouse Crackers – $2.55
6 Greek Yogurts – $3.54
1 8-oz pkg Deli Sliced Cheese – $1.69
1 16-oz pkg Deli Meat – $3.99
4 dozen Eggs – $5.26
1 bag Pretzels – $1.78
1 pkg Hotdog Buns – $1.09
1-lb box Butter Quarters – $2.95
Total: $116.46
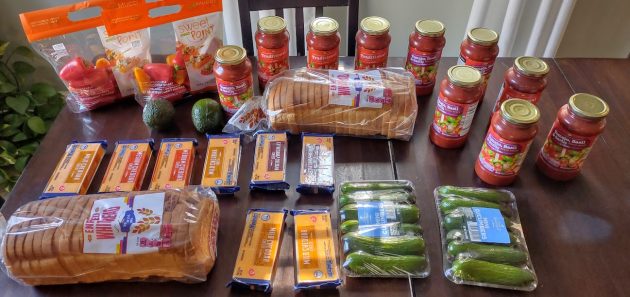
Lidl
2 loaves Sandwich Bread – $1
2 bags Mini Sweet Peppers – $3.98
2 Avocados – $1.18
2 pkgs Mini Cucumbers – $2.98
10 hars Pasta Sauce – $10
9 8-oz blocks Cheese (missing one in this picture because it was already half gone :)) – $15
Total: $34.14
Grocery Total for the Week: $150.60
Weekly Menu Plan
Breakfasts
Cereal, Oatmeal, Fruit, Smoothies, Eggs, Yogurt, Veggie Omelets, Toast
Lunches
Deli Meat/Cheese Sandwiches, Peppers/Cucumbers, Chips, Applesauce
PB and Honey on Rice Cakes, Peppers/Cucumbers, Chips, Apples
Leftovers x 4
Dinners
Hamburger Vegetable Soup (using Venison Sausage), Crackers, Shredded Cheese
Build-Your-Own-Burrito/Taco Salad (Seasoned Ground Venison, Shredded Romaine, Shredded Cheese, Chopped Onions, Chips, Tortillas, Salsa, Avocados, Rice)
Venison Meatloaf, Baked Sweet Potatoes, Mixed Vegetables
Chili, Crackers, Shredded Cheese, Honey Cornbread
Chicken Gravy over Rice, Biscuits, Tossed Salad, Green Beans
Venison Taco Meat over Baked Potatoes, Broccoli, Shredded Cheese
Baked Chicken, Mashed Potatoes, Tossed Salad, Broccoli
Psst! Want to cut your grocery budget? Go here and sign up (it’s free!) I’ll send you my 10 Easy Ways to Cut Your Grocery Bill By $50.
Did you do any grocery shopping this week? I’d love to hear what great deals you scored!
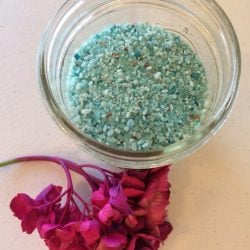
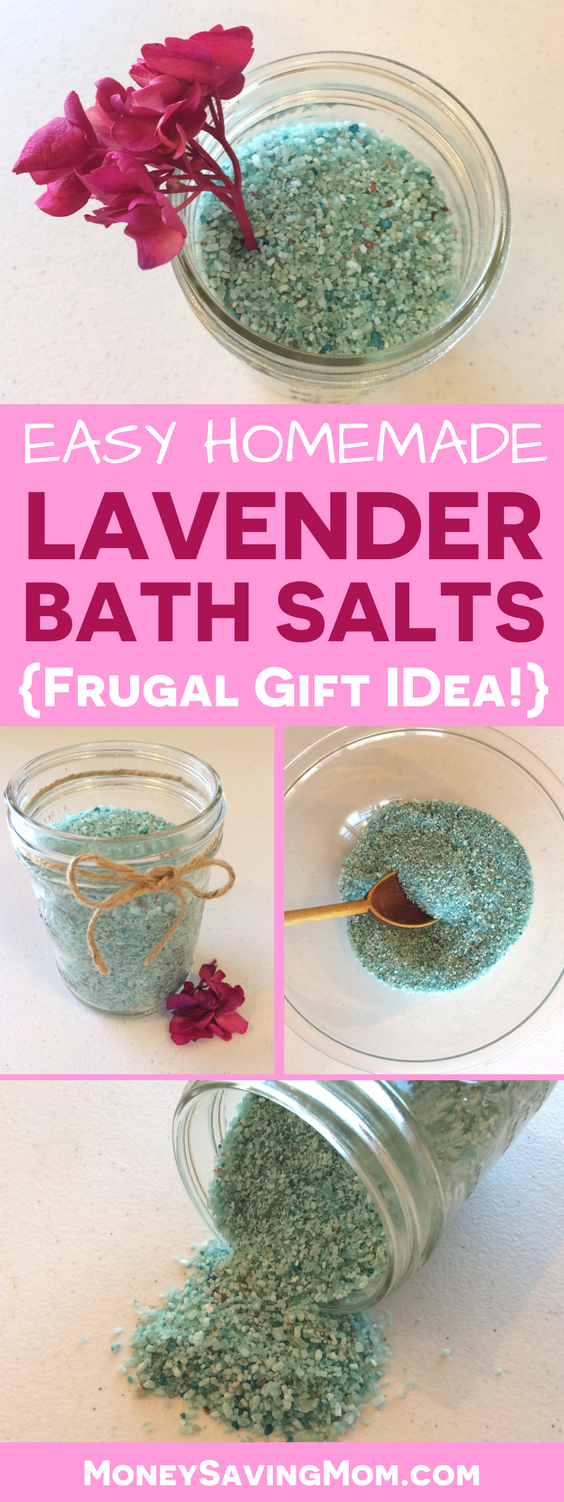
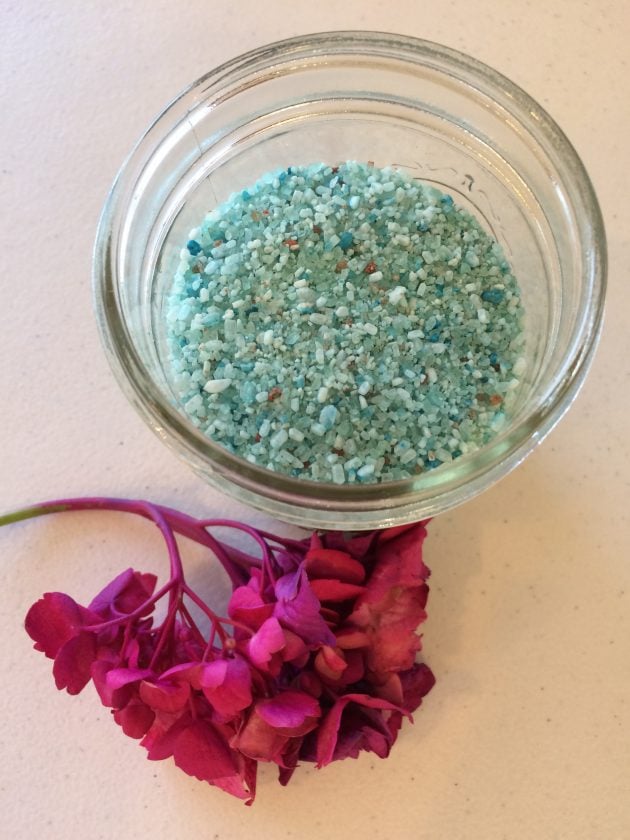
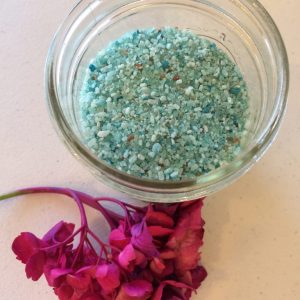
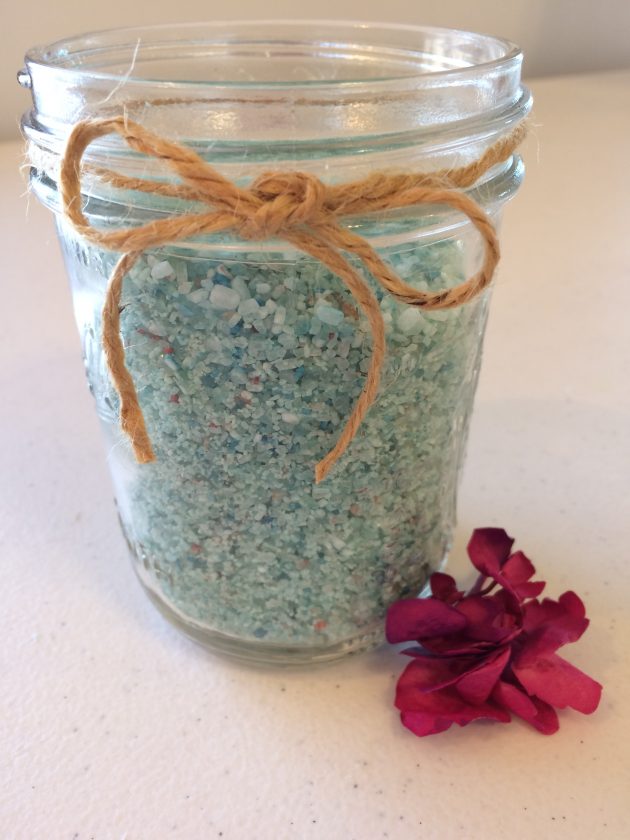
Homemade Lavender Bath Salts + Free Printable Gift Tags!
These Homemade Lavender Bath Salts are a beautiful homemade gift idea! (Plus, get FREE printable gift tags to go with this gift when you download our FREE Homemade Christmas Gifts Guide!)
During the months of November and December, we’ll be highlighting some of our favorite homemade gifts! Download our FREE Homemade Gifts Guide to get recipes to 15+ easy-to-make gifts, plus printable gift tags to go with each gift!
Homemade Bath Salts Recipe: Great Gift Idea!
I made this recipe years ago after having it on a list of do-it-yourself ideas to try. I remember being so pleasantly surprised by how easy it was and wondered why I’d waited so long to try it!
This recipe is SO simple and fun to make, and you could try using different essential oils and food coloring colors to change things up.
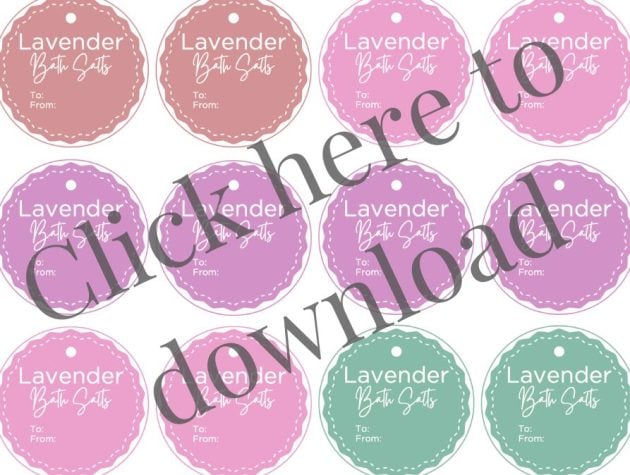
Download your free printable gift tags!
These bath salts make a wonderful frugal gift idea for so many people on your list, too!
Want to add on Christmas gift tags to gift this to someone this holiday season? Go HERE to download printable gift tags designed for these bath salts!
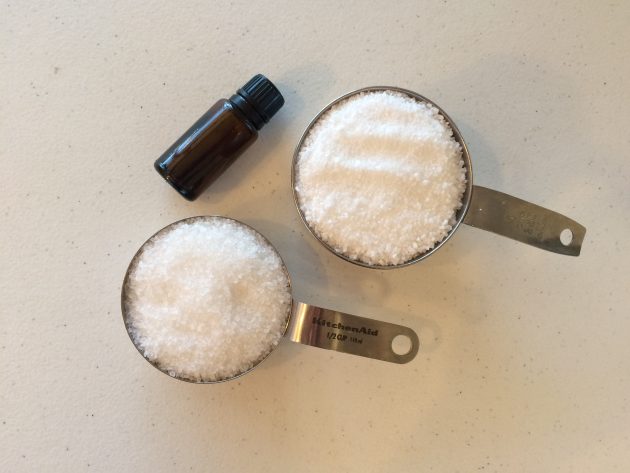
Ingredients for Lavender Bath Salts
- 1 cup Epsom salt
- 1/2 cup sea salt
- 10 to 15 drops of lavender essential oil
- 4-8 drops food coloring, optional
How to Make Homemade Lavender Bath Salts
1. In a mixing bowl, stir together all ingredients until well blended.

2. Transfer to an airtight container and let rest for a few days to allow time for the oil to infuse the salts.
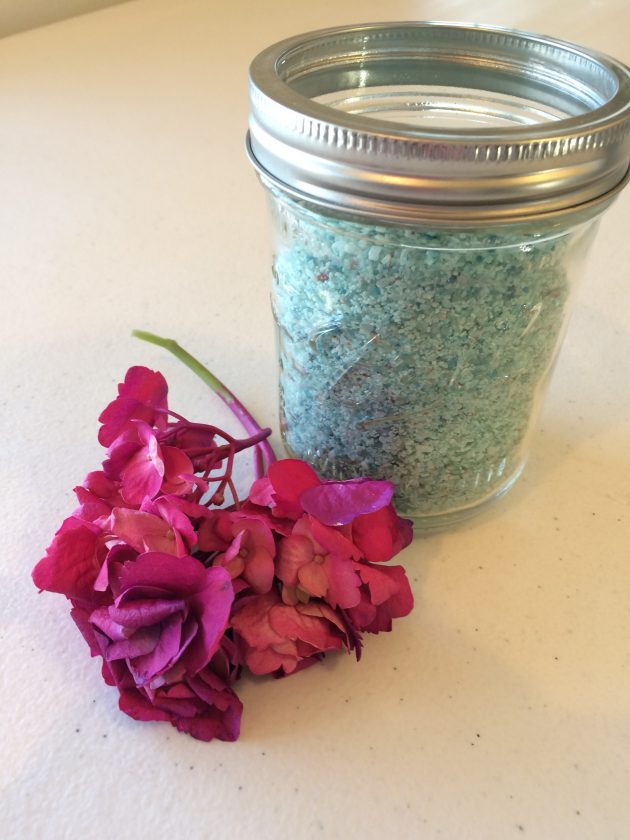
3. Use in your own bath or give as a gift.
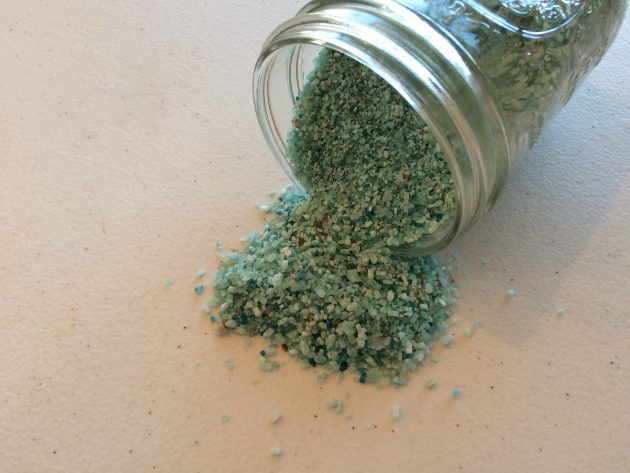
To Use: Add 4 to 6 Tablespoons of Lavender Bath Salt to warm running bath water. Enjoy a refreshing and relaxing bath soak!
Lavender Bath Salts
Materials
- 1 cup Epsom salt
- 1/2 cup sea salt
- 10 to 15 drops of lavender essential oil
- 4-8 drops food coloring optional
Instructions
- In a mixing bowl, stir together all ingredients until well blended.
- Transfer to an airtight container and let rest for a few days to allow time for the oil to infuse the salts.
- To Use: Add 4 to 6 Tablespoons of Lavender Bath Salt to warm running bath water. Enjoy a refreshing and relaxing bath soak!
Love this craft?
Make sure to share and save it on your favorite platform below!
Get your FREE Homemade Christmas Gifts Guide!
If you’re looking for ways to simplify gift giving this year, we have just the solution for you! Download our brand new FREE Homemade Christmas Gifts Guide! When you sign up, you’ll get:
- 15+ DIY recipes for unforgettable gift ideas (we’ve included something for everyone on your list!)
- Step-by-step instructions for ridiculously easy homemade gifts that anyone can make!
- Customizable, ready-to-print gift tags to go with each homemade gift!
This FREE guide was designed to help you have a more peaceful, intentional holiday season. Our hope is that it reduces stress, helps you save more money and spend less on your gift budget, and simplifies things so you can focus on what matters most this season!
Click here to get your FREE Homemade Christmas Gifts Guide!
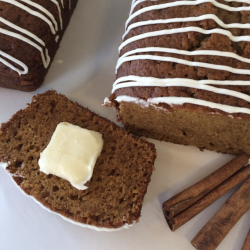
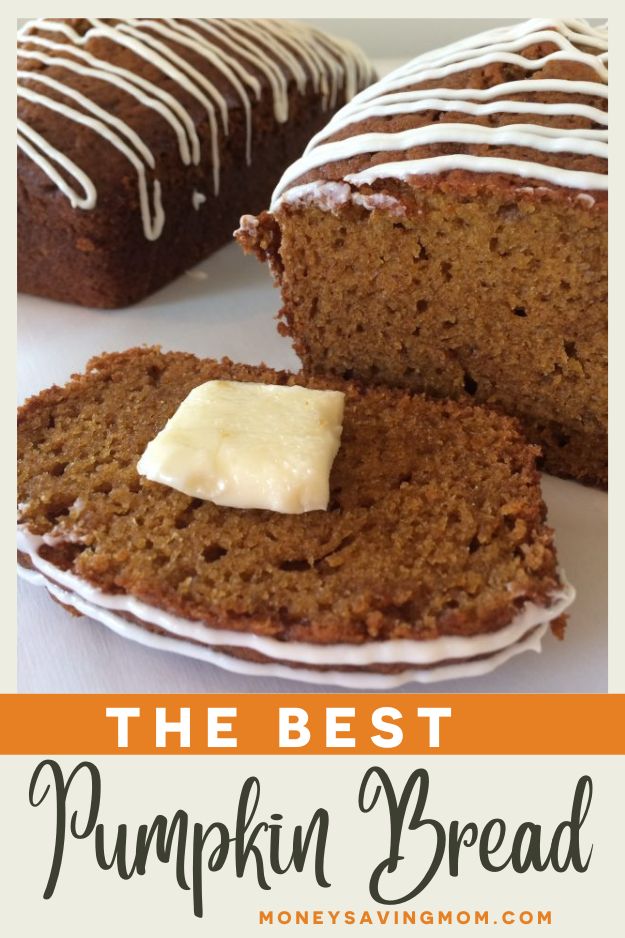
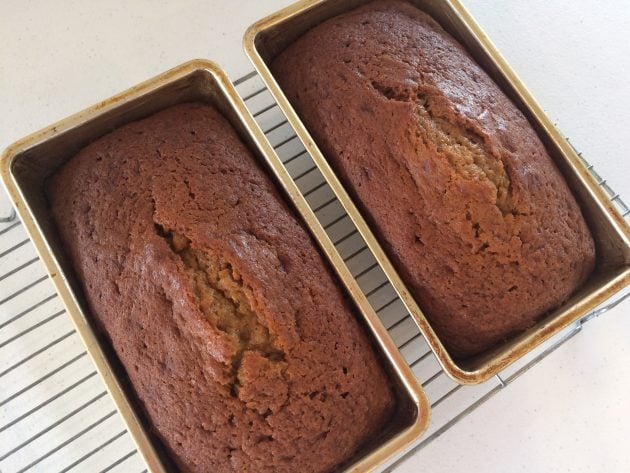
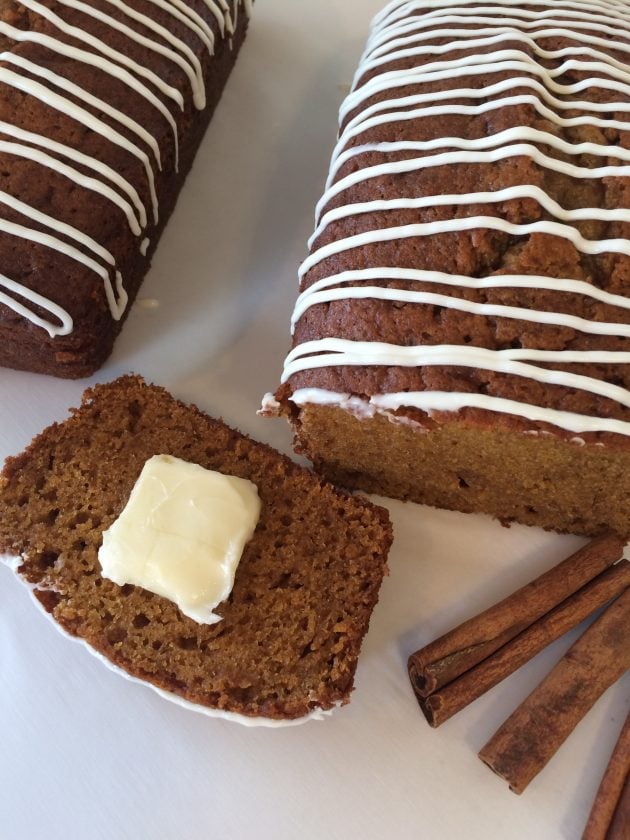
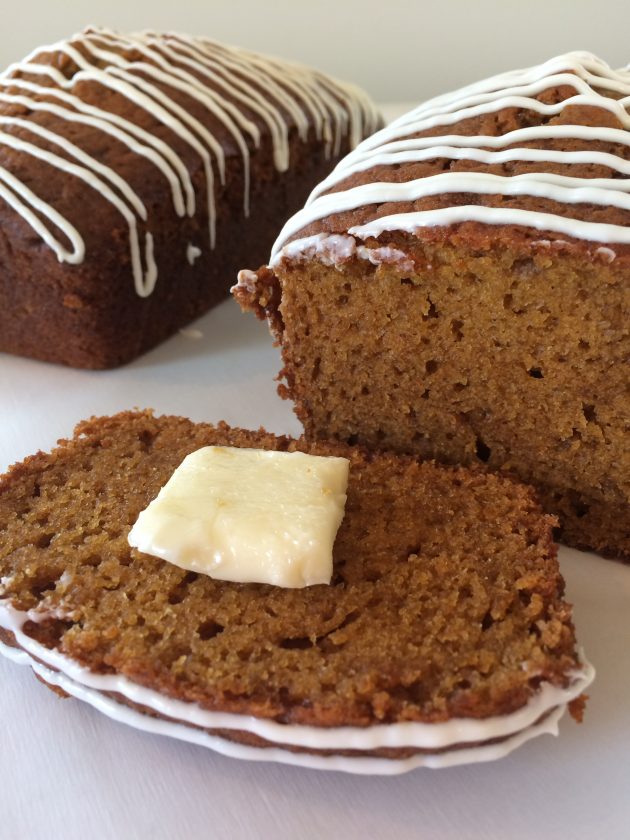
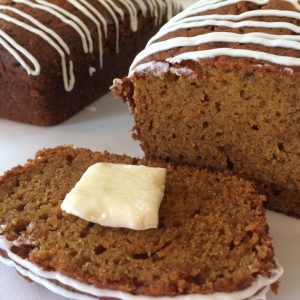
Moist Pumpkin Bread Recipe + Free Printable Gift Tags!
If you’re looking for a delicious pumpkin bread recipe this season, don’t miss this one with a unique flavor twist! It’s also great to give as a gift because it’s delicious and beautiful! (Plus, get FREE printable gift tags to go with this gift when you download our FREE Homemade Christmas Gifts Guide!)
Recipe by Olivia from the MoneySavingMom team. During the months of November and December, we’ll be highlighting some of our favorite homemade gifts! Download our FREE Homemade Gifts Guide to get recipes to 15+ easy-to-make gifts, plus printable gift tags to go with each gift!
The best Pumpkin Bread with a yummy, chocolatey twist!
It’s my favorite time of year — when you can pull out your leggings and sweaters and are in the mood to cook and bake all things pumpkin!
My sister, Olivia, concocted this incredible recipe for freezer-friendly White Chocolate Pumpkin Bread. It’s a fun twist on traditional pumpkin bread and would be perfect to bake for snack or dessert (or you could even eat it for breakfast, you know!)
This would be a great recipe to bake ahead and then have on hand to share with friends or to serve at fall or holiday get-togethers! Yum! -Crystal
Pumpkin Bread is a great gift idea!
You can also make a several loaves of this bread ahead of time and give them as yummy homemade holiday treats!
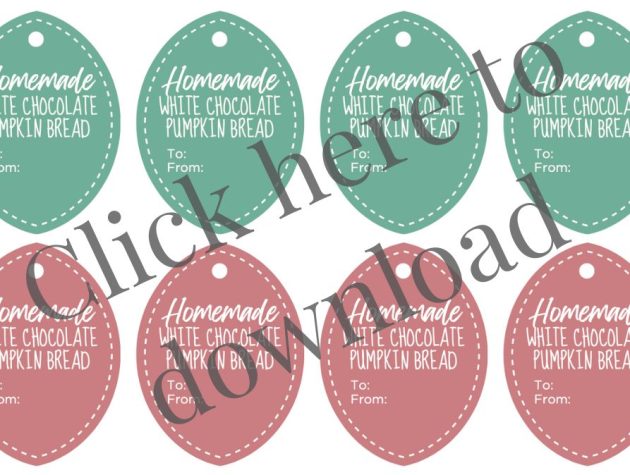
Download your free printable gift tags!
Want to add on Christmas gift tags to gift this to someone this holiday season? Go HERE to download printable gift tags designed for this pumpkin bread!
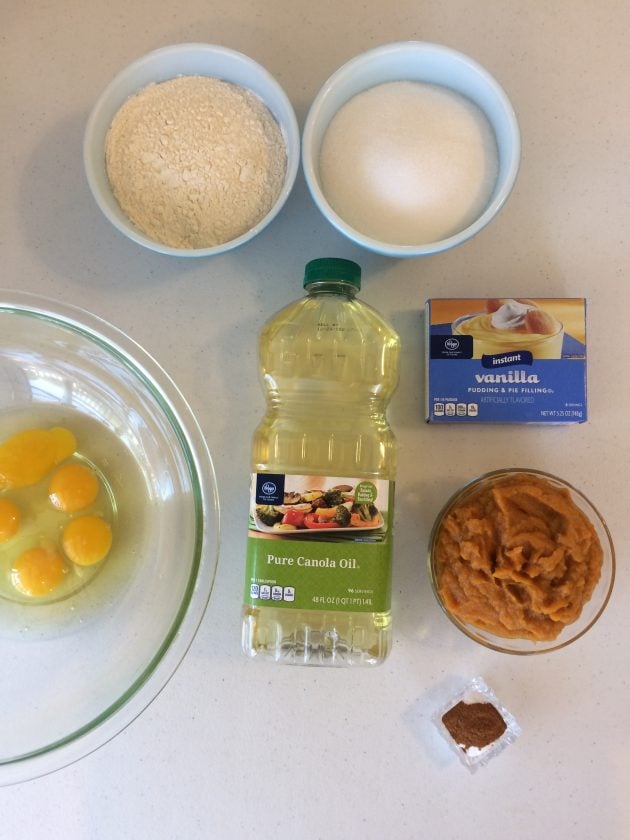
White Chocolate Pumpkin Bread Ingredients
- 5 eggs
- 1 1/4 cups canola oil
- 1 can (15 ounces) pumpkin
- 2 cups all-purpose flour
- 2 cups sugar
- 2 packages (3 ounces each) instant vanilla pudding mix (I used 1 5.25 ounce package.)
- 1 teaspoon baking soda
- 1 teaspoon ground cinnamon
- 1/2 teaspoon salt
- 1 cup white chocolate chips, optional
How to make Pumpkin Bread
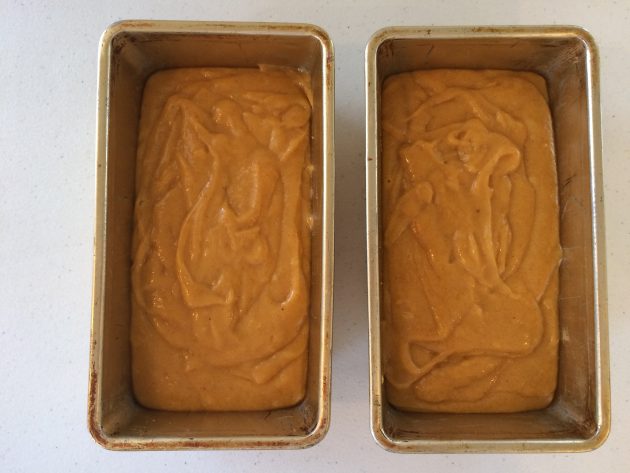
1. Preheat oven to 325º F. Grease two 8″ x 4″ loaf pans and set aside.
2. In a large bowl, beat eggs. Add canola oil and pumpkin; beat until smooth.
3. In a medium bowl, combine flour, sugar, pudding mix, baking soda, cinnamon, and salt.
4. Gradually beat the flour mixture into the pumpkin mixture.
5. Pour batter into prepared loaf pans.
6. Bake in preheated oven for 75-80 minutes, or until toothpick inserted in the center comes out clean.
7. Cool the loave for 10 minutes before loosening edges with a knife and removing bread to wire racks to cool completely.
8. If desired, microwave white chocolate chips in a microwave-safe dish, stirring every 15 seconds until melted and smooth. Drizzle over cooled bread.

How to tell if Pumpkin Bread is done
This bread is dense and takes a long time to fully bake. You can tell when it’s fully cooked through if you slide a toothpick in the center of the loaf and it comes out clean.
If there are still bits of gooey pumpkin batter left on the toothpick, you should put it back in the oven for at least 5-10 more minutes and then check again.
What to serve with Pumpkin Bread
This bread is so rich, it could easily be served as a dessert (even topped with a scoop of vanilla ice cream!)
It would also be a fantastic addition to any brunch menu — served with an egg dish, breakfast meat, and fresh fruit.
What to put on Pumpkin Bread
If you put the white chocolate drizzle on the bread, you hardly need anything else.
However, softened butter always tastes wonderful on fresh pumpkin bread.
How to store Pumpkin Bread
Once the bread is completely cooled to room temperature, you should put in in an air-tight food storage container or zip-top bag to keep it fresh.
How long does Pumpkin Bread last?
Pumpkin bread can be stored at room temperature for 3 or 4 days, but if you’re going to store it longer than that, we’d recommend freezing it. You can even slice it before freezing and simply defrost a few slices at a time.
Should pumpkin bread be refrigerated after baking?
Refrigeration tends to dry out baked goods, so keeping it tightly sealed at room temperature is best. If you live in a very warm or humid climate, you may need to refrigerate the bread to help it last longer.
How to freeze Pumpkin Bread
To freeze whole loaves, wrap the bread in a layer of plastic wrap and place in a zip-top bag. Label and freeze.
If you’d prefer to slice the bread ahead of time, then place the sliced bread in an air-tight food storage container to freeze. This way, it’s easier to quickly defrost a slice or two.
How long can you freeze Pumpkin Bread?
If properly packaged, pumpkin bread should be fine in the freezer for 6 months.
Easy Pumpkin Bread Recipe FAQs
This is most likely because you over-mixed the batter, causing excess gluten to develop. We recommend mixing the wet and dry ingredients separately and quickly combining them with a rubber spatula.
This might just be a taste preference — or even what is most readily available at your local grocery stores. Just make sure you use canned pumpkin puree and NOT canned pumpkin pie filling!
Easy Pumpkin Bread Recipe with Canned Pumpkin
Ingredients
- 5 eggs
- 1 1/4 cups canola oil
- 15 oz pumpkin puree
- 2 cups all-purpose flour
- 2 cups sugar
- 2 pkgs. instant vanilla pudding mix 3 ounces each (or one 5.25 ounce package)
- 1 tsp baking soda
- 1 tsp ground cinnamon
- 1/2 teaspoon salt
- 1 cup white chocolate chips optional
Instructions
- Preheat oven to 325º F. Grease two 8″ x 4″ loaf pans and set aside.
- In a large bowl, beat eggs. Add canola oil and pumpkin; beat until smooth.
- In a medium bowl, combine flour, sugar, pudding mix, baking soda, cinnamon, and salt.
- Gradually beat flour mixture into pumpkin mixture.
- Pour batter into prepared loaf pans.
- Bake in preheated oven for 75-80 minutes, or until toothpick inserted in the center comes out clean.
- Cool the loave for 10 minutes before loosening edges with a knife and removing bread to wire racks to cool completely.
- If desired, microwave white chocolate chips in a microwave-safe dish, stirring every 15 seconds until melted and smooth. Drizzle over cooled bread.
Nutrition
Love this recipe?
Make sure to share and save it on your favorite platform below!
Get your FREE Homemade Christmas Gifts Guide!
If you’re looking for ways to simplify gift giving this year, we have just the solution for you! Download our brand new FREE Homemade Christmas Gifts Guide! When you sign up, you’ll get:
- 15+ DIY recipes for unforgettable gift ideas (we’ve included something for everyone on your list!)
- Step-by-step instructions for ridiculously easy homemade gifts that anyone can make!
- Customizable, ready-to-print gift tags to go with each homemade gift!
This FREE guide was designed to help you have a more peaceful, intentional holiday season. Our hope is that it reduces stress, helps you save more money and spend less on your gift budget, and simplifies things so you can focus on what matters most this season!
Click here to get your FREE Homemade Christmas Gifts Guide!

REAL TALK: When It’s Hard to Prioritize Your Marriage

This year has been stretching for our marriage. We’ve had some really hard and spark-less days. In fact, at the beginning of the summer, I looked into Jesse’s eyes and said: “This isn’t working. Something needs to change.”
We talked about how we felt like we’d been running on empty in our marriage, that we’d been trying to tap into any reserves we had but we were now hitting the bottom of the barrel.
Maybe some of you who have walked through challenging seasons can relate?
It wasn’t any one thing. We still loved each other. We just were tired and worn down and our marriage was getting the leftovers — and truthfully it felt like there really hadn’t even been many leftovers to spare in recent months.
We knew something needed to change, so here were two things we did:
HONESTY: we said out loud what we were feeling. We didn’t blame the other person. We took personal responsibility. It’s sometimes easy to stuff down our feelings — but that only makes things worse over time as they eventually explode out in dysfunctional responses (and usually in anger). We also got honest with God — asking for His help and wisdom — and with few trusted friends in our life. We listened to their wise counsel and took their advice.
PRIORITY: we started prioritizing our marriage again — even when it was super challenging to do with 3 teens and 3-4 younger ones. I realized that I’d been putting the kids’ needs above Jesse. I would always view their needs as more urgent and put him on the back burner. I didn’t mean to do this, but it just sort of started happening — and it hurt our relationship. So I began asking them to wait sometimes so that I could talk to him/kiss him/greet him first. We committed to look into each others’ eyes more. To kiss more. To look for little ways to express our love throughout the day. And to make time for dates by ourselves — even if it was just 45 minutes.
Love is often built and nurtured in the little tiny choices day in and day out. We’d lost sight of that this year and the impact was significant.
But little bit, by little bit, in our choosing to make each other the most important priority next to God again, the sparks are coming back!
In this week’s episode of the podcast, Jesse and I share more about this year, the challenges our marriage has faced, and how we’re fighting through and fighting for each other… and learning from our mistakes.
I hope this honest and vulnerable conversation encourages you. Plus, like usual, we share some family updates and I talk about a sweatshirt I’m loving and an audiobook I’ve been listening to!
Powered by RedCircle
In This Episode
[3:19] – We’re getting honest about marriage today!
[6:22] – I have been listening to Three Sisters by Heather Morris.
[11:32] – A sweatshirt I’ve been loving and a free Christmas gift guide!
[13:52] – Reflecting on almost 21 years of marriage.
[17:02] – Both of us felt like there was not enough space in our lives to handle everything.
[19:29] – In the midst of a lot of unknown, unexpected, and interruptions, this year’s emotional toll strained our marriage.
[25:51] – We eventually admitted the need for change in our marriage, emphasizing honesty and shared responsibility without blame.
[29:07] – Confronting the danger of drifting apart, committing to creative solutions and honest communication.
[32:37] – Prioritizing each other, teaching our kids patience, and planning intentional dates.
[36:46] – Jesse adds that recognizing issues and being open to honest communication is crucial for marital understanding.
Links & Resources
- Crystal Paine
- FREE Homemade Gift Guide
- Oversized Sweatshirt
- Episode: Why I’m Saying No
- Three Sisters: A Novel by Heather Morris
- 10 Days to Be a Happier Mom
- Sign up for the Hot Deals Email List
- MoneySavingMom.com
- My Instagram account (I’d love for you to follow me there! I usually hop on at least a few times per day and share behind-the-scenes photos and videos, my grocery store hauls, funny stories, or just anything I’m pondering or would like your advice or feedback on!)
- Have feedback on the show or suggestions for future episodes or topics? Send me an email: crystal @ moneysavingmom.com
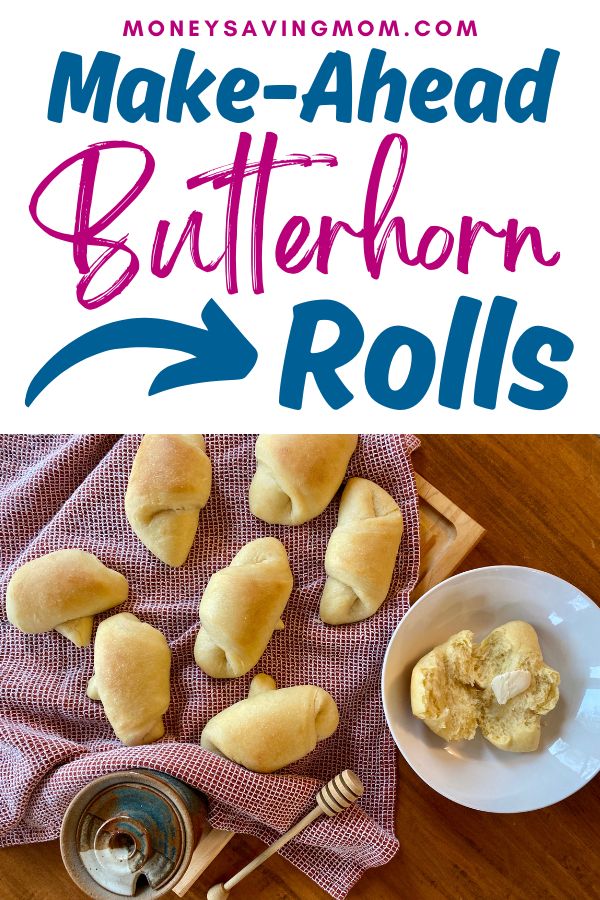
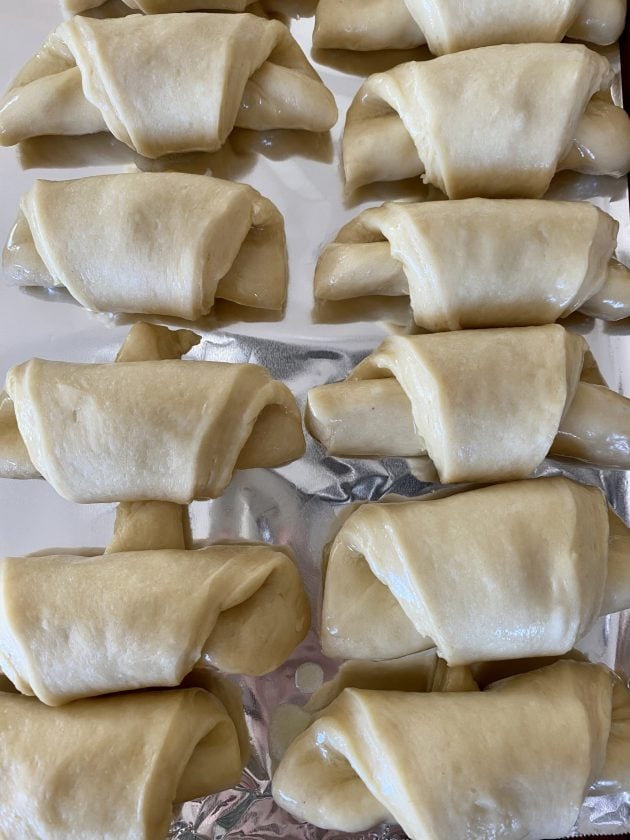
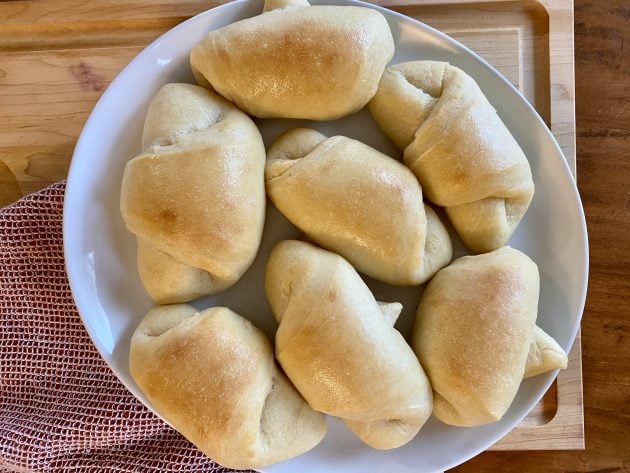
Butterhhorn Rolls Recipe + Free Printable Gift Tags!
Our family has been making these Butterhorn Rolls for as long as I can remember! And homemade breads are a great gift idea during the holidays! (Plus, get FREE printable gift tags to go with this gift when you download our FREE Homemade Christmas Gifts Guide!)
During the months of November and December, we’ll be highlighting some of our favorite homemade gifts! Download our FREE Homemade Gifts Guide to get recipes to 15+ easy-to-make gifts, plus printable gift tags to go with each gift!
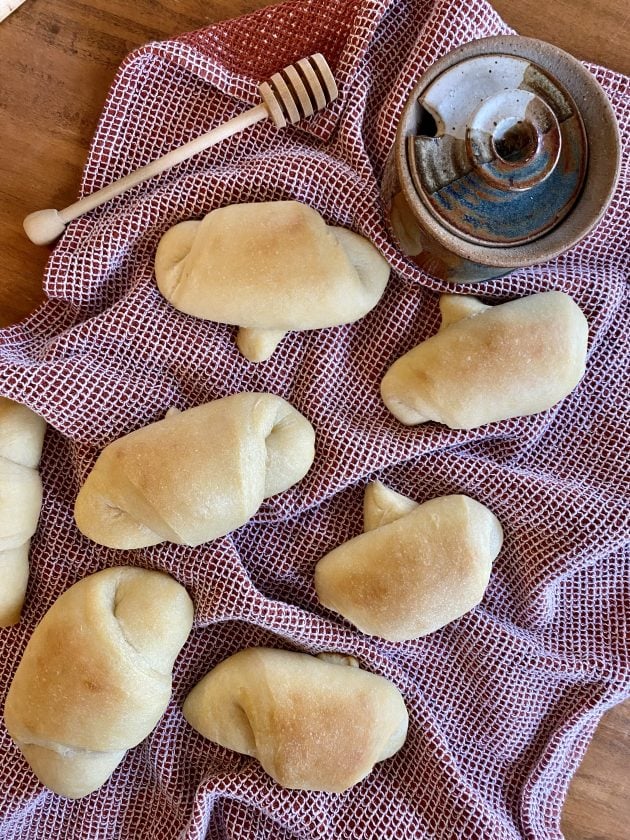
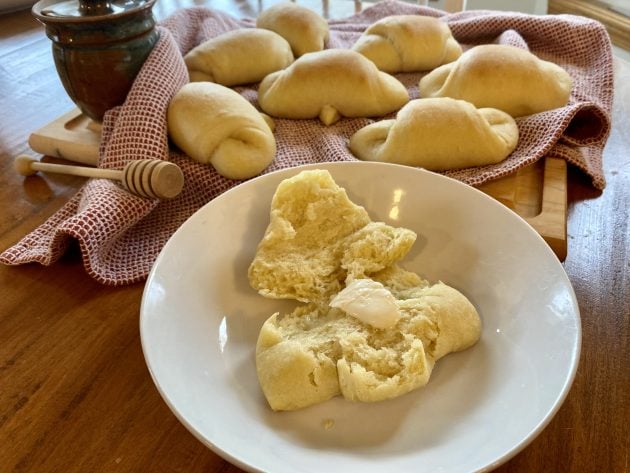
Butterhorn Rolls — The Most Delicious Dinner Rolls Ever!
These are pretty much hands-down the most-delicious dinner rolls you’ll ever eat. And best of all? You can make up a batch or a double-batch ahead of time and then just pull out, thaw, and bake as many as you need for dinner. (They can be baked right away too if you prefer!)
This is one of our family’s very favorite recipes and these are served at least a few times per month at our family gatherings.
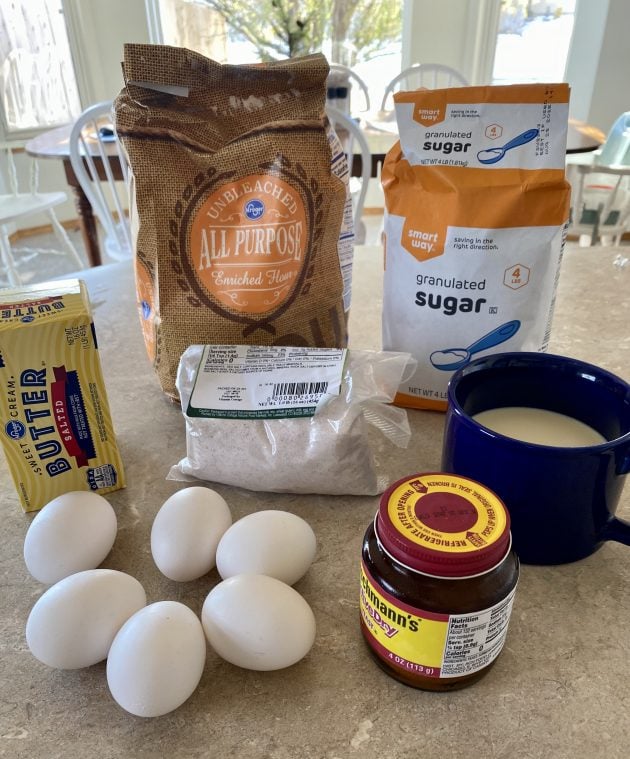
Butterhorn Roll ingredients
- 2 Tablespoons dry yeast, heaping
- 1/3 cup warm water (110-115 degrees)
- 9 cups flour, divided (you can use any mixture of white or whole-wheat flour you’d like)
- 2 cups warm milk (110-115 degrees)
- 1 cup butter, melted
- 1 cup sugar (we substituted sucanat)
- 6 eggs
- 2 teaspoons salt
- 3-4 Tablespoons butter, melted
How to make Butterhorns
1. In a large mixing bowl, dissolve yeast in warm water.
2. To the yeast, add 4 cups flour, milk, 1 cup melted butter, sugar, eggs and salt and use and beat for 2 minutes, or until smooth.
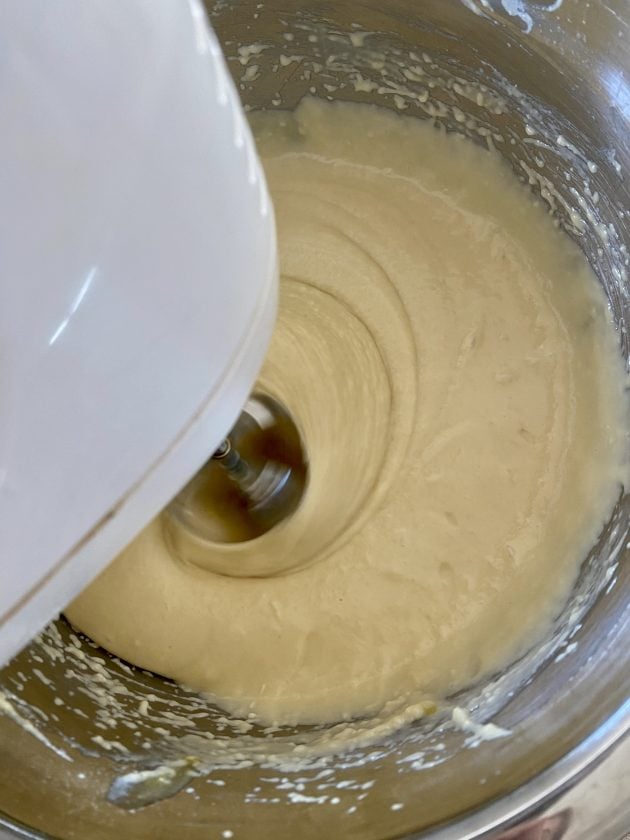
3. Add enough remaining flour to form a soft dough.
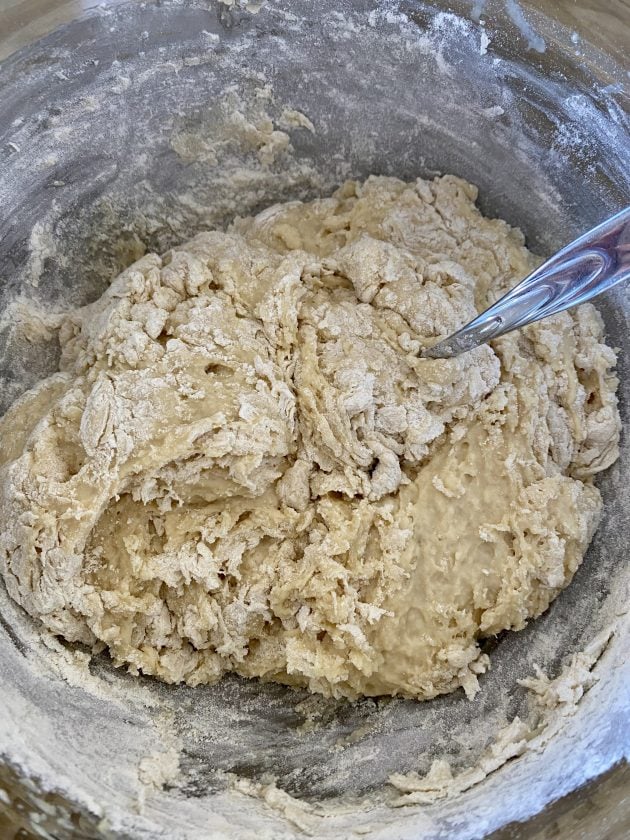
4. Turn onto floured board and knead lightly. (Or, knead in mixer until sides of bowl are clean, then knead two more minutes.)
5. Form dough into a tight ball and place in a greased bowl, turning dough once to grease top.

6. Cover and let rise in a warm place until doubled (1-3 hours).
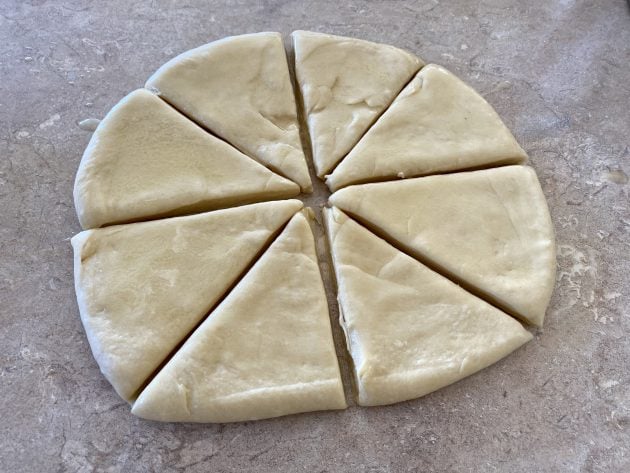
7. After dough has risen, punch it down and divide into four equal parts.
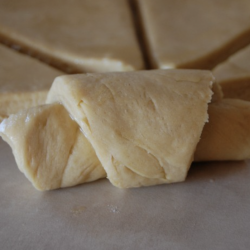
8. Roll each of the 4 parts into a 12-inch “circular disk” and brush with melted butter.
9. Cut each disk into 8 pie-shaped wedges.
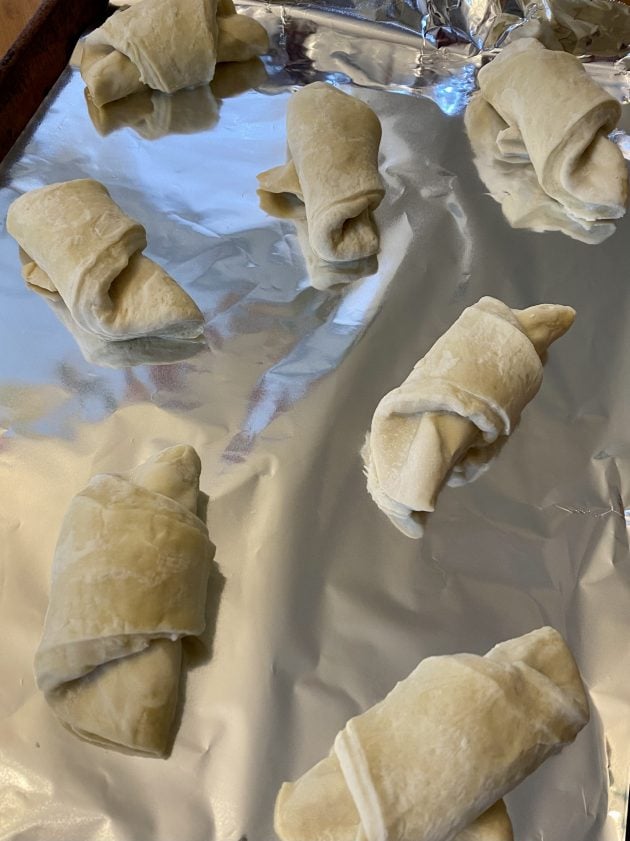
10. Roll up each wedge from the wide (outside) edge to the tip of dough and pinch to seal.
11. Place rolls, top down, on baking sheets and freeze.
12. When frozen, place in freezer bags and keep frozen until needed.
TO BAKE:
1. Take out as many frozen rolls as you’ll need and place them on a greased baking sheet.
2. Thaw for five hours or until doubled in size.
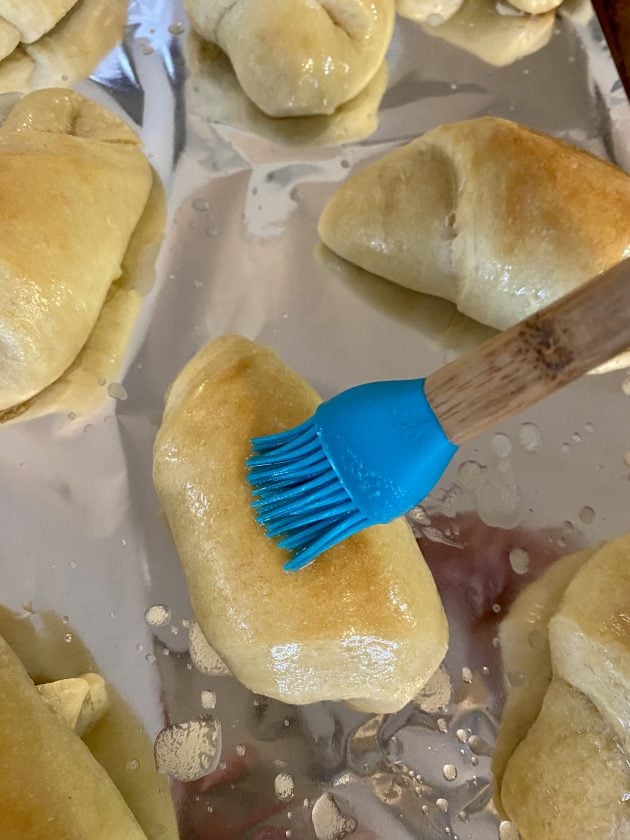
3. Bake at 375 degrees until lightly browned (about 8-10 minutes).
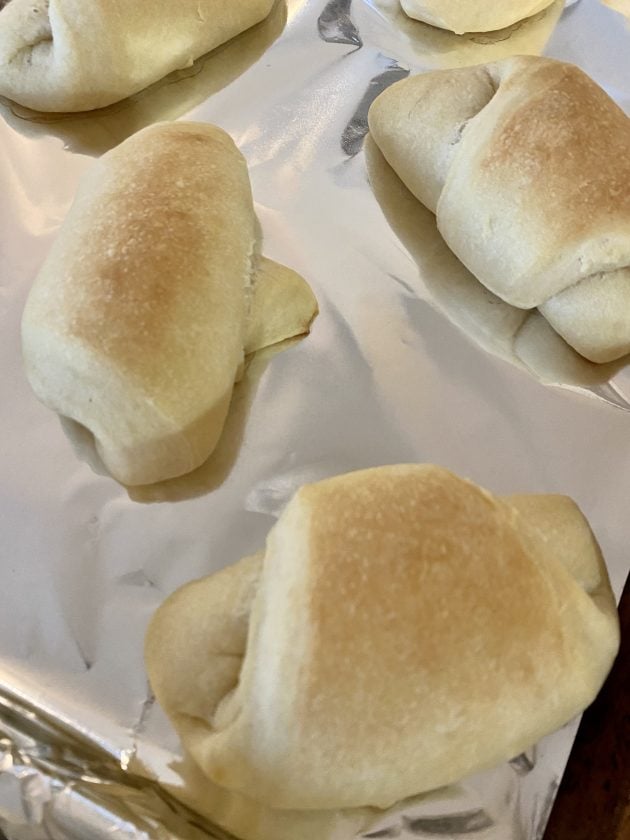
4. Brush with melted butter as soon as they come out of the oven.
5. Serve immediately or cool on wire racks.
What to serve with this Butterhorns Recipe
Well honestly, you could serve just about anything with these delicious rolls!
They are a great side dish for beef, chicken, pork, and certainly any type of soup or stew.
Butterhorns are also a great addition to any lunch menu as they are delicious with deli meats and cheese, or even various dips and spreads.
Butter Horns Recipe Storage
If you happen to have any rolls leftover, let them cool completely and place them in an airtight food storage container or in a zip-top bag. Store them at room temperature or freeze them for later.
This Butterhorn Rolls recipe is a great gift idea!
If you’re looking for an easy homemade gift idea during the holidays, you can’t go wrong with homemade bread. And most people give sweet dessert breads, so this switches things up and is a great way to give a unique bread recipe to someone!
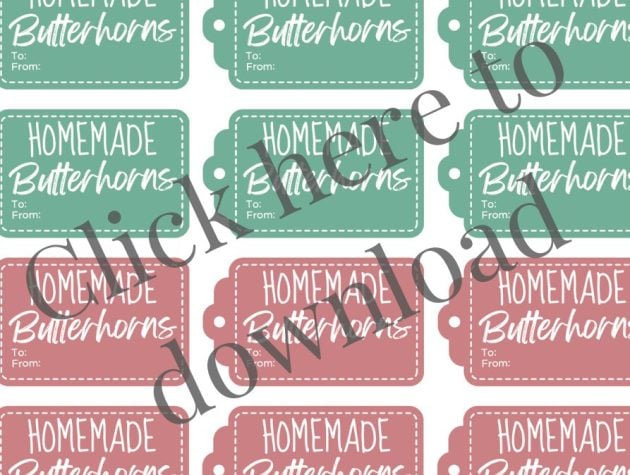
Download your free printable gift tags!
Want to add on Christmas gift tags to gift this to someone this holiday season? Go HERE to download printable gift tags designed for these Butterhorn Rolls!

Butter Horns Recipe
Ingredients
- 2 tbs dry yeast heaping
- 1/3 cup warm water 110-115 degrees
- 9 cups flour (use any mixture of white or whole-wheat flour)
- 2 cups warm milk 110-115 degrees
- 1 cup butter melted
- 1 cup sugar
- 6 eggs
- 2 tsp salt
- 3-4 tbs butter melted
Instructions
- In a large mixing bowl, dissolve yeast in warm water.
- To the yeast, add 4 cups flour, 2 cups milk, 1 cup melted butter, sugar, eggs, and salt and use and beat for 2 minutes, or until smooth.
- Add enough remaining flour to form a soft dough.
- Turn onto floured board and knead lightly. (Or, knead in mixer until sides of bowl are clean, then knead two more minutes.)
- Form dough into a tight ball and place in a greased bowl, turning dough once to grease top.
- Cover and let rise in a warm place until doubled (1-3 hours).
- After dough has risen, punch it down and divide into four equal parts.
- Roll each of the 4 parts into a 12-inch “circle”disk” and brush with melted butter.
- Cut each disk into 8 pie-shaped wedges.
- Roll up each wedge from the wide (outside) edge to the tip of dough and pinch to seal.
- Place rolls, top down, on baking sheets and freeze.
- When frozen, place in freezer bags and keep frozen until needed.
TO BAKE:
- Take out as many frozen rolls as you’ll need and place them on a greased baking sheet.
- Thaw for five hours or until doubled in size.
- Bake at 375 degrees until lightly browned (about 8-10 minutes).
- Brush with melted butter as soon as they come out of the oven.
- Serve immediately or cool on wire racks.
Nutrition
Love this recipe?
Make sure to share and save it on your favorite platform below!
Get your FREE Homemade Christmas Gifts Guide!
If you’re looking for ways to simplify gift giving this year, we have just the solution for you! Download our brand new FREE Homemade Christmas Gifts Guide! When you sign up, you’ll get:
- 15+ DIY recipes for unforgettable gift ideas (we’ve included something for everyone on your list!)
- Step-by-step instructions for ridiculously easy homemade gifts that anyone can make!
- Customizable, ready-to-print gift tags to go with each homemade gift!
This FREE guide was designed to help you have a more peaceful, intentional holiday season. Our hope is that it reduces stress, helps you save more money and spend less on your gift budget, and simplifies things so you can focus on what matters most this season!
Click here to get your FREE Homemade Christmas Gifts Guide!
OVER-SPENDING EVERY SINGLE MONTH?Grab these FREE Budgeting Sheets!
Click here to download!
Important: Tree Hut Scam and an apology
Earlier today, we posted a really hot Tree Hut sugar scrub deal. The deal was only up for a short while as we discovered that it wasn’t a legit site. We wanted to alert you to this and let you know what to do if you tried to get the deal.
What Happened
The deal we posted was on a site that looked identical to the real Tree Hut site and even had a believable URL, so it slipped past our usually very keen eyes. These types of sites that mirror a legit site are becoming more and more prevalent. We try our hardest to always do our due diligence to make sure what we post here is 100% legitimate, but this site didn’t have the usual red flags (weird URL, misspelled words on the home page, offers too good to be true, etc.) so we missed that it wasn’t legit.
The deal was only up for a short while before we realized something was off when a reader messaged to say their order wasn’t going through. Upon further investigation, we discovered it was not legit. We immediately deleted the post off of the blog and Facebook. We value your trust as our readers, so we wanted to be honest and upfront about what happened and let you know.
What You Should Do About It
If you gave your credit card info to the “Tree Hut” site today, please immediately call your bank and request to cancel your card and get a new one. We don’t know for sure what the scam site was doing and/or if they were stealing bank information, but to be on the safe side, that is what we suggest you do.
The majority of people who we heard from who tried to get the deal weren’t able to get their card to go through, but we still feel like it would be wise to cancel your card. If you have further information on what happened if you tried to order and/or if your card was charged or anything else weird happens, please let us know.
What We Are Doing About It
We are so sorry we messed up and didn’t catch that this wasn’t a legit site before posting. As always, we vigilantly research every deal we post and would never intentionally post anything that is not 100% legitimate. We talked as a team today about having even more in-depth processes in place to catch something like this in the future.
At the end of the day, we are only humans behind this screen and sometimes we mess up. Thank you for being here. Thank you for trusting us. And thank you for your grace!
HOT Deals on Arts & Crafts from Crayola and more
Amazon is having a huge sale on Arts & Crafts from Crayola and more! Here are are some deals we spotted…
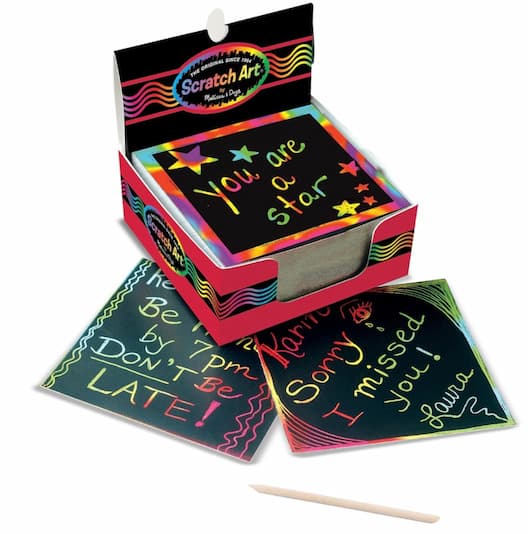
Get this Melissa & Doug Scratch Art Rainbow Mini Notes (125) With Wooden Stylus for just $5.49!

Get this Kahootz Super Spirograph Design Set for just $19.99!
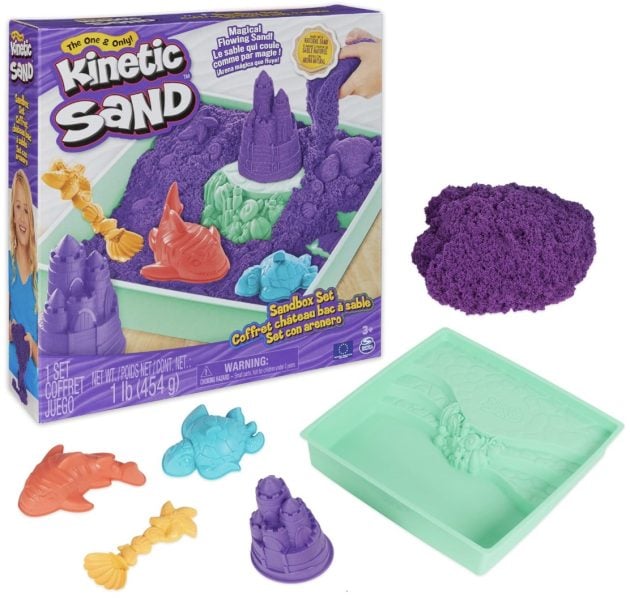
Get this Kinetic Sand Sandbox Set for just $7.99!
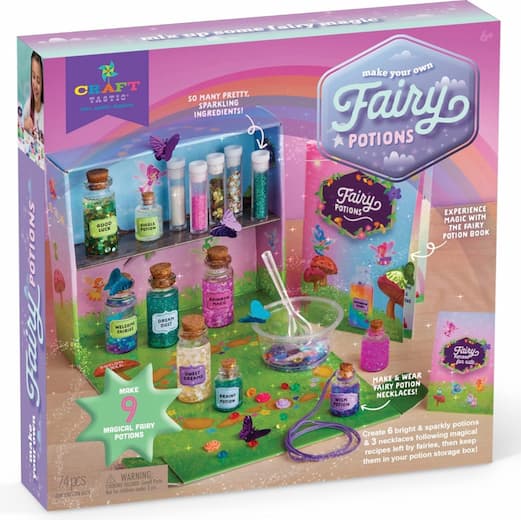
Get this Craft-tastic – Fairy Potions Craft Kit for just $10.99!
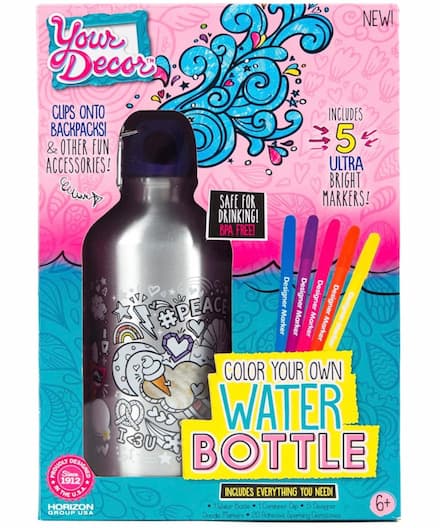
Get this Just My Style Your Decor Color Your Own Water Bottle for just $7.99!
Sign up for a free trial of Amazon Prime to get free two-day shipping (and possibly one-day or same-day shipping!) with no minimum. If you’re not sure Prime is worth it, read this post for some helpful info to help you decide! And don’t forget you can sign up for Swagbucks to earn free gift cards to use on Amazon deals!
Shop the entire sale here.
Looking for more Cyber Monday Deals?
You can go here for all of the best online Cyber Monday Deals that are already live! Also, be sure to sign up for our Hot Deals newsletter, follow us on Facebook, and follow us on Instagram so that you don’t miss out on any of the hottest, time-sensitive deals as soon as they go live throughout the rest of the holiday season.
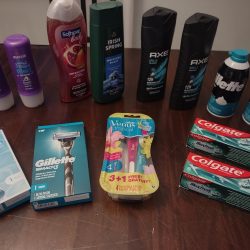
Brigette’s $14.90 CVS Shopping Trip ($6 Money Maker after ECB’s) and $20.67 Walgreens Shopping Trip (Free after Rewards)!
Love drug store shopping each week? Don’t miss these GREAT deals Brigette grabbed this week at CVS and Walgreens!
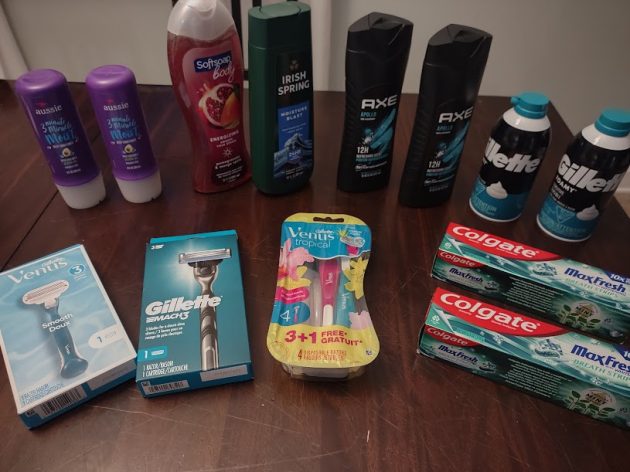
CVS Shopping Trip
All of my coupons are from the CVS app. I highly recommend it if you don’t have it already! Just log in to your account and clip the coupons you want, and they automatically come off in the store. There are CVS store coupons and manufacturer coupons to clip on the app – and you can stack them on the same product.
What I Bought:
1 Irish Spring and 1 Soft Soap Body Wash (B1G1 40%) – $10.74
Receive $4 ECB’s when you buy 2
Used $2/1 Soft Soap CVS digital manufacturer’s coupon
Used $2/1 Irish Spring CVS digital manufacturer’s coupon
= $6.74 for 2 total out of pocket ($2.74 for 2 after $4 ECB’s!)
2 Aussie Hair Care (B1G1 40%) – $7.50
Receive $4 ECB’s when you by 2
Used $2 off Select Hair Care CVS digital coupon
= $5.50 for 2 total out of pocket ($1.50 for 2 after $4 ECB’s!)
2 Axe Body Wash – $12.98
Receive $2 ECB’s when you buy 2
Used $6.50/2 Axe CVS digital manufacturer’s coupon
= $6.48 for 2 total out of pocket ($4.48 for 2 after $2 ECB’s!)
2 Gillette Foamy Shaving Cream (B1G1 50%) – $5.99
Receive $4 ECB’s when you buy 2
= $5.99 for 2 total out of pocket ($1.99 for 2 after $4 ECB’s!)
2 Colgate Toothpaste – $10.38
Receive $4 ECB’s when you buy 2
Used $5/2 Colgate CVS digital manufacturer’s coupon
= $5.38 for 2 total out of pocket ($1.38 for 2 after $4 ECB’s!)
1 Gillette Mach3 – $7.99
Receive $3 ECB’s when you buy 1
Used $3/1 Gillette CVS digital manufacturer’s coupon
= $4.99 total out of pocket ($1.99 after $3 ECB’s!)
1 Venus Tropical and 1 Venus Smooth Razor – $14.98
Used $3/1 Gillette Venus CVS digital manufacturer’s coupon
Used $3/1 Gillette CVS Disposable Razor digital manufacturer’s coupon
= $8.98 total out of pocket (I bought these because someone had posted an unadvertised ECB deal on these – however it did not work for me. Oh, well!)
Totals:
Total: $44.06 plus tax
Used $10/$70 Total Purchase CVS digital coupon
Paid with $20 ECB’s from previous weeks
Total Paid Out Of Pocket: $14.90 plus I received $21 ECB’s!
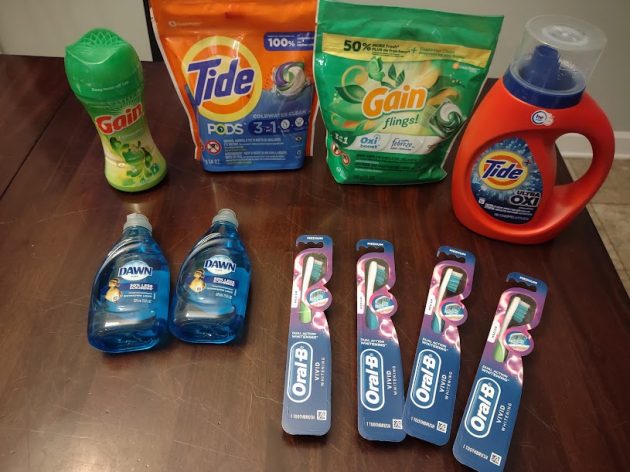
Walgreens
All of my coupons are from the Walgreens app. I highly recommend downloading it if you haven’t already. You can clip both Manufacturer’s and Store coupons and stack them together on the same item.
What I Bought:
4 Tide/Gain – $21.96
Receive $5 Register Reward when you buy 4
Used $1.50/1 Gain Flings Walgreens digital manufacturer’s coupon
Used $1/1 Gain Scented Boosters Walgreens digital manufacturer’s coupon
Used $1.50/1 Tide Pods Walgreens digital manufacturer’s coupon
Used $1.50/1 Tide Liquid Walgreens digital manufacturer’s coupon
= $16.46 for 4 total out of pocket ($11.96 for 4 after $5 Register Reward!)
4 Dawn Dish Soap – $2.48
Receive $1 Register Reward when you buy 2
= $2.48 for 2 total out of pocket ($1.48 for 2 after $1 Register Reward!)
4 Oral-B Toothbrushes – $12
Receive $6 Register Reward when you buy 4
Used $6/4 Oral-B Walgreens digital manufacturer’s coupon
= $6 for 4 total out of pocket (FREE after $6 Register Reward!)
Totals:
Total: $24.94 plus tax
Used $10/$35 Any Purchase Walgreens digital booster coupon
Paid with $6 Register Rewards from previous weeks
Total Paid Out Of Pocket: $20.67, plus I received $12 Register Rewards and $10.36 in Walgreens Cash!
Psst! Want to cut your grocery budget? Go here and sign up (it’s free!) I’ll send you my 10 Easy Ways to Cut Your Grocery Bill By $50.
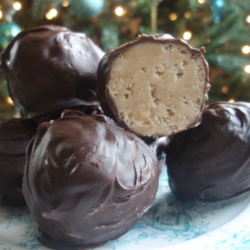
Our Favorite Chocolate Peanut Butter Truffles + Free Printable Gift Tags!
Our Favorite Chocolate Peanut Butter Truffles + Free Printable Gift Tags!
This is a longtime favorite family recipe! These Peanut Butter Bon Bons are such a classic, so easy to make, and are a GREAT gift idea! (Plus, get FREE printable gift tags to go with this gift when you download our FREE Homemade Christmas Gifts Guide!)

Recipe by Brigette from the MoneySavingMom team. During the months of November and December, we’ll be highlighting some of our favorite homemade gifts! Download our FREE Homemade Gifts Guide to get recipes to 15+ easy-to-make gifts, plus printable gift tags to go with each gift!
Chocolate Peanut Butter Truffles — A Perfect Holiday Treat!
This recipe brings back special childhood memories for me. Every December, my family would make and freeze dozens and dozens and dozens of cookies – and we always included these bon bons!
We would spend the week before Christmas making up platters of goodies to give away to all of our neighbors, relatives, friends, co-workers, and anyone else my mom could come up with. We even included the mailman and UPS man! Of all of the delectable treats we would make, these were always one of my very favorites.
I mean, how could you not like peanut butter and chocolate?

Download your free printable gift tags!
Want to add on Christmas gift tags to gift this to someone this holiday season? Go HERE to download printable gift tags designed for these Peanut Butter Bon Bons!
Why you’ll love this Peanut Butter Truffle Recipe
These bon-bons only take a handful of ingredients, make a large batch, and store in the freezer very well. They look fancy and indulgent and taste amazing. Just one word of warning, though: these are extremely addictive!
Ingredients for Peanut Butter Truffles
- 2 cups peanut butter
- ½ cup butter
- 1 teaspoon vanilla
- 3 cups crispy rice cereal
- 4 cups powdered sugar
- 12oz semi-sweet chocolate chips*
- 1 tablespoon vegetable oil
* This amount of chocolate is just enough to cover each ball. If you coat them very thickly, you will need more chocolate than this.
Peanut Butter Bon Bon Recipe Substitutions
If you’re trying to stay away from peanut butter, you can substitute any other nut or sun butter. You can also try chunky peanut butter for a little extra crunch.
Try almond extract for a slightly different flavor.
Feel free to mix up the chocolate too — try dark chocolate, white chocolate, or even milk chocolate with a white chocolate drizzle!

How to make Peanut Butter Truffles
1. Melt peanut butter and butter in a microwave-safe bowl.
2. Stir in vanilla.
3. Add rice cereal and powdered sugar and mix well (it might seem a little dry at first but will start holding together the more you mix. I usually finish up the mixing using my hands).
4. Form into 1-inch balls, firmly packed.
5. Place on a cookie sheet and freeze until firm (at least 30 minutes).
6. In a saucepan (or the top of a double broiler), melt the chocolate chips and oil together over very low heat, stirring often.**
7. Using a toothpick, dip each peanut butter ball in the chocolate and place them on wax-paper lined cookie sheets (I go back later and smooth out the toothpick hole on the top of each bon-bon). Chill until firm.
These can be eaten cold or at room temperature (or even frozen… but I’m weird like that!)
**You want the chocolate to stay in a nice, warm “liquidy” state during all the dipping. I don’t have a double broiler, so I usually take the saucepan on and off of the very low heat several times during the process. You can also add a little more oil if you need to.
Peanut Butter Bon Bons Recipe Variations
If you want to mix things up a bit, you can roll freshly coated chocolate balls in sprinkles, chopped nuts, graham cracker crumbs, or even just colored sugar. The melty chocolate will “glue” these additions to the bon bons and look extra festive!
Peanut Butter Truffle Recipe Serving Suggestions
These are great for holiday parties, after-school snacks, potlucks, birthday parties, or really for anything!
Just don’t let them get too warm or they will start melting and become very messy.
Storing leftover Peanut Butter Bon Bons
These will stay fresh for a LONG time, especially if you keep them in the freezer.
How long do Chocolate Peanut Butter Truffles last?
Just store them in a tightly-sealed food storage container or zip-top bag, and they should last for months (if you don’t eat them first!)

Peanut Butter Bon Bon Recipe (Peanut Butter Truffles)
Ingredients
- 2 cups peanut butter
- ½ cup butter
- 1 teaspoon vanilla
- 3 cups crispy rice cereal
- 4 cups powdered sugar
- 12 oz semi-sweet chocolate chips*
- 1 tablespoon vegetable oil
Instructions
- Melt peanut butter and butter in a microwave-safe bowl.
- Stir in vanilla.
- Add rice cereal and powdered sugar and mix well (it might seem a little dry at first but will start holding together the more you mix. I usually finish up the mixing using my hands).
- Form into 1-inch balls, firmly packed.
- Place on a cookie sheet and freeze until firm (at least 30 minutes).
- In a saucepan (or the top of a double broiler), melt the chocolate chips and oil together over very low heat, stirring often.**
- Using a toothpick, dip each peanut butter ball in the chocolate and place them on wax-paper lined cookie sheets (I go back later and smooth out the toothpick hole on the top of each bon-bon). Chill until firm.
Love this recipe?
Make sure to share and save it on your favorite platform below!
That’s it!
If you’re looking for a simple, delicious treat to make for a holiday party… give my Peanut Butter Bon-Bons a try!
Get your FREE Homemade Christmas Gifts Guide!
If you’re looking for ways to simplify gift giving this year, we have just the solution for you! Download our brand new FREE Homemade Christmas Gifts Guide! When you sign up, you’ll get:
- 15+ DIY recipes for unforgettable gift ideas (we’ve included something for everyone on your list!)
- Step-by-step instructions for ridiculously easy homemade gifts that anyone can make!
- Customizable, ready-to-print gift tags to go with each homemade gift!
This FREE guide was designed to help you have a more peaceful, intentional holiday season. Our hope is that it reduces stress, helps you save more money and spend less on your gift budget, and simplifies things so you can focus on what matters most this season!
Click here to get your FREE Homemade Christmas Gifts Guide!
Jane.com Has Unexpectedly Shut Down — Here’s What To Do
This post is not meant to be alarmist, but rather to serve our readers well through complete honesty and transparency. We take our readers’ trust very seriously and sometimes unexpected events like this happen. We want you to always know you can trust us to post legitimate deals on trustworthy sites and we would never ever intentionally partner with a site that we didn’t fully trust. We have been posting Jane deals on our site for close to a decade, so this comes as a complete shock to us.
What is going on with Jane.com?
We got word today that Jane.com — a site that we have promoted and partnered with closely for years — has unexpectedly shut down without notice or warning.
They went dark on Friday without telling anybody — their affiliates, customers, employees, or marketplace sellers — what happened. As affiliates, we received a couple emails telling us that the Jane site was “down for maintenance” which seemed strange leading up to Black Friday week, but we didn’t think much of it.
Today (Monday), we got word from a reader and a seller on Jane that they had unexpectedly shut down.
When we reached out to Jane directly for transparency on what is going on, they would not give us any information at all and avoided our questions.
If you have any firsthand information or are a seller, please let us know as we’re trying to get to the bottom of things and confirm what’s going on.
How this affects you as our reader (and what to do)
If you have purchased any Jane deals through our site recently and haven’t received your orders yet, you will most likely NOT be receiving them.
From what little we know and have been able to research online, they have left thousands of orders unfulfilled with no intention of shipping them out. The sellers on Jane who provide their beautiful handmade items to be featured on the marketplace were left in the dark and are owed thousands and thousands of unpaid earnings for their sales.
Therefore, we recommend that you open a dispute with your bank/credit card company and report fraudulent charges so that you can get your money back.
They have been reported to the police and an investigation has been open. This is a developing story and very little is known, but you can read this article for more information.
We are so sorry to have to post this announcement, but we hope that you will continue to trust us to bring you the best legitimate deals every day! Thank you for being here!