


Frozen chocolate chip cookie dough can be a bit dangerous to have on hand as it’s really yummy to eat straight from the freezer… but if you can have a little self control and wait for the cookies to bake, you’ll see that they taste just as delicious as if you made the dough fresh that day!
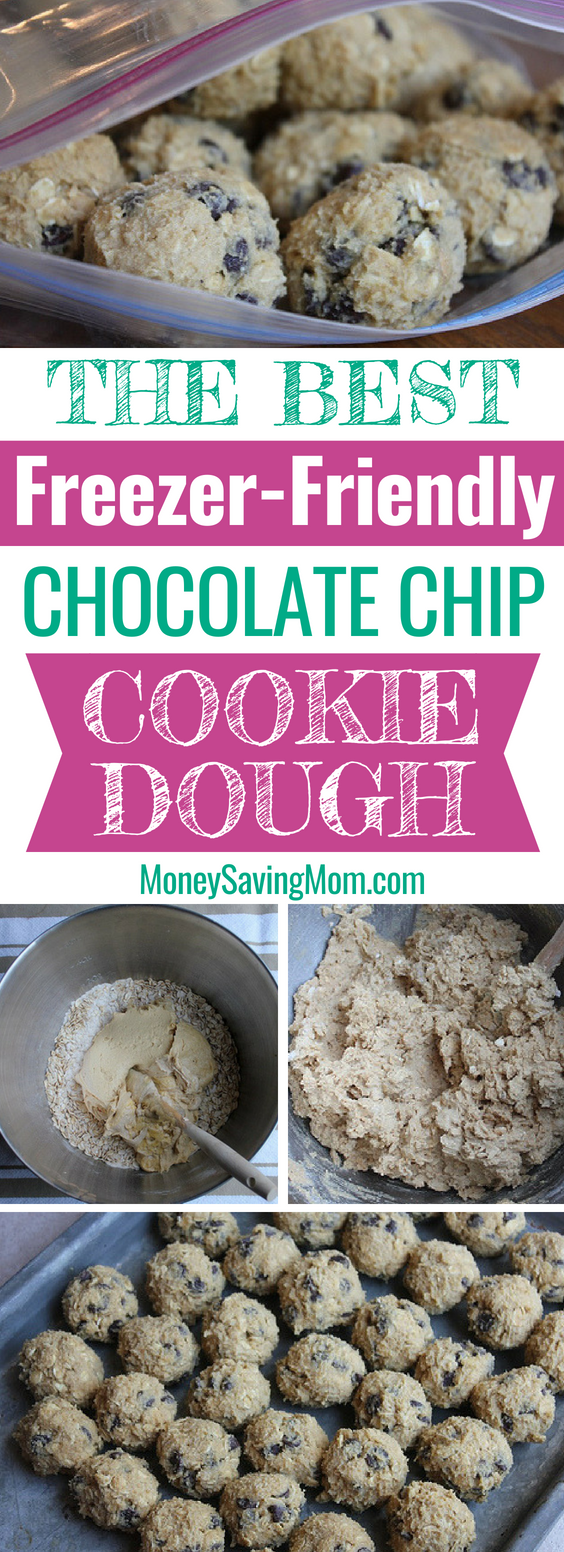
My sister concocted this recipe many years ago and it’s long been our favorite chocolate chip cookie recipe. It definitely wouldn’t win the prize for being a low-calorie cookie, but it’s a delicious and hearty cookie recipe.
You will LOVE frozen cookie dough!
If you’re not a fan of most freezer meals, can I encourage you to try making cookie dough and freezing it? I can almost guarantee you won’t be able to tell a difference between frozen cookie dough and fresh cookie dough.
Frozen cookie dough makes it so easy to make a batch of freshly-baked cookies when you have drop-in guests or need to bring a dessert or snack to some event at the last minute.
It’s also very handy for those times when you get a late-night craving for chocolate. Oh wait, I may be the only person who has that happen to them. Ahem. 😉

Ingredients for Freezer-Friendly Cookie Dough
- 1 cup butter or shortening (softened)
- 1/3 cup peanut butter
- 3/4 cup brown sugar (or raw sugar)
- 3/4 cup granulated sugar (or raw sugar)
- 2 eggs
- 1 teaspoon vanilla
- 1 1/2 cups all-purpose flour (you can also use half or all whole-wheat)
- 1 teaspoon baking soda
- 1/2 teaspoon salt
- 2 cups oats (rolled or quick oats)
- 1 12-oz. package chocolate chips
How to Make Freezer-Friendly Cookie Dough
1. In a large mixing bowl, cream together butter, peanut butter, brown sugar, and granulated sugar.

2. Add in eggs and vanilla and whip until very smooth.

3. Add in flour, baking soda, salt, and oats. Mix well.


4. Stir in chocolate chips.
5. Roll dough into 1-1 1/2-inch balls and place on a cookie sheet (either to freeze or to bake.)
To freeze:
1. Place cookie dough balls on a cookie sheet (they can be quite close together) and freeze for one to two hours.
2. Remove from cookie sheet and place in an airtight freezer bag.
3. Freeze for several months (if you have enough self control!)

To bake:
1. Preheat oven to 375ºF.
2. Put desired number of cookie dough balls on a parchment-lined cookie sheet, approximately 3 inches apart.
3. Let sit while oven preheats.
4. Bake in preheated oven for 10 minutes or until done.
5. Transfer warm cookies to cooling rack.
6. Eat and enjoy!


Freezer-Friendly Chocolate Chip Cookie Dough
Ingredients
- 1 cup butter or shortening softened
- 1/3 cup peanut butter
- 3/4 cup brown sugar or raw sugar
- 3/4 cup granulated sugar or raw sugar
- 2 eggs
- 1 teaspoon vanilla
- 1 1/2 cups all-purpose flour you can also use half or all whole-wheat
- 1 teaspoon baking soda
- 1/2 teaspoon salt
- 2 cups oats rolled or quick oats
- 12 oz chocolate chips
Instructions
- In a large mixing bowl, cream together butter, peanut butter, brown sugar, and granulated sugar.
- Add in eggs and vanilla and whip until very smooth.
- Add in flour, baking soda, salt, and oats. Mix well.
- Stir in chocolate chips.
- Roll dough into 1-1 1/2-inch balls and place on a parchment-lined cookie sheet (either to freeze or to bake.)
To freeze:
- Place cookie dough balls on a cookie sheet (they can be quite close together) and freeze for one to two hours.
- Remove from cookie sheet and place in an airtight freezer bag.
- Freeze for several months (if you have enough self control!)
To bake:
- Preheat oven to 375ºF.
- Put desired number of cookie dough balls on a parchment-lined cookie sheet, approximately 3 inches apart.
- Let sit while oven preheats.
- Bake in preheated oven for 10 minutes or until done.
- Transfer warm cookies to cooling rack.
- Eat and enjoy!
Nutrition
Love this recipe?
Make sure to share and save it on your favorite platform below!
Did you do any freezer cooking this week? If so, I’d love to see the results of your efforts! Link up your blog posts below or tell us about your success in the comments.
Want to cut your grocery budget? Go here and sign up (it’s free!) I’ll send you my 10 Easy Ways to Cut Your Grocery Bill By $50.

Ask The Readers: Meatless or inexpensive meal suggestions that guys would love?
Ask The Readers: Meatless or inexpensive meal suggestions that guys would love?

Today’s question is from Alicia:
My family consists of three boys, my husband, and myself. With the cost of food rising, I have let my meat stockpile diminish. I was wondering if your readers have any budget-friendly recipes for meatless or inexpensive recipes that will satisfy and fill the bellies of a house full of meat-eating males!? -Alicia
Do you have a question you’d like to ask Money Saving Mom® readers? Read the submission guidelines and submit it here.
4 Weeks to Fill Your Freezer: Italian Chicken (Day 15)

This is one of our go-to meals. It is so, so easy and delicious.
You could skip the freezing part altogether and just make it the day of, but some times it’s nice to pull a bag out of the freezer, dump it into a pan or crock pot and dinner is done.
It’s a great summer recipe because you can grill it or cook it in the crock pot and not heat up your kitchen at all. We love it served over rice or sliced and served on a big salad.


While I was making the Italian Chicken on one end of the table, the above picture is what was happening at the other end of the kitchen table. Seeing my husband so intently working with Silas on his preschool and Silas just soaking it up melts my heart.
{My husband has been doing one or two of each of the children’s homeschooling subjects with them each evening after he comes home from work. It was his idea — and the children love it!}

{I think one of the reasons they enjoy it is because Daddy’s homeschooling often involves snacks, too. ;)}
Freezer-Friendly Italian Chicken
- One bottle of your favorite Italian salad dressing*
- 6 frozen boneless, skinless chicken breasts
To freeze: Put frozen chicken breasts in a freezer bag. Pour the Italian dressing over the chicken. Squeeze the air out of the bag and seal it up. Freeze.
To thaw and bake:
- Quick Method: Pull frozen chicken out of the freezer and run the freezer bag under cold water to thaw slightly. Pour all the contents of the bag into a 9×13-inch baking dish. Cook at 350 degrees for 45 to 60 minutes.
- Longer Marinating Method: Pull frozen chicken out of the freezer, stick the bag in a bowl and let it thaw in the refrigerator for up to 24 hours. Pour all the contents of the bag into a 9×13-inch baking dish. Cook at 350 degrees for 45 to 60 minutes or grill until done.
- Crock Pot Method: Pull frozen chicken out of the freezer and run the freezer bag under hot water to thaw slightly. Pour all the contents of the bag into the crock pot and cook on high for 4-6 hours, until thoroughly cooked through.
This is delicious served over rice with steamed vegetables on the side. Serves 4-6.
*Want to change things up a bit? You can also use barbecue sauce or any other favorite salad dressing. Let us know if your family has a favorite variation of this recipe!
Did you do any freezer cooking today? If so, I’d love to see the results of your efforts! Link up your blog posts below or tell us about your success in the comments.
Do-It-Yourself: Sunburst Flower Headband

SewCraftCreate.com shows you how to make this adorable sunburst flower headband.
Do you have a fun and frugal DIY idea to share? I’d love to hear about it! Read the submission guidelines and submit it here.
Cash4Books: Make an additional 15% back for selling your used books
Cash4Books: Make an additional 15% back for selling your used books

Have extra books around your home that you no longer need or use? Definitely check Cash4Books.net, MyBookBuyer.com, and Amazon’s Trade-In Program to see how much they would pay you for selling your books to them.
Cash4Books is also offering a 15% bonus on your buyback total through June 8, 2012. All you have to do to get the bonus is use bonus code SecretStash at checkout and they’ll automatically give you the 15% bonus when they send your payment.
If you decide to sell your books to Cash4Books, you can print out a free shipping label so that there is no cost to you to ship the book. After your books are received, inspected and marked as ‘processed’, payment will be made within three business days. You can choose to be paid via Paypal or check.
If your books aren’t worth much, you might also consider listing them on PaperBackSwap so that you can swap them for books you are interested in reading.
Related posts:
Make Money Selling Books With MyBookBuyer.com
Earn Amazon Credit For Used Books Through Amazon’s Trade-In Program
(Note: Some of the links in this post are my referral links. Read our disclosure policy here.)
4 Weeks to Fill Your Freezer: Week #4 Freezer-Friendly Snacks & Desserts + Shopping List
4 Weeks to Fill Your Freezer: Week #4 Freezer-Friendly Snacks & Desserts + Shopping List

Can you believe we’ve made it to the last week of freezer cooking? My freezer is getting so stocked and it has been wonderful.
With Memorial Day weekend coming up, I’m spacing out the recipes a bit more this week to give everyone a little bit more time to play along (should you so choose) and to also give myself the flexibility to not blog much on Monday. 🙂
My apologies in advance that all but one of these recipes has chocolate in it. What can I say? “Dessert” and “snack” is pretty much synonymous with “chocolate” at our house. 🙂 And no day is complete without at at least a little bit of chocolate!
Here’s this week’s list of Snack and Dessert Recipes I’ll be making to stick in the freezer along with a grocery list (let me know if you see any mistakes on amounts needed):
Freezer-Friendly Snack and Dessert Recipes
Wednesday — One batch of Whole-Wheat Chocolate Chip Cookie Dough
Thursday — Double batch of Easy Morning Glory Muffins {I’ll share my “health-i-fied” version of this recipe on Thursday.}
Friday — Double batch of No Bake Energy Bites
Tuesday — One batch of Pumpkin Chocolate Chip Muffins
Wednesday – Double batch of Chocolate Banana Bread
Grocery List
(I rounded up on the amounts needed, just to be safe. You probably have many of these items already on hand. You’ll want to double-check that you have the correct amounts, though.)
16 eggs
8 cups sugar (or raw sugar)
3/4 cup brown sugar (or raw sugar)
6 cups rolled oats
1 1/3 cups peanut butter (or other nut butter)
1 (16 oz.) can pureed pumpkin
3 1/2 cups oil
12 cups flour
3 packages chocolate chips
2/3 cup honey
3 cup coconut flakes (For No Bake Energy Bites or Easy Morning Glory Muffins — could substitute something else if your family doesn’t like coconut.)
1 cup flaxseed (For No Bake Energy Bites — could substitute wheat germ or something for this.)
4 cups shredded carrots
1 cup raisins
6 bananas
1 cup chopped walnuts (optional)
2 apples
1/2 cup unsweetened cocoa powder
4 sticks butter
Staple Ingredients:
Vanilla
Salt
Baking Soda
Baking Powder
Cinnamon
Freezer Storage Items Needed
Foil
Plastic Wrap
8-12 large ziptop freezer bags
Something to label packages with (marker to write on bags, labels, and/or tape)
Click on the “Print This” tab at the top of the list to generate a printer-friendly list. (If you’re reading via email or a feed reader, you may need to click through to the post to print the list.)

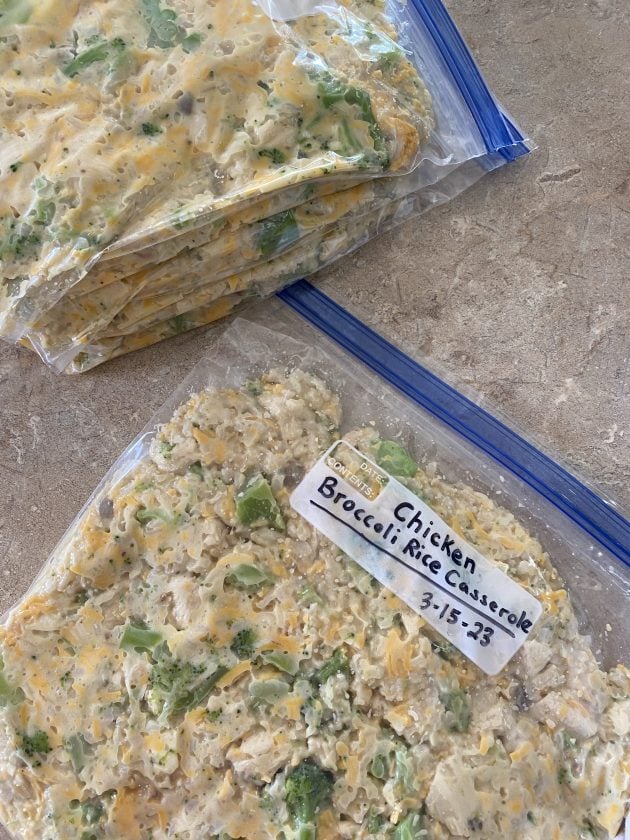
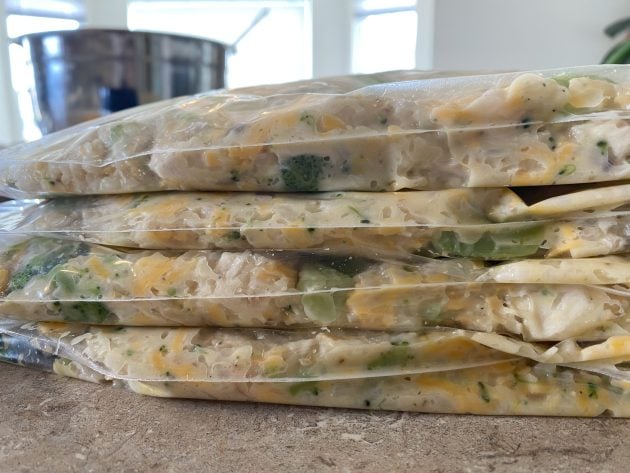
Chicken Broccoli Rice
Need another weeknight staple to add to your meal planning rotation? This easy casserole is it. Plus, you can easily double or triple the recipe as it freezes wonderfully!

Why we love Chicken and Broccoli Casserole
Chicken Broccoli Rice Casserole is delicious, filling, frugal, and freezer-friendly!
It’s the perfect family-friendly meal for busy weeknights when you just want to defrost something and bake it ASAP.
And thanks to the delicious cheesy sauce, your kids probably won’t even complain about eating their broccoli!

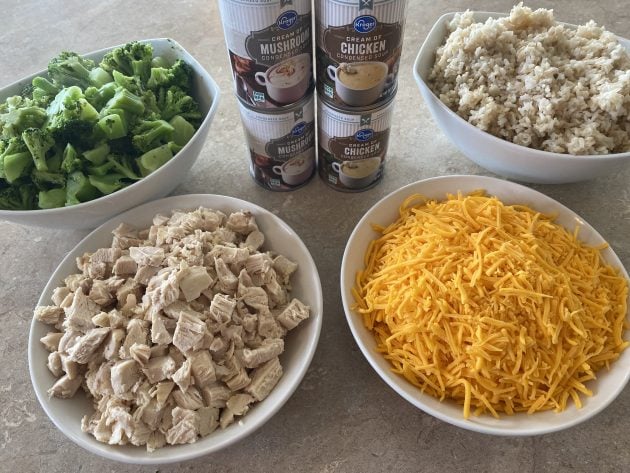
Chicken Broccoli and Rice Casserole Ingredients
- 10 cups cooked rice (white or brown)
- 4 cups cooked chicken, chopped (I bake mine in the oven like this.)
- 4 cups chopped broccoli, lightly steamed (frozen or fresh)
- 2 cans cream of mushroom soup (or 2 batches of homemade cream of mushroom soup)
- 2 cans cream of chicken soup (or 2 batches of homemade cream of chicken soup)
- 4 cups shredded cheddar cheese
- salt and pepper to taste
NOTE: This recipe makes 4 freezer bags worth of casserole — or roughly around 15-20 servings as each freezer bag serves 4-5 people.
Chicken Broccoli and Rice Casserole substitutions and variations
This casserole is not an exact science by any means — please feel free to mix up the ingredients to fit your family’s taste preferences or whatever you already have in the house.
Here are a few ideas to get you thinking:
- substitute turkey for chicken (perfect for post-Thanksgiving leftovers!)
- swap HALF the chicken for cubed ham and substitute Swiss cheese for cheddar (a.k.a. chicken cordon bleu)
- use cooked quinoa or barley instead of rice
- use mixed vegetables, chopped spinach, or even green beans in place of (or in addition to) broccoli
- sprinkle the top of the casserole with breadcrumbs for a crunchy topping
How to Make Chicken Broccoli Rice Casserole
1. In a large bowl, combine all ingredients and mix well.
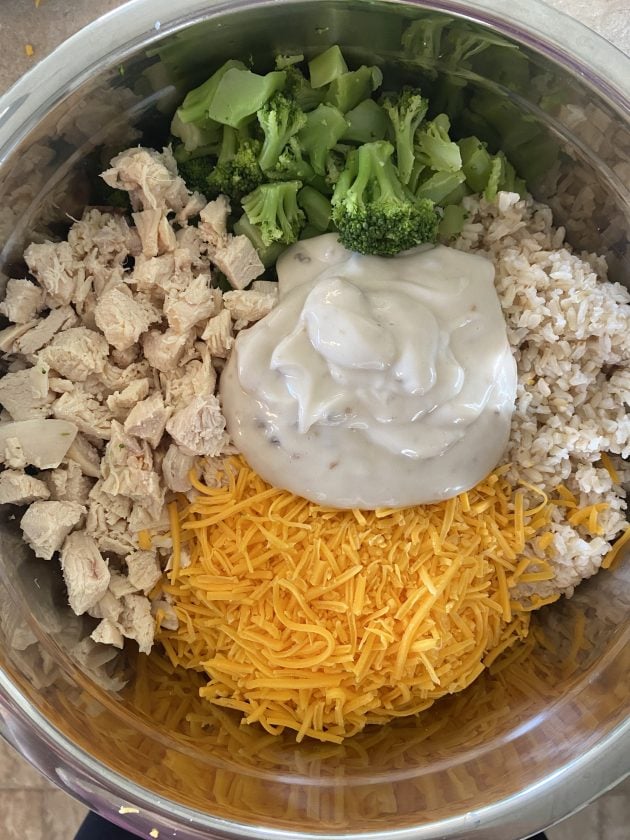
2. Divide mixture into 4 zip-top freezer bags. Label and seal them tightly.
3. Freeze the bags flat.
4. TO COOK: Thaw one bag overnight (or for 8 hours) in the refrigerator.
5. Dump the contents of the bag into a greased casserole dish (one bag fills an 8×8″ pan; two bags fills a 9×13″ pan).
6. Sprinkle with additional shredded cheese, if desired.

7. Bake at 350 degrees for 25-30 minutes, or until heated through and bubbly.

Chicken Broccoli Rice Recipe Tips
If you’re planning to make a big batch of this casserole for the freezer, you’ll want to make sure you have plenty of large mixing bowls handy — as well as a variety of freezer containers or bags.
Also, make sure all the ingredients are fully cooked before adding them to the casserole — you don’t want to be surprised by raw chicken or crunchy rice when it’s time for dinner!
Remember to grease whatever baking pan you use to cook the casserole as this recipe can be a bit sticky.
And feel free to let your kids help — this is a great recipe to let them dump and mix!
What to serve with Chicken Broccoli Casserole
This meal technically contains all your food groups, so if you’re short on time, you don’t really need anything extra… however, here are a few serving suggestions our family enjoys.
- fresh fruit
- applesauce
- homemade bread or rolls
- more cooked veggies
- a lettuce or spinach salad

Chicken Rice and Broccoli
Ingredients
- 10 cups cooked rice
- 4 cups cooked chicken chopped or shredded
- 4 cups broccoli lightly steamed and chopped
- 2 cans cream of mushroom soup 14 oz each
- 2 cans creams of chicken soup 14 oz each
- 4 cups shredded cheddar cheese
- 1 tsp salt
- 1/2 tsp pepper
Instructions
- In a large bowl, combine all ingredients and mix well.
- Divide mixture into 4 ziptop freezer bags. Label and seal them tightly.
- Freeze the bags flat.
TO COOK:
- Thaw one bag overnight (or for 8 hours) in the refrigerator.
- Dump the contents of the bag into a greased casserole dish (one bag fills an 8×8″ pan; two bags fills a 9×13″ pan)
- Sprinkle with additional shredded cheese, if desired.
- Bake at 350ºF for 25-30 minutes, or until heated through and bubbly.
Nutrition
Love this recipe?
Make sure to share and save it on your favorite platform below!
Did you do any freezer cooking over the past two days? If so, I’d love to see the results of your efforts! Link up your blog posts below or tell us about your success in the comments.
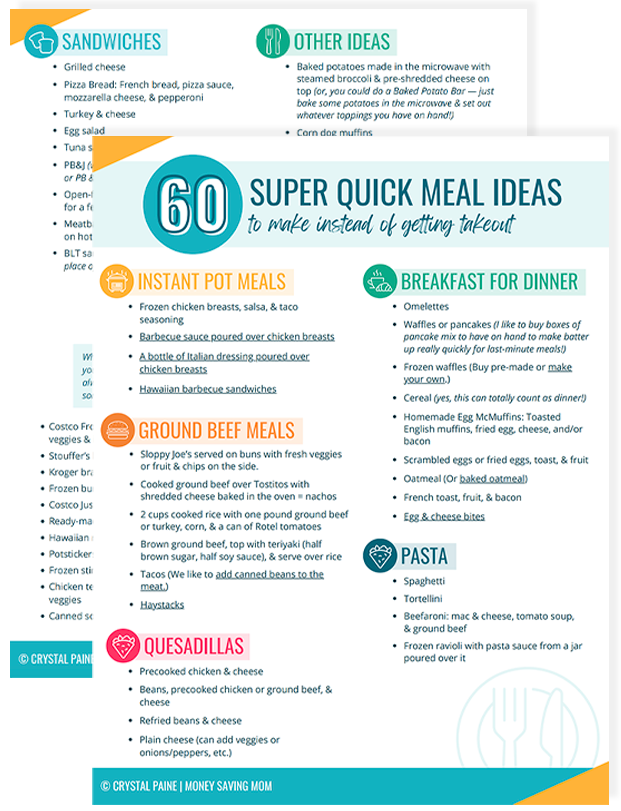
FREE DOWNLOAD: 60 Meals To Help You Avoid Takeout!
Meal time just got so much easier!
10 Goals for This Week

So, I kinda bombed last week… I had this lingering sinus infection most of the week and I was highly unmotivated as a result. I’m trying to dose up on a lot of Vitamin C and other things to boost my immune system — and trying not to get too discouraged that it is hanging on for so long.
The good news is that I did chip away at almost all the goals on the list, but I only completely accomplished three of them. By the way, I really, really tried to get 7.5 hour of sleep every night, but all the congestion made sleeping difficult and uncomfortable. Which, of course, doesn’t exactly lend itself to helping me get better — it’s kind of a vicious cycle!
Here’s to hoping this week is a better week — and that maybe I can find some relief from the sinus infection. {I’m *this* close to breaking down and trying a neti-pot. But it just weirds me out so much that I’ve not worked up the nerve yet! Yes, you can tell me I’m crazy! :)}
Last week’s goals:
Family/Mothering Goals
1. Finish reading Quest for Truth:Taken and Spy for the Night Riders aloud to the children.
2. Start our summer schedule.
3. Write a love note to Jesse.Personal Goals
4. Finish reading Escape from Saddam. Start The Referral Engine.
5. Run at least five times.
6. Listen to 2 hours of The Little Big Things.
7. Sleep for at least 7.5 hours every night.
Home Management
8. Follow my Freezer Cooking plan and blog about it.9. Make Homemade English Muffins.
Business Goals
10. Write one article for another site.
This week’s goals {pretty much a repeat!}:
Family/Mothering Goals
1. Finish reading Quest for Truth:Taken and Spy for the Night Riders aloud to the children.
2. Go to a baseball game and musical production as a family.
3. Write a love note to Jesse.
Personal Goals
4. Finish reading Escape from Saddam. Start The Referral Engine.
5. Run at least five times.
6. Listen to 2 hours of The Little Big Things.
7. Sleep for at least 7.5 hours every night.
Home Management
8. Follow my Freezer Cooking plan and blog about it.
9. Make Homemade English Muffins.
Business Goals
10. Write one article for another site.
How did you do on last week’s goals? What are your goals for this week? I’d love to have you share your progress on last week’s goals and your goals for this coming week in the comments. Of, if you’ve blogged about it, leave your direct link below. Let’s cheer each other on to live purposeful and productive lives!
You can download a free customizable weekly goal-planning sheet here.
This week’s menu
 Easy Italian Breadsticks (made in the bread machine!)
Breakfasts
Granola bars
Cereal
Baked Oatmeal (from the freezer)
Scrambled eggs, Cinnamon Roll Biscuits, fruit salad
Banana Split Pancakes
Omelets in a Muffin Tin, Fruit
Homemade English Muffins, scrambled eggs, fruitLunches
Peanut Butter & Jelly Sandwiches from the freezer
Lunch with friends
Leftovers x 2
Cheese Quesadillas, carrots, fruit
Salad, Hard-boiled eggs, toast, fruit
Snack-y lunchSnacks
Fruit/veggies
Popcorn
Chocolate Waffle Ice Cream Sandwiches
Better for You Banana BreadDinners
Dinner with extended family
Italian Chicken, Bread Machine Buttery Rolls, steamed veggies, fruit
Southwest Rollups from the freezer, steamed veggies, sliced oranges & apples
Homemade Pizza, tossed salad, fruit salad
Dinner out
Ham & Cheese Pockets from the freezer, fruit salad, steamed veggies
Lasagna Casserole, Easy Italian Breadsticks, steamed broccoli, fruit
What’s on your menu this week? Share details and/or your link to your menu plan in the comments.
How to Plan a Frugal Camping Trip

Guest post from Jackie of Mom on a Mission
Our family loves the great outdoors! Three years ago we bought a pop-up camper through Craigslist to make lasting family memories. My husband bought it off season and got it way below book value.
A year later we began to look for a camper with a bathroom, knowing we were having a little one on the way. Our friend found a used hybrid Jay Feather during the winter — we got a great price and begin to look for ways to save at the campground before the Spring.
Here are just a few of the ways we came up with:
Use membership discounts.
Good Sam RV Club and Passport America both offer discounts through a reasonable membership fee. Passport offers a whopping 50% off nationwide participating campgrounds. KOA offers discounts on special weekends. We camp at KOA when they run buy one get one free nights.
Some campgrounds offer free nights. For instance, Adventure Bound in Gatlinburg, TN offers all military, police, fire, nurses, EMT and teachers free camping for two nights on a designated weekend of the year. KOA offers buy one night, get one free on Mother’s Day and Father’s Day weekends.
Google “free camping”, “discount camping” and “complimentary camping” to see if there are any local campground deals in your area.
Dovetail your camping with local attractions.
We bought season passes at Dollywood in Tennessee this year so we will coincide our camping trips with our trips to Dollywood and Spash Country, use our Passport America discount, and save money on food by eating in our camper.
We live in a gorgeous area where there are plenty of hiking trails, natural water falls, slides, fishing, kayaking, and natural beauty. Different areas offer museums, parks, playgrounds, and more.
Research your camping area and look for discounts to those places as well. Groupon and Living Social sometimes offer half price tickets to different attractions.
Pack your freezer food and plan a menu.
You would think in the great outdoors, you could easily scrounge up something tasty. This is true when you only have one meal to plan, but most mommas would agree a healthy weekend requires some planning ahead to avoid last-minute purchases from the overpriced camp store.
This momma plans a camping menu just like our home menu — complete with breakfast, lunch, snacks, and dinner. I like to write it down and make as much as possible ahead of time. Salads, snacks, and fresh veggies can easily be stored in ziptop bags to fit inside a compact camper fridge or cooler.
I use a plastic shoe box to store items such as marinated chicken and homemade flatbreads for grilled pizza and/or gyros.
I like to make a healthy homemade trail mix with nuts as a protein snack. I often make freezer breakfast burritos or breakfast bagel bites for easier clean up in the camper. A fresh fruit basket on the table is a perfect way to implement grab-and-go for the kids.
Just like Crystal, I’m an avid freezer cook and I pack a cooler of freezer goodies right before we head out.
Many times camping can be just as costly as a motel visit. However, when you take these money saving ideas into consideration, you may find camping a frugal, family fun adventure like we do!
Jackie Brown is a Mom on a Mission, freezer cooking for her family while serving the poor and needy in her community.
OVER-SPENDING EVERY SINGLE MONTH?Grab these FREE Budgeting Sheets!
Click here to download!
4 Ways to Save Money on Moving

Guest post by Meg from Saving On The Essentials
Moving can be a stressful time. Between packing your current house, coordinating schedules with those helping you move, and unpacking, things can quickly get stressful.
As if that isn’t enough to take care of, you also have to keep in mind the cost of moving: renting versus borrowing trucks, the cost of boxes, tape, and packaging material for fragile items, and much more.
Here are a few tips I have put into action during our last two moves to help keep our moving costs minimum:
1. Research Prices on Moving Trucks
My husband and I moved twice in a six month period. The first time was only a few blocks so we were able to use my brother in law’s truck and as well as our our vehicles to move our entire house.
However, during our second move, we moved out of state. We knew that we would need to rent a truck in order to move our house in one trip. As we began to research prices, we found a wide range and were shocked at how much it costs to rent a moving truck!
Make sure to compare prices in order to get the best bang for your buck. Read all the fine print to see who charges the most for miles traveled over the set limit, late fees, and any other hidden fees.
We were surprised to be charged a $5 Environmental Fee from our truck rental because the company uses an environmentally friendly soap when washing their vehicles.
2. Find a Great Deal on Moving Boxes
When we reserved our moving van, we had the option of purchasing moving supplies. These came to a whopping total of $100! Needless to say, we opted for a more affordable (free) option.
We were blessed to receive a lot of our moving boxes from my husbands workplace, but we also were able to get them from our local grocery stores, Craigslist, family, friends, and neighbors.
3. Use Items on Hand to Protect Breakables
Use your wash clothes, towels, newspapers, expired coupons, and other items you have on hand to protect your breakable items. Clothes and towels are going to take up space when you box them to move anyway so make sure to put them to good use during your move!
4. Plan Your Moving Day Meal in Advance
When our moving day arrived I was ill prepared to feed those who so generously offered to help us move. Due to the fact that we were moving and all of our pots, pans, plates, silverware, and glasses were loaded into the moving van, we opted to splurge for a pizza lunch as a way to thank our family and friends for their help during our move. Easy prep and clean up is a must!
Using these simple money-saving tips, we were able to keep our moving expenses to a minimum.
What are your best tips for saving money on moving?
Meg Kavanaugh is an Arkansas native married to her best friend, Andrew. When she isn’t bargain hunting she spends her spare time with family, reading, or photographing God’s beautiful creation! She shares her love for frugal living and money saving tips over at Saving On The Essentials.
We Paid Cash: A New-to-Us Car
 A testimony by Kate from San Diego Deals and Steals
In 2011, we completed our second adoption process – this time completely debt free! One of the ways we did this was by praying my husband’s 99 Camry (with over 250,000 miles and a cracked radiator) would last just a bit longer.
Since we were fundraising for our adoption, we didn’t want to spend any extra on anything unless we absolutely had to. However, as soon as we completed our adoption, our next financial move was to save for a slight upgrade to his car.
We put the money we had been putting in our “adoption fund” into the “newish car fund”. Here are some of the ways we saved:
- working odd jobs
- continuing to cut back our grocery budget and cooking at home from scratch
- enjoying free entertainment – playing at the park, renting free movies, street fairs, etc.
- the little bit of money I made from my blog
- random, unexpected commission checks (hubby is a freelance artist and writer – his commission check was more than we anticipated this year so we got to our goal six months early!)
It all added up and we saved just over $6,000 without touching our emergency fund!
Our goal was to spend less than $6000 and not include the money we would make from our old car sale. We found a 2004 VW Passat with a little over 100,000 miles (that may seem like an old car to some – but it was dreamy for us!) and purchased it for just under $5,500.
Thank goodness he holds none of his self-worth in what he drives! We have lots of friends with much nicer cars, but he doesn’t care. He says, “Ours is paid for!” (Love him for that).
His new car also gets better gas mileage so he will save about $1 each day on his 40+ mile commute. That is going to help as we continue to work on our Baby Steps. We also sold our car (with full disclosure) for $1,700 the very low blue book value – but we wanted to be honest with our sale.
I know many people would have thought nothing of financing a $20,000 car with that $6,000 down. Instead, we just bought a less expensive car and put the money leftover (the extra $500 from our car savings and the $1,700 from the sale of his old car) into our Emergency Fund savings in the bank.
Kate lives in San Diego CA with her husband Harry, and kids, Josie (homemade), Silas (handpicked from Russia), and Charlotte (handpicked domestically). She is passionate about adoption and having fun in San Diego frugally. You can see more at San Diego Deals and Steals where she blogs about both.
Have you saved up and paid cash for something — large or small? Submit your story for possible publication here.

Best Frozen Pizza Dough
Homemade pizza is such a family-friendly meal… and extra delicious with a homemade crust. This recipe is super easy (and freezer-friendly!)
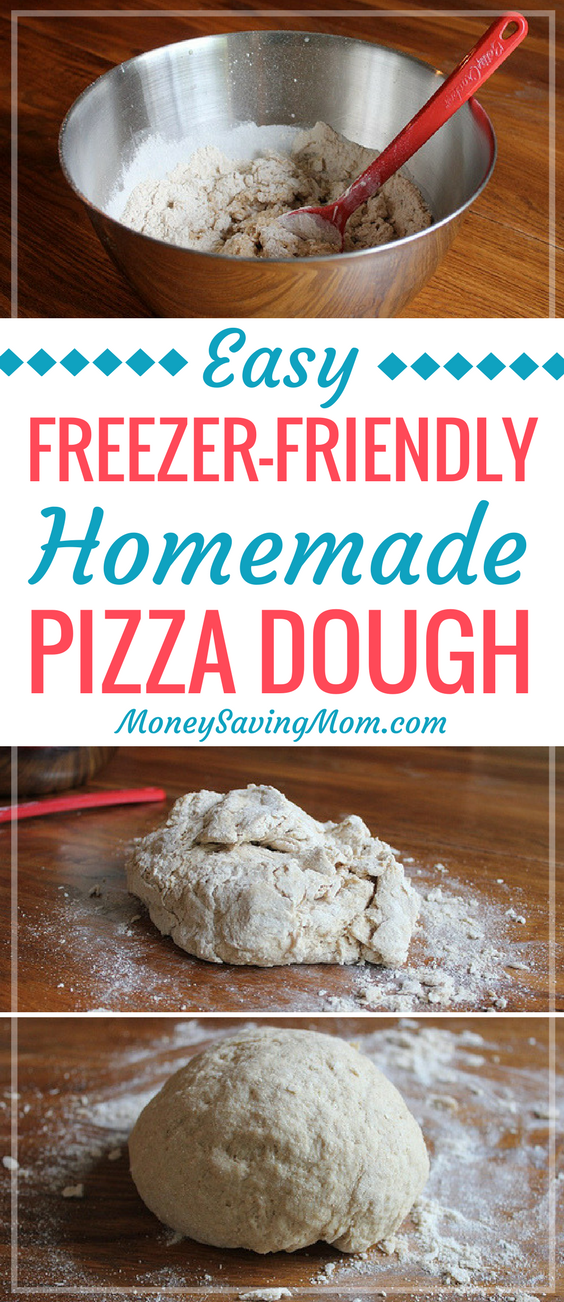
You Will Love this Homemade Pizza Dough Recipe
This pizza crust recipe has been my go-to recipe for years. It’s so easy to make — and it’s really hard to ruin. In fact, I’ve made it dozens upon dozens of times and I don’t think I’ve ever messed it up.
That’s saying a lot coming from someone like me, who can even ruin simple recipes like Reese’s Peanut Butter Bars.
Can you freeze pizza dough?
Last year, I experimented with freezing the pizza dough — to make it even quicker to pull off Homemade Pizza for dinner.
While I still think fresh is best, the frozen dough is almost as good — and it’s much less expensive than ordering pizza for dinner! 🙂
Ingredients for Homemade Pizza Dough
- 2 cups warm water (105º to 115º F)
- 2 Tablespoons active dry yeast
- 2 teaspoons sugar
- 2 teaspoons salt
- 4 Tablespoons oil (vegetable, Canola, or olive oil)
- 5 cups flour (can use all whole-wheat, half white/half whole-wheat, or all white)
How to Make The Best Pizza Dough
1. Pour warm water into a large bowl and sprinkle the yeast over it. Stir to dissolve.
2. Add the remaining ingredients and mix.

3. Dump onto a floured surface and knead dough for 3-5 minutes, or until smooth and no longer sticky.

4. Cut the lump of dough in half and roll out onto 2 greased pizza pans OR, put each half of dough into an airtight freezer bag and freeze for 4-6 weeks.

5. To Bake with Fresh dough: Add pizza toppings of your choice. Bake at 500ºF for around 10 minutes (until the crust looks crispy and lightly browned).
6. To Bake from Frozen dough: Place frozen dough in a greased bowl, cover with a damp towel, and thaw at room temperature for at least 3-4 hours. Roll out and shape onto a greased pizza pan. Add pizza toppings of your choice. Bake at 500ºF for around 10 minutes (until the crust looks crispy and lightly browned).
How to freeze Homemade Pizza Dough
The best way to freeze this homemade pizza dough is to divide the dough ball into 2 portions and place each into a gallon-size zip top freezer bag. Squeeze the air out, label, and freeze for 4-6 weeks.
I’ve found it often works best to let the dough cool in the refrigerator (in the zip top bags) before freezing it. The dough will continue to rise in the fridge, so you may need to squeeze the air out of the bag a couple of times.

How to thaw this Frozen Pizza Dough Recipe
You’ll want to plan ahead about 5 hours when using frozen pizza dough — as that’s about how long it takes to defrost, top, and bake.
1. Place frozen dough in a greased bowl and thaw at room temperature for at least 3-4 hours.
2. Roll out defrosted dough and shape onto a greased pizza pan.
3. Add pizza toppings of your choice.
4. Bake at 500ºF for around 10 minutes (until the crust looks crispy and lightly browned).

Does Frozen Pizza Dough need to rise after thawing?
Nope! Simply defrosted the dough enough so you can roll it out, then top and bake!
Fun recipes to try with the Best Homemade Pizza Dough
- Olympic Rings Pizza
- Homemade Hawaiian Pizza
- Grilled Pizza
- Pepperoni Rolls
- Stromboli (add the filling to half the dough, fold the other half over the filling)

Homemade Frozen Pizza
Ingredients
- 2 cups warm water 105º to 115º F
- 2 tbsp active dry yeast
- 2 tsp sugar
- 2 tsp salt
- 4 tbsp oil vegetable, Canola, or olive oil
- 5 cups flour
Instructions
- Pour warm water into a large bowl and sprinkle the yeast over it. Stir to dissolve.
- Add the remaining ingredients and mix.
- Dump onto a floured surface and knead dough for 3-5 minutes, or until smooth and no longer sticky.
- Cut the lump of dough in half and roll out onto 2 greased pizza pans OR, put each half of dough into an airtight freezer bag and freeze for 4-6 weeks.
- To Bake from Fresh: Add pizza toppings of your choice. Bake at 500ºF for around 10 minutes (until the crust looks crispy and lightly browned).
To Bake from Frozen:
- Place frozen dough in a greased bowl and cover with a damp towel.
- Thaw at room temperature for at least 3-4 hours.
- Roll out and shape onto a greased pizza pan.
- Add pizza toppings of your choice and bake at 500ºF for around 10 minutes (until the crust looks crispy and lightly browned).
Love this recipe?
Make sure to share and save it on your favorite platform below!
FREE One Week Menu Plan!
Done-For-You Dinner Recipes With Simple Ingredients and a Grocery Shopping List!
Reader testimonial: We made 112 lunches in 7 hours!

Need some freezer cooking inspiration? Head on over to Finding Hope to read about how Kayse and Bethany made 112 lunches in 7 hours!
How to Overcome Burnout and Get Back on a Routine (Part 4)

If you missed Parts 1-3, be sure to read them here.
6. Make Time For Things That Energize You
If you are feeling burned out, step back and evaluate your life. How much of the time are you spending doing things that drain you and how often are you doing things that energize you?
If your answer to this question is that you’re doing little that energizes you, you may have just found the solution to overcoming burnout.
Make a List of Things You Love to Do
Instead of thinking of all the things you have to do or the things you should do, clear your mind for 10 or 15 minutes and just make a list of things you love to do. What excites you, makes you feel alive, refreshes you, and recharges your batteries?
Maybe it’s gardening, having lunch with a friend, going to garage sales, painting, scrapbooking, swimming, writing, or browsing books at a bookstore. Whatever comes to your mind as something you love to do, write it down.
Be Intentional About Scheduling In Time for Things You Love
Take your list and schedule in at least one or two things every week that you love to do. Not only does this give you something to look forward to every week, but it prevents you from becoming too worn down. If every few days — or at least once a week — you’re doing something that recharges you, you’re going to be less apt to ever feel completely burnt out because you’re regularly replenishing your energy stores.
When I did this exercise, it was so helpful for me. I realized that, while I love spending time with other people, I’m most refreshed with quiet. Going and doing and being with people exhausts me after awhile.
So, in order to recharge my batteries, I need time away — going to a coffeeshop and writing for a few hours, curling up with a good book for an hour, or going grocery shopping by myself.
Because I know this about myself, I intentionally carve out at least an hour or two of quiet each week, if at all possible. The stillness — without people and projects and pressing to-do’s — re-energizes me and makes me much more productive and passionate about life.
What If You Can’t Think of Anything You Love To Do?
When I was deep in the midst of postpartum depression, someone encouraged me to try and do something fun every single day. The problem was, I couldn’t come up with a single thing I wanted to do. Nothing sounded fun, interesting, exciting, or even appealing to me. And that was a warning sign that I needed to get help — and to get it quickly.
If you’re feeling this way, please don’t take it lightly. Like me, you may be suffering from something more than just physical exhaustion or fatigue.