


These slow cooker cinnamon biscuits taste just as good as cinnamon rolls without all the extra time and effort. Plus, since they bake in a slow cooker, you won’t heat up your kitchen!

I recently came across a recipe slow cooker “Cinnamon Rolls” and I was very intrigued. So naturally, I had to try it for myself.
But in typical Crystal fashion, I had to tweak the recipe a bit, too. 🙂
Spoiler Alert — We LOVED them!
I was really happy with how they turned out.
They were yummy, easy to make, and with the alterations I made, they are good for you, too.
Best of all, we had hot biscuits without heating up the house!
Now I’m all inspired to try making other breads in the crockpot!
While the original recipe calls these Cinnamon Rolls, since they aren’t rolled up in any manner, I changed the name of the recipe to Cinnamon Biscuits, as that seemed better suited.
Ingredients for Slow Cooker Cinnamon Biscuits
- 1 recipe of your favorite biscuit dough (I used Homemade Whole-Wheat Baking Mix mixed with enough milk to make it into a biscuit dough.)
- 1/4 cup butter melted
- 1 teaspoon vanilla
- 1/2 cup raw sugar (you could also use brown sugar or regular sugar)
- 1 teaspoon cinnamon

How to Make Cinnamon Biscuits in the Slow Cooker
1. Thoroughly grease the crockpot with butter or shortening.
2. In a small bowl, melt butter in the microwave and stir vanilla into it.
3. In another small bowl, combine sugar and cinnamon.
4. Roll out biscuit dough and cut into biscuits with a biscuit cutter.
5. Dip biscuits into melted butter mixture, then into cinnamon sugar mixture. Put in crockpot in a single layer.

6. Cover the crockpot with a tea towel or paper towel (to reduce condensation) and put lid on.

7. Turn crockpot on low and bake biscuits for 2-3 hours until done.
You can glaze with a powdered sugar & milk glaze, if you’d like. Or you can leave them unglazed like I did. I thought they were plenty sweet without the glaze!

I let Silas make his own biscuits with some of the leftover dough!


Slow Cooker Cinnamon Biscuits
Ingredients
- 1 recipe of your favorite biscuit dough (see notes below)
- 1/4 cup butter melted
- 1 teaspoon vanilla
- 1/2 cup raw sugar or brown sugar
- 1 teaspoon cinnamon
Instructions
- Thoroughly grease the crockpot with butter or shortening.
- In a small bowl, melt butter in the microwave and stir vanilla into it.
- In another small bowl, combine sugar and cinnamon.
- Roll out biscuit dough and cut into biscuits with a biscuit cutter.
- Dip biscuits into melted butter mixture, then into cinnamon sugar mixture. Put in crockpot in a single layer.
- Cover the crockpot with a tea towel or paper towel (to reduce condensation) and put lid on.
- Turn crockpot on low and bake biscuits for 2-3 hours until done.
- You can glaze with a powdered sugar & milk glaze, if you’d like. Or you can leave them unglazed like I did. I thought they were plenty sweet without the glaze!
Notes
Love this recipe?
Make sure to share and save it on your favorite platform below!
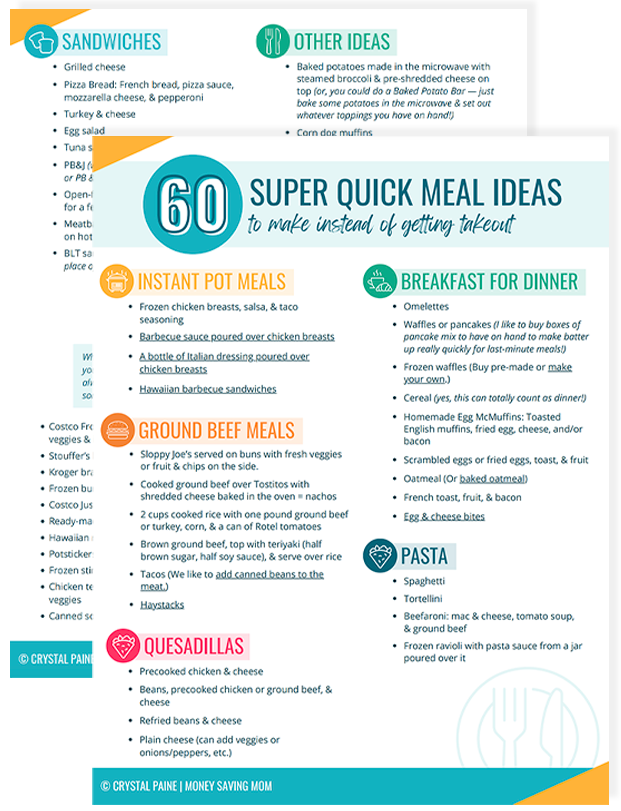
FREE DOWNLOAD: 60 Meals To Help You Avoid Takeout!
Meal time just got so much easier!

Today’s shopping trips: The health food store & Walgreens

We went to the health food store and Walgreens today. Here were our purchases:
The Health Food Store Shopping Trip
Ezekiel Sprouted Tortillas –$3.99
Raw Cheddar Cheese from a local farm — $5.93
Quinoa — $2.42
Pears — $0.99/lb. — $1.69 total
Chocolate Covered Sunflower Seeds (we’re going to use these for some Olympics-themed activities — I was looking for an alternative to M&Ms and these fit the bill!) — $6.70Total with tax: $22.24
I’ve never purchased quinoa (can you believe it?!) and have been wanting to try it. I was surprised at the price tag on it from the bulk bins, so I’m going to be on the hunt for a better deal on it since I’ve heard it’s really good and good for you. If you have a recommendation for where to get a good deal on it, I’d love to hear!

Walgreens Shopping Trip
10 Memo/Composition books — $0.20 each with coupon
5 Highlighters — $0.19 each with in-ad coupon
Glue — $0.39
Jumbo Glue Stick — $0.39
Erasers — $0.39
2 packages Sticky Page Markers –$0.39 each
2 packages of Wexford Dividers — $0.39
3 Clear School Boxes — $0.49 each with in-ad coupon (2 not shown as they were snagged to be put to use by two eager kiddos as soon as we got home!)
Total with tax : $8.21
How we save money and keep life simple by using the resources in our community
How we save money and keep life simple by using the resources in our community

Stephanie emailed in recently and I thought you’d be inspired by what she shared:
Have you ever thought about simple, small ways in which you can use the resources in your community to save, and also to teach your children simplicity and the basics of life? The reward of hunting and gathering is immense.
Here are a few of the ways we’ve used the resources available to us in our community to save money and keep life simple:
–My husband hunts. That provides considerable deer, hog, bullfrog and fowl meat for us. We also fish.
–My 6-year-old son and I have collected at least a gallon of mulberries in the last two weeks and we are freezing those for future use.
–We collect black walnuts (we live in Kansas) in the fall, let them sit all winter, then crack them in the spring.
–We pick rhubarb from my husband’s grandmother’s house, it comes up every year.
–A kind farmer let us ride his combine and gave us a bucket of wheat which we will grind into flour.
–I save the crusts off his bread and make my own bread crumbs.
–We save rain water and use it for our garden (though the drought has hindered that some!)
What are some ways that you save money by using the resources available to you in your community?
We Paid Cash: Our hospital birth
 A testimony from Lydia who blogs at Five4Five Meals
There is this book we read to our son called Wherever You Are: My Love Will Find You. The first line reads, “I wanted you more than you’ll ever know, so I sent love to follow wherever you go.”
If I wrote this book for my son, the first line would read, “I wanted you more than you’ll ever know, so I did some serious saving to pay for the hospital bills.”
You see, when I was ready to have my baby I was a newspaper journalist working for cheap at a company that offered bargain basement benefits, so long before I got pregnant, we started saving.
Months later, I found myself pregnant, thrilled, and sitting in the insurance coordinator’s cubicle at my obstetrician’s office. She was telling me that my insurance was covering little and my deductible was among the highest she had ever seen. I was fully aware that my benefits amounted to a latex bandage and two chewable vitamins, not the $5,000+ it would take to have this little guy.
When I told her we had been saving for a baby her eyes grew misty. “That is the sweetest thing I’ve ever heard,” she said.
We started saving six months before I was pregnant, cutting out everything from sodas from the drink machine at work, to coffee to lunch outings. Because of this, we were both able to sock away $50 a week from each paycheck.
We also saved any money we got for Christmas, birthdays, tax refunds, and the cash we were graciously given as shower gifts.
At the time, my husband worked out of town a lot, so per diem checks also went in savings along with spare change, gas reimbursement checks, funds from freelance writing gigs, and a few things sold on Amazon and eBay.
When my baby boy was born the night before our sixth wedding anniversary, I was not worried where the cash would come from to pay for his delivery.

I have to be honest, there was still a fair amount of sticker shock that came when the hospital bill finally arrived and I was grateful my husband and I had padded our savings. I was even able to get a 20 percent discount from the hospital when I paid our bill in full instead of in installments. That equaled a savings of over $2,000!
Life has changed so much since our son was born, and not just because we are new parents. My husband was offered a job — out of the blue — that pays excellent benefits and afforded us the opportunity to move closer to my parents and, due to our new-found savings habit, allows me to stay home.
This has been everything I prayed for.
While the saving was tough and the bills were expensive, my son is worth every penny. Some things you just can’t put a price on.
Lydia Senn is former stressed out journalist turned freelance writer and stay at home mom, who blogs about cooking on a budget and cleaning green. You can check out her blog at Five4FiveMeals.com.
Have you saved up and paid cash for something — large or small? Submit your story for possible publication here.
Do It Yourself: Raspberry Vinaigrette

Life Blessons shows you how to make homemade Raspberry Vinaigrette.
Do you have a fun and frugal DIY idea to share? I’d love to hear about it! Read the submission guidelines and submit it here.

15 Ways to Have More Energy (Part 3)
We’ve been talking about ways to have more energy this week. If you missed the first two posts in this series, read them here.
Here are three more ways to have more energy:
7. Set Goals
Without goals, you have no real purpose for going through your days. If you’re aiming at nothing, you’re not going to feel inspired, motivated, or driven. Goals give you momentum, passion for life, and a reason to wake up every morning excited about what lies ahead of you.
Good goals need to be specific, measurable, and realistic. I find it’s helpful to break big goals down into simple bite-sized pieces. Instead of setting a goal to read a book in one week, I’ll set a goal to read 2-3 chapters each day — enough to easily finish the book in a week.
By breaking my goals down into smaller chunks, it makes them much more manageable and doable — and I usually end up following through with more of them that way, too!
If you don’t have goals, start with something simple. At the beginning of the week, pick one or two small goals to accomplish, write them down, and then break them down into smaller pieces — and work on knocking them out little by little.
You’ll probably be amazed at how much more zest for life you’ll have when you actually have a destination in mind and a plan to get there. And you just might find that your renewed zeal for life helps you attack all of life with more energy and excitement!
8. Go To Bed Early
If you’re a night owl, you’re already shaking your head and skipping over this one. And it might not work for you.
For me personally, though, going to bed early on a consistent basis really helps me to feel more rested. When I feel more rested, I’m naturally much more energetic and cheerful. Rather than dragging through each day trying to keep my eyes open with toothpicks, I’m meeting the day with gusto.
I’ve found that I can’t commit to going to bed at 9 p.m. every single night, but if I aim to go to bed at 9 p.m., I’m much more likely to be in bed close to 10 p.m. It doesn’t always happen and I usually have one or two nights per week when I’m up past 11 p.m., but I rarely every stay up much past 11 p.m. — that’s really late for me! 🙂
As a result, I get more sleep — and I’m able to get up early most mornings, something that gives me a huge headstart on the day.
If you’d like to start going to bed earlier but you just feel like it’s not possible, sit down and really think through what your hindrances are. Do you need to cut out some of your evening activities or just turn off the TV or computer earlier? Do you need to eat dinner earlier and start your bedtime routine right after dinner?
For those of you who want to go to bed earlier but can’t seem to fall asleep much earlier than midnight, try getting up really early for two or three days in a row, plus adding some exercise into your schedule. You’ll probably find that by the second or third day, you’re starting to feel tired by 10 p.m.
And by the way, if you can at all help it: go to bed when you first start to feel drowsy at night. Don’t wait for your second wind to kick in. Just go to bed — you’ll be glad you did in the morning!
9. Make the Most of Your Mornings
What you do in the first two hours of your morning sets the tone for your whole day.
If you drag yourself out of bed after hitting the snooze button eight times, stumble into the kitchen, turn on your laptop or phone and waste 45 minutes trying to wake yourself up, you’re not setting yourself up for a day of success.
Think about what five things you’d really like to do in the same order each morning, write these down, and commit to getting up and doing them every single morning for the next three weeks.
It will be hard to follow your five things morning routine at first, but stick with it and it will pay off. I promise!
Making the most of your mornings will give you momentum for the rest of your day!
{And by the way, for those of you moms out there who are already feeling defeated because your mornings are so unpredictable when you have little people underfoot: don’t feel badly if you don’t always do all five things perfectly in the same order every day for three weeks. Life happens and perfection is impossible. Do the best you can do and remember that making progress in the right direction — even if it seems like microscopic progress — is still moving in the right direction!}
…To be continued tomorrow.
photo courtesy of BigStock
Help! I’m so frustrated with trying to use coupons that I’m thinking of giving up!
Help! I’m so frustrated with trying to use coupons that I’m thinking of giving up!


I’m giving up on coupons! Kroger accused me of “fraudulently” printing a coupon for a free package of Kings Hawaiian Bread, which was sent to me via a Facebook offer. Then today at Walart, they refused three of my coupons that were printed from Coupons.com because they didn’t have the right bar code.
Is this a common occurrence for users of coupons? Is there something I need to be doing differently with my coupons. I just wonder is this is something that happens to others. Hints, tips, and suggestions as to how to avoid these issues in the future? -Cyndi
I think most all of us couponers have had a bad experience or three while using coupons, so we feel your pain and frustration.The bad experiences are usually very minimal in comparison to the good experiences, but they happen to all of us at one time or another.
A number of years ago, I was accused of cheating and firmly asked never to come back to a store by a manager. Truth be told, although I replied kindly and left the store, I was shaking and wanted to give up coupons then and there.
Instead, because I knew that the manager was misinformed on coupons and had overstepped his bounds in the way he had treated me, I went home, wrote out all of the details of what had happened, and placed a call to that store’s corporate office the next morning.
You know what? They apologized profusely, reiterated the fact that I was using coupons in accordance with their policy, and were very concerned with how the manager had treated me.
In fact, they asked me if I’d like for them to have him call me and personally apologize! I said that wouldn’t be necessary, but I just wanted to ask if they could make sure the manager was better informed as to what their coupon policy was so that I and other couponers who shopped there in the future wouldn’t have such a difficult time using coupons.
I never found out exactly what happened, but I do know that from then on, that store became a much more coupon-friendly store and the manager never gave me or my other couponing friends who shopped there any issues.
So don’t give up — even when you feel frustrated! Your wallet will thank you and I promise that not every experience using coupons will be so bad in the future.
Here are some suggestions as to ways to prevent as many bad couponing experiences as possible in the future:
1. Make Sure You Know the Deals & Store Policies Well
Get a copy of the store’s corporate coupon policy and bring it with you when you shop. Know it backwards and forwards. That way, if there is any question regarding your coupon use, you are well educated and can make a clear case for why you are using coupons in accordance with the store’s corporate coupon policy.
2. Look for Efficient and Cheerful Cashiers
I always scan the checkout lanes before heading into one and look for a cashier that is speedy, efficient, and cheerful. For some reason, I always seem to have better success in using coupons with these types of cashiers.
In addition, I’ll look for people who are using coupons and checkout and if I see that the cashier is running them through cheerfully, I’ll head to that line. As the cashier is usually what makes or breaks your coupon-shopping experience, finding cashiers who are coupon-friendly go a long way toward a pleasant checkout.
3. Be Polite and Courteous, But Firm
Unfortunately, many cashiers do not know the store’s coupon policies. I can’t count the number of times a cashier has told me they can’t accept a coupon for one reason or another.
While their reason might be 100% true and valid, more often than not, I’ve found that they will tell me something that I know is not right per the store’s coupon policy. When this happens, I politely, but firmly explain what the store’s coupon policy is. More often than not, this is all it takes and they willingly accept all of my coupons, no questions asked.
Be a polite and informed customer, follow the store’s coupon policies to a tee, and you’ll usually earn the respect of the cashiers. When they respect you, they are much less likely to question your usage of coupons.
4. Don’t Make a Big Stink
In some instances, I’ve cordially explained the coupon policies and a cashier won’t budge. Instead of getting frustrated or upset, I just calmly ask them to remove the item from my transaction and return my coupon.
Yes, I miss out on some deals, but I’d rather leave the store without the deal if it means I avoid holding up the line and making a scene at the cash register. Plus, in many instances, I can use the coupon at another store to get a great deal.
5. Work on Lowering Your Grocery Bill Without Using Coupons
While I’m a big advocate of using coupons, I think they are just one piece of the grocery-savings pie. If you live in an area with few coupon-friendly stores, you might find that you just aren’t going to see the savings that someone with a lot of store options and stores that double or triple coupons is going to see.
Don’t be discouraged by this! There are many, many other ways to save money without using coupons. Pick a few of these to implement each month and determine which ones work best for your family.
Not everything that works for someone else will work for you, but I’m sure you’ll find many simple ways to lower your grocery bill without using coupons. Paired with the savings you can also obtain by using coupons, you can eventually really see significant savings!
What advice do the rest of you have for Cyndi? I’d love to hear your suggestions and tips!
photo courtesy of Big Stock
Ask The Readers: How do United Foods and Azure compare to each other?
Ask The Readers: How do United Foods and Azure compare to each other?
 Today’s question is from Hope:
I’m wondering if anyone has been in a buying club with both United Foods and Azure Standard? If so, which is better and why? Does one have better prices or delivery times? Is it easier to return products with one or the other? -Hope
Do you have a question you’d like to ask Money Saving Mom® readers? Read the submission guidelines and submit it here.
15 Ways to Have More Energy (Part 2)
Here are three more ways to have more energy (Missed the first three? Find them here.):
4. Eat Well
Food is your body’s fuel. If you’re mostly fueling yourself with donuts, candy bars, and carbonated beverages, that is probably the reason you’re feeling lethargic.
I recently read Energy Explosion (a quick and very practical read, by the way) and I loved the author’s encouragement to start each meal with protein and produce. Fill up on good fresh fruits and veggies and protein first, before eating sugars, fats, and carbs. This will not only give you more energy, but it will probably also help you more easily shed any extra pounds you’re carrying around.
I’ve found it helpful to make raw fruits and veggies really accessible. If I have a big bag of carrot sticks pre-washed and chopped in the fridge, fresh fruit already cut up, and eggs already hard-boiled, I have a lot fewer excuses for not grabbing a healthful snack or for not filling up on good foods at lunchtime instead of reaching for breads or sweets.
It’s completely okay to have some breads and sweets, but make sure that your diet is primarily made up of protein, fruits, and veggies. I find it helpful to track what I eat on SparkPeople to help me make sure I’m eating a balanced diet.
5. Take Vitamins
I used to be one of those people who felt like you could get all the nutrition your body needs from food alone. But my husband encouraged me to start taking a high-quality multi-vitamin and fish oil on a daily basis and I’ve been amazed at the difference that I’ve felt.
I encourage you to try taking a high-quality multi-vitamin for three months and see if you feel any difference. If you don’t, at least you know you’re not hurting anything to be getting some extra vitamins and minerals. 🙂
In addition, I would recommend scheduling an appointment with your doctor to have routine bloodwork done to see if there are other vitamins or nutrients you’re deficient in. It’s very possible that your lack of energy is due to anemia or some other vitamin deficiency you’re experiencing and simply adding some additional vitamins or supplements might make a major difference.
6. Refill Your Tank on a Regular Basis
In Leading on Empty, the author talks about making a list of things that refill your tank and things that deplete your tank. And then he encourages you to look at your week and make sure that you aren’t lop-sided in your activities (i.e. only engaging in activities that deplete you and never taking time for things that energize you).
What will energize you versus deplete will be different for each and every person. Since I tend to be more of an introvert, I’m energized and refueled by quiet: reading a good book, watching a movie with my husband, writing, or even cleaning.
I also find that a change in scenery can do wonders for me. Getting out of the house and going grocery shopping, taking the children to the park, chucking the schedule for an afternoon and playing board games or meeting a friend for a playdate, can often be just the ticket I need to recharge my batteries.
Make a list of things that refill your tank and then make sure you are engaging in those activities on a regular basis. If not, you’re going to run around trying to survive on fumes — and that’s a surefire way to constantly feel zapped of energy.
…To be continued tomorrow.
photo courtesy of BigStock
10 Weekly Goals

Last week wasn’t exactly like I’d envisioned.
It was a quiet week and there were a lot fewer responsibilities than I usually have, but Kaitlynn was so sick for most of the week that I spent a lot of time in the cabin with her or at the doctor’s with her. And then I got sick with the stomach flu on Friday evening and it’s taken me until today to start really feeling back to more of my normal self again.
But it was good to get away — despite the sickness. I had a lot of time to think, process, and view my life and priorities from a more objective standpoint. And I came home feeling renewed and refreshed, albeit it nauseated! 🙂
At any rate, I basically set most of my six goals for last week on the back burner. Caring for my sick daughter and then trying to get well myself were my top priorities.
{By the way, I’m SO thankful that Kaitlynn is finally almost 100% back to normal again! She was such a trooper through the IV, bloodwork, and throwing up more times than I can count. She’s a brave girl and I’m so thankful and relieved that it appears she just had a really bad case of the stomach flu plus a UTI.
I usually am not a worrier and don’t get easily stressed, but I was so concerned about her last week that I think I spent all week living on pins and needles. It made me appreciate anew those of you who deal with special needs children and/or children who have longterm illnesses. You are amazing and I have no idea how you do it — but I will be praying for you with a much greater fervency now that I’ve experienced a tiny little drop of what you must experience on a daily basis.}
Now that we’re finally almost all well (and hoping that no one else comes down with it!), I’m ready to jump back into life and plugging away at my goals again.
Here are my 10 goals for this week:
Family/Mothering Goals
1. Finish reading Wilma Rudolph: Olympic Runner aloud to the children.
2. Continue with swimming lessons for all three children.
Personal Goals
3. Finish reading Beyond Bath Time plus one other book.
4. Sleep for at least 7.5 to 8 hours every night.
5. Continue on with the Choosing Gratitude 30-Day Devotional.
6. Exercise at least five times.
7. Finish listening to Stop Acting Rich.
Homemaking Goals
8. Organize my top dresser drawer.
9. Try at least two new recipes.
Business Goals
10. Edit and submit an article for publication on RooMag.com.
How did you do on last week’s goals? What are your goals for this week? I’d love to have you share your progress on last week’s goals and your goals for this coming week in the comments. Of, if you’ve blogged about it, leave your direct link below. Let’s cheer each other on to live purposeful and productive lives!
You can download a free customizable weekly goal-planning sheet here.
OVER-SPENDING EVERY SINGLE MONTH?Grab these FREE Budgeting Sheets!
Click here to download!
Do-It-Yourself: Canvas Word Art

BrownSugarToast.com shows you how to make homemade canvas word art.
15 Ways to Have More Energy (Part 1)
So many people have been writing in recently and asking me, “How do you have so much energy?”
This question amuses me somewhat, because although I do try to live intentionally by setting goals and following through with them each week, I am not Superwoman or the Energizer Bunny and have friends who run circles around me (I’m looking at you, Angie, and you, Jessica!).
But since I’ve been getting this question so often recently, I sat down and made a list of 15 things I’ve personally found help me have more energy and zest for life. I can’t guarantee that by implementing this list you’re going to all of a sudden have this amazing transformation and feel like you could take on the world, but maybe my list will help give you some ideas and inspiration if you’re feeling lackluster and un-enthused about life right now.
I’ll be sharing three things from my list of 15 each week day this week in hopes that maybe something that has helped me will also be helpful to you. Here’s the first three:
1. Make Sleep a Priority
I know, I know. It’s hard to get sleep when you have a hundred other things you feel you should be doing.
However, if you don’t take the time to rest, you’ll constantly be running on fumes. Rearrange your schedule, turn off the electronics, do relaxing things before bed, go to bed early (if at all possible), take a 30-minute nap in the afternoon, or do whatever else it takes to make sure you are getting good sleep at least 5-6 nights each week (I’ve found that if I sleep well at least five nights each week, I’m rested enough that I can have a late night once or twice a week without it really affecting me!)
Don’t know whether you’re getting adequate sleep? I’ve heard that a good barometer is to see if you’re tired at all midday or afternoon. If you are, you aren’t getting enough sleep at night. Keep extending your sleep at night by 15 to 30 minutes until you no longer feel tired in the afternoon.
2. Drink More Water
Most of us suffer from dehydration, whether we know it or not. Make sure you’re drinking at least 64 to 80 ounces of water each day. If you think you’re currently drinking that much, track your water intake each day for two weeks. You might be surprised to realize you don’t drink as much as you think you do!
I’ve found it helpful to always have a glass of water nearby me, no matter where I am. And when I leave to go somewhere, I try to never leave the house without a big water bottle.
By make water readily accessible, I find I’m much more apt to drink. I also track my daily water intake on SparkPeople, just to verify that I’m staying well hydrated.
3. Exercise
Exercise will refresh you, it will help you shed excess pounds that can be zapping your energy, and it will probably help you be more alert and focused. Plus, as a side benefit, it will likely help you sleep better at night!
There are a thousand excuses for why you can’t or don’t exercise, but I’m not buying any of them. Everyone can find at least 10 minutes a few times per week to go out on a brisk walk, ride the exercise bike, do jumping jacks, or pop in an exercise DVD.
If you can find time to read this post, you can find time to exercise. Make exercise a priority; your current and future health is worth the sacrifice of time and rearranging of schedule.
…To be continued tomorrow.
photo courtesy of BigStock

Slow Cooker Molten Chocolate Lava Cake
This delicious molten lava chocolate cake tastes as good as it looks… and it’s gluten, dairy, and egg-free! Oh, and it’s made in a slow cooker — meaning, you won’t heat up your kitchen!

Guest post from Michelle
Are you the type that unplugs the oven in the summer to avoid heating up your whole house and raising your cooling bill? You’re not alone in this endeavor.
It’s always great to have a few favorite recipes to use during these warm (and enjoyable) summer months that do not require the oven, but rather use alternative cooking devices like the slow cooker and grill! These are great ways to cook dinner most nights, but what about dessert? Yes, that very important course to every meal!
Sure, you can opt for ice cream and popsicles, but what if you want cake? You’re sunk without the oven. Or are you?
I’m here to tell you that you’re not sunk. I have come up with a recipe that does many things for many of you chocolate lovers out there.
Are you ready for it? Molten Chocolate Lava Cake made in the slow cooker that is free of gluten, dairy, and egg (among a few other top allergens).
Yes, my friends, it’s true!
You will Love this easy recipe!
It’s basically a chocolate lover’s delight — super rich!
Also… it’s a “lava cake” so while the outside rim surrounding the crock pot cooks up like a cake. The further you get towards the center of the crockpot, it turns to a pudding consistency, then an icing consistency. YUM!
I recommend serving the cake by spooning out some of the outer “cakey” rim, topped with a little of the pudding center, followed by the “icing”. Then, top it all with fresh berries and powdered sugar (that’s optional, but highly recommended).
Now for that recipe…
")
Ingredients for Chocolate Lava Cake
- 1 cup brown rice flour
- 1/2 cup tapioca flour
- 1/2 cup oat flour
- 1/4 cup ground chia seed
- 4 tsp baking powder
- 1/2 tsp salt
- 1 1/2 cups coconut oil or butter
- 2/3 cups chocolate chips (Enjoy Life is a good dairy-free brand)
- 1 cup white sugar + 1/2 cup white sugar (added separately)
- 6 Tbsp cocoa + 1/2 cup cocoa (added separately)
- 2 Tbsp vanilla extract
- 2/3 cup allowed milk (cow, rice, almond, soy, etc.)
- 2 EnerG egg replacer (3 tsp powder + 4 Tbsp water); or 2 eggs
- 1/2 cup brown sugar
- 1 1/2 cups hot water
- (optional: summer berries, powdered sugar, sliced almonds, etc.)
How to Make Slow Cooker Chocolate Cake
1. Grease the inside of a 6 qt. slow cooker.
2. In a large mixing bowl, mix together the flours, chia seed, baking powder, and salt.
3. In a medium size microwavable bowl, microwave coconut oil and chocolate chips until melted and smooth, stirring occasionally.
4. Stir in 1 cup of white sugar, 6 Tbsp cocoa, vanilla, milk, and prepared EnerG egg replacer, until well blended.
5. Pour the wet mixture into the mixing bowl with the flour mixture. Mix together on medium speed until well combined.
6. Spread this batter into a slow cooker sprayed with cooking spray.
7. In the microwave (using the same bowl from earlier), mix water with the remaining 1/2 cup white sugar and brown sugar and microwave until hot (about 2 minutes).
8. Add in the remaining 1/2 cup cocoa; stir until sugars dissolve.
9. Pour this mixture over top the cake batter already in the slow cooker. It will look like muddy water.
10. Cook on high for 1-2 hours (mine took about 1 hour 20 minutes). You’ll notice it’s done when the batter starts to pull away from the edges and it looks solid (at least on the outer rim).
11. Remove the lid from the slow cooker and turn it off (be careful not to let the water from the lid drip into the cake).
12. Allow the cake to sit without the lid for about 30 minutes before serving.
13. Scoop out the outer “cakey” rim of the lava cake, followed by the pudding and icing center. Top with your favorite summer fruit and powdered sugar.
14. Enjoy your allergy-friendly chocolate goodness!

Slow-Cooker Chocolate Lava Cake
Ingredients
- 1 cup brown rice flour
- 1/2 cup tapioca flour
- 1/2 cup oat flour
- 1/4 cup ground chia seed
- 4 tsp baking powder
- 1/2 tsp salt
- 1 1/2 cups coconut oil or butter
- 2/3 cups chocolate chips
- 1 cup white sugar
- 6 Tbsp cocoa
- 2 Tbsp vanilla extract
- 2/3 cup milk cow, rice, almond, soy, etc.
- 2 EnerG egg replacer 3 tsp powder + 4 Tbsp water; or 2 eggs
- 1/2 cup brown sugar
- 1/2 cup white sugar
- 1 1/2 cups hot water
- 1/2 cup cocoa
- summer berries, powdered sugar, sliced almonds, etc. optional
Instructions
- Grease the inside of a 6 qt. slow cooker.
- In a large mixing bowl, mix together the flours, chia seed, baking powder, and salt.
- In a medium size microwavable bowl, microwave coconut oil and chocolate chips until melted and smooth, stirring occasionally.
- Stir in 1 cup of white sugar, 6 Tbsp cocoa, vanilla, milk, and prepared EnerG egg replacer, until well blended.
- Pour the wet mixture into the mixing bowl with the flour mixture. Mix together on medium speed until well combined.
- Spread this batter into a slow cooker sprayed with cooking spray.
- In the microwave (using the same bowl from earlier), mix water with the remaining 1/2 cup white sugar and brown sugar and microwave until hot (about 2 minutes).
- Add in the remaining 1/2 cup cocoa; stir until sugars dissolve.
- Pour this mixture over top the cake batter already in the slow cooker. It will look like muddy water.
- Cook on high for 1-2 hours (mine took about 1 hour 20 minutes).
- Remove the lid from the slow cooker and turn it off (be careful not to let the water from the lid drip into the cake).
- Allow the cake to sit without the lid for about 30 minutes before serving.
- Scoop out the outer “cakey” rim of the lava cake, followed by the pudding and icing center. Top with your favorite summer fruit and powdered sugar.
- Enjoy your allergy-friendly chocolate goodness!
Love this recipe?
Make sure to share and save it on your favorite platform below!
Michelle is blessed to stay home with her three children (ages 10, 7, and 4), while her husband works to provide. When she’s not experimenting with allergy-friendly meals, she’s blogging about it at The Willing Cook.
FREE DOWNLOAD: 60 Meals To Help You Avoid Takeout!
Meal time just got so much easier!
6 Creative Gift-Giving Ideas for a Limited Budget

Guest post from Jennifer of When Pigs Fly
Recently my husband and I had the grueling task of revamping our budget. We had to make cuts across the board, due to an increase in one of our bills. As we went through the budget line by line, we began asking ourselves, “Do we really need this?”
One of the categories in question was our Gift Budget, which was taking $120 per month. We decided to drastically decrease this amount and implement creative ways to reduce spending for occasions such as birthdays, anniversaries, special holidays, and various events.
We came to the conclusion that anyone can run to the store and pick up a quick gift and card. We wanted to show our recipients that we put extra effort into creating something unique and personal, especially for them, saving us money along the way!
1. Find your inner Betty Crocker!
Most people really enjoy receiving homemade treats. Get creative and bake up a small sample platter showcasing your favorite desserts, a simple batch of cookies, or homemade cake pops.
Baked goods make great gifts, especially when you have to give several gifts at one time. Give it that extra touch by purchasing an decorative platter or container at your local Dollar Store.
2. Recycle cards.
As you receive cards for all occasions throughout the year, place them aside. When a need arises, cut the fronts off with decorative scissors, leaving the back blank for a special note or make into a gift tag.
If you’re really creative, use sections of the cards to create a whole new card, using scrap-booking supplies you already have on hand. Plus, don’t forget to utilize the free card promo codes, often offered on online card sites!
3. Substitute gift wrappings.
Forget about buying wrapping paper and gift bags, I love to use my Sunday Comics as wrapping paper. Not only is it fun, it is free!
Forgo expensive gift bags and consider packaging your item in a basket, crate, mason jar, or bin, that you already have laying around the house. Also, save the ribbons and special embellishments from gifts you receive, and reuse them to decorate your gift.
4. Regift.
Okay, so I know this may be tacky to some, but don’t let a gift you received (and won’t use) go to waste. Place it aside for a future gift-giving occasion. Just make sure you remember who originally gave it to you!
A rule of thumb is not to regift anything that was especially handmade for you.
5. Give recycled gifts.
Your home is full of gift ideas, so before you throw items out, think of your possibilities! Turn an empty wine bottle into a elegant Tiki Torch, an old window shutter into a photo frame, or a small wooden crate into a beautiful planter.
6. Use those freebies.
Opportunities to receive free items are readily available these days — store promotions, giveaways and contests, requested samples, etc. When you get such items, set them aside. Use them later to create themed gift baskets for unexpected events such as baby showers, house warming, or get-well.
What are your favorite ways to give on a budget?
Jennifer Van Dahm is a stay-at-home mom, who knew there was more to life than laundry and dishes! Her motto, “Taking the ordinary out, of everyday living”, is shown throughout her website, When Pigs Fly. There, she highlights her passion for cooking and providing a healthy life style for her family, while saving money in the process. Her goal is to refresh families and help them get out of their rut– physically, mentally, and spiritually!
Reader tip: Use markers to touch up wooden furniture and ceramics
Reader tip: Use markers to touch up wooden furniture and ceramics

Here’s a new-to-me tip from reader, Michelle:
I buy a couple of cartons of markers (broad-tipped) during the back-to-school sales every year and then “steal” the brown ones. I use these to touch up my wooden furniture that gets nicked or scratched.
Sometimes it doesn’t work (!), but usually I can doctor a new scar so that it doesn’t show by using a marker on that place and then rubbing off the excess with a soft cloth.
The rest of the pack(s) of markers are kept on hand for touching up ceramics that get nicked (use the same way as above) and for art projects or are given to youthful artists. (My daughter is nearly seventeen now, so doesn’t go through these the way she used to!) -Michelle