

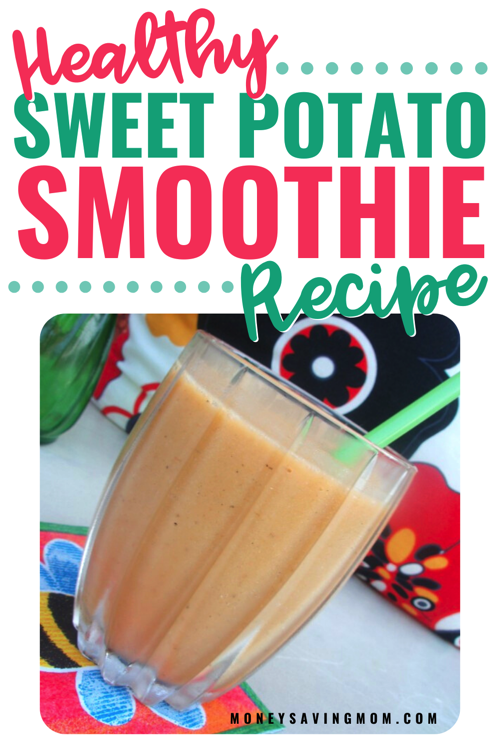
Want to get your kids to willingly eat veggies for breakfast? Try this delicious (and super healthy) sweet potato smoothie recipe. They’ll never guess they are enjoying veggies in the morning!
Guest post from Brigette Shevy
I don’t know about you, but there’s just something about getting in a serving of vegetables at breakfast that makes me happy. It gives me a sense of accomplishment by 8 a.m, especially when it tastes delicious!
Sweet Potatoes in a Smoothie?!
The sweet potato in this smoothie recipe adds that extra “oomph,” not only boosting the nutritional qualities (hello, beta carotene!) but increasing the “fill factor” as well. (If you’re wondering what “fill factor” is, I define it as something that keeps me full for longer than 1-2 hours!)
I realize adding sweet potato to a smoothie might seem like an odd combination, but it blends in quite nicely. For those of you who don’t care for sweet potatoes, this is a great way to consume them almost effortlessly… or you can substitute cooked carrots, pumpkin, or butternut squash in place of the sweet potato.

Ingredients for Sweet Potato Smoothies
- 1/2 cup (125 g) sweet potato, cooked and chilled
- 1 frozen banana, cut in thirds
- 1/2 apple, cored
- 1/8 tsp. nutmeg
- 1/8 tsp. cinnamon
- 1 Tablespoons maple syrup
- 1 teaspoon vanilla
- 1/2 cup milk (any kind will work)
- 1 cup ice cubes (use more or less, depending on how you like your smoothies)
How to Quickly Cook Sweet Potatoes
The easiest, quickest way to cook a sweet potato is in the microwave.
Simply scrub the potato skin, pierce it several times with a fork, and pop it in the microwave until soft (about 5-6 minutes).
You can store it in your refrigerator until ready to use for this recipe.
How to Make Sweet Potato Smoothies
1. Place all ingredients in a high-powered blender (we use a Vita-mix).
2. Blend on high until smooth.
3. Pour into 2 cups and serve immediately.

Sweet Potato Smoothie
Equipment
Ingredients
- 1/2 cup sweet potato cooked and chilled
- 1 banana frozen and cut in thirds
- 1/2 apple cored
- 1/8 teaspoon nutmeg
- 1/8 teaspoon cinnamon
- 1 Tablespoons maple syrup
- 1 teaspoon vanilla
- 1/2 cup milk any kind will work
- 1 cup ice cubes more or less, depending on how you like your smoothies
Instructions
- Place all ingredients in a high-powered blender (we use a Vita-mix).
- Blend on high until smooth.
- Pour into 2 cups and serve immediately.
Notes
How to Quickly Cook Sweet Potatoes
The easiest, quickest way to cook a sweet potato is in the microwave. Simply scrub the potato skin, pierce it several times with a fork, and pop it in the microwave until soft (about 5-6 minutes). You can store it in your refrigerator until ready to use for this recipe.Nutrition
Love this recipe?
Make sure to share and save it on your favorite platform below!
More Smoothie Recipes You’ll Enjoy
- Chocolate Peanut Butter Banana Smoothie
- Orange Cream Smoothie
- Patriotic Smoothie
- Pick-Me-Up Smoothie
- Ginger Smoothie
- Strawberry Oatmeal Smoothie
- Banana Coconut Green Smoothie
- Tropical Hawaiian Smoothie
Brigette is a full-time wife and mother who is blessed with three amazing bundles of energy. She enjoys music, experimenting in the kitchen, homeschooling her children, finding great deals, long-distance running, and anything chocolate.
FREE 50+ Easy and Cheap Breakfast Ideas!!
Mornings just got so much easier with this FREE list of 50+ Easy & Cheap Breakfast Ideas for Busy Weekday Mornings!

Do It Yourself: Sample Size First Aid Kits

SimpleOrganizedLiving.com shows you how to make homemade First Aid Kits out of sample-size products.
Do you have a fun and frugal DIY idea to share? I’d love to hear about it! Read the submission guidelines and submit it here.
Reader Tip: Changing Our Thinking About Discipline

Self Discipline via Bigstock
Tessa emailed in the following tip:
Quick: what’s the first word that comes to your mind when you hear the word discipline? Yuck? Difficult? Unappealing?
If you are like me, then I’m sure you at least thought of a synonym of the above words. In our culture of entertainment, discipline gets a bad rap. You hear, “You don’t need to be disciplined… everything will work itself out.”
Yeah right.
When has sitting on the couch ever gotten you anywhere?
Exactly. I believe that if we just change the way we think when we hear the word discipline, then we can stop buying into the myth that laziness is an acceptable option.
Start thinking about disciplines that you do every day… otherwise known as, chores. That’s right. You are already disciplined in some areas. Congratulations! If you start pairing the word discipline to sweeping or doing the dishes (or something that you do every day/night), then you start to associate it with action items that are doable.
Start with a small, new discipline to add to your life. For example, if eventually you want to run a marathon, you’re going to have to build up your endurance. So, you could start by walking a mile. Before you know it, you have a new discipline in your life. TA-DA!
Being disciplined is not as bad as it seems. If you look around, you’ll see that discipline does not have to have the negative connotations that society gives it. Today, let’s change the way we think about discipline and take action.
Ask the Readers: Should we pay for dental and vision insurance?
Ask the Readers: Should we pay for dental and vision insurance?

Today’s question is from Jill:
I recently left my job with a large corporation to work with my husband at our business. I made sure we had individual health insurance in place before I left, but I haven’t done anything about dental or vision insurance.
I’m thinking that negotiating the best deal for a cash payment may be the way to go, but I’m interested in any other good options for dental and/or vision insurance for our family. -Jill
Do you have a question you’d like to ask Money Saving Mom® readers? Read the submission guidelines and submit it here.
Today wasn’t anything like I’d planned…
Well today wasn’t anything like I’d planned! The day started with an early morning almost-3-mile run in the woods around the family camp here in Texas. I was picturing a day of encouraging sessions, swimming, rock-climbing, and a date night picnic on the lake with my husband.
But that was not to be…
Kaitlynn started throwing up this morning soon after she got up and she couldn’t keep anything down the rest of the day. We ended up taking her in and getting some IV fluids in her since she was beginning to get dehydrated.
We’re back at the cabin, she’s finally resting, and the nurse here at family camp is keeping close tabs on her… and I’m hoping she continues to rest so that her stomach will calm down and get back to normal. Poor girl, she was so sick today and I just felt miserable for her!
At any rate, I had a lot of posts planned to run today… but the computer was the last thing on my mind much of day. Thanks so much for your understanding when life trumps blogging.
I may have a chance to post some of the deals from my bulging inbox tonight, but we’ll just see how the evening goes! For now, I’m off to enjoy a “date night” with my husband (The rest of the couples at family camp are having a date night picnic at the lake. Since we needed to stay back with Kaitlynn, the camp staff brought our picnic basket to our cabin so we could still have date night in!)
Hopefully, your day was much less eventful and you are all well at your house!
Do It Yourself: Rose Petal Vinegar

TheNerdyFarmWife.com shows you how to make homemade rose petal vinegar.
Six goals for this week

I didn’t make as much traction on my goals last week as I’d hoped. But I’m trying to remind myself that I made much more progress by setting the goals and working toward them than I would have made had I not set goals at all.
A mountain isn’t climbed in one fell swoop; it’s an inch-by-inch, foot-by-foot process — and it’s the same with completing goals!
We’re at family camp in Texas this week and one of our big goals for this week is truly to just relax, soak up the sunshine, rest, savor the moments, laugh, and just spend a week away from the usual responsibilities of life so that we can be refreshed and renewed as individuals — and as a family.
Oh, and in addition to lots of relaxing, Jesse and I are also signed up to try the zipline and rock-climbing wall, go on an early morning horseback ride, and go skeet shooting — all things I’ve never done in my life. It might prove to be an interesting week. 😉
At any rate, I’m keep my goals really simple to allow plenty of room for margin and rest.
Last week’s goals:
Family/Mothering Goals
1. Start reading Wilma Rudolph: Olympic Runner aloud to the children. Read a few chapters of The Missing Video (reading to Kathrynne), and read at least two chapters of Little House in the Big Woods (reading to Kaitlynn).2. Have at least one playdate with friends.
3. Write a love note to Jesse.
Personal Goals
4. Finish reading Radical Together plus one other book.
5. Run at least five times for 45 minutes each; do weight-training program at least four days.
6. Finish listening to Stop Acting Rich.
7. Sleep for at least 7 hours every night.8. Continue on with the Choosing Gratitude 30-Day Devotional.
Home Management/DIY Projects
9. Try at least two new crockpot recipes.
Business Goals
10. Continue blogging the 4 Weeks of Family Fun series.
This week’s goals:
Family/Mothering Goals
1. Finish reading Wilma Rudolph: Olympic Runner aloud to the children. (I’m hoping we can finish this while we’re on vacation this week!)
2. Enjoy a relaxing week together at family camp making lots of memories and just enjoying being together.
Personal Goals
3. Finish reading The Life You’ve Always Wanted plus one other book.
4. Sleep for at least 8 hours every night.
5. Continue on with the Choosing Gratitude 30-Day Devotional.
Business Goals
6. Edit and submit an article for publication on RooMag.com.
How did you do on last week’s goals? What are your goals for this week? I’d love to have you share your progress on last week’s goals and your goals for this coming week in the comments. Of, if you’ve blogged about it, leave your direct link below. Let’s cheer each other on to live purposeful and productive lives!
You can download a free customizable weekly goal-planning sheet here.
Free printable: 30 Days of Healthy Lunchbox Meals

I Lost Sight of the Purpose for Saving Money

Guest post from Lauren
When my husband and I got married, we quickly realized that we came from very different financial backgrounds. My husband’s family was always a “don’t buy it unless you can’t live without it” kind of bunch, where my family enjoyed “retail therapy” a little too much!
Over the course of our first few years of marriage, I think we both changed each other, for the better: he got better about being willing to spend, and I got much better about not spending so much!
We accomplished a lot in a pretty short amount of time:
- We paid off a trip to Europe that I’d put on a credit card just before we got married (see what I mean??)
- We paid off all of my school loans.
- We paid for a move to Illinois for his work.
- We bought a home.
- We started purchasing our own health insurance so that I could stay home with our children.
- We had 3 beautiful children in the space of 3 years.
- We paid cash for a new-to-us vehicle.
- We paid cash for numerous home repairs and upgrades.
- We saved a lot for retirement.
However recently, I was feeling guilty for not saving more. As a result, I mentioned to my husband that I was renewing my commitment to try to find extra money to save.
He stopped me with one word: “Why?”
“Why?” I asked. “What do you mean, why? There’s retirement, and college for the kids, and moving to a better school district, and…” “Yes,” he said, “and we’re on track for all of those things. Why do you want to save more?”
I realized then and there: saving had become the goal.
That’s backwards! I’ve always been the type to save for a purpose – this dollar is going toward new curtains for the living room, this dollar toward a car down the road.
Somewhere along the line, though, I’d lost sight of the real goals we had for saving: to have a more comfortable life, to save against eventual needs, to be more generous with our time and resources.
Saving – just saving to hoard it – had become the goal.
We will still continue to tinker with our savings plan, I’m sure. I’m heading back to graduate school this fall, and we’ll have to replenish some of our savings after paying for that. But I won’t let saving money become my goal, my reason, again. I want to enjoy my life, and learning to live within my means will let me do that!
Lauren is Matt’s wife of 7 1/2 years, and stay at home mama to 3 sweet babies: Macy, Zoë, and Mark. Between cooking, cleaning, working at church, and volunteering, she decided she needed something else on her plate, so she’s headed back to school in the fall.
Traveling By Train Is Saving Me Money and Headache

Guest post from Jodi of Plastic Back Books
Remember the old saying, “Getting there is half the fun“?
Well, I have to say that the “miracle of flight” isn’t what it used to be. My head starts spinning when I think of purchasing an airline ticket.
There are so many variables that go into finding the best price. I have gotten some good deals when I have “named my own price”, but they don’t offer a “name your own time” option for those deals. Leaving at 4:45 a.m. to get to the airport in time is not always so fun.
Shuffling barefoot through airport security, sitting for hours waiting for a delayed flight, only to have to run like a crazy person through the concourse to make a connecting flight adds to the stress. And if you miss your plane — well, I hope is wasn’t a non-refundable ticket!
After my last flight, I decided driving was a simpler option. Then I looked at my bald tires and odometer (which was nearing 300,000 miles). Not to mention the cost of gas — ouch!
I needed an alternative. That’s when I thought about the train. I looked up Amtrak and was pleasantly surprised at how inexpensive my trip would be: it was less expensive than flying or driving — it was even cheaper than the Greyhound!
Here are some benefits of traveling on Amtrak:
- There’s one site to shop for a ticket: Amtrak.
- The cost of the ticket really is the cost of the ticket. There are no additional fees or taxes.
- Children ages 15-2 travel for half price, and those under two travel for free.
- If you cancel, you only lose 10% of your ticket price (this won’t exceed $100).
- If you change your ticket, Amtrak will credit what you paid toward your new ticket.
- You can bring three 50-pound bags, two carry-on items, plus personal items without baggage fees.
- You get to keep your shoes on (you don’t have to go through a thorough security checkpoint).
- There are no fasten seat belt signs — because there are no seat belts!
- There are electrical outlets and free Wi-Fi available for work or entertainment, tables for games, spacious seating, freedom to roam about the cars, and beautiful scenery!
- Riding the train makes getting there half the fun once again!
Jody Susan loves reading, but isn’t a fan of dusting bookshelves, so she loves e-books. She is creating PlasticBackBooks — a marketplace for wholesome, helpful, and hopefully entertaining e-books. She is slowly learning to break goals into bite-sized pieces. Finishing her ebook, Riding The Train, is one goal she has completed recently.
OVER-SPENDING EVERY SINGLE MONTH?Grab these FREE Budgeting Sheets!
Click here to download!
4 Weeks of Frugal Family Fun: Free food at Chick-fil-A (Day 19)
4 Weeks of Frugal Family Fun: Free food at Chick-fil-A (Day 19)

The kids had so much fun planning out and dressing up in their cow costumes for Chick-fil-A’s Cow Appreciation Day today.

We used stuff we already had on hand and I was really happy with how their costumes turned out.

Kaitlynn didn’t want to use one of the tails I printed out from Chick-fil-A’s website, so she made her own!

I think the kids had the most fun seeing all of the crazy costumes other people had concocted. I had told them ahead of time that probably other people would dress up, too, but I guess they didn’t quite believe me until they got out of the van and saw all of the cow-decked people headed inside.
They kept laughing at the hilarious things people had come up with — and, let me tell you, there were some doozies! I couldn’t believe how many teenage boys and grown men dressed from head-to-toe like cows. Some of them looked like they had put a whole lot of effort into their costumes and seemed not a bit embarrassed about wearing them for all to see!

We arrived at 11 a.m. and I’m so glad we did, since we were able to get a table back in the corner away from all of the throngs of people. Plus, we didn’t have to wait in a line that stretched out the door!
Some dear friends of ours who currently live in India but are back in the states for a few weeks met us there and we enjoyed getting to catch up and visit for awhile while the children played.
All in all, it was a wonderful experience — and definitely something we’ll be doing again!
Did you do something fun and frugal as a family today? If you blogged about it, I’d love for you to leave a link to your blog post below. Or, you can just tell us what you did in the comments.
Note: Since the purpose of this series is to encourage you to be intentional about fun in your home this summer, please only link up posts showing pictures/sharing details of fun things you did as a family today (or within the last few days). Posts that do not adhere to these guidelines will be deleted in order to make it fair for those who are putting forth a lot of effort to participate in this challenge.

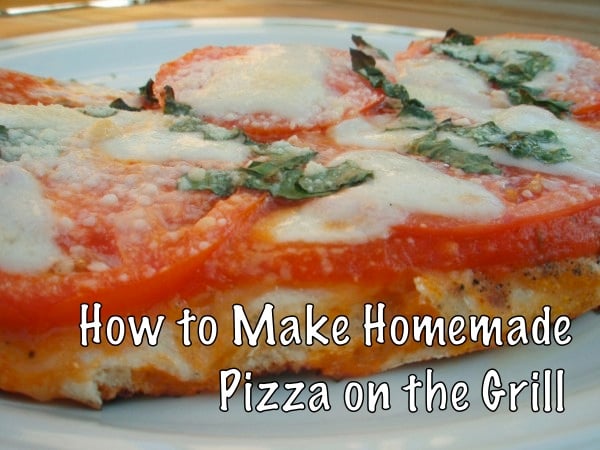
How to Make Homemade Pizza on the Grill
Note from Crystal: So many of you asked for details on how to grill a pizza on my Hawaiian Pizza Recipe, so my sister — the grilled pizza expert — is sharing her pizza recipe and how to bake pizza on the grill.

Guest post from Brigette Shevy
We LOVE grilled pizza!!
We love pizza at our house! Over the years, I’ve tried countless different recipes, temperatures, baking methods, and pizza pans. The first time I served grilled pizza, however, my husband took one bite and proclaimed it the best pizza I had ever made.
I can’t believe it took me so long to work up the courage to try! I say courage, because for some reason making pizza on the grill just sounded so… intimidating. While it did take a little bit of practice initially to get that “perfect” crispy crust, it was well worth it. And all those visions I had of the dough sticking, melting, and permanently uniting with my grill racks proved completely unfounded.

This is my go-to crust recipe for grilled pizza. It happens to be the only one I’ve tried, but I’ve never had a reason to look for another!
Ingredients for Grilled Pizza
FOR THE CRUST:
- 1 cup whole wheat flour*
- 2 1/2 to 3 cups bread flour, divided (can use all-purpose)
- 2 teaspoons salt
- 1 package instant active dry yeast (2 heaping teaspoons)
- 2 Tablespoons oil (I use olive oil.)
- 1 3/4 cups warm water
*You may use 1 c. bread/all-purpose flour instead of the whole wheat flour. While I love eating healthfully, I am not a fan of whole wheat pizza dough. I’ve found that I don’t mind it at all in this recipe, however. I figure if I can’t tell a difference, I might as well put it in!
FOR THE TOPPINGS:
- Pizza Sauce – I use around 3 Tablespoons per individual pizza.
- Shredded cheese – We like to combine cheeses (cheddar, provolone, mozzarella, etc.) and use at least 1/4 cup per pizza.
- Toppings – Cooked meat, chopped veggies, fresh herbs
- Shredded Parmesan cheese
How to make Pizza Dough for Grilled Pizzas
1. In a large bowl, combine whole wheat flour, 1 cup bread flour, salt, and yeast. Mix well.
2. Stir in oil and warm water.
3. Continue adding in additional bread flour until the dough forms a ball.
4. Turn onto a floured surface and knead until smooth and elastic (approximately 3-5 minutes), adding in more flour as needed to make a fairly stiff dough.
5. Put in a greased bowl, cover with plastic wrap, and let rise until doubled in size (1-2 hours).
6. Dump dough onto a lightly floured surface and divide into 8 pieces. (At this point, some or all of the dough can be refrigerated or frozen to use at a later time, if desired).
7. Stretch each piece into a rustic 12×4 rectangle (you can also use a rolling pin if you find that works easier) and transfer to a cornmeal-coated baking sheet.
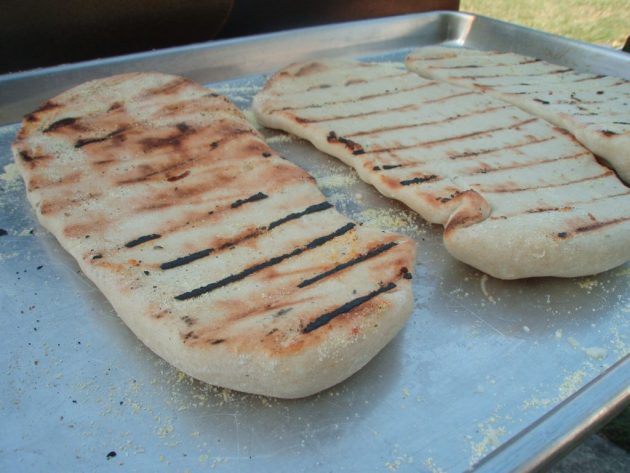
How to Grill Pizzas
Note: I do not oil the grill and have never had problems with the dough sticking. I make four pizzas at a time.
1. Turn all burners of a gas/propane grill to high.
2. When grill is preheated, turn down to medium heat (or medium low, depending on how hot your grill gets).
3. Transfer stretched pieces of dough directly onto grill (I use my hands to do this).
4. Close the lid and cook until bottoms are turning brown, 1-3 minutes. (Move the crusts around if necessary to ensure even cooking.)
5. Take the crusts off the grill and put them back on the baking sheet, grilled side up (at this point, the dough is cooked so you can use a grill spatula to do this).
6. Spread grilled side with sauce, cheese, toppings, and sprinkle with Parmesan cheese. (I sometimes take them inside the house to do this since it’s not as hot as working right next to the grill.)
7. Return to grill, close lid, and cook an additional 2-4 minutes, or until turning brown.
8. Eat and enjoy!

Grilled Pizza Tips and Tricks
One of the secrets of making really great pizza is baking it at an extremely hot temperature. The grill is the perfect summertime solution, because not only can it cook at a higher temperature than your oven, it does so without heating up your house at the same time. (Of course, this pizza is so good that we’ve been known to haul out our grill in the middle of winter, but that’s beside the point! )
The main difference I’ve found between cooking pizza on the grill versus in your oven is that it cooks much faster on the grill. Everything needs to be ready to go (cheese shredded, vegetables chopped, etc.) before you start cooking the dough.
The other thing to remember is that smaller pizzas are much easier to handle. I make individual pizzas (letting each person pick which toppings they want), and this makes transferring the dough to the grill and flipping the pizzas much less complicated.

How to Make Grilled Pizza
Ingredients
FOR THE CRUST:
- 1 cup whole wheat flour*
- 3 cups bread flour divided (can use all-purpose)
- 2 teaspoons salt
- 1 pkg instant yeast 2 heaping teaspoons
- 2 Tablespoons olive oil
- 1 3/4 cups warm water
FOR THE TOPPINGS:
- Pizza Sauce – I use around 3 Tablespoons per individual pizza.
- Shredded cheese – We like to combine cheeses cheddar, provolone, mozzarella, etc. and use at least 1/4 cup per pizza.
- Toppings – Cooked meat chopped veggies, fresh herbs
- Shredded Parmesan cheese
Instructions
How to make Pizza Dough for Grilled Pizzas
- In a large bowl, combine whole wheat flour, 1 cup bread flour, salt, and yeast. Mix well.
- Stir in oil and warm water.
- Continue adding in additional bread flour until the dough forms a ball.
- Turn onto a floured surface and knead until smooth and elastic (approximately 3-5 minutes), adding in more flour as needed to make a fairly stiff dough.
- Put in a greased bowl, cover with plastic wrap, and let rise until doubled in size (1-2 hours).
- Dump dough onto a lightly floured surface and divide into 8 pieces. (At this point, some or all of the dough can be refrigerated or frozen to use at a later time, if desired).
- Stretch each piece into a rustic 12×4 rectangle (you can also use a rolling pin if you find that works easier) and transfer to a cornmeal-coated baking sheet.
How to Grill Pizzas
- Turn all burners of a gas/propane grill to high.
- When grill is preheated, turn down to medium heat (or medium low, depending on how hot your grill gets).
- Transfer stretched pieces of dough directly onto grill (I use my hands to do this).
- Close the lid and cook until bottoms are turning brown, 1-3 minutes. (Move the crusts around if necessary to ensure even cooking.)
- Take the crusts off the grill and put them back on the baking sheet, grilled side up (at this point, the dough is cooked so you can use a grill spatula to do this).
- Spread grilled side with sauce, cheese, toppings, and sprinkle with Parmesan cheese. (I sometimes take them inside the house to do this since it’s not as hot as working right next to the grill.)
- Return to grill, close lid, and cook an additional 2-4 minutes, or until turning brown.
- Eat and enjoy!
Notes
- You may use 1 c. bread/all-purpose flour instead of the whole wheat flour. While I love eating healthfully, I am not a fan of whole wheat pizza dough. I’ve found that I don’t mind it at all in this recipe, however. I figure if I can’t tell a difference, I might as well put it in!
- Note: I do not oil the grill and have never had problems with the dough sticking. I make four pizzas at a time.
Love this recipe?
Make sure to share and save it on your favorite platform below!
What is your favorite type of homemade pizza?
Brigette is a full-time wife and mother who is blessed with three amazing bundles of energy (ages 5, 3 and 1). She enjoys music, experimenting in the kitchen, homeschooling her children, finding great deals, long-distance running, and anything chocolate.
FREE One Week Menu Plan!
Done-For-You Dinner Recipes With Simple Ingredients and a Grocery Shopping List!
Reader Tip: Check Your Receipts

Kristin emailed in the following tip:
Check your receipts! I can’t tell you how many times I’ve gotten home from shopping, peeked at the receipt, and saw I was overcharged. Unfortunately, at that point, I usually just forget about it since I’m already home and the cost of gas is more than the amount I was overcharged.
How can you avoid this?
- Keep a running tally on paper or in your head as you shop through the store to help you have an idea of what your total should be.
- Watch the register as things are rung up – it’s much easier to have a price changed right after something is rung versus having the cashier go back through your dozens of items to find the one that rang up incorrectly.
- Check your receipt before you leave the store! I always try to take a moment before I leave the store to quickly review my receipt.
If you catch something while you are at the store, take care of it right away! If you don’t find something until you get home, put a post-it note on the receipt noting the correct price and put this on your memo board, in your purse, etc. so that the next time you are there it’s easy to get it adjusted.
Keeping on top of receipts and the prices you are charged will help keep more money in your pocketbook and shouldn’t take more than a few minutes.
Have you ever been overcharged? Did you take the time to get the difference?
–Tip submitted by Kristin from Just Live Once
4 Weeks of Frugal Family Fun: Free Movie & Kool-Aid Ice (Day 18)
4 Weeks of Frugal Family Fun: Free Movie & Kool-Aid Ice (Day 18)

We met Angie and her four children at the local movie theater for their Free Kid’s Movie showing today.


It was a wee bit crowded and noisy, but you can’t beat the price of free!


We headed over to Angie’s house afterward and she made Kool-Aid Ice with Sprite for the kids while we moms snacked on Fudge Babies.
Did you do something fun and frugal as a family today? If you blogged about it, I’d love for you to leave a link to your blog post below. Or, you can just tell us what you did in the comments.
Note: Since the purpose of this series is to encourage you to be intentional about fun in your home this summer, please only link up posts showing pictures/sharing details of fun things you did as a family today (or within the last few days). Posts that do not adhere to these guidelines will be deleted in order to make it fair for those who are putting forth a lot of effort to participate in this challenge.
We Paid Cash: A New Bathroom
 A testimony from Marianne
Last summer, my husband and I were able to purchase our first home after renting for eight years. Southern California is a pricey area and we were very blessed to find a 4-bedroom fixer-upper in a great area within our budget.
We reserved some funds for renovations and completed many projects before we moved in the end of October. We had not gotten around to replacing the garage door or front door, but had the money to do it as time allowed. However, the day we moved in, we discovered a serious plumbing problem in the very old and dilapidated main bathroom.
Since we had planned to remodel that bathroom within a few months anyway, we opted to use our remaining funds plus our emergency fund money to get started on a full bathroom remodel, as opposed to paying a plumber to fix the blockage and temporarily patch things up.

Here’s how we made the most of our money to tackle this project:
We Hired “Friendly” Labor
We hired a friend from our church who is a contractor to do the demolition, plumbing, and tub and tile installation. We knew he was reliable, honest, and thorough, and charged less than any other contractor.
We Used Coupons
We collected Lowe’s 10% off coupons (these are also accepted at Home Depot). Our local post office has “new move-in” packets with these coupons and they were kind to give me quite a few. Also, I purchased a pack of seven coupons on eBay for $3.50.
We Purchased Discounted Gift Cards
We purchased Lowe’s and Home Depot gift cards from sites like Gift Card Rescue and Plastic Jungle. The gift cards come in many different denominations, which you buy at a 7% discount. Combined with our 10% off coupons, that saved us 17% on all our major purchases (tile, bathtub, plumbing fixtures, lights, etc.)
We Made Some Exceptions
My husband and I were not in total agreement when it came to selecting the tile for the floor and tub surround. Then we realized that we were both trying to choose from the absolute cheapest options available.
When we agreed to increase what we were willing to spend on tile, we found a nice quality tile that we were both happy with. Sometimes it’s worth a little extra money for the sake of the marriage!
We Shopped Around
We had a hard time finding a vanity that was reasonably priced, and figured we would have to pay full price for one at Home Depot that we liked, but wasn’t as high quality as we were hoping for. We happened upon a clearance sale at a cabinet warehouse and found an unfinished beech wood vanity (without a top) for $25! Then we found a granite warehouse and purchased a granite top and sink, which totaled less than half of what we would have paid for the non-granite unit we had seen at the store.

We love our new bathroom and are thankful the Lord kept us from spending our money on those other projects. And soon after the bathroom was completed, we received an unexpected gift that quickly replenished our emergency fund.
When I’m tempted to be discouraged about the many projects still on our to-do list, I remember how much has been accomplished and how thankful I am that we have our own home in beautiful southern California.
Marianne is a stay-at-home mom and private piano teacher. She has been married to her husband, Mark, for 9 years and they have two cute kids: Alexis is 5 and Grant is 2. They are loving the life God has given us in San Diego.
Have you saved up and paid cash for something — large or small? Submit your story for possible publication here.