


In my opinion, not many things in the food realm are better than homemade bread. It can take an average weeknight dinner into the gourmet category — and these rolls are no exception!

You’ll Love This Oatmeal Rolls Recipe
Seriously, is there anything better than the smell (and taste) of fresh bread coming out of your oven?
This is a simple, healthy dinner roll recipe that my family really enjoys… and I love how quickly they can be whipped up, thanks to the help of my faithful bread machine.
This recipe makes a large 9″x13″ pan of 24 rolls, but that isn’t a problem at my house considering how fast they disappear!

Ingredients for Oatmeal Rolls
- 2 ¼ c. very warm water (110ºF)
- 3 Tbsp. butter, melted
- 2 Tbsp. honey
- 1/3 c. brown sugar
- 1 ½ tsp. salt
- 1 ½ c. quick oats
- 1 c. whole wheat flour
- 3 ½ c. all-purpose flour
- 2 packages instant active yeast (1 ½ Tbsp.)
- Melted butter for tops of baked rolls

Oatmeal Rolls Recipe Substitutions
The addition of oatmeal and whole wheat flour gives these tall, fluffy rolls a hearty boost! I sometimes substitute wheat germ or wheat bran in place of some of the whole wheat flour for a little different twist.
How to Make Pull Apart Rolls
To Make Dough in a Bread Machine:
1. Combine all ingredients in a 2-lb bread machine in the order listed.

2. Run the dough cycle (if your machine has an option of dough cycles, choose the “short” one).

To Make Dough In a Stand Mixer:
1. Add warm water and yeast to the bowl of your stand mixer with a dough hook attachment. Let sit for 5 minutes to activate the yeast.
2. Add remaining ingredients and mix until a sticky dough ball forms.
3. Continue mixing for 3-5 minutes.
4. Place dough in a greased bowl, cover with a damp towel, and let rise in a warm place for 45 minutes.
To Make Rolls:
1. Punch down dough and gather into one large ball.
2. Divide dough into 24 even pieces and roll them into balls with floured hands (you can weigh them if you want them to be perfectly uniform.

3. Place dough balls into a greased 9″x13″ pan, cover with a damp towel, and let rise in a warm place for 30-45 minutes.
4. While rolls rise, preheat over to 350ºF.
5. Once rolls have risen, bake them in the preheated oven for 18-22 minutes, or until golden brown (cover with foil if necessary the last few minutes to prevent over-browning).

6. Remove rolls from over and lightly brush the tops of warm rolls with melted butter.
7. Serve warm with more butter!

How to Store Leftover Oat Rolls
Let rolls cool to room temperature and store any leftovers in a zip-top bag for 48 hours.
How to Freeze Pull Apart Dinner Rolls
If you want to make these in advance (or need to store leftovers for longer than a couple of days), just pop them in a zip-top bag or tightly sealed food storage container and freeze.
Pull out as many as you want, let them defrost at room temperature, and you can even pop them in the microwave for a few seconds if you want to eat your rolls warm! They reheat beautifully!

These rolls are the perfect accompaniment to just about any meal.
If you love homemade bread, but don’t have a lot of time to spend in the kitchen – this recipe is for you!

Oatmeal Rolls Recipe
Ingredients
- 2 ¼ c. very warm water 110ºF
- 3 Tbsp. butter melted
- 2 Tbsp. honey
- 1/3 c. brown sugar
- 1 ½ tsp. salt
- 1 ½ c. quick oats
- 1 c. whole wheat flour
- 3 ½ c. all-purpose flour
- 1 ½ Tbsp. instant active yeast 2 packets
- Melted butter for tops of baked rolls
Instructions
To Make Dough in a Bread Machine:
- Combine all ingredients in a 2-lb bread machine in the order listed.
- Run the dough cycle (if your machine has an option of dough cycles, choose the “short” one).
To Make Dough In a Stand Mixer:
- Add warm water and yeast to the bowl of your stand mixer with a dough hook attachment. Let sit for 5 minutes to activate the yeast.
- Add remaining ingredients and mix until a sticky dough ball forms.
- Continue mixing for 3-5 minutes.
- Place dough in a greased bowl, cover with a damp towel, and let rise in a warm place for 30-45 minutes.
To Make Rolls:
- Punch down dough and gather into one large ball.
- Divide dough into 24 even pieces and roll them into balls with floured hands (you can weigh them if you want them to be perfectly uniform.
- Place dough balls into a greased 9″x13″ pan, cover with a damp towel, and let rise in a warm place for 30-45 minutes.
- While rolls rise, preheat over to 350ºF.
- Once rolls have risen, bake them in the preheated oven for 18-22 minutes, or until golden brown (cover with foil if necessary the last few minutes to prevent over-browning).
- Remove rolls from over and lightly brush the tops of warm rolls with melted butter.
- Serve warm with more butter!
Notes
Nutrition
Love this recipe?
Make sure to share and save it on your favorite platform below!

FREE One Week Menu Plan!
Done-For-You Dinner Recipes With Simple Ingredients and a Grocery Shopping List!
Brigette is a full-time wife and mother who is blessed with three amazing bundles of energy. She enjoys music, experimenting in the kitchen, homeschooling her children, finding great deals, long-distance running, and anything chocolate.

Early to Rise Challenge: The Halfway Mark!

Welcome to the Early to Rise Challenge! Throughout the month of March, I’m challenging myself and my readers to make the most of their mornings. So every week day morning at 9 a.m. EST, I’m posting a short Early to Rise post. I’ll share a few of my thoughts on the day’s passage from Early to Rise, tell you what time I got up that morning, and encourage you to leave a comment to tell us what time you got up and how you’re doing on the challenge.
The Halfway Mark!
Yay! You’ve made it halfway in the Early to Rise Challenge!
I’m so proud of all of you who have been joining me for this challenge. You’ve motivated, inspired, and blessed me with your comments and participation.
And for today, I want you to celebrate your successes. I want you to focus on the progress you’ve made, instead of beating yourself up over where you feel you failed or fell short.
Remember: moving forward — even at a microscopic rate — is still moving forward.
What successes are you celebrating today? I want you to leave a comment today telling us how you’ve succeeded in this challenge, even if it’s just that two mornings this month you got up 15 minutes earlier than usual. Or that you have been more intentional in how you’ve been using some of your mornings.
What Time Did You Get Up This Morning?

I got up at 6:01 a.m. EST (I’m in South Carolina speaking at a conference this weekend) — so that would be 5:01 my time. And I’m going to celebrate that today! 🙂
What time did you get up? Leave a comment and let us know!
Join in the Chatter!
Want to blog about this challenge? If you’re blogging through this challenge with me, be sure to leave your link to your direct post for today below. Plus, if you’d like to post your daily posts to the Early to Rise Group Board on my Pinterest page, just shoot me an email (moneysavingmom @ gmail dot com) and I’ll invite you.
Want to follow along on Twitter or Instagram? Each week day morning on my Facebook Page, my Twitter account, and my Instagram account, I’ll be posting a picture of my alarm clock as public accountability. I’d love to have you do the same or join in the discussion on Twitter and Instagram. Just follow hashtag #EarlytoRise to see what others are tweeting and Instagramming about this challenge!
Freezer Cooking in an Hour: Kale Chips, Bean Burritos, and Pizza Pockets
Freezer Cooking in an Hour: Kale Chips, Bean Burritos, and Pizza Pockets

Last night, I switched up my planned Freezer Cooking in an Hour session and used up some of the items I’d purchased at great prices at Dillon’s yesterday instead.

First, I made Kale Chips. (More pictures and details on this recipe coming tomorrow.) These were super simple to make since I had bought a marked-down bag of pre-rinsed and torn Kale chips.

Then, while the Kale Chips were baking, I whipped up two bags of Bean Burritos. As you probably guessed I would, I tweaked the recipe some. I’ll share my tweaked version with you soon — probably early next week.

Finally, I make two pans of Beef & Cheese Pockets. You can read more about that recipe creation here.
I was highly motivated to get finished quickly since it was almost dinner time — and sure enough, all of this was accomplished in right at an hour. Yay!
Did you do any freezer cooking this week?
Free Pillsbury Pizza Dough + Free Oscar Mayer Meat = Beef & Cheese Pockets!
Free Pillsbury Pizza Dough + Free Oscar Mayer Meat = Beef & Cheese Pockets!

So I showed you yesterday how I picked up free Oscar Mayer Roast Beef and got paid for buy Pillsbury Pizza Crust. Well, I thought you might like to see what I did with it last night.

I chopped up the roast beef and shredded some cheese.

Then, I had to face my fears of opening up the canned dough… which is the very worst thing of all about buying canned dough. {Am I the only one who has this irrational fear?}

I tried. I really did. But in the end, I ended being too much of a coward and had Kathrynne “pop” them for me. {She was all, “Mom, I LOVE popping canned dough cans!” Apparently, she didn’t get that gene from me!}

I rolled out the dough and sliced it into six pieces…

…And sprinkled each piece with some chopped beef and shredded cheese.

Then, I folded the sides in and then were ready to stick on a pan and bake.

I didn’t get a picture of any of the baked Beef & Cheese pockets, but they were a hit last night. If you wanted to add some extra flavor, you could dip them in barbecue sauce — yum!
I love coming up with creative uses for what I get free or very inexpensively at the grocery store. It makes shopping and cooking a fun adventure!
If you’re looking for a healthier, non-processed Pizza Pocket recipe, be sure to check out my Homemade Chicken Salsa Pockets Recipe and my Homemade Pizza Pockets Recipe.
Coming up later, my freezer cooking session pictures and what I did with that bag of Kale!
Do It Yourself: Paper Lined Envelopes

StayAtHomemadeMom.com shows you how to make homemade Paper Lined Envelopes.
Do you have a fun and frugal DIY idea to share? I’d love to hear about it! Read the submission guidelines and submit it here.
How to Plan a Weekly Menu in Less Than 10 Minutes
Guest post from Sarah of Early Bird Mom
For a while, I had been planning out all our meals a week at a time: breakfast, lunch, dinner and snacks. It didn’t take a lot of time and it was nice to take a glance at my menu and know what to cook.
But over the past few months, this practice had fallen by the wayside and my family was getting tired of the same couple of stand-bys for dinner.
So even though I didn’t want to, I reluctantly wrote “Menu Plan” on my to-do list the other day.
Why do I dread menu planning?
The menu planning itself isn’t that difficult. The problem, I think for me, is that making a menu reminds me of all that cooking! Somehow I think if I don’t make a menu, the cooking will take care of itself; of course nothing could be further from the truth!
If you also dread menu planning, here are two quick tips to help you plan your menu in 10 minutes or less!
1. Start with a previous menu plan.
I pulled up an old menu plan on my computer to refresh my memory. I like saving old menus on my computer – they are a great source of inspiration.
I deleted a couple meals from the menu that didn’t interest me this week. Then I filled in the breakfast column. Breakfast around here is usually oatmeal, eggs, smoothies or brown rice with brown sugar and milk. By this time, I’m halfway done! I’m gaining momentum!
Then I checked my calendar to see if there are days when we need a crockpot dinner or when we might have extra time for baking. A couple more entries go on the menu.
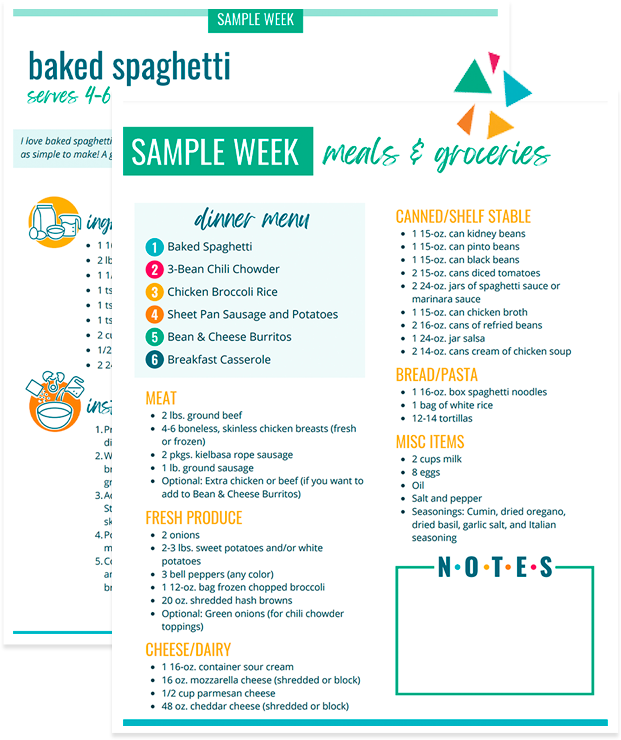
Note from Crystal: If you don’t have any old menus to look at for inspiration, you can check out my weekly menu plans.
2. Take note of foods you already have in the house.
I quickly looked downstairs in our second fridge and realized there was a lot of cauliflower that needed to be eaten – this will work for Tuesday’s side dish. I decided to thaw some chicken for Wednesday. Tonight will be Tilapia since we have lots in the freezer.
I filled in the remaining blank spots with a couple more of our favorite recipes.
That’s it! I’m finished.
All in all, this took less than 10 minutes of my time — and I feel a lot better about the cooking for the week.
The cooking still has to be done whether or not I plan ahead, but it sure is nice to know ahead of time what I am going to make for dinner.
What are your tips to quickly plan a weekly menu?
Sarah is happy to have a loving husband and 4 of the most rambunctious boys you’ll ever meet. She blogs at Early Bird Mom all about helping moms get more done at home and in home business.
Early to Rise Challenge: Find What Motivates You
Welcome to the Early to Rise Challenge! Throughout the month of March, I’m challenging myself and my readers to make the most of their mornings. So every week day morning at 9 a.m. EST, I’m posting a short Early to Rise post. I’ll share a few of my thoughts on the day’s passage from Early to Rise, tell you what time I got up that morning, and encourage you to leave a comment to tell us what time you got up and how you’re doing on the challenge.
Find What Motivates You
I thought it was interesting that Andy talked about getting up early for a flight in today’s reading from the Early to Rise book — because that is exactly what I had to do this morning! My alarm clock went off at 4:15 a.m. and while it took me a few minutes to rouse and get up, I had to get up — or miss my flight to South Carolina (I’m speaking at the Southeast Homeschool Convention this weekend)!
It’s amazing what we can accomplish when we are highly motivated. To be successful at rising early, it helps to discover what motivates us to get up.
For me, I’m motivated to get up by a few things:
1. I know that I’ll be glad I did later. If I’m tempted to crawl back into bed, I remind myself of the benefits I’ll experience later on in the day if I get up and get moving.
2. I love the early morning quiet. I love my children to pieces, but there’s something very refreshing and energizing about starting the day with quiet. I use the first 20-30 minutes of the day to read my Bible, pray, write in my gratitude journal, and sometimes read from a devotional book. This prepares my heart and mind for the day ahead.
3. It gives me a jumpstart on the day. When I wake up early, I always feel like I have a lot more time in the day. If I wake up when my children do, I feel like I start the day already behind.
4. I love coffee. My morning cup of coffee is something I look forward to and savor. But please, make sure it’s with milk and sugar. 😉
What motivates you to get up in the morning? And if you’re not very motivated to get up in the morning, what changes could you implement to help you become motivated to get up?
What Time Did You Get Up This Morning?

I got up at 4:18 a.m. in order to catch my early flight to South Carolina.
What time did you get up? Leave a comment and let us know!
Join in the Chatter!
Want to blog about this challenge? If you’re blogging through this challenge with me, be sure to leave your link to your direct post for today below. Plus, if you’d like to post your daily posts to the Early to Rise Group Board on my Pinterest page, just shoot me an email (moneysavingmom @ gmail dot com) and I’ll invite you.
Want to follow along on Twitter or Instagram? Each week day morning on my Facebook Page, my Twitter account, and my Instagram account, I’ll be posting a picture of my alarm clock as public accountability. I’d love to have you do the same or join in the discussion on Twitter and Instagram. Just follow hashtag #EarlytoRise to see what others are tweeting and Instagramming about this challenge!
Today’s shopping trips: Dillon’s and the health food store
I had an errand to run this afternoon, so I popped into Dillon’s and the health food store since they were right by where I was. And I found a few bargains!

Dillons’ Shopping Trip
Pepsi Next — used free coupon
Kale — marked down to $1.29
Marked-down Bananas — $0.61
Oscar Mayer meat — used free coupon
Yoplait yogurt — used free coupon
2 tubes of Pillsbury Artisan pizza dough — on sale for $1.25 each, used 2 $1.50/1 coupons = free plus overageTotal with tax: $1.70
Stay tuned tomorrow for my post on what I’m going to do with the Kale and Pizza Crust. And no, I’m not using them both in the same recipe. 🙂

Health Food Store Shopping Trip
Gala apples — $0.99/lb.
Blueberries — $1.99Total with tax: $4.54
Have you gotten any great deals on groceries this week?
I Paid Cash: A Trip to England

A testimony from Katrina who owns Edelweiss Patterns
A few years ago, I was most pleasantly surprised to hear about a dream trip to England — a tour that focused on London and Bath, studied historical costume at some world-famous museums, and included a weekend at the Jane Austen Festival!
As a long-time fan of British history and literature, I thought this sounded like a once-in-a-lifetime opportunity. But looking at the costs involved, I knew I would have to do some serious saving to make it happen.
After talking with my family and working out a budget, I committed to going, and paid my deposit. The next ten months were spent working hard and spending very little, but the luxurious trip to England made it all worth it!
In fact, I saved enough to have several hundred British pounds of spending money — and I even had to transfer quite a few pounds back to American dollars once I got back to the States! The memories I made on that trip will never be forgotten, and these are the principles I followed to save what I needed:
1. Keep tithing!
As a pastor’s daughter, my parents had raised me with the firm belief that you cannot withhold your money from God and expect your finances to be blessed. Even when it seems that you need every extra dollar, God is the one who has given us the money and the least we can do is give Him 10% (Malachi 3:8-12).
2. Pay your bills and save the rest.
After tithe, I would pay my monthly bills and leave the rest of my paychecks alone. If it wasn’t an actual bill, it didn’t need to be paid for or purchased!
3. Cut all clothes spending.
I know, this is a very hard one! Believe me, as a total fashion enthusiast and historical costume fan, it was very difficult to see the new spring styles coming out and know that I couldn’t get anything.
In addition, it was tempting to buy fabrics to make clothes (no, you can’t save much money that way, but it sure is fun!) But I’m happy to say that despite working retail during the entire year, I stayed quite disciplined and did no “impulse” shopping.
Even though you may not have the type of wardrobe we’d like, you can still make do with the clothes you have when there’s a real goal in mind. It did mean that I really needed to purchase some new things once I came back from the trip, but you know what? That’s okay!
4. Buy your makeup during promotional sales.
I didn’t want to cut this from my budget, but I put forth effort to buy it as inexpensively as possible. At my local malls, the major makeup brands have big promotions every couple of months where if you spend a certain amount (usually $20), you get a whole promo bag of makeup.
At the time I used mainly Clinique, and when I would purchase my facial cleansers through them I would end up with a bag of lipstick, lip gloss, mascara, and face creams. One time I was nearly out of lipstick and the “free” bag I received had a bright red tube of lipstick in it — just what I needed!
5. Work as hard as you can.
While I usually didn’t work full-time, a promotion I got in my job over the course of that year meant that I had a new department to work in. And that department needed all the help they could get!
While I might have usually worked around 26 hours a week regularly, I was soon being scheduled for 30-40 hour weeks because they could tell that I loved what I was doing and did my absolute best on the job.
I know it doesn’t seem like a lot of fun to go work 8 hours days on a sunny Saturday when the rest of your family is going on an excursion up the mountain, but if you really keep your goal in mind it makes it so much easier!

In the end, I had paid cash for the entire trip a couple of months before I had to leave. It felt so good to write out the final trip payment directly from my checking account!
I had also transferred several hundred dollars into British pounds, paid cash for my airplane ticket, and (finally!) purchased fabric to make my costumes for the Jane Austen Festival.
The resulting trip to England was beyond anything I could have imagined! My tour group visited many landmarks in London, studied at the Victoria & Albert Museum, toured Kensington Palace, saw Jane Austen’s house in Chawton, and had the most marvelous time at the Jane Austen Festival in Bath.
At one point I felt like I had stepped into a BBC adaption of “Pride & Prejudice”, with the whole town of Bath filled with ladies and gentlemen in Regency costumes. Besides touring fashion museums, having afternoon tea, and attending historic churches, we also were privileged to attend an English country dance. It was marvelous!
Well, four years later, I have now signed up to take the same tour again in 2013. So you know what that means? I’m saving like crazy! It may mean giving up a few things between now and then, but I can promise you that it will be totally worth it once I get back to England.
Katrina is the owner of Edelweiss Patterns, which specializes in vintage Sound of Music costume patterns. When she’s not designing patterns, she blogs about her historical and retro costume reproductions, participates in swing dancing, and enjoys the gorgeous Pacific Northwest where she lives.
Have you saved up and paid cash for something — large or small? Submit your story for possible publication here.
5 Steps to Start Your Day With a Better Attitude

I’m over at Keeper of the Home today sharing five steps to start your day with a better attitude.
And I also link to two of my favorite get-me-moving songs that I listen to almost every single morning.
OVER-SPENDING EVERY SINGLE MONTH?Grab these FREE Budgeting Sheets!
Click here to download!
Ask the Readers: What should I do with extra cash at the end of the month?
Ask the Readers: What should I do with extra cash at the end of the month?
 Today’s question is from Sarah:
I just started doing the money envelope system for my house budget, and at the end of the month, I have some extra money! I’m wondering how I should use this extra cash? Should I leave it in the envelope for a month that may have more expenses, put it towards a debt, or something else? -Sarah
Do you have a question you’d like to ask Money Saving Mom® readers? Read the submission guidelines and submit it here.
Early to Rise Challenge: Focus on Other People
Welcome to the Early to Rise Challenge! Throughout the month of March, I’m challenging myself and my readers to make the most of their mornings. So every week day morning at 9 a.m. EST, I’m posting a short Early to Rise post. I’ll share a few of my thoughts on the day’s passage from Early to Rise, tell you what time I got up that morning, and encourage you to leave a comment to tell us what time you got up and how you’re doing on the challenge.
Focus On Other People
Today’s reading in the Early to Rise book is on how you can change your life by living it to bless others. Getting up early is a great way to not only prepare yourself for a wonderful day, but also to help you be more organized so you have time in your life to bless others.
Think about it: if you’re always living life at breakneck speed with no time to breathe, you’re probably not going to have a lot of room or energy in your schedule to bless others. But if, on the other hand, you start your day off a little earlier and you have a plan of attack (and you actually follow through with that plan), you’re going to find that your days are not only more calm, you also have more enthusiasm for life. This enthusiasm will fuel your ability to bless others more.
I loved that a number of you said yesterday that one of the benefits of getting up early has been that you are a more cheerful person. I so agree (though if you get up late, don’t let that be an excuse for having a bad attitude, okay?).
You know what a direct by-product of a cheerful attitude is? Blessing others. Whether you intend to or not, when you are cheerful, it is going to be contagious.
What are you going to do today to bless someone else? Tell us your plan in the comments.
What Time Did You Get Up This Morning?

Me? I got up at 6:40 a.m. Not as early as I would have liked to, but I stayed up too late last night prepping for this weekend’s trip, so I set the alarm for 6:30 a.m. this morning… and then, ahem, I had a little trouble actually getting up when it went off.
That’s life sometimes, though. And I’m determined to have a great day today, even if it started out a little later than I would have liked.
What time did you get up? Leave a comment and let us know!
Join in the Chatter!
Want to blog about this challenge? If you’re blogging through this challenge with me, be sure to leave your link to your direct post for today below. Plus, if you’d like to post your daily posts to the Early to Rise Group Board on my Pinterest page, just shoot me an email (moneysavingmom @ gmail dot com) and I’ll invite you.
Want to follow along on Twitter or Instagram? Each week day morning on my Facebook Page, my Twitter account, and my Instagram account, I’ll be posting a picture of my alarm clock as public accountability. I’d love to have you do the same or join in the discussion on Twitter and Instagram. Just follow hashtag #EarlytoRise to see what others are tweeting and Instagramming about this challenge!
How I Keep My Email Inbox to Fewer Than 5 Emails


I’ve always been pretty fanatic about keeping my email inbox cleaned out.As a result, for the past few years, I’ve deleted diligently and filed fastidiously, and this has worked alright.
However, the more email I received, the more I started dumping things into my “To Answer Later” file. This file would soon fill up with 50 to 75 messages that needed to be addressed — some that required a significant amount of time to deal with (a lengthy form that needed to be filled out for something or other, information that needed to be gathered and emailed back, an article I needed to write and submit, etc.)
I made it my goal to deal with my To Answer file on Saturdays. But this stopped working efficiently as the number of emails in the To Answer File grew. Some Saturdays, I wouldn’t have time to answer the emails — which then meant their number was doubled the next week.
As a result of not being able to find a big time block to deal with these emails, I’d often miss important deadlines and opportunities. These unanswered and undealt-with messages hung over my head like a dark cloud, constantly making me feel behind and unorganized.
Clearly, I needed a new system! So, at the beginning of this year, I drew a line in the sand and made some significant changes to my email system.
The result? Not only am I hitting Inbox Zero almost every single day, I’m also much more productive and efficient with my email time. Plus, I’m answering emails much more quickly than I ever used to!

Here’s what has worked for me:
1. Unsubscribe Ruthlessly
I started examining every single email list I was subscribed to. I’d ask myself, “Have I found something from this email list to be valuable in the past few months?” If so, I wouldn’t unsubscribe.
In just about 90% of the cases, I realized I was deleting the emails from each list as they came in every week — or as much as every day. Sure, I’d delete them immediately, so it’s not like it was clogging up my inbox.
But why was I wasting minutes every single day deleting emails that I didn’t care anything about when I could take 5 seconds to unsubscribe and never see an email from that company in my inbox again? Such a revolutionary thought, I know. 🙂
In all honesty, though, it was something I’d not given a lot of thought to. I’d just delete, delete, delete. However, since taking a week to unsubscribe from 90% of the lists I was signed up to, I’ve realized how much time and inbox space this is freeing up!
For example, it used to be when I’d check my email in the morning, I’d have at least 40-60 new emails, the bulk of which I’d delete. Now, it’s unusual for me to have more than 20 each morning. Most of those 20 are emails that need to be responded to or in some way dealt with. But instead of having to go through my email first thing and delete a bunch of unneeded emails. Now, I can just start responding to emails right off the bat!
I have figured out that just the act of ruthlessly unsubscribing is saving me a good five to 10 minutes of time every single day. That doesn’t seem like too much, until you multiply that out over the course of a week (35 to 70 minutes), a month (150 to 30 minutes), or a year (1,825 to 3,650 minutes). That’s a lot of minutes saved!
Stop the Social Media Insanity!
Please do yourself a favor and unsubscribe from all notifications you possibly can from social media. You can always go look up and see who your new Twitter followers are or who left you a comment on Facebook. You don’t need those notifications interrupting your workflow throughout the day. I promise you will survive just fine without them!
2. Use the Delete Button Liberally
The delete button is your friend. Use it as your secret productivity weapon. If you don’t need an email, just delete it. Right now.
If you think you might need some of the information on it in the future, then just use the handy-dandy feature on GMail and archive. {You are on GMail, right? I am convinced is the best productivity email service on the planet!}
For those of you who currently have 35,000 emails in your inbox, the delete button needs to become your very best friend. Today. To save yourself the extra time and effort, check out Unroll.me. One of my readers recommended it on my Facebook Page this morning and it looks like a fabulous way to deal with a huge load of emails in an efficient manner.
Save Yourself a Little Time With Send & Archive
Have you added the Google Send & Archive option to your email? This saves you the step of having to send an email and then delete it. Just press Send & Archive and your email is sent and archived. Ta-da!

3. Set Up Filters Fanatically
Maybe you can’t unsubscribe from an email, but you can always filter it — provided you have GMail. I use filters for affiliate notifications that I can’t turn off, junk email that I can’t subscribe from, and more.
I also have filters set up for submissions to my site. So if you submit a deal or a guest post, those go in a separate folder that I check when I’m posting deals or reviewing guest posts. This keeps them in an organized place that I can easily access, without taking up real estate in my inbox.
4. Deal With Email Immediately
I saved this suggestion for last, because this is truly what has revolutionized my inbox. Before my “Inbox Revolution”, I filed things that would take longer than a minute or two to answer.
This truly only just resulted in a bulging To Answer File. Yes, it wasn’t in my inbox, but it was still weighing me down because I knew it was lurking there waiting to be dealt with.
At the beginning of the year, I decided to change my strategy and stop filing any email in my To Answer file for a few weeks. I was amazed at how this forced me to be more efficient!
I stopped asking myself, “Should I file this to answer later or take the time to answer it now?” Instead, I just answer the email right then and there, if at all possible, and then delete it.
Usually, there are a few emails that will require longer answers. In that case, I’ll leave those few in my inbox until I have a longer time-slot to deal with them. But I try to not let anything stay in my inbox for longer than a few days, preferably a few hours.
By adopting this strategy, it’s opened my eyes to how much time I was wasting just moving around virtual files and furniture, rather than just getting the job done.

How I Keep My Email Inbox to Fewer Than 5 Emails
A. Check Email
B. Immediately Delete Any Emails That Don’t Require Opening or Answering (such as someone just responding with a one-sentence confirmation)
C. Unsubscribe From Any Subscription That Has Still Made It Into My Inbox
D. Open and Deal With All Emails
- Respond to those requiring only a few-sentence response first.
- File emails that need to be filed (such as a deal that someone submitted via email rather than through my deals submission form).
- If time, respond to as many emails as possible that require a lengthier response. Oftentimes, I find that it doesn’t take me at all as long as I think it will if I just dive in and start writing!
E. Never Allow There to Be Any More Than Four Emails In My Inbox <— This has been key for me. If there are more than four, it means that I highly prioritize email answering above other computer work.
What tips & tricks do you have for taming your email inbox?
The Homemade French Bread Flop

I’m beginning to wonder if I’m a homemade French Bread failure. Because every single recipe I’ve tried so far has been a disappointment.
Which makes me wonder whether it’s more the baker than the recipe itself. Ahem.
I was all determined to try yet again yesterday. I searched online, found what looked to be a winner recipe, and I got to work dumping the ingredients in the bread machine.
About an hour later, I checked the bread machine and saw that the ingredients hadn’t really moved at all — even though the bread machine was on, the pan was fully locked in place, and the paddles were installed. (Yes, those three things have been the culprits in the past when I’ve had issues with my bread machine not mixing up the dough!)
Then I realized that the paddles weren’t all the way locked in. Aha!
So I got the paddles fixed and restarted the bread machine cycle. I thought all was well.
The dough looked beautiful and it rose wonderfully. But in my haste (since I was delayed by the bread machine hiccup), I think I under-baked the bread even though I thought it was done when I took it out of the oven.
The final result was edible, but I didn’t love the taste or texture at all. And it’s far from the amazing loaf I was hoping for!
So I’m back to the drawing board again… and I’d LOVE any amazing French Bread recipes or tips you want to throw my way. Because clearly I need all the French Bread help I can get.
Someday, someday, I’m going to be a Homemade French Bread pro. In the mean time, I’ll keep experimenting and hoping that the next recipe I try becomes the winning ticket.
In the mean time, though, I can attest to the winning nature of these bread recipes. I’ve made them all multiple times and they are family favorites:
My Favorite Homemade Bread Recipe
My Sister’s Bread Recipe
Homemade Breadsticks in the Bread Machine
Bread Machine Cinnamon Rolls (not really bread, but these are so good that I have to include the link for those of you who have yet to discover their yummy goodness!)
Have you had any recipe flops recently? I’d love to commiserate with you! 🙂
Save money on baby & kid items by shopping at Moms of Multiples sales
Save money on baby & kid items by shopping at Moms of Multiples sales

Katie emailed in the following tip:
Before our twins were born, we learned about a “Moms of Multiples” club that held a resale in our area. I went to the sale with my husband, and we were able to find almost everything we needed for our newborns (pack ‘n plays, swings, bouncy seats and more) for just under $200. If we had purchased these items new, we would have spent well over $1000.
Across the country, “Moms of Multiples” clubs frequently have sales where they sell gently used items for babies and children. Most clubs publicize their sales by posting fliers, emailing, and word-of-mouth.
You can use this website to find upcoming sales in your area. If you don’t have any sales in your area, you can search for “Moms of Multiples” clubs in your area as they might know of another nearby sale. You can also visit the National Organization of Mothers of Twins Clubs site to find a club in your area.