

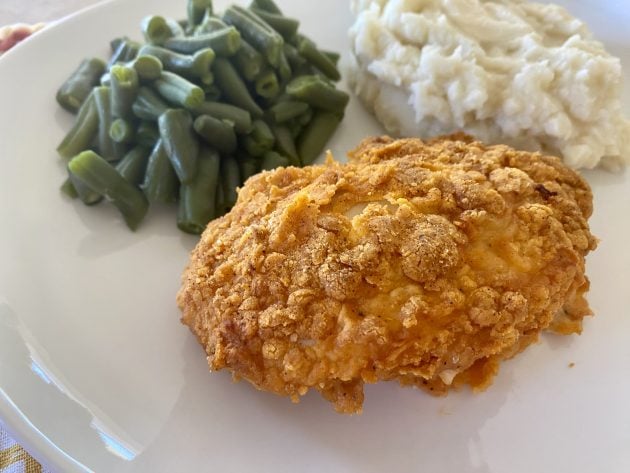
This simple recipe for oven fried chicken requires only a few basic ingredients and is less time-consuming than regular fried chicken. It’s also healthier since it’s baked and not fried — plus you won’t stink up your house with a deep fryer! Win, win, win!

Guest post from Brigette Shevy
Crystal and I grew up in a family of seven children. Given our family size, and the fact that we had company over for meals at least once a week, our Mom was (is!) the Queen of simple, budget-friendly, crowd-pleasing meals.
Crystal and I were recently reminiscing about different recipes we grew up on and thought it would be fun to share some of our favorites with you.

This Oven Fried Chicken Recipe is a classic!
Oven Fried Chicken was one of my Dad’s favorite meals.
My Mom got the recipe out of the church cookbook from the church my parents attended the first years of their marriage, and it has been a regular in our family for as long as I can remember.
Depending on what you serve with it, this chicken can be a fancy special occasion dinner or a hearty recipe for any night of the week!
What is oven fried chicken?
Oven frying is a low-fat technique for cooking crumb-coated foods in a very hot oven in an effort to recreate that crisp and golden exterior of foods that have been deep fried.
This technique cuts down on fat and calories without sacrificing flavor.
Oven fried chicken is a perfect example of how to make your favorite fried foods a whole lot healthier!
You Will Love This Easy Oven Fried Chicken
Well for starters… it tastes amazing! The outside is perfectly crispy and crunchy while the meat is so tender and juicy.
I love that this simple recipe requires only a few basic ingredients and is less time-consuming than regular fried chicken.
Also, it’s so much healthier since it’s baked and not fried — plus you won’t stink up your house with a deep fryer!

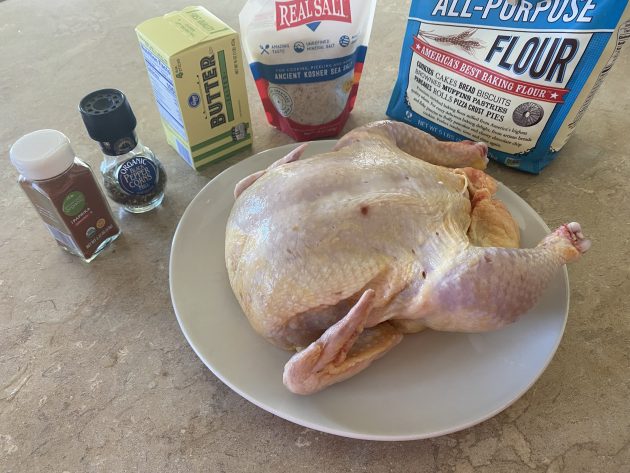
What you’ll need for Fried Chicken in the Oven
- 3lbs chicken pieces; rinsed and patted dry*
- ½ cup melted butter (you can use less)
- ½ cup flour, (possibly a bit more)
- 1 ½ teaspoons paprika
- 1 teaspoon salt
- ¼ teaspoon pepper
NOTE: The original recipe calls for the skin to be left on, but I usually remove the skin. It’s good either way!
How to Make Fried Chicken in the Oven
1. Preheat the oven to 400ºF.
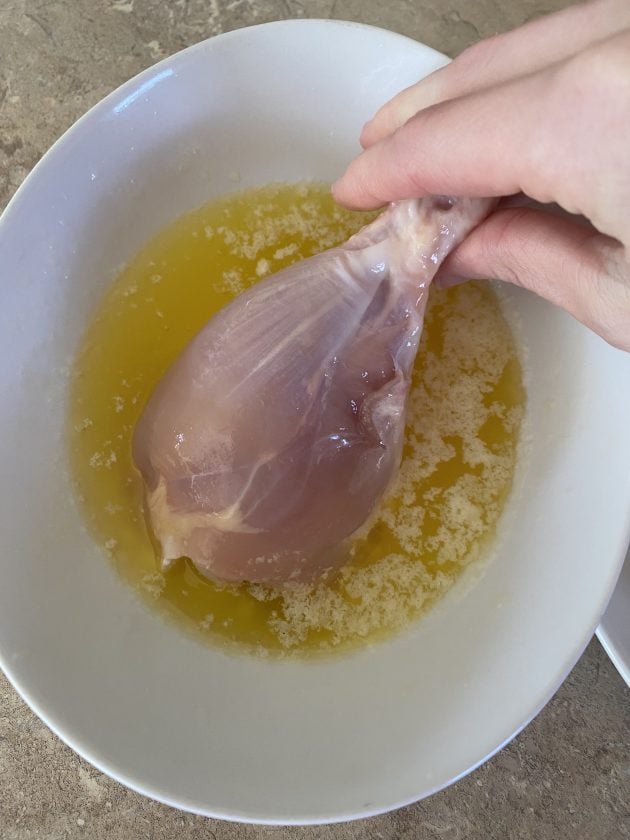
2. Melt butter in a shallow baking dish or bowl.
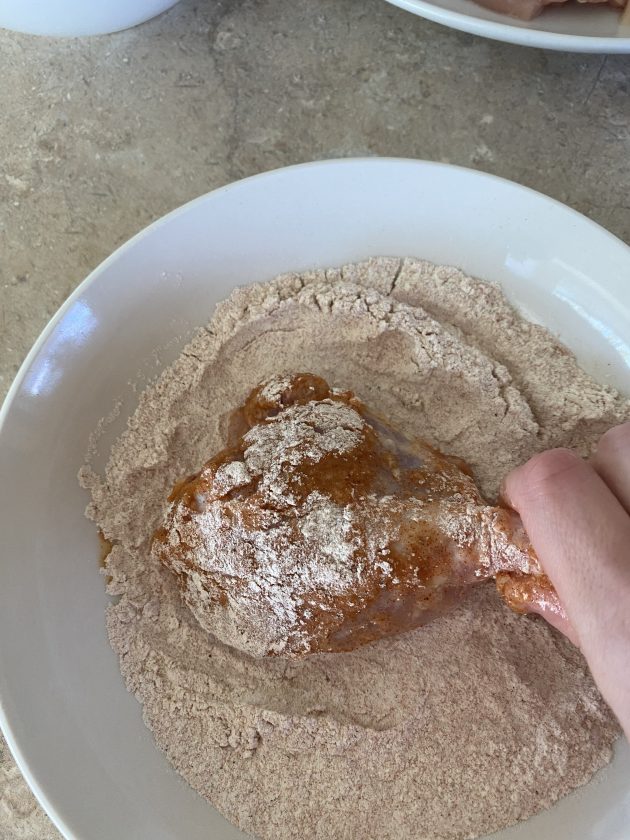
3. In another bowl, mix together flour, salt, pepper, and paprika.
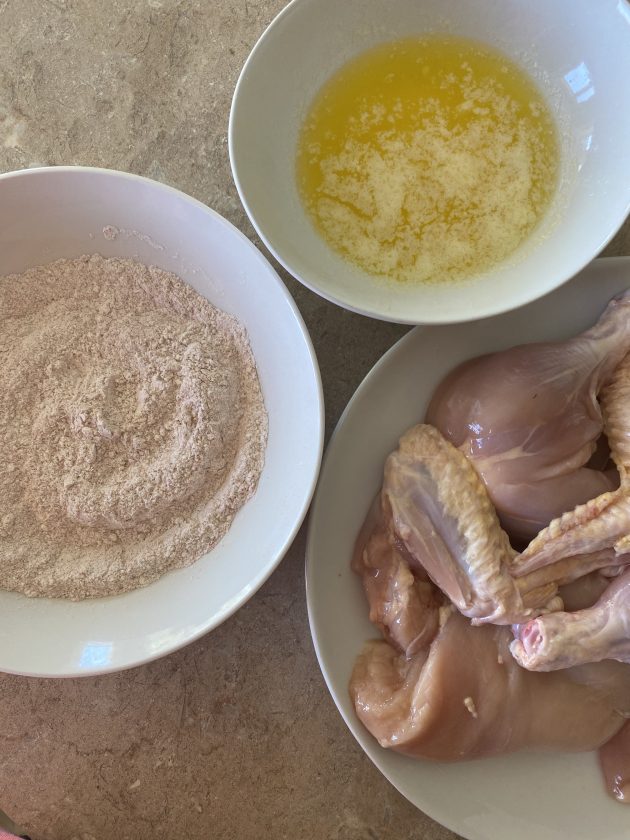
4. Dip chicken pieces in melted butter…
5. And then dip the chicken into the flour mixture.
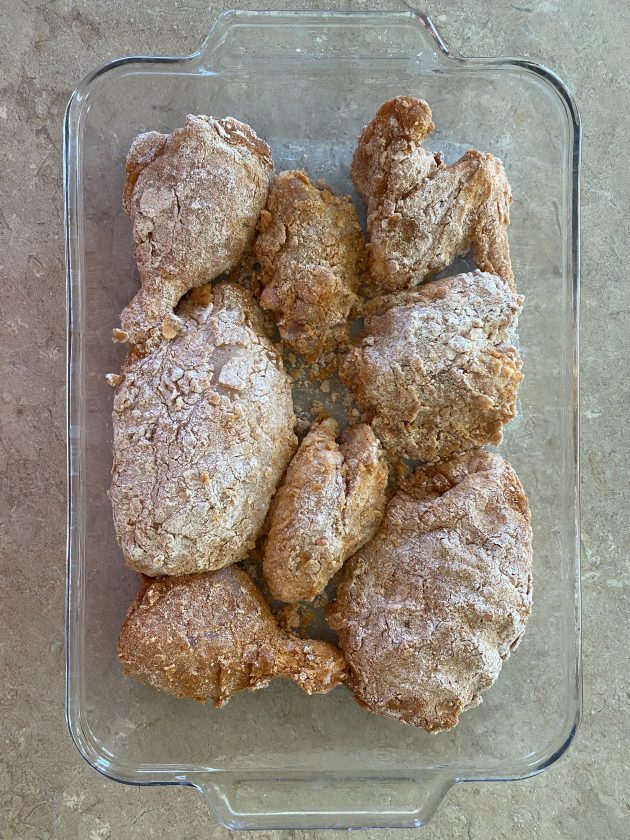
6. Place coated chicken pieces in a single layer on a greased shallow baking pan (skin side down – if you’ve left the skin on).
7. Bake at 400º for 30 minutes.
8. Flip chicken pieces over and continue baking for an additional 30 minutes.

Temp for oven fried chicken:
We recommend setting your oven to 400ºF as that seems to be the best temperature to allow the chicken to fully cook without burning the deliciously crispy, crunchy crust!

At what temperature is fried chicken done?
The recommended “safe” temperature for cooking poultry is 165ºF. So the INTERNAL temperature of the chicken should be stable at 165ºF before eating.
You can use a simple instant-read thermometer to test the internal temperature — just make sure you’re not accidentally touching the thermometer to a bone (which will be much hotter).
And keep in mind that white meat usually cooks faster than dark meat.

How to serve this Recipe For Oven Fried Chicken
As I mentioned above, oven fried chicken can be as fancy or as “every day” as you want it to be.
If you’re going for a hearty sit-down dinner, serve it up with baked or mashed potatoes, roasted vegetables, homemade applesauce, and dinner rolls.
If you prefer a lighter meal, oven fried chicken pairs nicely with a simple Ceasar Salad and fresh fruit.
For a backyard barbeque, try serving it with baked beans, coleslaw, potato salad, and watermelon wedges.
Storing Easy Oven Fried Chicken
On the off chance you have any leftover chicken, simply refrigerate it in a food storage container to reheat later.
It’s best to let the chicken cool completely before covering it in the refrigerator — this will help to prevent the crunchy coating to get soggy.
How to reheat fried chicken in the oven
Oven fried chicken tastes amazing as leftovers — but it’s best to reheat it in the oven so you can enjoy the crispy crunchy coating again!
Preheat your oven to 400ºF again and place cold chicken on a foil-lined baking pan. It helps to let the chicken sit at room temperature while the oven preheats.
Pop the chicken in the oven for 15-20 minutes, checking after 10 to see how warm it is.
Oven Baked Fried Chicken FAQs
Chicken needs to be dry in order to get crispy in the oven — so make sure you pat the skin well with a paper towel before coating it with the egg + flour mixture.
In order to get a crispy coating on your chicken, you’ll need to use some type of flour or cornstarch in the breading. Make sure you drench the chicken in melted butter so all the yummy breading has something to stick to.
In addition to making sure the skin is nice and dry, you’ll want to have your oven nice and hot — at least 400ºF. And if you have a wire baking rack that fits in one of your baking pans, set the chicken on that so air can circulate around the entire piece of chicken.
This will mostly depend on your personal preferences. Deep-frying is faster than oven-fried chicken, however, it’s a lot messier and smellier. It also requires the use of a deep fryer and lots of oil. Oven fried chicken takes a bit longer to bake, but it’s healthier and a lot easier.

Classic Recipe for Oven Fried Chicken
Ingredients
- 3 lbs chicken pieces rinsed and patted dry
- ½ cup melted butter
- ½ cup flour
- 1½ tsp paprika
- 1 tsp salt
- ¼ tsp pepper
Instructions
- Preheat the oven to 400ºF.
- Melt butter in a shallow baking dish or bowl.
- In another bowl, mix together flour, salt, pepper, and paprika.
- Dip chicken pieces in melted butter.
- Then dip them into the flour mixture.
- Place coated chicken pieces in a single layer on a greased shallow baking pan (skin side down – if you’ve left the skin on).
- Bake at 400º for 30 minutes.
- Flip chicken pieces over and continue baking for an additional 30 minutes.
- Eat and enjoy!
Nutrition
Love this recipe?
Make sure to share and save it on your favorite platform below!
Brigette is a full-time wife and mother who is blessed with three amazing bundles of energy (ages 6, 4, and 2). She enjoys music, experimenting in the kitchen, homeschooling her children, finding great deals, long-distance running, and anything chocolate.
FREE DOWNLOAD: 60 Meals To Help You Avoid Takeout!
Meal time just got so much easier!

Less Running Around, More Nesting

During the month of October, I’m following along with Edie & Ruth on their 31 Days of Less & More journey. I’d love for you to join in by reading the posts and completing the projects, or just sit back and read along each day.
Less Running Around
We live in a go-go-go and do-do-do society. It’s almost as if our worth is tied to how busy we can pack our schedules.
This frantic pace isn’t healthy and it prevents us from being able to take time to savor life. That’s why we have to be intentional about slowing down…
More Nesting
In the last year, we’ve been really putting forth effort to make time and take time to stop and smell the roses instead of just rushing through life. Here are three things that have helped:
1. Plan for Margin Time
When you plan your daily schedule, don’t pack it so full that you have no time to breathe. Cross some things off your list without doing them or just don’t even plan to do them at all so that you can free up at least two hours of margin time in your day.
This will immediately help you to feel more relaxed and less stressed, plus, it will mean that interruptions don’t frustrate or completely throw off your day.
2. Take Sundays Off
One of the best decisions we ever made was to make Sunday a media-free day of rest at our house. I’ve talked about this here before, but I’ll say it again: having one day off in a week makes such a difference in our lives.
Sundays are a day to recharge, refresh, and renew. It’s a day to refuel our tanks for the week ahead — and we look forward to it every week.
3. Stay Home At Least 2 Days Per Week
We don’t always accomplish this, but we really try to stay home at least two full days every week. I’ve found that this makes things so much calmer and quieter, plus, we seem to get a lot more done in a week when we stay home more!
What are your best tips and tricks for slowing down and savoring life more?
For more on this topic, check out Ruth’s post on Less Running Around and Edie’s post on More Nesting. I promise you’ll be inspired and blessed!
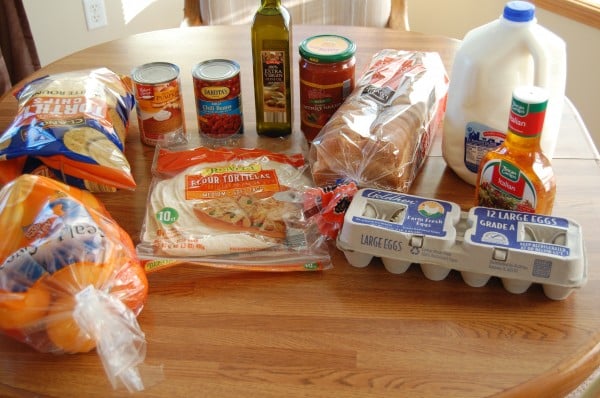
Gretchen’s $69 Grocery Shopping Trip and Weekly Menu Plan
Aldi
1 Navel Oranges – $3.49
1 dozen Eggs – $1.39
1 gallon Milk – $1.99
1 Loaf Bread – $1.29
1 Flour Tortillas – $0.99
1 canned Pumpkin – $0.89 (So happy to see this on the shelf at Aldi!)
1 Tortilla Chips – $1.19
1 Extra Virgin Olive Oil – $2.99
1 Salsa – $1.69
1 Italian Dressing – $1.39
1 can Chili Beans – $0.59
Total with tax ($1.28): $19.17
Dillons
While shopping at CVS earlier today, my coupon box broke in the parking lot and coupons flew everywhere. About 1/3 of them were blown away in the wind and the ones I “rescued” are so disorganized and messed up that it is going to take me several hours to get them re-organized. 🙁 I spent about 15 minutes in the car digging through my coupons trying to find the ones I was going to use at Dillons…but I couldn’t bring all my coupons in with me since they were ALL over my car. I shopped without my coupon box and all my coupons (which was a first for me). After my experience today, I’m thinking maybe I should switch to a coupon binder instead of a box.
1 Tyson Frozen Chicken Breasts (3 lbs) – $7.99
1 Private Selection Frozen Strawberries – $2.49
1 Kroger Ice Cream – $2.50
1 Kroger Cheddar Cheese (24 oz) – $3.99
1 Kroger Plain Yogurt – $2.39
1 Kroger Cottage Cheese – $1.99
2 Food Should Taste Good Cheddar Chips – Marked down to $0.75 each
2 Milky Way Bites – $2.49 each, used 2 $2/1 printable – $0.49 each after coupons
1 Kroger Turkey Sandwich Meat – $2.50
6 Knorr Pasta Sides – $1 each, used $1.50/5 printable, Received 2 $1 catalinas – $0.41 each after coupon and catalinas (We like to use these while camping, which we do a lot of in the fall!)
0.66 lbs Broccoli @ $0.99/lb – $0.65
1 Romaine Lettuce – $0.99
2 Cucumbers – $0.75 each
3 Green Peppers – $0.75 each
1 Kroger Natural Peanut Butter – $1.88
1 Green Mountain K-Cups – $6.99, used $1/1 printable – $5.99 after coupon (This is my favorite brand of coffee and I rarely see a sale on it. This was a splurge for me!)
3 Larabar – $1 each, used $0.75/3 e-coupon AND $0.75/3 SavingStar.com rebate – $0.50 each after coupon and rebate
Total before sales and coupons: $70.31
Total after sales and coupons: $50.17
Total for all grocery items: $69.87
Menu Plan for this Week:
Breakfasts
Smoothies x 4, Cereal, Toast
Lunches
Tossed Salad and Cottage Cheese, Peanut Butter & Jelly Sandwiches, Scrambled Eggs, Cheese Quesadillas, Cheese and Fruit
Dinners
Homemade Cheese Pizza, Tossed Salad, Breadsticks
Chicken Drumsticks, Green Beans, Sliced Oranges, Steamed Broccoli
Beef, Cheese & Noodle Bake, Steamed Cauliflower, Fruit Salad
Stuffed Green Peppers (I’m using this recipe as a reference), 30 Minute Rolls, Tossed Salad
Three-Cheese Chicken Penne Florentine, Steamed Broccoli, Sliced Oranges
Belgian Waffles, Eggs, Hashbrowns
Date Night (Yay!)
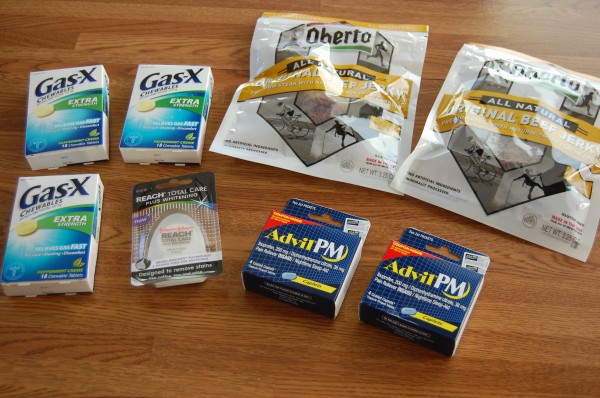
Gretchen’s Walgreens Shopping Trip: $38.37 for $4.80 out of pocket
Gretchen’s Walgreens Shopping Trip: $38.37 for $4.80 out of pocket
Walgreens Shopping Trip
2 Advil PM – $1 each
Used 2 $1/1 coupon from the 10/13 RedPlum insert2 Oberto Beef Jerky – $2.99 each (My husband was pretty happy about this treat!)
Used Buy One Get One Free printable3 Gas-X – $4.99 each (I will donate this – but I couldn’t resist “buying” it since I got paid to get it.)
Used $2/1 Walgreens coupon from the October Walgreens booklet (took off $6)
And used $10/3 coupon from the 10/13 SmartSource insert1 Reach Total Care Floss – $2.99
Used $1/1 printableRedeemed 1,000 points (like $1)
Total before sales and coupons: $38.37
Total with tax ($1.85) after coupons and sales: $4.80
Ask The Readers: How can we save on our grocery budget when dealing with Type 1 Diabetes & Celiac Disease?
Ask The Readers: How can we save on our grocery budget when dealing with Type 1 Diabetes & Celiac Disease?
 Today’s question is from Julie:
For many years, MoneySavingMom.com has helped me save hundreds of dollars. However, one of my children was diagnosed with Type 1 Diabetes and Celiac Disease, and our food budget has been obliterated as we make the necessary changes to a starch-free diet.
How can I get the best deals on nuts, seeds, coconut products, and the high volume of produce that we now consume? I am already preparing everything from scratch and am attempting to learn how to garden but would welcome any advice! -Julie
Do you have a question you’d like to ask Money Saving Mom® readers? Read the submission guidelines and submit it here.
Gretchen’s CVS Shopping Trip: $33.74 worth of products for $1.77 out of pocket
Gretchen’s CVS Shopping Trip: $33.74 worth of products for $1.77 out of pocket
CVS Shopping Trip
Transaction #1
2 Maxwell House K-Cups – $5.99 each
Used 2 $1/1 printable1 CVS Razor – $6.99
Used $5/1 CVS razor store coupon from the in-store coupon machine2 Suave Professionals 2-in-1 – $2
Used 2 $1.50/1 coupon from the 9/29 RedPlum insertUsed $13 ECBs from previous shopping trips
Free after coupons, Received $3 ECBs (for buying CVS razor) and $3 ECBs (for buying 2 Maxwell coffees)
Transaction #2
3 Ghirardelli Chocolate Bars – $3.59 each
Used 3 $1/1 printableUsed $6 ECBs from transaction #1
Paid $1.77 out of pocket, Received $2 ECBs (for buying 3 Ghirardelli)
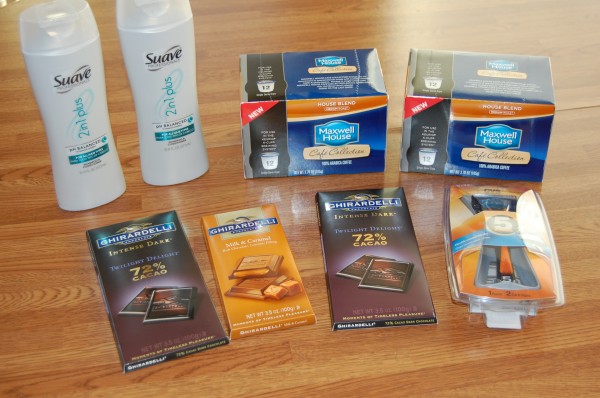
Total before sales, coupons and ECBs: $33.74
Total after sales, coupons and ECBs: $1.77 PLUS $2 ECBs leftover
Less Television, More Reading

During the month of October, I’m following along with Edie & Ruth on their 31 Days of Less & More journey. I’d love for you to join in by reading the posts and completing the projects, or just sit back and read along each day.
Less Television
According to statistics, the average American watches over 30 hours of television per week. That’s a LOT of time!
Stop to think what you could do with that time. You could keep your house in amazing shape. You could exercise more. You could cook from scratch. You could have a profitable side business. You could write a book. You could invest in some close relationships.
The sky is the limit with what you could do with 30 hours per week!
I think we’d all agree that, in most cases, there are more productive things to do than to spend hours and hours each week sitting in front of a black box. But we have to be intentional in setting up our days so that television-watching doesn’t become our default.
Here are three practices that have helped us:
1. Turn It Off!
Okay, so this seems like a no-brainer, but how often do you have the TV on in the background as you go about your day? Try just turning it off. It will mean less distraction and less noise in your day — which doesn’t sound like a bad thing to me!
2. Don’t Pay for Cable
This is another simplistic tip, but it really works! If you can’t get that many shows on your TV, there’s a lot less temptation to turn it on or channel surf.
2. Have Set Times for Watching
We don’t watch a lot of TV, but we do have Movie Time at 5 p.m. every day. Establishing a specific time for having the TV on at our house has been so beneficial as then I don’t have to field questions all day on “when can we watch a movie”? And also, it provides a lot of motivation for our kids to get their school and chores done by 5 p.m.! 🙂
More Reading
It’s no secret that I’m a big fan of reading. In fact, I enjoy it so much that I sometimes put it as a higher priority than sleep (which I don’t recommend!).
Making good books a part of your life isn’t something that will just naturally happen. Again, it’s something you need to be intentional about — especially if you’re not much of a reader.
Challenge yourself to read for 15 minutes when you get up in the morning or when you go to bed at night. Listen to audiobooks while you’re driving or working around the house. Read aloud as a family.
Set small goals to make reading a part of your everyday life. I promise it will be worth the effort!
For more ideas, check out my post on 15 Ways to Fit More Reading Into Your Day.
For more on this topic, check out Ruth’s post on Less Television and Edie’s post on More Gratitude. I promise you’ll be inspired and blessed!
Are you coming to MOMCon on Friday? You won’t want to miss this!
Are you coming to MOMCon on Friday? You won’t want to miss this!

Are you going to be at MomCon in Kansas City on Friday? If so and you like free stuff and saving money, I promise you’ll want to be at my workshop, 25 Ways to Significantly Cut Your Grocery Bill.
I love to give things away here on the blog, so I thought it would be so much fun to do that at my MomCon workshop, too! Everyone in the audience at my workshop on Friday will have the opportunity to take home a fun prize — like a Starbucks gift card or even an iPad.
It will be worth being there for, trust me on that! Oh and be sure to be there at least 10 minutes early to be eligible for the giveaways. 🙂
But the giveaways aside, I’d really love for you to be there because I would be honored to have the opportunity to meet you in person. Truly, meeting my readers in person is one of my most favorite things in all the world! So if you are there, please come say “hi” — it will make my day!
Sign up for Bing and earn rewards for searching the web!
Are you using Bing Rewards? If not, you’ll want to sign up here.
Bing Rewards is a way to earn credits for searching online and participating in daily offers. By spending just a few minutes per day, you can easily earn a $5 Amazon gift card every month.
You can read all about how it works and how to use it in my post here.
(Note: The link in this post is my referral link. Read my disclosure policy here.)
Do It Yourself: Lemon Rosemary Air Freshener

DomesticSerenity.org shows you how to make a homemade Lemon & Rosemary Air Freshener.
Do you have a fun and frugal DIY idea to share? I’d love to hear about it! Read the submission guidelines and submit it here.
OVER-SPENDING EVERY SINGLE MONTH?Grab these FREE Budgeting Sheets!
Click here to download!
Monthly Sponsor Spotlight: An interview with Teach Them Diligently
Monthly Sponsor Spotlight: An interview with Teach Them Diligently

We’re excited to have Teach Them Diligently as one of our monthly sponsors in October. WE had the opportunity to interview them and get to know their company a little more recently:
Can you tell us about the history of your company?
Teach Them Diligently was started in 2011 out of a mission board called Worldwide Tentmakers. The event was meant to provide financial support for its overseas ministries. This is the reason for the strong Gospel and Family Discipleship focus of the event. It was born out of a mission board in which the entire purpose for its existence is the Great Commission.
The first event was in 2012 in Spartanburg, SC, and we hosted 7,000 at that first event, and we were overwhelmed with positive testimonials as to how the Lord used the event in the hearts and lives of families. After much prayer, we expanded in 2013 to Spartanburg, SC; Nashville, TN; and Omaha, NE. We hosted 7,000, 7,000 and 5,000 respectively at each of those events.
Now we are expanding again slowly into online media and adding a fourth event. In 2014, our events will be in Nashville, TN; Spartanburg, SC; Washington, DC; and Dallas, TX. We’re excitedly looking forward to seeing thousands of homeschoolers at our events again in 2014!
The main focus on Money Saving Mom® is saving money and making our dollars stretch. How do Teach Them Diligently conferences help us to do that?
We have an exhibit hall with hundreds of booths from companies interested in reaching families attending our events with their products, curriculum, and resources. In most cases, the prices at our events are lower than these companies offer all year.
Additionally, we are offering an exclusive discount code to get $8 off the early bird registration price for our events for MoneySavingMom.com readers. Just use coupon code MSMBESTSAVINGS at checkout to get this special discount! This discount code is valid through November 1, 2013.
Do you all participate in any charity work that you’d like us to know about?
A portion of every dollar of registration fees goes toward supporting Christian ministries overseas.
What would you most like your customers or future customers to know about your company?
Our events are encouraging. They are specifically Christian homeschool events, but anyone is welcome.
At Teach Them Diligently events, you can expect to have your vision renewed and refreshed toward the reason why you started homeschooling. Additionally, we want to encourage parents that homeschooling is about discipleship not just academics.
We believe that what parents do every day in their homes is part of the Great Commission and an extension of Christ’s command to reach out. We are equipping our children to go out into the world and make a difference.
Interested in becoming a monthly sponsor or advertising with us? Find more details here.

52 Ways to Save $100 Per Year: 3 Ways to Save on Online Orders {Week 33}
52 Ways to Save $100 Per Year: 3 Ways to Save on Online Orders {Week 33}

Every week in 2013, I’ll be sharing a different way you can save $100 this year. If you do all of these things, you’ll be able to save over $5,000 this year alone! Many of these things will likely be things you’re already doing, but hopefully all of you will pick up at least a few new ideas or some inspiration from this series.
Christmas will be here soon and that means that many of us are doing more online shopping than usual. Whether you shop online all year long or just around Christmastime, use the following tips and tricks and you’ll probably save $100 or more on your online orders!
1. Look for a Free Shipping Offer
When I order online, I rarely pay for shipping. It’s just not worth it to me to have to pay high shipping prices — even if the online deal is spectacular.
I’ve found that if you’re willing to look around and be patient, you can almost buy just about anything online without paying for shipping. Many stores offer free shipping year-round on a minimum order or they offer free shipping codes at various times throughout the year. Check FreeShipping.org to find free shipping codes and offers available at thousands of stores online.
It’s best to shop when an online store is running a free shipping special that requires no extra code. This way, you can not only get free shipping, but you can also get a percentage off your order by using a coupon code. (Some stores do allow you to combine coupon codes, but many don’t — see point #2.)
Tip: See If the Site Offers Free Shipping to Your Local Store
If you can’t get free shipping, check to see if you can have the item shipped to your local store for free. This isn’t quite as convenient as having something shipped to your front door, but if the store is nearby, it could definitely be worth the effort to run by and pick it up and save on shipping.
2. Search for a Coupon Code
Up until a few years ago, I never even thought to look for a coupon code when I ordered something online. Now, my husband and I both have a policy to never purchase anything without first finding a coupon code to use.
I’ve tried a lot of different coupon code websites and I’ve also tried Googling for coupon codes, but in my opinion, nothing compares to RetailMeNot.com. They are the best coupon code website in existence so far. All you have to do is go to their homepage, search for the store you’re planning to shop from, and ta-da! you have a long list of coupon codes that have been rated by their large community of users.
More often than not, I’m able to find at least one coupon code from the long list that works for me. And, for possibly 1-2 minutes of effort, that coupon code will usually save me at least 10% off my order — sometimes even as much as 25%!
Tip: Try to Combine Coupon Codes
Sites like Kohls.com allow you to stack two coupon codes — one to get free shipping and one to get a percentage off your total. It’s always worth it to try to see if a site will let you use more than one coupon.
3. Shop Through a Cashback Site
Cashback sites work with online stores to offer you a percentage — usually somewhere between 3-6% of your total purchase — back as a rebate. While 3-6% might not seem like much, it can really add up over time.
My theory: if you’re already going to be making the online purchase, you might as well get a little money back, too, right? After all, it’s essentially “free” money!
Here are two cashback sites I recommend:
- Rakuten (formerly Ebates) — One of the oldest cashback sites, Rakuten has an easy-to-navigate website. You only have to earn $5.01 in rebates in order to get a check or Paypal payment. You get a $5 bonus upon sign-up, so with just one purchase, you can reach payout. However, payments are only sent every three months, so you have to wait awhile to get your rebate. Go here to sign up.
- Mr. Rebates–A smaller cashback site, Mr. Rebates still offers a pretty good payout: you get a $5 bonus when you sign up and you can choose to request a check or Paypal payment as soon as you’ve received $10 in rebates. Go here to sign up.
When you are ready to make an online purchase, check both of these sites to see which one is currently giving the highest percentage of cashback and then shop through that one. To ensure your cashback is credited to your account, search for the store on the cashback site you’re using and then click through the store link. This should guarantee that you are credited for your purchases.
By combining free shipping, an online coupon code, and a cashback rebate on all of your online shopping purchases, you will make your money go a lot farther and you’ll likely save at least $100 per year (if not more!).
What are your best tips and tricks for saving money on online orders?
Less Smart Phone, More Communication

During the month of October, I’m following along with Edie & Ruth on their 31 Days of Less & More journey. I’d love for you to join in by reading the posts and completing the projects, or just sit back and read along each day.
Less Smart Phone
It took my husband two years to convince me that getting a smart phone was a good idea. I had all sorts of excuses about how extravagant and unnecessary it was, but in the end, he won.
And he was so very right. 🙂
Since I have a business and travel regularly, my smart phone saves me an incredible amount of time, money, and hassle. I can keep up on emails, manage my team, have conference calls, check into my flights, get directions when I’m driving, keep track of all my travel information, and get internet pretty much anywhere without having to pay an extra fee.
I am much more efficient thanks to my smart phone. It streamlines my life and saves my sanity. But it can also take over my life. Thus, the reason I have Smart Phone Rules. These are not hard and fast rules and maybe these won’t be the same rules I’ll have for years to come, but right now, they are working really well for me:
1. I Don’t Play Games
I know, I’m so very boring aren’t I? But here’s the thing: I don’t need any more reasons to be connected to electronics. So I just haven’t learned how to play any of the games and then I don’t know what I’m missing. 🙂
2. I Only Have a Few Apps
This is the minimalist in me, but it really streamlines my life. I have a very small number of apps I use and I rarely add new ones.
3. I Don’t Update My Blog/Facebook From My Phone
This is just a personal preference thing, but it’s also a way to stay more untethered. If I don’t have things set up so I can update my blog or Facebook Page with my phone, I won’t be tempted to do so.
4. I Leave My Phone Off Sometimes
Novel idea, I know. 🙂 But truly, I think it’s important to know that I can survive untethered. So sometimes, when I’m with friends or we’re going out somewhere, I leave my phone off — or leave it home altogether.
See Ruth’s Smart Phone Rules here. Great food for thought!
More Communication
It’s pretty easy to send quick texts or tweets or to email someone through Facebook, but many times, there’s not a lot of real depth or sacrifices required in these relationships.
It takes much more effort to meet someone for coffee, to call your friend to pray with her over the phone, to drop everything to help a neighbor in need. Close, long-lasting friendships take work, effort, and time, but they are so worth it.
If you don’t have any close friendships in your life right now, can I encourage you to do all you can to cultivate friendships? To have friends you have to be a friend. Reach out, ask questions, be a listener, be interested, give, care, pray, offer to help… I’ve found that the more I invest in others, the more I’m blessed in return!
For more on this topic, check out Ruth’s post on Less Smart Phone and Edie’s post on More Communication. I promise you’ll be inspired and blessed!
How Simple Routines Save Me A Lot of Money
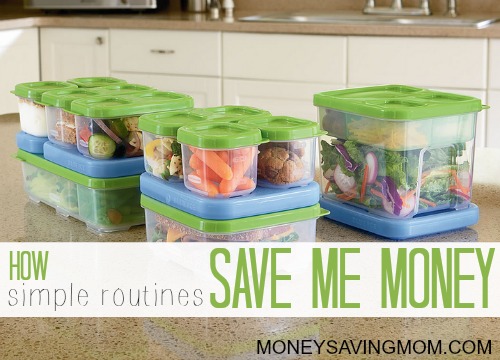

Guest post from Katie of Holidays for Less
I am not a “routine” person by nature. I am not a type-A personality or even very organized for that matter. But out of necessity, I had to start a few routines to keep myself (and my family) sane! Once I saw how my routines are not only saving me time but money, I forced myself to become a “routine” person!
So, how do my routines save me money?
Here are three simple routines I’ve implemented in my own life that have helped me save time and money.
1. Packing lunches the night before
I work outside the home, so I’ve gotten in the routine of making my lunch for the next day before I go to bed. I pack every single thing that I will need and put my whole lunch bag in the fridge.
Sometimes that means my popcorn or spoon sit in the fridge over night. I’m okay with that, because on the nights that I slack off and don’t pack my lunch, I always end up buying my lunch (and sometimes breakfast, too!) because there’s never enough time in the morning.
If I buy lunch, it runs about $6 and breakfast costs between $3-$4. That’s $10 a day! Start multiplying that by a month or even a year and the numbers get really ugly!
That savings is motivation enough to stick to my evening lunch-packing routine.
2. Fueling up on Sundays
Between my commute to work and standard errands around town, a tank of gas lasts me exactly one week. I used to just fill up whenever I needed; however, I found that many times, I would end up filling up on the highway, which is always the most expensive place for gas!
So I finally made myself get in a routine of filling up every Sunday. This way, I was in control of where I was when I needed gas.
Even if it’s a holiday week and I don’t use my car as much, I top my tank off on Sunday, to ensure I’m not stuck low on gas mid-week. I always use the same gas station because it is the cheapest in my area.
Since I have started this routine, I have never found myself just going to the nearest gas station and I have averaged a savings of about $15 per month.
3. Updating the budget daily (on my lunch break)
I am the keeper of the finances in my house, which means I keep our monthly budget updated. I used to keep my budget (an excel spreadsheet) on my home computer, but I would be too tired at night to update it, or I would just plain forget.
Then, the end of the month would roll around and suddenly I was in a panic looking back and what we’d spent and hoping we hadn’t gone over in our budget categories. Many months, not surprisingly, we had gone over, which meant less money going in to our savings account that month.
In an effort to fix this problem, I’ve now moved my budget to be housed on my work computer and gotten in to the routine of updating my budget during the first 5 minutes of my lunch break each day. I literally look at and update my budget Monday through Friday each week. Some days, I have nothing to enter and some days (like Mondays!) I have quite a few things to enter.
I’ve been in this routine for 5 months now and not only have we kept within our budget each month, but many months we’ve come in well under budget — allowing us to put even more money in savings. In fact, last month we received our car insurance bill for the year and instead of dipping in to the savings we have for that bill, we were able to pay it entirely out of our monthly income. This never would have been possible just 6 months ago!
Routines can be intimidating to the organizationally challenged, like myself, but if you can find a routine that doesn’t take much time out of your day and actually saves you money, I promise it will be much easier to stick to!
Katie is a wife and mother who loves a great deal and helping her family save towards their financial goals. In her spare time, Katie blogs at Holidays for Less, where she shares ideas and deals that will make parties, holidays and general entertaining easier on your wallet.
Swagbucks Paid For Our Christmas

Today’s Swagbucks success story is from Kira:
Beginning in January of 2012, I found our budget was becoming tighter and tighter. I went from a part-time job to no job outside of the home — which meant our family was totally dependent my husband’s income. At that time, his income was not consistent and we started pinching every penny.
I found that our Christmas savings account could no longer have money deposited each week like it had been. Actually, by April I noticed I had not yet contributed to it at all. Thankfully, I had begun using Swagbucks.
Between surveys and searching, I saw the points racking up. I continued to redeem at every 450 points that would rack up for a Amazon Gift Card. In November, I noticed I had $150 in gift cards.
This might not seem like a lot, but with all the incredible deals that Amazon was offering, I was able to have a fantastic Christmas for my three young boys. The living room was loaded! I was so thankful, and realized the blessing that Swagbucks had been for my family.
I know Christmas isn’t about gifts at all, but for little ones, they certainly look forward to seeing those gifts under the tree on Christmas morning. My husband and I love to see that sparkling in their eyes when they first look downstairs.
I will continue to use Swagbucks as long as it is around. I’m thankful for Christmas 2012 and Swagbucks!!
Kira: can you email me so I can send you your $50 gift card for submitting your story? Thanks so much!