
Request a free Vegetable Garden Guide. (Thanks, For the Mommas!)
You can also request a free Gardener’s Idea Book.

Saving Families Money Since 2007


Request a free Vegetable Garden Guide. (Thanks, For the Mommas!)
You can also request a free Gardener’s Idea Book.

Well, considering what came in my mailbox today (see picture above), I’d say a definite yes! I usually spend less than five minutes per week signing up for freebies and my mailbox is a source of constant surprise and fun — and often high-value or free product coupons. For five minutes of my time each week, it’s certainly worth it!
Want to have your mailbox start filling up with fun and money-saving freebies and high-value coupons? Just start signing up for a few of the freebies I post every day. Within 4-6 weeks, you should start seeing free things show up in your mail!
Missed the first posts in this series? Read them here.
Last week, I shared with you how I organize my coupons. My system has worked well for me for over 10 years. I’ve tried other systems and they never quite work as well so I always end up going back to the Coupon Box method of organization.
3 Tips for Choosing an Organizational System for Your Coupons
1) Start Small
If you’re new to couponing, don’t feel like you have to go get yourself some big honkin’ box or binder in order to use coupons correctly. It’s really perfectly okay to start out with a little index box or something like The Couponizer.
Get accustomed to something small. When you feel really comfortable with that and you want to move up, then it’s time to consider a box or a binder. But don’t overkill from the get-go and then burn yourself out. You can save plenty of money with a small coupon organizer, too.
2) Keep it Simple
The goal is to save money with coupons, not create some elaborate system. Don’t get hung up in all the details. Keep it simple — especially at first.
3) Do What Works for You
What works for me won’t necessarily work for you. I strongly encourage you to experiment with a few different methods and find what works best for you. And then stick with it, so long as it is working well for you!
 photo from Coupon Magic Organizer
This method of coupon organization is probably the most popular. There are many different ways to create a Coupon Binder, but they all usually involve a 3-ring zippered binder with baseball card holders. You file your coupons in the plastic sleeves of the baseball card holders.
Pinching Your Pennies has an excellent video here on How To Create a Coupon Binder. And Penny Pinching Diva has a great article on The Anatomy of a Coupon Binder which explains how to set up your own Coupon Binder.
Pros — You can easily see all coupons you have at a glance making it simple to locate coupons. Unlike the Coupon Box method, if you drop the Coupon Binder, you don’t have to worry about coupons scattering everywhere!
Cons — When I tried this method, I found it tedious to put all the coupons in the sleeves. If they didn’t fit, you’d have to fold them and stuff them in. It took quite a bit of time and effort compared to my Coupon Box method.
See more Pros and Cons on the Coupon Binder from Utah Deal Diva.
Pre-Made Coupon Binders
Don’t have the time to put together your own Coupon Binder? You can buy them already made up for you from Prospering Families or from Coupon Magic Organizer.
Want something more stylish than a plain old 3-ring binder? Order a Coupon Clutch!
This method of coupon organization is the least time-consuming. Instead of clipping coupons out, you file the inserts whole by date. See a video of how the Whole Insert Method works here.
Pros — It’s so simple and is perfect for a person who doesn’t have a lot of time to clip coupons. In addition, it’s easy to find your coupons when you’re planning your grocery shopping trip as you can search for coupon in our Coupon Database and then just pull the insert from the file and clip the coupon.
Cons — Since you don’t clip all your coupons, if you run into a great clearance or unadvertised deal, you won’t be able to search your coupons to see if you have some which you could use. This was the most frustrating aspect when I tried this method. I missed out on deal after deal because I didn’t have my whole Coupon Box with me and at my finger tips.

I shared how this method works for me here. You can watch a Video Tour of My Coupon Box to see how Carrie set her system up. Monica also has a great tutorial on her adorable coupon box.
Pros — You have every coupon at your finger tip. Plus, I found it much easier to file and find coupons than when using a Coupon Binder.
Cons — The box is a little bulky and might feel conspicuous to some of you to take into a store (doesn’t bother me, but I’m already weird!). In addition, if you drop the box, you may have Coupon Disorganization Disaster! 🙂 And finally, you have to keep up with cutting and filing coupons, otherwise the Coupon Box is not that beneficial.
Those are the three basic methods used by “super-couponers”. There are a thousand different variations on these methods and I encourage you to experiment and figure out what works for you!
I’m curious: If you clip coupons, do you clip all of them or just the ones you think you’ll use? I’ve actually been moving more towards what Carrie outlines here (a combination of the Coupon Box method and the Whole Insert method) in order to save time. So far, it seems to be working well!
Get the latest coupons delivered right to your door for
as low as $1 per week with Discounted Newspapers!

As of today, we’re starting a new feature here called Q&A Tuesdays. I’ll choose one question each week from my inbox to answer. Today’s question comes from Teandra:
I know you’re a huge Dave Ramsey fan and my husband and I are currently in FPU. I heard Dave suggest eMeals on the radio last week so I went to check it out. It’s $1.25 per week and feeds a 7-day dinner meal plan for 4 to 6 people $75/week, or a 5-day dinner plan for 2 people $35/week. I’m wondering if you’ve heard of eMeals and what you think of it compared to what you already do with your family.
Teandra
I’ve heard of eMeals, but have never used the program before because I’ve been planning my own menus for so long that it’s hard to imagine paying someone else to plan them for me!
I did try out and review Stolen Moments Menu Planning service back in November and was thoroughly impressed with it. I’m assuming eMeals would be somewhat similar, though it’s less expensive and offers aisle-by-aisle grocery lists — which would be really helpful! However, it’s not as tailored for your family as Stolen Moments Menu Planning is and I also noticed they don’t offer that many different specific grocery store options.
Since I like to plan my menus based upon what I have on hand in addition to what’s on sale at the store, shop at more than one store, shop the marked-down section of stores and stock up when items are at rock-bottom prices, it’s hard to follow a pre-planned menu plan written by someone else. I also have been cooking the majority of our meals ahead on Freezer Cooking Day, so it seems like this would defeat the purpose of subscribing to a menu planning service right now.
That said, if menu-planning is overwhelming to you or you’re in a busy season of life and need to keep it simple when it comes to grocery shopping and cooking, I’d definitely give eMeals a try. It’s only $5 per month and you can cancel at anytime. You just might find that it’s a perfect fit for your family!
Have you used eMeals or another menu-planning service before? If so, tell us about your experiences — good or bad — in the comments. I’d love to hear.
PSST! If you’re considering signing up for an eMeals subscription to try it out, you can use coupon code savemoney to get $2 off a 3-month subscription, making it only $13 for 3 months — or around $4.33 per month.
Have a question you’d like me to answer for our Q&A Tuesdays feature? Email it to me and I’ll be glad to consider it for a future post.
We live in an Instant Gratification culture. There’s fast-food, express checkout, and 0% down financing. And in many respects, I think we’ve forgotten the old-fashioned virtue of waiting.
That’s one reason I loved Jessica’s video on how they delayed their honeymoon for 2.5 years in order to be able to pay cash for it. What a great way to start marriage! (And kudos to her for winning the Get Rich Slowly Video Contest!)

Have you heard of Offermatic? It’s a free service which tracks your debit or credit card purchases and then offers you discounts and deals based upon what you routinely purchase. Here’s what Lifehacker says:
The best discounts are for things you actually buy. Free web service Offermatic uses your credit card, through the same back-end as Mint.com, to offer 40-90 percent discounts on products similar to what you’ve already purchased.
If you’re not squeamish about providing financial information to financial scanning sites like Mint.com, Offermatic is a pretty sweet deal. You register your credit cards with Offermatic through their secure system, which then scans your purchases and spits back out high-discount offers from their advertisers, made to match your interests. You won’t necessarily get coupons for the exact stores you shop at, but the examples seem to be highly related.
I’m curious: Would you be willing to provide them your financial information in order to get a coupons and deals in return?
Thanks for the heads’ up on this, Jason!
As I’ve confessed in the past, I do not have a decorating bone in my body. But I so admire those who do! Myra is such a person and she kindly offered to share some tips she’s learned in her experience as an interior designer. I can’t wait to attempt to put some of her tips into practice once we move into our own home. – Crystal
Guest Post by Myra from My Blessed Life
Decorating is something I’ve loved for as long as I can remember. As a child, I regularly rearranged my room and the living room (whenever my mom would allow me to!).
I decided to study Interior Design because it was a “trade” I could practice as a stay-at-home mom. After I graduated with a B.A. in Interior Design, I worked for three years in the high-end furniture industry. My clientele was willing to pay big bucks for furniture, accessories and for my time, but I was not.
Over the years, I’ve discovered a number of tricks for decorating a home beautifully and frugally:
Read decorating magazines and browse decorating blogs online. Don’t try to perfectly replicate what you see; take inspiration and create your own look!
I have found numerous items at these stores on sale or on clearance. Hobby Lobby has a rotating 50% off sale that covers most of their inventory. If you need a product that doesn’t go on sale, check Hobby Lobby’s website for a 40% off coupon.
Don’t buy junk, but look for items that can be re-purposed. I love finding architectural pieces like picture frames, windows, shutters and furniture like this desk I re-purposed.

Many people are afraid of paint, but it is one of the most inexpensive ways you can update a room. Neutrals are good, but don’t be afraid to use color to spice things up! Arm yourself with spray paint for re-purposing items – it will become your new best friend.

Use branches or sticks, rocks, shells and de-bugged moss to bring the outdoors inside – for free!
Knick-knacks be gone. It is more pleasing to have five awesome pieces on your mantel rather than twenty little things.
Hang architectural pieces on the wall. I hung an old window in my dining room that I dug out of my mother-in-law’s neighbor’s garbage. {blush} Enlarge photos and use inexpensive frames to create an arrangement of family photos.

Trust me. It will make the ceiling look higher and your room will appear more “grand.”
You think I’m kidding? I’m not. I’ve found many inexpensive “pretty” hard cover books at antique stores, thrift stores and at library book sales. You can stack them, lean them and even turn them around backwards to let the pages show.
Let your home’s personality shine through! Take it slowly. Don’t try to completely overhaul your home in a week. Change little things out here and there and you will be amazed at how much you can do for so little out of pocket cost!
Myra enjoys her days as a WAHM and wife to her childhood sweetheart. She blogs at My Blessed Life about various topics to inspire your heart and your home. You can also find Myra on Twitter @blessedlife2 and Facebook.

After filling our freezer last week, our cupboards, refrigerator and freezer was pretty well stocked. I was planning to make a quick shopping trip to get some of the best deals, but things came up and it didn’t happen. And then we just stretched what we had on hand to last us through the end of this week.
I was really, really excited that my free Tropical Traditions Coconut Oil came this week! I can’t wait to try it out and see if it’s just as wonderful as everyone has told me it is.
_____________________
 Did you snag any great deals or bargains this week or save money in other ways? If so, be sure to post about them on your blog and leave your link below. Please remember that this weekly round-up is to share deals you personally got and/or money you were able to save this week. In order to keep this weekly round-up focused on helping and inspiring others in their efforts to save money, links which have little-to-no content other than promoting affiliate links, etc. will be deleted. Also, to make it easy for everyone to navigate quickly through the links, your link must link directly to your Super Savings Saturday post.
Two years ago, Shannon went to Africa with Compassion International. I followed along with her journey and was forever changed. (Please stop right now and go read her posts if you haven’t already.)
My husband was unemployed at the time and we were really struggling. But after reading her posts, we realized how much we truly had. We had plenty to eat, clean clothes to wear, a roof over our heads… while it seemed like money was tight for us, we didn’t really know the first thing about true poverty.
Even though we had little wiggle room in our budget, we committed to sponsor two children. Until our income increased, we gave up our small Eating Out budget for a few months in order to sponsor these children. Compared to the circumstances they were living in, it was the least we could do.
You know what? We’ve been so blessed in stepping out and giving, even when it meant some small sacrifices on our part. And we’ve learned that the more you freely and generously give, the more you receive — not necessarily always in the form of financial blessings, but in many other ways. Truly, it is “more blessed to give than to receive”.
One of the most exciting things about the growth of this blog is that it’s given us more resources to be able to give. Since the beginning of this year, we committed to give all of the proceeds from private ad sales on this blog to Compassion International. So when you visit here, you’re actually impacting lives of little children in other countries who are living in extreme poverty. It gives me goosebumps to think that God is using this blog to feed and clothe the needy!
As we see it, all our money and resources are God’s anyway; He’s just entrusted it to us to manage. We always want to keep an open hand. There’s so much more fulfillment and blessing in that than in a clenched fist.
I don’t share this to gloat, but to encourage you to step out and be a giver. I know some of you are in very difficult financial circumstances right now and you’re barely squeaking by. If that’s you, maybe you can’t afford to sponsor a child through Compassion or World Vision, but you can do something: give a smile, do an act of service for someone in need, share some of your free groceries or consider splitting sponsorship of a child with another family.
We all can do something. And our combined generosity can make a powerful difference — in the lives of those in our own community and in far away countries!
My friends, Briana and Andrea are in the Dominican Republic right now on a blogging trip with World Vision. Their posts and emails inspired this post. Go read QuatroMama’s post for some of the highlights of the trip. And don’t miss Andrea’s touching story here.
 Should you buy items you don’t need or can’t use if it will save you money in the long-run? Kimberlee sent me the following guest post on why she does just that and I thought it might be a good start to a great discussion. I appreciate her honesty and I think she provides some interesting food for thought. Read her post and then I’d love to have you chime in with your thoughts. – Crystal
Guest Post by Kimberlee at The Peaceful Mom
Question: Why did I buy the Depends at CVS this week if I won’t use them?
Answer: They are part of my overall plan to save money.
(If you are unfamiliar with the CVS customer rewards program, Extra Care, you can read more about it here.)
I use this program for several reasons:
My daughter has severe eczema and we have found that a CVS-brand ointment is the best product for her to use. I bought the Depends for $6.99, but I used a $2 off coupon so my net expenditure was $4.99 plus tax. I then received $6.99 in ECBs, thereby making an extra $2 to spend on the ointment or special body wash.
Extra Care Bucks have an expiration date. So as not to lose them, I occasionally buy something I won’t use, but will give me “fresh” Extra Care Bucks in return. I strive to buy only things which will give me the same or a greater amount of ECBs so that I spend as little cash as possible out of pocket.
Even though we have quite the stockpile of toothpaste, when I can get free toothpaste (almost every week at CVS!), I do. Why? Because I can give them to friends who don’t coupon or donate them to our church’s homeless ministry. Body wash is another item that I can regularly purchase free (by combining sales, coupons and ECBs) and is a welcome donation at any battered women’s or homeless shelter.
So even if I won’t use the Depends, they will go to a good home and I made a little extra money to buy my daughter’s expensive necessities. I think that is a win-win scenario.
Kimberlee is the wife of one very patient husband and the homeschooling mom of four hilarious children ages 9-15. She regularly feeds her family of six for less than $450 a month and in her “spare” time she enjoys writing, planting things, and getting free stuff from CVS. You can visit her at ThePeacefulMom.com.
What do you think? Do you buy products you know you won’t use? Why or why not?
I understand we may have differing opinions and I welcome friendly discussion, even when there’s a need to agree to disagree. However, as always, any comments which are attacking, demeaning or mean-spirited will be deleted.
Once you start accumulating a nice stash of coupons, you’ll quickly find you need to come up with some method of organization. There are all sorts of ways to go about this and the most important thing is that you do what works for you.
If you use more than a few coupons each week, you’ll likely quickly outgrow the little coupon organizers many stores sell and need something more substantial. My solution has to use the Coupon Box Method that my mom used. She originally got the idea from her friend, Renee — who introduced us to using coupons in the first place. (Thanks, Renee, we owe a lot to you!)

For those of you who have asked, here’s what it looks like and how it works:
The coupons are stored in categorical envelopes. The individual envelopes were made by using small letter envelopes (No. 6 3/4 – 3 5/8 x 6 1/2 in.), cutting the flaps off, and stapling an index card standing up inside.
The envelopes are organized alphabetically with the main categories and then multiple envelopes for each main category. Something like this:
Baby
- diapers
- products
- wipes
Bags
- containers
- foil, plastic wrap
And so on.
Here are all the rest of the categories I have in my box (the items in parentheses are each of the separate envelopes):
Baking (mixes, oil/sugar)
Batteries, film
Beverages
Bread
Candy
Canned (meat, soup, vegetables, fruit)
Cereal (envelopes for each brand)
Cleaner (all purpose, bathroom, dish detergent, disinfectant, laundry, furniture polish, floor, glass)
Condiments
Crackers
Dairy (beverage, cheese, sour cream/cream cheese/butter, snacks, yogurt)
Frozen (beverage, bread, ice cream, meat, snacks, vegetables/fruit/potatoes)
Health Food
Hygiene (band-aids, deodorant, face, feminine, hair, lotion, medicine/vitamins, shaving, soap)
Jelly, Peanut Butter
Meat
Mexican
Office Supplies
Paper Products (facial tissue, cups/plates, toilet tissue, towels/napkins)
Pasta
Rice
Salad Dressing
Sauce
Seasonings
Snacks
Syrup
Toothpaste
Toothbrushes

I sometimes put restaurant coupons, other coupons for non-grocery stores, rebate forms, and any receipts I need to hang onto on one side of the box. The front of the box is where I stash coupons which need to be organized into the categories. I stick envelopes for each of the stores I shop at the top of the box.
When I make out my grocery lists for each store, I put the coupons I’ll be using in these envelopes, along with the lists for the store. I always bring a calculator and a pen in my box, too. The size of the container fits into the front of the shopping cart (the child seat section), and if you don’t have a child sitting in there, this works well.
I have yet to figure out how to take three young children to the store without putting a child up front, so my coupon box usually goes in the cart. I just carry the envelope of coupons I’m planning to use at the store along with my grocery list. If I find an unadvertised deal or something I missed on my list, I can quickly search through the coupons in my coupon box and pull the item and stick it into the envelope in my hand.
Before going up to the register, I always double-check to make sure I have all of the coupons together and ready to go, as shopping with young children means I’m sometimes distracted and not as organized as I’d like to be! It’s better to realize you misplaced a coupon before you’ve already checked out!
I usually only take my whole box into the store when I go to Dillon’s, since I often find extra deals and reduced items that I have coupons for which were not advertised in the sale flier. At Walgreens, Target, Walmart or the health food store, I just pull out the envelope in the front of the box which is for that store and head in. If I find some special deal that I know I have coupons for, I can always run back out to the car and get them.
This method works well for me and, after using it for ten years, I’m pretty stuck in my ways. However, it’s not for everyone. And since I’m all about doing what works for you, next Wednesday, we’ll be talking about a variety of organizational methods for coupons — the binder method, whole insert method and more. I’m confident you’ll find something which works well for you!
In the mean time, I’d love to hear what method you use for organizing your coupons. Is it working well for you? If you have blogged about it, leave the link in the comments — I just might use your link in my post next week!

The final results of Saturday’s Freezer Cooking Day:
–4 meals’ worth of Barbecued Beef (Wasn’t really thrilled with how the recipe turned out, so I’m not sharing it here — maybe next time!)
–3 meals’ worth of Southwest Roll-ups (enough for
–4 meals’ worth of Marinated Chicken
–Quadruple batch of Whole-Wheat Chocolate Chip Pancakes (Recipe was supposed to be coming, but they were all eaten before I got a picture. I’ll likely make these next time around and try to get a picture so I can share the recipe then!)
–Cooked bacon for BLT sandwiches and salads (enough for 3 meals)
–Cooked and chopped chicken for Homemade Pizza and Chicken Pasta Salad (enough for 4 meals — 2 of each)
By the end of my Cooking Marathon, I made enough for 18 meals or parts of meals, plus pancakes and fruit cups. For 2 1/2 hours of work, that was every bit worth the effort spent!
We still have 6 meals leftover from last month’s Freezer Cooking Day, so I’m pretty sure we’re just about set for dinners in May — and that’s such a great feeling! Yes, Freezer Cooking is very worth it.
_______________________________
Did you have a chance to do any baking or cooking this week? If so, post about it on your blog and leave your link below to your direct blo g post. I’d love it especially if you could share pictures and recipes so we can get ideas for our next Freezer Cooking Day! And I’m guessing many others would be inspired as well.
 Wheat kernels ready to be ground
Well, I made it through my 2-Hour Freezer Cooking list on Saturday. It did end up taking me a little over two hours — more like 2 1/2 hours. But I was very happy to have made the equivalent of 18 meals or parts of meals during that timeframe, plus pancakes and fruit cups.
I think it was extremely helpful to map out specific times on my cooking plan. It motivated me to work fast and keep at it.I definitely think I’ll be doing that again in the future.
And of course, it was also helpful that my husband took over childcare duties for 3 hours so I could cook and clean up. It’s amazing how much you can accomplish when you’re not being interrupted every two minutes to get someone a drink, change a diaper or calm down a fussy toddler. I’m very grateful to be a mommy to these precious children, but it doesn’t always mean I get a lot of other things done aside from taking care of them many days! 🙂
In other news, apparently our family really likes Whole Wheat Chocolate Chip Pancakes. A quadruple batch of them didn’t make it much longer than 24 hours! But they were made with freshly-milled whole wheat flour, organic eggs and milk and turbinado. So I really am not going to complain. And I won’t mention how many I ate, either!
Coming at 8:30 p.m. tonight: My revised Frozen Fruit Cups recipe
Coming at 9:00 p.m. tonight: A picture of all my Freezer Cooking accomplishments, plus an opportunity for you to link up your blog posts about your freezer cooking, too!
 Freshly-ground Whole Wheat flour — I love to use it when it is still warm!

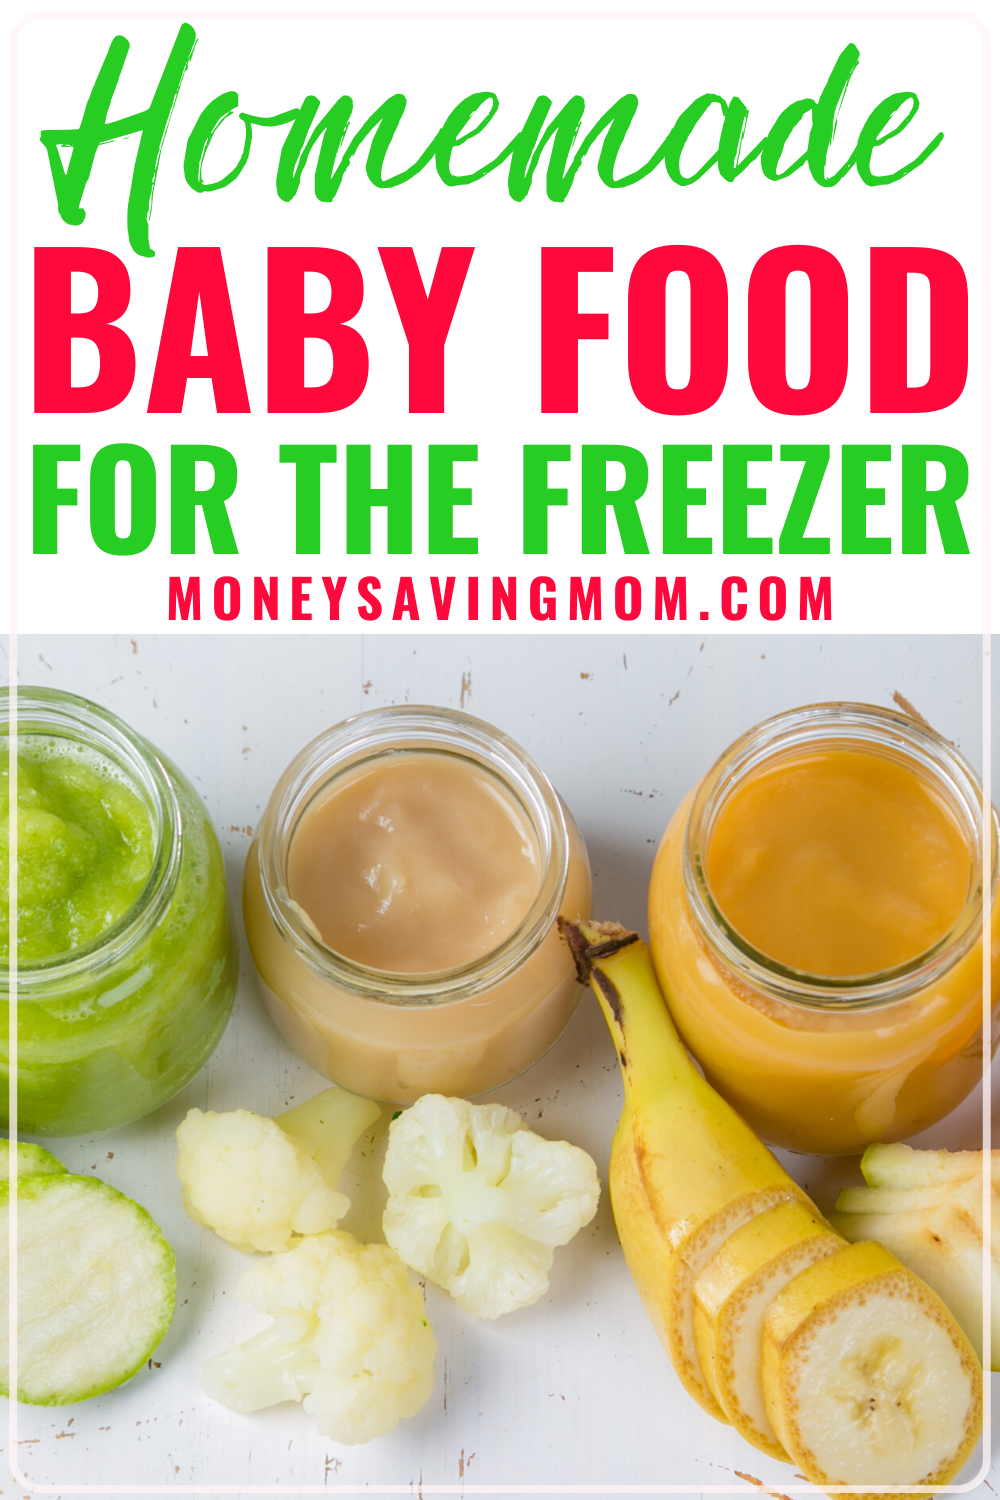
Guest Post by Erin from $5 Dinners
A great way to save money when you’ve got a little one crawling under foot is to make your own baby food. The average price at my grocery store for a 1-serving jar of baby food, stage 1, is $0.51. From my rough calculations, you can save an average of 75% by spending a few minutes in the kitchen to make your own food — especially if you buy in season and get the best prices on that fresh produce.
While I prefer cooking in the kitchen each night for our “big people” meals, I’ve found it works really well for me to have a Freezer Cooking Day once a month preparing homemade baby food.
Here are a few tips for making homemade baby food efficiently and cost-effectively:
Watch the sale prices on produce. If butternut squash or sweet potatoes are on sale, but your Baby Food Freezer Cooking Day isn’t for another 2 weeks, that’s okay. Purchase the vegetables that will last longer when you see them on sale. Then, get other produce, apples, pears, mangoes, that won’t stay fresh as long just before your baby food prep day.
If it’s not too overwhelming for you, plan your baby food making into your regular Freezer Cooking Day. If that is overwhelming, plan another “1/4 day” to prepare just the baby food.
The biggest “hang-up” that I’ve experienced is not having enough ice cube trays. I get all my purees made up and then fill up all my ice cube trays, while the next puree “waits in line” for a tray!
Plan to make enough purees for the first set of trays, then busy yourself while those sit in the freezer for 2-3 hours. Put the then-frozen purees into a freezer baggie, wash the trays and pour in the next purees. Freeze, wash, pour, repeat. You can simply work these steps into your Freezer Cooking Day.
The ideal way to thaw homemade baby food is to remove the number of cubes needed for the next meal and place them in the refrigerator overnight. But I know I have a hard enough time remember where I left my car keys or cell phone, let alone remembering to take out a few baby food cubes.
So when necessary, thaw the cubes on the counter for 30 minutes. Mix in a little warm water and baby cereal to speed up the thawing. And in desperate moments, thaw the cubes in the microwave. But never give baby hot food! Always test temperature by touching the food with clean finger.
A Quick Tutorial on Preparing Homemade Sweet Potatoes for Baby:
1. Slit sweet potatoes. Bake at 350 degrees in a glass baking dish with 1 cup of water, covered with foil, for 50-65 minutes, or until all the sweet potatoes are soft. Remove foil and drain foil. Let cool 10-15 minutes.
2. The sweet potato skins will practically fall off after they are “steam-baked.” Drop the sweet potato flesh into a blender or food processor.
3. Add enough water to form the consistency you wish for your baby food.
4. Puree.
5. Pour into ice cube trays and freeze. Place frozen cubes into freezer baggie.
6. Serve to hungry, growing baby!
Have you successfully made homemade baby food? If so, share what worked. Did you find it difficult or frustrating? We’d love to answer questions.

Today’s Ask the Readers question comes from Anne:
What do you know about driving cars with ads placed on them? I have tried to investigate this online a bit and aren’t sure what companies are legit and how the process works.
Anne
Knoxville, Tennessee
Have any of you participated in car wrap programs before? What advice or input do you have? I’d love to hear as I find this a fascinating way to earn some extra money.


