

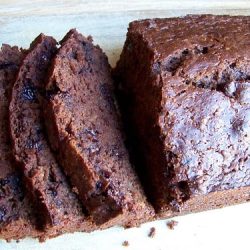
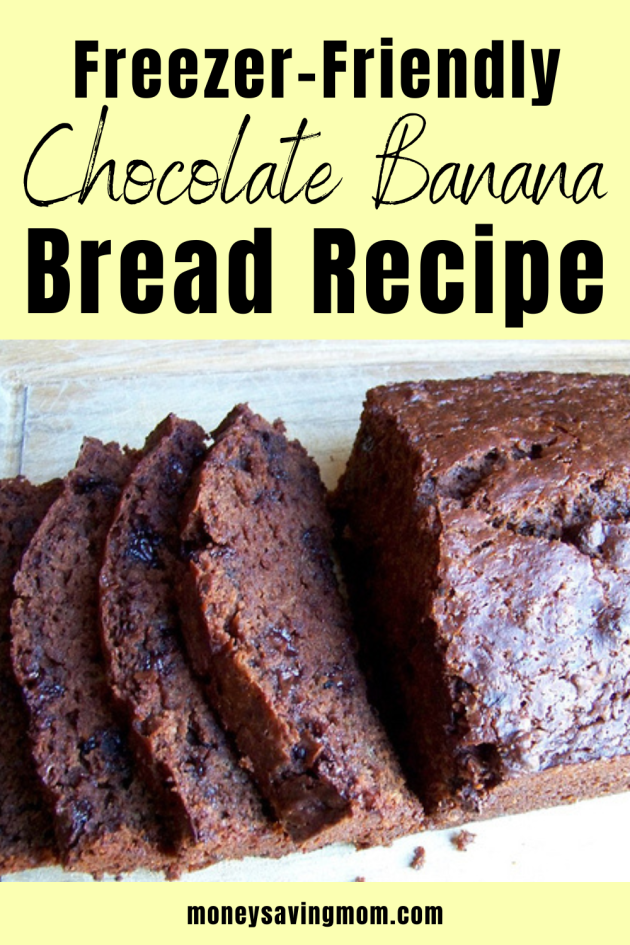
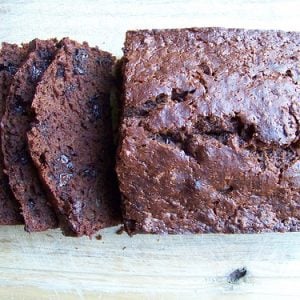
If you need another idea to use up over-ripe bananas, this is your recipe! It’s loaded with delicious bananas and lots of chocolate. Plus, it’s freezer-friendly!
We made it to Day 20 — woohoo! If you’ve followed along and joined me in any or all of the daily freezer cooking challenges, you deserve a huge congratulations for making it this far.
This is the Best Chocolate Banana Bread recipe!
My recipe for Chocolate Banana Bread is so simple to whip up — we’ve been making it for years and years (as is evident by this picture of teeny-tiny toddler Silas “helping” me!)

It uses frugal ingredients we almost always have in the house, it’s deliciously moist, and it’s more nutritious than desserts (but it tastes just as rich).
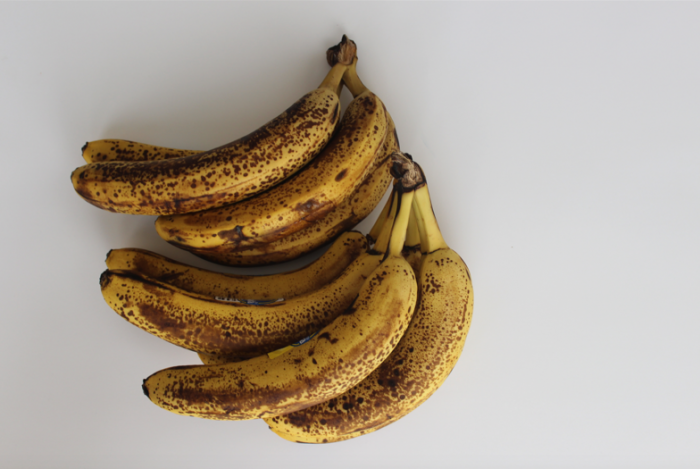
Plus, it’s a great way to use up over-ripe bananas (here are a bunch of other ideas to use up ripe bananas too.)
Ingredients For Banana Chocolate Bread
- 1 3/4 cups flour
- 1/4 cup unsweetened cocoa powder
- 1 cup sugar
- 1 teaspoon baking powder
- 1/4 teaspoon baking soda
- 1/4 teaspoon salt
- 2 large eggs, lightly beaten
- 1 stick butter, melted and cooled
- 3 ripe bananas, mashed well
- 1 teaspoon vanilla extract
- 1/2 cup semi-sweet chocolate chips
How ripe should bananas be for banana bread?
The bananas should be quite ripe (lots of brown spots or even black) as over-ripe bananas are much sweeter.
You can also peel over-ripe bananas and put them in a zip-top bag in the freezer for later. Just defrost however many you need for your recipe.
Can bananas be too ripe for banana bread?
Usually, bananas can not be “too ripe” for bread — however, if they are moldy or smell sour, you should probably throw them out.
Double Chocolate Banana Bread recipe substitutions
You can substitute some or all of the flour for whole wheat flour — but the bread won’t be as light and fluffy.
You can also substitute 1/4 cup of applesauce for half of the melted butter.
And if you really want to healthify this recipe, you can swap 1/2 c. honey for the full cup of sugar (honey is sweeter than sugar).
How to Make Chocolate Chocolate Chip Banana Bread
1. Preheat oven to 350ºF.
2. In a large bowl, stir together flour, cocoa powder, sugar, baking powder, baking soda, and salt.

3. Add in the mashed bananas, eggs, melted butter, and vanilla.
4. Carefully fold the banana mixture into the dry ingredients until just combined.
5. Mix in the chocolate chips.

6. Pour into a greased 9″x5″ loaf pan and bake in preheated oven for 55 to 65 minutes until the bread has risen and a toothpick inserted in the center comes out clean.


7. Let the bread cool for 5-10 minutes in the pan, then release it from the pan onto a cooling rack.

8. Enjoy this delicious bread warm… or let it cool completely and freeze it for later!
How long to bake banana bread?
If your oven is true to its temperature, a 9″x 5″ loaf of bread should bake in around 55-60 minutes — although you can check it for doneness around 45 minutes if you’re concerned.
How to tell if banana bread is done:
The bread will rise significantly while baking and it should have a nice domed top.
You can also insert a toothpick into the center of the loaf and if it comes out clean, the bread is fully cooked all the way through.

How to store Banana Bread
Do you put Banana Bread in the fridge?
Technically, putting bread in the fridge will dry it out — it’s best left on the counter or in the freezer. However, in warm summer weather, I tend to refrigerate banana bread, just because it’s so moist.
How long does banana bread last?
This bread is so yummy, you’ll most likely eat it long before it has a chance to go bad.
That said, you should probably plan to eat it within 5-6 days — or freeze it for later.
How to freeze banana bread.
Let the bread cool completely to room temperature, then wrap it tightly in plastic wrap AND tinfoil and place it in the freezer.
Alternatively, you can slice the bread before freezing it and place it in a zip-top bag. This way, you can simply remove one or two slices whenever you want!
Banana Chocolate Bread FAQs
If you notice a bummy texture to your bread (specifically if the center of the bread is gummy) it’s most likely under-baked.
In general, quick bread is not considered a “health food” although it is more nutritious than chocolate cake! If you make the substitutions mentioned above (honey, applesauce, whole wheat flour) banana bread can actually be quite nutritious.
One factor might be that your baking powder and/or baking soda is no longer active — meaning, it won’t give your baked goods the rise you desire. Also, using whole-grain flour will produce a denser loaf. Finally, over-mixing the batter could also create a more dense bread.
Make sure your bananas are over-ripe and very mushy — this will help the bread stay extra moist. Also, don’t use too much flour, and don’t over-bake your loaves.
Freezer Friendly Banana Chocolate Bread
Ingredients
- 1¾ cup all purpose flour or sub half whole grain flour
- ¼ cup unsweetened cocoa powder
- 1 cup granulated sugar or sub 1/2 cup honey
- 1 tsp baking powder
- ¼ tsp baking soda
- ¼ tsp salt
- 2 eggs
- ½ cup melted butter you may sub half the butter for 1/4 c. unsweetened applesauce.
- 3 over-ripe bananas mashed
- 1 tsp vanilla extract
- ½ cup semi-sweet chocolate chips I like using the mini chips
Instructions
- 1. Preheat oven to 350ºF.
- 2. In a large bowl, stir together flour, cocoa powder, sugar, baking powder, baking soda, and salt.
- 3. Add in the mashed bananas, eggs, melted butter, and vanilla.
- 4. Carefully fold the banana mixture into the dry ingredients until just combined.
- 5. Mix in the chocolate chips.
- 6. Pour into a greased 9″x5″ loaf pan and bake in preheated oven for 55 to 65 minutes until the bread has risen and a toothpick inserted in the center comes out clean.
- 7. Let the bread cool for 5-10 minutes in the pan, then release it from the pan onto a cooling rack.
- 8. Enjoy this delicious bread warm… or let it cool completely and freeze it for later!
Notes
Nutrition
Love this recipe?
Make sure to share and save it on your favorite platform below!
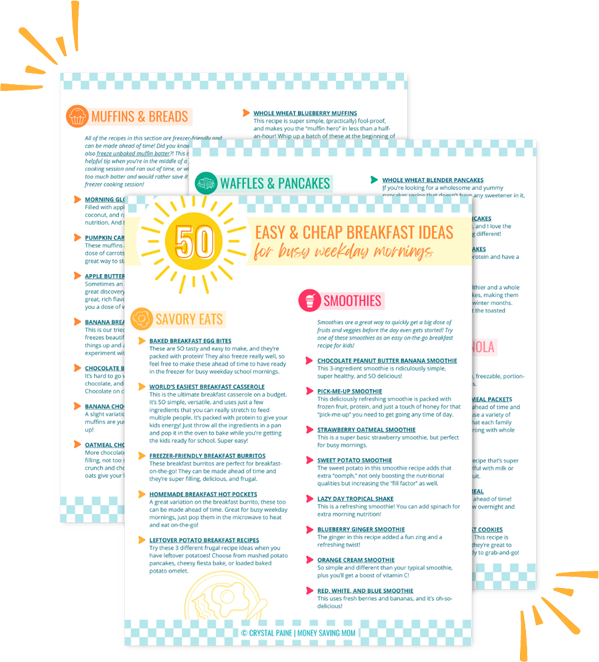
FREE 50+ Easy and Cheap Breakfast Ideas!!
Mornings just got so much easier with this FREE list of 50+ Easy & Cheap Breakfast Ideas for Busy Weekday Mornings!

Freebies in my mailbox

Here are the freebies I’ve gotten over the past week:
2 Gevalia Coffee samples
Larabar sample
Ecover sample
International Delight Iced Coffee coupons
Tampax Pearl samples
Tampax Gift Bag
Tresemme samples
What freebies have arrived in your mailbox this week?
By the way, if you want to start getting great freebies in your mailbox, just start signing up for the freebies I post every day that interest you. Within 4-6 weeks, your mailbox will start filling up with great freebies!
Ask the Readers: Frugal Ways to Cool a Home

Today’s question is from Jerilyn:
Our children sleep on the second floor and it gets really hot up there! Last year we used several fans but they have since broken and I always worried that they were too hot. I am looking for an efficient way to cool our hot and humid 2nd floor besides a window air conditioning unit .
Do you have a question you’d like to ask Money Saving Mom® readers? Read the submission guidelines and submit it here.

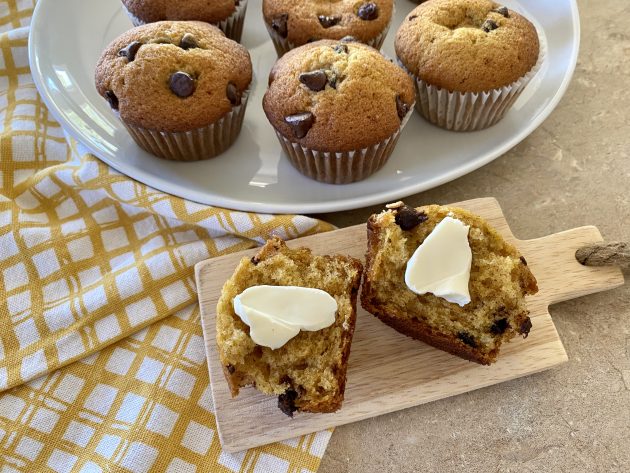
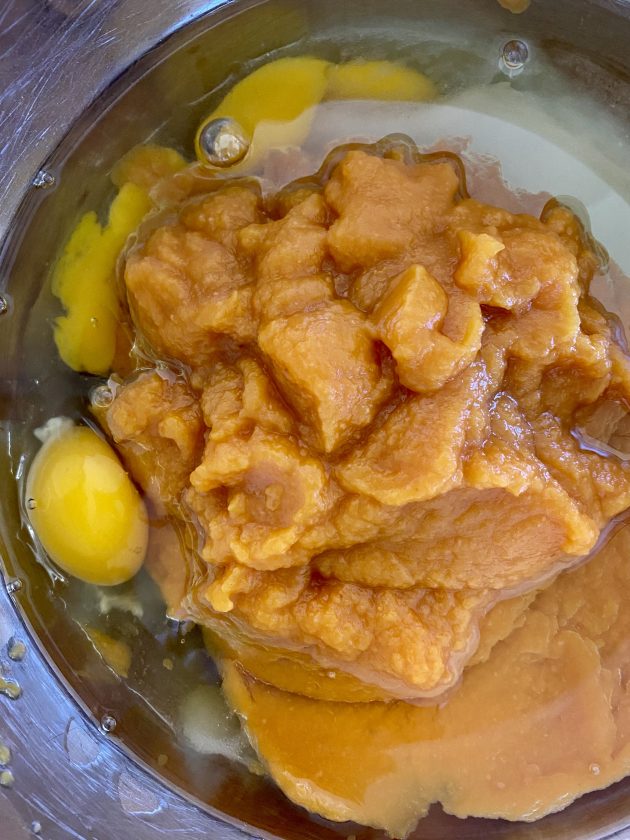
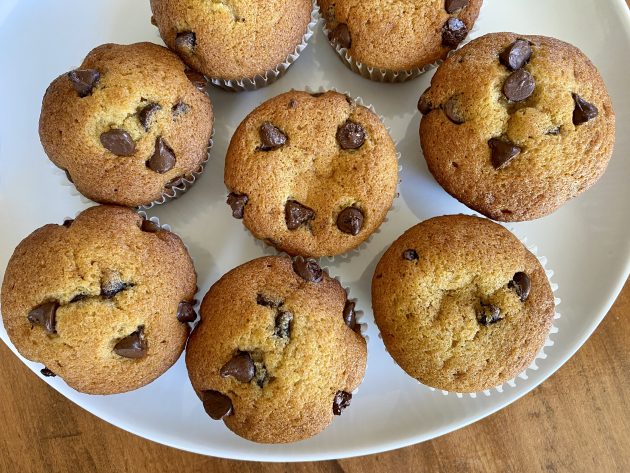
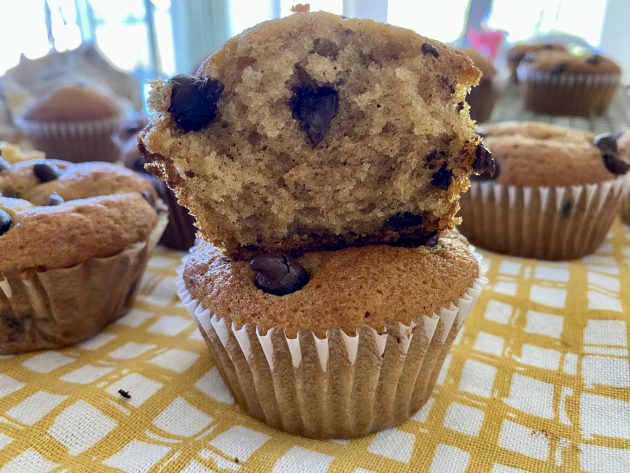
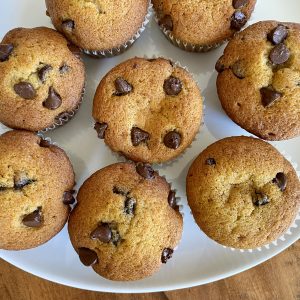
Pumpkin Chocolate Chip Muffin Recipe
These Pumpkin Chocolate Chip Muffins have been a go-to recipe at our house for as long as I can remember! The best part? They a frugal AND they freeze beautifully!!
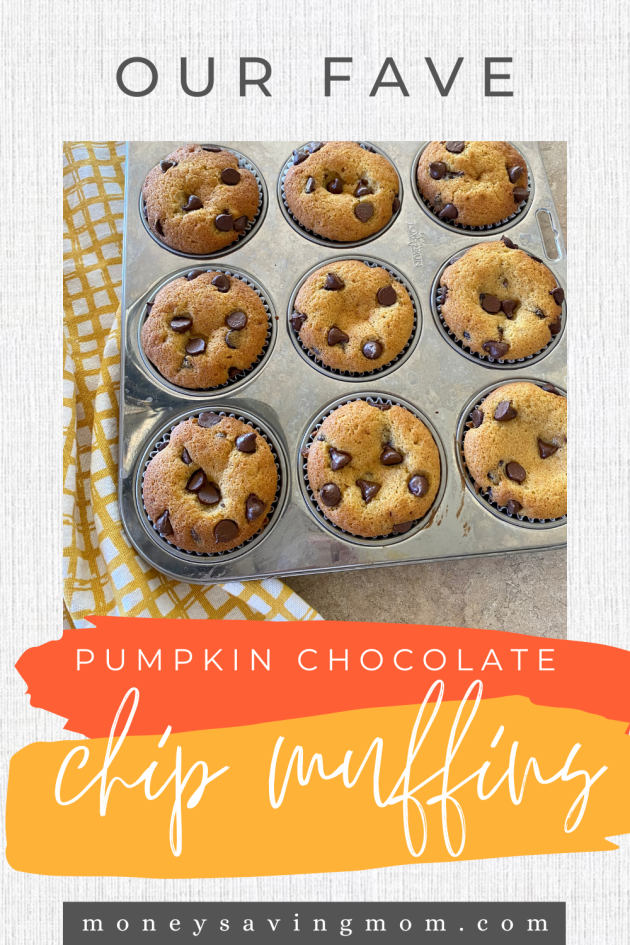
This Pumpkin Chocolate Chip Muffin Recipe Never Gets Old!
Pumpkin Chocolate Chip Muffins are a longtime family favorite at our house — they are so delicious!
If you can stock up on the staple ingredients and canned pumpkin at a rock bottom price when it’s on sale (or at Aldi), these pumpkin muffins can be rather economical too!
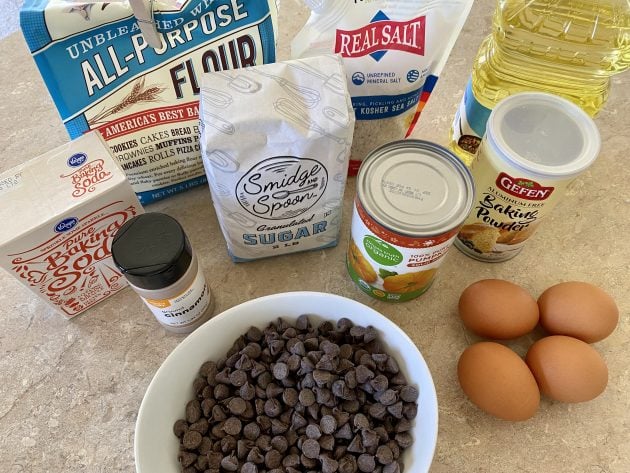
Chocolate Chip Pumpkin Muffin Recipe Ingredients
- 4 large eggs
- 2 cups granulated or raw sugar (can be reduced to 1.5 cups)
- 1 (16 oz.) can pureed pumpkin (or two cups cooked and pureed fresh pumpkin)
- 1 1/2 cups oil or unsweetened applesauce
- 3 cups flour (all-purpose, whole-wheat, or a combination)
- 2 teaspoons baking soda
- 2 teaspoons baking powder
- 1 teaspoon cinnamon
- 1 teaspoon salt
- 1-2 cups chocolate chips (or just throw the whole package in if you love chocolate like us!)
How to Make Pumpkin Muffins with Chocolate Chips
1. Preheat oven to 400ºF.
2. Grease two 12-cup muffin tins, or fill with paper liners.
3. In a large mixing bowl, beat eggs, sugar, pumpkin, and oil until smooth.
4. Add in dry ingredients and mix until just combined.

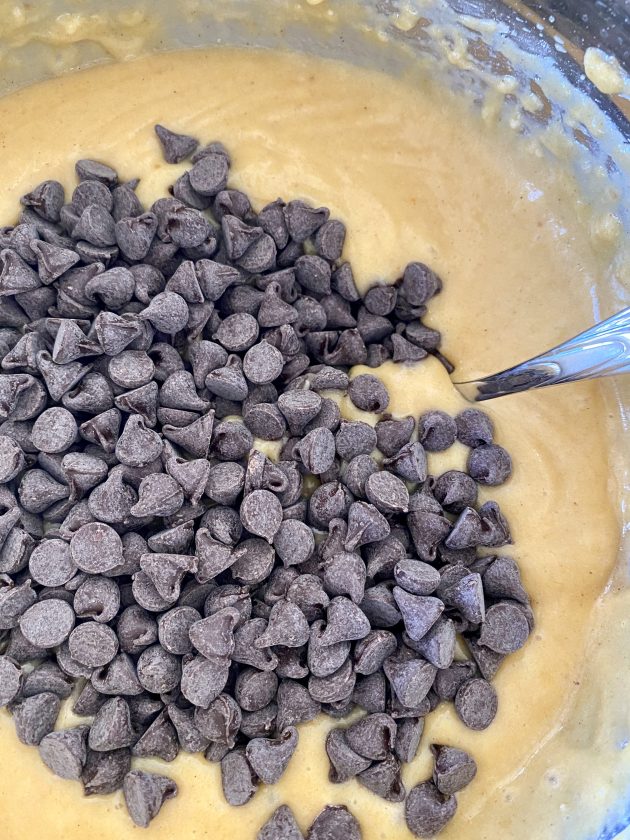
5. Fold in chocolate chips.
6. Fill muffin cups 3/4 full.


7. Bake in preheated oven for 16-20 minutes, or until toothpick inserted in muffins comes out clean.

How to Store Chocolate Chip Pumpkin Muffins
Let muffins cool thoroughly and store in an air-tight food storage container on the counter for up to 5 days, or freeze for longer.
To thaw, simply let muffins sit at room temperature for 30 minutes to an hour. Or, defrost individually for 1 minute in the microwave (this makes the chocolate a little gooey!)
Can you freeze pumpkin muffins with chocolate chips?
Yes! Muffins freeze wonderfully with and without chocolate. Just follow the instructions above when you’re ready to defrost them.
We love to eat pumpkin muffins for quick snacks or for a special breakfast treat.
They’re also a great dessert to add to a sack lunch. Just pull a frozen muffin out and stick it in a baggie and by lunchtime, it’s all thawed and ready to eat! (This used to be one of Jesse’s favorite things for me to pack in his lunch when he worked outside the home full-time.)
Pumpkin Chocolate Chip Muffins Recipe FAQ
Often, overmixing the batter is the main reason for dense muffins. We suggest mixing the wet ingredients well, and then incorporating the dry ingredients just until the powderiness disappears.
Using whole grain flour will also cause denser muffins than if you use all purpose flour.
Baking in an oven that’s not hot enough is another cause — which is why we recommend preheating your oven to 400º for this recipe.
And finally, you’ll want to verify that your baking powder and baking soda are fresh and still active. You can do this by scooping a small amount of baking soda into vinegar and scooping a small amount of baking powder into hot water. If they fizz and bubble, they are still active. If not, you should replace them.
Yes… these are interchangeable for this recipe (and any other recipe).
You do NOT want to use “pumpkin pie filling” though, as that already has added sugar and spices.
Refrigerating bread products dries them out faster than letting them sit on the counter. So since pumpkin muffins don’t have any uncooked ingredients (like cream cheese frosting) they are fine if left out on the counter. However, if you don’t plan to eat them in the first few days, they will stay freshest in the freezer.
Either is ok, but milk can make muffins softer and more moist — which sounds like a good thing, but you can actually have muffins that are too moist. Since pumpkin is very dense and moist, we recommend sticking to the recipe and using water for this recipe.
The short answer: No, you don’t have too. Your muffins will taste great if you bake them immediately.
The longer answer: You can choose to let your muffin batter sit in the fridge overnight to allow the gluten structure to more fully develop. This resting time is thought to produce higher “domed” muffin tops.
So if you’re short on time, just mix and bake. Or if you want to save time in the morning, you can mix up the batter at night, let it rest in the fridge, and bake it in the morning.
Pumpkin Chocolate Chip Muffin Recipe
Ingredients
- 4 large eggs
- 2 cups granulated sugar
- 16 ounces pumpkin pureé
- 1 ½ cups vegetable oil
- 3 cups all purpose flour
- 2 tsp baking soda
- 2 tsp baking powder
- 1 tsp cinnamon
- 1 tsp salt
- 1-2 cups chocolate chips
Instructions
- Preheat oven to 400ºF.
- Grease two 12-cup muffin tins, or fill with paper liners.
- In a large mixing bowl, beat eggs, sugar, pumpkin, and oil until smooth
- Add in dry ingredients and mix well.
- Fold in chocolate chips.
- Fill muffin cups 3/4 full.
- Bake in preheated oven for 16-20 minutes, or until toothpick inserted in muffins comes out clean.
Notes
- reduce sugar to 1.5 cups
- use unsweetened applesauce instead of vegetable oil
- use some (or all) whole wheat flour in place of the all purpose flour
Nutrition
Love this recipe?
Make sure to share and save it on your favorite platform below!
Did you do any freezer cooking today? If so, I’d love to see the results of your efforts! Link up your blog posts below or tell us about your success in the comments.
Reader testimonial: My kids are learning to save up and pay cash for things!
Reader testimonial: My kids are learning to save up and pay cash for things!
Testimonial from Heather of CreativeFamilyMoments
Someone has been watching me very closely.
He is a logical fellow and very careful with his money. But since he’s only 10 years old, this surprises me a bit. On occasion, it’s also made me blush.
For instance, in Target, he watched as the checker circled the ‘You Saved’ amount. He turned to the line behind me and said, “Wow! It really DOES pay to use coupons. That’s a lot of money saved!”
He has a huge wish list like most kiddos, but instead of spending the money, he asks me to check the library and put new books or DS video games on hold or on request. If that’s not an option, he usually goes without instead of begging. He knows we’re on a tight budget and begging doesn’t help.
What I wasn’t anticipating, was his influence on his sisters. My youngest is always asking — she does it creatively — by slipping notes like this under my door:

I wasn’t worried because there’s no room for a trampoline in the budget. However, my son suddenly took an interest in perusing the Sunday advertising sections.Weeks went by without him saying a word until he spotted a deal on a trampoline and enclosure.
I put two and two together as I overheard him ask his older and younger sister to join him in a secret conversation. Before I knew it, they had pooled their money and found a steal of a deal on a trampoline!

Eight months later, our Nintendo Wii broke. Since it had been given as a gift in the first place, there was no plan of replacing it until my son started asking around on the playground and heard about a place that sold refurbished game stations. Again, he asked for his sisters to join him in a discussion.
So far, my kids have paid cash for a trampoline, a Wii game station with remotes, art supplies, and more.
Seeing such great results has made an impact on my daughters. I notice my eldest daughter looking at outfits at the store and then finding something similar at a consignment shop. My youngest daughter, prone to spending her money the moment she has it, has started requesting things from the library.
There’s just one problem, they’re all working hard and saving…
… and guess who just slipped a picture of a kitty under my door!
Heather Humrichouse loves to live life purposely by finding the celebratory in the ordinary. She blogs at CreativeFamilyMoments.com
Teaching Kids How to Save


Guest post from Grace of Romance Never Dies:
Starting with their first experience of mass media, kids are exposed to powerful advertising, much of it aimed directly at them. Advertisers spend millions on developing effective strategies for instilling the feeling of need for their product, and children may be especially vulnerable to this. The result is that kids can very early on fall victim to the want-want-want, spend-spend-spend trap that has been set for them.
In this kind of atmosphere, how are parents to teach their children the value of saving?
Start early
Just as teaching a child to choose healthy foods starts at a very young age, helping a child learn how to save should also start early. As soon as children become aware of the process of exchanging money for items they want, they are ready to understand the basics of saving. Because very young kids live in the “now”, don’t start out with expectations of building a college savings with them — they simply can’t identify with goals that are so far-reaching.
Start with a piggy bank
Instead, start with a little piggy bank where they can see the coins they deposit. With my three kids, I taught them from an early age to save for a special toy or small outing — something that can be accomplished within a few weeks. As a result, one of my son Dylan’s favorite toys remains the Anakin Skywalker figure from Star Wars because it was the first toy he worked towards buying with his own money.
Match their savings
To spur the excitement, parents can match their savings. For every quarter the child puts into the bank, the parents also deposit one.
Kids see their savings build quickly that way. It also helps reinforce the value of saving. You are in essence rewarding them for their attempt to save money. You might tape a picture of what they are saving for next to the bank to help them stay focused on why they are saving.
Where does their money come from? Simple, with my three I keep a chart with stickers next to the fridge which they earn for keeping their toys picked up or for helping out with other little daily chores. This reward system lets them learn as they earn. Be creative and make this fun for both the kids and adults.
Open a bank account
By the time children are in third or fourth grade, they may be ready to open a bank account. It can be very disturbing to a child who is used to seeing their money accumulate in their piggy bank to have it suddenly disappear.
So, it is up to the parents to teach them how banks work. Their money is being kept some place safe; but it is still theirs!
When Dylan was ready to get started we made a point of visiting our local bank so he could see the building in which his money would be kept.
Make interest the reward
Just as you matched their funds when they were younger, you can make a plan to chip into their savings. Interest rates are so low now, it is difficult for children to see their savings build, so this extra reward for saving helps keep their focus.
Sit down and discuss with your kids what portion of their allowance should be put in their savings. Set a minimum percentage that is always devoted to their account. They can always put in more, but should be discouraged from putting in less. You may also want to set rules for withdrawals and the minimum amount kept in the account.
The older kids get, the easier it is for them to plan for a goal further in the future. By their early high school years at the latest, they should be setting their sights on college savings and it is something I will be encouraging in my brood. Statistics show that young savers are more likely to go to college, even if that isn’t what they are saving for!
How do you encourage your kids to save money?
Grace Pamer is a work from home mom and the author of Romance Never Dies, one woman’s on-going quest to keep romance alive despite modern day time pressures.
Books We Love: Roxaboxen by Alice McLerran

I’m always on the hunt for good children’s books to check out from the library or purchase for our family library. And judging from the number of emails I receive asking me for children’s book recommendations, it appears I’m not alone.
So I thought it would be fun this summer to feature a few of the books we read and enjoy each week.
Roxaboxen by Alice McLerran has recently become one of our children’s favorite picture books. It tells the story of the author’s mother and neighbors who used boxes, sticks, shells, and more to create an innovative town complete with a bakery, ice cream shop, and jail.
My children are always fascinated and inspired when we read this book. I love how it sparks their creativity and gives them new ideas for imaginative play.
For more picture book ideas, check out my list of 15 Favorite Children’s Books.
Have you read any great books (children’s books or otherwise) recently?
Ask the Readers: What computer would you recommend?
Today’s question is from Shannon:
I’m looking to buy a new computer that will be dependable for homeschooling and other uses, but not cost an arm and a leg. Any suggestions?
I’m so out of touch with the latest technology that I really don’t know what to look for in a new machine. I’m not a “techie” and I generally use things until they die! -Shannon
Do you have a question you’d like to ask Money Saving Mom® readers? Read the submission guidelines and submit it here.
4 Tips to Get Great Deals on Quality Children’s Books

Guest post from Charity of The Homeschool Experiment
I could care less about shopping for shoes, but I anticipate my favorite used book sale for months.
I’m weird that way.
If you are a parent, chances are you love finding quality books for your kids at great prices. Used-book and curriculum fairs (whether you homeschool or not) are great opportunities for finding some gems.
If you’ll be looking for used books this summer, here are a few tips:
1. Find Pickier Sales
There are a lot of junky books out there. I personally avoid crowded library sales and other book fairs in my area that have only a few good books tucked in among lots of mediocre ones. I focus on smaller sales with higher quality books.
If you don’t know of any used-book fairs in your area, find a homeschooler. Whether you ask her in person or on a Facebook group, chances are she’ll know of a few. Any used-book fair, library sale, private-school book fair, or church curriculum sale is an option.
2. Familiarize Yourself with Great Books
How do you know what books to buy? Every year I read over the Sonlight book list on Amazon (or look through their catalog), and the Five in a Row book list to remind myself of titles. Those books are the best of the best.
Since we homeschool, I also try to plan out what books I want to read with my kids the upcoming year, maybe 10 chapter books, and 10-30 picture books. For Easy Reader books, and additional picture books, I get what looks good at the sale and supplement with the library.
I might take my list to the sale, but it’s awfully hard to shop directly from it. It just serves as a reminder and gets the books fresh in my mind.
3. Think about what you need for this year
Even if someone is giving a high school curriculum book away, I don’t take it. My kids are young (eight, six, and two), and I just don’t know what life will look like five years from now or if we’ll even need that science book.
Next year, for example, I know I’m teaching an art class at my homeschool co-op so I am looking for art and artist books, art prints, etc. I don’t actually need a lot else. I’m going to try to restrain myself.
4. Go early and take cash
I try to get there when the doors open for the best selection and I find someone to watch my kids (my brain works much better that way). I take a stroller to put the books in, otherwise, my enormous, teetering pile makes my back hurt.

My Favorite Deals:
1. Easy Readers – There are many wonderful choices here. I’m looking for books that will engage my child with history, science or poetry, or are just funny, warm stories. If a book is in great condition and we’ve loved it, I might buy it for a gift.
2. “Spine” or Anthology Books – By this, I mean books you can read every day for a few weeks or months. You’re looking for something you can get a lot of use out of.
3. Stories on tape – Since nobody listens to cassette tapes anymore, I’ve gotten some great deals on them. We once purchased a whole box for $1. Often, my daughter will listen to stories on tape during her rest time, and sometimes we’ll put in a tape at meals when Mommy needs everyone to Just. Stop. Talking.
4. Educational Toys for Toddlers — These are great to buy at curriculum fairs. You can save them for birthday or Christmas gifts, or use them to keep your toddler busy while you read to your big kids or do a project with them.
What I Don’t Buy:
1. Junky books – Like books my kids might enjoy once or twice, but without a great vocabulary or an enduring story. I try to stick to the classics!
2. Books I can get at the library – If I’m running out of money in my budget, I think, “Can I get this at the library?” It is nice to have a good home library, but I don’t need twenty Henry and Mudge books. We can own three and supplement from the library.
I do still buy new books occasionally (often hard-to-find character books at a homeschool convention), but the bulk of my book budget goes to used book sales.
After the sale I get to drive merrily home, give our new friends a happy home on our bookshelf, and show the kids (and my husband) all the great deals I got. It beats a pair of new shoes any day!
What are your favorite frugal ways to find used books?
Charity Hawkins is the author of The Homeschool Experiment: a novel. Charity lives, homeschools, and scours used-book sales in Oklahoma.
Note from Crystal: See a list of our family’s favorite picture books here.

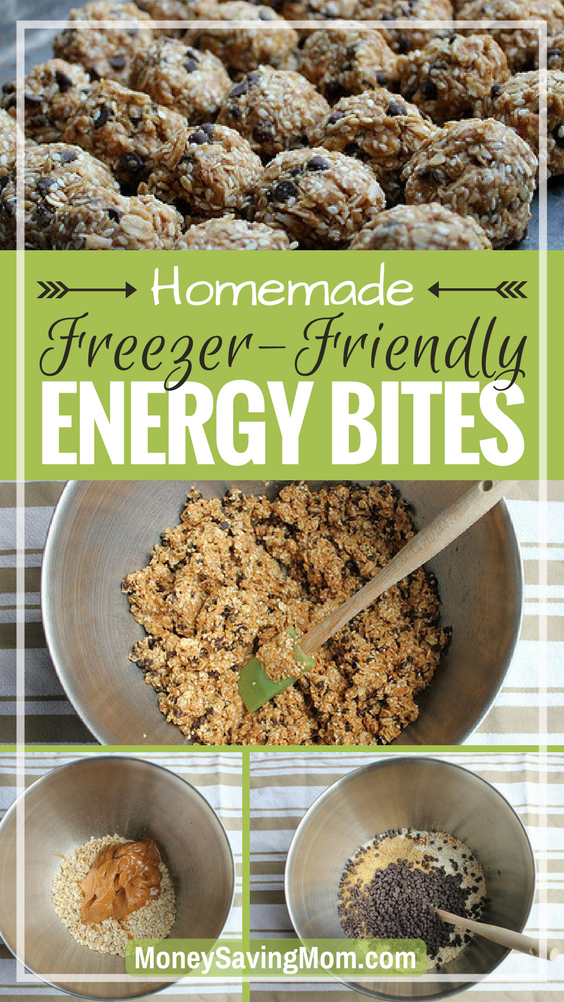
No Bake Energy Bites: 4 Weeks to Fill Your Freezer (Day 18)
What do you get when you combine the hearty goodness of whole-grain oats and the all-day energy of extra protein with a hint of honey and a few chocolate chips?
One of the easiest snacks around — no-bake energy bites!

These homemade energy bites are delicious, adaptable, packed with nutrients, and freezer-friendly!
You’ll love these no-bake energy bites!
No-bake energy bites are a hit at our house… partially because they don’t require baking (so I can whip them up in about 10 minutes), but also because they pack a lot of protein and nutrients into a small package.
They are also SO delicious — it tastes like you’re eating raw cookie dough (without the risk of raw eggs!)
And they are freezer-friendly, so feel free to make several dozen at a time.
If you’re looking to mix up your snack rotation, give these no-bake energy bites a try. I hope you love them as much as we do!

Energy Balls Recipe Ingredients
- 2 cups oatmeal
- 1 cup peanut butter or other nut butter
- 2/3 cup honey
- 2 teaspoons vanilla
- 1 cup mini chocolate chips
- 2 cups coconut flakes, wheat germ, sesame seeds, or a mixture of all three (can also substitute oatmeal or protein powder, if you prefer)
- 1 cup ground flaxseed
FAQs about Ingredients
You can substitute maple syrup, but the flavor will be different and the balls might not firm up as well.
You can also substitute brown sugar, but you’ll want to melt it into the peanut butter by microwaving it for a minute or two.
Yes, any of your favorite chocolate chips should work just fine — however, mini chocolate chips are the ideal size for these energy bites. If you need to use larger chips or chunks, you may want to chop them up before adding them to the mixture.
Yes. Our bodies can not properly digest the nutrients in whole flaxseed, so it must be ground in order for us to get the benefits. Also, ground flaxseed absorbs significantly more liquid so it will help to create firmer energy bites.
It can be. If you use certified gluten-free oats and omit the wheat germ, it will be gluten-free.
How to Make Freezer Friendly Energy Bites
1. In a large bowl, combine oats, peanut butter, honey, and vanilla.

2. Add in chocolate chips and other mix-ins (or more oats).

NOTE: If you only have whole flaxseed, you can use a coffee grinder to grind it (see notes above for why it’s important to use ground flaxseed).

3. When all ingredients are mixed thoroughly, use a spoon or small cookie scoop to create 1″ balls.

4. Place balls on a cookie sheet and refrigerate until firm (30-60 minutes). Refrigerate leftovers in a covered container.
Substitutions for Energy Bites
One of our favorite things about this recipe is how versatile and flexible it is — you can mix up the ingredients to fit your family’s preferences, or just based on what you have in the house.
Here are a few ideas:
- try various types of nut butter, almond butter, or even sun butter
- use maple syrup instead of honey (or a 50/50 mixture)
- add cinnamon or another favorite baking spice
- use almond extract instead of vanilla
- add in raisins, craisins, or other chopped dried fruit
- try a variety of chopped nuts or seeds
- add in your favorite protein or energy powder
- mix up the type of chocolate you use — white chocolate, dark chocolate, butterscotch, etc.
- roll balls in coconut flakes

How To Store No Bake Energy Bites
You’ll want to keep your energy bites in the refrigerator so they stay nice and firm. They will get sticky and soft if you leave them out at room temperature.
How long do Energy Balls last in the fridge?
Energy bites can last for several days in the fridge — at least 2 weeks (if you don’t eat them all first). If you want to store them longer than that, just pop them in the freezer (see question below).
Can You Freeze Energy Balls?
YES! They freeze really well!
Simply freeze them on a cookie sheet for 1-2 hours and then transfer them to a freezer bag or container.
You can eat them frozen (they are delicious) or let them thaw for 10-15 minutes at room temperature.
FAQs for No Bake Energy Bites
Energy balls are an easy-to-make no-bake snack that is packed with protein, fiber, and healthy fats to keep you full and loaded with energy throughout the day. They are easy to take on the go and great for all ages.
This recipe makes roughly 36 1″ balls. Of course, if you make your balls bigger, you will end up with fewer. If you make them smaller, you’ll get more.
We typically recommend 3 1″ balls per serving
This depends on what ingredients you use and how large or small you make your energy balls.

Energy Balls
Ingredients
- 2 cups oatmeal
- 1 cup peanut butter (or nut butter)
- ⅔ cup honey
- 2 tsps vanilla extract
- 2 cups coconut flakes, wheat germ, sesame seeds, OR a mixture of all three (or more oats)
- 1 cup mini chocolate chips
- 1 cup ground flaxseed
Instructions
- In a large bowl, combine oats, peanut butter, honey, and vanilla.
- Add in chocolate chips and other mix-ins (or more oats).
- If you only have whole flaxseed, you can use a coffee grinder to grind it.
- When all ingredients are thoroughly, use a spoon or small cookie scoop to create 1″ balls.
- Place balls on a cookie sheet and refrigerate until firm (30-60 minutes). Refrigerate leftovers in a covered container.
- OR, freeze balls on cookie sheet for 1-2 hours and store in a covered container.
Love this recipe?
Make sure to share and save it on your favorite platform below!
OVER-SPENDING EVERY SINGLE MONTH?Grab these FREE Budgeting Sheets!
Click here to download!
Today’s Dillon’s Shopping Trip

I ran out to Dillon’s today since I didn’t get to go last week as I didn’t feel up to it. I didn’t get as great of deals as I was hoping for since I couldn’t get all the coupons to print that I wanted to (my computer/printer combo has been finicky about printing things recently!) and then some of the prices I’d seen online didn’t match up to what was on the shelves at the store.
But I was still happy for the few deals I found — and it was also just plain nice to go out shopping after being home all week long last week!
Dillon’s Shopping Trip
2 Plum Organic Baby Food Pouches — on sale for $1 each, used 2 $0.50/1 coupons (doubled) = free after coupons
4 Yoplait Kids Yogurts 4-packs — on sale for $2 each, used 2 $0.75/2 coupons (“doubled” to $1 off) = $1.50 each, plus get $4 back as part of the Buy 6, Get $6 Back promo (so $0.50 per yogurt pack after the catalina) — The $0.75/2 coupon is no longer available, but I just found a $0.35/1 coupon here that would make it even less with doubles.
2 Turkey Hill Sweet Tea half gallons (my husband’s favorite!) — $1.25 each, used $1/2 coupon = $0.75 each after coupon
2 Betty Crocker Cookie Mixes — $2.39 each, used $0.50/1 coupons (“doubled” to $1 off) = $1.39 each, plus got $2 back as part of the Buy 6, Get $6 Back promo (so $0.39 each after the catalina)
Total with tax: $11.65 + I got a $6 catalina back that is good off my next shopping trip!
Did you get any great deals today?
My 10 goals for this week

So, my sinus infection got worse instead of better after last Monday. It ended up moving to my chest — giving me a cough and causing me to struggle to talk for a few days. (I think maybe Jesse was kind of hoping it would inhibit me from talking, but I managed to still talk — even though it hurt! ;)).
I gave in and went to the doctor at the end of the week. (I’m one of those weird people who really dislikes going to the doctor and will try every natural remedy under the sun before heading into the doctor.) They put me on two different antibiotics and they seem to be working, albeit slowly.
I’m so thankful to finally be on the mend after being sick for three weeks. Thanks so much to everyone who gave me suggestions and input on how to treat a sinus infection. I was touched by your thoughtfulness and how much you care about me!
At any rate, despite how I felt, I did knock out quite a few of my goals. It helped that we had a long weekend and that Jesse stayed home from work on Friday and made me stay in bed and rest so I had more time on my hands than usual. {Yes, I love that man; he takes such good care of me!}
Last week’s goals:
Family/Mothering Goals
1. Finish reading Quest for Truth:Taken and
Spy for the Night Riders aloud to the children.{Since my voice was almost gone, I had to skip reading to the children for a few days.}
2. Go to a baseball game and musical production as a family.{Jesse took the children to both of these since I wasn’t feeling well.}
3. Write a love note to Jesse.Personal Goals
4. Finish reading Escape from Saddam. StartThe Referral Engine.
5. Run at least five times. {I only managed three times.}
6. Listen to 2 hours of The Little Big Things.
7. Sleep for at least 7.5 hours every night.Home Management
8. Follow my Freezer Cooking plan and blog about it. {I did every day but one. I’m making that up this week!}
9. Make Homemade English Muffins.Business Goals
10. Write one article for another site. {Worked on this, but didn’t get it quite finished.}
This week’s goals:
Family/Mothering Goals
1. Finish reading Quest for Truth:Taken (reading to everyone), Winnie the Pooh (reading to Kathrynne), and The Courage of Sarah Noble (reading to Kaitlynn).
2. Attend our local homeschool convention and buy our curriculum and other things for next school year.
3. Write a love note to Jesse.
Personal Goals
4. Finish reading Radical.
5. Run at least five times.
6. Listen to 2 hours of The One-Minute Entrepreneur.
7. Sleep for at least 7.5 hours every night.
Home Management
8. Follow my Freezer Cooking plan and blog about it.
Business Goals
9. Finish writing one article for another site.
10. Prepare for speaking/having a booth at the Virginia Homeschool Conference next week.
How did you do on last week’s goals? What are your goals for this week? I’d love to have you share your progress on last week’s goals and your goals for this coming week in the comments. Of, if you’ve blogged about it, leave your direct link below. Let’s cheer each other on to live purposeful and productive lives!
You can download a free customizable weekly goal-planning sheet here.
My Money Saving Mom® Inspired Cleaning Schedule

Testimony from Victoria of Snail Pace Transformations:
Back in April, I decided to join Crystal in her 4 weeks to a More Organized Home series. To be honest, I did not start the program with a great attitude. I knew my home needed help but I had so much else on my plate.
Looking back however, I know the series helped me manage that plate more effectively. Plus, I discovered my cleaning groove that I had been trying to find for 17 years of housekeeping!
After the 4 Week Challenge was finished, I used what I had learned from it to create my own customized cleaning routine.
My New Cleaning Routine
(Those that followed Crystal’s daily assignments will see many similarities.)
- Get dressed.
- Follow my Morning Routine — For me that is starting the kettle for tea. Cleaning off the kitchen counters. Getting the laundry going and having my time of morning prayer and bible reading.
- Write a list of 7 to 10 things to do for the day — This list includes my 15-Minute Daily Cleaning Assignment and the 15-Minute Room of the Week Assignment.
- Write a list of chores for the children to do.
- Do the 15-minute Daily Cleaning Assignment.
15-Minute Daily Cleaning Assignments
Cleaning doesn’t really take long. Often I was spending more time dreading a chore than it took to do the chore. Now I set the time for 15 minutes each weekday and work on the following:
Monday: Master Bedroom
Tuesday: Upstairs Bathroom
Wednesday: Wild Card Day (I pick an area that is the most cluttered.)
Thursday: Downstairs Bathroom
Friday: Master Bedroom
15-Minute Room of the Week Assignment
In addition to the Daily Room Assignment, I also spend 15 minutes each weekday focusing on cleaning a specific area of my home.
Saturday Assignment
Every Saturday, I pick one area of the home and attack it for 30 minutes. I save Saturdays for bigger projects, such as reorganizing a closet or book case.
Additional Weekly Assignments
- Designate 5 items to sell or toss — less stuff really does equal less mess to clean up. This can happen any time during the week or on Saturdays, depending upon that week’s schedule.
- Spend one hour listing things to sell — I have a lot of stuff in piles that I have been saying I will sell, but the project just seemed too overwhelming. Now I set the timer for 60 minutes, and start posting my items (on Craigslist or eBay) or start pricing them (for consignment sales or stores). When the timer goes off, I pack up the unlisted or untagged items and put them away until next week.
The benefits of this new schedule have been numerous:
- I no longer fear someone just dropping by because I know my bathrooms can be quickly cleaned up with just a few wipes.
- I am adding to my family’s income — I made $190 off of my first one-hour selling session!
- Our master bedroom is now truly the oasis I always wanted it to be.
Victoria is a wife and homeschooling mom of three. She loves running marathons and training for an annual sprint triathlon. Victoria considers herself a snail pacer in life. She grows in inches not in leaps hence the name of her blog Snail Pace Transformations.
Note from Crystal: Looking for some motivation and ideas for creating your own cleaning routine? Be sure to check out my post on How to Stay Motivated to Get the Housework Done.
This week’s menu
 Chicken Broccoli Rice Casserole ready to go in the freezer
I’m so thankful for a freezer full of food! We’re gearing up for our local homeschool conference this weekend and for speaking/having a booth at the Virginia Homeschool Conference next week. So I’m relying a lot on food that’s already prepped and won’t take me long to prepare.
Breakfasts
Granola bars
Cereal
Baked Oatmeal (from the freezer)
Green Monster Smoothies
Morning Glory Muffins, hard-boiled eggs
Omelets in a Muffin Tin, fruit
English Muffin Bread (toasted), scrambled eggs, fruitLunches
Peanut Butter & Jelly Sandwiches from the freezer
Leftovers x 2
Chicken Broccoli Rice Casserole, carrots, fruit
Salad, Hard-boiled eggs, toast, fruit
Snack-y lunch
Brown Bag BurritosSnacks
Fruit/veggies
Popcorn
Banana BreadDinners
Dinner with extended family
Memorial Day Cookout: Marinated Chicken, wild rice, corn on the cob, fruit salad, s’mores
Southwest Rollups from the freezer, steamed veggies, sliced oranges & apples
Barbecued Meatballs, sweet potatoes, steamed veggies, fruit
Dinner out
Ham & Cheese Pockets from the freezer, fruit salad, steamed veggies
Lasagna Casserole, English Muffin Bread (toasted), steamed broccoli, fruit
What’s on your menu this week? Share details and/or your link to your menu plan in the comments.
Do-It-Yourself: A Month of Bread Machine Mixes

ThriftyAndThriving.com shows you how to make an entire month’s worth of bread machine mixes.
Do you have a fun and frugal DIY idea to share? I’d love to hear about it! Read the submission guidelines and submit it here.