


Saving Families Money Since 2007

 A testimony from Becky
Working in the field of architecture, it has always been my husband’s dream to build our own home. In 2008, we felt like God breathed life into that dream and said, “Go for it!”
Umm… remember 2008? Financial catastrophe for most investors living in our abundantly blessed country? We were currently living in Uganda and watched from afar as people’s investments plummeted – including our own.
Upon our return to America in 2009 we began renting a home. “Still build?”, we tentatively wondered, and we felt calling us to build — and to do it debt-free.
Thanks to so many encouraging testimonies from people on this blog as well as friends in our community, we knew we could do it!
We started by making an itemized list of all that we would need and what it would cost — from soil samples to yards of concrete. My husband kept everything well organized and looked around for the very best deals on everything – both labor and supplies. He would also be able to do some of the labor himself because of his background and experience.
We pulled out what little of our investments were left – believing that if we could truly pay for a house debt-free we would quickly be able to refill our investments after a year or two of being mortgage-free. My husband worked side-jobs for close to a year, and these two amounts combined gave us what we needed to lay the foundation of our future home.
Bulldozers and construction workers descended upon the little lot we had purchased for a great deal, and we saw everything we had on paper becoming a reality. It seemed almost too good to be true!

When the last bill came in we realized we were $400 short of what we needed. We had a garage sale, and some friends and family pitched in their “treasures” to help us out.
Do you know how much we made? $420! – exactly the amount of money we needed, plus a little extra for pizza for dinner. 🙂
We are full of faith that God will help us see our home to completion. It’s not the quick and easy way that we would sometimes prefer, but it is definitely the path we want to take as we have seen it increase our dependence on God and build our character for the life we have to live here on aarth.
The saving for Phase 2 has already begun. In the next two years, we hope to complete the framework of the house. Our kids are helping us keep track of the money we need this time. What fun!
Have you saved up and paid cash for something — large or small? Submit your story for possible publication here.
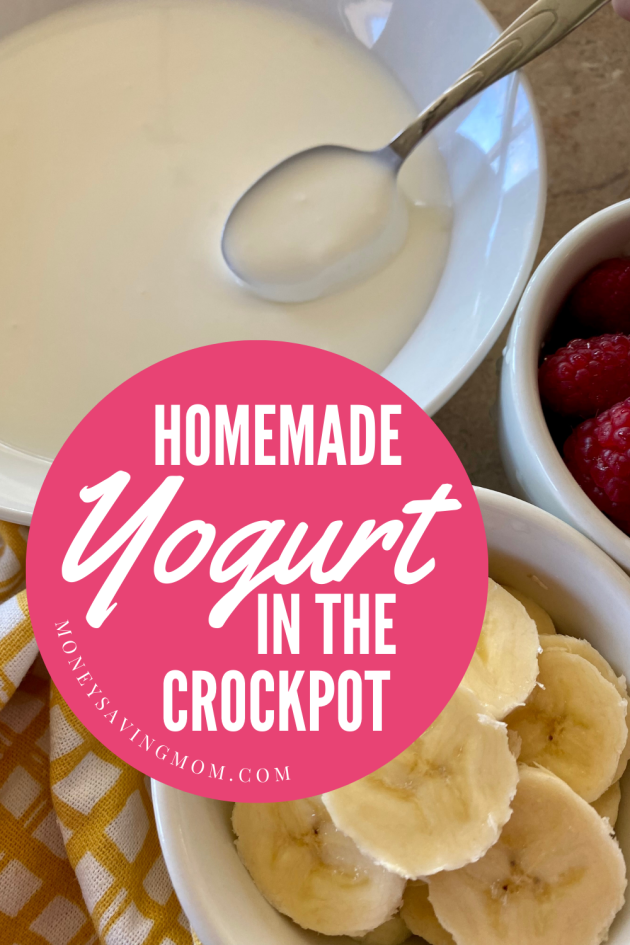
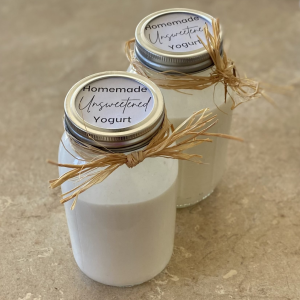
This recipe for homemade yogurt is almost too easy — seriously, once you try it, you’ll wonder what took you so long! It’s easy, delicious, and your family will love it!
After my fairly successful attempt at making homemade toothpaste, I was inspired to try homemade yogurt in my crockpot.
I’ve made yogurt on the stove and in a yogurt maker before, but I’ve always worried that it wouldn’t turn out right in the crock pot. Don’t ask me why!
And now I’m wondering why I was scared to try… because folks, if you haven’t done this before, it is SO easy.
It felt almost too easy — like I was cheating or something! 😉

If you want the nutritional benefits of homemade yogurt without a huge mess or hassle, you will love the ease of making it in a slow cooker!
With almost no hands-on time, you can enjoy a huge batch of homemade yogurt without any extra sugar, additives, or preservatives.
You can eat the yogurt plain, or make flavored yogurt by mixing in your favorite fruits (or even some homemade jam!)
Oh… and it’s SOOOOOO much less expensive than buying organic whole milk yogurt from the store!

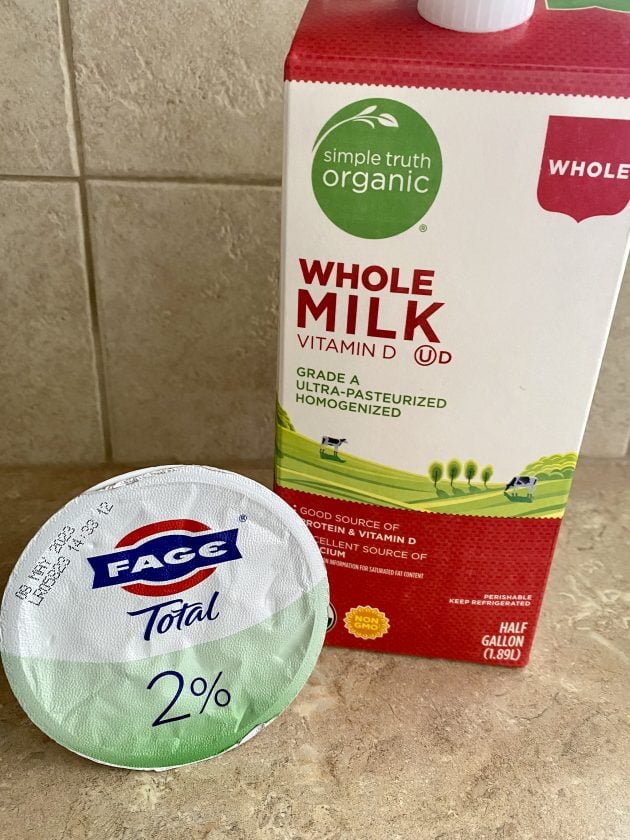
I’d picked up a half gallon of whole organic milk marked down to $1.99 at the health food store, so I used that for the milk. And I used plain Greek yogurt for the starter because that’s what I had on hand.
1. Pour the full half gallon of milk into your slow cooker and turn it on low. Cook it for 2 hours and 45 minutes (set the timer to remember to turn it off!)
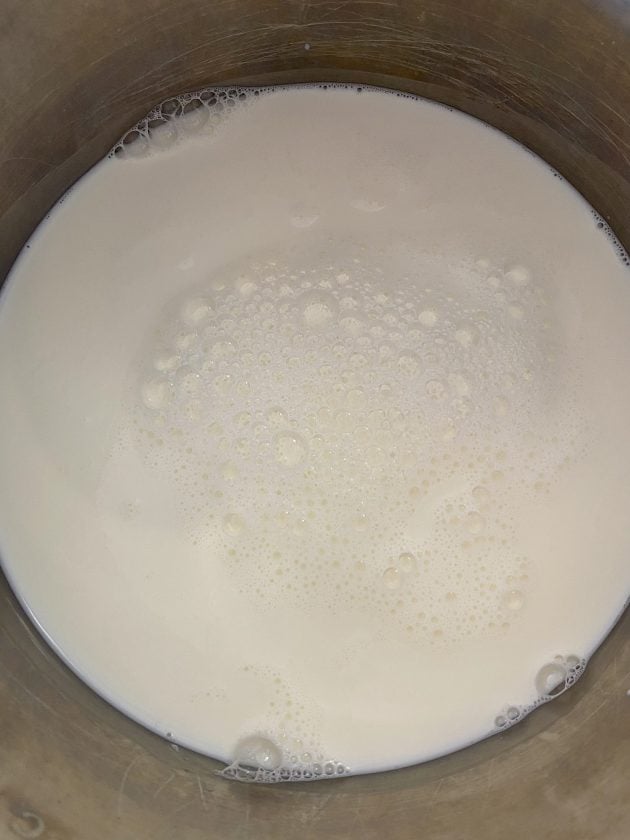
2. After 2 hours and 45 minutes, turn the crock pot off and let it sit for 3 hours.
3. Spoon a cup of the warm milk into a small bowl and add the half cup of yogurt to it. Mix thoroughly.
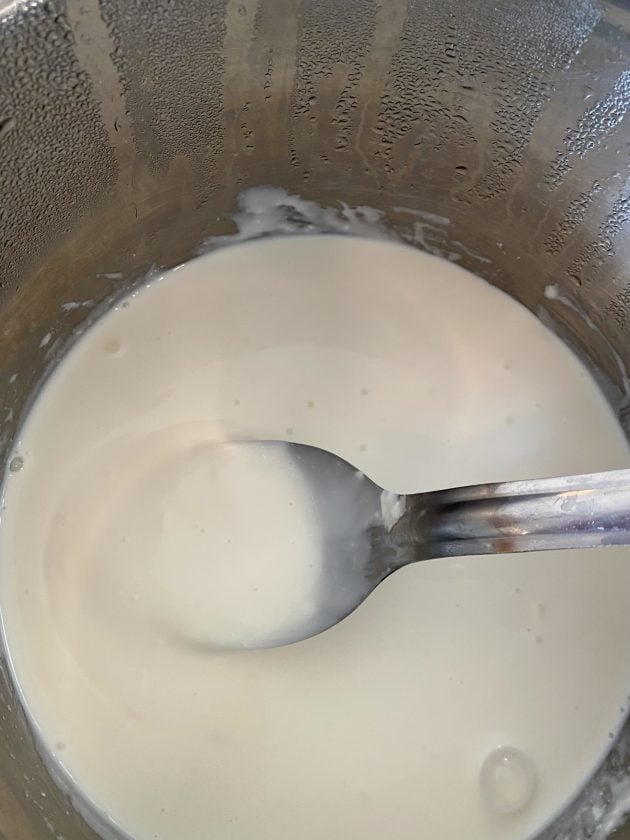
4. Dump this mixture back into the milk in the slow cooker and mix it around well.
5. Put the lid back on your slow cooker and wrap the crock pot with a large beach towel or blanket (make sure the crock pot is unplugged and turned off!).
Yes, I know, it sounds a little ridiculous to wrap a crock pot with a beach towel, but I did some research online and it seems that the experts recommend this step as it helps keep the heat in the crock pot and allows it to cool more slowly.
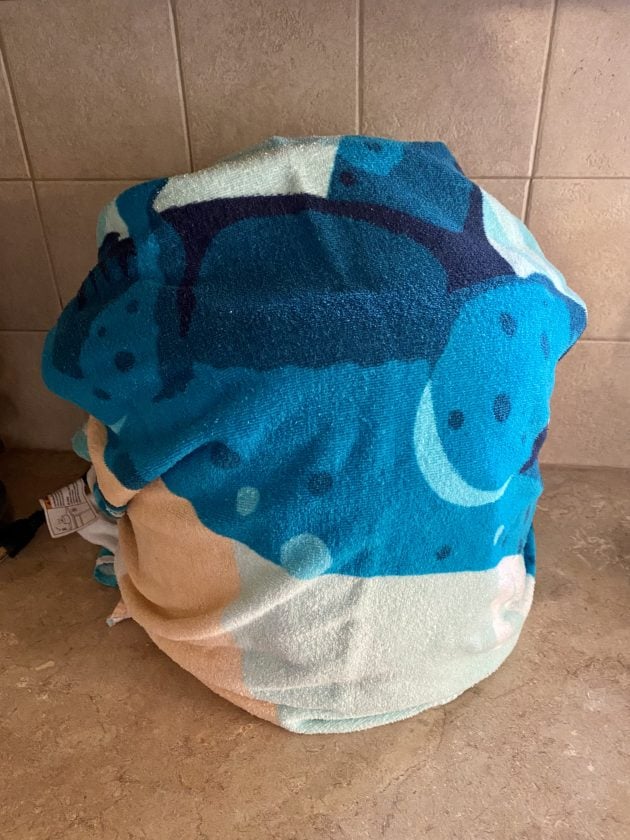
6. Let the beach towel-wrapped crock pot sit for 8-12 hours (or overnight). At this point, the yogurt should be thickened.
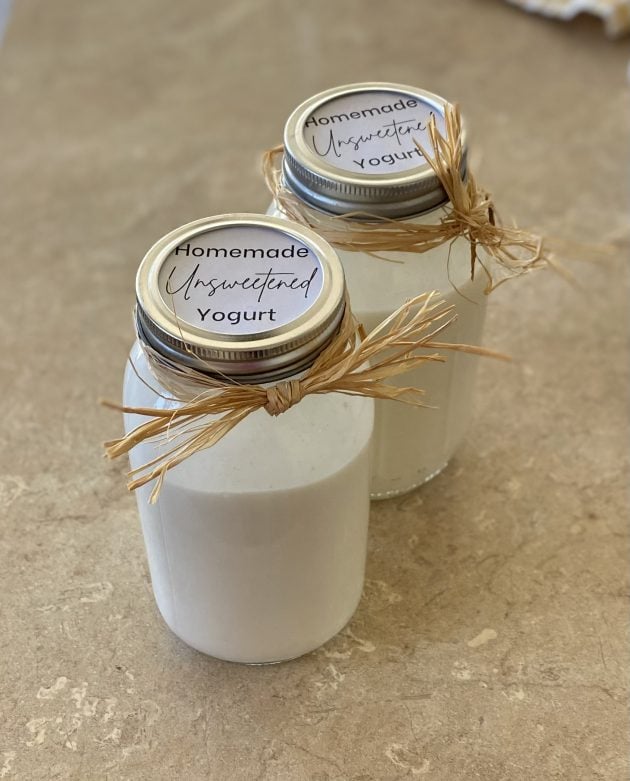
7. Spoon yogurt into jars or plastic containers and refrigerate for a few hours before eating.

This will keep for one to two weeks in the refrigerator. Be sure to save a half cup to use as a starter for your next batch of homemade yogurt.
The recipe requires very little effort on your part, but it takes a long time to make — I started it yesterday morning and it wasn’t done until I woke up this morning.
So, if you want to try this, I’d recommend doing it on a day when you’ll be home all day.
And you might want to set a timer to remind you when you need to go do something to it. You certainly don’t want to waste a whole half gallon of milk!
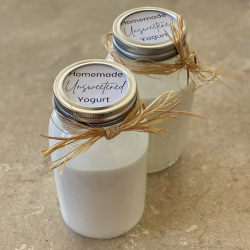
We recommend storing this yogurt in glass food storage containers to reduce the risk of any unwanted bacteria getting into the yogurt. Choose containers that have tight-fitting lids.
You can also store them in mason jars — which is especially pretty if you’re giving them as gifts!
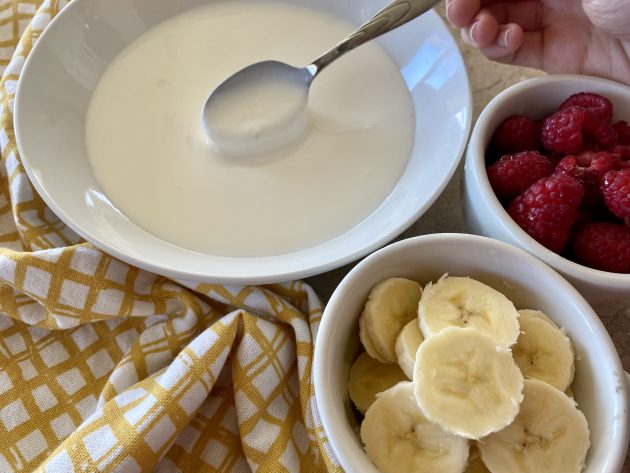
We love eating this yogurt with fresh fruit and granola! It’s such a tasty treat! I had some for a snack this afternoon with dried cranberries, sunflower seeds, and chocolate chips sprinkled over it and it was delicious!
This homemade yogurt is great to use to make Homemade Go-Gurts!
You can also use these tips from Andrea Dekker to make thicker Greek Yogurt or Yogurt Cheese.
Make sure to share and save it on your favorite platform below!
Mornings just got so much easier with this FREE list of 50+ Easy & Cheap Breakfast Ideas for Busy Weekday Mornings!

When I saw Jenae’s post on making Fireworks in a Jar, I knew we had to try it. Only we didn’t have any empty jars, so we used clear glasses, instead.


Each child got to choose their color or colors for their glass. We found it worked better when you did multiple colors and only put 1-2 drops of each in the oil.
I got smart this time around and did most of the pouring and all of the food coloring handling so that there was little mess to clean up afterward — unlike yesterday’s Homemade Bouncy Ball mess! 🙂
See Jenae’s post on I Can Teach My Child for step-by-step instructions for making your own Fireworks in a Jar.
Did you do something fun and frugal as a family today? If you blogged about it, I’d love for you to leave a link to your blog post below. Or, you can just tell us what you did in the comments.
Note: Since the purpose of this series is to encourage you to be intentional about fun in your home this summer, please only link up posts showing pictures/sharing details of fun things you did as a family today (or within the last few days). Posts that do not adhere to these guidelines will be deleted in order to make it fair for those who are putting forth a lot of effort to participate in this challenge.

The economy has been hard on many families. Some of you have struggled through months (or even years!) of unemployment or underemployment.
When you struggle for a long time and are barely eeking by, it can be easy to want to give up. To feel like you’re never going to get anywhere or get out of the hole you feel like you’re stuck in.
I know the feeling. I’ve felt very hopeless and helpless at times in my life.
But if there’s one thing I’ve learned, it’s that you’ll never make any progress if you stop dreaming. You’ll never get anywhere if you feel like taking a step in the right direction is a pointless exercise.

We live in America and, compared with so much of the world, we have immense opportunities and possibilities at our disposal. Times are tough here for many of you, but you can still access so much free information online or at your local library.
You can start a blog (for free!) and grow it to the point that you earn a part-time — or even full-time — income from it. You can start a service job for almost nothing out of pocket and turn it into a thriving business.
You can join local groups to network with other businesses and professionals. You can take free or very inexpensive classes to learn new skills. There is a wealth of help, tools, and resources available — free of charge — for you to learn and grow as an individual and to help you develop a business or improve and sharpen your marketable skills.
I’m living proof that the American Dream is alive and well. I remember so vividly the hopelessness I felt when we found out we were expecting our first child and I was too sick to continue working.
I had no special skills, no special degrees or training or credentials, and no special marketable talents. But we needed money to eat and have a roof over our heads and Jesse’s part-time income while in law school was not enough to cover all of our basic bills.
I may not have had credentials, but I had time and determination. And so I spent countless hours researching ways to make money from home on the internet and then I jumped in and started trying things.
So much of those first feeble attempts were pathetic failures (I’m embarrassed to even admit some of the crazy things I tried or considered trying!), but with each failure, I learned a little bit more. And I kept trying and learning until things slowly started to work.
Over time, I’ve come to believe that there is a world of possibility out there and it’s available to anyone and everyone who is willing to work hard, put forth enormous effort, think outside the box, and not give up when the going gets tough.

So dream big dreams. Don’t give up hope. And don’t ever let anyone tell you that you’re stuck.
As long as you have breath in your body, there is opportunity out there for you!
Note: This post was inspired by reading Frank Sonnenberg’s post, Dream No Small Dreams. If you need some inspiration to dream big, I encourage you to head on over and read it.


Guest post from Michelle of The Willing Cook
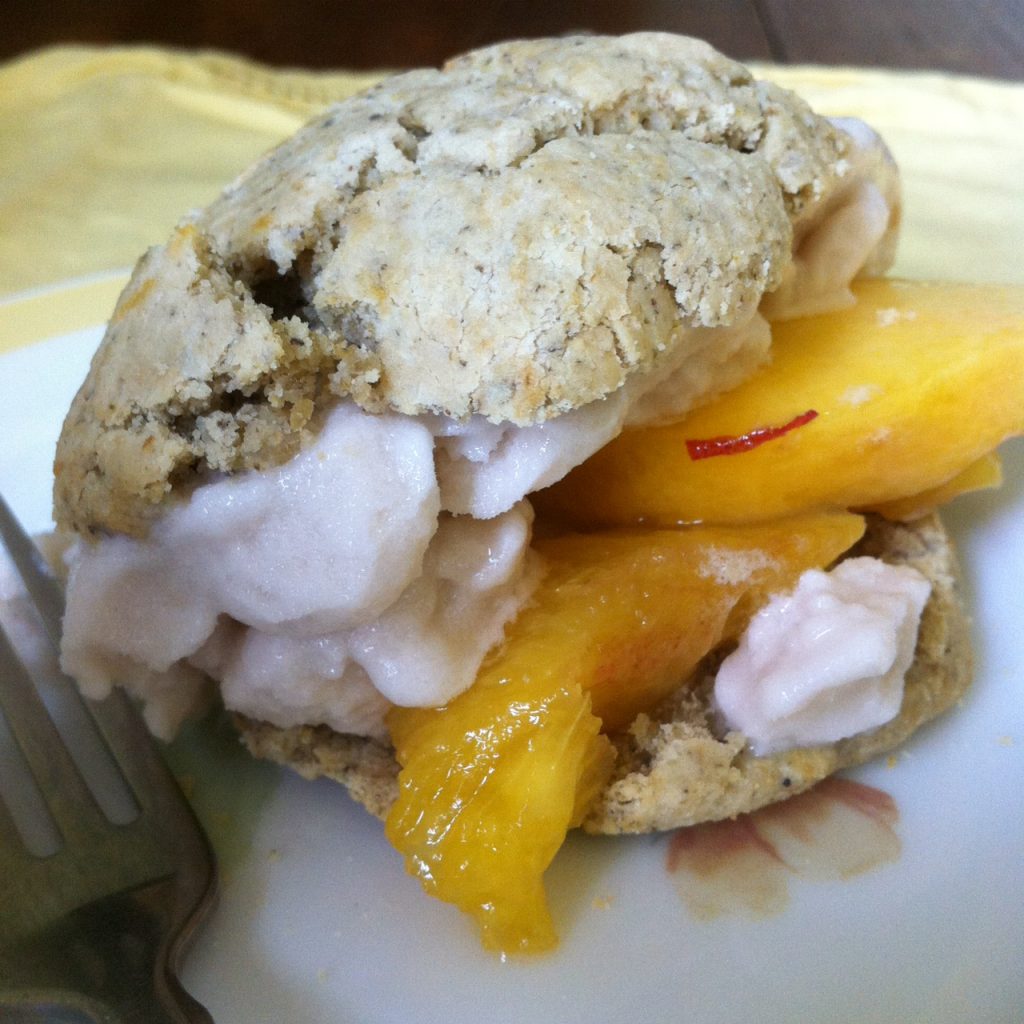
I came across a recipe in a magazine recently for Ginger Biscuits with peaches that was simply calling my name. Seeing as how it is peach season and we love ginger, I thought we could not go wrong with this flavor combination.
However, in order that everyone in our family could enjoy this summer treat, I decided to make it free of all the top allergens. This was a first-time recipe experiment for me, and oh boy! we were so pleased with the outcome! The ginger biscuits are wonderful for breakfast, as well, with a fruit jam spread on top.

(recipe makes approximately 9 biscuits; multiply recipe for freezer as desired)
**See ingredient substitutions list below recipe.**
For dairy-free buttermilk:
For peaches:
For cream:
You can add back in any “regular” ingredients for the allergy-friendly ingredients in this recipe.
Wheat: Use 2 cups whole wheat flour (in place of the gluten-free flours).
Chia Seed: Really helps with the binding of the gluten-free flours, so it can be left out of whole wheat flour. However, Chia Seeds add a great fiber and protein boost, so I’d leave them in. Corn: Use 2 teaspoon baking powder & 1/2 teaspoon baking soda (in place of cream of tartar and 1/2 tsp taking soda).
Oil: Use 8 Tablespoons cold vegetable shortening, butter, or coconut oil (in place of palm shortening).
Dairy: Use dairy buttermilk (in place of non-dairy buttermilk).
Michelle is blessed to stay home with her three children (ages 10, 7, and 4), while her husband works to provide. When she’s not experimenting with allergy-friendly meals, she’s blogging about it at The Willing Cook. Through the Willing Cook, her hope is that you gain peace of mind in your kitchen (and your pocket book) and are able to serve those you love who suffer with food allergies.
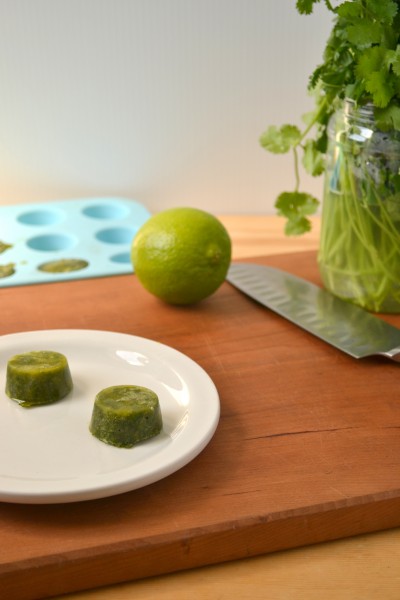
FoodDoodles.com shows you how to make homemade lime cilantro cubes.
Do you have a fun and frugal DIY idea to share? I’d love to hear about it! Read the submission guidelines and submit it here.

We had fun making homemade bouncy balls today, even if it did result in one giant mess!


Makes one bouncy ball
Mix the glue and a few drops of food coloring of your choice together in a small bowl. In a separate bowl, mix the cornstarch, borax, and warm water together.
Pour the cornstarch mixture over the glue and combine together. Stir until a glob forms.
Take the slimy glob out of the bowl and roll it in your hands. It will be very sticky at first.
Continue rolling for at least a few minutes until it is no longer slimy and feels more like a soft rubber ball (you may need to put some cornstarch on your hands while rolling to help all of the stickiness disappear).
Have fun bouncing your homemade bouncy ball!
Recipe from Sidetracked Sarah
Did you do something fun and frugal as a family today? If you blogged about it, I’d love for you to leave a link to your blog post below. Or, you can just tell us what you did in the comments.
Note: Since the purpose of this series is to encourage you to be intentional about fun in your home this summer, please only link up posts showing pictures/sharing details of fun things you did as a family today (or within the last few days). Posts that do not adhere to these guidelines will be deleted in order to make it fair for those who are putting forth a lot of effort to participate in this challenge.

So, my husband thinks I might be a little crazy (and yep, he’s probably right!) but I made homemade toothpaste yesterday.
From scratch.
Some of you are probably shaking your heads right now and thinking what someone said yesterday, “Good grief! Go clip a coupon and buy yourself some Colgate!”
And yes, it might seem ridiculous — especially since I can often get free toothpaste by combining coupons with sales. However, when I saw the recipe the other day on Thankfully Thrifty, I realized I had all of the ingredients on hand and I wanted to try it — mostly out of curiosity!

It whipped it up in less than a few minutes and smelled delicious. But when I put a little on my toothbrush the first time, I just about gagged.
It has a very strong and salty flavor — something I’m not used to with regular toothpaste. However, once I got over that, I actually think it cleans really, really well.
And I think I actually might end up really liking it. Only time will tell for sure on that, but it’s certainly fun to be able to say I’ve made my own toothpaste since most people probably don’t do that on a regular basis. 🙂

Want to join me in the craziness and try making your own homemade toothpaste, too?
Stir together. Add more coconut oil, if need be.
Store in an airtight container or squeeze bottle.
Recipe from Thankfully Thrifty
Do note that the ingredients are somewhat expensive, especially if you’re used to getting toothpaste for free. But if you usually pay for all natural toothpaste, I’d definitely recommend experimenting with making your own. It’s so easy to do and much, much less than what you’d pay for all natural toothpaste.
If you a recipe that’s a little bit less on the salty side, this Homemade Toothpaste Recipe on Keeper Of The Home has Xylitol or Stevia in it to sweeten it. If you just want a really inexpensive recipe that gets the job done, DIY Natural has a very cheap Homemade Toothpaste Recipe without coconut oil in it.
Have you made your own toothpaste before? If so, what recipe did you use and what did you think of it? I’d love to hear!
 Today’s question is from Katrina:
I attend a church that is blessed to welcome many, many new babies each year! We love to shower the new parents with meals for a couple
of weeks while they adjust. This is a wonderful thing, but if you are a faithful “meal taker” you can sometimes get bogged down in the costs associated with it.I currently stay at home with my own three children and love to take meals whenever they are needed, but am finding it hard to know how to fit it into our budget sometimes. I want to bless these families! Do you have any recipe ideas or suggestions for great, tasty, yet frugal meals that can be taken to families? -Katrina
Do you have a question you’d like to ask Money Saving Mom® readers? Read the submission guidelines and submit it here.

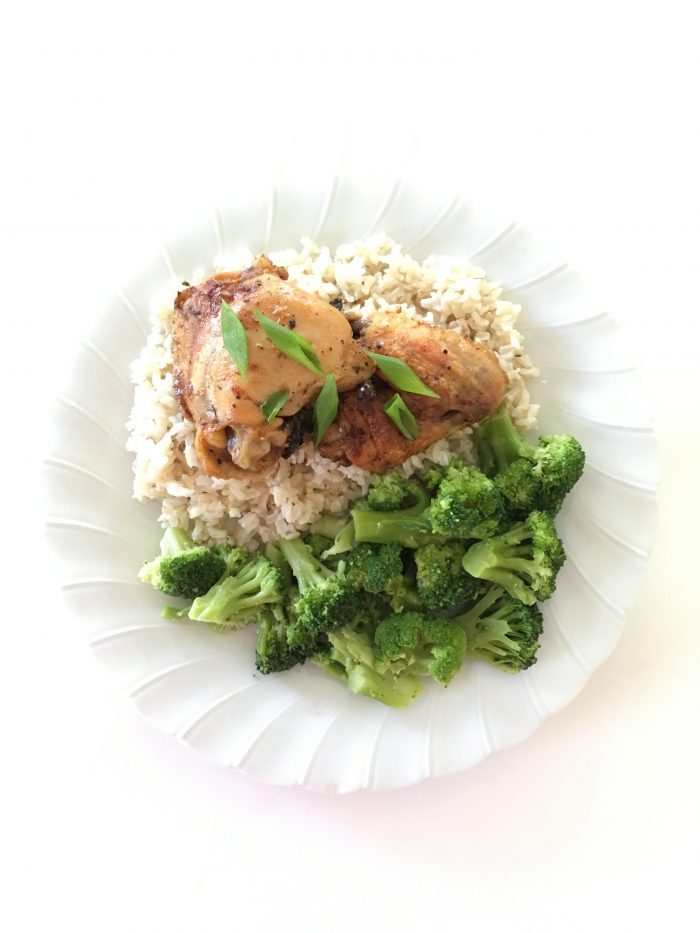
If you need to cook around allergy restrictions, you’ll love this recipe for Italian lemon chicken. It is free from all the most common food allergy ingredients AND it’s freezer friendly!

Guest post from Michelle.
Yeast is one of those ingredients that is becoming banned from more and more people’s diet lists, for various health reasons. I recently did some food allergy cooking for a friend who had about 50 items to which she was allergic, yeast being one of them.
I wanted to serve her a salad but did not know what to do with the vinegar (yeast is often an ingredient in vinegar) found in most store-bought and homemade salad dressings (not to mention the other ingredients she had to avoid).
After doing some research, I came up with an Italian dressing recipe that turned out SO delicious.
I made the dressing again, this time as a marinade for our chicken.
My husband’s response was, “That’s the way marinade on chicken is supposed to taste. I couldn’t quit eating it.”
It really was that good, very healthy, and simple to make.

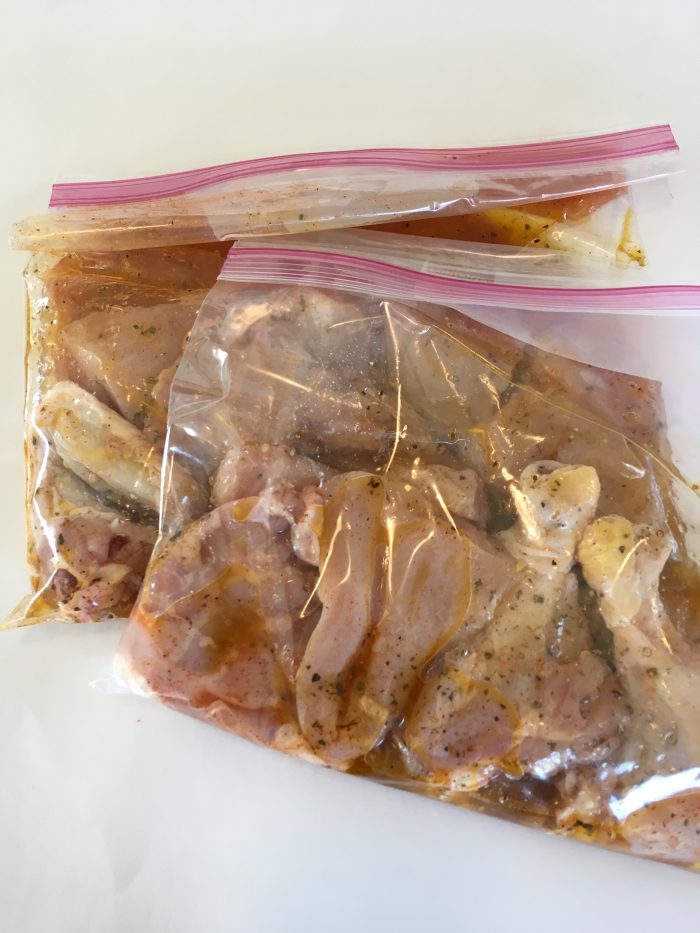
To Marinate:
1. Rinse chicken and remove any fat or skin (if desired).
2. Separate into two freezer bags (or baking dish if cooking right away).
3. In a small bowl, whisk together the lemon juice, water, oil, and spices to make the marinade.
4. Pour 1/2 the marinade into each freezer bag; seal tightly and place in the freezer.
5. When ready to cook the chicken, remove bag from freezer and place in a baking dish in the refrigerator to thaw for about 24 hours.
6. Once thawed, allow to marinate as long as you can.
To Cook:
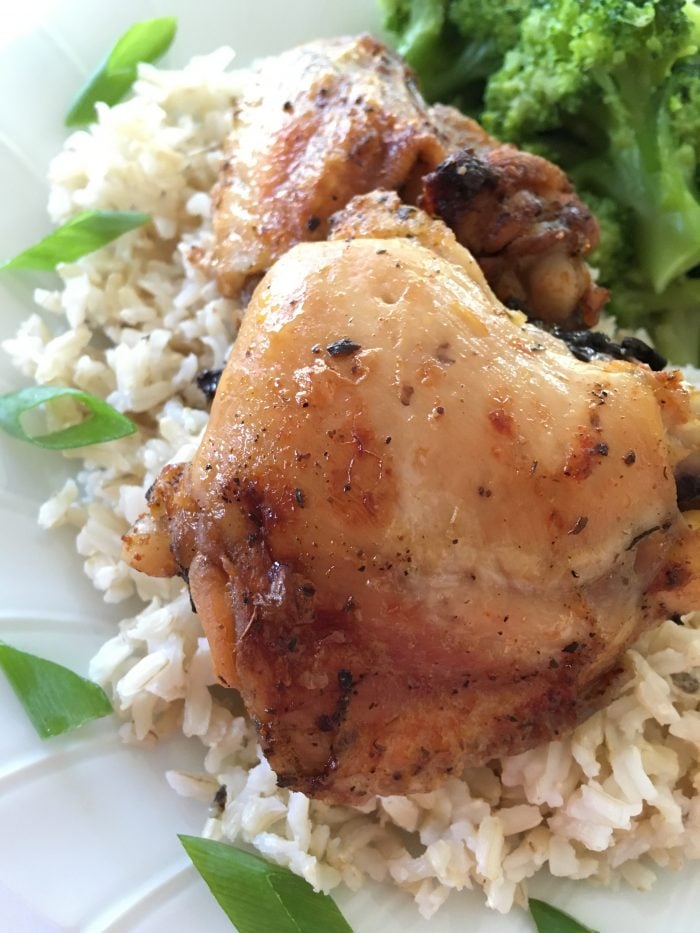
1. Place pieces of marinated chicken in a greased baking dish.
2. Bake at 325º for 1 hour.
3. Turn the heat up to 375º and bake for another 20-30 minutes.
You can substitute apple cider vinegar for the lemon if desired — although it will change the flavor somewhat.
You can also mix and match the seasonings to fit your family’s taste preferences.
This chicken would cook beautifully in the crockpot or on the grill if you don’t want to heat up your kitchen.
I recommend serving the chicken over steamed rice with a side of vegetables.
It would also be great with a baked potato and Cesar salad.

The marinated bags of chicken can be refrigerated for up to 24 hours, or frozen for up to 3 months.
Once the chicken is cooked, you can refrigerate any leftovers in food storage containers.
We recommend freezing the marinated chicken in zip-top freezer bags to save space and for easy cleanup.
If you want to freeze the chicken after baking, it’s easiest to cut the chicken off the bones and into bite-size pieces. Freeze the chopped chicken in 1 or 2-cup containers to use in soup, casseroles, etc.
After the chicken is cooked, you can simply microwave it to reheat — or pop it in the oven at 250 for 15-20 minutes.

Make sure to share and save it on your favorite platform below!
Michelle is blessed to stay home with her three children (ages 10, 7, and 4), while her husband works to provide. When she’s not experimenting with allergy-friendly meals, she’s blogging about it at The Willing Cook. Through the Willing Cook, her hope is that you gain peace of mind in your kitchen (and your pocket book) and are able to serve those you love who suffer with food allergies.
Done-For-You Dinner Recipes With Simple Ingredients and a Grocery Shopping List!

It was a scorcher day today, so we didn’t venture out until late in the afternoon when it had cooled down a bit. And, because it was so hot, it was the perfect for trying out the sock bubble idea I’ve been seeing on just about every other blog recently.

We had so much fun with this — and it was so easy to do.


We decided to get adventurous and add drops of food coloring to the sock.

It was messy — but oh so fun! Word to the wise: don’t try adding food coloring unless your children are wearing smocks or play clothes. 🙂

And the children also thought it was tons of fun to use the socks to “clean” the deck, too!
Did you do something fun and frugal as a family today? If you blogged about it, I’d love for you to leave a link to your blog post below. Or, you can just tell us what you did in the comments.
Note: Since the purpose of this series is to encourage you to be intentional about fun in your home this summer, please only link up posts showing pictures/sharing details of fun things you did as a family today (or within the last few days). Posts that do not adhere to these guidelines will be deleted in order to make it fair for those who are putting forth a lot of effort to participate in this challenge.

We went shopping at the health food store today and I got some great deals on produce and other healthful foods. Silas helped me unload everything and then asked if he could be in my grocery pictures, too! 🙂

Health Food Store Shopping Trip
2 pints of blueberries — $1.50 each
Cilantro — $0.99
10 oranges — 5 for $1, $2 total
Rudi’s organic hot dog buns — marked down to $0.99
Rudi’s organic bread — marked down to $0.99
2 bags of organic potatoes — marked down to $0.99 each, $1.98 total
1 eggplant — $0.79 {Should I confess that I’ve never bought eggplant before? Anyone want to share amazing recipe ideas?!}
2 mangos — $0.50 each
Green onions — $0.79
3.10 pounds of apples — $0.99 per pound = $3.10 total
5-lb. bag of organic carrots — $1.49
Ezekiel Tortillas — $3.99 {Yes, you can choke — and tell me that I should recant on my I Don’t Make Homemade Tortillas stance! :)}
1 pound raw cheddar cheese from a local farm — $5.99
1/2 gallon organic whole cream top milk — marked down to $1.99
1 lb. green beans — $0.79/lb.
Total with tax: $33.19

Suzy from Suzy’s Sitcom emailed in the following tip:
My husband and I have been on a quest to get healthier. But when it comes to exercise, joining a gym or exercise program often costs money.
We wanted to be healthy but do it in an inexpensive and fun way. That is where hiking came in.
The benefits of hiking are many: improved muscular fitness, lower risk of high cholesterol, reduced depression, and better quality sleep, among others. Getting outdoors and away from the television and visiting with nature is truly a mood lifter, and the best thing of all is that it is totally free.
But how could we make it interesting enough that the whole family would want to get involved? I went to the local bookstore and discovered that there was a whole section of books on local trails to hike. Most of the books not only included trail maps, but local information, restroom locations and areas to picnic.
I chose one for the Atlanta area that included 60 hikes, and thought, why don’t we make it a challenge to complete every hike in the book? I cut out scraps of paper and wrote the numbers one to sixty on them and put them in a jar.
My family’s challenge each week is to draw a number from that jar and do that hike on the weekend. It’s always fun to choose and then get to discover where we are hiking each week! Not only have we found a fun way to get great exercise, but we have learned a whole lot about the area that we live in. -Suzy


Guest post from Michelle of The Willing Cook
Crystal shared a very popular freezer cooking challenge in May with “regular” food. However, a number of readers have requested allergy-friendly recipes as well.
That’s where I come in.
For the next three days, I’ll be sharing an allergy-friendly freezer cooking recipe each day. All three recipes will be free of the top eight allergens and more. Hopefully, this will help some of you who have food allergies and would like to do some freezer cooking, but who are struggling to come up with ideas as to what you can make with your dietary restrictions.
When Crystal linked to a Peanut Butter Pancake recipe recently in her meal plan, I knew I had to try it. I was so excited about the results using whole wheat flour and almond butter, that I decided I would make a gluten-free batch as soon as possible.
The successful and power-punching breakfast pancake recipe below is what resulted. We loved these!
Note: Any “nutty” spread can be used for this recipe, like sunbutter, and still be peanut and treenut free. You may wish to talk to your doctor before using sunbutter, but it is free of peanuts and treenuts. You can also try leaving out the nut butter from the recipe.

(makes approximately 28, 4-inch pancakes)
**See ingredient substitution notes below recipe.**
Place the pancakes in a single layer on a cookie sheet and put in the freezer for about 30 minutes, then move to a freezer bag. To reheat, simply pop the frozen pancake in the microwave for 30-60 seconds (or use a preheated oven/toaster oven).
You can add back in any “regular” ingredients for the allergy-friendly ingredients in this recipe.
Wheat: Use 4 cups whole wheat flour (in place of gluten-free flours).
Corn: Use 2 teaspoon baking powder (in place of cream of tartar and baking soda).
Egg: Use 4 eggs (in place of EnerG Egg Replacer).
Dairy: Use 1/2 cup butter (in place of coconut oil) or cow’s milk (in place of non-dairy milk).
Like I mentioned earlier, these pancakes are absolutely delicious — and our family loves them!
Michelle is blessed to stay home with her three children (ages 10, 7, and 4), while her husband works to provide. When she’s not experimenting with allergy-friendly meals, she’s blogging about it at The Willing Cook. Through the Willing Cook, her hope is that you gain peace of mind in your kitchen (and your pocket book) and are able to serve those you love who suffer with food allergies.