


This delicious molten lava chocolate cake tastes as good as it looks… and it’s gluten, dairy, and egg-free! Oh, and it’s made in a slow cooker — meaning, you won’t heat up your kitchen!

Guest post from Michelle
Are you the type that unplugs the oven in the summer to avoid heating up your whole house and raising your cooling bill? You’re not alone in this endeavor.
It’s always great to have a few favorite recipes to use during these warm (and enjoyable) summer months that do not require the oven, but rather use alternative cooking devices like the slow cooker and grill! These are great ways to cook dinner most nights, but what about dessert? Yes, that very important course to every meal!
Sure, you can opt for ice cream and popsicles, but what if you want cake? You’re sunk without the oven. Or are you?
I’m here to tell you that you’re not sunk. I have come up with a recipe that does many things for many of you chocolate lovers out there.
Are you ready for it? Molten Chocolate Lava Cake made in the slow cooker that is free of gluten, dairy, and egg (among a few other top allergens).
Yes, my friends, it’s true!
You will Love this easy recipe!
It’s basically a chocolate lover’s delight — super rich!
Also… it’s a “lava cake” so while the outside rim surrounding the crock pot cooks up like a cake. The further you get towards the center of the crockpot, it turns to a pudding consistency, then an icing consistency. YUM!
I recommend serving the cake by spooning out some of the outer “cakey” rim, topped with a little of the pudding center, followed by the “icing”. Then, top it all with fresh berries and powdered sugar (that’s optional, but highly recommended).
Now for that recipe…
")
Ingredients for Chocolate Lava Cake
- 1 cup brown rice flour
- 1/2 cup tapioca flour
- 1/2 cup oat flour
- 1/4 cup ground chia seed
- 4 tsp baking powder
- 1/2 tsp salt
- 1 1/2 cups coconut oil or butter
- 2/3 cups chocolate chips (Enjoy Life is a good dairy-free brand)
- 1 cup white sugar + 1/2 cup white sugar (added separately)
- 6 Tbsp cocoa + 1/2 cup cocoa (added separately)
- 2 Tbsp vanilla extract
- 2/3 cup allowed milk (cow, rice, almond, soy, etc.)
- 2 EnerG egg replacer (3 tsp powder + 4 Tbsp water); or 2 eggs
- 1/2 cup brown sugar
- 1 1/2 cups hot water
- (optional: summer berries, powdered sugar, sliced almonds, etc.)
How to Make Slow Cooker Chocolate Cake
1. Grease the inside of a 6 qt. slow cooker.
2. In a large mixing bowl, mix together the flours, chia seed, baking powder, and salt.
3. In a medium size microwavable bowl, microwave coconut oil and chocolate chips until melted and smooth, stirring occasionally.
4. Stir in 1 cup of white sugar, 6 Tbsp cocoa, vanilla, milk, and prepared EnerG egg replacer, until well blended.
5. Pour the wet mixture into the mixing bowl with the flour mixture. Mix together on medium speed until well combined.
6. Spread this batter into a slow cooker sprayed with cooking spray.
7. In the microwave (using the same bowl from earlier), mix water with the remaining 1/2 cup white sugar and brown sugar and microwave until hot (about 2 minutes).
8. Add in the remaining 1/2 cup cocoa; stir until sugars dissolve.
9. Pour this mixture over top the cake batter already in the slow cooker. It will look like muddy water.
10. Cook on high for 1-2 hours (mine took about 1 hour 20 minutes). You’ll notice it’s done when the batter starts to pull away from the edges and it looks solid (at least on the outer rim).
11. Remove the lid from the slow cooker and turn it off (be careful not to let the water from the lid drip into the cake).
12. Allow the cake to sit without the lid for about 30 minutes before serving.
13. Scoop out the outer “cakey” rim of the lava cake, followed by the pudding and icing center. Top with your favorite summer fruit and powdered sugar.
14. Enjoy your allergy-friendly chocolate goodness!

Slow-Cooker Chocolate Lava Cake
Ingredients
- 1 cup brown rice flour
- 1/2 cup tapioca flour
- 1/2 cup oat flour
- 1/4 cup ground chia seed
- 4 tsp baking powder
- 1/2 tsp salt
- 1 1/2 cups coconut oil or butter
- 2/3 cups chocolate chips
- 1 cup white sugar
- 6 Tbsp cocoa
- 2 Tbsp vanilla extract
- 2/3 cup milk cow, rice, almond, soy, etc.
- 2 EnerG egg replacer 3 tsp powder + 4 Tbsp water; or 2 eggs
- 1/2 cup brown sugar
- 1/2 cup white sugar
- 1 1/2 cups hot water
- 1/2 cup cocoa
- summer berries, powdered sugar, sliced almonds, etc. optional
Instructions
- Grease the inside of a 6 qt. slow cooker.
- In a large mixing bowl, mix together the flours, chia seed, baking powder, and salt.
- In a medium size microwavable bowl, microwave coconut oil and chocolate chips until melted and smooth, stirring occasionally.
- Stir in 1 cup of white sugar, 6 Tbsp cocoa, vanilla, milk, and prepared EnerG egg replacer, until well blended.
- Pour the wet mixture into the mixing bowl with the flour mixture. Mix together on medium speed until well combined.
- Spread this batter into a slow cooker sprayed with cooking spray.
- In the microwave (using the same bowl from earlier), mix water with the remaining 1/2 cup white sugar and brown sugar and microwave until hot (about 2 minutes).
- Add in the remaining 1/2 cup cocoa; stir until sugars dissolve.
- Pour this mixture over top the cake batter already in the slow cooker. It will look like muddy water.
- Cook on high for 1-2 hours (mine took about 1 hour 20 minutes).
- Remove the lid from the slow cooker and turn it off (be careful not to let the water from the lid drip into the cake).
- Allow the cake to sit without the lid for about 30 minutes before serving.
- Scoop out the outer “cakey” rim of the lava cake, followed by the pudding and icing center. Top with your favorite summer fruit and powdered sugar.
- Enjoy your allergy-friendly chocolate goodness!
Love this recipe?
Make sure to share and save it on your favorite platform below!
Michelle is blessed to stay home with her three children (ages 10, 7, and 4), while her husband works to provide. When she’s not experimenting with allergy-friendly meals, she’s blogging about it at The Willing Cook.
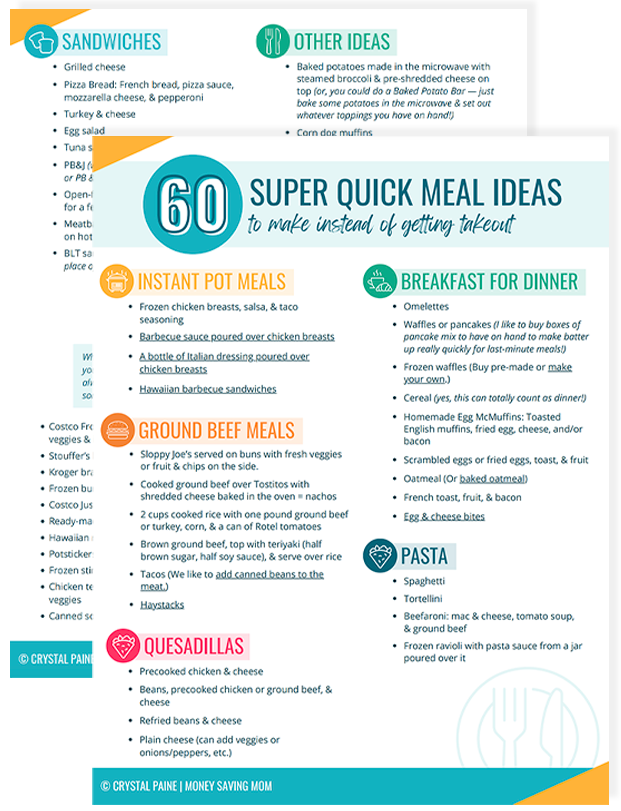
FREE DOWNLOAD: 60 Meals To Help You Avoid Takeout!
Meal time just got so much easier!

6 Creative Gift-Giving Ideas for a Limited Budget

Guest post from Jennifer of When Pigs Fly
Recently my husband and I had the grueling task of revamping our budget. We had to make cuts across the board, due to an increase in one of our bills. As we went through the budget line by line, we began asking ourselves, “Do we really need this?”
One of the categories in question was our Gift Budget, which was taking $120 per month. We decided to drastically decrease this amount and implement creative ways to reduce spending for occasions such as birthdays, anniversaries, special holidays, and various events.
We came to the conclusion that anyone can run to the store and pick up a quick gift and card. We wanted to show our recipients that we put extra effort into creating something unique and personal, especially for them, saving us money along the way!
1. Find your inner Betty Crocker!
Most people really enjoy receiving homemade treats. Get creative and bake up a small sample platter showcasing your favorite desserts, a simple batch of cookies, or homemade cake pops.
Baked goods make great gifts, especially when you have to give several gifts at one time. Give it that extra touch by purchasing an decorative platter or container at your local Dollar Store.
2. Recycle cards.
As you receive cards for all occasions throughout the year, place them aside. When a need arises, cut the fronts off with decorative scissors, leaving the back blank for a special note or make into a gift tag.
If you’re really creative, use sections of the cards to create a whole new card, using scrap-booking supplies you already have on hand. Plus, don’t forget to utilize the free card promo codes, often offered on online card sites!
3. Substitute gift wrappings.
Forget about buying wrapping paper and gift bags, I love to use my Sunday Comics as wrapping paper. Not only is it fun, it is free!
Forgo expensive gift bags and consider packaging your item in a basket, crate, mason jar, or bin, that you already have laying around the house. Also, save the ribbons and special embellishments from gifts you receive, and reuse them to decorate your gift.
4. Regift.
Okay, so I know this may be tacky to some, but don’t let a gift you received (and won’t use) go to waste. Place it aside for a future gift-giving occasion. Just make sure you remember who originally gave it to you!
A rule of thumb is not to regift anything that was especially handmade for you.
5. Give recycled gifts.
Your home is full of gift ideas, so before you throw items out, think of your possibilities! Turn an empty wine bottle into a elegant Tiki Torch, an old window shutter into a photo frame, or a small wooden crate into a beautiful planter.
6. Use those freebies.
Opportunities to receive free items are readily available these days — store promotions, giveaways and contests, requested samples, etc. When you get such items, set them aside. Use them later to create themed gift baskets for unexpected events such as baby showers, house warming, or get-well.
What are your favorite ways to give on a budget?
Jennifer Van Dahm is a stay-at-home mom, who knew there was more to life than laundry and dishes! Her motto, “Taking the ordinary out, of everyday living”, is shown throughout her website, When Pigs Fly. There, she highlights her passion for cooking and providing a healthy life style for her family, while saving money in the process. Her goal is to refresh families and help them get out of their rut– physically, mentally, and spiritually!
Reader tip: Use markers to touch up wooden furniture and ceramics
Reader tip: Use markers to touch up wooden furniture and ceramics

Here’s a new-to-me tip from reader, Michelle:
I buy a couple of cartons of markers (broad-tipped) during the back-to-school sales every year and then “steal” the brown ones. I use these to touch up my wooden furniture that gets nicked or scratched.
Sometimes it doesn’t work (!), but usually I can doctor a new scar so that it doesn’t show by using a marker on that place and then rubbing off the excess with a soft cloth.
The rest of the pack(s) of markers are kept on hand for touching up ceramics that get nicked (use the same way as above) and for art projects or are given to youthful artists. (My daughter is nearly seventeen now, so doesn’t go through these the way she used to!) -Michelle

Budgeting for Back-To-School Supplies

Guest post from Trisha of Finances With Funk:
I know! I know! The last thing you want to think about right now is back to school.
But if you don’t, you could be left scrambling for the extra expenditures and missing a great opportunity to teach your kids or grandkids about budgeting.
Here’s how we do it at our house:
Step 1:
Take a look at your own budget and set a dollar amount that you can afford to spend on each child for all back to school necessities.
Yes, if you have teenagers and 2nd graders there may be a difference between the amount each needs, and that’s OK. You know what’s appropriate for your family.
Step 2:
Start putting away a little bit every week or pay period for the next few months to fund those expenses come August.
Just take your total budgeted amount and divide that by the number of pay periods you have between now and then.
Step 3:
Plan a back-to-school shopping trip with your kids.
Discuss, with your kids specifically, what they are going to need, and then make a list to bring along on your trip.
Example: 2 pairs of shoes, 2 new pants, 2 new shorts, 2 nice shirts, 3 new t-shirts, new Backpack and lunch box.
Step 4:
Decide where you are going to shop and help them prioritize.
Are there some things you can look at higher end second hand shops for because they are set on a very specific more expensive shoe? Allow them to help with the decisions in that process.
With teens you can put their money into their own account (Like a MONEY account from ING) or on a Prepaid Visa Card that they will need to keep a record of in a checkbook register. If they choose to spend over and above what you have told them is their budget then they can use their own money to do so.
Step 5:
Go shopping and have fun.
Make a day out of it! Plan a fun breakfast out if you can or take a lunch for a picnic in the park to break up your trip. Or if you can afford to, make it a little weekend trip.
Step 6:
Immediately after your trip start, planning for next year.
It is much easier to find an extra $30 a month than to wait until June and need to come up with a $100 or more.
Trisha Funk is a momma to 4, wife to 1, small business owner x2, financial coach, and author at Finances With Funk. She is passionate about helping others gain control of their finances and living a life free to be obedient to their purpose God created them for.
Why Moms Need to Set Goals

I wrote about the importance of goal-setting over on MomLife Today:
As moms, it often seems like we do the same things over and over again.
We cook a meal, only to turn around and find that it’s all been eaten up before we even had time to finish the dishes! We scrub the floor, and by the afternoon, it’s hard to even notice any difference.
It’s hard to see progress amid the sea of never-ending responsibilities. We long to just actually finish something, anything.
If you’re feeling like you’re not really getting anywhere, never really finishing anything, and going to bed only to wake up and put out the same fires again the next day, may I encourage you to consider setting goals?
Most women have great ideas and huge ambitions, but very few actually turn those big ideas into tangible, realistic, bite-sized, doable goals.
…Read the full post over on MomLife Today.
Reader Tip: Save More by Using Less

photo source: BigStock
Jeni emailed in the following tip:
Several years ago I read The Tightwad Gazette by Amy Dacyczyn. One of her tightwad tips made a big impression on me, and has stayed with me over the years: use less.
Do you really need to fill the laundry detergent cap to the line determined by the manufacturer before you dump it in the washer? Or will your clothes get clean using a bit less?
Do you need to fill the palm of your hand with shampoo to wash your hair? Or will a smaller amount do the job?
This idea can be applied to everything from condiments to cleaning products. Experiment in your home to see if using smaller amounts of products will give acceptable results.
The great thing is, you have nothing to lose. If your clothes don’t seem to get as clean with less detergent, or you don’t have enough lather to wash your hair properly using less shampoo, you can always go back to using more product. But you may just find that less is enough, thereby making those products last longer and ultimately your money go further.
We Paid Cash: A Couple’s Getaway

A testimony from Kayse from Finding Hope
My husband and I had a stressful year. He was in grad school and worked three jobs, and I worked full time from home and took care of our daughter.
That didn’t leave much time for each other, and we needed to get away together for a few days! However, we already had a tight budget and didn’t know how we could possible afford a three-day trip.
Here’s what we did:
- We put a cookie jar on the dresser in our bedroom, and collected all of our change for about six months.
- My husband put aside all of the tip money he received from one of his jobs, adding it to the cookie jar, all year long.
- He also picked up a few extra gigs throughout the year (he is a professional musician) that we hadn’t expected or added into our budget, so all of that money went in the cookie jar!
- I cut the grocery budget and didn’t by any extras in any category during the last three weeks before the trip.
Although I knew about and helped contribute to the money saving, my husband did all the planning, keeping the trip a complete surprise for me! He scoured the internet and found all the best deals! He also planned the trip mid-week for the best hotel prices!
Here’s what we got to enjoy:
- Three glorious days in Big Bear Lake, only an hour and a half away from our home. (We didn’t have to spend much on gas.)
- A toddler-free trip! He asked his parents to come stay with our girl… for free!
- A car rental — just for fun, he rented a convertible for the trip! He knew the manager, as she came into his store every day, so he got the car for less than $50 a day.
- Two nights in an inn with an in-room spa tub — for $150 total!
- Freedom! Because we had more than enough cash on hand for the three days, we were able to do whatever we wanted. We went out to nice dinners, took a boat ride, and got a couples’ massage at a local spa!

It was so much fun to be able to go on a trip and not worry about how we were going to pay for everything when we got home!
The freedom of paying for everything in cash really added to the relaxation of our trip! It allowed us to spend time together and take advantage of enjoyable opportunities, without having to worry about the cost. We were able to invest in the weekend and each other! You can read more about our trip here.
We’ll never do it another way again!
Kayse is a wife, mommy, and teacher. She writes over at Finding Hope about finding hope among the day-to-day realities of dinners, dishes, and diapers.
Have you saved up and paid cash for something — large or small? Submit your story for possible publication here.

Sweet Potato Smoothie
Want to get your kids to willingly eat veggies for breakfast? Try this delicious (and super healthy) sweet potato smoothie recipe. They’ll never guess they are enjoying veggies in the morning!
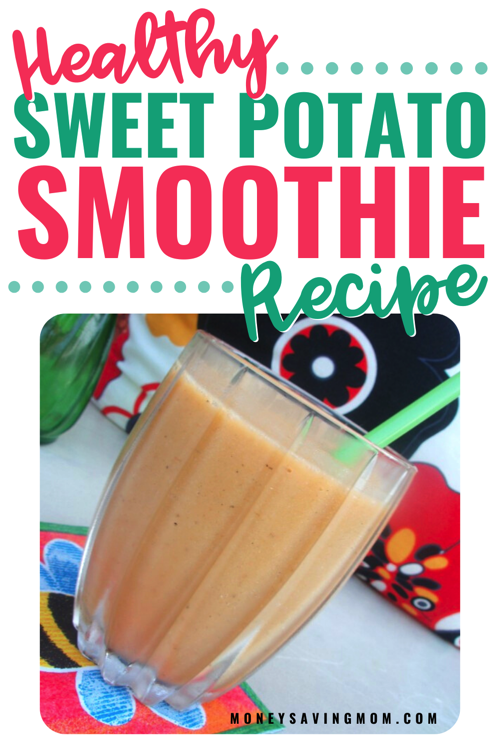
Guest post from Brigette Shevy
I don’t know about you, but there’s just something about getting in a serving of vegetables at breakfast that makes me happy. It gives me a sense of accomplishment by 8 a.m, especially when it tastes delicious!
Sweet Potatoes in a Smoothie?!
The sweet potato in this smoothie recipe adds that extra “oomph,” not only boosting the nutritional qualities (hello, beta carotene!) but increasing the “fill factor” as well. (If you’re wondering what “fill factor” is, I define it as something that keeps me full for longer than 1-2 hours!)
I realize adding sweet potato to a smoothie might seem like an odd combination, but it blends in quite nicely. For those of you who don’t care for sweet potatoes, this is a great way to consume them almost effortlessly… or you can substitute cooked carrots, pumpkin, or butternut squash in place of the sweet potato.

Ingredients for Sweet Potato Smoothies
- 1/2 cup (125 g) sweet potato, cooked and chilled
- 1 frozen banana, cut in thirds
- 1/2 apple, cored
- 1/8 tsp. nutmeg
- 1/8 tsp. cinnamon
- 1 Tablespoons maple syrup
- 1 teaspoon vanilla
- 1/2 cup milk (any kind will work)
- 1 cup ice cubes (use more or less, depending on how you like your smoothies)
How to Quickly Cook Sweet Potatoes
The easiest, quickest way to cook a sweet potato is in the microwave.
Simply scrub the potato skin, pierce it several times with a fork, and pop it in the microwave until soft (about 5-6 minutes).
You can store it in your refrigerator until ready to use for this recipe.
How to Make Sweet Potato Smoothies
1. Place all ingredients in a high-powered blender (we use a Vita-mix).
2. Blend on high until smooth.
3. Pour into 2 cups and serve immediately.

Sweet Potato Smoothie
Equipment
Ingredients
- 1/2 cup sweet potato cooked and chilled
- 1 banana frozen and cut in thirds
- 1/2 apple cored
- 1/8 teaspoon nutmeg
- 1/8 teaspoon cinnamon
- 1 Tablespoons maple syrup
- 1 teaspoon vanilla
- 1/2 cup milk any kind will work
- 1 cup ice cubes more or less, depending on how you like your smoothies
Instructions
- Place all ingredients in a high-powered blender (we use a Vita-mix).
- Blend on high until smooth.
- Pour into 2 cups and serve immediately.
Notes
How to Quickly Cook Sweet Potatoes
The easiest, quickest way to cook a sweet potato is in the microwave. Simply scrub the potato skin, pierce it several times with a fork, and pop it in the microwave until soft (about 5-6 minutes). You can store it in your refrigerator until ready to use for this recipe.Nutrition
Love this recipe?
Make sure to share and save it on your favorite platform below!
More Smoothie Recipes You’ll Enjoy
- Chocolate Peanut Butter Banana Smoothie
- Orange Cream Smoothie
- Patriotic Smoothie
- Pick-Me-Up Smoothie
- Ginger Smoothie
- Strawberry Oatmeal Smoothie
- Banana Coconut Green Smoothie
- Tropical Hawaiian Smoothie
Brigette is a full-time wife and mother who is blessed with three amazing bundles of energy. She enjoys music, experimenting in the kitchen, homeschooling her children, finding great deals, long-distance running, and anything chocolate.
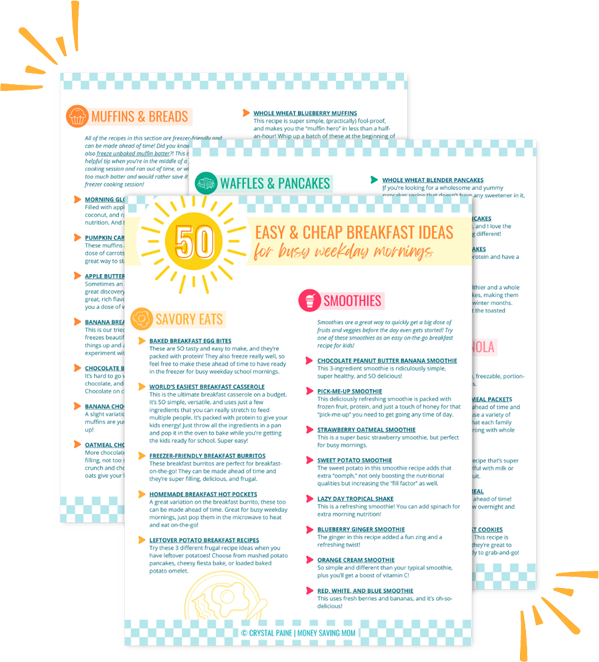
FREE 50+ Easy and Cheap Breakfast Ideas!!
Mornings just got so much easier with this FREE list of 50+ Easy & Cheap Breakfast Ideas for Busy Weekday Mornings!
Do It Yourself: Sample Size First Aid Kits

SimpleOrganizedLiving.com shows you how to make homemade First Aid Kits out of sample-size products.
Do you have a fun and frugal DIY idea to share? I’d love to hear about it! Read the submission guidelines and submit it here.
Reader Tip: Changing Our Thinking About Discipline

Self Discipline via Bigstock
Tessa emailed in the following tip:
Quick: what’s the first word that comes to your mind when you hear the word discipline? Yuck? Difficult? Unappealing?
If you are like me, then I’m sure you at least thought of a synonym of the above words. In our culture of entertainment, discipline gets a bad rap. You hear, “You don’t need to be disciplined… everything will work itself out.”
Yeah right.
When has sitting on the couch ever gotten you anywhere?
Exactly. I believe that if we just change the way we think when we hear the word discipline, then we can stop buying into the myth that laziness is an acceptable option.
Start thinking about disciplines that you do every day… otherwise known as, chores. That’s right. You are already disciplined in some areas. Congratulations! If you start pairing the word discipline to sweeping or doing the dishes (or something that you do every day/night), then you start to associate it with action items that are doable.
Start with a small, new discipline to add to your life. For example, if eventually you want to run a marathon, you’re going to have to build up your endurance. So, you could start by walking a mile. Before you know it, you have a new discipline in your life. TA-DA!
Being disciplined is not as bad as it seems. If you look around, you’ll see that discipline does not have to have the negative connotations that society gives it. Today, let’s change the way we think about discipline and take action.
OVER-SPENDING EVERY SINGLE MONTH?Grab these FREE Budgeting Sheets!
Click here to download!
Ask the Readers: Should we pay for dental and vision insurance?
Ask the Readers: Should we pay for dental and vision insurance?

Today’s question is from Jill:
I recently left my job with a large corporation to work with my husband at our business. I made sure we had individual health insurance in place before I left, but I haven’t done anything about dental or vision insurance.
I’m thinking that negotiating the best deal for a cash payment may be the way to go, but I’m interested in any other good options for dental and/or vision insurance for our family. -Jill
Do you have a question you’d like to ask Money Saving Mom® readers? Read the submission guidelines and submit it here.
Today wasn’t anything like I’d planned…
Well today wasn’t anything like I’d planned! The day started with an early morning almost-3-mile run in the woods around the family camp here in Texas. I was picturing a day of encouraging sessions, swimming, rock-climbing, and a date night picnic on the lake with my husband.
But that was not to be…
Kaitlynn started throwing up this morning soon after she got up and she couldn’t keep anything down the rest of the day. We ended up taking her in and getting some IV fluids in her since she was beginning to get dehydrated.
We’re back at the cabin, she’s finally resting, and the nurse here at family camp is keeping close tabs on her… and I’m hoping she continues to rest so that her stomach will calm down and get back to normal. Poor girl, she was so sick today and I just felt miserable for her!
At any rate, I had a lot of posts planned to run today… but the computer was the last thing on my mind much of day. Thanks so much for your understanding when life trumps blogging.
I may have a chance to post some of the deals from my bulging inbox tonight, but we’ll just see how the evening goes! For now, I’m off to enjoy a “date night” with my husband (The rest of the couples at family camp are having a date night picnic at the lake. Since we needed to stay back with Kaitlynn, the camp staff brought our picnic basket to our cabin so we could still have date night in!)
Hopefully, your day was much less eventful and you are all well at your house!
Do It Yourself: Rose Petal Vinegar

TheNerdyFarmWife.com shows you how to make homemade rose petal vinegar.
Six goals for this week

I didn’t make as much traction on my goals last week as I’d hoped. But I’m trying to remind myself that I made much more progress by setting the goals and working toward them than I would have made had I not set goals at all.
A mountain isn’t climbed in one fell swoop; it’s an inch-by-inch, foot-by-foot process — and it’s the same with completing goals!
We’re at family camp in Texas this week and one of our big goals for this week is truly to just relax, soak up the sunshine, rest, savor the moments, laugh, and just spend a week away from the usual responsibilities of life so that we can be refreshed and renewed as individuals — and as a family.
Oh, and in addition to lots of relaxing, Jesse and I are also signed up to try the zipline and rock-climbing wall, go on an early morning horseback ride, and go skeet shooting — all things I’ve never done in my life. It might prove to be an interesting week. 😉
At any rate, I’m keep my goals really simple to allow plenty of room for margin and rest.
Last week’s goals:
Family/Mothering Goals
1. Start reading Wilma Rudolph: Olympic Runner aloud to the children. Read a few chapters of The Missing Video (reading to Kathrynne), and read at least two chapters of Little House in the Big Woods (reading to Kaitlynn).2. Have at least one playdate with friends.
3. Write a love note to Jesse.
Personal Goals
4. Finish reading Radical Together plus one other book.
5. Run at least five times for 45 minutes each; do weight-training program at least four days.
6. Finish listening to Stop Acting Rich.
7. Sleep for at least 7 hours every night.8. Continue on with the Choosing Gratitude 30-Day Devotional.
Home Management/DIY Projects
9. Try at least two new crockpot recipes.
Business Goals
10. Continue blogging the 4 Weeks of Family Fun series.
This week’s goals:
Family/Mothering Goals
1. Finish reading Wilma Rudolph: Olympic Runner aloud to the children. (I’m hoping we can finish this while we’re on vacation this week!)
2. Enjoy a relaxing week together at family camp making lots of memories and just enjoying being together.
Personal Goals
3. Finish reading The Life You’ve Always Wanted plus one other book.
4. Sleep for at least 8 hours every night.
5. Continue on with the Choosing Gratitude 30-Day Devotional.
Business Goals
6. Edit and submit an article for publication on RooMag.com.
How did you do on last week’s goals? What are your goals for this week? I’d love to have you share your progress on last week’s goals and your goals for this coming week in the comments. Of, if you’ve blogged about it, leave your direct link below. Let’s cheer each other on to live purposeful and productive lives!
You can download a free customizable weekly goal-planning sheet here.
