


Looking for an easy make-ahead lunch or dinner idea that’s frugal and will fill you up? How about a quick meal for busy weekdays? This freezer-friendly recipe for bean & cheese burritos checks all the boxes, and your family will love it too!

After the amazing success I had with Crockpot Refried Beans, I decided to try making Freezer-Friendly Bean & Cheese Burritos (adapted from Pennies & Pancakes). They were SO easy to make, and very inexpensive too!
These burritos aren’t anything spectacular and, if you’re a foodie, you just might be appalled that I’m posting such a crazily basic recipe.
But I’m all about keeping it simple — especially when it comes to quick lunches on the go!
Ingredients for Bean and Cheese Burritos
- 24 medium flour tortillas (you can make your own)
- 1/2 recipe Crockpot Refried Beans (or 4 16-ounce cans of refried beans)
- 1 jar salsa of your choice
- 1 package taco seasoning mix (or homemade taco seasoning)
- 8-12 ounces of cheddar cheese, grated
How to Make Bean and Cheese Burritos
1. In a large bowl, mix beans, salsa, and seasoning together.
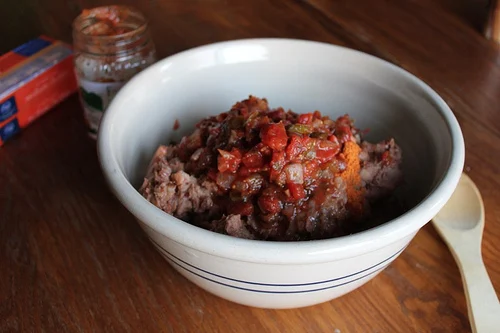
2. Spread 2-3 Tablespoons of the mixture into center of a tortilla.

3. Sprinkle with cheese and roll up (folding the sides in to keep all the filling inside).

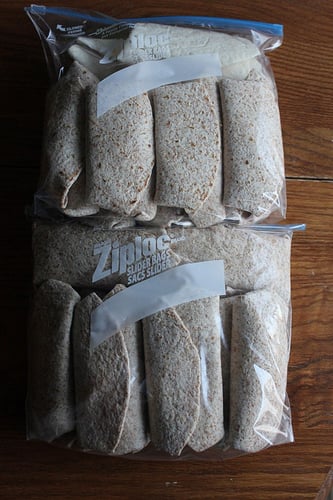
4. Place assembled burritos in a freezer bag OR cook burritos to eat immediately.

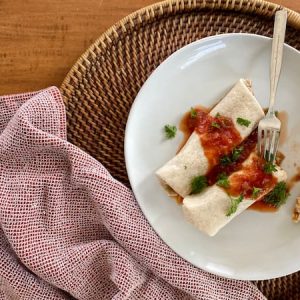
5. Serve with salsa and sour cream if desired.
How to Re-Heat Frozen Burritos
Microwave Baking Instructions:
- Pull 1-3 burritos out of the freezer and put on a microwave-safe plate
- Warm in the microwave on 50% heat for 2-3 minutes, or until cheese is melted.
- If you want a crispy tortilla, place warmed burritos in a hot frying pan for 30-60 seconds on each side.
Oven Baking Instructions:
- Pull out desired number of burritos and thaw for 1-3 hours.
- Bake at 350º for 20 to 30 minutes, or until heated through.
- You can top with additional cheese before baking.
Other Burrito Recipes You Might Like:

Freezer-Friendly Bean & Cheese Burritos
Ingredients
- 24 medium flour tortillas you can make your own
- 1/2 recipe Crockpot Refried Beans or 4 16-ounce cans of refried beans
- 1 jar salsa of your choice
- 1 package taco seasoning mix or homemade taco seasoning
- 8-12 ounces of cheddar cheese grated
Instructions
- In a large bowl, mix beans, salsa, and seasoning together.
- Spread 2-3 Tablespoons of the mixture into center of a tortilla.
- Sprinkle with cheese and roll up (folding the sides in to keep all the filling inside).
- Place assembled burritos in a freezer bag OR cook burritos to eat immediately.
- Serve with salsa and sour cream if desired.
Microwave Baking Instructions:
- Pull 1-3 burritos out of the freezer and put on a microwave-safe plate
- Warm in the microwave on 50% heat for 2-3 minutes, or until cheese is melted.
- If you want a crispy tortilla, place warmed burritos in a hot frying pan for 30-60 seconds on each side.
Oven Baking Instructions:
- Pull out desired number of burritos and thaw for 1-3 hours.
- Bake at 350º for 20 to 30 minutes, or until heated through.
- You can top with additional cheese before baking.
Notes
Love this recipe?
Make sure to share and save it on your favorite platform below!
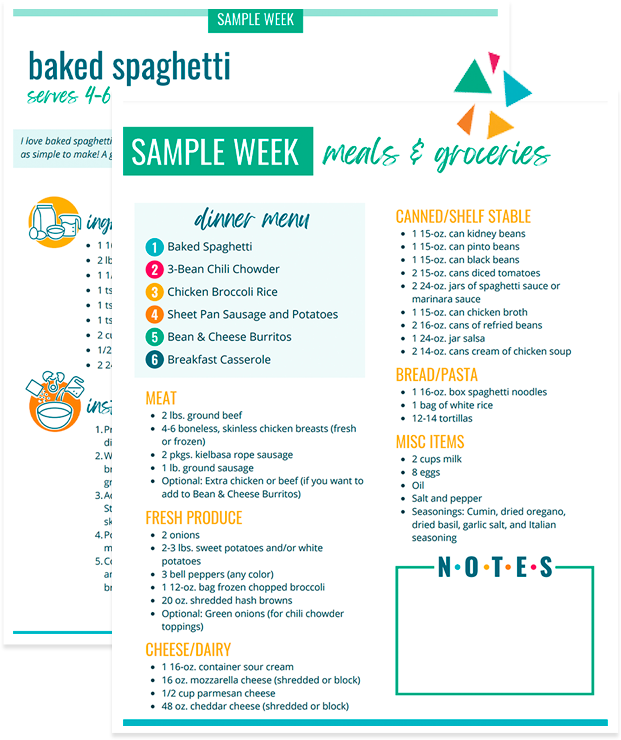
FREE One Week Menu Plan!
Done-For-You Dinner Recipes With Simple Ingredients and a Grocery Shopping List!

When You Want to Give Up

 Is your life feeling hopeless and overwhelming right now? My guest post on Hope for Women today might encourage you:
I flung myself into a heap on the floor in our little basement apartment.
“What am I supposed to do, God?” I cried aloud. “I’m so thankful for this baby, but I’m so sick with this pregnancy. And being so sick means I can’t work. How are we going to survive?”
I felt helpless and at the end of my rope. My morning-noon-and-night sickness had hung on for weeks, keeping me from working at the part-time jobs I had before I got pregnant.
While my husband was in law school, those part-time jobs were keeping us afloat. Combining both of our incomes, we were already barely making it. With the absence of my income, our finances suffered a huge blow – and so did my faith.
Read the full post over on Hope for Women.
Allergy-Free Buffalo Chicken Pasta Salad


Guest post from Michelle of The Willing Cook
As I’ve said before, coming up with something original and satisfying for lunch while still remaining food allergy-safe is not always an easy task.
The most common lunch menu in our home is leftovers. It is nice, though, to have other lunch options for those times when leftovers is not an option or you’re tired of the same ol’ thing.
I have come up with a recipe today that I hope will fit that bill for you. My intention in making this dish was for a quick and tasty lunch, but we ended up having it for dinner as well. So, whether you make up a batch to eat for lunch for a few days or have it as a lunch leftover from dinner, it is sure to satisfy.
An added bonus for many of you out there is that while this recipe is safe for food allergy sufferers, it’s also great for everyone else as well. So, give it a try and enjoy!

Buffalo Chicken Pasta Salad
Ingredients
- 2 cups cooked chicken, diced (I pulled out previously cooked chicken from the freezer and thawed.)
- 8 ounces pasta of choice, gluten-free or whole wheat
- 1/4 cup bell pepper, finely diced
- 1/4 cup sun-dried tomatoes, finely diced (regular tomatoes are fine too)
- 1/4 cup red onion, finely diced
- 1 celery rib, finely diced
- 1/4 cup cilantro, chopped
- 5 slices bacon, cooked and crumbled
- 1/2 cup cayenne pepper sauce, like Frank’s Red Hot Sauce
- 1/3 cup extra-virgin olive oil
- 1/2 teaspoon kosher salt
- 1/2 teaspoon black pepper
- shredded cheddar cheese (optional)
Directions:
- Cook your pasta according to package directions to al dente. Once cooked, rinse with cold water and pour into a large bowl.
- While pasta is cooking, prepare the rest of your ingredients. Dice your cooked chicken and put in bowl with pasta. Use any kind of chicken that works for you, whether grilled, leftover roasted whole chicken, baked, etc.
- Dice your bell pepper, tomatoes, onion, celery, cilantro. Cook the bacon. Pour all these ingredients into the large bowl with the chicken and pasta.
- Season the pasta salad with kosher salt and pepper.
- In a separate bowl, whisk together the hot sauce and olive oil. Pour sauce over the pasta salad. Toss gently to combine all the ingredients with the sauce. (If cheese is allowed, add desired amount to top of pasta salad.)
- Refrigerate pasta salad until ready to eat. Serve with fresh fruit. Enjoy!
Would you like more allergy-friendly brown bag lunch ideas? You can find more ideas at The Willing Cook by clicking on Lunch Ideas for School/Work.
Michelle is blessed to stay home with her three children (ages 10, 7, and 4), while her husband works to provide. When she’s not experimenting with allergy-friendly meals, she’s blogging about it at The Willing Cook. Through the Willing Cook, her hope is that you gain peace of mind in your kitchen (and your pocket book) and are able to serve those you love who suffer with food allergies.
18 Brilliant Re-Uses For Things You Already Have

Have a minute? You’ve got to go check out this post on BuzzFeed with 18 Brilliant Re-Uses For Things You Already Have. I’m sure you’ve seen some of these before, but many of them were new ideas to me.
Thanks, Emily!
Our wonderful September Sponsors

Don’t let the name fool you: Camping Survival Women is for all women who are interested in being proactive, while at home or out-and-about. Whether it’s knowing how to build a fire, deck out a camper, save money by canning your own food, or prepare your home and family for that next big storm, Camping Survival Women is your place. Join our active Facebook page to learn from women just like you, and shop our store for some great deals. Don’t forget to code “women” for 5% off your purchase!

Kroger Krazy is a blog where Katie shares weekly Kroger ad matchups, unadvertised Kroger finds (including a running list of everything you can get for FREE at Kroger) and general money-saving deals in a very detail oriented manner. If you are looking for one concise location for all your Kroger needs, then look no further. Kroger Krazy is here to do the heavy lifting, so to speak, and guide you through the process.

How often should you clean door handles and light switches? What’s the easiest way to clean fan blades? When is the best time to clean your oven? What’s the fastest way to wash windows? Spring Cleaning 365 will give you all the answers by prompting you to do one task, each day, all year. Each cleaning prompt will be season specific and should take 15 minutes or less — and we’ll focus on the less! It’s the easiest way to have a home that looks Spring Cleaned all year long. Sign up now to be notified when we begin!

The Modest Mom is a family owned online clothing store for women, girls, and moms to be. They specialize in custom made maternity and women’s skirts. They also offer modest cami’s, layering shells and nursing covers. If you are struggling to find feminine, cute, and comfortable clothing, or you just need something that is custom fitted to you, look no further than The Modest Mom.

Are you considering homeschooling but wonder if the costs are too high? Maybe you have been homeschooling for a while and want to find some areas where you can shave off some curriculum expense. Wherever you are in your homeschooling journey, check out the list of homeschool freebies at How To Homeschool For FREE!

Great Homeschool Conventions is hosting two huge homeschooling events in 2013! March 14–16, 2013 will be the SouthEast Homeschool Convention in Greenville, SC, at the TD Convention Center and April 4–6, 2013 will be the MidWest Homeschool Convention in Cincinnati, OH, at the Duke Energy Center There will be lineup of incredible speakers (including Crystal Paine from MoneySavingMom.com!), hundreds of workshops, and a wealth of exhibitors! Back for 2013: Christian Comedian Tim Hawkins will be performing live! Find out more information at our website.
Do It Yourself: Melted Crayon Art

SimplyRebekah.com shows you how to make homemade melted crayon art.
Do you have a fun and frugal DIY idea to share? I’d love to hear about it! Read the submission guidelines and submit it here.
My Lunchbox Freezer Cooking Plan

School is back in session and many of you are packing lunches to send with your children. Or, you might be packing a lunch for your spouse or yourself to take to work.
Packing your own lunch is a great way to save money, but trying to put together lunches at the last minute can be time-consuming. And that’s where freezer cooking comes in!
For the next two weeks, we’ll be doing a Lunchbox Freezer Cooking series here on MoneySavingMom.com. I’ll be making a different freezer-friendly Lunchbox item each day — and I’ll be blogging about it, with pictures, and encouraging you to join in and make what I make or another recipe that would work for brown-bagging it.
I’m not 100% sure of all of the recipes I’m making, but here’s what I think I’m going to make (most of these are new to me, so I can’t vouch for them!):
Individual Mac & Cheese
Peanut Butter & Jelly Sushi Rolls
Pizza Lunchables
Broccoli Chicken & Rice Cups
Corn Dog Muffins
Homemade Pizza Rolls
Bean & Cheese Burritos (here’s another option for Burritos, if you want something with a little more variety in it)
Mighty Tasty Mini Lasagnas
Chocolate Chips Granola Bites
Pumpkin Chocolate Chip Muffins
Other Freezer-Friendly Lunchbox Ideas:
Barbecued Meatballs
Peanut Butter & Jelly Sandwiches
Brown Bag Burritos
Homemade Pizza Pockets
Ham & Cheese Pockets
Southwest Rollups
Will you be joining us for some or all of the cooking/ What are you planning to make? Leave a comment with your list and links to your recipes!
10 Goals For This Week

We had a hard week last week. And, as a result, most of my goals went by the wayside. But that’s okay… goals aren’t the be all, end all of life.
And sometimes, you just have to set aside all of your ambitions and focus on just doing the basic things — like making sure everyone has food to eat, clothes to wear, and knows that they are loved and cared for.
Last week’s goals:
Family/Marriage/Mothering Goals
1. Start reading A Way Through the Sea aloud to the kids. Continue reading one chapter of The Borrowers aloud at dinner each night. {I did not read at all as much as I usually do last week and all of the reading was pretty much picture books from the library.}
2. Write a love note to Jesse. {Gulp… does texting count??!}
3. Read together with Jesse before bed at least three nights. {Um, this totally did not happen}
Personal Goals
4. Finish reading Running For My Life, Eats, Shoots, and Leaves, Now, Discover Your Strengths, Unglued, Abundant Simplicity, and Happier at Home. {I had all of this big plans to read while I was on my trip to and back to Illinois last week, but I ended up reading through my stack of magazines and some of the ebook I’d downloaded for free recently. Yes, I know, I’m so easily distracted and so good at starting new things instead of working on finishing the things I already have started.}
5. Listen to two chapters of Switch: How to Change Things When Change Is Hard. {I think I only listed to about 20 minutes total.}
6. Exercise at least five times. {I only managed to exercise four times.}
Homemaking Goals
7. Try at least two new recipes. {Progress here: a big fat zero.}
8. Finish at least 25 rows on the scarf I’m working on knitting. {I think I got a grand total of 12 rows done. Hey, at least it’s something, right?}
Business Goals
9. Write at least two articles for other blogs/sites.10. Prep for my speaking engagement in Bloomington, IL on Saturday.
This week’s goals:
Family/Marriage/Mothering Goals
1. Start reading A Way Through the Sea aloud to the kids. Continue reading one chapter of The Borrowers aloud at dinner each night.
2. Write a love note to Jesse.
3. Work on getting back on our Fall routine after falling off the bandwagon last week.
Personal Goals
4. Finish reading Running For My Life, Eats, Shoots, and Leaves, Now, Discover Your Strengths, Unglued, Abundant Simplicity, and Happier at Home.
5. Listen to two chapters of Switch: How to Change Things When Change Is Hard.
6. Exercise at least five times.
Homemaking Goals
7. Fill freezer using Lunchbox Freezer Cooking Plan. (More on that in a bit.)
8. Spot clean and wash curtains in kitchen.
Business Goals
9. Write at least two articles for other blogs/sites.
10. Blog four posts in the Lunchbox Freezer Cooking series.
How did you do on last week’s goals? What are your goals for this week? I’d love to have you share your progress on last week’s goals and your goals for this coming week in the comments. Of, if you’ve blogged about it, leave your direct link below. Let’s cheer each other on to live purposeful and productive lives!
You can download a free customizable weekly goal-planning sheet here.
This week’s menu
Breakfasts
Homemade Instant Oatmeal Packets, Cereal, Toast, Eggs, and/or Fruit
Lunches
Cheese Quesadillas, Raspberries
Snack-y lunch
Chicken Noodle Soup, carrot sticks, apple slices
Peanut Butter & Jelly Sandwiches from the freezer, veggies, apple slices
Mini Deep Dish Barbecue Chicken Pizza Muffins, raw veggies, peaches
Leftovers x 2Snacks
Fruit/Veggies
Homemade Bagels
Homemade Wheat Thins
Homemade Instant Oatmeal Packets
Pumpkin PancakesFreezer Cooking:
Homemade Bagels
Homemade Wheat Thins
Homemade Instant Oatmeal Packets
Pumpkin Pancakes
Lunchbox Freezer Cooking (more details coming in just a bit)
World’s Easiest Marinated Chicken
Dinners
Dinner with extended family
Dinner out
World’s Easiest Marinated Chicken, Bread Machine Bread Sticks, mashed potatoes, fruit, steamed veggies
Chicken Noodle Soup, Soft 100% Whole Wheat Dinner Rolls, fruit salad
Steak Fajitas, fruit
Breakfast for dinner: Pumpkin Pancakes, Scrambled Eggs, Fruit
Dinner with extended family


What’s on your menu this week? Share details and/or your link to your menu plan in the comments.
2012 Goals: August Update

How are you doing on your goals for 2012? I’m excited about the progress I made in August…
Personal
Read through the Bible in a year. {I’ve been keeping up with this faithfully.}
Read through the 24 books on my 2012 booklist. {Finished through August. I have also read quite a few other books!}
Listen to 12 audiobooks. {I’m still finishing up listening to August’s audiobook!}
Run in at least one 5K race. {I’ve been running at least a few 3.1+ mile runs on the treadmill each week and am slowly working on getting my time down. I’m hoping to sign up for an official race soon — hopefully this month.}
Complete the Couch to 10K program. {I’m hoping to start this soon.}
Tackle 12 Do-It-Yourself Projects. {I’m hoping to make June through September’s projects this month. I’ll keep you posted!}
Focus on one habit per month. {We didn’t get everywhere early in August, but we’ve been making huge strides in getting places on time — and we’ve been early multiple times, too! Yay! I’m so excited to see this habit starting to stick!}
Learn to use my new DSLR camera (huge surprise Christmas present from Jesse!!) & improve my photography skills. {I’m excited to be seeing some improvement and progress with this! And I’m also excited that I’m beginning to feel more and more comfortable using my camera!}
Take at least one photo a day and put together a page every week for my Project Life album. {I didn’t do as well with this in August, hoping to improve in this area in September.}
Memorize Colossians using the plan and free download here. {I didn’t do very well on this one this past month; must make this more of a priority!}Marriage
Go on the Love Like You Mean It Cruise.{Done–read my recap here.}
Go on two Marriage Retreats (Went to Cincinnati together in April).
Have monthly date nights. {We had two dates in August.}
Read four books together. {We’ve done two books so far this year and we’re working on a third.}
Read at least 3 books on marriage. {I’ve read two so far this year.}Children/Homeschooling
Continue regular dates/outings with each of the children individually. {I went on at least one outing with each child individually in August.}
Continue Grace and Truth memory book. {The children memorized a few verses plus a few verses of a hymn in August.}
Ice-skating lessons for all three children.{The children finished up their third round of ice-skating lessons and we’re taking a break while we do swimming lessons!}
Swimming lessons for all three children.{We started our fourth round of lessons this month and the children are loving it!}
Finish second grade, begin third grade with Kathrynne.{Kathrynne finished second grade in May and we started third grade in August.}
Finish kindergarten, begin first grade with Kaitlynn.{Kaitlynn finished Kindergarten in May and we started first grade in August.}
Start preschool with Silas.{Started this in April.}
Go on at least one field trip every month. {We went on one field trip in August.}
Go on at least one family vacation.{We went to family camp in July.}
Finish at least 15 read-aloud books. {We’ve finished 22 read-alouds so far this year!}Ministry/Friendships/Extended Family
Write at least two handwritten notes every month to encourage someone. {I wrote & mailed five handwritten notes this month.}
Continue being involved in our local church, homeschool group, young couple’s group, and blogging accountability group. {Ongoing}
Continue with weekly get-togethers with both sides of our extended family. {Ongoing}Business/Blogging
Continue to take Sundays off from blogging/business work. {Ongoing}
Continue keeping strict Office Hours for the business/blogging time each day. {Still plugging away on this!}
Switch to a paperless planning system. {This is the one goal I think I’ve officially decided to drop this year as it just wasn’t working for me. Back to the paper.}
Follow my weekly blogging plan. {I mostly stuck with my blogging plan in August!}
Plan blog posts out at least a month in advance.
Write and schedule blog posts at least a week in advance.Financial
Continue to tithe 10% of our income. {Ongoing}
Give generously to needs in our community and around the world, as God prompts us. {Ongoing}
Pay cash for a new-to-us vehicle to replace our family’s van.{We bought a new-to-us vehicle in July — yay!}
Finish saving for and purchase a rental property with cash. {We’re in the process of investigating our options in our price range right now and deciding if we want to go ahead and purchase something or continue saving. At this point, it’s looking like there’s a good possibility we might be purchasing something very soon. I’ll keep you posted.}
How Are You Doing on Your Goals for 2012?
If you’ve posted goals for 2012, I’d love for you to post an update on how things are going and share your link in the comments. If you don’t have a blog, feel free to just leave your update as a comment. Let’s encourage one another to live lives of intention and purpose!
OVER-SPENDING EVERY SINGLE MONTH?Grab these FREE Budgeting Sheets!
Click here to download!
Organizing Your Important Documents: Final Thoughts (Part 5)

Guest post from Mandy White
There has been a lot of information given over the last week in this series. Compiling and typing everything will take some time. Don’t expect to get it all done in one sitting. Also, don’t be afraid to make adjustments to the index, adding or deleting sections if necessary. This is your book for your family, so put it together in a way that makes the most sense to you!
Over the last six years, I have occasionally noticed things I am missing, or make a change that makes it just a little better. I hope you do the same as you start to use your book.

Something I did recently that I have really liked is to create two additional parts of our Brain Book:
- The first is a three-prong folder that has a copy of our bill accounts page, bank accounts page, and debit card page. This makes paying bills online a lot easier than having to get out the entire 3” notebook.
- The other part is a second notebook. It is a 2” binder and contains three-ring zippered pockets, and the multi-page sheet protectors mentioned back in the suggested supplies on Day 1. I call it the Brain Book Supplement. In it, I keep our travel hard-drive, cash emergency fund, life insurance policies, and anything else that is bulky. This is totally not necessary, but moving these items makes handling the original Brain Book a lot easier.
I cannot overstate the importance of both a fire safe and a shredder! If you are going to invest in a fire safe, make sure it is large enough for your notebook. (The first one I ever got wasn’t – that’s how I know!) If you have one that is small enough to be carried, make sure that it is well hidden.
You can get an inexpensive shredder at Target or Walmart. though, Sam’s Club and Costco carry ones that are larger and more heavy-duty.
When you assemble your notebook, it is helpful to create section dividers and print them on cardstock. Put them in sheet protectors, and attach your index tabs. Avery has come out with great color-coded adhesive divider tabs that you can write on. I found mine at Target, but I saw a larger pack of them at Sam’s Club just the other day.
The cheapest place to buy your notebook is Sam’s Club or Costco. However, they come in either 2-packs or 4-packs depending on what size you get, so split the pack with a friend. Those two places are also the cheapest source of page protectors. The best place I found for multi-sheet page protectors to hold life insurance policies, etc. is Amazon.
Again, it is time consuming, but so worth it to have all of this information organized and readily accessible. If you have any other questions, feel free to leave a comment, and I will try to help!
Mandy White is blessed to be a stay-at-home wife and mother. She and her amazing husband have three amazing kids. She loves to serve others, and her favorite time of year is fall. Unfortunately, in Arizona, fall doesn’t start until November!
Becoming Debt-Free Versus Staying Debt-Free

Guest post from Liz of The Hesitant Housewife
When my husband and I decided to become debt-free, it was a firm decision. We had a plan, a timeline, and a finish line.
We forged ahead day after day, week after week, paycheck after paycheck, and chipped away at the mess we’d gotten ourselves into. We got second jobs, sold cars, sold our home, canceled everything, and said “No” — a lot.
If you’re working on getting out of debt right now, you can probably relate. It’s like a diet, in a way. Once you see those pounds melt away, you become so motivated and you press on, full steam ahead. However, like the old saying goes…
Keeping it off is the key!
We’ve been debt-free (except for our home) with a fully-funded emergency fund, contributing to college funds as well as retirement accounts for nearly six years now. I thought breaking the chains of credit cards and instant satisfaction was difficult during those 18 months, but I wish I had known the hard work had just begun.
Here are the five lessons I’ve learned about staying debt-free.
1. Mourn the spending.
The first few months after becoming debt-free will be exhilarating! After that, however, you will realize how little you can do with cash compared to credit. Talk with your spouse often about your feelings and struggles.
2. Tell Everyone and their dog about your success!
I find telling people about our debt-free lifestyle, the blessings it has bestowed us, and even blogging about it, has held us accountable. You are much less likely to fall back into old habits when people are inspired by your story. It’s like a workout buddy!
3. Make some “debt-free and loving it” friends!
I really struggled with feeling alone in our lifestyle when saying “No” had become the norm. Having a support group to make you realize the sacrifice is worth it will help you stay on track!
4. Make special plans to splurge.
Whether you decide to save for a big splurge like a vacation, a home improvement project, or a date night — spending money on something that makes you feel successful and is really healthy on a regular basis.
5. Find new hobbies and ways of enjoying life
If you were deep in debt, you most likely did things and shopped a lot. Adjusting to being at home and bored can be shocking. Going anywhere except the grocery store can be a bit depressing.
Plan fun, free activities that make your life feel full! The library, new parks, free community events (say “no” to the $4 snow cones!), and even volunteering can help to keep your mind off buying!
Do you have any other tips for STAYING debt-free?
Liz is redefining ‘having it all’ while being a homeschooling housewife. She enjoys finding strength from God’s word, the Today show, talking on the phone with friends, and being real about finances and parenting. She’s blogging about homeschooling and much more over at The Hesitant Housewife.

10 Free Ways to Go Green Today
Guest post from Rebekah of SimplyRebekah.com
Anyone browsing the produce section of a grocery store can tell you that living a green lifestyle can be expensive! You could also add overwhelming, time-consuming, and flat out hard to that list. Yet it doesn’t have to be that way.
Reducing, reusing, and recycling can actually save you money while making a positive impact on the earth and/or your health and it doesn’t have to be hard!
Here are 10 free ways you can go green that are easy enough for you to do today:
1. Visit the Library
Save a tree and borrow your next book instead of buying a new one. While you’re at the library, look into the other programs they have available. With DVDs, story time programs, and Kindles, libraries go way beyond books.
2. Donate Unused Items
You might not shop at thrift stores, but other people do! Instead of throwing out your old clothes or knick-knacks, give someone else the opportunity to reuse them.
3. Unplug Unused Items
Any electronic that is plugged in is using power whether it is turned on or not. Cut back on your electricity use by unplugging that lamp in the guest room, the rarely used second TV, or your empty cellphone charger.
4. Get Some Fresh Air
Sadly, the air in our homes isn’t always as pure as we think it is. Paint, candles, and cleaners are just a few of the things that can be polluting the air in our homes. So open a window or go for a walk and breath deep.
5. Turn Off The Lights
We all know we should turn off the lights when we leave a room, but knowing and doing are two different things. Take a look around the house right now and see if there are any lights you can turn off.
6. Skip The Meat
I would love to be able to afford to eat 100% organic, free range, hormone free, grass fed meat everyday, but I can’t. Perhaps you can’t either. Don’t stress about it. Instead skip the meat all together every once in a while. My family loves black beans & rice and curried lentils.
7. Call for Updated Recycling Information
If you have been living in your neighborhood for several years, then it is possible that the local recycling program has been updated. Perhaps more items are being recycled than you realized.
8. Upcycle An Old T-Shirt
There are hundreds of ideas online for turning an old t-shirt into something fun like a scarf, pillow, skirt, bracelet, or necklace.
9. Open (or Close) The Windows
Depending on the time of day and season, closing or opening your windows and curtains can help keep your home the temperature that you want it. Recently my area experienced an intense heat wave. Despite temperatures in the 90s outside, my AC-free house was a comfortable 72 inside because I closed up all the windows and shades.
10. Educate Yourself
Conquering ignorance is truly the first step towards living a green lifestyle. A good place to start is the dirty dozen, a list of the 12 worst offenders in the produce aisle. Maker sure your organic purchase is worth it by choosing items from the dirty dozen list.
What is your favorite way to go green without spending a lot of money?
Rebekah shares frugal lifestyle tips, going green baby steps, and all of life in between at SimplyRebekah.com.
Organizing Your Important Documents: Property (Part 4)
Missed the other posts in this series? Read them here.
Guest post from Mandy White
Today is Day 4 of Organizing Your Important Documents, and marks our last section: Property Information. On Monday, we will go over some suggestions and tips for putting everything together, but the hard parts of gathering and compiling are nearly through.
Once again, please make sure you are using a secure computer or hand-writing this information. Let’s get started!
Home
Property Deed or Lease Agreement
Mortgage/lease information
Mortgage/lease holder contact information
Monthly payment amount and due date
Start date and term length of mortgage/lease
Home or Rental Insurance policy, and agent contact information
Property Tax information
Inventory of major household items (excluding electronics; be sure to include jewelry, art, and major household appliances like the Central AC/Heating Unit)
Item description, Serial Number, Year purchased
Replacement value and receipt (if you have it)
Warranty and repair information
List of major renovations or upgrades
Project, Date, Cost of projects
Contractor’s contact information (if applicable)
Vehicles
Vehicle Title
Insurance
Insurance company and agent contact information
Policy
COPY of your insurance ID card
Motor Vehicle Division information and COPY of vehicle registration
Note: PLEASE don’t put your actual registration in here! That needs to remain in your vehicle, along with your original insurance ID card.
Maintenance/repair receipts
Any other vehicle documents (such as Bill of Sale)
Computer(s)
Software registrations and key codes
Wi-fi password
Backup of your computer, updated regularly
We were extremely blessed to receive a travel hard-drive for Christmas to use to backup our computer. It is designed for this exact purpose, and came with the software to do so already loaded. However, travel hard-drives aren’t exactly cheap, so watch for sales, or think about requesting one as a gift. If you participate in the rewards programs from the office supply stores, you might want to save up enough points to purchase one.
As great as travel hard-drives are, using flash drives, or even DVD’s are also effective backup methods, and less expensive. You just want to make sure your pictures and data are protected from loss. Because our travel hard-drive is kind of bulky (about the size of a large smart phone), I keep it in a zippered pocket in the “Brain Book Supplement”. This is a second book that is specifically for bulky items. I will give you more information on it tomorrow.
Electronics
Inventory of electronic items
Item description
Serial Number
Year purchased
Replacement value and receipt (if you have it)
Warranty and repair information
If you like, you may download a printable version of this index (for personal use only).
Tomorrow, we will finish up with some final notes and tips for putting everything together.
Mandy White is blessed to be a stay-at-home wife and mother. She and her amazing husband have three amazing kids. She loves to serve others, and her favorite time of year is fall. Unfortunately, in Arizona, fall doesn’t start until November!

Slow Cooker Chipotle Burritos with Homemade Pico de Gallo
Here’s a super easy dinner idea that makes use of that oh-so-versatile slow cooker! The homemade pico de gallo takes this recipe up a notch and is a fantastic way to use up some of those amazing garden tomatoes that are quite prolific right about now.

Guest post from Brigette Shevy
I’m always looking for meals that are healthy and budget-friendly. This one definitely makes the cut!
If you add the optional beans and corn (see the money-saving tip below), you can get a lot of mileage out of two pounds of meat!

Ingredients for Chipotle Burritos
- 2 lbs. boneless, skinless chicken breasts
- 16 oz. salsa
- 1 teaspoon chili powder
- 1 teaspoon dried oregano
- 1 canned chipotle pepper in adobo sauce*
- Flour or corn tortillas
- Pico de gallo (see recipe below or use your favorite store-bought salsa)
- Optional toppings: shredded lettuce, sour cream, shredded cheese, black olives, avocado, etc.
How to Make Chipotle Burritos
1. Place chicken or beef pieces in a 3 or 4-quart crock pot.
2. In a blender, combine the salsa, chili powder, oregano, and chipotle pepper.
3. Blend for a few seconds until well mixed and pour over meat.
4. Cover and cook on low for 6-8 hours.
5. Shred meat with 2 forks.
6. Serve on tortillas with pico de gallo and optional toppings.
Money Saving Tip: To stretch this meal even further, stir in one can drained black beans and 1 cup corn to the cooked, shredded meat. Heat through.
If you don’t have the time or ingredients to make your own homemade Pico de Gallo, you can substitute with your favorite salsa. However, if you want to give it a try, here’s the super simple recipe!

Ingredients for Pico de Gallo
- 2 medium/large tomatoes, chopped
- 1/3 cup chopped sweet onion
- 2-4 Tablespoons chopped fresh cilantro (if you don’t like cilantro, use 1 teaspoon dried oregano)
- 2 garlic cloves
- 1-2 Tablespoons fresh lime (or lemon) juice
- 1 teaspoon chili powder
- ¼ teaspoon sugar
- Salt to taste
- Cayenne pepper or finely chopped jalapeño to taste, optional (I don’t use it)
How to Make Pico de Gallo
1. Combine all ingredients in a bowl, or if you prefer a smoother texture, you may pulse the ingredients together in a blender for a few seconds.
2. Chill for several hours before serving to allow flavors to blend.

These recipes are so easy — and the perfect way to serve a hot meal without heating up your kitchen!

Slow Cooker Chipotle Burritos with Homemade Pico de Gallo
Ingredients
Ingredients for Chipotle Burritos
- 2 lbs. boneless chicken breast
- 16 oz. salsa
- 1 teaspoon chili powder
- 1 teaspoon dried oregano
- 1 can chipotle pepper in adobo sauce*
- Flour or corn tortillas
- Pico de gallo
- shredded lettuce, sour cream, shredded cheese, black olives, avocado, etc. optional
Ingredients for Pico de Gallo
- 2 tomatoes chopped
- 1/3 cup sweet onion chopped
- 3 Tablespoons fresh cilantro chopped
- 2 garlic cloves
- 2 Tablespoons lime juice
- 1 teaspoon chili powder
- ¼ teaspoon sugar
- Salt to taste
- Cayenne pepper or finely chopped jalapeño to taste optional
Instructions
How to Make Chipotle Burritos
- Place chicken or beef pieces in a 3 or 4-quart crock pot.
- In a blender, combine the salsa, chili powder, oregano, and chipotle pepper.
- Blend for a few seconds until well mixed and pour over meat.
- Cover and cook on low for 6-8 hours.
- Shred meat with 2 forks.
- Serve on tortillas with pico de gallo and optional toppings.
How to Make Pico de Gallo
- Combine all ingredients in a bowl, or if you prefer a smoother texture, you may pulse the ingredients together in a blender for a few seconds.
- Chill for several hours before serving to allow flavors to blend.
Notes
Love this recipe?
Make sure to share and save it on your favorite platform below!
Brigette is a full-time wife and mother who is blessed with three amazing bundles of energy (ages 5, 3 and 1). She enjoys music, experimenting in the kitchen, homeschooling her children, finding great deals, long-distance running, and anything chocolate.
FREE One Week Menu Plan!
Done-For-You Dinner Recipes With Simple Ingredients and a Grocery Shopping List!