


These freezer-friendly breakfast burritos are perfect for busy weekday mornings or a quick snack on the go. They are packed with protein, super frugal, and SO easy to make!

You’ll love having these Freezer Breakfast Burritos on Hand
My husband loves McDonald’s Breakfast Burritos and I wanted to create a homemade version he’d like as well. These Freezer-Friendly Breakfast Burritos were my first attempt and Jesse absolutely loved them!
I’m not a huge breakfast burrito fan, but I have to say, I think this recipe is a winner. In fact, I can see myself sneaking these from the freezer for a mid-morning snack. 🙂
They are perfect for breakfast on the go, and they are probably loads healthier than the McDonald’s Breakfast Burritos.
One thing is for sure, they are significantly less expensive — especially if you can get some of the ingredients on sale.

Best Frozen Breakfast Burrito Ingredients
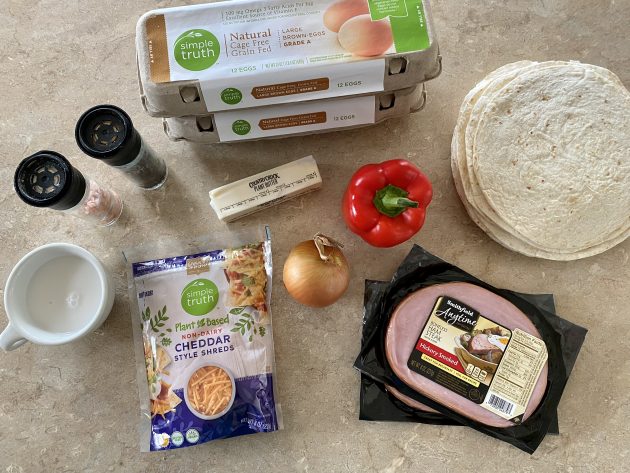
- 1/4 cup butter
- 1/3 cup chopped onion
- 1/3 cup chopped green pepper
- 18 eggs
- 1/2 cup milk
- 1 cup chopped ham
- 1 teaspoon salt
- 1/2 teaspoon pepper
- 2 cups shredded cheddar cheese
- 20 flour tortillas
How to Make Breakfast Burritos to Freeze
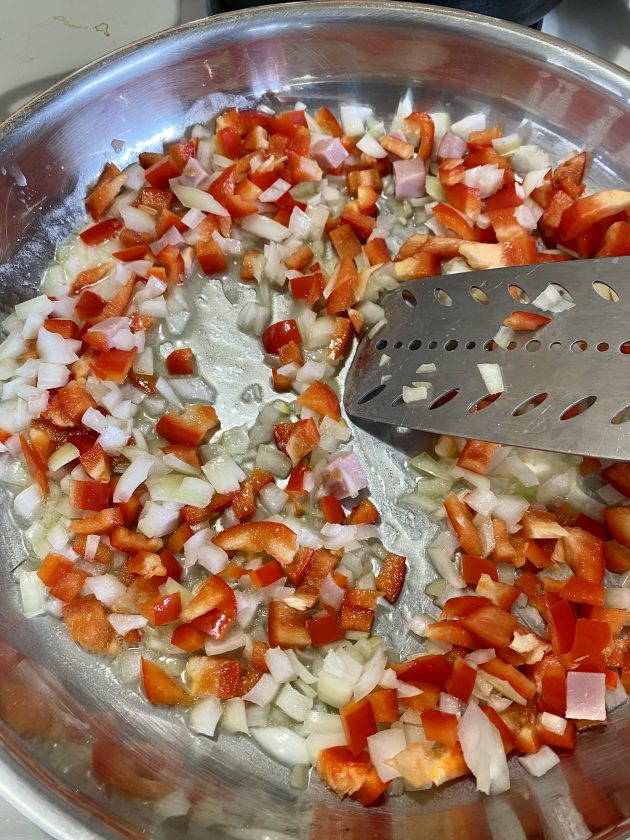
1. Saute onions and green pepper in butter.
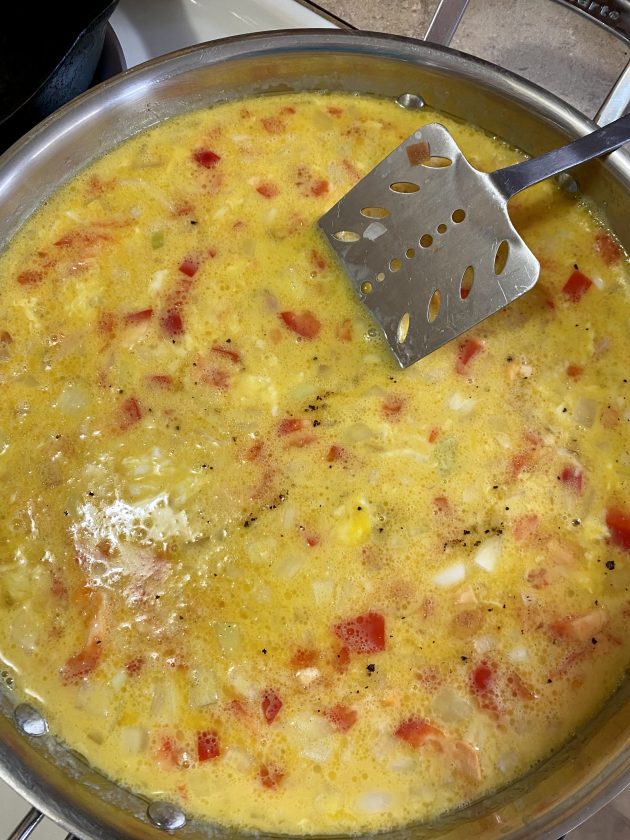
2. Beat eggs and milk together and pour into the skillet with the onions and peppers.

3. Add the ham, salt and pepper. Cook, stirring occasionally, until eggs are set.
4. Mix in cheese and let melt.

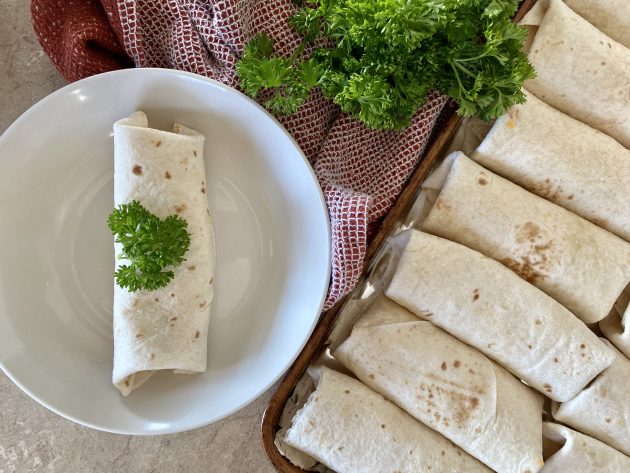
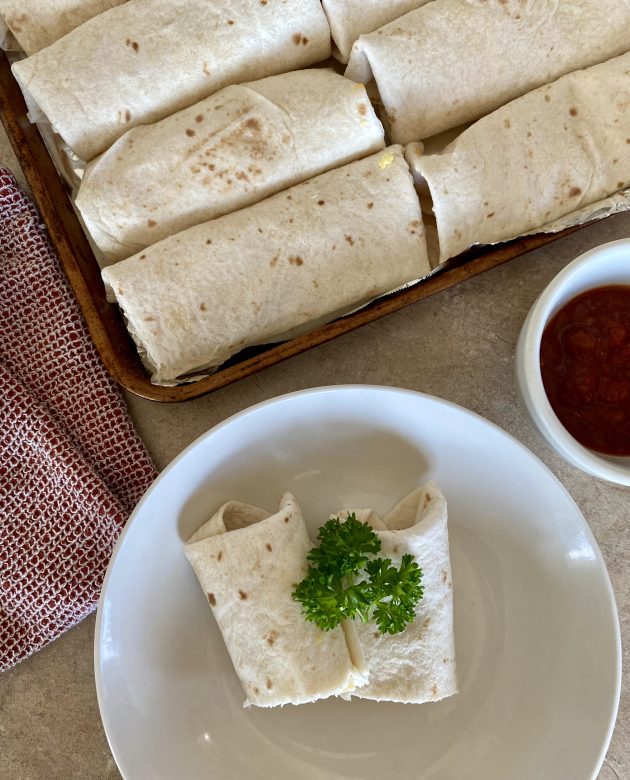
5. Scoop 1/2 cup egg mixture onto each tortilla.

6. Fold ends under and roll up.

7. Freeze (see instructions below) or put all burritos in a baking dish, top with extra cheese (if you’d like) and bake at 350º for 20 minutes or until heated through.
8. Serve with salsa.

How to freeze Breakfast Burritos
1. Wrap each burrito in a paper towel and then in a sheet of aluminum foil foil.
2. Seal foil tightly and place in freezer bags.
3. When the bag is full, remove all air, seal, and freeze.
How to reheat Freezer-Friendly Breakfast Burritos
Remove the foil and put the paper-towel-wrapped burrito in the microwave for about 1 minute.
Serve with salsa.
Breakfast Burrito Meal Prep Tips
These burritos go together so quickly, as long as you have the ingredients on hand.
Stock up on eggs, cheese, and tortillas, and use whatever breakfast meat you already have in the house (bacon and sausage taste wonderful too!)
You could even get your kids involved and create an assembly line — one person adds the filling, one wraps them up, and one preps them for the freezer!

Breakfast Burritos to Freeze
Ingredients
- 1/4 cup butter
- 1/3 cup chopped onion
- 1/3 cup green pepper chopped
- 18 eggs
- 1/2 cup milk
- 1 cup ham diced
- 1 teaspoon salt
- 1/2 teaspoon pepper
- 2 cups cheddar cheese shredded
- 20 flour tortillas
Instructions
To Assemble
- Saute onions and green pepper in butter.
- Beat eggs and milk together and pour into the skillet with the onions and peppers.
- Add the ham, salt and pepper. Cook, stirring occasionally, until eggs are set.
- Mix in cheese and let melt.
- Scoop 1/2 cup egg mixture onto each tortilla.
- Fold ends under and roll up.
- Freeze (see instructions below) or put all burritos in a baking dish, top with extra cheese (if you’d like) and bake at 350º for 20 minutes or until heated through.
- Serve with salsa.
To Freeze
- Wrap each burrito in a paper towel and then in a sheet of aluminum foil foil.
- Seal foil tightly and place in freezer bags.
- When the bag is full, remove all air, seal, and freeze.
To Reheat
- Remove the foil and put the paper-towel-wrapped burrito in the microwave for about 1 minute.
- Serve with salsa.
Nutrition
Love this recipe?
Make sure to share and save it on your favorite platform below!
FREE 50+ Easy and Cheap Breakfast Ideas!!
Mornings just got so much easier with this FREE list of 50+ Easy & Cheap Breakfast Ideas for Busy Weekday Mornings!

Do-It-Yourself Experiment #5: Appliqued Flower Tee (+ free downloadable petal pattern!)
Do-It-Yourself Experiment #5: Appliqued Flower Tee (+ free downloadable petal pattern!)
When I chose the 12 Do-It-Yourself projects to complete this year, I tried to put a few on the list that were a little outside my “comfort zone”. Meaning, they’d require skills I usually didn’t exercise or typically wouldn’t profess to have.
The Appliqued Flower Tee was one such project. It looked beautiful, but I wasn’t so sure if I could actually pull it off — especially because I didn’t have a pattern kit.

But I’m excited to say that I actually did it! Okay, so mine might not look as pretty as the original, but I’m still really encouraged that I did something crafty all on my own.

I was planning to do the big yo-yo in the center, but I didn’t have enough fabric scraps left to pull it off. So I just did three small ones. I don’t like it quite as much, but Kaitlynn was happy with it.
(If you’re a professional seamstress or naturally crafty person, you are more than welcome to laugh at my feeble attempts, bad stitchery and the fact that I forgot to put backing on the fabric. Me? I’m just thrilled you might be able to tell it’s a flower and that Kaitlynn could actually wear this in public… unlike most of my other failed crafty projects! There may yet be hope for people like me. :))
Free Petal Pattern + Instructions
Want to make your own appliqued flower tee? Joy from FiveJs.com put together a free downloadable pattern for the flower petals if you’re like me and can’t just draw something freehand like that. You can download the free petal pattern here. The instructions for completing this project are here.
And now I’m all inspired to try doing more applique because I really enjoyed this project, much to my surprise. Anyone have links to fun free patterns online? I’m thinking of trying this one next. But I’d welcome other suggestions.
In case you missed it, here’s the list of the 12 Do-It-Yourself Projects I Plan to Try in 2011:
January: Make From-Scratch Chai Tea
February: Make Homemade Dishwashing Detergent
March: Make Homemade Hamburger Buns
April: Make Homemade Laundry Soap
May: Make Appliqued Flower TeeJune: Make Homemade Hummus
July: Make Freezer Jam
August: Make Homemade Soap
September: Sew a Rag Quilt
October: Make Homemade Apple Butter
November: Make Artisan Bread in Five Minutes a Day
December: Make Homemade Marshmallows
Dillon’s and Dollar Tree Shopping Trips
In addition to stopping at Walgreens, I also made a quick trip into Dillon’s and the Dollar Tree today. Here’s what I bought:

Dollar Tree — Eight different kinds of Nature’s Own breads and buns for $1 per package.

Dillon’s — Organic plain yogurt marked down to $1.59, two packages of deli ham for $1.29 each and one box of Kashi cereal for $0.99 (on sale for $2.99, used $2/1 coupon from Recyclebank.)
Do-It-Yourself: Homemade Tinted Lip Gloss

Kojo Designs has a great post on how to make your own tinted lip gloss. I really want to try this!
Do you have a fun and frugal DIY idea to share? I’d love to hear about it! Read the submission guidelines and submit it here.
It’s the Simple Things

Guest post by Brandy Chandler at Team Chandler
It seems in this hurried world that we rush from this activity to that, making sure our children are “well rounded” and have the opportunity to have fun and to make new friends. Even if we don’t spend money on lessons or sports, we might still find ourselves spending gas money taking them to and from the park or spending buying lunches at McDonalds while they play in the playzone.
I’m guilty! Guilty of trying too hard to provide my child with various opportunities without just giving him time to be a kid. Time to just play.
Recently, we had a “family night”. Typically, this would involve a special (yet quick) meal, movies, games and maybe a special treat. While I pride myself on keeping this way under budget, it hit me: “Family night” isn’t about a well-planned time with one another; it’s about embracing the time to do something spontaneous (yet frugal).
When I asked my 5-year-old what he wanted to do for family night, his simple answer “Play hide and seek”, “watch Wild Kratts with me”, etc. I was given a gentle reminder that sometimes what we, as parents, value as important may not be all that important at all.
It’s about that undivided time with our children doing things they want to in the moment. It’s about saying “Yes” to that 10th game of tic-tac-toe when the dishes need to be done. It’s about saying “Yes” when asked to read that favorite story again when you are ready to drift to sleep. These are the memories that will last. The memories of a mom and dad who were there for the little things.
That is priceless.
Brandy is a work from home mom of two who spends her time homeschooling her oldest child, training for half marathons, couponing and blogging about her families adventures at Team Chandler.
How to Make Money Blogging: 5 Tips for Writing Top-Notch Content
How to Make Money Blogging: 5 Tips for Writing Top-Notch Content


If you missed it, be sure to read: 5 Necessary Traits of Successful Bloggers (Part 1) and 5 Ways to Set Up Your Blog for Success (Part 2).
1. Be You
One of the greatest hindrances to successful blogging is trying to be someone else. You are not someone else. You will never be someone else. You are you!
You are unique and one-of-a-kind. You have amazing gifts and talents that many people don’t. You have a perspective on life that no one else in the whole wide world does, because no one else is you. Learn from other bloggers, but figure out who you are and be you.
2. Be Confident
It’s easy to become discouraged and to feel completely inadequate when you see other bloggers who seem to have more creativity, a cuter blog, a more-frequently-updated blog, more traffic, more comments, more Facebook followers and on and on it goes. You can spend so much time worrying about not measuring up that you completely lose sight of what you have to offer as a blogger.
As I used to tell a dear friend of mine who often felt incompetent as a blogger (and who has now gone on to create a wildly successful blog), “Don’t be mouse-y!” Any time spent sitting and sulking about your lack of ability or worrying about what people will think of you is time that is wasted.
3. Be Engaging
Interact with your readers and respond to their comments and emails as much as you can. Ask your readers for their advice and input and listen to what they have to say. Your readers want to know that you value them. And you should, because without them, you’d have no audience to write for!
Don’t be afraid to try new things — even if they fail. Don’t always post the same things in the same way. Throw in some off-topic posts, photos or videos every now and then. Occasional surprises and unexpected posts will help keep things exciting.
4. Be Real
Readers aren’t looking for perfectionism, they are looking for real-ness. We all make mistakes and we all have our areas we struggle with. Don’t try to pretend that you have all your ducks in an alphabetized row.
Be honest, be open and be vulnerable (when appropriate). People will connect with authenticity but they will run from hypocrisy.
5. Be a Perfectionist
This might seem to fly in the face of being real, but I’m not talking about being perfect as a person, but about being thorough and detailed as a blogger. Frequent typos and blatant grammar errors are irritating.
Sloppiness will never get you far. Always proof your posts at least twice before publishing them. Constantly seek to improve as a writer. Read books and blogs written by good writers. Critique your writing and ask others to do the same.
Please, please, please do not use massive paragraphs without paragraph breaks. This is one of the easiest ways to turn people off from reading your blog. Blog paragraphs should be no more than a few lines long so that people can read them easily on a computer screen.
Three more don’ts: Don’t center the text. Don’t use exclamation points, all caps or ellipses excessively. Don’t use multiple fonts.
Use paragraph headings or points in articles that are longer than a few paragraphs. Include graphics and/or photos on most posts. And did I mention how important it is to proof-read your posts before hitting publish? 🙂
Bonus Point: Be Careful
If you share something in a public forum like your blog, you can never completely take it back. Always assume everyone in the whole world may read what you write.
Don’t use names, photos or other identifying information without thinking carefully about the potential ramifications. It’s better to be safe, than sorry.
What about you? What are your best suggestions for creating top-notch content?
Next week we’ll talk about five ways to increase your blog’s readership.
Save Money and Have Fun By Starting a Frugal Club
 Guest post by Jennifer
In 2009 some friends and I found that we were like-minded and wanted to try new ways of saving money. We all especially enjoy using more natural products and thought we could make some of them inexpensively ourselves. So we started Frugal Club and have tried to meet most months and work on a variety of projects.
Recently one of our members was interviewed by our hometown magazine, Rochester Magazine. Now more people in our town have asked us about the club!
How to start your own Frugal Club:
*Find friends who are interested in a frugal lifestyle.
* Get together and talk about what everyone is already doing to save money.
* Brainstorm ideas of what you would like to do to save money/get ideas from Money Saving Mom.
* Have someone volunteer to lead or organize each project you decide to do.
* Have people bring what they already have for the project and divide the cost of what needs to be purchased.
* Get together and try some of the projects.
* Rotate homes for hosting and bringing treats.
* After finishing a project, evaluate if the project was beneficial and if it saved money.
* Have fun!
Projects we have done as part of our Frugal Club:
* Made and then exchanged seasoning/mixes (taco seasoning, chai tea, popcorn seasoning, oatmeal packets).
* Traded items we didn’t need or wanted to re-gift (see this post on a Stockpile Swap Party for more ideas).
* Made personal products (facials, shampoo, deodorant, cocoa lip balm).
* Made greeting cards from scrap paper and magazines.
* Had a holiday cookie exchange.
* Shared a CSA vegetable box together.
* Made window cleaner, laundry detergent and dishwasher detergent.
* Made dish scrubbers out of onion mesh bags.
* Went to garage sales together in the summer
* Discussed freezer meals/cooking in bulk/purchased meat in bulk and split it.
* Made homemade air fresheners.
* Discussed frugal baby things (cloth diapers, cloth wipes).
* Exchanged or lent books we already own.
* Made fire starters for camping.
* Rented an aerator and did multiple yards.
* Shared packets of seeds for our gardens.
* Hauled our own trash/recycling.
* Exchanged coupons.
* Picked strawberries.
Projects we plan to do in our Frugal Club:
* Try our hand at home haircuts and go to a cosmetology school for inexpensive hair cuts.
* Make candles and lotions.
* Wash each others’ windows.
* Help each other with time consuming yard work (trimming bushes)
* Plant herbs.
* Make “sandwich bags” out of cloth.
* Make soap when we visit a goat farm in May.
Jenny and her friends/current Frugal Club members: Jill, Beth, Carla, Kristy & Dana all live in Rochester, MN. In our group we have five nurses and one librarian. We enjoy learning from each other and of course talking! In the last year, three babies have joined the Frugal Club so our meetings are a little different than they used to be! 🙂
Ask the Readers: Is it a better deal to buy disposable batteries or invest in rechargeable batteries?
Ask the Readers: Is it a better deal to buy disposable batteries or invest in rechargeable batteries?

Today’s question is from Heather:
I’m curious to know if anyone has done a cost comparison over time with buying batteries (using coupons, of course!) to using rechargeable batteries. We have three children and we go through a Costco-sized batch of batteries within a couple of months. I’m considering investing in rechargeable batteries but wondering if that would really save any money. Thoughts?
Do you have a question you’d like to ask Money Saving Mom® readers? Read the submission guidelines and submit it here.
2011 Do-It-Yourself Experiment #4: Homemade Powdered Laundry Soap
2011 Do-It-Yourself Experiment #4: Homemade Powdered Laundry Soap

A few years ago, I attempted making liquid laundry detergent. The entire recipe bombed and I ended up throwing it out.
Ever since then, I’ve been leery of trying homemade laundry detergent again. But, after all the rave reviews many of you have emailed in, I worked up my courage to try again. And I’m so glad I did because I had a much better experience this time!

I used the recipe I found from DIY Natural. It only takes three ingredients and seemed pretty fail-proof!
Homemade Powdered Laundry Soap
- 1 bar of soap (Ivory, ZOTE, Fels-Naptha)
- 1 cup of borax
- 1 cup of washing soda

Shave or grate the bar of soap.

Mix the rest of the ingredients together. Thoroughly stir together for about five minutes.

Yields 32-64 loads, depending upon whether you use one or two Tablespoons per load. I’ll report back soon to let you know if I think this would work for our family long-term. It seems promising!
In case you missed it, here’s the list of the 12 Do-It-Yourself Projects I Plan to Try in 2011:
January: Make From-Scratch Chai Tea
February: Make Homemade Dishwashing Detergent
March: Make Homemade Hamburger Buns
April: Make Homemade Laundry Soap (I did attempt this one time before, but it was with a pre-made mix someone gave me. So I’m going to try again — this time completely from scratch!)
May: Make Appliqued Flower Tee
June: Make Homemade Hummus
July: Make Freezer Jam
August: Make Homemade Soap
September: Sew a Rag Quilt
October: Make Homemade Apple Butter
November: Make Artisan Bread in Five Minutes a Day
December: Make Homemade Marshmallows
Have you attempted any new do-it-yourself projects recently? I’d love to hear how they went!
Ask Jesse: What financial aspects should I consider when becoming a stay-at-home mom?
Ask Jesse: What financial aspects should I consider when becoming a stay-at-home mom?

I have been thinking about becoming a stay-at-home mom. I have a 1-year-old and a 3-year-old. I am going to start my budget to see if we can afford to live off of one income. My parents informed me that I would not be able to contribute to an IRA since I would have no income. What other things should I take into consideration when making this decision? I know I will be saving on gas, work clothes, daycare, etc. What else am I missing? Thanks so much! -Lori
Staying home and devoting your life to nurturing and raising the next generation is a wonderful thing. That said, many who want to make the jump from working outside of the home full-time to working inside the home full-time are realistically not financially able to do so.
If you are thinking you may be able to do it, what I recommend you do is to first sit down with your husband and create a written budget based upon his income alone. You may need to cut back, eliminate or restructure some of your budget categories and expenses in order to accomplish this.
Then, continue working while you attempt to live only on your husband’s income and see if you can pay for all your necessary expenses. If not, go back through your budget and see if there are other areas you can cut or expenses you can reduce.
While you continue to work, bank everything you earn towards an Emergency Fund. This will not only provide a training session on how to make it on one income, it will also give you a good savings cushion for you to draw against if you need to once you quit working.
Now, pertaining to the IRA contributions you would supposedly miss out on, non-working spouses can still contribute to an IRA through the special spousal contribution allowance even though they do not have have an earned income. SmartMoney Magazine has a good piece explaining the contribution limits to IRAs for non-working spouses as well as the deductibility of the contributions to traditional IRAs. Here’s a snippet of the obviously-outdated article:
A nonworking spouse can make a deductible IRA contribution of up to $5,000 for 2010 ($6,000 if age 50 or older as of 12/31/10) as long as the couple files a joint return, and the working spouse has enough earned income to cover the contribution. However, the deductibility of the nonworking spouse’s contribution for 2010 is phased out for couples with adjusted gross income (AGI) between $167,000 and $177,000, provided that the working spouse is covered by a qualified retirement plan (via a job or self-employment). The working spouse’s ability to make a deductible contribution for 2010 is phased out between AGI of $89,000 and $109,000.
Contributions to ROTH IRAs are not deductible because they are made after tax; as such, you do not have to pay taxes on the back end when getting money out.
If you’ve transitioned from working outside the home to staying home full-time or part-time, I’d love to hear your story on how you did that.
Jesse Paine is a licensed attorney who owns his own law firm. He’s married to Crystal and is the numbers nerd of the MoneySavingMom.com team! If you have a question you’d like him to answer in a future column, you can submit it here.
The content of this column intended for informational use only and is not to be construed as providing legal, investing, accounting or other professional advice. Your situation is factually specific and you should accordingly seek qualified professional counsel concerning your specific legal, investing or accounting needs.
OVER-SPENDING EVERY SINGLE MONTH?Grab these FREE Budgeting Sheets!
Click here to download!
Do-It-Yourself: Homemade Foaming Hand Soap

Live Renewed shows you how to make your own foaming hand soap.
Ditching the Sippy Cups
This doesn’t have much to do with saving money (unless you count the money saved on buying sippy cups!), but so many of you asked how we’ve taught Silas to drink from a regular cup yesterday that, just for fun, I did a short video last night explaining how we’ve taught our children to drink from regular cups instead of sippy cups.

Reader Testimonial: Our Most Sucessful Garage Sale Ever
Amy emailed in the following testimonial which I thought many of you would enjoy reading:
I just wanted to let you know that we just had our most successful garage sale ever after reading your Ten Tips for a Successful Garage Sale post. For starters, our philosophy was different because we realized we had already gotten our use out of each item and so were not holding onto the “but this is what we paid for it new” syndrome.
After the sale, we also realized that a clean and empty garage is definitely worth our efforts to have the sale. (The garage had been full after our move back to Texas two years ago. We began to realize if all that stuff had not been used in that long, we really do not need it.) I think this sale proved a successful teaching tool for all of us in the blessings of minimalism. We all love jumping around freely in the newly-emptied garage!
How We Did It
We started the sale on Friday, so Thursday night we listed the sale on Craigslist. My husband created a public map on Google Maps, with directions to our house from the nearest major cross-roads. In the description of the Destination (our house), he posted sale hours and a long list of items we had for sale. It was the same text that was in the Craigslist post, but including the link in the post made it very easy for folks to find us.
We also posted signs like we had in the past, but most people said they heard about us and found us because of Craigslist and the map we placed in the ad. Very effective, indeed.
The second day of our sale we updated our Craigslist and Google Maps postings and stapled smaller, brightly colored signs to the original signs that said, “50% off Sat. 7:30 a.m.” Wow! That worked!
We sold most the remaining big stuff within minutes of opening the garage door. All the little stuff was sold off in steady streams until about 10:30 a.m., at which time we had our children take turns holding up a sign at our street corner saying, “90% off — many items FREE!”
People came in droves after that! We got rid of just about everything very quickly. It was all said and done by about 12:30 p.m..
Lessons Learned
We included our children the sale and let them set up a table of their own. One of our sons was originally miffed because he sold some of his things for way less than he wanted to, but he quickly learned the art of strategic marketing! So, all was good in the end.
The children also sold donuts and bottled waters. Those were a huge hit — and a big profit-maker, earning a dollar per donut or bottled water. They made a good return for their efforts, and were very happy about it. They learned effective salesmanship and how to talk with a variety of people.
Afterward, we had a long talk about rejoicing and giving thanks for the 90% God lets us keep from our earnings and we were able to give a much larger than usual tithe on Easter Sunday morning which gave us all so much joy! -Amy
31 Weeks to a Better Grocery Budget Video Series: How to Get Started Playing the Drugstore Game
31 Weeks to a Better Grocery Budget Video Series: How to Get Started Playing the Drugstore Game
This Week’s Menu

Smoothies for our breakfast and reading time… Kaitlynn’s such a ham!
We have a busy week this week, so I’m keeping dinners very simple. And I’m thankful our freezer is starting to fill up which relieves me from having to cook as much!
Breakfasts
Cantaloupe Strawberry Smoothies (This was a crazy smoothie creation I came up with on the fly this morning. Everyone drank them, but they weren’t a big hit!), Hard-boiled eggs
Cereal, Pick-Me-Up Smoothies
Waffles (from the freezer), scrambled eggs, fruit
Steel Cut Oats with raw sugar and milk
Breakfast Burritos, Fruit
French Toast Casserole (from the freezer), FruitLunches
Leftovers x 3
Apple Peanut Butter sandwiches, carrot sticks
Beans & Rice with cheese, peas, fruit
Mac & Cheese, carrot sticks
Cheese Quesadillas, fruitSnacks
Whole Wheat Chocolate Chip Oatmeal Cookies
Popcorn
Fruit/VeggiesDinners
Marinated chicken, wild rice, frozen veggies, fruit
Steak on the grill, frozen veggies
Tilapia, rice, steamed broccoli, fruit salad
Barbecued meatballs, sweet potatoes, frozen veggies, fruit
Dinner at church
Dinner out
Dinner with extended familyFreezer-Cooking-In-An-Hour Plan (I’ll share pictures/details on how this goes on Thursday!)
Breakfast Burritos
Southwest Roll-Ups
Lighter Chocolate Chip Pancakes
 (You thought my floors weren’t too bad? Well, take a peek at my countertops before I’ve cleaned the kitchen in the morning. They always need serious help after breakfast!)
What’s on your menu this week?