Published: by Crystal Paine on | This post may contain affiliate links. Read my disclosure policy here.
I loved the way you posted your “goals” (what to read, what to make, etc.) last year instead of New Year’s Resolutions and I’ve loved reading how you have checked them off each month. I want to be able to do this for 2012 and was thinking it might be a good topic for you to post a “how to” or tutorial as to how you came up with your list of things to help others “plan” their upcoming year. -Kris
Setting realistic, achievable goals on a yearly basis has been life-changing for me. Not only am I much more productive, I’m also living with much more intention. Here’s how I recommend going about goal-setting:
1. Determine Your Priorities
It’s pretty near impossible to decide what route you need to take if you don’t know what your final destination is supposed to be! Therefore, goal-setting and living an intentional life requires you to first know what your priorities are.
So, before you set down and make out a list of goals for 2012, first spend some time creating a list of five or six priorities in your life. I’ve written more about determining your priorities and share my own current priorities in this post here.
2. Create a List of Focus Areas
Once you have your list of priorities written out, it’s time to get more practical. Take each area of priority and determine 4-5 specific things you want to focus on for that priority item.
It’s great to have goals, but it’s hard to actually accomplish them unless you break them down into bite-sized pieces. A big goal can seem overwhelming and daunting as a whole, but when broken down into small pieces, it becomes much more doable.
When you break your goal down to a weekly bite-sized piece, you are better able to know exactly what you need to do to stay on track. If you want to read 24 books next year, you know you’ll need to read two books per month, or half a book each week. That boils down to around a chapter per day, give or take. That’s much more concrete and doable than a big audacious goal of reading 24 books in a year.
4. Set an End Date
I like to set yearly goals, but some goals are too big or too small for a year’s time frame. Consider how much time you realistically think it would take to accomplish your goal and then set a date to have it accomplished.
You can always change the date, if need be, but having a goal finish date gives you momentum and drive. And you just might find yourself picking up speed the closer you get to the finish line!
5. Track Your Progress
Accountability is key to be successful in following through with your goals. My husband and I review our financial goals on a monthly basis and I review my personal goals at least every few weeks. I’ve also found that the public accountability of blogging my goals and process is also amazingly motivating. 🙂
Plan a monthly accountability meeting with your spouse or accountability partner, write it down on your calendar, and don’t deter from it, no matter how tempted you are to slack off. I promise it will be worth it!
Tomorrow, I’ll post a downloadable goal sheet you can customize and print to create your priorities list, break your goals down, and track your progress. And later this week, I’ll be sharing more of my goals for 2012.
What process do you use for goal-setting? What helps to keep you on track and motivated? I’d love to hear!
This plan worked very well for me, and while I didn’t follow it exactly, it motivated me to read more and read some great books that I likely wouldn’t have picked up and read had they not been on my list. I still have 2.5 books on the list to finish before the year ends, but I’m hopeful I’ll actually be able to cross all of them off my list by December 31!
I also finished quite a few books that were not on my list. All in all, I ended up reading 56 books in 2011 (see the full list here), plus the books I read aloud to the children (see the full list of books we read aloud in 2011 here). It’s amazing how committing to read at least a chapter or two each day personally as well as a few chapters per weekday aloud to the children really adds up over time!
Since the 24 book list idea worked so well, I decided to stick with it again this year. After surveying my bookshelf of books I really want to read (yes, I have three entire shelves of books on a bookshelf in our basement with books I haven’t read yet and really want to read!), I narrowed the stack down to 24 books.
Here’s my list of 24 books I plan to read in 2012:
Later this week, I’ll be sharing a downloadable list you can print and fill out with the books you want to read this year. I’ll also be sharing a list of audiobooks I’m planning to listen to and my top five favorite books I read this past year.
What books are you hoping to read in 2012? I’d love to hear!
Published: by Crystal Paine on | This post may contain affiliate links. Read my disclosure policy here.
I’m so excited!
The Amazon order page for The Money Saving Mom®’s Budget got updated over Christmas and now you can click on the graphic to see some of the inside pages of my book. I love how the final layout turned out and my hat is off to the team of folks at Simon & Schuster who worked tirelessly to make the finished product one I was really happy with.
Whew! It’s hard to keep your healthy routines going during the busy holiday season.
However, don’t use this as an excuse to skip working out, eating healthy, and taking care of yourself. To help you out, here are a few tips for finding a balance between keeping yourself on track health wise and understanding that your normal routine may not work:
1. Get enough sleep.
I can’t stress this enough. If your sleep suffers, everything else will suffer. This is one area I need to work on myself–it is so tempting to stay up to get everything done, but I have to remind myself I’m just “stealing” quality time from tomorrow.
2. Drink lots of water.
It’s easy to indulge in Peppermint Mocha’s from Starbucks and rich hot chocolates right now, but remember to continue to drink water.
3. Eat a healthy breakfast.
Might as well start each day off with a home run this season. A few suggestions: oatmeal with some dried fruit, a veggie omelet, or sourdough toast with peanut butter and a piece of fruit on the side. All three of these will fill you up while keeping your calorie intake at a reasonable breakfast level.
4. Get a little exercise everyday.
Maybe you can’t make your normal fitness routine work in all the busyness right now, but you can do something each day. Open your front door, walk for 15 minutes, turn around and walk back. If you’re traveling, use the hotel gym or see if a local Y or health club will give you a free or heavily-discounted day pass.
Worst case scenario: do 10 push ups, 25 sit ups, and 15 squats as soon as you wake up and right before bed (that will take you no more than 10 minutes total). If you do something, even if it’s not much, it won’t come as a shock to your body (or your mind) when you pick back up exercising regularly in January.
Finally, don’t be too hard on yourself. It is a crazy time of year, people are busy, schedules are full. Just try your best to do a few things to keep yourself on track and if you mess up one day, start fresh the next!
Pam is a work-at-home mom of two (ages 5 and 7). She enjoys healthy living (nutrition, exercise, etc.), learning, saving money, and having fun! She blogs at Save Money, Be Happy.
Published: by Crystal Paine on | This post may contain affiliate links. Read my disclosure policy here.
Tomorrow is Christmas Eve, so today it’s time to get our homes in shape for company or so that we can enjoy our family and not have to worry about stepping over dirty laundry piles or tripping on spilled milk. If you’re feeling overwhelmed by all you have to do, I’m here to help!
I’ve got a two-hour step-by-step plan to help you get all the major cleaning done so that your home looks presentable for your guests tomorrow:
Two-Hour House-Cleaning Plan
1. Start a load of laundry (3 minutes).
2. Set the timer for 15 minutes and take a laundry basket and a trash bag and go through each room in your home. Quickly straighten, pick up, and put away everything that’s out of place. Put all trash in the trash bag and put everything that doesn’t go in that room in the laundry basket (15 minutes).
3. Put away all contents in the laundry basket and throw out the trash (5 minutes).
4. Head to the kitchen and load the dishwasher or hand wash the dishes (15 minutes).
5. Switch the laundry from the washer to the dryer and start another load in the washer (2 minutes).
6. Sweep or vacuum your kitchen floor and wipe down your countertops (10 minutes).
7. Take some toilet cleaner and go squirt it in all your toilets (2 minutes).
8. Take some window cleaner and spot clean the main glass windows/doors/mirrors (3 minutes).
9. Take a dust rag and quickly dust in the main rooms of your home (10 minutes).
10. Vacuum all the major traffic areas in your home (20 minutes).
11. Head back to the bathrooms wipe down the toilet, sinks, floor, and bathtub/shower. Change the towels (20 minutes).
12. Switch the laundry from the washer to the dryer and fold the clean laundry (15 minutes).
13. Light a candle or simmer some potpourri on the stove and enjoy your freshly-cleaned home!
Free Downloadable Checklist
Like to cross off lists? Download the free 2-Hour House-Cleaning Checklist to keep you on track and remind you of what you’re supposed to be doing next. Now you have no excuse for getting distracted. 🙂
3 Tips for House-Cleaning Success
1. Set the Timer
A timer works wonders in helping me stay focused and work quickly. Plus, it makes it seem more like a game to see if I can finish my project before the timer goes off!
2. Turn on Some Music
It’s much more fun to work when you’re accompanied by cheerful, upbeat music.
3. Stay Focused
Don’t worry about the next thing on the list or your overwhelming to-do list. Just focus on the project at hand until the timer goes off. Then, move on to the next project.
If your house is a complete disaster, it might need more than two hours. However, remember not to get too hung up on making it perfect.
Just work quickly and efficiently and do the best you can do in the time you have. Even if your house isn’t pristine after two hours of work, I’m sure it will at least look quite a bit better than it did when you started. 🙂
Published: by Crystal Paine on | This post may contain affiliate links. Read my disclosure policy here.
Delicious food is one of the best things about Christmas, in my opinion! But who wants to slave away in the kitchen all day on Christmas Eve or Christmas Day?
Here are a some ideas of things you can make ahead of time and freeze to make your Christmas meal preparations smoother and leave you more time to just savor the season:
1. Cookie Dough
Make up a double or triple batch of cookie dough and keep it in the freezer to give as gifts or to use when company drops by unexpectedly or you need a treat to take to a gathering at the last minute. Here’s one of my favorite Chocolate Chip Cookie recipes.
This year, I made biscuit dough ahead of time and stuck it in the freezer to be able to quickly make Brown Sugar Biscuit Twists for a Christmas Brunch at my family’s house the day after Christmas.
4. Scone Mixes
I put together the dry ingredients from the Glazed Cinnamon Scone recipe and froze them earlier this month. For Christmas Eve breakfast, we’re having scones, scrambled eggs, and juice. It will be a snap to put these together since I already have the dry ingredients measured out.
5. Scone Dough
If you want to really speed up prep time for scones, you can also make the dough up ahead of time and cut the scones and flash freeze them. Just pull them out, thaw, and bake to have fresh scones without almost zero effort! Our very favorite scone recipe is this Pumpkin Scone recipe.
Looking for a delicious roll recipe that can be made ahead and frozen? Check out our family’s Butterhorn recipe. It’s a little time-intensive, but oh so worth it!
8. Christmas Candy
What’s Christmas without candy? My World’s Easiest Christmas Candy recipe is a winner–and it can be made ahead and frozen (if any of it lasts that long!)
Homemade drink mixes are great to give as gifts or to have on hand to serve at Christmas get-togethers. Plus, you can keep them for months in the freezer!
What are some of your favorite Christmas foods to make ahead and freeze? Share the recipe links in the comments!
I was gifted this really cute hot chocolate kit last year from a friend. Hot chocolate is one of my favorite things to drink in the winter so I instantly fell in love with this idea and replicated it this holiday season. A Hot Chocolate Card Kit is the perfect little gift to hand out to your neighbors, co-workers, or friends.
Supplies:
scrapbook paper (1 piece in each size: 8.5″ x 5.5″, 3.75″ x 5.25″ and 3.75″ x 1.75″)
ribbon
adhesive
hole punch
stamps and/or stickers and/or embellishments
hot chocolate packet
candy cane
Step 1: Score your largest piece of paper (8.5″ x 5.5″) at the 4″ mark and the 8″ mark (you can use a scoring tool or simply measure with a ruler and fold)
Step 2: Attach your medium-sized piece of paper (3.75″ x 5.25″) onto the front of the card.
Step 3: Using stamps, stickers, or embellishments decorate your smallest piece of paper (3.75″ x 1.75″) and attach to the front of the card.
Step 4: Punch a hole at the top of the card.
Step 5: Wrap your ribbon around the bottom of your hot chocolate packet leaving a couple of inches at the top to tie a knot (you’ll need roughly 12″-14″ of ribbon).
Step 6: Thread your ribbon through each hole.
Step 7: Adhere the .5″ scored piece inside of the card closing the hot chocolate packet inside.
Step 8: Tie a knot at the top of the card.
Step 9: Adhere the candy cane to the front of the card.
Voila! A quick and easy gift in a card. Using the ribbon to pull out the hot chocolate packet like a little surprise is fun for all ages. Write a little note on the back and gift someone a warm cozy evening of hot chocolate.
Jessica is a work-at-home mom to Shane (4.5) and Adalyn (1). She loves photography, crafting, reading, baking, cooking, and is a Consultant for Close To My Heart. You can read about all of Jessica and her family’s adventures at Preserving Life’s Moments.
Have you blogged about a Handmade Christmas idea? Submit the link through this form here and we’ll consider sharing it as part of this series during the next 4 weeks!
OVER-SPENDING EVERY SINGLE MONTH?Grab these FREE Budgeting Sheets!
Have any other great last-minute gift ideas? Share them in the comments!
Have you blogged about a Handmade Christmas idea? Submit the link through this form here and we’ll consider sharing it as part of this series during the next 4 weeks!
Published: by Crystal Paine on | This post may contain affiliate links. Read my disclosure policy here.
Hopefully by now, your Christmas presents are purchased. Some of you ultra-organized folks likely had them purchased and wrapped months ago. But some of the rest of us are just now getting around to thinking about wrapping gifts. 🙂
If you’re one of those people, don’t despair! Here are six simple and frugal ideas to dress up your packages without spending a lot of money:
1. If you haven’t done so already, get the rest of your gifts wrapped in the next 24 hours.
2. Once you’ve wrapped your gifts, be sure to label them clearly with the recipient’s name.
3. If you’re attending multiple Christmas gatherings, divide your wrapped gifts up into boxes or tubs by event (label these boxes/tubs with the event name) and then stick them by the door so that you can just grab the appropriate tub or box on your way out the door and you’re good to go! (Since we have young children who like to unwrap gifts, we’re keeping our wrapped gifts at the top of our coat closet. That way, it’s almost impossible to forget them since we have to put our coats on before we head out the door!)
Published: by Crystal Paine on | This post may contain affiliate links. Read my disclosure policy here.
Guest post by Kimberly from Couponing University
Growing up, I can remember Thanksgiving to be just as exciting as Christmas at my Grandma’s home. Every year, she would make all ten of the grandchildren a Christmas ornament. These became the first gift of the season, coming at Thanksgiving so we could enjoy them for the month to come.
Her ornaments were most often intricately crocheted with amazing skill and great attention to detail. My grandmother’s thoughtfulness ran deep as she crafted us ornaments each year. She knew that her gifts would serve to fill our first tree of our own one day as we began our journey into adulthood when money might run tight and leave us with an otherwise bare tree.
As my Grandmother’s ornaments graced my very first tree just three years after she passed, I couldn’t help but pull up the memories of all those years in anticipation for Thanksgiving and a new ornament. Today, all my Grandmother’s ornaments have a special tabletop tree for themselves.
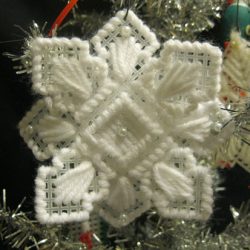
Sometimes, my Grandmother would make us something out of the ordinary, such as this snowflake ornament which was given to me in 1989. (Grandma would always label the back with the year.) We loved this ornament so much that my mother deconstructed the snowflake so that we could reproduce what seemed like a hundred of them for gifts to teachers, neighbors and friends.
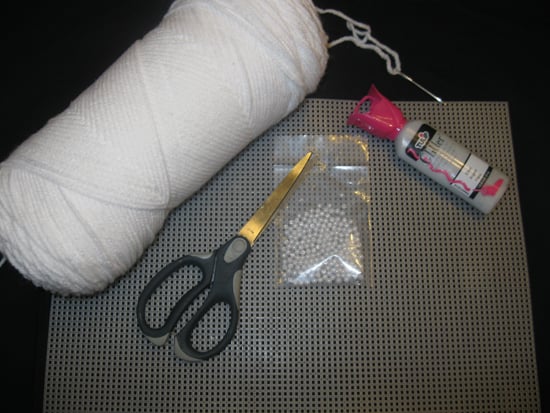
Supplies:
Plastic mesh canvas (one sheet will make six completed ornaments)
White yarn
Pearl beads
Glitter fabric paint
Yarn needle
Scissors
Instructions:
::Cut two snowflakes following the pattern. To begin, cut 19 by 19 squares, then cut the ‘petals’. Once you have cut one petal, you can use your scissors as a guide to begin the next cut, just line them up with the inner line and start over.
::Cut a hole in the middle of the one of the snowflakes. The easiest way to do this is to fold the piece in half, count in two squares, and cut up two squares on each side. Then fold the other direction, again cutting up two on each side. This will be the top piece.
::Starting in the middle of the full snowflake piece, secure the yarn by creating the first stitch and making a knot. Continue to stitch the center.
::Bring the yarn up to the closest petal and stitch the veins.
::Bring the yarn to the side and overstitch the sides, making two stitches in each outer corner, until you come to the next petal.
::Continue in this manner until the bottom is complete, making a double knot at the end.
::Begin stitching the top snowflake in the veins of the petal, creating a double knot to secure. Continue to stitch the first petal.
::Overstitch outer edges, petals, as the bottom snowflake.
::Overstitch the inner edge and secure with a double knot.
::Using the glitter fabric paint, place a dot in the middle of the bottom snowflake to attach a bead. You may find it easier to use the needle to help hold the bead in place. Place beads in the same manner onto the stitched points on the petals of the top snowflake.
::Allow to dry overnight.
::Place the snowflake with the center hole on top of the second snowflake and turn 45 degrees.
::Gently pop the petals of the top snowflake into the centers of the bottom snowflake.
::Tie a loop with yarn into the top of one petal or attach an ornament hook for hanging.
::Write the year on the back with glitter fabric paint.
::Hang to dry.
Kimberly is a stay-at-home mother of two teenage daughters and a one year old boy. In her spare time, she blogs at Couponing University where she shares all she has learned about shopping smarter as well as other tricks for the Domestic Engineer of today.
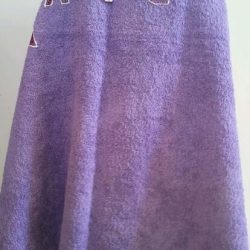
This towel is the absolute cutest personalized gift, and kids just love receiving something with their name on something that they use so regularly. While the pictures in this tutorial are of a towel that is made for a young child, I have made this gift for children of various ages (including one for a “tween” boy using camouflage material and a dark-colored towel) and they have all been well-received!
You could also do the name of a favorite sports team or school. With only four materials that are all inexpensive, this gift is not only incredibly frugal, but also very quick to make.
Supplies needed:
Towel — $2
1/4 yard fabric that coordinates with towel — $2
Heat ‘n’ Bond Ultrahold — $2.50 (found at Walmart — will make several towels)
Tulip Slick Fabric Paint — $3
Instructions:
1. Pre-wash the fabric and the towel.
2. Cut the fabric and the Heat ‘n’ Bond to a smaller size that will fit all of your letters but will be more manageable to work with.
3. Follow the directions on the Heat ‘n’ Bond package to adhere the Heat ‘n’ Bond to the fabric using an iron.
4. Take the paper off the back of the heat Heat ‘n’ Bond.
5. Cut the letters needed for the child’s name from the fabric you just adhered the Heat ‘n’ Bond to. I use my Cricut to cut the letters, but you can also simply type the name in Microsoft Word in a simple font, then before you print it, in the Print Dialog Box, choose “Mirror”. After it prints, cut the letters from the paper and use these as your letters for the towel.
6. Trace them onto the Heat ‘n Bond that is adhered to the fabric. By tracing them backwards onto the back of the fabric, they will then be the correct way when you look at the front of the fabric. Or maybe you’re just artistic enough to freehand the letters!
5. Follow the directions on the Heat ‘n’ Bond package to iron the letters onto the towel.
6. After they cool, use the Fabric paint to outline the letters and/or shapes. This keeps the edges from fraying and helps keeps the edges attached to the towel.
7. Allow the paint to dry for approximately 72 hours before wrapping the present.
8. Enjoy seeing the special kiddo in your life be thrilled to receive a gift that was made just for them!
Leah is married to her best friend and is a mom to three children who will always be reminded of their names at the end of bathtime. She enjoys blogging about anything that will help you save your dime and your time at YourDimeYourTime.com.


Do you have a fun and frugal DIY idea to share? I’d love to hear about it! Read the submission guidelines and submit it here.


 10. Drink Mixes
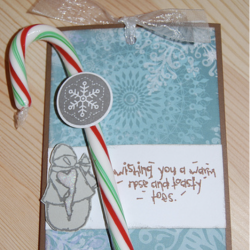


