


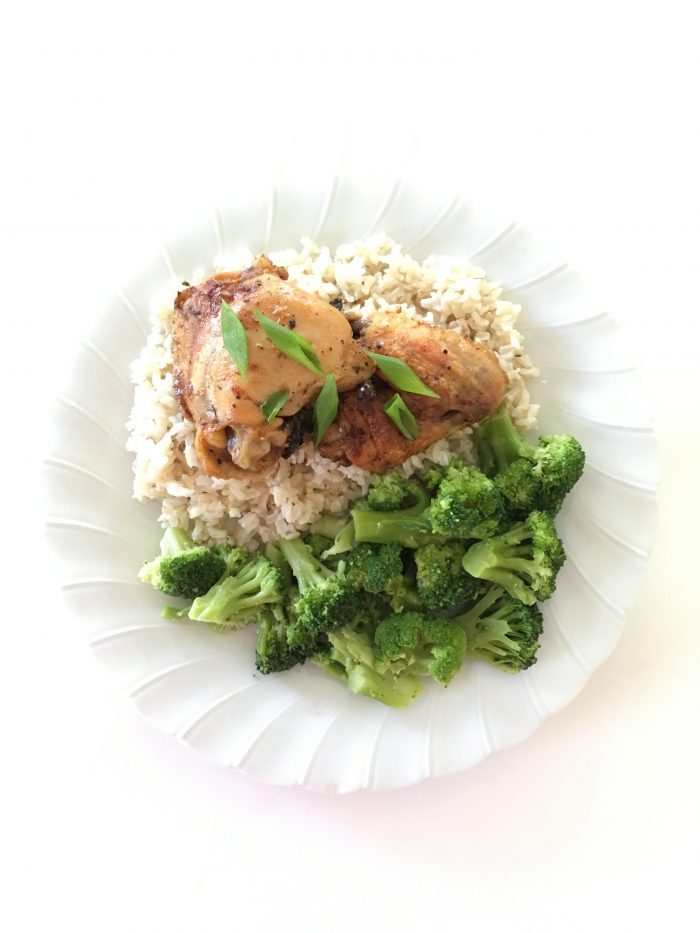
If you need to cook around allergy restrictions, you’ll love this recipe for Italian lemon chicken. It is free from all the most common food allergy ingredients AND it’s freezer friendly!

Guest post from Michelle.
Yeast is one of those ingredients that is becoming banned from more and more people’s diet lists, for various health reasons. I recently did some food allergy cooking for a friend who had about 50 items to which she was allergic, yeast being one of them.
I wanted to serve her a salad but did not know what to do with the vinegar (yeast is often an ingredient in vinegar) found in most store-bought and homemade salad dressings (not to mention the other ingredients she had to avoid).
After doing some research, I came up with an Italian dressing recipe that turned out SO delicious.
You will Love This Easy Lemon Chicken Recipe
I made the dressing again, this time as a marinade for our chicken.
My husband’s response was, “That’s the way marinade on chicken is supposed to taste. I couldn’t quit eating it.”
It really was that good, very healthy, and simple to make.

Italian Lemon Chicken Recipe Ingredients
- 4-6 pounds of chicken (Use whatever chicken you desire, whether chicken breasts, chicken thighs, drumsticks, cut-up fryer, etc.)
- 1/3 cup lemon juice (about 1 large lemon)
- 1/4 cup water
- 1/2 cup grapeseed oil, canola oil, or olive oil (or a combination of oils)
- 1/2 t. garlic powder
- 1/2 t. basil
- 1/2 t. oregano
- 1/2 t. paprika
- 1/2 t. onion powder
- 1/2 t. kosher salt
- 1/2 t. black pepper
How to make Italian Lemon Chicken
To Marinate:
1. Rinse chicken and remove any fat or skin (if desired).
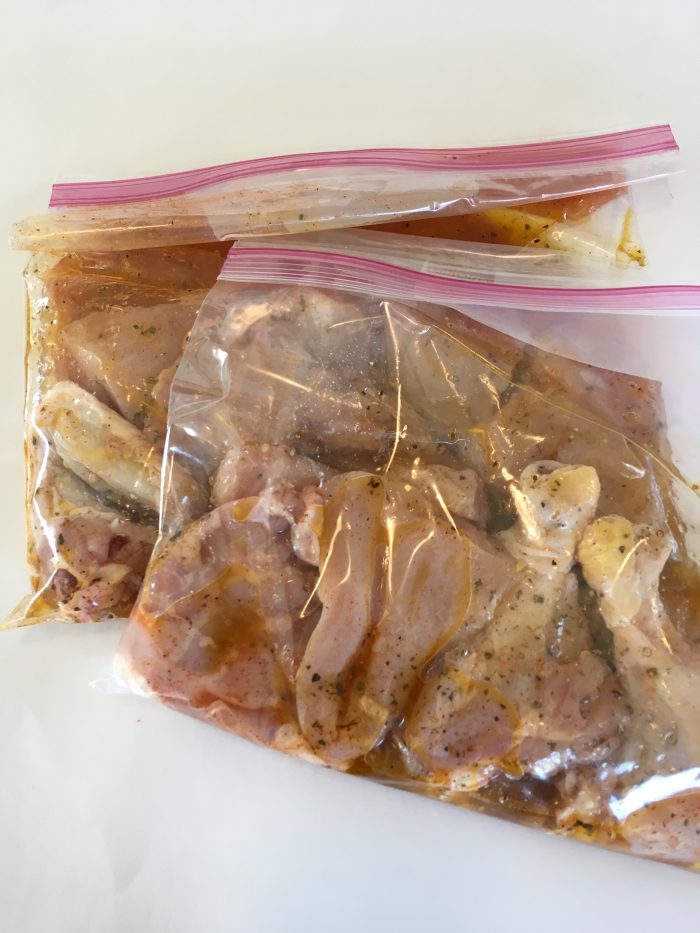
2. Separate into two freezer bags (or baking dish if cooking right away).
3. In a small bowl, whisk together the lemon juice, water, oil, and spices to make the marinade.
4. Pour 1/2 the marinade into each freezer bag; seal tightly and place in the freezer.
5. When ready to cook the chicken, remove bag from freezer and place in a baking dish in the refrigerator to thaw for about 24 hours.
6. Once thawed, allow to marinate as long as you can.
To Cook:
1. Place pieces of marinated chicken in a greased baking dish.
2. Bake at 325º for 1 hour.
3. Turn the heat up to 375º and bake for another 20-30 minutes.

Lemon Chicken Recipe Easy Variations
You can substitute apple cider vinegar for the lemon if desired — although it will change the flavor somewhat.
You can also mix and match the seasonings to fit your family’s taste preferences.
This chicken would cook beautifully in the crockpot or on the grill if you don’t want to heat up your kitchen.
What to Serve with Italian Lemon Chicken
I recommend serving the chicken over steamed rice with a side of vegetables.
It would also be great with a baked potato and Cesar salad.

How to Store This Italian Lemon Chicken Recipe
The marinated bags of chicken can be refrigerated for up to 24 hours, or frozen for up to 3 months.
Once the chicken is cooked, you can refrigerate any leftovers in food storage containers.
Freezing Italian Lemon Chicken
We recommend freezing the marinated chicken in zip-top freezer bags to save space and for easy cleanup.
If you want to freeze the chicken after baking, it’s easiest to cut the chicken off the bones and into bite-size pieces. Freeze the chopped chicken in 1 or 2-cup containers to use in soup, casseroles, etc.
How to Reheat This Italian Lemon Chicken Recipe
After the chicken is cooked, you can simply microwave it to reheat — or pop it in the oven at 250 for 15-20 minutes.

Italian Lemon Chicken
Ingredients
- 6 lbs chicken pieces
- ⅓ cup lemon juice
- ¼ cup water
- ½ cup olive oil (or other oil)
- ½ tsp garlic powder
- ½ tsp basil
- ½ tsp oregano
- ½ tsp onion powder
- ½ tsp paprika
- ½ tsp salt
- ½ tsp pepper
Instructions
To Marinate
- Rinse chicken and remove any fat or skin (if desired).
- Separate into two freezer bags (or baking dish if cooking right away).
- In a small bowl, whisk together the lemon juice, water, oil, and spices to make the marinade.
- Pour 1/2 the marinade into each freezer bag; seal tightly and place in the freezer.
- When ready to cook the chicken, remove bag from freezer and place in a baking dish in the refrigerator to thaw for about 24 hours.
- Once thawed, allow to marinate as long as you can.
To Cook:
- Place pieces of marinated chicken in a greased baking dish.
- Bake at 325º for 1 hour.
- Turn the heat up to 375º and bake for another 20-30 minutes.
Notes
Nutrition
Love this recipe?
Make sure to share and save it on your favorite platform below!
Michelle is blessed to stay home with her three children (ages 10, 7, and 4), while her husband works to provide. When she’s not experimenting with allergy-friendly meals, she’s blogging about it at The Willing Cook. Through the Willing Cook, her hope is that you gain peace of mind in your kitchen (and your pocket book) and are able to serve those you love who suffer with food allergies.
FREE One Week Menu Plan!
Done-For-You Dinner Recipes With Simple Ingredients and a Grocery Shopping List!

4 Weeks of Frugal Family Fun: Sock Bubbles (Day 8)

It was a scorcher day today, so we didn’t venture out until late in the afternoon when it had cooled down a bit. And, because it was so hot, it was the perfect for trying out the sock bubble idea I’ve been seeing on just about every other blog recently.

We had so much fun with this — and it was so easy to do.


We decided to get adventurous and add drops of food coloring to the sock.

It was messy — but oh so fun! Word to the wise: don’t try adding food coloring unless your children are wearing smocks or play clothes. 🙂

And the children also thought it was tons of fun to use the socks to “clean” the deck, too!
Did you do something fun and frugal as a family today? If you blogged about it, I’d love for you to leave a link to your blog post below. Or, you can just tell us what you did in the comments.
Note: Since the purpose of this series is to encourage you to be intentional about fun in your home this summer, please only link up posts showing pictures/sharing details of fun things you did as a family today (or within the last few days). Posts that do not adhere to these guidelines will be deleted in order to make it fair for those who are putting forth a lot of effort to participate in this challenge.
Today’s Health Food Store Shopping Trip

We went shopping at the health food store today and I got some great deals on produce and other healthful foods. Silas helped me unload everything and then asked if he could be in my grocery pictures, too! 🙂

Health Food Store Shopping Trip
2 pints of blueberries — $1.50 each
Cilantro — $0.99
10 oranges — 5 for $1, $2 total
Rudi’s organic hot dog buns — marked down to $0.99
Rudi’s organic bread — marked down to $0.99
2 bags of organic potatoes — marked down to $0.99 each, $1.98 total
1 eggplant — $0.79 {Should I confess that I’ve never bought eggplant before? Anyone want to share amazing recipe ideas?!}
2 mangos — $0.50 each
Green onions — $0.79
3.10 pounds of apples — $0.99 per pound = $3.10 total
5-lb. bag of organic carrots — $1.49
Ezekiel Tortillas — $3.99 {Yes, you can choke — and tell me that I should recant on my I Don’t Make Homemade Tortillas stance! :)}
1 pound raw cheddar cheese from a local farm — $5.99
1/2 gallon organic whole cream top milk — marked down to $1.99
1 lb. green beans — $0.79/lb.
Total with tax: $33.19
Reader Tip: How we’re making exercise fun without spending a lot of money
Reader Tip: How we’re making exercise fun without spending a lot of money

Suzy from Suzy’s Sitcom emailed in the following tip:
My husband and I have been on a quest to get healthier. But when it comes to exercise, joining a gym or exercise program often costs money.
We wanted to be healthy but do it in an inexpensive and fun way. That is where hiking came in.
The benefits of hiking are many: improved muscular fitness, lower risk of high cholesterol, reduced depression, and better quality sleep, among others. Getting outdoors and away from the television and visiting with nature is truly a mood lifter, and the best thing of all is that it is totally free.
But how could we make it interesting enough that the whole family would want to get involved? I went to the local bookstore and discovered that there was a whole section of books on local trails to hike. Most of the books not only included trail maps, but local information, restroom locations and areas to picnic.
I chose one for the Atlanta area that included 60 hikes, and thought, why don’t we make it a challenge to complete every hike in the book? I cut out scraps of paper and wrote the numbers one to sixty on them and put them in a jar.
My family’s challenge each week is to draw a number from that jar and do that hike on the weekend. It’s always fun to choose and then get to discover where we are hiking each week! Not only have we found a fun way to get great exercise, but we have learned a whole lot about the area that we live in. -Suzy
Allergy-Friendly Freezer Cooking: Nut Butter Pancakes


Guest post from Michelle of The Willing Cook
Crystal shared a very popular freezer cooking challenge in May with “regular” food. However, a number of readers have requested allergy-friendly recipes as well.
That’s where I come in.
For the next three days, I’ll be sharing an allergy-friendly freezer cooking recipe each day. All three recipes will be free of the top eight allergens and more. Hopefully, this will help some of you who have food allergies and would like to do some freezer cooking, but who are struggling to come up with ideas as to what you can make with your dietary restrictions.
When Crystal linked to a Peanut Butter Pancake recipe recently in her meal plan, I knew I had to try it. I was so excited about the results using whole wheat flour and almond butter, that I decided I would make a gluten-free batch as soon as possible.
The successful and power-punching breakfast pancake recipe below is what resulted. We loved these!
Note: Any “nutty” spread can be used for this recipe, like sunbutter, and still be peanut and treenut free. You may wish to talk to your doctor before using sunbutter, but it is free of peanuts and treenuts. You can also try leaving out the nut butter from the recipe.

Nut Butter Pancake Recipe
(makes approximately 28, 4-inch pancakes)
Ingredients:
**See ingredient substitution notes below recipe.**
- 2 cups rice flour
- 1 cup oat flour (use certified gluten-free oat flour, if necessary)
- 1 cup tapioca flour
- 4 Tablespoon brown sugar
- 1 teaspoon cream of tartar
- 1/2 teaspoon baking soda
- 1 teaspoon kosher or sea salt
- EnerG Egg Replacer for 4 eggs (6 tsp powder + 8 TBSP water)
- 2 cups milk (whatever is allowed)
- 1 cup nutty butter (Examples: sun butter, almond butter, cashew butter, peanut butter)
- 1/2 cup coconut oil
- (optional add-ins: berries, chocolate chips)
Directions:
- Mix together dry ingredients.
- In a separate bowl, whisk together EnerG Egg Replacer and water.
- Melt nut butter with coconut oil in a small pan over medium heat.
- Add egg replacer, milk, and nut butter/oil mixture to dry ingredients; mix until combined.
- Preheat griddle and pour pancake batter onto griddle about 4 inches in diameter.
- After pancakes have cooked for a minute or two, drop a few berries or chocolate chips onto each pancake (You can also mix the add-ins straight into the batter. My kids usually request a variety of add-ins, so I do it while the pancakes are cooking.).
- When edges are cooked/dry, flip over and cook for another minute or two.
- Enjoy warm with some delicious maple syrup!
To Freeze:
Place the pancakes in a single layer on a cookie sheet and put in the freezer for about 30 minutes, then move to a freezer bag. To reheat, simply pop the frozen pancake in the microwave for 30-60 seconds (or use a preheated oven/toaster oven).
Ingredient Substitutions:
You can add back in any “regular” ingredients for the allergy-friendly ingredients in this recipe.
Wheat: Use 4 cups whole wheat flour (in place of gluten-free flours).
Corn: Use 2 teaspoon baking powder (in place of cream of tartar and baking soda).
Egg: Use 4 eggs (in place of EnerG Egg Replacer).
Dairy: Use 1/2 cup butter (in place of coconut oil) or cow’s milk (in place of non-dairy milk).
Like I mentioned earlier, these pancakes are absolutely delicious — and our family loves them!
Michelle is blessed to stay home with her three children (ages 10, 7, and 4), while her husband works to provide. When she’s not experimenting with allergy-friendly meals, she’s blogging about it at The Willing Cook. Through the Willing Cook, her hope is that you gain peace of mind in your kitchen (and your pocket book) and are able to serve those you love who suffer with food allergies.
Do-It-Yourself: Natural Mosquito Spray
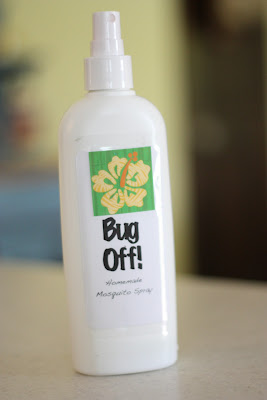
ICanTeachMyChild.com shows you how to make natural mosquito spray.
Do you have a fun and frugal DIY idea to share? I’d love to hear about it! Read the submission guidelines and submit it here.
Is it wrong to splurge?

I really enjoyed and appreciated all of the comments on my Is Frugality Really Worth It? post last week (Click over and read it here, if you haven’t already.)
I’m pretty sure most all of us agree that having a purpose behind our frugality gives much more meaning and motivating for saving money. However, while I think it is a wonderful thing to live simply so that others can simply live, I don’t think this means we shouldn’t ever splurge, we should always buy the cheapest of everything, or that we should go without everything unnecessary lest we spend a penny more than we need to.
On the contrary, I think it’s important that we have balance and breathing room in our lives — and in our budgets. If we pack our schedules so full that we never have a moment to spare and can never just stop and smell the roses, we’ll likely end up rushing through life and missing out on some of the best moments of life altogether. We’ll also probably be frazzled, stressed, and exhausted much or all of the time.
In the same way, I believe it’s important that we give ourselves breathing room and find a healthy balance when it comes to our finances. It’s wonderful to be really focused and aggressive when it comes to paying off debt or saving to pay cash for something and it’s absolutely life-changing to be in a position where you can give generously, but I want to encourage you to not become so frugal that you forget to give yourself space in your budget to strategically splurge.
If we scrimp and save so much that we never have any wiggle room to enjoy and savor life, we’ll likely lead a miserable existence. That said, strategic splurging doesn’t have to mean you go and spend hundreds of dollars. It could be something as simple as ordering pizza once a month with a coupon or stopping by the bookstore every other week, ordering a coffee, and browsing books to add to your library list. Or having a fun family outing using a Groupon voucher every few months.
What matters most is not how much or little money you spend, but that you choose to strategically splurge on something that is important for your family, something that you love and enjoy, and something that will boost your morale and keep you going strong on your frugal journey.
Living frugally is not about living so miserly that you can’t ever enjoy life. In fact, going for years without breathing room in your budget will suffocate and frustrate you. So budget for strategic splurging — and then you’re able to enjoy it guiltlessly because it’s a line item in your budget!
*Note: For most of us, there will be seasons in life where there is little or no wiggle room in the budget. If you’re in one of those seasons, don’t lose heart. Constantly remind yourself that the frugal decisions you are making will pay off and be encouraged that you are doing so much better than you would be doing if you weren’t being so frugal. {Read my post here for more encouragement and ideas if you feel like you’re in a really desperate situation financially.}
4 Weeks of Frugal Family Fun: Picnic at the Park & Baking Chocolate Chip Muffins (Day 7)
4 Weeks of Frugal Family Fun: Picnic at the Park & Baking Chocolate Chip Muffins (Day 7)

All three children started swimming lessons this morning. Kathrynne had a blast (she’s been anticipating swimming lessons for weeks now!). Silas and Kaitlynn are still warming up to the idea.
But their instructors promised me that it’s perfectly normal for the first day for young children and that they’ll come around and be loving it soon, so I’m hoping that’s true. We’ll see how the next two weeks go. 🙂
After swimming lessons, we went to the park to play and have a picnic lunch.

Kathrynne had fun trying to climb a tree.

And Silas had fun watching her climb!

Kaitlynn enjoyed riding her bike around on the many sidewalks at the park.

While the children ate lunch, I read a few more chapters of Snow Treasure.

Later in the afternoon, Kaitlynn and Silas made chocolate chip muffins using a mix and child-sized pans that a kind friend gave to her for her birthday.


I think they might have made more messes than muffins and they adapted the recipe somewhat (hmm, I wouldn’t know where they would get that idea from?!?), but the final result turned out beautifully and it was a fun addition to dinner tonight.
Did you do something fun and frugal as a family today? If you blogged about it, I’d love for you to leave a link to your blog post below. Or, you can just tell us what you did in the comments.
Note: Since the purpose of this series is to encourage you to be intentional about fun in your home this summer, please only link up posts showing pictures/sharing details of fun things you did as a family today (or within the last few days). Posts that do not adhere to these guidelines will be deleted in order to make it fair for those who are putting forth a lot of effort to participate in this challenge.
My 10 goals for this week

Last week’s goals:
Family/Mothering Goals
1. Read at least a few chapters of The Railway Children aloud to all the children, read a few chapters of The Missing Video (reading to Kathrynne), and read at least two chapters of Little House in the Big Woods (reading to Kaitlynn).2. Special outing one-on-one with Kaitlynn for her birthday. {We didn’t get to do this because we were supposed to go out the afternoon that I ended up having to take Kathrynne into the doctor and then as soon as Kathrynne got well, Kaitlynn came down with the sickness! I’m hoping we’re able to do it this week instead because both Kaitlynn and I have been looking forward to it for quite some time!}
3. Write a love note to Jesse.
4. Special family outing for Kaitlynn’s birthday.Personal Goals
5. Finish reading The Referral Engine: Teaching Your Business to Market Itselfplus one fiction book
.
6. Run at least five times for 45 minutes each; do weight-training program at least four days.
7. Listen to 2 hours of Stop Acting Rich.
8. Sleep for at least 8 hours every night.Home Management
9. Scrub the master bedroom shower.Business Goals
10. Continue blogging the 4 Weeks of Family Fun series.
This week’s goals:
Family/Mothering Goals
1. Read at least a few chapters of The Railway Children aloud to all the children, read a few chapters of The Missing Video (reading to Kathrynne), and read at least two chapters of Little House in the Big Woods (reading to Kaitlynn).
2. Start swimming lessons for all three children.
3. Write a love note to Jesse.
Personal Goals
4. Finish reading Choosing Gratitude plus one other book.
5. Run at least five times for 45 minutes each; do weight-training program at least four days.
6. Listen to 2 hours of Stop Acting Rich.
7. Sleep for at least 8 hours every night.
Home Management
8. Make Homemade Wheat Thins
9. Make Homemade Toothpaste.
Business Goals
10. Continue blogging the 4 Weeks of Family Fun series.
How did you do on last week’s goals? What are your goals for this week? I’d love to have you share your progress on last week’s goals and your goals for this coming week in the comments. Of, if you’ve blogged about it, leave your direct link below. Let’s cheer each other on to live purposeful and productive lives!
You can download a free customizable weekly goal-planning sheet here.
This week’s menu
 Need a fun & easy Fourth of July Breakfast or Lunch? How about Red, White, & Blue Toast?
Breakfasts
Berry Cado Smoothie, Hard Boiled Eggs
Whole Wheat Peanut Butter Pancakes
Oatmeal
Oatmeal Pancakes
Toast, scrambled eggs, fresh juice
Cereal x 2Lunches
Oscar Mayer Beef Hot Dogs, peaches
Green Monster Smoothies, hard boiled eggs
Peanut Butter & Jelly Sandwiches from the freezer, veggies, apple slices
Leftovers x 2
Quesadillas, raw veggies
Snack-y lunchSnacks
Chocolate Protein Truffles
Healthful Chocolate Freezer Fudge
Homemade Protein Bars
Popcorn
Fruit/VeggiesDinners
Dinner with extended family
Barbecued Meatballs, Easy Dinner Rolls, peaches, green salad
Ultimate Hawaiian Pizza with Freezer-Friendly Pizza Crust, fruit salad
Grilled Steak, grilled sweet corn, fruit salad, Easy Dinner Rolls
Crockpot Rotisserie Chicken, Biscuits with Homemade Baking Mix, peaches, steamed veggies
Homemade Pizza Pockets, green salad, fruit, steamed veggies
Dinner out
What’s on your menu this week? Share details and/or your link to your menu plan in the comments.
OVER-SPENDING EVERY SINGLE MONTH?Grab these FREE Budgeting Sheets!
Click here to download!
3 Financial Principles I Wish My Parents Had Taught Me

Guest post from Jason of Work Save Live
Looking back on my childhood, I can’t remember a time that my family taught me or talked to me about managing money. There was never a mention of anything regarding a budget, limiting spending, saving, or investing for retirement. Even when I left for college, I still hadn’t balanced a checkbook or written a check for that matter!
I realize now that some of my financial struggles as an adult could be directly related to the lack of teaching I received from my parents. The only teaching I received was from what I witnessed: the spending habits of my parents growing up and certainly the habits of the people I associated myself with during college.
Here are three financial principles I wish my parents had taught me:
1. You can’t have everything you want
Although I was raised by a single mother, I never remember going without. We didn’t live luxuriously by any means, if we went to the movies it was on $1 movie night and if we ate out it was typically at all-you-can-eat places where children ate free or at a discount. However, when it came to sports and Christmas presents, I always remember getting what I wanted.
Not only did this hurt my future financial well-being, it also gave me an impractical view of what life really looks like. The reality in life is that you can’t and won’t have (or get) everything you want.
2. You have to work to get paid
While I wasn’t given a strong financial foundation, I was taught a strong work ethic. I did the laundry, cleaned the house, and mowed the yard through my grade school and middle school years. I learned from an early age that I had to work hard if I wanted to succeed in life.
Furthermore, this principle also helped me become a better husband. While my wife and I continue to inch our way out of debt, it’s vital that we complement each other and are one team. When my wife works late I make sure to straighten up the house, cook dinner for the night, and prepare our lunches for the next day.
Not only did teaching me a strong work ethic eventually help my ability to generate income, it’s also strengthened our marriage in more ways than I could have ever imagined. I’m so thankful it was ingrained in me from the start that nothing in life is given to you and that, as a family, we must all work together and contribute to the household.
3. You can’t spend everything you earn
I wish my parents had taught me how to manage money. Instead, they modeled a life of spending everything they earned.
As I recall on my childhood, I distinctly remember trips to Walmart and the wonderful clearance racks that line parts of their stores. My mom would often buy things that we’d never use solely because the price was reduced.
Instead of budgeting, having a limit, and paying in cash, I remember the majority of the things we bought were purchased with credit cards. As time passed, the debt started to rack up (along with the associated stress and collection calls) and by the time I reached high school she had no choice but to file for bankruptcy.
Being a single mother with two growing boys couldn’t have been easy, but it was still possible to survive and prosper (due to living on a tight budget) despite the circumstances.
While some of us are destined to learn life’s lessons the hard way, it never hurts to ingrain these valuable principles early in your children’s lives.
Jason is a financial coach and advisor. He started Work Save Live in late 2011 in hopes of helping people change the way they think about money, life, and their careers.
“Don’t place your mistakes on your head…”

6 Ways to Save Money On Vitamins and Supplements

Guest post from Shelly of Coupon Teacher
While I never anticipated becoming an expert about saving on vitamins and supplements, the last nine months of my life changed my outlook. Recently, my chronic illness took hold of my body once again, and I have been on at least seven vitamins and supplements per day (most at my doctor’s recommendation).
If I paid regular price for my current vitamins and supplements, I would be spending in excess of $150 per month not including my prescription medication. Needless to say, we could not afford the expense, so I have become a woman on a mission to find the absolute lowest prices on my healthcare expenses.
This past month, using the following tips, I cut that in half by only paying about $75 out of pocket:
1. Buy high quality vitamins and supplements with your drug store rewards.
I recently was able to get my vitamin D3 for free after Extra Care Bucks, coupons, and a Buy One, Get One Free sale. Always check for the correct dosage and the expiration date to be sure what you are buying is really a deal.
2. Utilize your Swag Bucks account to get Amazon gift cards.
After plunking $30 down on a supplement at my doctor’s office, I looked for it online. I found it for the same price on Amazon from a reputable source, so I was able to order my next bottle for free with my Amazon credits.
3. Use store programs and coupons.
When I can’t get my supplements anywhere but the vitamin store, I use a coupon from their rewards program. I recently received a 20% off my purchase coupon, so I stocked up on the items I couldn’t find anywhere else.
4. Ask your doctor if the vitamins are available as prescriptions.
I pay a $12 co-pay on my generic prescriptions. I was recently able to get three months’ worth of a vitamin for only $12 via my prescription coverage.
5. Utilize sales at Vitacost.
They have great prices, flat rate and free shipping options, and their sales are good, too. I initially signed up for my free $10 credit, and I have since ordered from them (even without credit)! One of my supplements is half price over the local vitamin store. Vitacost also carries many allergen related foods.
6. Don’t stock up until you try it.
One of the supplements that was suggested to me didn’t work. In fact, it made me feel worse. A lot worse. If I had stocked up on a “great deal”, I would have been out the extra money.
How do you lower your cost for vitamins and supplements?
Shelly is a full-time fourth grade teacher and blogs at Coupon Teacher. She wants you to share and celebrate your successes with her, and she may give you a few tips along the way!
4 Weeks of Frugal Family Fun: Green Smoothies, Sidewalk Chalk, Snow Treasure, and a game of Old Maid (Day 6)

We had a very laid back Friday full of lots of frugal family fun. Here’s a little peek into our day:
 We made our favorite Green Monster Smoothies.

So good and refreshing — especially after my daily run!

We went outside and played with sidewalk chalk on the deck.

We were hoping that maybe we could make the Fizzy Sidewalk Chalk by spraying the drawings with vinegar as outlined here. But apparently it only fizzes if you make Homemade Sidewalk Chalk Paint with baking soda. So we’ll have to try that idea again sometime soon!

But everyone had fun drawing and spraying, regardless!

While the children played, I read a few chapters of one of our current read-alouds — Snow Treasure. We are loving this book, by the way!

After playing outside, we came in and Kathrynne and I played a rousing game of Old Maid together.
Did you do something fun and frugal as a family today? If you blogged about it, I’d love for you to leave a link to your blog post below. Or, you can just tell us what you did in the comments.
Note: Since the purpose of this series is to encourage you to be intentional about fun in your home this summer, please only link up posts showing pictures/sharing details of fun things you did as a family today (or within the last few days). Posts that do not adhere to these guidelines will be deleted in order to make it fair for those who are putting forth a lot of effort to participate in this challenge.
