
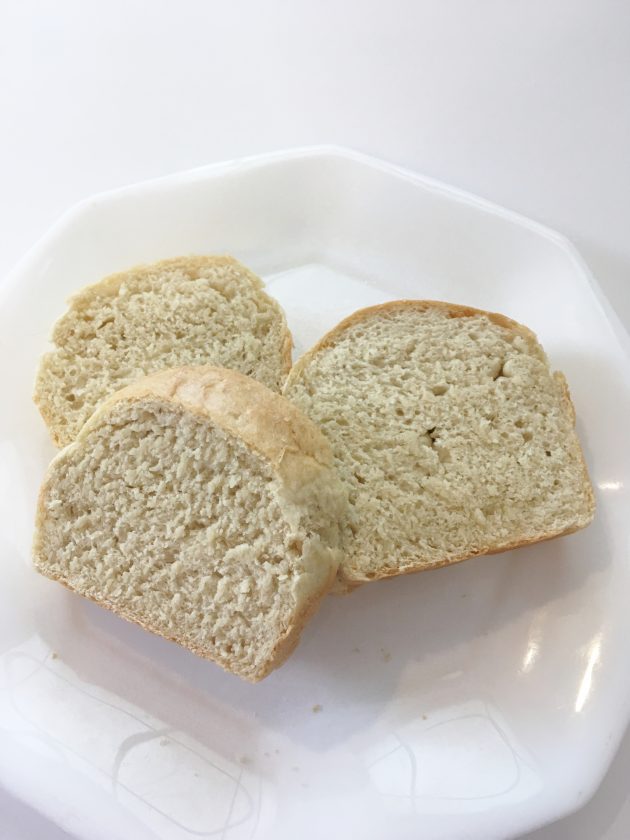
Not only is this English Muffin Bread so delicious, it’s also extremely easy to make and is a very frugal alternative to store-bought english muffins!
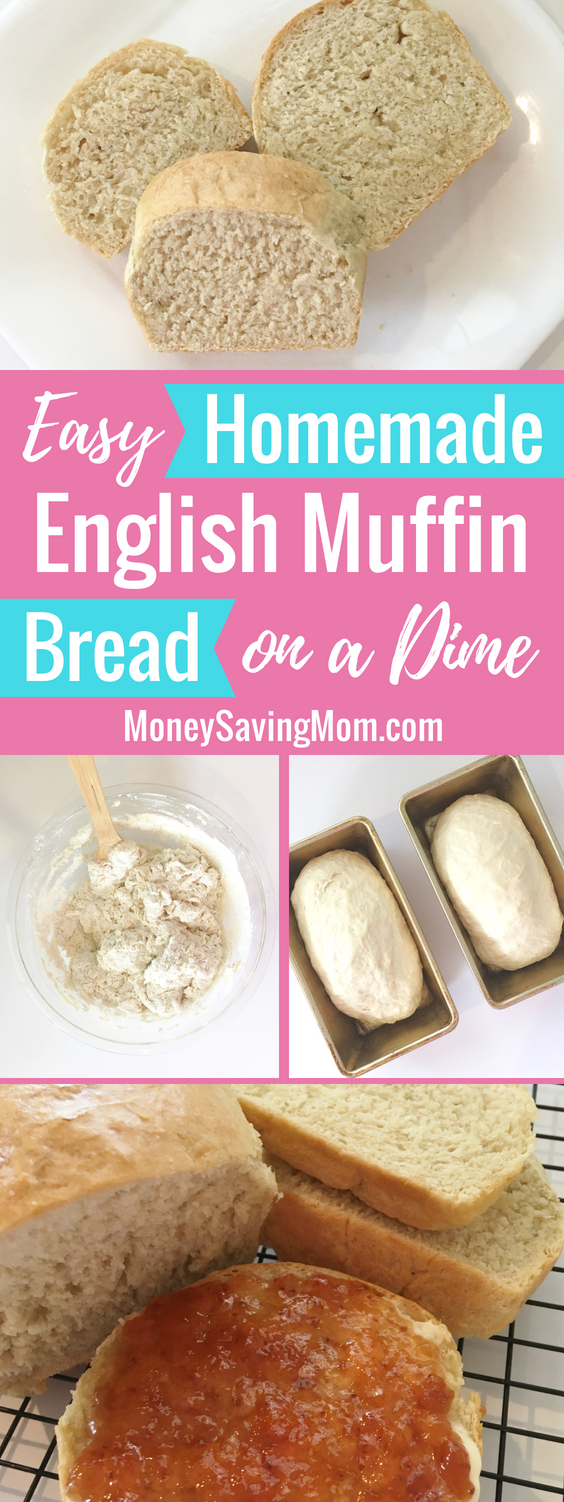
Homemade English Muffin Bread is a winner!
As one of my do-it-yourself projects, I planned to make English Muffins.
However, after some blog commenters suggested I try English Muffin Bread instead, I decided it looked much, much easier to make.
I’m so glad I tried this recipe. It’s a winner. So easy to make, so frugal, and so good!
What is English Muffin bread?
English Muffin bread is a coarse-textured bread with a crisp crust that is ideal for toasting.
It tastes exactly like the English Muffins you’ve come to love (with those little nooks and crannies) but it’s way faster and easier to make!
English Muffin Bread Recipe Ingredients
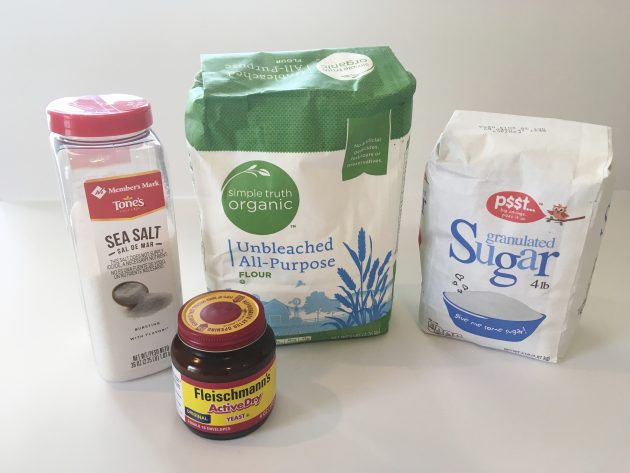
- 2 1/2 cups warm water
- 3 1/2 teaspoons yeast
- 1 Tablespoons salt
- 1 1/2 Tablespoons sugar
- 5 1/2 cups flour (I used unbleached all-purpose flour.)
How to make Homemade English Muffin Bread
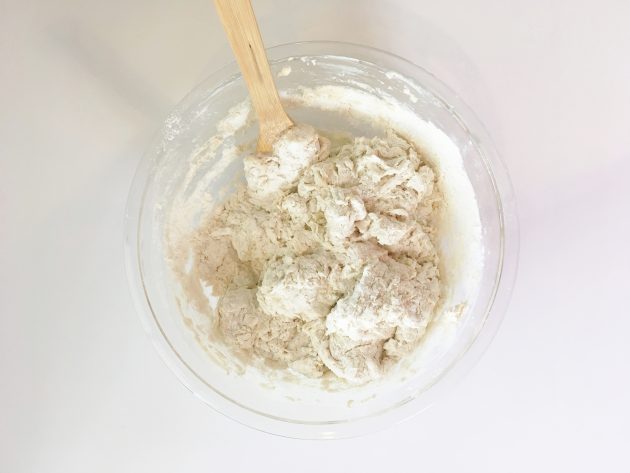
1. In a large bowl, mix together all ingredients (a KitchenAid works well — or you can do it by hand with a wooden spoon).
2. Cover bowl with a cloth and let dough rise in a warm place until doubled (skip this step if using rapid rise yeast).

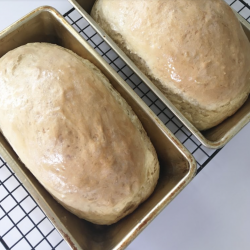
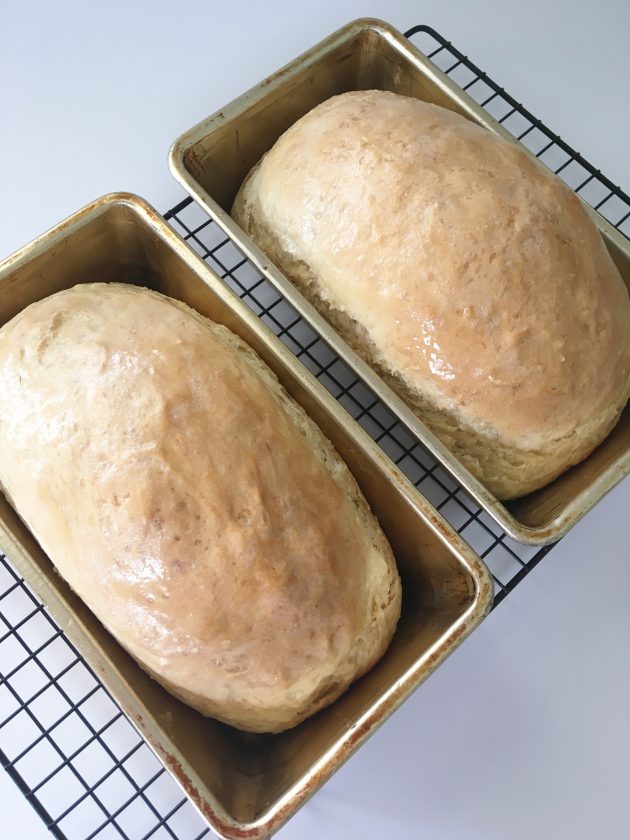
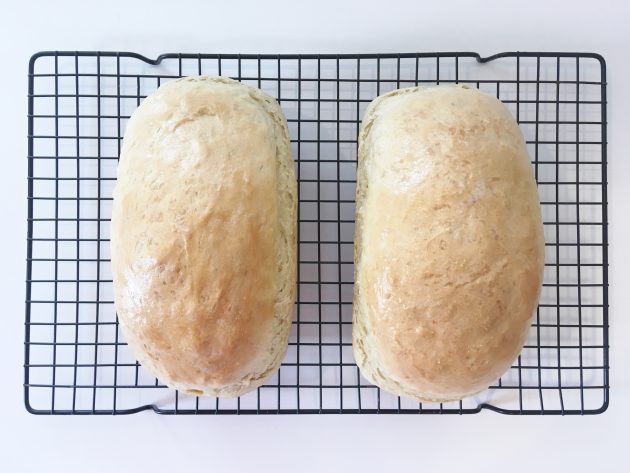
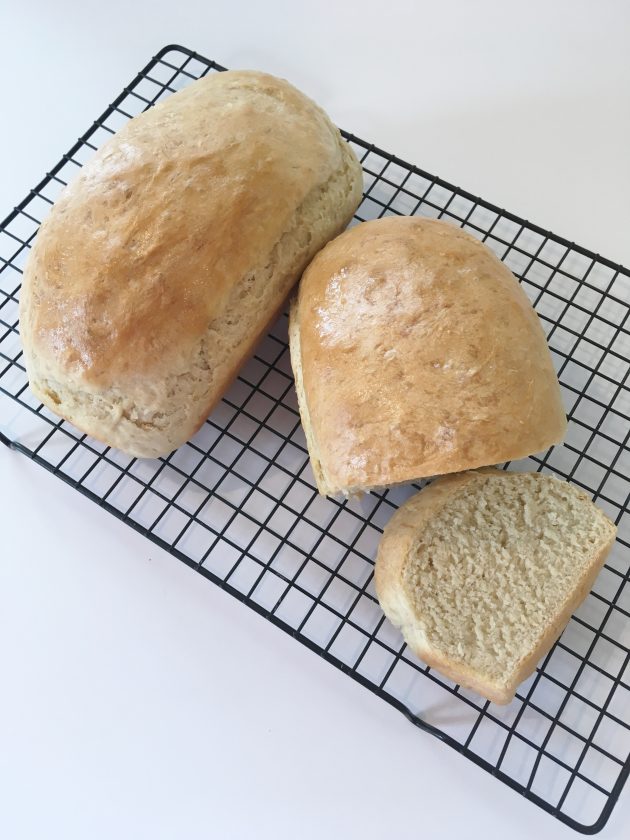
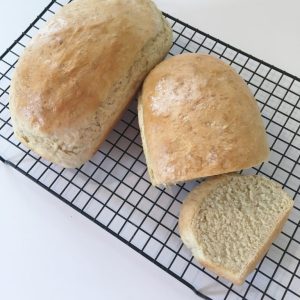
3. Punch down the dough and “scoop” half of the dough into two well-greased loaf pans (dough will be extremely sticky).
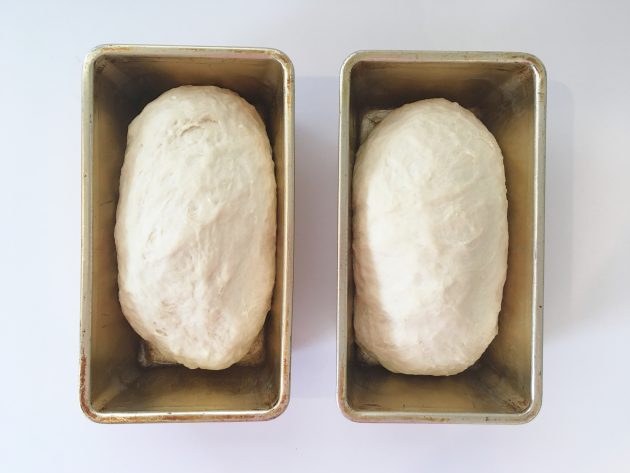
4. Cover pans with a cloth an let dough rise again until it reaches the top of the pans.
5. While dough rises for the 2nd time, preheat your oven to 350º
6. When dough is fully risen, put pans in preheated oven and bake for 45 minutes, or until golden brown.
7. Remove pans from oven and brush the tops of loaves with melted butter.
8. Cool completely before cutting.
To freeze:
Let the loaf cool completely. Slice and put in an airtight ziptop freezer bag in the freezer for up to six weeks.
To thaw:
Remove the desired number of slices and let thaw at room temperature for 30 minutes to one hour (or thaw in the microwave). Warm in the oven or microwave or toast.
Recipe for English Muffin Bread Tips
Don’t freak out if the dough is very sticky — it’s supposed to be that way! You don’t need to worry about shaping it into loves — just literally scoop the dough into 2 loaf pans and let it rise.
Also, it freezes wonderfully — so save yourself a bunch of time and slice the bread before you freeze it, then you can simply pull out one or two slices whenever you want toast.
If you want to increase the nutritional value, you could make it with half whole-wheat flour.
My husband isn’t a huge bread person, but he absolutely adores this bread. He has raved about it repeatedly and often asks if we can have it with dinner!
How to store this Recipe for English Muffin Bread
I slice the loaves after they cool, then packaged them in freezer bags. We take out however many slices we want at a time — so easy!
Best Ways to Eat This English Muffin Loaf
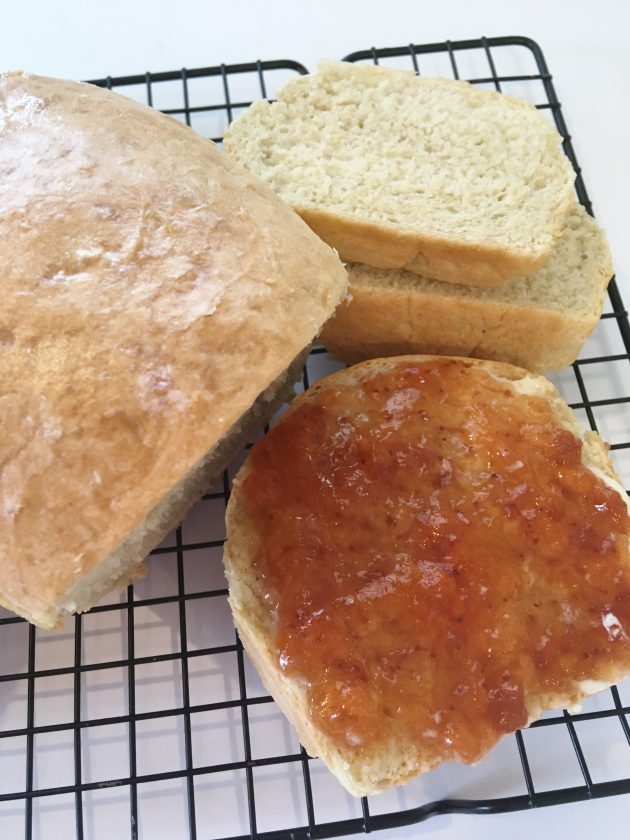
English Muffin Bread is best served warm or toasted with butter and jam/jelly or honey.
A loaf of English Muffin Bread would be such a lovely gift, paired with homemade jam or honey.
Recipe English Muffin Bread FAQs
English muffin bread uses store-bought yeast as its leavening agent while sourdough bread uses wild yeast from the air. Sourdough bread is “long-fermented” which helps to break down some of the carbohydrates and protein in the flour, releasing gas, which makes the bread rise (and makes it easier for many people to digest).
English Muffin dough is quite wet and cannot be shaped into loaves like traditional bread dough. The texture of the finished bread is also unlike traditional bread in that English Muffin bread has a smaller crumb, a tougher crust, is slightly denser, and has more nooks and crannies (especially after toasting).
Homemade bread is better for you than store-bought bread with all its added preservatives. However, bread made from white all-purpose flour doesn’t have much nutritional value (but it sure tastes good!) If you use freshly ground whole grain flour, then English muffin bread would be much more nutritious.
Homemade English Muffin Loaf
Ingredients
- 2 ½ cups warm water
- 3 ½ tsp yeast (active dry)
- 1 tbsp salt
- 1 ½ tbsp sugar
- 5 ½ cups flour (I used unbleached all-purpose)
Instructions
- In a large bowl, mix together all ingredients (a KitchenAid works well — or you can do it by hand with a wooden spoon).
- Cover bowl with a cloth and let dough rise in a warm place until doubled (skip this step if using rapid rise yeast).
- Punch down the dough and “scoop” half of the dough into two well-greased loaf pans (dough will be extremely sticky).
- Cover pans with a cloth an let dough rise again until it reaches the top of the pans.
- While dough rises for the 2nd time, preheat your oven to 350º
- When dough is fully risen, put pans in preheated oven and bake for 45 minutes, or until golden brown.
- Remove pans from oven and brush the tops of loaves with melted butter.
- Cool completely before cutting.
Notes
Nutrition
Love this recipe?
Make sure to share and save it on your favorite platform below!
FREE One Week Menu Plan!
Done-For-You Dinner Recipes With Simple Ingredients and a Grocery Shopping List!

Five Frugal Ways to Keep Kids Reading This Summer

Guest post from Caren of The Prudent Reader
As a parent and school media specialist, I know how important it is to keep kids reading over the summer months.
Now that school assignments are over, its time to focus on finding material that your child is interested in reading. My experience has been that even students who claim they don’t like to read, like to read something. Which is why providing a wide range of material to select from is so important.
Visit Your Local Library
A weekly visit to your local library should be part of your summer routine. An hour spent at the library, letting children look through books on any topic of interest, is time well spent.
Be sure to spend time looking at both fiction and nonfiction material. Some students have no interest in reading stories but love to read nonfiction.
Daily Reading Time
Depending on the age of your children, this may involve you reading to the children, or the children reading independently. Either way, approximately 30 minutes each day set aside for reading is a great habit to establish during lazy summer days.
When my children were younger, we would schedule reading time in the late afternoon. When the temperature was at its highest, a relaxing activity was most welcome.
Even if your children are reading independently, it is still important to read aloud to them occasionally. And if they are spending this time reading on their own, set a good example and use this time to catch up on your personal reading list.
Shop Garage Sales and Thrift Stores
You can find children’s books at amazingly low prices at garage sales and thrift stores. I have found great kid’s books for as little as a quarter.
Your library may also have a used book sale. Our local library sells children’s books for a dime.
Paperback Swap
When searching for a particular title, one of the first places I look is PaperBackSwap.com. Paperback Swap is not just for paperbacks. They have hardcover and audio books as well.
In a nutshell, this is how it works: You list books that you are ready to part with. If someone requests one of the books you have listed, you accept their request and mail the book via media mail. The cost to you is the cost of shipping your old book (around $2.50, depending on the book’s size). For each book you mail, you get a book credit.
When you see a book you would like, you simply request the book. You “pay” for the book with your book credit and another member sends the book to you.
Ebooks
For an unbelievable variety of reading material at a great price (often free), you can’t beat ebooks. For reluctant readers who wouldn’t be caught reading a book on vacation, the “cool” factor of holding a handheld device may overcome their resistance.
And ebooks are easily transportable. In fact, you can take your entire library with you on vacation.
How do you encourage summer reading for your kids?
Find more tips about frugal ways to obtain reading material at The Prudent Reader.
Do It Yourself: Framed Chalkboard

TheFamilyCEO.com shows you how to make homemade framed chalkboard.
Do you have a fun and frugal DIY idea to share? I’d love to hear about it! Read the submission guidelines and submit it here.
Do-It-Yourself: Raspberry Banana Frozen Yogurt Popsicles

AngelaStrand.com shows you how to make homemade Raspberry Banana Frozen Yogurt Popsicles.
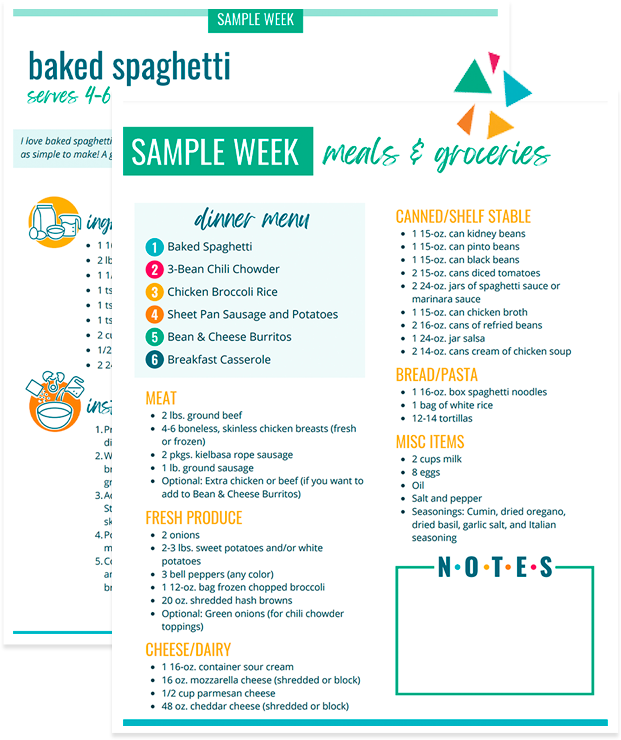
This week’s menu
 English Muffin Bread
Breakfasts
Green Monster Smoothies (plus cereal or oatmeal for the children)
Whole-Wheat Peanut Butter Pancakes, fruit
Omelets in a Muffin Tin, fruit
Morning Glory Muffins, hard-boiled eggs
Toast, scrambled eggs
Oatmeal
CerealLunches
Chicken, sweet potatoes, peas
Salad, hard-boiled eggs, toast, fruit
Peanut Butter & Jelly Sandwiches from the freezer
Snack-y lunch
Brown Bag Burritos
Leftovers x 2Snacks
Grain-Free Peanut Butter Chocolate Chip Cookie Dough Bites
Strawberry Ice Cream (dairy-free/sugar free)Dinners
Leftovers
Steak, baked potatoes, steamed veggies
Chicken, steamed veggies, wild rice, fruit
Barbecued Meatballs, sweet potatoes, steamed veggies, fruit
Dinner out at Subway
Pizza Pockets from the Freezer, fruit salad, steamed veggies
Lasagna Casserole, English Muffin Bread (toasted), steamed broccoli, fruit
What’s on your menu this week? Share details and/or your link to your menu plan in the comments.
10 Goals for This Week

The HEAV conference last week was fantastic!
There were so many details that came together, so many answers to prayer, and so many exciting things that happened in those few short days and the whole thing was a wonderful experience. I am so thankful to those of you who prayed for me, who took time to chat and share with me at the conference, and for those of you who made sacrifices to come to my workshops.
I was especially excited that I thoroughly enjoyed speaking five times, even if it was a little exhausting! It is truly God who is helping this once-very-shy-and- scared-to-death-of-public-speaking girl to actually feel at ease and confident in front of a room full of people!
This week, it’s back to regular life again — and there’s nothing I love more than quiet, slow-paced days at home with my children!
Last week’s six goals:
Family/Mothering Goals
1. Pick out new books to start reading aloud to the girls individually, as well as to everyone.
2. Write a love note to Jesse.
Personal Goals
3. Finish reading The Referral Engine: Teaching Your Business to Market Itself and
Without a Word: How a Boy’s Unspoken Love Changed Everything.
4. Sleep for at least 7.5 hours every night.
Business Goals
5. Finish tweaking workshops and powerpoints for Virginia Homeschool Conference.
6. Travel to Virginia Homeschool Conference with Jesse and Kathrynne for speaking engagement.
And this week’s six goals:
Family/Mothering Goals
1. Start reading The Railway Children aloud to all the children, The Missing Video (reading to Kathrynne), and Little House in the Big Woods (reading to Kaitlynn).
2. Go to a baseball game as a family.
3. Write a love note to Jesse.
Personal Goals
4. Finish reading The Referral Engine: Teaching Your Business to Market Itself
plus one fiction book.
5. Run at least five times; start weight-lifting program.
6. Listen to 2 hours of The One-Minute Entrepreneur.
7. Sleep for at least 8 hours every night.
Home Management
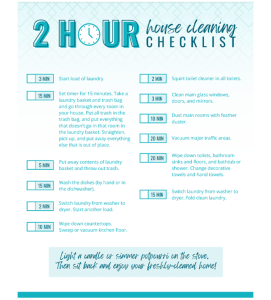
8. Clean out my bathroom drawers.
9. Experiment with one new homemade cleaner recipe.
Business Goals
10. Start new 4-week blogging series (more details coming this week!)
How did you do on last week’s goals? What are your goals for this week? I’d love to have you share your progress on last week’s goals and your goals for this coming week in the comments. Of, if you’ve blogged about it, leave your direct link below. Let’s cheer each other on to live purposeful and productive lives!
You can download a free customizable weekly goal-planning sheet here.
Six Things That Have Helped Me Improve My Financial Behavior

Guest post from Rebecca of Spirit Led Mom
It’s a proven fact: inflow must be equal to outflow. If not, there could be a crisis, such as a foreclosure or repossession, or your family could starve.
One of the few ways to have a good financial future is to set up a good budget and stick to it.
However, setting up the budget, isn’t always the hard part. Deciding where to spend the money (and then sticking to it) is usually more difficult.
I’ve learned from my group at church called Celebrate Recovery, that the first thing we have to do is admit we have a problem. If you’ve always been living paycheck to paycheck and bouncing checks or using credit cards, then you most likely have a spending problem.
I was in denial for a long time until I realized I had a lot of debt. I was not one to bounce checks or even reach the point of foreclosure and I’ve always paid my bills on time, but my issue was that I felt it was okay to have certain debts like credit cards and car loans.
Here are 6 things that have helped me improve my financial behavior:
- Write out the budget, either on a piece of paper or on a spreadsheet.
- Try a cash envelope system.
- Get rid of temptations to spend such as credit cards, debit cards, or cash in your wallet.
- Pay bills and buy necessities first.
- Get a support group of people who are doing the same thing as you
- Find a mentor who’s already gotten their spending under control.
What other things would you suggest adding to this list that has helped you improve your financial behavior?
Rebecca is a Christian mom to 4 beautiful children, a wife to a Godly man, and a full-time student. She loves sharing ideas with others and encouraging those who are struggling. She recently began blogging at Spirit Led Mom to share Bible verses and tips with other moms.
What the Most Successful People Do Before Breakfast

Guest post from Laura of LauraVanderkam.com
Once upon a time, I was a night owl.
I worked some late night jobs in college, and I’d still love to write until 2 a.m. Early evening seems to me like an ideal time to exercise.
But there’s just one problem with those scenarios. Well, several problems, really.
By 7 a.m., my three children are all up and ready to greet the day. Around 8 a.m., the emails and phone calls related to my job start coming in. That continues until dinner time, when the kids are not about to let me sneak out to go to yoga class.
And so, I’ve started to see the benefits in getting a jump on the day. Last summer, I got in the habit of going to bed on time and setting my alarm for 6:20 a.m. I’d dress quickly, then go for a 40-minute run while people slept. I’d come home refreshed, with lots of great article bouncing around my head.
What could you do if you got up 45 minutes to an hour before your children? What personal priorities could you make time for when you’re energized by a good night’s sleep? Here are four ideas for morning habits:
1. Exercise.
Figuring out how to stuff three kids in a jog stroller is not so fun. But as long as your husband or another relative is home, you can get up before the gang, go for a run (or swim, bike, or take an exercise class) and enjoy some blissful, endorphin-producing solitude.
2. Do spiritual work.
It’s hard to “be still and know that I am God” when one kid is screaming in a crib and another just knocked over her milk. Get up before your kids, though, and you can pray and read the Bible or a devotional book without being interrupted.
3. Bond with your husband.
If date night rarely happens, what about date breakfast? You don’t have to leave the house — but having coffee on the back porch together, with grown-up conversation can be a great way to start the day.
4. Create.
In an hour or less, you can write a blog post. You can write a few hundred words in a novel. You can design jewelry to sell on Etsy or indulge your crafty side and become a star on Pinterest. You can paint. You can take photographs if it’s light out. You probably can’t compose a piano sonata without waking everyone up, but you get the idea!
Moms often think there’s no time for personal passions once the kids come along. But there is time. The early hours before most people are eating breakfast are available to all of us if we choose to use them. If you want something to happen, why not do it first?
Laura Vanderkam, author of the new ebook What the Most Successful People Do Before Breakfast, blogs at LauraVanderkam.com
How to Stop Being Frustrated By Frugal Blog Posts

Guest post from Lisa of Cooking Up A Sale
I can feed my family of 6 for $10 a week! It’s really not very much work. I hardly spend any time at all hunting down deals! And you can do it too!
Okay, not really. I wrote the above tongue-in-cheek, because I’ve never heard anyone claim that.
But reading stories like this can be frustrating as you work to lower the number at the cash register. To avoid frustration when trying to cut grocery and household expenditures, keep it real… by keeping these things in mind:
There is no magic, one-size-fits-all formula.
It’s easy to read those “How I Feed my Family of X on $X Per Month” and get frustrated, discouraged, and even annoyed. “I’ll never get my grocery bill that low, because my daughter has a food allergy/my husband won’t eat meatless dinners/we eat all organic/my store doesn’t double coupons/I don’t have a garden.”
Maybe you’re right. Maybe your monthly grocery bill won’t ever be as low as the author’s. But remember that you will never find another family exactly like yours with all the same ages, appetites, allergies, taste preferences, access to discount stores, and so forth. This means that your approach to saving money on grocery and household items won’t be identical to anyone else’s.
Instead of getting frustrated, take what you can from the article or blog post and move on. And then read another article or blog post and take what you can from that one. Pick and choose your savings strategies to create your customized cost-cutting plan.
The savings will not fall in your lap.
If you want to see that dollar amount drop, it’s going to take some work.
There are so many free resources available, from coupon classes and food trucks to deal-matching websites and frugal-living blogs. But you have to make the effort to find them!
Likewise, any advice you read will not do you any good if you don’t put it into practice. You can read one article after another about how to menu-plan, clip coupons, find good deals on produce, can and freeze in season, and get your toiletries for free, but if you don’t follow through on what you’ve learned, you won’t see the savings.
Time is money.
I’ll never forget that important lesson taught by my high school economics teacher! Not only do you have to put the effort into following through on money-saving advice and strategies, but all that follow-through takes time.
Matching up sales with coupons, making all your kids’ snacks from scratch, planting a garden… those are all great ways to save money, but each requires a time commitment.
You can’t expect to shave your expenditures very much if you’re not willing to commit at least a small amount of time to money-saving tasks. Stated positively, this means that, in general, the more time you spend working on ways to save money, the more money you’ll save.
It’s all about making choices… and compromises.
For example: because of my time and space constraints (and my brown thumb!) I paid to join a CSA instead of planting a garden. Secondly, although I know that eating rice and beans for supper one or more nights each week would save us money on food, I decided to try to stretch our meat a little further rather than serving meatless meals.
- Maybe eating all organic produce is important to you.
- Maybe you have multiple small children, so you decide you aren’t going to play the drugstore game.
- Maybe you really need to tighten your belt, so you decide you’re going to have peanut butter and jelly sandwiches for lunch (or supper!) all month.
- Maybe baking isn’t your strong suit, so you decide to purchase snacks instead of make them from scratch.
All of these are choices that will affect the grocery line item of your budget. Some choices make it go up, and some choices make it go down.
Decide what’s important to you and your family, and then plan accordingly. And remember, different things are important to different people and this means that we all choose to spend (and save!) our money differently. Instead of getting frustrated with bloggers or commenters who make different choices than you, strive to appreciate the fact that there are so many different ways to save money.
There’s nothing new under the sun.
Well, maybe there is once in awhile. If you’re a newbie to frugal living, there’s probably a lot of new-to-you information available. But if you’re an experienced coupon-clipper/sale-shopper/
Sure, it’s fun to discover a new way to save money on food and household items, but as a rule, the same basics (coupons, discounted produce, menu-planning, stockpiling) are preached by everyone for good reason: they work.
Don’t get frustrated when bloggers or others don’t constantly spoon-feed you new information. Instead, challenge yourself to think outside the box all on your own — and then have fun passing your own money-saving idea on to others!
It’s important to be realistic about our savings efforts so that we don’t get frustrated and decide to quit trying. Let’s all remember to encourage each other in our savings endeavors!
Lisa is a Michigan wife and mother who loves to spend time in the kitchen. She enjoys the challenges of menu-planning around grocery sales and creating delicious food using on-sale ingredients. Lisa blogs about two of her favorite topics – food and saving money on groceries – at www.cookingupasale.blogspot.
com
How A Budget Changed My Life

Testimony from Tshanina of Thrifty T’s Treasures and Murfreesboro’s Treasures
At the age of 15, I received my W-2 from my employer and wondered what I’d done with all the money I had earned that year. (It couldn’t have been more than $2,000 but it was a lot of money to me). I had worked all that time and didn’t have anything to show for it.
I’d heard a lot about this guy called Dave Ramsey and decided to try budgeting. I was hooked and there was no turning back. Every dollar was spent on paper and if I didn’t have the money to pay for it, I wouldn’t buy it. I must say that paying cash for my first car made me appreciate it a lot more (even if it was a Chevette).
After graduation, I saved up enough money to pay my way through cosmetology school. My fellow students teased me because I always brought my lunch and would only buy a treat for myself once a week (that was all that I had in my budget). They would always say that I was going to be a millionaire someday (wouldn’t that be cool?)!
I was married at the young age of 20. We were debt-free, except for our house, and faithfully worked our budget each week.
A few years into our marriage, my husband decided the “grass was greener” on the other side of the road and left me for his girlfriend. I found myself desperately scared because I worked out of our home part-time. How in the world was I going to be able to pay the monthly bills on a part-time salary?
As I walked down that difficult road, I knew that the only way to financially survive was to continue to work my budget as I’d always done. There were many times when I wasn’t able to go out with friends, could only put a few dollars in my gas tank, or couldn’t get a special treat at the grocery store. Looking back, I’m not really sure how my finances survived but God always provided (He’s so faithful).
Had I not started budgeting at a young age, it’s hard to imagine where I would be and what my life would look like. Believe me, sticking to a budget can be extremely difficult, but it’s so worth it in the long-run. As Dave Ramsey says, “Live like no one else so that later you can live like no one else.”
Now at the age of 32 I am remarried and God has given me a wonderful husband. We continue to work our weekly budget and I’m excited to share that we are debt-free, including our home!
Whether you have $2,000 or $200,000, I strongly encourage you to try a budget. It just might change your life; it did mine!

Tshanina Peterson is passionate about helping people save money and blogs at Thrifty T’s Treasures and Murfreesboro’s Treasures. She works as a web designer, loves to laugh, and truly enjoys the simple things of life.
OVER-SPENDING EVERY SINGLE MONTH?Grab these FREE Budgeting Sheets!
Click here to download!
How to Make Homemade Puffy Paint

I saw an idea for making Homemade Puffy Paint on Pinterest the other day. And I knew we had to try this — especially since my children love to paint.
 It was really quite simple to make.

Though we quickly discovered we didn’t have enough paint brushes to go around. But cotton swabs worked great as stand-ins.
 Silas had a blast — and didn’t make too much of a mess, either.

While Silas had the “crazy painter” act going on (i.e. hurriedly dipping his paint “brushes” into the paint and slopping it onto the page), the girls were much more methodical.

They painstakingly worked to create pictures — and were a little frustrated that the paint solutions wasn’t as easy to work with as regular paint.

With some effort, we figured out how to make the paint and swabs work decently — at least you could tell what they were painting.

Kathrynne made a landscape scene.

Silas made what we decided was a tree — though I think it wasn’t intentional. 🙂

And Kaitlynn — ever the girly-girl — made hearts and a princess. The poor princess didn’t get a enough paint on her so that you could really see here, though.
It was a fun experiment and while our end result wasn’t as puffy and cool-looking as the original recipe on Skip To My Lou, we had fun trying something new and different together.
Homemade Puffy Paint Recipe
- 1 Tablespoon self-rising flour
- 1 Tablespoon salt
- Food coloring
Combine the flour and salt. Drop 3-4 drops of food coloring over it. Add in 1-3 Tablespoons water to make a smooth paste.
To make more than one color, repeat the steps above with a different color of food coloring.
Use paint brushes or cotton swabs to paint designs on cardboard.
When finished painting, microwave the design on high for around 30 seconds (until the paint puffs and it’s dried).
Recipe originally posted at Skip To My Lou
How to Feel Rich


Frugal Summer Fun from A to Z

Guest post from Sarah
If you’re looking for frugal summer fun, here are 26+ ideas to try with your family this summer! (And if you’d rather have a printable version, you can download one here!)
Free Printable Summer Fun from A to Z List
Art – From shaving cream and chalk drawings to real paintings for grandma’s art collection, the possibilities are endless!
Balloons, Bubbles, and a Big Box – Need I say more about simple pleasures?
Cookouts – Nothing brings people together better than a campfire or food cooked on a grill.
Drama – Put on family plays, puppet shows (make your own with old socks, plastic spoons, or toilet paper rolls with photos glued on for faces), have a talent show, make up your own music videos or commercials. Make sure to get crazy costumes as well!
Eat Treats – Cooking together and eating together bring you closer together. A couple of my favorite kid-friendly recipes:
- Juicesicle – freeze juice in plastic ice cube trays with toothpicks stuck in them or Dixie cups with a popsicle stick stuck in them.
- Simple homemade ice cream – 1 Tbsp. vanilla, 2 cup cream or half & half, 1 cup milk, and 3/4 cup sugar. Mix together and freeze.
Field Trips – Designate one day a week to go somewhere interesting and fun. Visit a library, fire or police station, check out a local museum, or tour a bakery or factory in your area.
Games – Pull out the board games or make up some fun games of your own for a memorable family game night.
Homemade crafts – Teach your child how to make a craft. Or learn a new skill like woodworking or sewing together. Take them to a craft store and let them pick out a kit.
Insects – Go on a nature hike and hunt for bugs and identify and learn about them.
Joking around – Be silly together: wrestle, tickle, or have a pillow fight.
Kite – Make a kite or buy one at the dollar store and take it to a park to fly.
Lake – Play on the beach, swim, or fish.
Movie Night – Rent a movie, go to a cheap movie theater or drive-in, or host your own backyard movie night.
Nature/ Neighborhood – Explore the area around your home whether that is nature or a neighborhood park.
Outside fun – Teach your children some of the fun games you used to play as a child such as: capture the flag, freeze tag, or hide and seek.
Photos – Take family pictures. Take goofy pictures. Go for a walk down memory lane by looking at old photo albums or make a new album or a collage.
Quality Time – Go on an outing with just one of your kids at a time so you can spend one-on-one quality time together.
Relatives – Visit your relative and extended family together.
Service Projects – Contact your local church or non-profit and see how you can serve as a family.
Tent – Go camping in your backyard or make a tent fort in your living room.
Undercover Secret Spy Missions – Anonymously do random acts of kindness. For a fun twist: try writing a secret note in white crayon on white paper. Then, attach watercolors and instructions to paint over the paper to reveal a secret message.
Vocal Talents – Recite a verse, perform a musical, or have a karaoke night. Make sure to get it on tape!
Water is Wonderful – Your kids can play for hours with just a kiddie pool of water. A few creative ideas to change things up:
- Have a water fight with balloons, water guns.
- Sponge fun: Give everyone a bunch of cheap yet absorbent sponges and a bucket of water to play with. (Get the car cleaned while they are at it.)
- Make your own sprinkler.
- Give your preschooler a bucket of water, a durable paintbrush, and a shady spot on the cement and let her paint pictures with water.
“X”-treme Sports – Try something a little more adventuresome like mountain climbing, rock climbing, or rappelling.
Yard Sales – Go to yard sales, thrift stores, and consignment sales. You can find great and entertaining items for the price of pocket change. Or, have your own yard sale. This is a great way to clean out and simplify and, if your kids get to keep the money they make, the will have more incentive to de-clutter!
Zoo – Visit the zoo or a nearby farm.
What are your favorite frugal fun activities for summer?
Sarah is a former teacher and current stay-at-home mom of three characters. She’s also a local columnist, blogger, and speaker. She loves to encourage and equip moms to grow Christian character in their families through fun and simple ideas and insight.
202 Summer Activity Ideas for Kids

Download a free printable list of 101 Summer Activities for Kids from My Blessed Life.

Read a great post with 101 Ways to Embrace Summer from Life… Your Way.
5 Ways to Stay Organized in a Small Kitchen

Guest post from Diana of Saving by Making
If you’ve ever lived in a small house or worked in a small kitchen, you know there’s a learning curve to cooking and baking without creating a giant mess. You can cover every inch of counter space with dirty dishes just by making a batch of muffins!
Here are five simple ideas to make life in a small kitchen a bit easier:
1. Use vertical space effectively.
Use wire racks to double the capacity of a shelf. Items will also be easier to remove when they’re not all stacked on top of each other.
Magazine holders work well because they’re tall and narrow–they help use vertical space without being so big that you lose items at the bottom.
2. Clear Your Counters.
Instead of piling up the dirty dishes next to the sink, put them right into the dishwasher or the sink. It might take some adjustment, but clutter-wise, it’s better to have dishes in the sink and your countertops clear.
Wash and rinse dishes in one side of the sink and let them dry in the other side (consciously keep that side clean). Clutter stays off the counters and the mess is contained.
Implement once-a-week clearing. Ideally, you’d do this every night, but if you have young children, your evenings are probably somewhat unpredictable. Instead, choose one day a week when your goal is to have all extraneous items off of the kitchen counters.
3. Containerize.
Choose a container that’s able to hold all the items in a certain category (cooking utensils, sharp knives, table linens, dishcloths, etc.). Then use that container to limit the amount of items you can have in that category.
Don’t use containers that take up more space than the items themselves. Some baskets look beautiful but their shape wastes space. Look for straight-sided baskets and boxes to use available space efficiently.
4. Develop good habits.
Unload the dishwasher in the morning. Make this part of your morning routine and you’ll be free to add dirty dishes directly to the dishwasher throughout the day. Like the “touch it once” rule for paper, if you don’t deal with a dish immediately, you’ll shuffle it around multiple times before it gets washed.
Rinse and drip-dry. If a bowl, plate, or measuring cup only had dry ingredients on it, give it a quick rinse and let it dry in the clean side of your sink. Your dishwasher will be less crowded and you’ll have a smaller pile of dirty dishes.
Wash as you cook. If you make this a habit, you’ll be washing dishes in short spurts and they’ll never stare you in the face, just daring you to get started.
5. Reorganize Frequently.
During times when you bake a lot, can a lot, pack lunches a lot, or have lots of guests, be willing to rearrange things so that they’re easy to access.
When the system stops working, take time to reassess your system and see what needs to be changed.
How do you organize your small kitchen?
Diana is mom to one cute 4-month old and wife to world’s best husband. Besides washing dishes, folding laundry, feeding the baby, and playing the piano for church, she blogs at Saving by Making about saving time and money by making things at home.