
Find more inspirational quotes here.

Saving Families Money Since 2007


A testimony by Kate from San Diego Deals and Steals
Our family is middle class, but we felt called to adopt. When we adopted our son from Russia we fundraised, but planned poorly and came home with $10,000+ in debt. We promised ourselves that we would adopt again, but that we would not do so with credit.
When we started our second adoption process we had a solid and realistic budget. We were completely debt-free (other than our mortgage) and had an emergency fund worth one month of living expenses.
Since we had two healthy children, we requested to adopt a child with disabilities as they are less likely to be adopted. Our adoption process cost nearly $30,000. (Note: Depending upon the circumstances, it can cost less and there are also grants available, such as through ShowHope.)
Our adoption journey was just over a year from start to finish. We saved for it in a variety of ways.
::We got creative and found ways to make extra money. My husband took on a few more hours. I made crafts, babysat, and started my blog.
::We cut our expenses in every way we could. We took advantage of free entertainment and bartered for all kinds of things to cut our already tight budget down. Every extra penny we saved was deposited into the adoption fund.
::We put our tax refund check as well as the small raise my husband got immediately into the bank.
::We stopped buying stuff. We paid for Christmas with Swagbucks and we rarely bought clothing or toys.
::We learned to be content. We didn’t pay for cable or video games. My husband drove his trusty ’99 Camry with over 260,000 miles. I learned to use my crock pot even more, instead of going out to eat.
::We were blessed with donations from friends, family, and strangers. People gave willingly as they understood this was not only a way to grow our family, but also an important ministry for our family to a needy child. We saw God provide as we were faithful in answering the call to adopt.
Our adoption story is long, but the short version is that in late May we were made aware of a girl who was to be born “any minute” that nobody in the immediate network was willing to adopt because of some significant (but correctable) special needs that had been determined by an ultrasound. In June, our daughter was born. With our savings from the previous year and the donations we had been gifted, we brought our daughter home with no debt.
We thought we had a $100 surplus, but we got one last lawyer invoice – for $110! — so we dipped into our emergency fund for $10! It was a tremendous blessing to bring her home without any debt associated with her adoption.

Kate lives in San Diego CA with her husband Harry, and kids, Josie (homemade), Silas (handpicked from Russia), and Charlotte (handpicked domestically). She is passionate about adoption and having fun in San Diego frugally. You can see more at San Diego Deals and Steals where she blogs about both.
Guest Post By Lucky
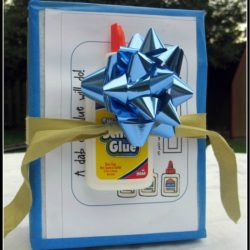
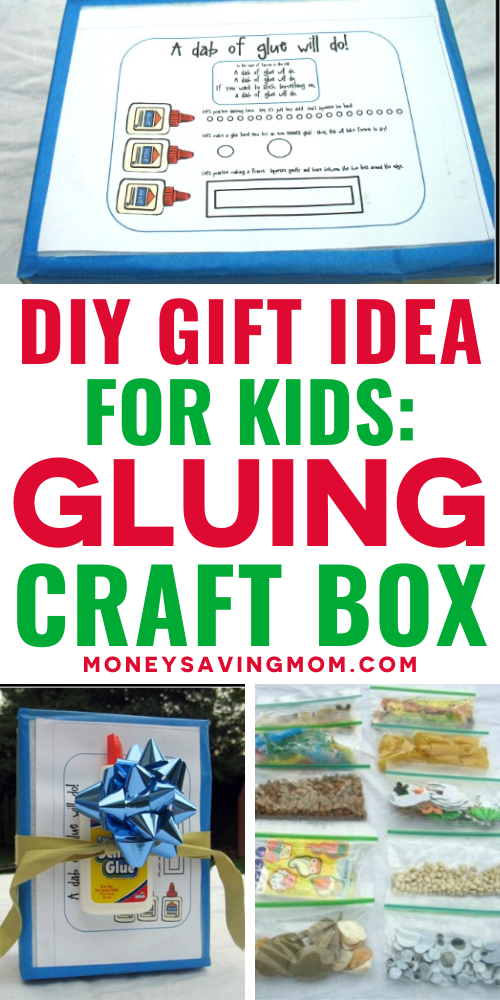
My 3-year-old son is a gluing fool. I decided to make him a Christmas gift that would embrace this (and keep him busy through the long winter to come).
Here’s what you’ll need to make your own Gluing Craft Box:

1. A shoe box
2. Material to cover the box (I used felt I had on hand and this printable.)
3. Painter’s tape
4. Scissors
5. Glue Gun
6. Washable school glue
7. Foam sheets
8. Snack size bags
9. Odds and ends for gluing
10. A piece of ribbon for decoration

Instructions:
:: Use the felt and a glue gun to cover the box. Use the four sides and the cover as a template, and cut out five pieces of felt. Glue each piece to the proper side.
:: Use the painter’s tape to tape over the seams on the sides of the box and top of the box.

:: Collect odds and ends around the house to fill up 10 snack-sized bags. Be creative. You can use left-over bits of pasta or beans from your pantry, leftover bits and pieces of fabric and string from craft projects, or anything else you can find. I used:
o Two types of pasta
o Two types of stickers
o Dried pinto beans and dried white beans
o Seashells and rocks
o Googly eyes
o Plastic dinosaurs and lizards from various prizes and goody bags that my son comes home with
o String, and rick rack cut into short pieces with buttons
:: Place the foam sheets at the bottom of the box (I got a package of 20 sheets at the dollar store). These will serve as the bases for my son’s gluing projects. You could also cut out pieces of card stock or cardboard.
:: Add the snack bags full of odds and ends to the box.
:: Close the box and use a piece of ribbon to tie the bottle of washable glue to the box.

Lucky is the mother of two young kids and a carb-intolerant kitty. She also loves making homemade bread.
Find other DIY handmade gift ideas in our Handmade Christmas series.


Guest post by Sean from Free Snatcher and One Smart Dollar
With the colder months almost upon us, you may be concerned about the cost of your utilities rising as the temperature outside goes down. The winter months already come with additional expenses due to the holidays, so why not follow a few tips to cut your heating bill down so you can spend less money on keeping warm and more money on the things you enjoy?
Before deciding to take on home renovation projects to save money on utilities make sure you figure out the cost of the improvement and how much you will really be saving each year. Compare these costs and decide if the upgrade to your home is worth it.
The investment you may make in energy efficient windows or a fireplace insulator may not pay off for a number of years, so you should calculate how much the project will cost, how much you will save on utilities each year, and how many more years you are going to be living in your home. This will help you decide whether the project will pay off in the long term. If you do undertake a home improvement project, check to see whether there are any tax breaks or homeowner’s insurance policy discounts you can qualify for adding energy efficient items to your home.
If you decide to forgo the home improvement projects because you do not want to spend a lot of money upfront, here are seven simple ways to reduce the cost of heating your home this winter:
You do not need to be living in tropical conditions at your home during the winter months. Find a temperature that is comfortable that you and the members of your household can live with, and keep the thermostat fixed at that temperature.
Also, make sure to turn down your thermostat when you are out of the house and at night when you go to sleep. You can turn it down manually, but a programmable thermostat works best because it does the work for you!
In addition, only heat rooms you actually use. If you don’t use your spare bedroom, storage room, or parts of your basement, don’t pay to heat them.
In order to keep the heat in your house, make sure that your blinds and curtains are open during the day. This will allow natural sunlight and warmth into your home to help heat it. At night, make sure to close your blinds and curtains in order to trap the heat in and not allow it to escape via the window.
You can buy plastic film to cover your windows, which will curb drafts and keep heat from escaping. Although this may not be the most attractive solution, it can help reduce heating costs.
Inspect your door frames to make sure no drafts are coming into your home through cracks or other spaces. If there is a crack, repair it yourself or have it repaired so cold air is not coming into your home. You can also purchase or make door snakes or put towels in front of the bottom of your door to prevent cold air from coming in.
Check your furnace to see if your air filter is clean. An unclogged air filter will help your heating system work more efficiently.
Air filters are very inexpensive to replace (they cost anywhere from $5 to $20) and will help your heating system to work as it should. You may also want to have your furnace checked by a professional in order to see if it is working in the most cost-effective way to heat your home.
Fans can be used during the winter in order to suck up warm air through your home and distributing it to help keep your house warm. Set your fan to blow air towards the ceiling. This will allow it to evenly heat the room.
Many utility companies offer specific tips by phone, email, or on their website to help you save money on your utility bills. Some companies will even send a representative to your home and conduct an energy audit and will offer ideas on how to help you use less energy and reduce your utility costs.
Sean Bryant is a personal finance blogger at FreeSnatcher.com and OneSmartDollar.com. He enjoys helping people spend and manage their money more effectively.

Let Birdz Fly shows you how to make T-shirt Yarn. You can use this to make a t-shirt yarn necklace or knitted dishcloths.
Do you have a fun and frugal DIY idea to share? I’d love to hear about it! Read the submission guidelines and submit it here.

Guest post by Kelly from Fru-Gal
I have been couponing for a little over two years now and it has become a complete way of life for me and my family. Not only does it save us hundreds of dollars a year on our grocery, drugstore, and clothing budgets, but it has enabled us to give abundantly to people in need on a regular basis!
The relative ease in acquiring free products through couponing, playing the “drugstore game,” taking advantage of daily deal sites, and signing up for freebies quickly replenishes my stockpile each month. Therefore, I have become more creative and proficient in how I use these freebies to bless others in times of natural disaster or personal crisis:
Natural disasters are a continuous reality in our fallen world. We’ve seen this clearly over the past year with the tornadoes in Tuscaloosa and Joplin, the unbelievable tsunami in Japan, and flooding in Minot and most recently the Northeast. Monetary donations are always very helpful during these disasters, but personally, I have been able to give more and more frequently through donating actual needed items from my stockpile.
After a natural disaster, I research online for organizations accepting items and try to specifically donate what they are asking for. Usually, these items include nonperishable food, diapers and other baby products, feminine care products, toiletries, and new clothing. I usually have an adequate supply of these items from my couponing and can quickly pack and send a box to these disaster areas throughout our country.
Operation Christmas Child is one of my favorite ministries. I love the impact of this ministry on children all over the world, and personally know adults who received a life changing shoe box as a child.
It’s rather easy to fill a shoe box with quality items I can get for free or nearly free by couponing. These include toothbrushes and toothpaste, toys, socks, hats, school supplies, hard candy, and much more.
Personally, my goal for 2011 is to fill 10 shoe boxes for $10 total. I have already succeeded in this goal and I’m currently working on my eleventh box. For a thorough list of items that can be included in an OCC shoe box, please see these gift ideas.
Voice of the Martyrs sends “Action Packs” to families of martyrs who are struggling in restricted nations such as Pakistan, Iraq, and the Sudan. They have a specific list of items needed for each country which includes pens, bar soap, blankets, towels, writing pads, flip flops, colored pencils, and more.
For more information on how to send an Action Pack, visit the VOM site.
A Blessing Bag is an easy way to help a homeless person when you drive by them at a busy intersection. Simply put essential items in a gallon Ziploc bag and keep your Blessing Bag in your car.
The next time you see a homeless person asking for help, you will already be prepared to bless them. Potential items to include can be: chap stick, small packages of tissues, toothbrushes and toothpaste, mouthwash, combs, bar soap, snacks, socks, a note of encouragement, and a list of community resources.
Due to my husband’s allergies, we don’t own a pet, but I can still accumulate free pet supplies every few months. Since I don’t need these freebies, I save and then send them to Humane Societies in natural disaster locations. Every little bit helps when shelters become overloaded from displaced pets.
These are just some of the ways I have found to bless people out of the abundance I have through frugal shopping. So next time you sign up for freebies or get free items at the store through couponing, take a second look at these items and see if you can donate them instead. I’m a stay at home mom and our family lives on one income, but I still have enough margin to give when I can get many items for free on a weekly basis.
Kelly is a wife and stay at home mom to a very active one year old. Her blog, Fru-Gal.org, is focused on frugal living to allow for more generous giving to people in need. She is an avid supporter of Operation Christmas Child, Voice of the Martyrs, and Gospel for Asia, and she supplies Disaster Relief Boxes to areas in the U.S. that have been struck by natural disasters using items she has gotten for free.

Paige emailed in the following tip:
Last night I needed two cans of cream of mushroom soup for a recipe, and I saw that we only had one. I happened to have two small cans of mushroom bits and pieces from Aldi that I hadn’t used, so I made my own, instead!
I just heated two Tablespoons of butter in a saucepan and then stirred in two Tablespoons of all-purpose flour. I then added in two cans of mushrooms (undrained) and stirred in a bit of milk (you can also use broth) until texture was creamy.
It was the tastiest cream of mushroom soup I’ve had! Since it wouldn’t be wise to buy the two small cans of mushrooms every time to make this, I am going to go to Aldi to buy fresh mushrooms when they are on sale, chop them fine, saute them in butter and then add the flour and milk. -Paige

Remember when I posted about the gal who made 46 freezer meals in four hours for a total of $95? Well, not only did I get to meet this amazing woman at the Harrisburg Reader Meet-up, but she also told me that she’d recently posted about her Football Food Freezer Cooking Frenzy.
Head over and read how she made a bunch of Football Food for her Freezer in just a matter of a few hours. I promise you’ll be inspired!

You know how I ran a guest post all about the benefits of menu-planning last week? Well, I totally dropped the ball on menu-planning for the first two days of this week.
I had all these great visions of maybe doing an Eat From the Pantry Week and blogging about it. But I didn’t make it very far with that idea–especially after I opened my fridge and freezer and found no motivation whatsoever to pull together meals.
In fact, for the sake of complete honesty here, I’ll tell you I’ve not showered in two days nor have I made it out of my pajamas. (You will be very happy to know that I did change into another set of pajamas, so at least I had clean pajamas on, if that counts for something! :))
There were some delays with our flights coming back from Relevant and we didn’t end up making it home until after 9 p.m. on Sunday evening. So my plans for getting things unpacked, laundry started, and a to-do list made for Monday morning went straight out the window.
I slept in on Monday in an attempt to catch up on multiple nights of little sleep, got up late, and then Monday was a blur of playing catch-up and homeschooling. I had an idea for dinner, but 5 p.m. came and went without me pulling anything out of the freezer to thaw.
So guess what I did? Oh yes, I know it goes against everything I’ve preached here again and again… but I called Jesse and asked if he could pick up Subway.
I know, you probably just fell out of your chair. But it’s true.
And I decided I wasn’t even going to feel guilty about it. Instead, I enjoyed the yummy sub and decided to switch Friday night’s usual dinner out for Monday and call it even. Sometimes you just gotta do what you gotta do and give yourself grace for doing it, instead of feeling like a failure.
However, I did make myself pull together a last-minute menu plan for the rest of the week this afternoon so that I actually had a plan at 5 p.m. tonight! Here’s my very simple menu plan for this week:
Breakfasts
Granola bars
Cereal x 2
Steel Cut Oats with dried cranberries
Pumpkin Ginger Waffles
Toasted bagels, scrambled eggs
GranolaLunches
Hard-boiled eggs, pasta, peas
Carrots, hard-boiled eggs, granola bars
PB&J, carrot sticks, apple slices
Macaroni & Cheese, applesauce
Tossed salad hard-boiled eggs, feta cheese, and dried cranberries
Leftovers x 2Snacks
Fruit/veggies
Chocolate Banana Bread
Cheese & CrackersDinners
Subway 🙂
Barbecue Chicken, potatoes, steamed veggies
Chicken Parmesan Casserole, Easy Italian Breadsticks in the Bread Machine, fruit salad
Cheesy Chicken & Rice Bake, steamed veggies, fruit
Cheese Ravioli, leftover breadsticks, fruit salad
Dinner at extended family’s house
Dinner with friends (we’re bringing a fruit salad)Freezer Cooking
Pumpkin Ginger Waffles
Homemade Applesauce
Cheesy Chicken & Rice Bake
What’s on your menu this week? Share details and/or your link to your menu plan in the comments.
I had all these plans of blogging a short recap everyday while we were at the Relevant Conference last week. But, ahem, that plan went completely by the wayside. I got so involved in just enjoying the wonderful people who were at Relevant that it was hard to break away to even check my email or post.
However, since I had promised some recaps to many of you, here’s a one-post recap of some of the events (it would take at least 10 posts to even try and scratch the surface of all that went on and all I learned and gleaned!).

Since we were one of the Relevant sponsors, we were generously given three display tables. The problem? We don’t really have any products to sell.
However, I hated for the table space to go to waste, so I asked if we could give stuff away from some companies we love and have worked with in the past. The Relevant coordinators kindly gave us permission to do that, so we contacted a few companies and asked if they’d be willing to send free items for us to give away.
Well, let me tell you, we were blown away by the generosity of these companies. In fact, we were a little overwhelmed to arrive at the hotel and have 30 boxes of free stuff waiting for us to go through and organize. Gratefully, I’d brought my assistant, Erika, along and she transformed the 30 boxes into a beautiful display.

I was worried about what we were going to do with all the freebies and whether or not we’d really be able to get rid of everything. Well, I should have known better. As soon as the 250 bloggers attending the conference showed up for dinner, our table was pretty well mobbed. It was so much fun to get to be the bearer of freebies. It felt a little like blogging about freebies, only I got to hand-deliver them this time.

People kept asking, “Is all of this really free?” And then they’d go pass the word that we had free stuff and it was going fast!

The planners from Home Educating Family were especially big hits. Erika and I could hardly keep the stack stocked. And long after we were completely out, people kept coming back asking if we had anymore left.

My publisher also offered to give away a free pre-release copy of my upcoming book, The Money Saving Mom®’s Budget, to every blogger who was willing to sign up and do a review on their blog. I was so humbled and blessed at how excited everyone was about the release of my book. Dozens upon dozens of bloggers signed up and we ended up running out of sign-up sheets!

(You can get a little sneak peek of my book’s cover here. It’s now available for pre-order on Amazon.com, too, for those who have been asking to see what it’s going to look like! I can hardly wait for the release date in January!)

One of the best parts of the whole event was getting to introduce bloggers to some of my favorite products and companies — like The Imagination Station books, All You magazines, Tropical Traditions coconut oil, and Marie-Madeline Studios products. My sister even made a bunch of bars of homemade soap that I gave out–which people loved!
Friday afternoon, I hosted the first official Money Saving Mom® Reader Meet-Up. While there were some hiccups and some last-minute scrambling (thanks to those of you who came early and patiently endured me running around like a chicken with my head cut off!), it turned out incredibly well.

I was so blessed in meeting all of the amazing women who came. I laughed until I cried at how hilariously funny you all were during the games. I was touched deeply with your stories that you came up and shared with me individually at the end. And I was so humbled that many of you drove 30 to 100+ miles to attend this event.
 (A group picture of the reader meet-up. Such beautiful ladies!)
Meeting these precious readers in person solidified something I’ve long believed: I have the best readers on the planet. It’s hard to describe in words just how much of a blessing my readers are to me on a daily basis. And I can’t wait to do more get-togethers in 2012 in other parts of the country so I can meet more of you face-to-face!

Guest post by Lacey
One of the things motherhood has taught me–besides how much I love my daughter–is to value community. Yes, my baby girl is great, and I adore spending time with her, but time with other moms is incredibly important for the heart and soul. Too much time in isolation, and I find myself growing discouraged, impatient, and less likely to embrace the goodness I have been given.
Spending time with other women who are in the same spot in life provides encouragement and perspective. But, if you’re not careful, meeting up with someone else or a group can turn expensive quickly. It’s easy to say, “Meet me for lunch,” or, “Let’s get coffee,” and not think about how much money you’ll be spending.
So, here is a list of 20 things you can do with others for little or no money that still allow you to find the community that we all need:
1. Go to a park and enjoy a pretty day.
2. See if your city has a Science Spectrum. In the city where we just moved, a year long membership costs just $5 a month–and I can invite another adult woman for free, as long as our children are under age three.
3. Make your own coffee and invite someone over. If you want to make it extra special, try making some homemade syrups or your own lattes.
4. Rent a redbox movie and pop your own popcorn.
5. Walk around the neighborhood and enjoy a pretty day.
6. Do potluck lunch. Suppers are often hard to do (and that’s family time), but a potluck lunch with several friends could be a lot of fun!
7. Have a dessert buffet: everyone brings one snack or sweet to share! (This could be a lot of fun around Christmas time!)
8. Start a book club.
9. Have a baby sitting circle–one mom watches the other kids while the other moms shop or run errands.
10. Have a baking day and get caught up on all of your baking for the month.
11. Take a picnic.
12. Take a nature walk with all your children.
13. Walk the mall (and window shop!).
14. Visit a museum.
15. Hold a craft party, or any other “skill:” knitting, photography, etc.
16. Make brunch.
17. Have a weekly/monthly group where each member takes a turn teaching the others how to do something.
18. Start a blogging group.
19. Plan menus together.
20. Create an accountability group.
To Remember:
::It doesn’t matter what you do. The point is to build a community of people that helps you stay encouraged and in the proper perspective.
::In order for this to happen, the people with whom you are in community (yourself included) need to be real, vulnerable, and honest. This is the surest way to build solid community.
::As well, each person needs to be willing to be sensitive to the needs of others—listen at least as much as you talk (if not more). Keep your eyes out for new people to include–remembering that you were once where they were!
What are your best tips for finding and building community, without spending a lot of money?
Lacey lives in Lubbock, Texas with her husband, Kade, and sweet daughter, Selah, where they work at Redeemer Church. She regularly captures her musings on all things related to being wife, mommy, and recipient of grace at her blog. There’s usually a cup of coffee involved.
Testimony from Mauree who blogs at Today is Sweeter
When my husband and I got married almost three years ago, I was in the process of paying off numerous credit cards, a small school loan, and a car loan. Though I had made tremendous headway, we still had close to $8,000 to pay off when it was all said and done.
As a result of my husband’s personal commitment to saving before we were married, we were able to pay off all but the car loan within days of coming back from our honeymoon. The car loan was paid off a few months later after we had “packed” some more away. That left us completely, 100% debt free!
Because we had been debt-free for that first year of marriage and saving on a monthly basis, we were able to purchase a house and take advantage of the First Time Home Buyer’s Credit. We received a check for $8,000 a few months after closing on our home. While it was tempting (okay, really tempting!) to splurge on new furniture and home upgrades, we decided to simply leave those funds in our savings account as an emergency fund and to do any decorating and small home improvements out of what we were saving monthly.
Saving for a rainy day was hard at times, but because of our resolve to stay debt-free and to save for the future, we were blessed to have the ability to pay cash for three unexpected expenses over this past summer. That “rainy day” certainly came!
During a morning thunderstorm, a large tree fell on our deck leaving us with tree removal and deck repair costs. A week or so later the 25-year-old oven that came with the house gave up the ghost and had to be replaced. And while we knew our home would be in need of a new roof when we bought it, replacing it came sooner than planned and had to come out of our savings account this summer as well.
While it would have been easy to spend that “free” money on the non-essentials, I’m so thankful that we chose to save it. By choosing saving over spending, we have the peace that those unexpected expenses are paid in full and we have not gone into debt to meet those needs.
Maureen Polderman is a stay-at-home mom, private piano instructor, and writer of the blog Today Is Sweeter. She and her husband Josh have one son, Blake, and live in Wyoming, Michigan. They are striving to live debt-free and cherishing the sweet days God gives them!

Guest post by Jessica from The Abundant Wife
I have been following Money Saving Mom® for over a year now, and I have long been curious about the concept of Freezer Cooking. As I was creating my meal plan for this week, I looked on Crystal’s website for some Freezer Cooking Recipes. It was then that I realized that her recipes were not all that different from recipes that I already use. This was a new idea to me!
Then I reviewed her instructions for how to begin Freezer Cooking. I had always imagined Crystal gathering with her friends to cook all their meals for the month together. I was surprised to see that Freezer Cooking can be done any time of day, and does not require a team of cooks. Here are the top ten things I learned from Freezer Cooking for the first time:
1. Freezer Cooking can be done using what you already have in your kitchen, with recipes your family already enjoys.
That big pot of soup you made for dinner? Just freeze the leftovers in individual meal sizes, and pop it in the freezer. Voila! Now you’re freezer cooking!
2. Freezer Cooking can be done at any time during the day.
I made my soup for dinner, and prepared Mexican rice (to freeze) at the same time.
3. Freezer Cooking reduces anxiety.
You don’t have to experience stress at 5 p.m., wondering what to make for dinner or if you’ll have time to cook it.
4. Freezer Cooking simplifies meal planning.
When you are making your weekly meal-plan and grocery list, you can count on some meals already in your freezer.
5. Freezer Cooking reduces waste.
You don’t have to worry about food spoiling before you can cook it, or about running out of an ingredient before you can use it.
6. Freezer Cooking and using Supercook.com is a great way to utilize what’s already in your pantry.
You can list your current ingredients in your free Supercook account, and the website will give you hundreds of recipes based on what you already have. Choose one to cook, and then freeze it for later!
7. Freezer Cooking is great if you have children who grow impatient while you’re cooking.
By planning ahead, I can cook during a quieter time of the day. With a meal in the freezer, I can spend less time on food prep and more time with my kids.
8. Freezer Cooking will save you clean-up time all week long.
My husband loves this part. He usually washes the dinner dishes, so Freezer Cooking means less work for him!
9. Freezer Cooking gives you more opportunities to be generous.
Once you have food prepared, it’s easier to offer a meal to someone in need.
10. Freezer Cooking saves money!
You’ll be less likely to buy more expensive convenience foods at the last minute when you have a meal in the freezer ready to go.
I could keep talking all day, but I’ve got to go defrost our dinner.
Jessica’s family of four just moved 2,700 miles from Maryland to California for her husband’s new job. When she’s not freezer cooking, you’ll find her blogging at The Abundant Wife about faith, family, and finances.

Guest post by Melissa from Mom’s Plans
By the time my second child was born, I was a die-hard freezer cooking mama. I had my freezer cooking session every month, and we ate meals from the freezer every week. I couldn’t imagine it any other way.
After my third child was born, I relied on freezer cooking even more. I followed Crystal at Money Saving Mom® and Jessica at Life as Mom and had my freezer cooking day on the same weekend everyone else did. I loved feeling like I was part of a freezer cooking community.
But then I quit my outside job so I could stay home. Without my income, our family could not make ends meet, but I was willing to sacrifice so I could be home with our kids.
We trimmed our budget, but I still found it necessary to bring in some money, so I began to do work as a freelance writer and virtual assistant in the evenings when my kids were sleeping. God does provide, and slowly more and more work trickled in until I was making enough to supplement our budget so that it finally balanced every month.
However, I was no longer able to get all of the work done in two to three hours at night. My husband watched the kids on the weekend so I could go someplace quiet and write for a few hours on Saturday and Sunday in addition to my evening work time.
My weekend work time was when my freezer cooking time used to be. I could no longer find a place to fit a large freezer cooking session, and I was growing frustrated. Shortly before this, Crystal admitted that having a freezer cooking day was no longer working for her, and she turned to freezer cooking in an hour.
I loved the concept! Seeing Crystal’s flexibility created a new way of thinking for me. Instead of stressing about not being able to freezer cook, I gave myself permission to realize that in this season of life, it was no longer working for me.
The five o’clock hour with three small children still gets crazy, so I had to come up with another plan. Now, I prepare our meals based on the week. If it has been a chaotic week, then on the weekend I do what I can which may be only prepping some foods such as veggies to make dinners easier on the week nights.
Last weekend I had time to prep all of our upcoming meals for the week night and put four additional meals in the freezer. This will give me some leeway when I have another chaotic week. Other times I cook all week long, but I double each recipe so I have five new meals in the freezer for another week. In short, I do what I can, and it seems to be working.
Here are some of my favorite meals to put together quickly:
Don’t forget if you work outside the home to take some of these meals and put them in the freezer in single serving packages. They make quick, nutritious lunches and will save you a bundle.
Also, I love to cook up a bag of dry beans and put the extra in the freezer. I just pull them out when I am cooking; it is like using canned beans without the extra price and sodium.
Thanks to Crystal’s inspiration, I have modified my cooking plans, which has lifted my guilt and made me feel less tense about meal preparations. It is still busy around our house, buy I am much more relaxed about feeding my family.
Melissa is a work-at-home mom to three little ones ages 7, 2, and 1. She blogs at Mom’s Plans where she shares her family’s desire to learn to live a fulfilling life on less.

Ever since I posted this knit bracelet, I’ve wanted to try it making it. So this past Saturday, I pulled out a t-shirt from the rag bag and got to cutting.

I initially was going to do the four-finger knitting, but that didn’t go so well. I settled on the two-finger knitting and that was much easier.
After two tries, I finally ended up with a decent finished product. The girls were especially impressed that I made that out of an old stained shirt!

Speaking of knitting, here’s my latest dishcloth. Slowly but surely, I’m seeing some improvement in my stitches–and that’s encouraging to this not-crafty-at-all gal. 🙂


