


Tutorial by Heather from Life in God’s Country
Materials needed:
- For 12-12″ napkins and 2-20″ bread basket napkins:
- 2 1/3 yards fabric (44/45″ wide)
- Thread to match fabric
- Rotary cutter & mat (not required, but very helpful)
Instructions:
Wash your fabric then iron it.

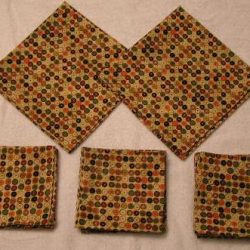
For the breadbasket napkins, cut a strip 22″ wide by the width of the fabric (44/45″). Cut this in half. You should have 2-22″ squares. (Trim to make it square, if necessary.)
For the napkins, cut the remaining fabric into strips 14″ wide by the width of the fabric (44/45″). Then, cut each strip into 3 equal pieces. You should have 12-14″ squares. (Trim to make it square, if necessary.)
To create the hemmed edges:
On each piece of fabric, using a straight stitch, sew a 1/4″ seam on all 4 sides. Trim the corners so when you fold in the sides, you’ll reduce the bulk of fabric.

Fold the fabric (wrong sides together) on the stitching line then fold it in again. Iron the hem to hold it together before you stitch it.

Using a straight stitch (or decorative stitch, if you prefer), sew the folded edges down.
Fold each piece in quarters and you have a nice gift set of napkins.

Heather and her husband, Phillip, own Bogie’s Deli in downtown Abilene, TX. Heather is a stay-at-home mom to their two girls, ages 3 and 10 months, and is actively involved in MOPS. Visit her blog, Life in God’s Country.


 Do you have a fun and frugal DIY idea to share? I’d love to hear about it! Read the submission guidelines and submit it
