
The Imperfect Homemaker has a great list of 25 Free Fall Activities.

Saving Families Money Since 2007


Note from Crystal: Thanks so much for joining me for the Lunchbox Freezer Cooking series. It’s been a fun adventure! For the last post in this series, Michelle from The Willing Cooking is sharing an allergen-free recipe for those of you who have food allergies in your home.
Guest post from Michelle of The Willing Cook
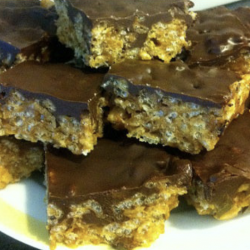
A good friend of mine makes Peanut Butter Scotchies on occasion — a delicious and calorie-loaded recipe. I have had the pleasure of indulging myself in this treat a few times, and let me tell you, there is a reason why she doesn’t make them very often. 🙂
Since we have wheat, dairy, egg, soy, corn, and a few other allergies at house, I would be the only one who could eat Peanut Butter Scotchies if I made them. While I’m sure I can enjoy an entire pan of these bars, I certainly don’t need to. So, I embarked upon a mission to make an allergen-friendly (and a little healthier) version that my family can share with me.


My first attempt at these bars, while delicious, almost sent us on an emergency dentist trip because they were so hard. I couldn’t leave them alone though — the taste was amazing! After a bit more tinkering, I finally got the recipe down and I’m thrilled to share this recipe with you today.

(makes a 9″x13″ pan of bars)
These bars are so good, you’ll never guess they were allergen-free!
Michelle is blessed to stay home with her three children (ages 10, 7, and 4), while her husband works to provide. When she’s not experimenting with allergy-friendly meals, she’s blogging about it at The Willing Cook. Through the Willing Cook, her hope is that you gain peace of mind in your kitchen (and your pocket book) and are able to serve those you love who suffer with food allergies.
Are you joining us for Lunchbox Freezer Cooking? If you’ve blogged about a lunchbox recipes you’ve made for your freezer, leave a link to your post and recipe below. I can’t wait to see your yummy recipes and ideas!

I don’t know about you, but I am so excited that it’s finally fall. It’s my very favorite season of the year for a lot of different reasons, one of which is that pumpkin is in abundance!
In celebration of the beginning of fall, I’m going to be featuring A Week of Pumpkin Recipes starting on Monday. I’ll be trying quite a few new recipes and can’t wait to share photos and details of how they turn out!
Can’t wait until Monday for pumpkin recipes? Check out Andrea’s Pumpkin Recipes round-up post. And you can also get a sneak peek at some of the recipes I’m considering making over on my Pinterest page.

As you well know, I tend to be just a little bit frugal. Er, well, maybe more like a lot frugal. My husband says that if I were left on my own, I’d never spend any money on myself. I love to spend money on others, but when it comes to me, I’ll just keep using and re-using whatever I already have.
That’s not always a bad thing… especially considering all of the money it has saved us over the years. Sometimes we lose sight of just how much these simple things we do really benefit our lives. And it’s time that we celebrated the simple savings!
Welcome to Frugal Photo Friday! For the next month I am partnering with Rebekah from SimplyRebekah to bring you a fun series dedicated to inspiring others and celebrating our simple savings. We’ll be sharing photos each Friday of simple ways that we save money. And we’d love for you to join us!
How it will work:
Each Friday in October Rebekah and I will share pictures on our blogs that demonstrate ways that we save money. At the end of our posts we’ll have a link-up where you can share a link to your own blog post. Your Frugal Photo Friday post should include at least one photograph along with a brief caption or story that explains how you saved money.
We will have themes for each Friday. Feel free to share photos that fit either of the themes for that week.
October 5 – Kids, Bath & Beauty
October 12 – Food & Fun
October 19 – Home & Decor
October 26 – Anything Goes!The Details:
- No blog? You can also share your pictures on Twitter or Instagram using the hashtag #FrugalPhotoFriday.
- Frugal Photo Friday posts will go live on Friday mornings and the link-up will stay open until Sunday night at 11:59 PM.
- You will only need to share your link on one of our blogs and it will automatically be displayed on both blogs.
- Please link directly to your Frugal Photo Friday post and not to your homepage.
- Feel free to grab the Frugal Photo Friday button to use in your post.
- Please include a link back to Money Saving Mom or Simply Rebekah in your post so others can be encouraged by all the savings.
- There is no time limit on your savings. We want to see things that saved you money this week, last month, last year, or beyond!
To kick things off, Rebekah and I are each sharing a photo of a simple way we save. Here’s mine:
 Making Starbucks at Home
Wait, you don’t think Starbucks coffee is frugal? Well, let me tell you, it’s a whole lot cheaper to make your own Starbucks at home then to buy it at the coffee shop.
Sure, I’d save even more money if I gave up coffee altogether. But brewing my morning cup puts a smile on my face. I sit and savor it — and it just starts my day off on the right foot.
After lots of practice, I’ve learned how to make coffee at home just exactly how Jesse and I love it. In fact, we both agree that I can brew a better cup of coffee than any coffee shop we’ve visited.
So not only have we saved a lot of money by making coffee at home, we just plain think the coffee we make at home is better. Win-win!
Head over to SimplyRebekah for her photo and tip on how she saves money on gift wrap.

These roll-ups are something fun and a little different to include in those school lunches. They also are an attractive, can’t-go-wrong addition to any table of finger foods.

Guest post from Brigette Shevy
This “recipe” is so simple that I don’t think it can even be called a recipe.
This is a great basic idea to be creative with. Sometimes I add chopped olives or flat leaf spinach for more variety and color (just make sure you don’t add anything wet or bulky). You can also make these up several hours (up to a day) in advance and keep them covered in the refrigerator until you are ready to serve them (although I can’t vouch for the make-ahead factor if you’ve added in extra ingredients).
I make these look a little more like “pinwheels” (or flowers, or windmills, or whatever you think they resemble!) for my children’s lunches at home by arranging them with apple/orange slices and a carrot stick (see photo below). They love it! So much so, that I gave up on trying to get a photo I was happy with – it was just too traumatizing for my 19-month old to see “his” lunch and not be allowed to touch it. 🙂

They should stay secure without a toothpick.


Make sure to share and save it on your favorite platform below!
Meal time just got so much easier!
Brigette is a full-time wife and mother who is blessed with three amazing bundles of energy (ages 5, 3 and 1). She enjoys music, experimenting in the kitchen, homeschooling her children, finding great deals, long-distance running, and anything chocolate.

I find a lot of great ideas on Pinterest… but pinning something doesn’t do anything unless I actually, you know, try the idea. So I thought it’d be fun to challenge myself to do at least one Pinterest experiment every week — and blog my results. You can follow my personal Pinterest account here, if you’re interested.
Update: So it looks like this isn’t really that effective of a cleaning agent after all, according to this post. You’d probably just be better off sticking with vinegar or baking soda.
I saw this recipe for Homemade Toilet Bomb on Pinterest and knew I had to try it. It just looked plain fun — plus, it looked so simple.
Well, apparently I forgot what I had learned back in grade school about the reaction you’ll get when you mix baking soda and vinegar. Um, yup, I ended up getting my toilet and my kitchen table cleaned out of the deal. 😉

Truthfully, the recipe worked great, but I think it would work just as well to scrub the toilet with baking soda and/or spray it with vinegar. But if it makes you feel better to clean with something that looks kind of like Scrubbing Bubbles (versus straight vinegar or baking soda), then this is your recipe.
But learn a lesson from me: either mix it up in a big container, directly in the toilet, or cut the recipe in half. 😉
1/4 cup baking soda
1/4 cup white vinegar
5 drops essential oil
Mix together in a large container, dump into the toilet, and scrub away. 🙂
Original recipe from How Does She
Have you tried any ideas or recipes you’ve found on Pinterest recently? If so, I’d love to hear how they worked out for you. Feel free to leave your blog link in the comments if you blogged about your experiment!
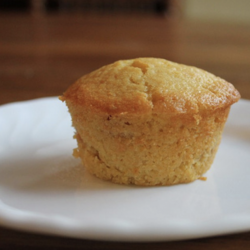
Looking for a fantastically frugal and delicious lunch or after-school snack for your kids? Try these quick and easy corn dog muffins!

There’s a big debate over whether or not corn bread should be sweet or not… if you’re in the camp that says it should not be sweet, then this recipe probably isn’t for you. 🤣
But if you love a good piece of sweet, moist cornbread, you have got to try my World’s Best Honey Cornbread recipe. Because you know I don’t dub something “world’s best” unless I believe in all sincerity it is.
I took that cornbread recipe and used it to make these easy and delicious “Corn Dog Muffins”, which are basically just a much easier way to make homemade corn dogs.
You don’t get to eat these on a stick like a typical corn dog, but the taste is exactly the same.
Last time I made Corn Dog Muffins, I put in a big chunk of beef hotdogs in the center of each muffin.

I decided I wasn’t completely sure that I loved that idea, so this time, I cut the beef hotdogs into chunks and then put a spoonful of batter on the bottom of the muffin tin, some chunks of beef dog, and topped it with another spoonful of corn bread batter.
The results were delicious and kid-approved!


1. Preheat oven to 400 degrees. Grease a 12-cup muffin pan and set aside.
2. In a large bowl, cream sugar and butter.
3. Add in eggs, honey, and milk and mix well.
4. In a smaller bowl, mix flour, baking powder, corn meal and salt.
5. Carefully stir dry ingredients into wet ingredients (Do not overmix — the batter will be lumpy.)
6. Put a large spoonful of batter at the bottom of each muffin cup..
7. Spoon several chunks of hotdogs over the batter.

8. Cover hotdogs with another spoonful (or two) of batter.

9. Bake in preheated oven for 10-12 minutes, or until cooked through.


Make sure to share and save it on your favorite platform below!
Are you joining us for Lunchbox Freezer Cooking? If you’ve blogged about a lunchbox recipes you’ve made for your freezer, leave a link to your post and recipe below. I can’t wait to see your yummy recipes and ideas!
Done-For-You Dinner Recipes With Simple Ingredients and a Grocery Shopping List!

I’m pretty sure I’ve been living under a rock for years because Unglued is the first book by Lysa TerKeurst that I’ve read. And now I know why everyone loves her so much and what I’ve been missing out on for so long!
Lysa is real, she’s Southern (bless her heart!), and she calls it like she sees it. After you read her book, you just want to invite her over for a big glass of sweet tea and some girl talk. Because Lysa gets you. She doesn’t pretend to have her act together (I almost laughed aloud while reading about the missing toilet seat!) and her authenticity gives you hope and inspiration.
It just so happens that I read Unglued during a month where there were many extra burdens heaped on my shoulders — things I didn’t have control over and couldn’t just run away from, even though there were times when I really wanted to!
It’s easy to be all calm and smiles when life is going smoothly. But how do you respond when your boat is rocked and life is in upheaval? I got a whiff of just how much I need to work on patience as a result of some of that this month. It was humbling to have to go back and ask forgiveness from my husband and children time and again as I lost my temper or reacted out of frustration.
So Lysa’s words and encouragement couldn’t have come at a better time. I found it so beneficial to think through how I respond in different situations (Do I react? Or do I stuff? Or do I explode? Or somewhere in between?) and to seek the Lord to help me become more and more the woman who doesn’t come unglued in the midst of tumultuous times. I’m far from there, but it’s something that I’m working on — thanks to Lysa’s encouragement.
See more book recommendations I’ve posted this year here. You can also see all books I’ve read so far in 2012 here.
Have you read any good books recently?

Many of you have written in to ask for some advice and tips on how to build a mix and match wardrobe.
Seeing as I’m the last person who should be giving fashion advice, I thought I’d share this link to a blog I found today that has lots of great ideas and suggestions for how to use what you already have to create lots of new wardrobe possibilities.

Ever since I saw this recipe for Mini Lasagnas, I knew I had to try it.

It’s not the simplest or most inexpensive recipe out there, but it sure was fun to make. And it’s definitely a more unique portable lunch idea — especially great for those of you who have access to a microwave.

I added salt, pepper, parsley, and two eggs to the ricotta cheese. This is how I always make lasagna, so I thought it would make these a bit more flavorful than just using straight ricotta.

I also added canned tomatoes to the pasta sauce. I attempted to save myself from having to dirty up another bowl by pouring these two things in the empty ricotta container. But, as you can see, that idea didn’t go over so well… actually, I guess it did go over — over the side of the container, that is! 😉


I thought these turned out beautifully and they tasted really delicious. I’m freezing them in airtight ziptop bags and am thinking I can just pull out however many I need at a time and let them thaw for a few hours before warming in the microwave.
You can find a Dairy-Free version of these Mini Lasagnas over at Milk Allergy Mom.
Are you joining us for Lunchbox Freezer Cooking? If you’ve blogged about a lunchbox recipes you’ve made for your freezer, leave a link to your post and recipe below. I can’t wait to see your yummy recipes and ideas!

Guest post from of Kelli of Eat Pray {Read} Love
Having a baby is such an exciting time, and if you’ve been pregnant before, you know that the costs can add up quickly.
Sometime in the first few months of pregnancy, you realize you will need a whole new wardrobe. Since some women don’t even show until they are 20 weeks (I’m jealous!), the wardrobe only has to last about 4 1/2 months — which means dropping a whole lot of cash isn’t ideal.
When I walked into stores during my first pregnancy, I was shocked to see the high sticker price on many items just because they were “maternity.” I am currently in my 4th pregnancy, and have learned a few tricks for getting maternity clothes on the cheap.
In this pregnancy, I just needed a few extra items to get me through the summer. I had bought two $10 Old Navy Groupons that were worth $20 each. When I found out I was pregnant, I went in and hit the clearance section. I was able to get two shirts, a dress, and a pair of maternity shorts for myself, as well as a shirt and dress pants for my son, all for $20 out of pocket!
Sometimes this works and sometimes it doesn’t. Sometimes, the item is just too big all over — armholes are too big, or neckline is too low. Buying a bigger size has worked for me mostly in “stretchy” items like cotton T-shirts, skirts, and tank tops.
Recently, I was able to use a “$3 off any Merona item” at Target, and buy a nice shirt for $3 in a larger size. (One of the keys to buying shirts is to make sure they are long enough to cover your tummy, and fortunately, longer shirts seem to be fashionable right now.)
Consignment stores seem to be better than thrift stores in this aspect, at least where I live. Thrift stores often have the maternity clothes mixed in with the regular clothes, and it takes a while to sort – not something I want to do when I’m already tired and have swollen feet!
But you can get some amazing deals on barely-worn maternity clothes. Search Craigslist for garage sales in your area that specifically mention maternity clothes. As a bonus, you may be able to pick up some baby clothes for your new little one while you’re there!
This pregnancy, my “uniform” has been mostly tank tops and shorts since I am at home with my kids. When I was working part-time during my first two pregnancies, black and khaki pants, a nice pair of jeans, and a black skirt made dressing for work each day easy. I just added a maternity shirt to one of these, and I was good to go!
Save the majority of your budget for staples, as you’ll most likely wear these often. You will want to budget for at least one or two “dressy outfits”, as you may attend a wedding or other formal affair during the pregnancy.
If you ask friends who are done having kids to either borrow or buy their clothes for a small fee, many of them will be happy to help you.
Put out a inquiry on Facebook — someone you may not have thought of may have a stash she’d be willing to part with at a great rate! My best friend had 4 kids before I had my first, and she gave me all of her clothes. A few of these clothes will make it through 8 pregnancies — 4 of hers and 4 of mine!
Most of all, enjoy your pregnancy! Your little one will be here soon and what you’re wearing will be the least of your worries!

Kelli Hays is a pastor’s wife, will be a mom to four kids in November, follower of Christ, avid reader, aspiring cook, and she blogs about it all at Eat Pray {Read} Love.

Guest post from Kristen of Celebrate Every Day With Me
One of my kids’ favorite Bible stories is the feeding of the 5,000. It starts with a hungry crowd and ends with the thousands being blessed. Why? Because a little boy gave his food to Jesus and Jesus performed the miraculous: He multiplied the food given and fed the massive crowd.
My favorite part of this story? The fact that it was a boy. Not a man. But a boy who gave of what he had to bless and help others.
Somewhere in our culture (and please excuse the negativity), we have neglected to teach our children to serve others, to have a heart for other people and to think beyond ourselves. How many times have we commented about the self-entitled, self-pleasing, “all about me” world we live in?
So what can we do about it?
Even at a young age, children can begin to develop a heart for others. Just as the boy who shared his lunch was an instrument of blessing, so too can our children bless and help others. But we have to know this: if we want children who have hearts to give to others, we must be deliberate about teaching them.
Are my kids perfect? Umm, no! Spend an hour with us and you’ll find that out. But are they growing in a heart for others? You bet!
As I have been deliberate about being an example, providing opportunities and practicing giving with them, I have watched my children’s hearts change in the way they think and respond to others. We are on a journey of learning how to give.
Kristen Summers is a mom to two kids who keep her busy and laughing. As a former wedding and event planner, she now blogs at Celebrate Every Day With Me about fun ideas for party planning, children’s activities, and creating memorable moments. She has just released her first ebook, Teach Me To Serve: 99 Ways Preschoolers Can Learn to Serve and Bless Others. Use coupon code moneysaving30 to get 30% off the purchase of this ebook this week.

My friend, Stacie, from Motherhood on a Dime, has put together 16 simple Busy Bag Ideas perfect for a local Busy Bag Swap. You can find more Busy Bag Ideas here.

If you missed Jen’s question in part 1 last night, please take a few minutes to go read it. The comments were packed with fantastic wisdom and advice. Plus, I think it’s so encouraging to just be reminded that we all struggle with somewhat similar things. It’s good to know that none of us are alone in this journey!
I promised some specific advice for Jen’s situation. After contemplating it as I went about my various tasks today, here are my thoughts:
There are no supermoms. Seriously. None of us have our acts together.
Some of us might have cleaner homes or more organized schedules, some of us might be able to juggle more things or decorate our homes beautifully or whip up amazing recipes, but we all have plenty of warts and struggles. Believe me.
I have yet to meet a mom who didn’t have things she struggled with. And if any mom says she doesn’t struggle with anything, I can guarantee you she’s not being authentic.
Take time in the next few days to find a quiet hour and sit down with a blank piece of paper. Start mapping out your thoughts of what you want to be your priorities for this season of life. Keep these short and sweet, no more than 3-4 priorities for starting out. (You can see my current list of eight priorities here. The first four are my main priorities. The other four are my secondary priorities.)
Review these priorities with your husband and close friends for input. Once you feel like you’ve got a solid list that you’ll be happy with 25 years from now, type it up or write it out and tape it to your bathroom mirror or stick it on your refrigerator.
Before adding anything new to your plate or saying “yes” to any commitment, check your priorities list. This helps you to really consider things and not just pile all sorts of commitments on yourself that you’ll later regret.
It sounds like you might be a lot like me in that you have a hundred and one new ideas each week! There are books I want to read, things I want to do with my children, places I want to visit as a family, people I want to reach out to, friendships I want to maintain, skills I want to learn, character I want to develop, business projects I want to experiment with, house projects I want to work on… the list is practically endless.
And very quickly, it can become daunting and overwhelming — if I let it. Instead, just keep a notebook with a running list of ideas. That way, you’re recording them somewhere and they are out of your head vying for your attention.
A surefire way to set yourself up for failure is to try and re-invent your life overnight. It’s just not going to happen. Or if it does, it won’t last longer than a short while. Instead, take your list of priorities and your running list of things you want to do and map out one area of your life to focus on at a time.
I recommend picking the habit or change that is going to most significantly effect your everyday life. So think about what your biggest hangups and struggles are and then choose an area based upon that.
Make this habit your focus for 3-6 weeks. Once you feel like it’s truly become ingrained in your life, you can move onto the next habit or skill. But be careful that you don’t add something new too quickly. You’d rather improve a little bit more each month than to try and go full steam ahead and end up back where you started after a few months of effort.
Most importantly, give yourself lots of grace! You have a lot on your plate right now: you just moved and you have a six-month-old. Plus, it sounds like you no longer have the support you had before you moved.
Adjusting to being a new mom is a huge. Throw moving in there, too, and you’ve got a lot of big learning curves you’re shouldering at one time.
Now is the time to keep things really simple and to lower your expectations of yourself. Don’t worry about making elaborate dinners or cleaning your baseboards. Maybe even buy a few packages of disposable diapers instead of cloth diapering while you get settled in your home?
Don’t stress too much about trying to clip a bunch of coupons or shop at three different grocery stores. Just stick with simple, inexpensive meals and focus on stocking up on the loss leaders (or do more of your shopping at Aldi, if you have one nearby).

Finally, constantly remind yourself about what is really going to matter at the end of your life. Love on your baby and husband, cherish and embrace each day, and don’t forget to make sleep a priority.
In time, as you become more accustomed to your new area and your baby grows, you’ll be able to do more. But don’t be so anxious to do-do-do that you forget to take time to just soak up and savor the moments with your precious baby. They are fleeting!

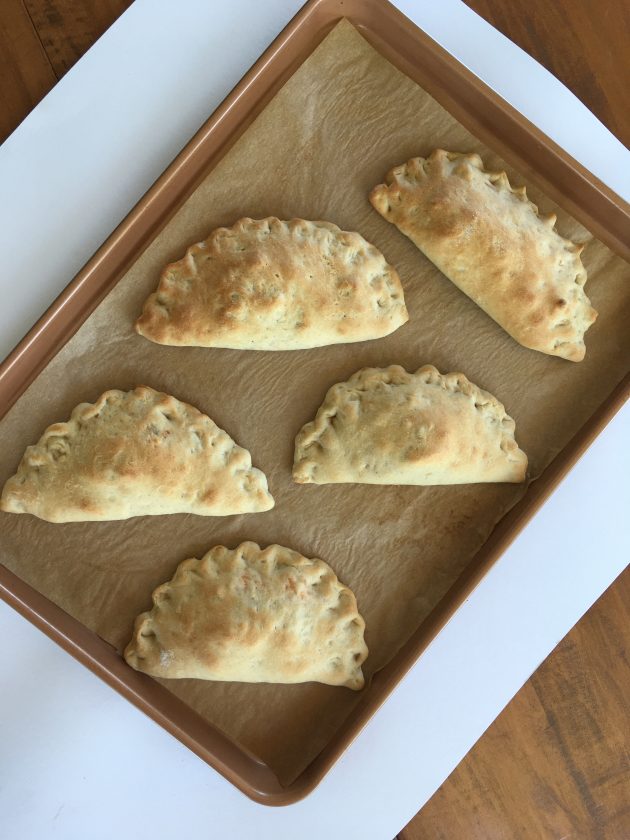
This cheesy salsa chicken enfolded in a flakey homemade crust will soon become the meal your family requests! Eat them warm or freeze them for an easy weeknight meal.

I concocted these on a whim one night and they ended up being a huge hit with everyone in our family.
They were gone in a flash and I had to make more since Jesse was wondering what happened to them the next day!
Don’t you just love it when simple ingredients come together and become a family favorite?
For the Dough:
For the Filling:

1 Preheat oven to 500ºF
2. In a large bowl (or stand mixer) sprinkle yeast over warm water and mix until dissolved.
3. Add sugar, salt, oil, and flour and mix well.
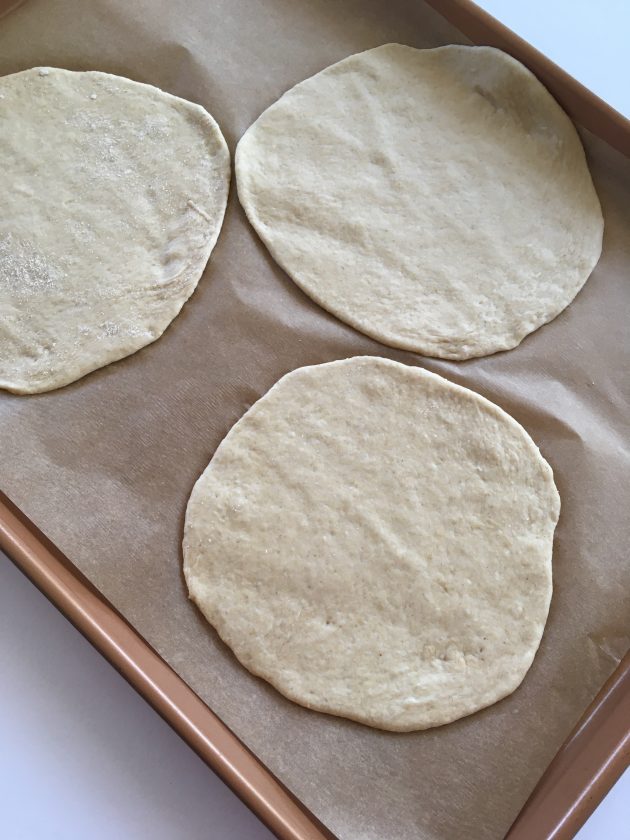
4. Dump the mixture onto a floured surface and knead for 3-5 minutes, until a soft dough forms.
5. Divide into 8-10 pieces.
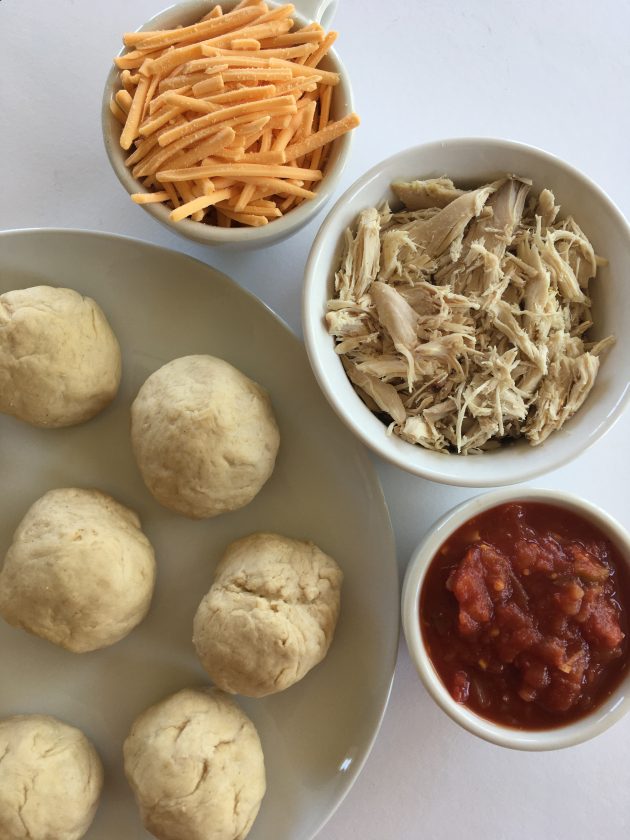
6. Roll each piece into a ball and flatten with a rolling pin to form a small circle.
7. In a medium bowl, mix salsa, chicken and cheese.
8. Place a large spoonful onto each dough circle.
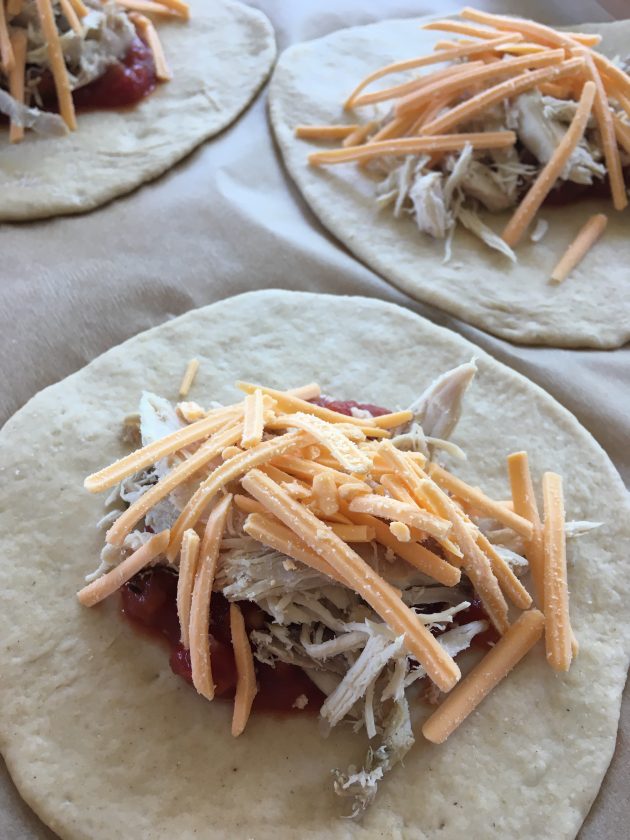
9. Fold dough over and seal tightly.

10. Bake on a greased cookie sheet in preheated oven for 10-15 minutes, or until browned.


You can purchase refrigerated pizza dough or crescent roll dough if you’re short on time. I’d suggest following the baking directions on the packages for the dough (likely 375º or 400º).
Feel free to use your favorite cheese — specifically anything that pairs well with salsa and chicken. A Mexican queso blend would be fantastic!
Again, you can use whatever you have in the house, but if you’re going to buy something, look for a chunkier canned salsa (not fresh salsa) as they are less watery and won’t make your dough soggy.
Yes, for sure. Any type of cooked chicken will work for this recipe.
Let them cool completely and store them in an airtight container or freezer bag for up to 3 months.
Remove the desired number of pockets from the freezer and warm them individually in the microwave for about two minutes or until heated through.
OR, warm on a cookie sheet in a 350-degree oven for 20 minutes, or until heated through.

Make sure to share and save it on your favorite platform below!
Are you joining us for Lunchbox Freezer Cooking? If you’ve blogged about a lunchbox recipes you’ve made for your freezer, leave a link to your post and recipe below. I can’t wait to see your yummy recipes and ideas!
Done-For-You Dinner Recipes With Simple Ingredients and a Grocery Shopping List!