


This White Chicken Chili Recipe is so easy to make and super tasty! It’s a long-time favorite in our family and one I can remember enjoying for as far back as I can remember.

Guest post from Brigette
You’ll Love This White Chili Chicken Recipe
My mom has served this soup as part of lunch on Christmas Day for as long as I can remember!
She always did a “Soup and Sandwich” theme, with several different kinds of soup and all the ingredients for make-your-own sub sandwiches. This kept Christmas meal preparations fairly simple, while still being a meal that we all looked forward to!
White Chicken Chili is a nice change of pace from regular chili too.
The original recipe, which I’ve adapted somewhat, came from some dear family friends who are well-known for their hospitality and delicious recipes.
This soup is no exception! It is cheesy, filling, and perfect on any chilly day of the year.

Creamy White Chicken Chili Ingredients
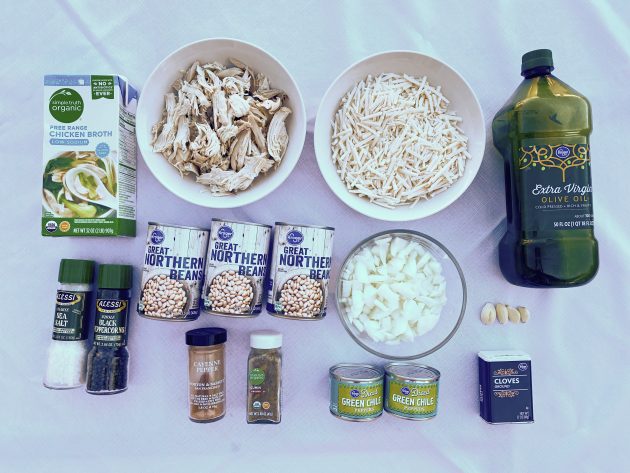
- 1 Tablespoon olive oil
- 2 medium onions, chopped
- 4 garlic cloves, minced
- 2 teaspoons ground cumin
- 1 teaspoon ground oregano
- ¼ teaspoon ground cloves
- ¼ teaspoon cayenne pepper
- 3 cups cooked, diced chicken
- 3 16-ounce cans Great Northern beans, drained
- 1 8-ounce can chopped mild green chilies (use hot for a spicier version)
- 4 cups chicken broth or stock
- 16 ounces grated Monterey Jack cheese, divided (less works too)
- Salt and pepper to taste, if needed
How to Make Easy White Chicken Chili
1. In a large saucepan, heat oil over medium heat. Add onions and cook until translucent.
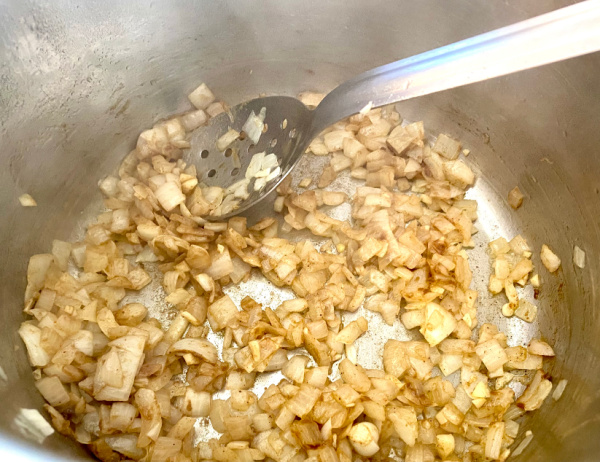
2. Stir in garlic and the remaining spices except salt and pepper and saute for 2-3 minutes
3. Add chicken, beans, chilies, broth, and 12 ounces cheese. Simmer over low heat for 15 minutes, stirring occasionally.

4. Add salt and pepper to taste, if needed.
5. Ladle into bowls and sprinkle with remaining cheese.

Tips for Making White Chili Chicken
Start with a very large, heavy-bottom pot to make sure you have enough room for your ingredients and so the soup doesn’t burn as it simmers.
Also, make sure you taste-test as you go along to assure it’s properly seasoned.
And, if you want to make it in advance, just transfer the cooked soup to a large slow cooker and let it simmer on low for several hours, or until you’re ready to eat.
White Chicken Chili Recipe Easy Variations
There are many ways you can tweak this recipe based on what you have in the house (or your family’s taste preferences.
Feel free to adjust the spices, or even try new seasoning blends, based on what you prefer.
You can also use shredded or ground turkey for a different flavor and texture.
Omit the chilies if that’s not your thing — try different cheese blends to see what you like best.
What to Serve with Creamy White Chicken Chili
The great thing about chili is that it’s essentially a meal in itself, however it pairs well with any type of salad or sandwich, fresh fruit, homemade bread or rolls, crackers, cornbread, etc.
You could also create a “topping buffet” and offer a variety of cheeses, green onions, sour cream, and other toppings to make it feel a little more gourmet.

Storing Leftover White Chili Chicken
Chili is great as leftovers, so definitely plan ahead to make sure you get to enjoy them!
Chili will last for several days in the fridge if stored in an air-tight food storage container.
Freezing Creamy White Chicken Chili
You can freeze Chili for later, if you don’t think you’ll be able to eat all the leftovers within a week.
Freeze it as a full meal or in individual servings (great for lunches throughout the week).
How to Reheat Easy White Chicken Chili
Chili reheats wonderfully — either on the stove or in the microwave.
Microwave individual servings in a microwave-safe bowl in 30-second intervals until the desired temperature is reached.
If you’re reheating a bunch of chili, you’ll have the best results by reheating it in a saucepan on medium-low heat, stirring occasionally.
Best White Chicken Chili Recipe FAQs
If you know you like thicker chili, you may want to use less broth when making the soup (you can always add more later). However, if your chili ends up too runny for your preference, you can thicken it with flour or cornstarch.
Regular chili has a base of red chilies, tomatoes, red beans, and beef, while white chili calls for green chilies, white beans, and chicken. They are very different but both delicious!

White Chili Chicken
Ingredients
- 1 Tablespoon olive oil
- 2 onions chopped
- 4 garlic cloves minced
- 2 teaspoons ground cumin
- 1 teaspoon ground oregano
- ¼ teaspoon ground cloves
- ¼ teaspoon cayenne pepper
- 3 cups chicken cooked and diced
- 48 ounces Great Northern beans drained
- 8 ounces mild green chilies chopped
- 4 cups chicken broth
- 16 ounces Monterey Jack cheese shredded
- Salt and pepper to taste if needed
Instructions
- In a large saucepan, heat oil over medium heat. Add onions and cook until translucent.
- Stir in garlic and the remaining spices except salt and pepper and saute for 2-3 minutes
- Add chicken, beans, chilies, broth, and 12 ounces cheese. Simmer over low heat for 15 minutes, stirring occasionally.
- Add salt and pepper to taste, if needed.
- Ladle into bowls and sprinkle with remaining cheese.
Nutrition
Love this recipe?
Make sure to share and save it on your favorite platform below!
Brigette is a full-time wife and mother who is blessed with three amazing bundles of energy. She enjoys music, experimenting in the kitchen, homeschooling her children, finding great deals, long-distance running, and anything chocolate.
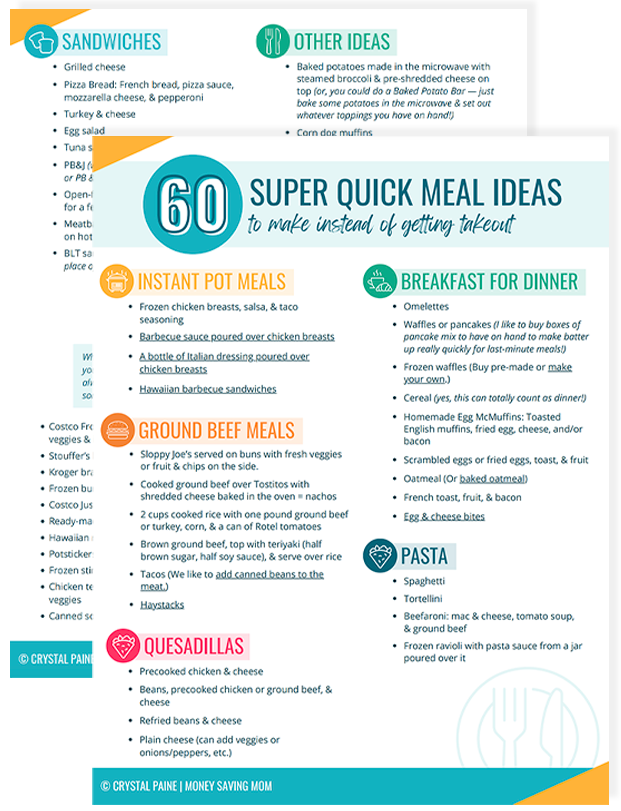
FREE DOWNLOAD: 60 Meals To Help You Avoid Takeout!
Meal time just got so much easier!

I’m No Longer a Wannabe
“I’m no Ann Voskamp.”
The words spilled off my tongue last week as I was trying to explain my writing style to a company who wanted to possibly have me do some projects with them.
After I got off the phone, I realized what a big deal it was that I said those words. And, more importantly, that I said them with courage and confidence.
You see, for years, I wanted to be able to write poetically, beautifully, and poignantly. I wanted to be a wordsmith and an artist as a writer.
I’d read books by these writers. I’d study their writing style. I’d convince myself that I could write like that. And then I’d try… and the final result would come up short.
But I kept trying, because I thought that a writer had to write in beautiful phrases and word pictures. Otherwise, you weren’t a writer; you were a wannabe.
Slowly, ever so slowly, these past few years, I’ve stopped trying to be who I thought I was “supposed” to be and started embracing who God has made me to be. I stopped wishing I had her gifts or her talents, and started owning the gifts and talents God had given me.
And you know what? There’s been immense freedom and fulfillment in that.
I won’t ever be as poetic as Ann or as picturesque as Angie or as deep as Brene, and that’s 100% okay. My gift is to take big-picture concepts and break them down into bite-sized pieces. My writing style is practical and actionable. My voice is conversational.
That’s who God has created me to be as a writer… and I’m completely content with it.
Yes, I want to grow as a writer. Yes, I want to improve. Yes, I hope that I continue to stretch and challenge myself so I don’t stay in the safe zone as a writer.
But I’ve stopped wishing I were someone else and started owning my own voice. Because it’s the one I’ve been given.
I have a message that others need to hear. I have a way of sharing things that will be different than Ann, or Angie, or Brene. Because I’m the best version of me that exists.
I’m no longer a wannabe. I’m a writer.
Will you join me in this journey of seeking to embrace who God has called us to be? You are the best version of YOU. Believe it, own it, and live it!
21 Days to a Simple Christmas: Day 11 {Update}


It’s Day 11 of the 21 Days to a Simple Christmas Challenge!
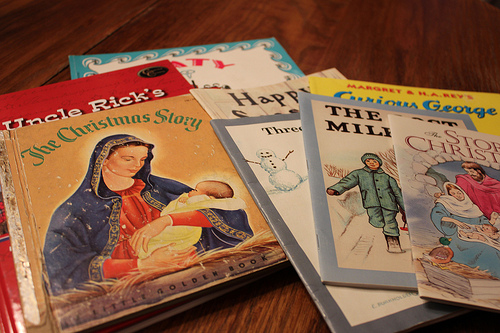
I gathered together some of our Christmas and winter-themed books today to read to the children. Here’s what I came up with:
- The Story of Christmas
- The Lost Milk Jar
- Three Happy Days
- Curious George in the Snow
- Happy Seasons
- The Christmas Story
- Uncle Rick’s Holiday Book
- Katy and the Big Snow
We also requested all of these books that were available from our library.

And here are the two Christmas-related books I’m reading this December: A Winter Dream by Richard Paul Evans and The Greatest Gift by Ann Voskamp.
What Christmas/Winter-themed books are you planning to read/reading this December? If so, I’d love to have you share your list or a link to your blog post (if you posted about it).
Gretchen’s $62 Grocery Shopping Trip and Weekly Menu Plan
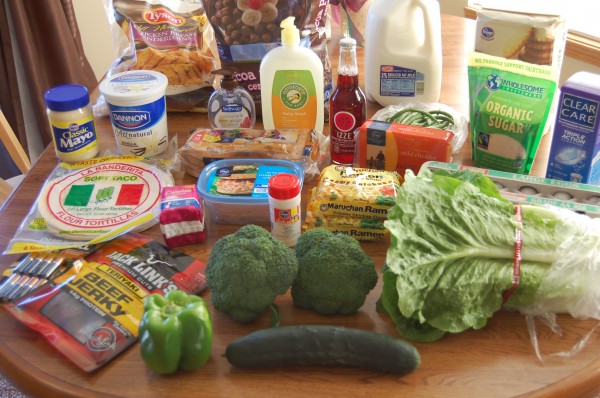
Dillons
I didn’t have time to go to Aldi this week so I bought everything at Dillons. Note: The beef jerky in the picture above was NOT purchased at Dillons (it was purchased at a different store as a Christmas gift/stocking stuffer for my husband). I didn’t realize it was in the picture until several hours later…I’m guessing my toddler stuck it up on the table when I wasn’t looking. 🙂
1 Kroger Cocoa Puffs Cereal – $2.99
1 Dillons Eggs – $1.67
1 Romaine Lettuce – $1.49
1 gallon Dillons Milk – $2.98
1 Kroger Flour – $1.47
1.03 lbs Broccoli @ $1.49/lb – $1.53
1 Cucumber – $0.75
1 Carefree Liners – $1
1 Green Pepper – $0.75
0.46/lb Green Beans @ $1.69/lb – $0.78
1 Kroger Sliced Turkey Breast – $2.50
1 Dannon Vanilla Yogurt – $2.79
1 Kroger Mild Cheddar Cheese – $2.99
1 Kroger Mayo – $2.35
1 Comforts Baby Wash – $2.99
1 Organic Sugar – Marked down to $1.39
1 Kroger Sandwich Slim Buns – $1.99
2 Duracell Batteries (4 pk) – $1.99, used 2 $1/1 printable – $0.99 each after coupons
1 Tyson Frozen Boneless, Skinless Chicken Breasts (48 oz) – $7.99
1 Clear Care – $10.99
1 Flour Tortillas – $2.49 (These were marked as $1.50 each and I realized when I got home that I was overcharged.) 🙁
1 SoftSoap Pump – $0.89
1 Garlic Salt – $1
2 Ramen Noodles – $0.20 each
1 Izze Sparkling Juice – $1, used Free e-coupon (no longer available) – Free after coupon
Total with tax ($4.30): $62.45
Menu Plan this Week
Breakfasts
Cereal x 2, Eggs, Toast, Applesauce (I canned this several months ago)
Lunches
Leftovers, Cheese & Crackers, Peanut Butter & Jelly Sandwiches, Cheese Quesadillas, Fruit, Veggies & Crackers
Dinners
Turkey Sandwiches, Chips, Steamed Broccoli
Chicken Tetrazzini, Peas
Pancakes, Eggs
Deer Roast, Potatoes, Carrots, Biscuits
Chicken & Rice Casserole, Steamed Broccoli, Banana Muffins
Venison Stew, 30-Minute Rolls, Steamed Cauliflower
How to Bless the Less Fortunate Without Making Them Feel Like a Heel (Part 1)
How to Bless the Less Fortunate Without Making Them Feel Like a Heel (Part 1)

The following is a guest post from a reader who asked to remain anonymous
Growing up, my family vacationed in 5-star hotels and spent more at a single meal in a gourmet restaurant than my husband and I currently spend on groceries for an entire month!
Needless to say, the disparity between my financial situation and that of others in my family has led to some pretty awkward situations. While my own struggle with contentment is something I need to put in perspective, I’m pretty sure my family would do some things differently if they understood.
If someone you love has far less income than you, or is simply in a financial slump, they’d probably like for you to understand these concepts, too.
Remember that I Need To Plan Ahead
What seems like no biggie to you may be huge to me.
Let me give you an example: One year, my parents, siblings, and our families were together for a rare long weekend. Someone suggested that every family unit could pay for a couple meals throughout our visit. Sounds fair, right?
The problem was that my family rarely eats out on our own, especially at sit-down restaurants. And even when we do, we plan ahead, have coupons in tow, and usually drink water. We simply could not afford to foot the bill for 8 adults, plus children.
The situation was awkward, to say the least! Others footed the bills, and we felt like absolute heels. However, we simply couldn’t justify dipping into our meager savings or going into debt over a family get-together.
Let Me Serve You, My Way
The next time a family gathering was planned, I suggested (plenty of time ahead) that each of our families take care of two meals, however we wanted to do it.
For our part, my husband and I cooked up a pretty impressive breakfast — if I do say so myself! I was able to make room in our budget and pair coupons and store deals to purchase the needed groceries ahead of time. I also used some Crystal’s freezer cooking strategies to reduce my time in the kitchen that week!
Everyone was impressed, and I was glad to be able to do my part. Some of the others did take everyone out to a favorite restaurant, and that was okay, too.
Realize What I Can (& Can’t) Give
Even if I realize that I make one tenth of what some others make, giving them a $10 gift when they give me a $100 one feels crummy. Seeing my kids receive more gifts from extended family than they do from me is difficult, too.
My one sister was out-giving me with my kids at Christmas — in a big way. I told her how I felt, and that I wanted my kids to receive more from their parents than extended family. She completely understood but didn’t want to spend less on my kids than she did her other nieces and nephews.
She now gets my kids each a gift (usually after asking me for ideas, first), and then buys them savings bonds with the remainder of what she wants to spend.
Know that Conversations Can Easily Exclude or Embarrass Me
I’ll try to be excited for you when you tell me about your home renovation or trip to Bermuda, but I just won’t have much to contribute to the conversation. I don’t want you to feel like you can’t share your exciting news with me, but please realize that if everyone else is spending a lot of time talking about things I don’t have or can’t do, I’m going to feel left out.
I’m not trying to be antisocial, but I’m pretty sure that saying “My husband glued down the part of the Formica countertop that keeps popping up,” wouldn’t quite fit in.
And then there’s Christmas.
In our own home, we try not to make Christmas about the gifts or money, but when you tell me what you gave your kids and ask me what I got mine, it’s hard for me not to feel like a bad mom. It’s also a little embarrassing when people ask my kids what they “got for Christmas.”
I do try to make our celebrations enjoyable, though, so I’d much prefer that we be asked what our favorite part of Christmas was, or something like that.
At the end of the day, I don’t want to be seen as “the poor one” or pitied for my (current) lot in life. I just want to be loved and appreciated and included in the festivities.
The author is a freezer-cooking , baby-wearing, stay-at-home mama who does some freelance writing while her 3 young kiddos nap. She’s married to a wonderful man who’s the pastor of a small country church and prefers to remain anonymous due to the content of this post.
21 Days to a Simple Christmas: Day 11
It’s Day 11 of the 21 Days to a Simple Christmas Challenge! Christmas wouldn’t be complete without reading some wonderful Christmas stories and books!
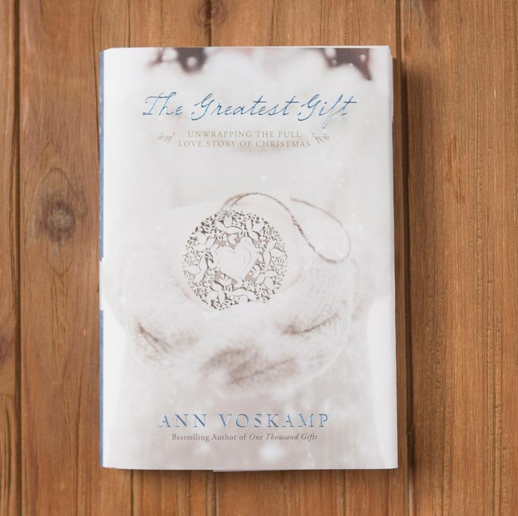
Personally, I’m reading through Ann Voskamp’s book, The Greatest Gift, this season. It’s beautiful, inspiring, and convicting.
And then we always check out a lot of Christmas books from the library. Here are a few of our favorites (most of these should be available at your local library):
.


The Christmas Miracle of Jonathan Toomey

If you have younger children, it’s fun to gather a basket-full of Christmas read-alouds and plan a daily time to read for 10-15 minutes. Let your children choose from the basket to make it more engaging for them.
Want to make it even more exciting? wrap up the books and let them unwrap a few each day.
What are some of your family’s favorite read-aloud Christmas books? I’d love to find new ones to add to our list of favorites!
Day 11 Project
1. Read chapter 7 from Celebrating & Savoring a Simple Christmas if you didn’t get a chance to read it yet. (Did you sign up for your free copy yet? If not, click here and fill out the form to be emailed a copy.)
2. Pick 1-2 Christmas-related books to read this year personally. If you have children, pick at least a few books to read together as a family this Christmas season.
4. Come back around 8 p.m. tonight where I’ll share a few of the Christmas books we’ll be reading over the next two weeks.
Gretchen’s CVS Shopping Trip: Spent $2.45 out of pocket for $44 worth of products
Gretchen’s CVS Shopping Trip: Spent $2.45 out of pocket for $44 worth of products

CVS Shopping Trip
2 Hersheys Candy – $3 each (Buy 2, Get $3 ECBs)
Used $1.10/2 printable2 Nabisco Oreo Snacks – $0.99 each
Used $1/2 printable1 Beauty of Essence Body Mist – $2.99
Used Free printable1 Tums – $1.19
Used $1/1 coupon from the in-store coupon machine2 Schick Razors – $8.99 each
2 Skintimate Shaving Cream – $3.79 each
Buy $25 in Schick/Skintimate/Edge products, Get $10 ECBs
Used $1/2 coupon from the 12/8 SmartSource insert
And used Buy One Get One Free razors coupon from the 11/17 SmartSource insert
And used $3/1 Schick coupon from the 12/8 SmartSource insertUsed $3/$15 CVS coupon (I received in my email)
Used $15.46 ECBs from previous shopping trips
Total before coupons, sales and ECBs: $44.73
Total with tax ($2.27): $2.45, Plus received $13 ECBs back
52 Different Ways to Save $100 Per Year: Simplify Birthday Parties {Week 40}
52 Different Ways to Save $100 Per Year: Simplify Birthday Parties {Week 40}

Every week in 2013, I’ll be sharing a different way you can save $100 this year. If you do all of these things, you’ll be able to save over $5,000 this year alone! Many of these things will likely be things you’re already doing, but hopefully all of you will pick up at least a few new ideas or some inspiration from this series.
Guest post by Shannon
Birthday parties are great, but throwing one these days can almost break the bank. It is possible to throw a birthday party on a budget and make it a party that your child and their friends will long remember. Here are five tips to help:
1. Make your own cake.
Buying a birthday cake from a bakery can be a costly proposition. Instead, get a couple boxes of cake mix and frosting to make your own. Cupcakes are even better! Get a fancy star tip and decorating bag to put a neat swirl on top.
2. Use solid color party-ware.
Your child’s party can still be themed with their favorite character or activity, but instead of having all matching cups, plates, napkins, and more, pick up some solid color items to match. They are less expensive and are easy to match the themed items. You will save money by just getting the themed invitations, a centerpiece, and a mylar balloon.
3. Just serve cake and ice cream.
Much of the cost for a birthday party is in the food. Invite your guests over in between lunch and dinner. That way the only items on your menu can be cake and ice cream.
4. Go back to the basics for party games.
It is easy to host some party games with items found around your home — think three-legged races which only require something to tie ankles together, a spoon and egg race, musical chairs, and freeze tag. Serve cake and ice cream before the games so that the kids can burn off all the extra energy!
5. Cut back on party favors.
It can be so tempting to go overboard on party favors to send home with your guests. Instead bake some cookies, place them in a cellophane or sandwich bag, tie with some ribbon to match your party theme, and place them in a basket by the door to hand out as people are leaving. This a great activity for your child to participate in if they love to bake.
Your child can still have a great birthday party even without spending a bunch of money. Follow one or all of these tips to help celebrate their special day and stay on budget.
Shannon Weidemann is best known as the Partyelf. Check out all the great party ideas on her website to help plan your next celebration
21 Days to a Simple Christmas: Day 10 {Update}
It’s Day 10 of the 21 Days to a Simple Christmas Challenge! Today we’re talking about creating a Christmas Bucket List.
Here’s our Christmas Bucket List for 2014:
- Go ice-skating.
- Decorate Christmas cookies.
- Read Christmas books together.
- Go to a family movie together at the theater.
- Drive around and look at Christmas lights as a family.
- Go to Dollar Tree for a family shopping night to buy stocking stuffers.
We also scheduled these out on the calendar and everyone is excited for each of these things — and so am I!
Did you create your Christmas Bucket List? If so, I’d love to have you share your list or a link to your blog post (if you posted about it).
How We Got a Discount on Our Furnace by Paying Cash

Testimonial from Krissy:
After purchasing a house in August of 2013, everything seemed to break! This included the garage door opener, the washing machine, the couch frame, and then the furnace — all within three months of moving into the house!
We called a company that we had done business with in the past for a repair estimate/inspection. Since our furnace was 21 years old, we were told that “if” we found parts it would be very costly and there was no guarantee on how long this repair would hold out. We were charged a $135 service fee for this estimate and inspection.
We discovered that we had a home warranty and tried to go through them for the repair. After two weeks, we still had a broken furnace and didn’t seem to be getting anywhere with our home warranty, so we called the company that did the initial inspection back.
They told us it would cost us $3500, plus $300 for a humidifier (which we really wanted), and then the original service call fee of $135. That is $3800 — and we’d already spent $135 with them for the initial service call!
Our options:
- 12 months same as cash, no interest. (We had savings but were worried about an extra $330 payment each month, the savings would be gone before we paid it off. We did not have the cash in our normal budget.)
- Finance the project (interest, interest, interest… and again, no extra cash.)
- Pay in full.
We choose option 3!
We used almost all of our savings, but because we paid-in-full, they waived the $135 service fee and gave us a cash discount. We paid $3650 — saving $420 — which made the humidifier FREE!
We have to build our saving back up, but we have a brand new furnace/humidifier and NO PAYMENT and NO INTEREST from a charge!
OVER-SPENDING EVERY SINGLE MONTH?Grab these FREE Budgeting Sheets!
Click here to download!
21 Days to a Simple Christmas: Day 10
It’s Day 10 of the 21 Days to a Simple Christmas Challenge!
I love the Christmas season. I love the sights, smells, tastes, sounds… all of it. But you know what I don’t love? That so many people feel rushed, hurried, and frazzled during Christmas.
The heart of Christmas is not about impressing people or running around at a crazy, frantic speed. And making either of those things your focus is certainly not going to help you celebrate and savor the season!
Creating a Christmas Bucket List
One thing that has helped us to slow down and just enjoy December is to create a Christmas Bucket List. We all sit down as a family and choose a few things that each of us really wants to do for Christmas.
Things we’ve put on our Christmas Bucket List in the past:
- Building a snowman
- Playing in the snow as a family
- Decorating Christmas cookies
- Going ice-skating
- Doing an Advent project
- Going to the Nutcracker Ballet
- Driving around and looking at Christmas lights as a family
- Watching a Christmas movie together
By the time we’re done discussing our Bucket List, we’ve come up with a great list of memorable activities to do together and since everyone gave their input, there’s something (or more than one thing) on the list that each person will really enjoy.
We spread these activities out during the whole month of December, doing a few items each week. Because our list is not long and overwhelming and because we have four weeks to do it, we’re able to really take time to enjoy each thing and create beautiful memories.
This tradition has been one of the best things we’ve ever implemented to help us stay focused, calm, and intentional during the Christmas season. And it also helps us to say “no” to most of the other ideas and opportunities that come up that aren’t already on our list.
Day 10 Project
1. Read chapter 6 from Celebrating & Savoring a Simple Christmas if you didn’t get a chance to read it yet. (Did you sign up for your free copy yet? If not, click here and fill out the form to be emailed a copy.)
2. Sit down as a family and create a simple Christmas Bucket List.
3. Look at your calendar and decide when you’re going to do each of these things. If there isn’t time or space, cull a few things off the list.
4. Come back around 8 p.m. tonight where I’ll share our family’s Christmas Bucket List this year and encourage you to do the same.
A Beginner’s CVS Shopping Trip

Shopping Trip Submitted by Jennifer
I’ve been reading your blog for about a year now and I really appreciate how much I’ve learned about how to save money! My husband and I are currently on a journey to pay off our credit card debt, and I’ve been inspired by your creative ways to live below our means.
Before reading your blog I had never heard of the “drugstore game” and just assumed things would always be cheaper at my grocery store. But I decided to give some of the deals you post about a try… and this week I had great success at CVS!
I got $77.76 worth of products for $23.77. I thought some of your other readers might be inspired that even a “beginner” can score some great deals!
Here were my two transactions:
Transaction #1:
Right Guard body soap and deodorant – $3 each (buy 2, get $2.00 ECB)
– used $2/2 coupon
1 Colgate Total Optic White mouthwash 1 liter – $5.99 ($3.00 ECB)
1 Colgate 360 toothbrush – $2.99 ($2.00 ECB)
– used $0.50/1 coupon
Total before sales, ECBs, and coupons = $23.76
Total after sales and coupons = $13.53 (including $1.05 tax)
PLUS, I received $7 in ECBs to use on my next order.
Transaction #2:
1 Garnier Fructis shampoo – $2.99
– used $1/1 coupon
1 Garnier Fructis conditioner – $2.99
– used $1/1 coupon
1 Dean skim milk – $2.99 (received $1.00 ECB)
1 Softsoap handsoap – $1.88
– used $1/1 CVS coupon
Purex laundry soap – $12.00 (Buy 1 get 2 free – I did this deal twice so I got 6 bottles of soap)
– used 2 $1.50/2 and 2 $0.50/1 coupons
Total before sales, ECBs, and coupons: $54.00
Total after sales, coupons and $7 ECB from transaction #1: $10.24 (including $1.39 tax)
I still have a $1 ECB from the milk purchase for my next trip. All in all, I saved about $54 and spent less than $24!

My Top 5 Time Management Tips for Work-At-Home Women

Those of you who work from home know that it can be a wonderful blessing. But there are also many things that can be hard, too. It’s easier to be distracted at home and harder to stay focused and disciplined.
I’ve been working from home since 2005 and I’ve learned a lot through trial and error. There are times when I’ve really struggled with my time management, but as a result of those struggles, I’ve learned a lot that has helped me to be much more efficient and productive.
Here are five of my top tips for work-at-home women (most of these can be applied even if you don’t work from home):
1. Create a Prioritized List
A few years ago, I set up a time budget for my daily activities. This has been revolutionary for me!
When I first switched to using a time budget, I adhered to the same daily time budget for my work-at-home hours (45 minutes on this, 10 minutes on this, 15 minutes on this, etc.). However, in recent months, I’ve shifted to writing out a time budget plan for each new day.
I include everything on this plan — from showering to making dinner to homeschooling to work projects. I try to cover all of the bases and leave 2 hours of margin time for those inevitable interruptions.
This might seem like a lot of work, but because each day is different and there are different project deadlines and must-do’s that vary with each day, this helps me to be able to stay organized and manage my time well — all while being flexible.
After creating the time budget plan for each day, I take it a step further and prioritize my work/blogging time. I’ve found that if I don’t have a prioritized plan for what I need to do, I can quickly spend a few hours just putting out fires.
Instead of just saying, “I’m going to spend four hours on the computer and blogging work each day,” I write down exactly what I plan to do during that time in prioritized order. If I know I need to do A then B then C then D, it keeps me on task and it guarantees that I actually accomplish the most important priorities.
If you’re interested in hearing more how this works for me, watch my video on How I Do It All — Or Not.

2. Do One Thing At a Time
I know, I know! Multi-tasking can seem like a very efficient way to do many things. However, when it comes to most work tasks, if you want to get concentrated work done in an efficient manner, you need to shut out all the noise and just focus on one thing at a time.
If it’s your time to email, work on email. Go through your emails in order of priority and don’t stop until your time is up. If it’s your time to research something, only work on researching that thing. If you need to make a phone call, just make the phone call.
If you’re used to trying to work on your computer while you have a bunch of applications open and with your phone constantly dinging at you, you’ll likely be surprised at just how much work you can get done in a distraction-free 20-30-minute concentrated block of time.
And once you get in the habit of doing one thing at a time, you’ll learn where your fizzle-out point is. This is the point when you need to stop and take a break or stop for the day in order to come back to your project refreshed and energized.
Personally, I’ve found that I do best by working in 20-30 minute blocks and then rewarding myself with a short 5-minute break to check email or read something online. If I’m working on an in-depth project that requires a lot of brain power, I’ll often set the timer for 20 minutes and work on it and then set the timer for 15 minutes and work on a cleaning project or play with the kids.
3. Tame the Email Monster
I shoot to have no more than 5 emails in my inbox at all times. This might sound crazy, but it’s one huge way that I stay organized and efficient as a business owner.
When I check my email, I aim to deal with emails immediately. Here’s how:
- If an email can be deleted, I delete it immediately (I’m pretty ruthless when it comes to using the delete button!)
- If an email only requires a quick response, I respond immediately.
- If no response is necessary, I archive the email.
- If an email can be handled by someone else on my team, I forward it onto the appropriate team member.
I’ve found that this system covers the majority of emails. For the emails that require a longer response, I save them in my inbox and try to get to them as soon as I can — preferably that same day. (By the way, if you’re a blogger and you’re going to take the time to answer a question in more than a paragraph or two, consider turning it into a post. Then, you kill two birds with one stone — you answered an email and you wrote a post!)
Want more help with keeping your inbox under control? Read my extensive post on How I Keep My Inbox to Fewer Than 5 Emails.

4. Get Enough Rest
I used to think that burning the midnight oil would make me more productive, but I’ve actually found that I’m much more productive if I get at least seven hours of sleep almost every single night. I usually am most productive in the mornings so I make it my goal to go to bed by 10 p.m. and get up between 5 and 6 a.m.
It’s hard for me to shut things down at night but I’ve found that I’m much more prone to dawdle and waste time at night than I am in the mornings. You might be the other way around. Do what works best for you, but whatever you do, put getting enough rest high up on your priority list.
You’ll feel better and more energetic and I’d wager to guess that you’ll also find an extra hour or two of sleep at night helps you to be more productive than if you spent that time trying to pry your eyeballs open with toothpicks and get more work done.
5. Say “No” Often
As women, we’re often afraid to say no. We fear we might miss out on a big opportunity and we worry about what other people might think of us. I know, because I’m there a lot.
I just want to encourage you (and myself!) to guiltlessly say “no”. If an opportunity is going to require time you don’t have or going to oblige you in a way you don’t feel comfortable with or is just not a good fit for you, your family, and/or your business, say “no”.
Before committing to anything, count the costs. What are you going to have to give up in order to do this thing or attend this event or write this post or participate in this project? Is it worth what you’re giving up? If you’re not 100% sure that it is, then say “no”.
Are you a work-at-home woman? If so, what are a few of your best time management tips?
If you’re looking for in-depth advice on how to make money from home… Be sure to check out my book Money-Making Mom: How Every Woman Can Earn More and Make A Difference, where I share creative ways to manage money, generate income and–most importantly–live a life of deeper meaning, fulfillment, and generosity than you might have ever imagined possible. This book is packed with hard-won wisdom, real-life stories, and practical tips to help inspire and motivate you!
21 Days to a Simple Christmas: Day 9 & Update
It’s Day 9 of the 21 Days to a Simple Christmas Challenge!
If you decided to send Christmas cards yesterday, today’s the day to get to work on them. Design the card, write the letter, or buy your cards.
Also, organize your Christmas address list, make sure you have stamps and address labels, and contact anyone you need to contact to get their address or an updated address. (We keep a running address spreadsheet on the computer with all our contacts in it and try to update it throughout the year so that there’s not a mad scramble for addresses at the last minute.)
Day 9 Project & Update
1. Read chapter 5 from Celebrating & Savoring a Simple Christmas if you didn’t get a chance to read it yet. (Did you sign up for your free copy yet? If not, click here and fill out the form to be emailed a copy.)
2. Finish your Christmas cards within the next 48 hours.
3. Address, stamp, and mail your Christmas cards no later than Saturday.
My Update: Since we’ve opted to simplify and not send cards this year, I get to skip today’s project. 🙂

Do-It-Yourself Reusable Baby Food Pouches
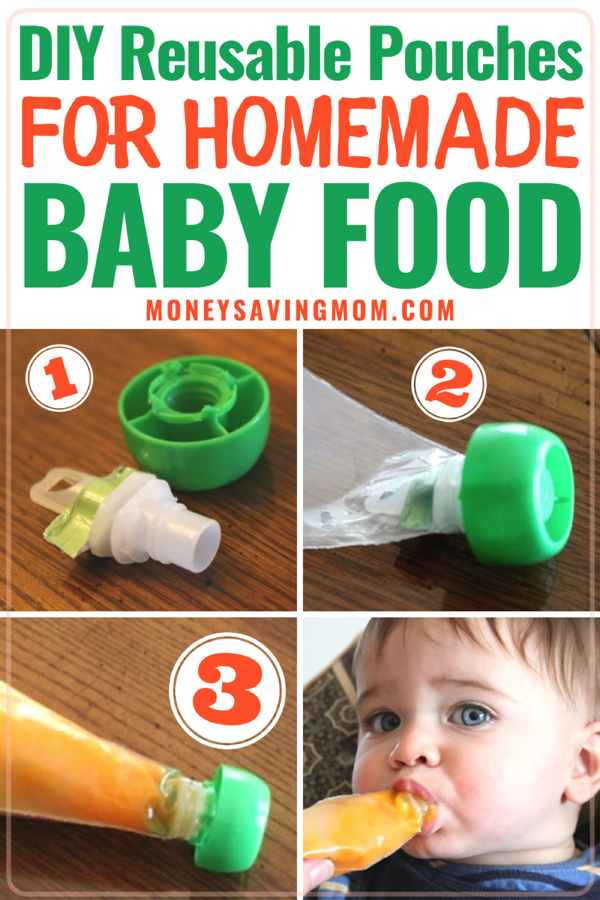
Guest post from Elise
Baby food pouches came out a few years ago when my now four year old was a toddler. They were immediately a huge hit with many of my mommy friends. I have always made my own baby food, so I never bothered to purchase any of the store-bought pouches.
After the birth of my third son earlier this year, I was still committed to making my own baby food. However, a few weeks ago I was walking through the baby section and found myself in the baby food aisle. The colorful, transportable, spoonless, feed-as-you go food pouches were calling my name and persuaded me into buying two of them for a busy-on-the-go week… just to see what all the fuss was about.
The price was less than alluring at $1 a pouch (sale price), but I figured this was just a one-time purchase, so it wasn’t a big deal. The problem was, after using one of the pouches, I was hooked! I was amazed at how easy it was to feed him while we were out and about — so much less mess, and he seemed to like it, too!
So, I started researching refillable pouches online and was dismayed with how expensive they were. I wasn’t willing to invest that much, especially since this was our last child and I would only be needing them for a few months and would probably only use one or two pouches a week.
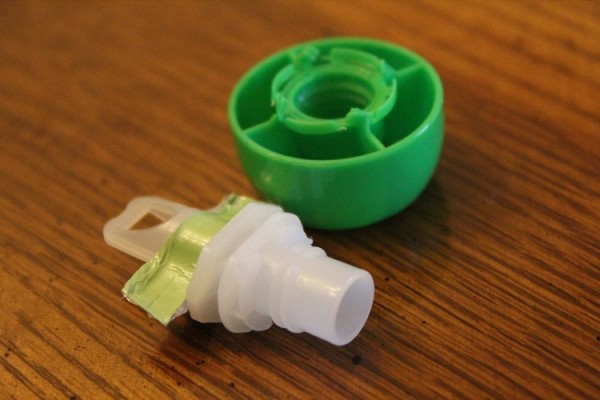
I was expressing my desire to do some sort of inexpensive, re-fillable pouches for all of our upcoming holiday travels to my husband; and he all the sudden chimed in, “Can you use the spout from the pouch you just used and put them in one of your icing bags?” Genius! Have I mentioned how glad I am that I married an engineer?
So, that is what I did. I took my two empty pouches, cut out the spouts, removed the foil as much as I could, and ran the spout and lid through the dishwasher. Then I dug out my cake decorating supplies and found my plastic, disposable piping bags and went to work. If you decorate any cakes the assembly will be pretty easy for you!
Amazingly enough, the lid will screw on over the plastic and still lock into place. I will not guarantee that these homemade pouches are completely leak proof. But throwing the pouch into a plastic baggie (that I re-wash later) is something that I am used to doing whenever I packed up my re-usable plastic containers, anyways.
And, best of all, the piping bags that I buy are quality enough that after I feed my baby I re-wash the tip and bag for another use! Thus far, I am on my third use with one bag and it still works like a charm! (Quick tip: turn the bag inside out to pull out the spout!)
Approximate Total Cost:
12 Disposable Piping Bags = $3.99
2 Pre-filled Food Pouches = $2.00
TOTAL = $5.99 for 14 pouches (plus the 12 piping bags can be reused)
Not bad if you ask me!
Picture Instructions:
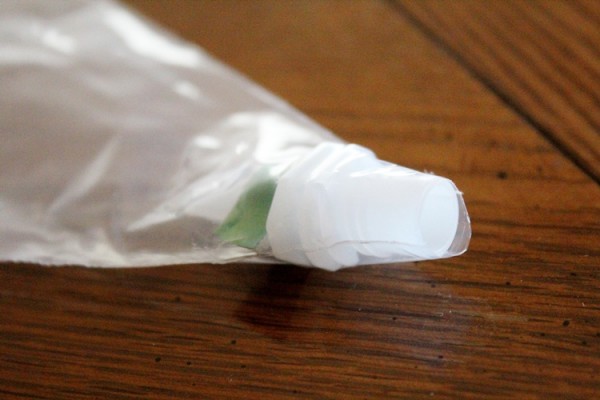
Carefully cut out the spout remove as much foil as you can. Wash thoroughly by hand or in the dishwasher.
Push the spout as far down into the disposable piping bag and snip the end with scissors. Reach in again and push the spout down as far as you can again to create a tight seal.
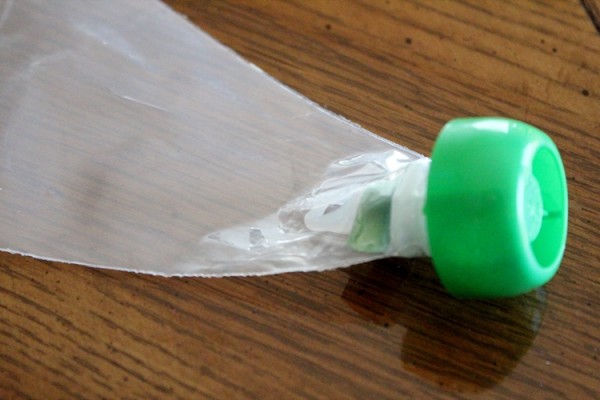
Twist on the lid and lock it into place.
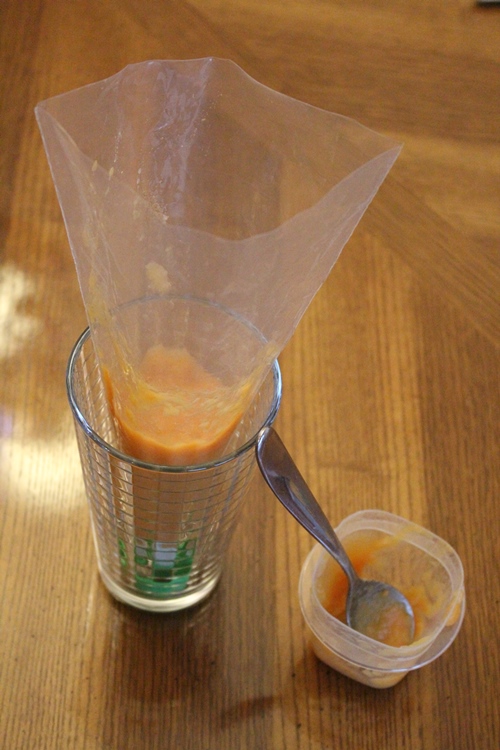
Carefully fill the bag with your home made baby food puree. (Consider filling it with applesauce or yogurt for your toddlers for when you are on the go). I recommend using a tall cup to hold the bag in place so you can be careful not to get too much on the sides of the top of the bag.
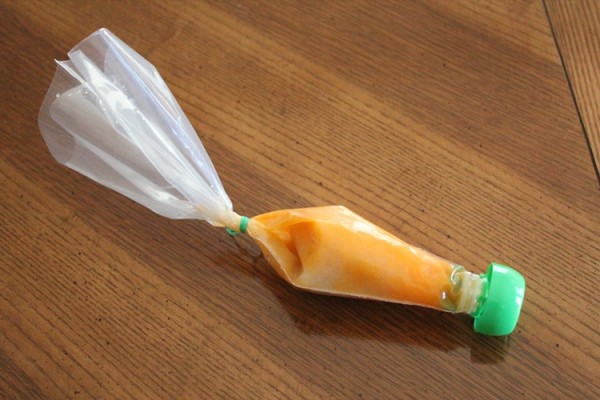
Twist off the excess bag and secure in place (I used a twist tie, but you could probably use a rubber band or even just tie it off.)
Feed your ridiculously cute baby!

Or let ridiculously cute baby feed themselves!

Elise Haroldson has enjoyed eight years of oneness with her dear husband Steve (who really deserves the credit for this amazing idea!). They have been blessed with three active little boys, ages 6, 4 and 10 months and love living on a 15 acre homestead in IL. Elise strives to maintain an orderly, budget conscious, fun and Christ-centered home, all while dabbling in the fine arts of gardening, baking, sewing, and photography. She currently enjoys writing a quarterly “Cutting Corners” article for her church’s women’s newsletter.