![HPIM3315[1]](/images/old/6a00e552792fa288330105362caf71970b-pi.jpg "HPIM3315[1]")
Do you have a leftover turkey carcass from Thanksgiving? If so, you'll want to try out Frugal in Indy's delicious-looking Turkey Noodle soup recipe. She has the full details and step-by-step instructions for concocting this frugal recipe here.

Saving Families Money Since 2007


Do you have a leftover turkey carcass from Thanksgiving? If so, you'll want to try out Frugal in Indy's delicious-looking Turkey Noodle soup recipe. She has the full details and step-by-step instructions for concocting this frugal recipe here.

photo by bkajino
Guest Post by Hannah and Abby from Safely Gathered In
Syndicated radio host Dave Ramsey advises his listeners to set up an emergency fund that consists of
three to six months of living expenses. The fund is for "just in case"
situations like job loss and medical or auto emergencies–basically a
source of cash for unexpected tough times.
Along this same line of
thinking, it is also smart to consider setting up an emergency fund of
food. Thinking of your long-term food needs is not only for
"gloom-and-doom" situations. By systematically storing food that your
family enjoys eating, you will be able to purchase the food on your
plan when it is at rock-bottom prices, learn to plan and budget better,
and give your family peace of mind.
Building
a three month supply of food can seem daunting at first—it is a lot of
food! But it can be done. The first step is to plan meals you want to
store. It won't do you much good to just store random food items.
Make
a menu plan and post it on your pantry door for easy reference. Ideally, you want to plan meals that only use non-perishable items so
your food storage isn't ruined if you lose electricity and your freezer
food thaws. Spaghetti, rice and beans, chicken pot pie, and vegetarian
taco soup are some excellent meals that can be made completely from
pantry (non-perishables) items.
Once your meals are planned
out, write down all the ingredients you need on one "Master List." Each time you visit the grocery store, look at what's on sale and stock
up reasonably on the things from your list. Or, you can just buy one
extra full meal every time you shop. Soon you will have a week of
extra meals, then a month, and so on.
A supply of food should
be built up slowly according to both your budget and plan. Do not go
into debt building your food storage—that's neither frugal or
responsible. Don't "hoard" food either. Only buy what you need and
what your family will enjoy eating. Then use it when you need it.
The
third important step in creating your emergency fund of food is
rotation. Even non-perishable food can spoil. This is why it's so
important to "store what you eat and eat what you store."
In order to
avoid wasting the money that you spent purchasing the non-perishable
food items, pay close attention to expiration dates, and devise a
system for rotation. For example, if you have cans of veggies or fruit
in your food storage, eat them. Then, when you replace the items
you've taken out, put the new food in the back so the old food gets
eaten first. Food storage is a constant cycle of buying, storing,
rotating, eating, and replacing.
Do we only serve food storage
meals to our families? Of course not! We like to try new food storage
recipes weekly and we also like to eat a lot of fresh foods in the
summertime. We
rotate our supply, usually eating at least one food storage meal per
week, sometimes more. Because the foods are non-perishable, there is
not any pressure to use them immediately. At the same time, if we don't
feel like cooking what we had planned for dinner, we can fall back on
one of the food storage classics, and no one will complain.
Just
recently, Abby and her family had a tight month financially with some
car issues. The one expense they could confidently cut was their food
budget. She stopped going to the grocery store completely except to get
a few things like milk, eggs, and a little produce. Did they starve?
Not at all! They ate delicious, nutritious meals. In fact, no one even
noticed she hadn't been shopping as long as they didn't look in her
fridge.
Hannah and Abby share recipe ideas, food preservation
tutorials, and more information regarding food storage
at SafelyGatheredIn.blogspot.

A few months ago, I was searching for a work-at-home mom to design some promotional post cards and business cards for me on a tight time schedule. I was delighted to happen upon Heather Moritz from Moritz Fine Designs.
Not only was Heather a pleasure to work with, she graciously went the extra mile in the design and graphic work she did. I was very impressed with her work ethic, her design skills, and her fast turn-around, but I was especially appreciative of her very reasonable pricing. And the end results were fabulous!
If you're a work-at-home mom or wife looking for someone to design and print affordable business
cards or post cards for your business, definitely visit Moritz Fine Designs. Not only does Heather offer logo design, and custom business cards and post cards, she also has some adorable "Mommy Calling Cards" which would be great for those of you with blogs.
Ever been somewhere and wished you had your blog information on a cute little card to give out to someone who asks? Well, her Mommy Calling Cards are perfect for those occasions! And if you're looking for someone to do holiday photo cards for your family, Heather's got you covered, too. Check out her brand new line of unique holiday photo cards here.
No matter your design needs, Heather can likely handle it and do an excellent job of it. So be sure to stop by her website today; she comes highly recommended by
me!
Aside from buying ingredients for the various items I cooked for our three Thanksgiving dinners and purchasing a few other staples, I took the week off from my usual shopping. In fact, I didn’t even plan a menu–something that is incredibly uncharacteristic of me.
I’m not even exactly sure what I was thinking. Well, come to think of it, I don’t know that I was thinking at all! Let me tell you, I learned very quickly that skipping menu planning is not a good idea. We ended up going out to eat more than I care to admit and spending some money unnecessarily because of my lack of organization and preparation ahead of time.
We did have some extra money in out “Dates and Eating Out” envelope and we did have some extra money leftover from some other categories that we used to fund these “splurges” this week, but still, I know that even just a little bit of time spent to prepare at the beginning of the week would have saved us a nice chunk of change.
I learned my lesson and I’m hopeful I will remember this week if I’m ever tempted to “play hooky” from menu-planning again. Maybe it can be a lesson to the rest of you all, too. Learn from my mistakes: don’t skip the menu planning–it’s a very important part of keeping the food budget low!
How’d you do this week? Post about the deals and
bargains you were able to snag this week or other ways you saved money
on your blog (with pictures, if possible!) and then come back here and
leave your link below. **To make it easy for everyone to navigate quickly through the links, your link must link directly to your Super Savings Saturday post.**

photo by Brian Hathcock
Guest Post by Kate from Cincinnati Cents
Fall is such a magical time of year for children. Trees seem to change right before their eyes, bursting into brilliant hues of red, yellow, and orange. The warm air of summer has subtly been replaced with cooler, crisper mornings. Children are amazed by their power to create a frosty cloud when breathing into the cool fall air. It is a season of change, and with that change, comes a limitless supply of family fun that will last until the first snows of winter.
Pumpkins are wonderfully symbolic of harvest time, and most children have an amazing fascination with them. For young children who are not quite ready for the carving experience, paint is a creative option. Don an old t-shirt, lay out newspapers on the table (I’m sure we all have plenty lying around), and pour paint into old yogurt cups. Voila! You have the perfect recipe for creativity. Cheerful faces can be painted on to adorn your child’s pumpkin, and their creations will last right through the Thanksgiving season.
For older children, carving a pumpkin is always a memorable experience. From the first cut into a pumpkin, the kitchen is filled with the fresh smell of autumn. The seeds that are scooped out can be washed and set aside for later roasting. They make a yummy treat after the hard work of creating a perfect pumpkin.
The designs for pumpkin carvings are limitless. There are several online sites that offer free downloadable templates, with everything from very traditional pumpkin faces, to popular characters, and intricate scenes. Once the pumpkin is carved to satisfaction, a candle can be placed inside, and you have a one-of-a-kind autumn decoration.
Autumn leaves offer a great potential for creativity as well. Placed under paper, children can create rubbings of the leaves they find. Unpeel the paper from your child’s crayon, and rub the side of the crayon against the paper. Children are often amazed that the texture and shape of the leaf magically appears on their paper. As an added learning experience, older children can then identify their leaves, and label them accordingly.
Colorful leaves can also be torn and arranged on a sheet of waxed paper in the shape of animals or other objects of your child’s liking. Once your child is satisfied with his or her creation, place another sheet of waxed paper on top of the leaf design. Carefully iron the creation on low heat. The leaf project will need to cool for a few minutes; afterwards, punch a hole in the top of the waxed paper, slip a string through, and your child will have a unique fall creation to hang up.
Fall projects can also be created through the use of “puffy paint”. Mix equal parts of white shaving cream and white school glue. Add in various colors to create a multitude of options for projects. I often use Kool Aid to color our puffy paint, as it is inexpensive, and forms bright hues. Children can then use this “paint” to make puffy pumpkins or fall leaves (be sure to use heavy paper, as this paint is very thick). When finished, glitter can be sprinkled on top to give the project a shimmery effect. These should be laid flat to dry for 24-48 hours, depending on how thick the paint is applied.
Of course, if you do not feel creative this Fall, that’s perfectly alright, too. Grab a rake, pile up a mound of leaves, and turn the clock back a few years. Jump with your children and let the leaves fly. It’s amazing how much fun it is to be a child again! Enjoy your Fall!
Katie is a homeschooling mother of four. She blogs at Cincinnati Cents,
where she shares money-saving ideas, deals, and frugal activities to
enjoy as a family.
Nuns fret not at their convent’s narrow room
And hermits are contented with their cells;
And students with their pensive citadels;
Maids at the wheel, the weaver at his loom,
Sit blithe and happy; bees that soar for bloom,
High as the highest Peak of Furness-fells,
Will murmur by the hour in foxglove bells:
In truth the prison, into which we doom
Ourselves, no prison is: and hence for me,
In sundry moods, ’twas pastime to be bound
Within the Sonnet’s scanty plot of ground;
Pleased if some Souls (for such there needs must be)
Who have felt the weight of too much liberty,
Should find brief solace there, as I have found.
– from Nuns Fret Not at their Convent’s Narrow Room, Wordsworth
Guest Post by Jennifer from Life From The Roof
In our neck of the woods, there are lots
of bars over the windows and doors. Despite how elaborate the design,
the overall effect is still a bit disheartening, as it is aesthetically
a distraction, and psychologically it’s a reminder that there are
reasons roaming the streets at night that require those bars to be
there in the first place.
We live on the third floor, however, and
for awhile we were able to enjoy the prettier views and bar-free
existence that this height enables. That is, until our little guy Eli
became a bigger guy who was capable of climbing out of those windows.
We racked our brains for solutions. Our
windows are fairly large, and are only 18 inches off the ground (the
building we live in is around 100 years old), and as I researched
options, I was discouraged to find that if I wanted something really
secure, it would cost upwards of $200 a window, and we had two windows
to secure.
Safety of course, matters, and no matter
how frugal you are, it’s not something you want to compromise when your
child’s well-being is at stake. So I braced myself to somehow find a
way to scrape the money together on our limited budget.
Then one day, as I was taking out the
trash, I took another look at an old abandoned black metal headboard
and footboard that had been sitting there for at least a couple of
months. They were about 3 feet tall, and just wide enough that they
looked like they might fit our windows. I went upstairs and after my
husband measured them, lo and behold, they would fit! They even had
holes drilled in them for the bed rails that would make securing them
to our windows easy.
Only, they were still black and ugly. I
thought about it for a minute, and then remembered an extra set of
sheer white curtains I had purchased awhile back but had never got
around to using. An hour or two later, I had come up with sheer white
sleeves to ruffle over the bars, and voila, window gates that not only
kept our little critter in, but also allowed light to pour in and
shield our view of the next door building’s roof.

“They say that God is in the details, but
maybe He’s in the dumpsters, too,” my husband commented wryly as we
finished up our project.
It’s easy at times to feel like we’re
limited or lacking in our ability to “live” because we have less money,
but I’ve observed over time, in my own life as well as in the lives of
others, that often we are at our most creative when we are provided
with limitations and boundaries. As T.S. Eliot once wrote:
“When forced to work within a strict framework the imagination is taxed to its utmost – and will produce its richest ideas. Given total freedom the work is likely to sprawl.”
Sprawl…yes, that is what I feel like at times when I’m faced with too many choices. My mind becomes cluttered with options instead of solutions, because I have to waste so much time considering the many choices.
When I was working in Uzbekistan, an Uzbek friend of mine had the opportunity to visit the US for six months. When she returned, I asked her what she thought of America.
“America…they have too many cheeses,” she replied.
“Too many cheeses?” I asked, not quite clear on what she meant.
“Yes…so many choices, and why do you need so many cheeses in the first place?” she asked.
I understood later when I returned for the first time to the US after my initial 2 years in Uzbekistan. I went into Wal-Mart to buy shampoo, and ended up just standing there for a few minutes staring at an entire aisle of shampoo.
I was so overwhelmed, I ended up just turning around and walking out without buying anything. While it was hard at times to be deprived of access to certain products in Uzbekistan, I now understood what Wordsworth commented on in his poem Nuns Fret Not at their Convent’s Narrow Room. Instead of being limited by what we cannot buy, perhaps sometimes we should look at having too many liberties as a weight, and at our limitations as true freedom.
Jennifer Duenes is a homemaker, wife to Michael, and proud
mother to one-year old Elijah. She lives in the San Francisco Bay
Area, and despite living on one income with the high costs of living
associated with that area, she enjoys finding creative ways to save
money and thrive. She attributes part of her ability to save and
appreciate the important things in life to her experiences as a teacher
in a poor region of Uzbekistan for five years before getting married.
For more on her insights from life in Uzbekistan and tips on making the
most of your resources in high-cost urban areas, check out her blog at www.lifefromtheroof.wordpress.
Here's a picture of this week's shopping trip:

You can read more about what bargains we snagged, how much we spent, and how much we saved here.
How'd you do this week? Post about the deals and
bargains you were able to snag this week or other ways you saved money
on your blog (with pictures, if possible!) and then come back here and
leave your link below. **To make it easy for everyone to navigate quickly through the links, your link must link directly to your Super Savings Saturday post.**

Erin, Monica, and I hope you've enjoyed the ideas we've shared this week for the "Thanksgiving on a Budget" series. Our main goal was to show you how you could create a simple from-scratch Thanksgiving meal for your family without spending a fortune to do so.
To recap, here's the menu we shared:
–Turkey, gravy, and stuffing/dressing (I got a kick out of how many of thought dropping the dressing from your menu was ludicrous! Wouldn't it be a boring world if we all thought the same way about everything?!)
–Sweet potato casserole and make-ahead mashed potatoes
–Orange Ginger Cranberry Sauce
—Green Vegetables
—Pumpkin Dinner Rolls
—Pumpkin Pie and Apple Pie
While I'm sure not all of the recipes or decorations would be something you might use for your Thanksgiving celebration, we hope that our ideas will inspire you as you seek to have a memorable Thanksgiving celebration for your family this year.
I'm positive we've only barely scratched the surface when it comes to Thanksgiving ideas, though, and that's why today is the day for all of you–my wonderfully creative readers–to chime in with your own ideas for celebrating Thanksgiving on a Budget.
The floor is yours! Share your favorite recipes, helpful tips, ideas for simplifying the Thanksgiving menu, decorating how-to's, or special traditions your family has. If you have a blog, post about it on your blog and leave the direct link to your blog post below. If you don't have a blog, feel free to leave your ideas in the comments section.
Guest Post by Monica from The Homespun Heart
Paper is one of my favorite crafting supplies because it is inexpensive and the variety available creates endless possibilities! Here are some ideas to jump start your Thanksgiving table decorating this year:

::Turkey coloring books::
Details on how to make these are here. All you do is print the template, cut it out, and glue together! Bring this idea
to the grown-up table by placing one at each plate. Provide pens or
pencils to jot notes of thankfulness to each other!

Image from Martha Stewart Living
::Silhouette Table cloth::
Instructions for making this are here. I
haven't made mine yet as I'm not sure how to store it until
Thanksgiving–but I will have my silhouettes all cut out and ready to
go for my littles table!
Bring the silhouette idea to the
grown-up table by creating napkin rings, decorations and place cards
(take it a step further by creating silhouettes of your guests!):

::Silhouette Napkin Rings::
Use
the templates provided in the silhouette tablecloth link above to make these. Glue to a piece
of cardstock and staple at the back. Slide over your napkin!

::Silhouette Place cards/table decor::
Hot glue a length of ribbon around a canning jar and glue silhouette onto ribbon.

Or, glue silhouette to a stick (from your yard!) and insert into a small jar or votive holder filled with unpopped popcorn.

Create
varying heights with jars, upside down sundae dishes, juice glasses,
or anything that is clear or coordinates with what you want to use! You
could also opt to put one of these at each place for name cards!
You
could also have a little stack of these silhouettes cut out with holes
punched in the top and string tied on. Provide chalk for guests to
write things they are thankful for and hang on a branch from your yard
to create a Thankful Tree!

::Turkey Trivia Place Cards::
Details on how to make these fun little turkey quiz decorations are here. Find some interesting turkey facts here and here.

::Napkin Rings (inspired by Country Living November 2006)::
To make these, cut a small piece of cardstock and decorate with rubber stamps, stickers, or just write a short message. Punch a small hole in each end of the cardstock. Pull
a ribbon through one end, and then through the other. Tip: if you cut
the ends of the ribbon in a diagonal, they will be much easier to get
through the small holes.

::Favor Tags::
Make up little bags of some kind of treat and add a festive nametag and bow. I
used these for place cards one year and then let them become the favor for guests to take home as well. By the way, this would be a great opportunity to use some of those sugared pumpkin
seeds!

::"Thankful For You" breakfast::
A
few years ago I started a new Thanksgiving tradition. It is intended to
be a practical way of showing thanks to someone who has been a blessing
to our family over the past year. I prepare an extra batch of our
Thanksgiving breakfast and pack it up festively to deliver to the
recipient. I like the expression of doing something visible to say "thank you" to one of the many people who encourage us throughout the
year.
I make little tags for each item naming what it is and if
there are any specific heating instructions. Then you can package
pancakes and sausage wrapped in waxed paper and tied with twine. Canning
jars make great containers for syrup and nuts. Put them all in a pretty
gift bag and deliver!
Our traditional Thanksgiving breakfast is:
Pumpkin Pancakes (cooked in a maple leaf shaped pancake mold)
Brown & Serve Sausage
Homemade Maple Syrup & Chopped nuts to top pancakes

Pumpkin Pancake Recipe from Martha Stewart Living
Whisk:
1 1/4 c. flour
2 Tbsp. sugar
2 tsp. baking powder
1/2 tsp. each cinnamon, ground ginger, and salt
1/8 tsp. nutmeg and a pinch of ground cloves (I use pumpkin pie spice)
Mix:
1 egg
6 Tbsp. pumpkin puree
2 Tbsp. melted butter
1 c. milk
Fold
wet ingredients into dry ingredients.Heat a buttered skillet over
medium heat; pour in 1/4 c. batter for each pancake. Cook about three
minutes per side; serve with butter and syrup. Makes about 10 leaf
shaped pancakes.
Maple Syrup:
Combine in saucepan:
1 3/4 c. white sugar
1/4 c. brown sugar
1 c. water
Bring to a boil, cover, and cook one minute. Cool slightly.
Add:
1/2 tsp. vanilla
1/2 tsp. maple flavoring
Cover
saucepan for a few minutes as syrup cooks to melt down crystals; helps
prevent syrup from crystallizing later in storage. From the More With
Less Cookbook.
::ABC's of Thanks::
My Mom started this tradition
when we were growing up and I have continued it in our home. Print this
And here are a couple of other ideas I haven't made before, but think are full of possibility:
Paper Turkeys
Mayflower Centerpiece
Have you made any Thanksgiving decorations with paper? I'd love to hear your ideas!
Monica enjoys blogging about the simple pleasures of faith, family and home over at The Homespun Heart.
___________________________
Note from Crystal: If you happened to miss Monica's previous guest post with lots of fun ideas to do with pumpkins, you'll want to check it out here. There's likely something there you could also incorporate into your Thanksgiving menu or decor ideas. Also, don't forget to check out Monica's brand-new online boutique, The Rusty Robin.
Homemade Pumpkin Pie
by Erin at $5 Dinners
Crust Ingredients
1 cup all-purpose flour
½ teaspoon salt
1/3 cup shortening or butter
2-4 Tablespoons COLD water
Preheat oven to 425 degrees. Place flour in mixing bowl; add butter and cut in with pastry blender.

Add salt and then add COLD water 1 Tablespoon at a time. Mix/toss with fork until dough ball forms.

Place in plastic wrap or Ziploc baggie and put into the refrigerator
while you make the filling. Make filling (see directions below) while
dough is in the fridge.Take dough ball from fridge and place on lightly
floured surface. Roll out into a circle at least 12 inches in diameter
and gently fold pie crust into quarters.

Move pie crust from counter to pie plate. Unfold. Flute edges in your favorite design. Pour filling into pie shell. Place pie crust shield over the top or use foil to make a shield to keep the crust edges from burning
or turning dark brown while baking. Bake pie at 425 for 15 minutes. Then reduce heat to 350 and bake
another 40-50 minutes, until center of pie is done. If
you want a darker crust, remove the foil or pie crust shield 10 minutes
before pie is finished.
Filling Ingredients
3/4 cup granulated sugar
1/2 teaspoon salt
1/2 teaspoon ground ginger
1/4 teaspoon ground cloves
1 teaspoon cinnamon (You can substitute 2 teaspoon of pumpkin pie spice for above 3 spices)
2 large eggs
1 15 oz. can pure pumpkin
1 12 oz. can evaporated milk

Place all ingredients in baking bowl. Blend with mixer or stand
mixer on low for 2-3 minutes. Set aside until pie crust is prepared
and pour into the pie crust. Cost: approximately $2.50 to $3 per pie
Our Favorite Apple Pie
This is one of our family's very favorite pies. If I'm able to snag a good deal on apples, this is one of the first things I think of making. It takes a little bit of work, but once you've made it, it's so worth it! And Thanksgiving wouldn't quite be the same without this pie–though it's great year-round, too!
(Confession Time: I had every intention of making up a fresh pie and
taking pictures of it for you, but time slipped away from me this week.
So I'll just let you imagine how beautiful this pie turns out! Think
something like this.)
Pie crust (uncooked, see recipe above or use your favorite recipe)
6 cups thinly sliced, peeled cooking apples (about 2 1/2 pounds)
3/4 cup sugar
2 Tablespoons flour
1/2 teaspoon ground cinnamon
1/8 teaspoon ground nutmeg
Crumb Topping:
1/2 cup flour
1/2 cup packed brown sugar
3 Tablespoons butter
Prepare and roll out pie crust. Line pie pan with it and flute edges. In a large bowl, stir together sugar, flour, cinnamon, and nutmeg. Add in apples and gently toss until coated. Transfer apple mixture to the pie crust. Dot apples with butter. Set aside.
Prepare crumb topping ingredients by stirring together 1/2 cup flour and 1/2 cup brown sugar. Using a pastry blender, cut in 3 Tablespoons butter until mixture resembles coarse crumbs.
Sprinkle crumb topping evenly over apples in pie pan. Cover edges of pie with foil and bake at 375 degrees for 40 minutes. Remove foil and bake 20 minutes more or until fruit is tender and filling is bubbly. Cool on a wire rack. This is especially delicious served with freshly-whipped cream or Breyer's vanilla ice cream. Delicious!
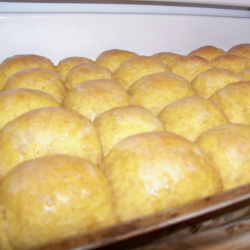
If you don’t normally make homemade rolls for Thanksgiving, you might just want to consider taking a little extra effort to make these rolls this year. They are just that good. In fact, I’ve tried literally hundreds of roll recipes over the years and this recipe is hands-down the best one I’ve ever made.
These are best served within an hour or two of making, though, so if you’re planning to serve them on Thanksgiving, you’ll want to make sure and allow extra time to whip up the dough. While it’s rising, you can do your last minute Thanksgiving meal preparations and then stick these in the oven to bake an hour or so before you’re planning to eat.
Yes, it’s a little bit of extra work but I think you and your guests will agree it was worth it!

Pumpkin Dinner Rolls
(Recipe modified slightly from the original recipe found at Tammy’s Recipes–a cooking blog you ought to be reading, if you’re not already!)
1 cup sugar
1/2 cup warm water
2 cup warm milk
¼ cup butter, softened or melted
2 cup mashed cooked pumpkin (I usually use one can of pumpkin.)
2 teaspoons salt
1/2 cup wheat germ (can omit and use flour instead)
10-12 cup all-purpose flour (I usually use a mixture of whole-wheat and white flours. I’d recommend going about 1/3 whole-wheat to 2/3 white flour.)
7 teaspoons dry yeast
In large mixing bowl, combine sugar, water, milk, butter, pumpkin, and salt. Mix well. Add wheat germ, 7-8 cups of the flour, and yeast. Mix, and then
continue adding flour and kneading until dough is elastic and not
sticky.
Place dough in greased bowl; grease top of dough, cover with a towel, and set in a warm place until doubled (about 1 hour). Punch dough down and divide into thirds. Divide each third into 16 pieces and shape into balls.
Place on greased baking sheets. Cover and let rise until almost doubled, about 30 minutes. Bake at 350 degrees for 15-18 minutes, until tops are golden. Brush with melted butter as soon as they come out of the oven. (Note: These rolls usually look somewhat dry when first coming out of the oven. Wait about 15 minutes and they will look and taste beautifully. Don’t ask me why, but that’s how it always works for me!)
Yield: 4 dozen rolls (If you’re not expecting a large crowd for Thanksgiving, I’d recommend halfing the recipe. I often do this for smaller groups and it works great!)
Up Next: $5 Dinner Mom’s Pumpkin Pie recipe and Our Favorite French Apple Pie recipe
By Erin at $5 Dinners
Each of these green vegetable dishes are not only healthy and lower in
calories than a traditional casserole, they won’t take up any space in
the oven. Each vegetable can be prepared on the stove top and won’t
need any of that precious “Thanksgiving morning oven time”!

Green Beans and Garlic
2 lb. fresh green beans
4 cloves garlic, peeled and sliced
4 Tablespoons extra virgin olive oil
Salt and pepper
Snap or cut the stems off the green beans. Rinse well and pat dry.

Place oil in skillet and set heat to medium-high. Add green beans and garlic slices. Saute for 4-5 minutes, until green beans turn a brighter green. Serves 8-12. Cost: approximately $4
Sauteed Asparagus
2 lb. fresh asparagus
4 Tablespoons extra virgin olive oil
Salt and pepper
Snap the ends off the asparagus. Hold each end of the asparagus and push ends together away from you. Allow the asparagus to “naturally” snap. Rinse and pat dry. About 15 minutes before sautéing the asparagus, drizzle oil over the asparagus and let sit. Saute asparagus with olive oil over medium-high heat in skillet for 4-5 minutes. The asparagus will turn brighter green. It is ready to serve! Serves 8-12. Cost: $3.50

Lemon Broccoli
8-12 heads of broccoli
Lemons
Steam broccoli in steamer for 3-5 minutes. Slice fresh lemon into 6-8 wedges. Serve lemon wedges next to broccoli and suggest that guests squeeze lemon over their broccoli. Serves 8-12. Cost: approximately $6

What are your favorite vegetables to serve at Thanksgiving? The traditional green bean casserole or something else? I’d love to hear!
Up Next: Our Favorite Roll Recipe

Well, I didn’t end getting everything crossed off my long Baking Day list, but we did get four bags of rice cooked and frozen, salmonettes made and frozen for quick lunches, Healthy Harvest Pumpkin muffins made and frozen, Cranberry Wheat Muffins made and frozen, and Pumpkin Apple Harvest Bread and muffins made and frozen.
And hopefully that will tide us over in the quick snacks and breakfast department for a little while. Though at the rate I’m eating these things, I’m not sure sure if they will be lasting very long. 🙂
Did you have a chance to do anybaking this week? If so, post about it on your blog and leave your link below to your direct blog post. I’d love it especially if you could share pictures and recipes so I can get more ideas for my next Baking Day projects! And I’m guessing many others would be inspired as well.
Note from Crystal: For the record, cranberry sauce would also be an area my minimalistic nature would nix. (I know, I know, some of you are probably thinking you'd never want to eat Thanksgiving Dinner at my house by now, seeing as I already said I think stuffing is a non-essential, too!)
However, I know that to many of you, Thanksgiving wouldn't be Thanksgiving without cranberry sauce. And so I present Erin's Orange Ginger Cranberry Sauce:
Homemade Orange Ginger Cranberry Sauce
by Erin at $5 Dinners
This sauce costs approximately $1.50 to make one batch. Not only is it fairly frugal but it' also doesn't contains any preservatives or additives!

1 lb. fresh cranberries (these are on sale at Aldi this week for $0.99!)
1 orange, juiced
½ teaspoon of ground ginger
¼ cup sugar
Rinse cranberries. Pick out any cranberries that are white in color or have "gushy" spots. Place cranberries in sauce pan with 2 inches of water, or apple juice. Boil for 10 minutes, then reduce heat and let simmer for 5 minutes to allow the sauce to thicken. While boiling, add the juice from one orange. I squeeze it over a strainer to prevent seeds from dropping into the sauce. Add 1 teaspoon orange zest to the sauce. Cranberries will "pop" while boiling!

Add ¼ cup sugar to the cranberries. Alternative sweeteners include apple juice concentrate, orange juice (from a sweet orange), honey, Stevia or Splenda. Add more sweetener for sweeter sauce, or less sweetener for a more tart sauce. Add ½ – 1 teaspoon of ground ginger. Allow sauce to sit for at least 10 minutes to "thicken" a bit more.
Other mix-in ideas: fresh apples, cooked with the sauce, or raw for some crunchiness; walnuts, pecans or other nuts; crushed Pineapple.

Just for fun: Do you usually serve cranberry sauce at your Thanksgiving dinner? If so, do you normally serve homemade or store bought?
If you've never had this sweet potato casserole before, let me tell you,
you're in for a treat. Even if you don't normally like sweet potatoes,
you'll want to try this because I'm guessing this is one sweet potato
dish you will eat and like.
Best of all, it's simple and fairly economical–especially if you
can snag a deal on sweet potatoes. (By the way, Aldi has them on sale
this week at $0.99 for three pounds so you should go scoop some up
there if you have an Aldi store close by!)
Our Sweet Potato Casserole
4 cups sweet potatoes, mashed
1 cup sugar
2 eggs
1 teaspoons vanilla
2/3 cups milk
6 Tablespoons butter, melted
Topping:
1 1/2 cups brown sugar
1/4 cup flour
1/3 cup butter
chopped pecans, optional
Mix first six ingredients together and spread in a 9×13-inch dish. Mix topping ingredients together and sprinkle over sweet potato mixture. Bake at 350 degrees for 45 minutes. Makes approximately 10 servings. This can be made the day before Thanksgiving and kept in the refrigerator and baked on Thanksgiving morning.

Our Make-Ahead Mashed Potatoes
15 small to medium potatoes
1/2 stick butter
1/2 cup sour cream (can use plain yogurt)
1 8 oz. block cream cheese
salt and pepper to taste
Cut and boil potatoes leaving the skins on (unless you prefer them skinless). Use mixer, Bosch, food processor, or KitchenAid to mash potatoes and add in the rest of the ingredients. Place potato mixer in a slightly greased 9×13-inch. Dot with butter. Bake at 350 degrees for 20 minutes. Makes approximately 8 servings.
These potatoes can be made the day before Thanksgiving and kept in the refrigerator and baked on Thanksgiving morning. Or, if you're really brave, you might try Amy's method of freezing and reheating in the crock pot.
Up Next: $5 Dinner Mom's recipe for Orange Ginger Cranberry Sauce and her recipe for some easy green veggies for a healthful side.
