 A testimony from Jennifer who blogs at A Healthy Mix
My husband and I purchased our home in July, 2012.
We paid $21,000 for an 1800 square foot home and 2-acres of land. It needed a lot of work, but we made the decision to remodel our home debt-free. It has been a work in progress ever since.
At the beginning of the year my husband received a $1,000 bonus and we knew we wanted to use that money for our latest renovation project — our boys’ bathroom.
We weren’t sure how we were going to remodel an entire bathroom on less than $1,000, because normally, bathroom remodels are expensive. We began by searching Pinterest for a look we desired and set out to achieve it on a small budget.
Getting Started
We knew we would have to refurbish as many items as we could.
We were able to salvage:
- the shower
- the toilet
- a large mirror
- the shower fixtures
- other bathroom fixtures
We searched the internet for hidden treasures. We found a brand new pedestal sink ($25) on a yard sale page. Then we went to Lowe’s to match our wants with the right price.
Transformation
Shower:
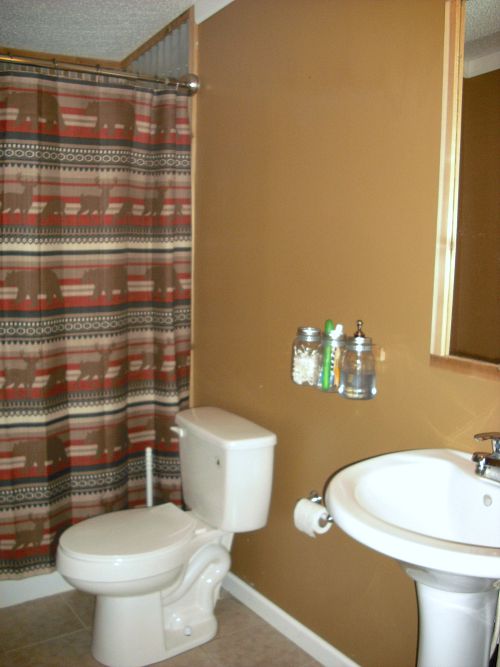
We were able to totally transform the old shower by using CLR and a lot of elbow grease. We decided to change the look of the shower by adding sheets of galvanized tin ($12 each) for the walls.
We used wood trim ($3 each) to finish the look. We soaked the old shower fixtures in bleach overnight, and they looked brand new. We did purchase a replacement shower faucet ($10).
Floors and Walls:
We installed the tile floors ($0.62 each). We painted the walls ($25). We used floor molding for both the floor and ceiling. We purchased the contractor pack ($72) since it actually cost less per unit and the leftover pieces could be used elsewhere in our home.
Accessories:
We purchased a glass cutter and cut the large mirror in half. We used left over pieces of the shower trim to trim out the mirror that was placed over the pedestal sink.
We splurged on a curved shower curtain rod ($42) since our kids were not getting a new shower. This was an inexpensive way to make their shower feel larger. We also purchased a new shower curtain ($30).
Since our boys had a pedestal sink instead of a vanity, we made holders that attached to the walls out of wood and mason jars that would hold their toothbrushes, hand soap, etc. We used jars we already had and scrap wood so it only cost $2 to create extra storage.
We changed the light fixture in the bathroom by screwing in a Mason jar into the old fixture. It completed the country look and cost us nothing.
We were actually able to complete the project for less than $500! It was amazing to see what was once the worst room in our home be transformed into a nice space on such a small amount of money.

Jennifer is a wife, mother to three handsome boys, a lover of homesteading on a smaller scale, and an aspiring writer. She loves sharing what she learns with each passing day and encouraging others to chase their dreams while she is busy chasing her own. You are invited to come along on this journey with her at A Healthy Mix.
Have you saved up and paid cash for something — large or small? Submit your story for possible publication here.

Wow! Great job, love the finished product!
I LOVE the Mason jars on the wall for toothbrushes, etc. Great and super frugal idea!
I am curious about cleaning the galvanized tin walls?
Wow! I am impressed. It looks great, and you have a lot of good ideas. You’ve reminded me that you can do a lot if you use a little creativity and elbow grease.
Wow– love the look of the bathroom. Looks like you spent a lot of money– congrats on a great looking bathroom.
Everything looks very nice but I do question the wood trim around a shower. I’m thinking that will rot over time due to the moisture content of a bathroom plus water maybe hitting it. Otherwise good job I say & way to go saving a ton of money.
Maybe you could (or they did) put on several coats of polyurethane to effectively keep out moisture?
Or, before putting it on, put two coats of deck stain on it. That should help keep it water proof for a while, but it would eventually need to be restained (like a deck).