
I started blogging back in 2005 with the hope that it would help bring in a small stream of income and be a means to promote the online business I had at the time. So much has changed since then, but one thing has not changed and that is that you can make a good part-time or even full-time income from blogging.
However, it’s easier and harder than you may think. It’s easy because it requires very little cash outlay upfront, you don’t need a degree or certification, the field is wide open and the profit margins are high. On the other hand, setting up a successful blog that makes a part-time or full-time income will only be the result of massive amounts of effort, determination, consistency and perseverance.
For more thoughts on this, read my post on 5 Necessary Traits of Successful Bloggers.
How to Set Up Your Blog
(Note: The Bluehost links below are affiliate links, and we will be compensated if you sign up for Bluehost by clicking through our links below. Read our disclosure policy here.)
1. Sign Up For Hosting
The first thing you need to do after you decide to set up a blog is to sign up for hosting. This is where your blog will “live” online. It’s basically like paying rent to have a site online. Hosting supports your site and keeps it live and online.
This is different than your domain name (your www. address). Hosting is like the house or apartment you rent or own, while your domain name is your address. You need both.
I recommend using Bluehost if you are new to blogging and/or just need a robust site with great customer service. I used Bluehost for a few years when I was first blogging. I no longer use it now that my site has grown very large and we need more personalized and customized service. But Bluehost is a great fit for small to medium-sized sites.
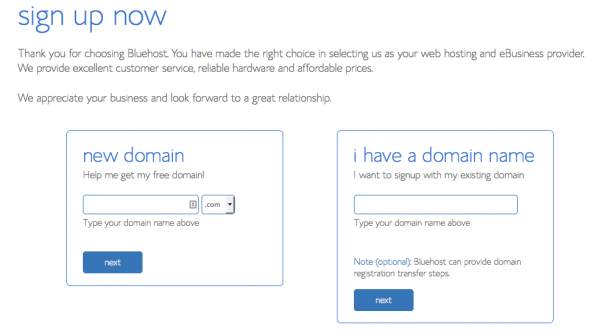
To sign up for your hosting with Bluehost, just go here and click on the Get Started Now button.
Next, you’ll need to choose your hosting plan. I recommend going with the basic plan if you are a small to medium-sized site. You can always move up to a larger plan, if need be. But the lowest rate should meet your needs well when you are getting started.
If your blog outgrows the Bluehost shared hosting plan and you need a good next-step option, you can sign up for WpEngine Hosting. I have not personally used this, but I’ve heard great things about this company.
The main perk is that this hosting company specializes in WordPress, so the customer service team can help with all issues — even the ones that are directly related to Wordpress. One reader wrote in with her testimony of how great it works for her:
“When my blog grew too large for the shared hosting options I was trying, I knew that I wanted to move to a reliable hosting company. Up-time was a huge factor in my move to WpEngine — as my blog was outgrowing the shared hosting plans and was down constantly. WpEngine offers an uptime guarantee plus they specialize in WordPress — so when I have a question about something going on with my site, I know the person I’m talking to knows WordPress inside and out. It’s great to be able to reach out to my hosting company and not hear “That’s a third party platform issue so you’ll need to get in touch with a WordPress expert.” My blog is actually hosted by WordPress experts! Over the past two years, I’ve had minimal issues with my site, and when there were issues, the support team at WpEngine worked them out — even when the issues might have been caused by an error on my end! If you’re looking for a hands-off hosting option where you know your blog will be well taken care of, I highly recommend WpEngine!” -Tanya at Blogelina
Go here to get started with WpEngine hosting.
2. Choose a Great Blog Name
Once you’ve chosen your plan, you’ll then need to choose and type in your domain name. As mentioned above, this is the www. link for your site. I wouldn’t rush through this part of the process. In fact, I’d say this is THE most important thing to consider once you know what your site or blog is going to be about.
How to Pick a Great Name for Your Blog
Your blog name should encompass your blog’s mission and should clearly articulate your blog’s purpose. Don’t hurry through the process of picking a name: it’s your brand and you want to make sure you love it and it’s something you’re going to love for years to come.
Take a week or two to consider potential names. Ask a few trusted friends to give their input. Toss around ideas and, when you land upon ones you like, check to see if the domain name (the www website address) is available on GoDaddy.com before jumping ahead and settling on any one name.
Important note: Blog names can be federally trademarked. This means that an individual or company owns the federal rights to a particular name or phrase and it cannot be used by others or you will be subject to fines and required to discontinue using the name. To be safe, search thoroughly online to make sure no one is using the name you come up with or a very similar variation of it.
Tip: If you want to think long-term and hope to turn your blog into a successful business, I encourage you to consider purchasing all variations of your domain name (for instance, we own MoneySavingMom.net, MoneySavingMom.org. etc). That way, you don’t have to worry about someone else setting up a site with a domain name very similar to yours. You can purchase these additional URL names through a site like NameCheap.com.
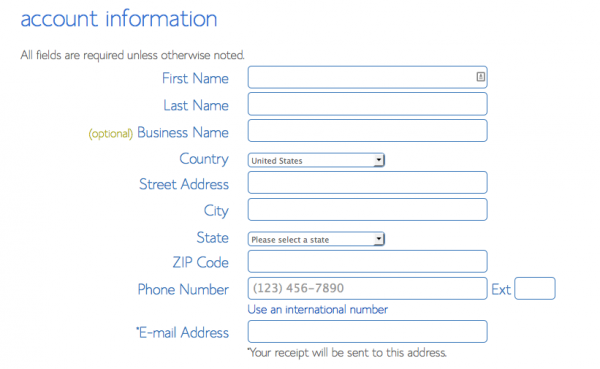
Once you’ve chosen your name and verified that it’s available, go to the next page and input all your information. You can skip the extra upgrades. The only one I might suggest you consider is that you purchase the Domain Privacy. This will guarantee that your home address or whatever address you used to sign up for your domain cannot be accessed in public records.
Input your billing information and you are good to go! Your brand-spanking-new hosting and domain are set up.
3. Choose the Right Blog Platform From the Get-Go
After you set up your hosting and domain name, you’ll want to install WordPress on your new hosting. You can do this in the dashboard section when you log into your Bluehost dashboard.
WordPress is the “software” that you’ll use to actually blog. Basically, it’s the nuts and bolts of what allows you to type up your posts and upload them onto your hosting so that they show up at the domain name you picked. It makes it very simple to type and publish posts without having to mess with understanding all the ins and outs of HTML or how to write code for your website.
Important note: You must have your own hosting and install WordPress from WordPress.org onto that hosting. While you can set up a free site on WordPress.com, you are not allowed to add advertising or affiliate links if you’re hosting it there — thus disabling your ability to making money blogging!
Why WordPress?
Not too long ago, I was asked what is the one thing you wish you had done differently when setting up your blog. I instinctively replied, “I wish I had started with WordPress.”
I started with Blogger because that was pretty much the only blogging platform in existence. I moved to TypePad when the Blogger SPAM bots marked my blog as SPAM in 2008 and I was locked out of my Blogger blog for 10 days.
Near the end of 2009, my blog outgrew TypePad and I was forced to switch to WordPress. Making the leap from TypePad to WordPress was daunting and tedious. We had to move thousands of posts and hundreds of thousands of comments. There were all sorts of glitches and it was a big learning curve.
Truth be told, though it was a major headache, it was one of the best blogging moves I’ve ever made. WordPress has allowed me to have a much more organized blog and offer many features I couldn’t with TypePad and Blogger.
So, if I were to suggest a blog platform, I’d highly recommend WordPress. It gives you many more options than other platforms offer. Plus, you don’t have to worry about your blog getting locked or outgrowing TypePad.
Another big perk of WordPress is that it has much more sophisticated SEO capabilities (i.e. SEO stands for Search Engine Optimization and basically refers to optimizing your site so it comes up high in search engines. People will find you a lot more easily if you come up on the first page or two of Google rather than page 133!). I don’t do a lot for SEO at this point, but I’m all about doing small things to help improve where MoneySavingMom.com shows up when you search for “money-saving blogs” or “grocery budget”. WordPress makes it extremely simple to accomplish this.
4. Hire a Designer
Back in the “olden” days when there weren’t many blogs, if you had great content and updated regularly, you’d have a good number of readers — even if you had a basic, free Blogger blog design. Today, because there are so many more blogs, great content is paramount, but a nice designer and ease-of-use is also very important. If people find your blog design dull or your layout disorganized, they are much more apt to just go find another blog.
Now, please don’t let this discourage you. You don’t need a fancy-schmancy blog with lots of bells and whistles. Just a clean design that is easy to navigate can make a world of difference. And paying someone to set this up for you may be every bit worth the money.
If you can’t afford a designer, at least consider paying to have someone design your header and connect your hosting and domain name on WordPress. I promise it is worth the bit of money that it will cost — and it will save you a great deal of hair-pulling.
That said, I do recommend taking time to learn at least basic HTML. I’m not techie at all, but I’ve forced myself to learn enough to make basic tweaks and do minor fixes. It’s invaluable when talking to a designer to at least have a cursory knowledge of how your site works.
5. Publish Some Posts Before You Publicly Announce Your Blog
I can’t tell you how many times I’ve seen a new blog advertised and been all excited to check it out, only to find there were a whopping three posts on it! If you want people to stick around, you need to have depth and series and a variety of posts.
Before you “open your doors to the public”, go ahead and post 10 or 15 posts, plus plan out and write another 15 to have in queue to post after you start “advertising” your blog. Not only will this allow you to “get your feet wet” and get accustomed to blogging before you have a real live audience, it also provides some great content for people to check out when they visit your blog.
I love Google calendar for planning out post series long-term. I also have recently begun printing out a monthly calendar to pencil in specific posts for each day. This gives me accountability, inspiration and organization — well, at least it’s better than my former “blog-by-the-seat-of-my-pants” routine!
For more ideas on writing great blog posts, check out this post with 5 Tips for Writing Top Notch Content.
6. Build Your Readership
Before you jump into making money as a blogger, I strongly encourage you to focus the first few months on producing great content and building your readership. Remember, this is a marathon, not a sprint.
There are many, many creative ways to grow your readership. Check out this long post where I share some of my most effective strategies for increasing your readership and building your community on your blog.
7. Become an Affiliate
Now that you’ve set up your hosting and have posted some great content on your blog, it’s time to start talking about how to make money with your blog. The first — and easiest — way to make money is through affiliate marketing.
For those who may have never heard the term of affiliate marketing before, it’s basically when you are paid to promote another person’s product, coupon, deal, or website. It’s typically CPA advertising — which means that you only get paid per action. In other words, a reader must take some form of action (purchase something, click through your link and sign up for something, download a coupon or ebook, etc.)
You sign up for an affiliate program (I’ll share some of my favorites in a little bit), you promote your unique affiliate link that the company gives you, and then you are paid if your readers buy the item or sign up for the item.
For instance, not too long ago, I promoted a sale on Amy’s Tell Your Time ebook. She has an affiliate program that offers 50% of the sales to the affiliate. Since the ebook was on sale for $2, I earned $1 for every person who clicked through my affiliate link and made a purchase. So, if 100 people bought the ebook, I’d make $100 in affiliate earnings.
In many cases, people have to make a purchase in order for you to earn money as an affiliate. However, there are also hundreds of other options that require no purchase. To give you an example, I’m affiliate for Coupons.com, RedPlum, and SmartSource. If I post a great coupon that is on any of these sites, I earn anywhere from $0.02 to $0.40 per coupon printed (I have different agreements with each network and some pay per coupon printed, others pay a flat fee per print session per user per day).
As you can imagine, since one of the key focuses of MoneySavingMom.com happens to be using coupons, the affiliate money earned from coupons printed is one of the highest revenue earners. However, it is a win-win situation, because I’m sharing a great deal with you, it’s hopefully helping you save money and get a great deal, and then we both benefit from it.
Some of the Current Top-Earning Affiliates I Use:
- Panthera Network
- Linkshare
- Escalate Media
- ShopHer Media
- Commission Junction
- ShareASale
- Savings.com
- CenterPoint Media
- Glitter Network
- Coupon-printing (Coupons.com, RedPlum, and SmartSource)
- Amazon
- TopCashback
- Pepperjam Network
- Impact Radius
Amy has a great list of many different affiliate programs here, if you’re interested.
I highly, highly recommend reading my post on 5 Strategies for Maximizing Your Earnings With Affiliate Marketing.
8. Set Up Google Adsense
In addition to promoting affiliate links for products and resources that you believe in and that are a good fit for your blog’s audience, I also recommend signing up for Google Adsense. Google Adsense is a simple way to earn a little money showing ads on your sidebar.
Typically, you’ll earn around $1 to $2 per CPM with Google Adsense. CPM = cost per 1,000 pageviews. So if you have 10,000 pageviews per month, you’ll earn around $20 per month with Google Adsense.
That might not seem like a lot, but as you continue to grow your readership, you can see those numbers steadily climb. And you do nothing other than set up the ad at the beginning and add the code for it to your sidebar, header, footer, or even at the bottom of your posts.
The thing I like about Google Adsense is that you can block any URL’s of sites that you don’t want advertising on your site. You can also set up channels with keywords to help Google Adsense serve up ads that are more targeted for your audience.
You can also consider selling your own sidebar ads to help you sell even more sidebar ads.
5 Additional Ideas
Not only are there many ways to earn income directly from blogging, but blogging also opens up a host of other ways to earn money indirectly. Here are five ways I’ve used my blog as a springboard to earn additional income.