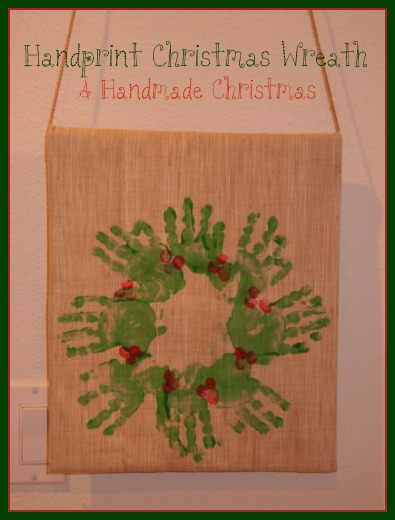
Guest post by Nikki from Christian Mommy Blogger
This wreath is something I made as a child. My mother still has mine and hangs it each year for Christmas. It is simple, rustic and classic.
With a few simple materials, you can make this homemade wreath. With one decoration you will capture a snippet of your child’s past, add warmth to Christmas, and give those grandparents a beautiful homemade Christmas present.
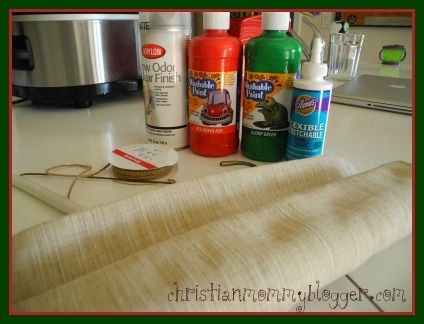
Here’s what you’ll need:
- Fabric of your choice (Burlap, Muslin, or similar fabric in a remnant for the best price!)
- 3 paper grocery bags
- Clothes pins (or other clip to secure the fabric)
- Tempera Paint (Finger Paint) in red and green
- A wire hanger with white cardboard cover (you only need the cover)
- Yarn (you want it to be sturdy and rustic, like your fabric)
- Matte protective spray so the paint doesn’t fade (optional)
- Fabric Glue or Tape
- A child with cute chubby hands!
Here’s how to make it:
Step 1: Put one of the grocery bags on your ironed fabric. Trim the fabric to just a few inches wider than the paper bag on three of the sides and leave about 6 inches on the top (you will be folding it over in a few steps).
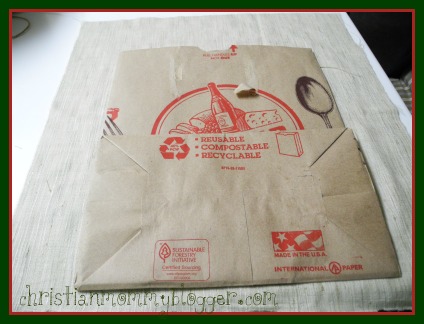
Step 2: Lay your fabric on the counter with the side you want visible facing down. Fold the fabric up onto the bag and secure with the clothes pins. You want it to be smooth but not too tight.
Step 3: Turn the bag over. Pour the green paint onto the second grocery bag. Spread it around and press your child’s hand in the paint and stamp a hand print on the fabric. Dip the child’s hand between each stamp so there is good paint coverage. Make sure to space them out well enough that you can see their handprints well (that is the whole point after all!). Set the “canvas” aside to dry before starting step 4.
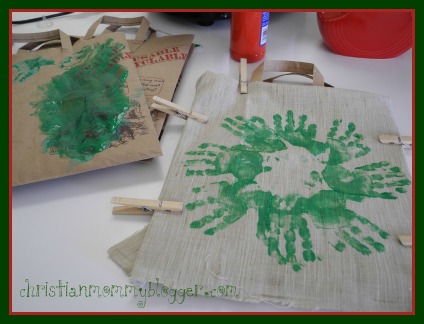
Step 4: Pour red paint onto third grocery bag. You will only need a small amount. Dip your child’s thumb (if they are old enough they can clearly be on their own, my daughter is only two!) in the paint and place red thumbprints where ever you desire (I place mine between each of the gaps in the hands). Set aside to dry before moving on to step 5.
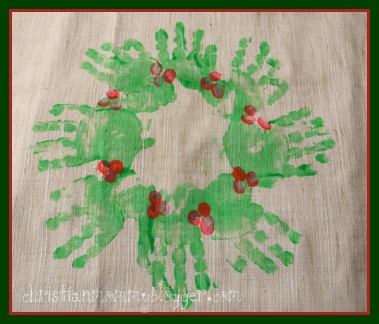
Step 5: Remove clothes pins from one side and replace them with either glue or tape. Repeat with the other side and the bottom.
Step 6: Take the extra fabric on the top and make it smooth. Thread the yarn through the cardboard cover. Place the cardboard cover at the top of the bag (see image below). Fold the fabric over the cover (the cover is now hidden) and secure it with tape or glue as in step 5. You can see in the image below that the glue shows through and that is okay.
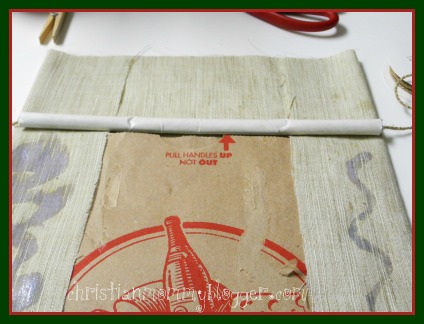
Step 7: Decide how long you want the yarn. Knot it and move the yarn until the knot is hidden within the cover. Let it dry completely. Spray with matte protective spray (if desired). Let dry and give away or display proudly!
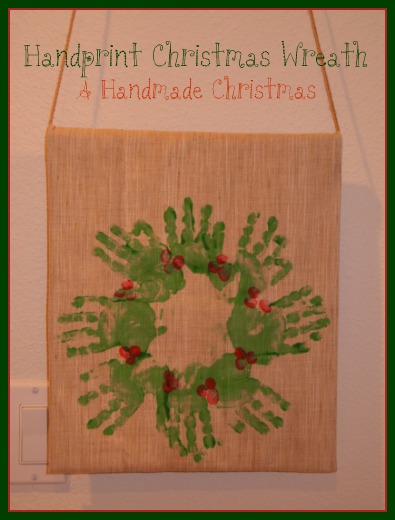
From personal experience, I can tell you that you will love looking at this for at least 30 years! If you leave room at the top (as I did) you can even put “Merry Christmas” or “Happy Holidays” or “Your Child’s Name” at the top in cute felt letters!
Nikki is a Christian work at home mommy to her two children and wife to her husband who serves in the Navy. She loves real food cooking, spending sweet time with the Lord, and blogging about how fun it is to tackle homemaking responsibilities and playtime with her precious daughters. You can find her blogging at ChristianMommyBlogger.

I just made these for the Grandma’s in the family and now I want one too! this was my first ever craft and it is too cute, thanks for the great idea! I hope everyone loves theirs as much I like them 🙂 Plus, I had everything but the fabric (3$) and the spray ($5) already on hand so it was super cheap, sweet, AND thoughful gift too. Thanks!
Thanks so much for sharing! I am soo happy you made them!
Thanks! just made this with my little one 🙂
This is the idea I needed! I’m going to have my kids make these on dish towels for the grandparents! Thanks!
Are you going to get paint that is non-washable? LMK what it is!
This would be great to do with the WHOLE family! I think when we get the last little one (hopefully last) We’ll be doing a family wreath!
Great idea! Maybe next year we will tackle that…I have all of the supplies!
Thinking about doing this in my classroom for the students to give their parents. Any suggestions when doing 23 wreaths?
I would buy burlap and cut it ahead of time and wrap it directly around the hangar (step 6) and omit the paper bag. This would cut down on the supplies, but yield similar results. And once they are totally dry, you could even gently roll them, store then inside an empty paper towel roll, wrap them or decorate them and give them to the parents that way. Just a thought! Please let me know how it goes (you could share on my fb page). Thanks for reading 🙂
This is so nice, I like it much better than mine! We used paper and I think the next time I do my craft I will omit the hand bow. Here is our version with construction paper: http://mylittlebitoflife.com/?page_id=483 . It would be cute to decorate with red pom poms or make thumbprint red berries on it! 🙂
Carolynn that is so cute! A lot of cutting out though! I tend to be a bit sloppy with scissors 🙂
I love this!! I am totally doing this with my 3 little girls. Festive and a perfect keepsake to pull out from year to year.
Thanks for sharing!
This might also be cute on a reusable bag!
Wow, another great idea! A cute canvas reusable tote. I have one that doesn’t have any writing on it!
This is so fun. I made one when my guys were 3 1/2, 1 1/2 and a newborn. I did a double layer of hands with the larger ones on the outside and then used the newborn’s feet to make a “bow”. The boys are now 17 1/2, 15 1/2 and 14!
The newborn’s feet as a bow is the cutest idea ever! I assume you had another adult there to help you with all the bits and pieces!!
The newborn’s feet as a bow is the cutest thing I have ever heard! I love that idea! I have a little baby with tiny little feet…didn’t even think of that! I would love to see a pic of that if you still have it! You could share it on my fb page maybe? I would like some inspiration!
I would love to share it, unfortunately it was given as a gift and the recipient has passed away and I wasn’t there when the house was cleaned out and so I don’t have it.
I actually didn’t have another adult there, I just did the best I could. I did the newborn while he was sleeping!
Crystal & Erika thank you SO much for posting my craft! I love being able to share this with so many people! I love mine!
I love this, Nikki! When I first saw the picture, I thought it was on wood of some sort. When I learned it was fabric, I was totally impressed. It looks so good. Can’t do this just yet, but will keep it in mind for the future. I know a grandmaw who would love this to pieces. I tried to trace my little boy’s hands to make something last week, and let’s just say an 11 month old isn’t super cooperative. I managed about 3 fingers. Not quite human, eh? 😛
ET Phone Home 🙂 I did this (sort of) last year when my little one was only 15 months. Didn’t work very well. Chunky uncooperative hands = green blobs 🙂
I was just going to ask if my 20 month old is too young to do this. I should probably wait until next year, but I don’t know if I’ll remember by then. It’s so, so cute!
20 months? I bet you could! You would just have to hold and guide his/her hands. But you would need to do that for a few years anyway until the get the concept. Try it out! If it isn’t perfect it will be ever more beautiful!
Thanks! I’m going to try it!
Nikki, this ROCKS! You’re so creative. 🙂
Thanks Stacy!
Awesome post, Nikki!!
Thanks so much Erin!